FrontRow ezRoom User manual

FrontRow ezRoom Installation
Introduction
To install a Frontrow ezRoom you will be following these general installation steps. They do not necessarily need to be in the
order below, rather this is meant as a guide for estimating installation time and effort. These steps assume that the projector is
already mounted, if not then the projector installation time and effort needs to be factored in.
The general scope of work required to install the grant room:
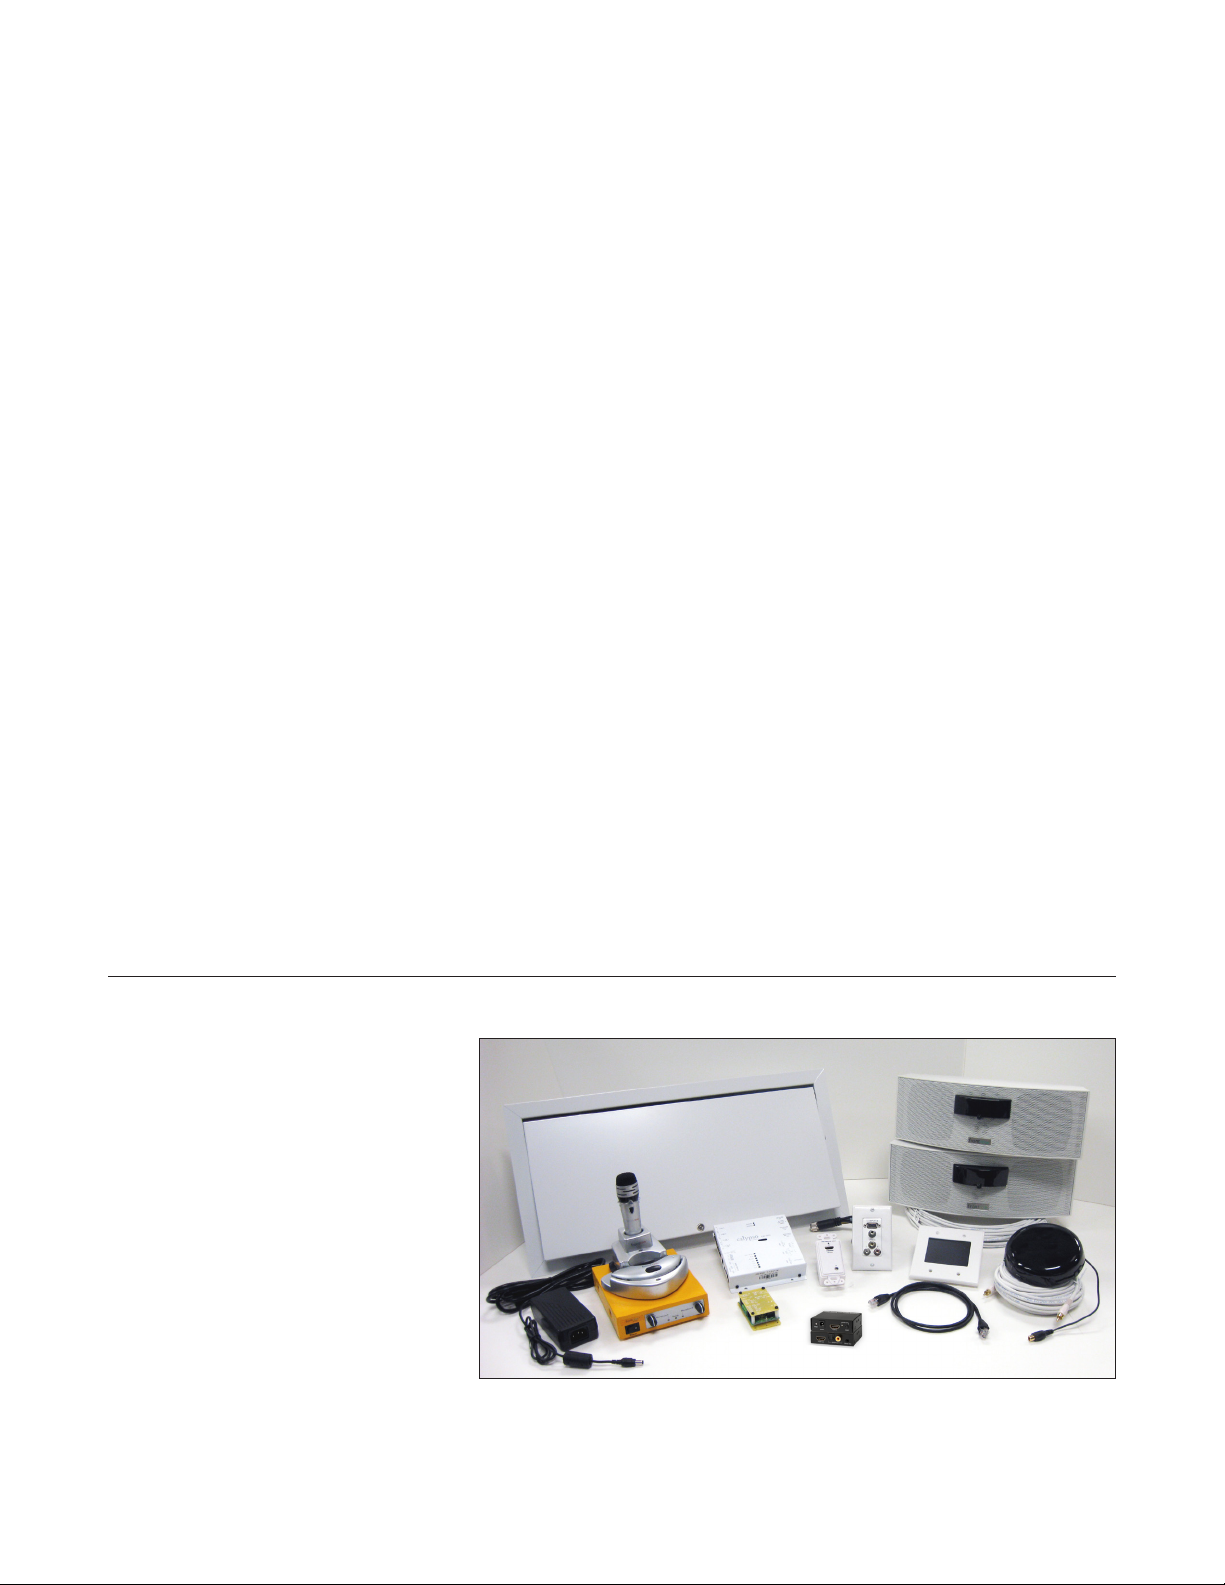
• IdentifytheezRoomparts,makesureyouhaveeverythingthatisneeded.
• ApplypowertotheezRoomandloadtheCB6000configfile,adjusttheCM3000serialportBaudratetomatchthe
projector if necessary. Note: If using a CB2000, follow the same instructions as you would for setting up and configuring
the CB6000 except use the CB2000 or CB2050 configuration files, and of course adjust the holes you cut for the control
panel accordingly. The complete CB6000 and CB2000 installation guides are also available on the web site.
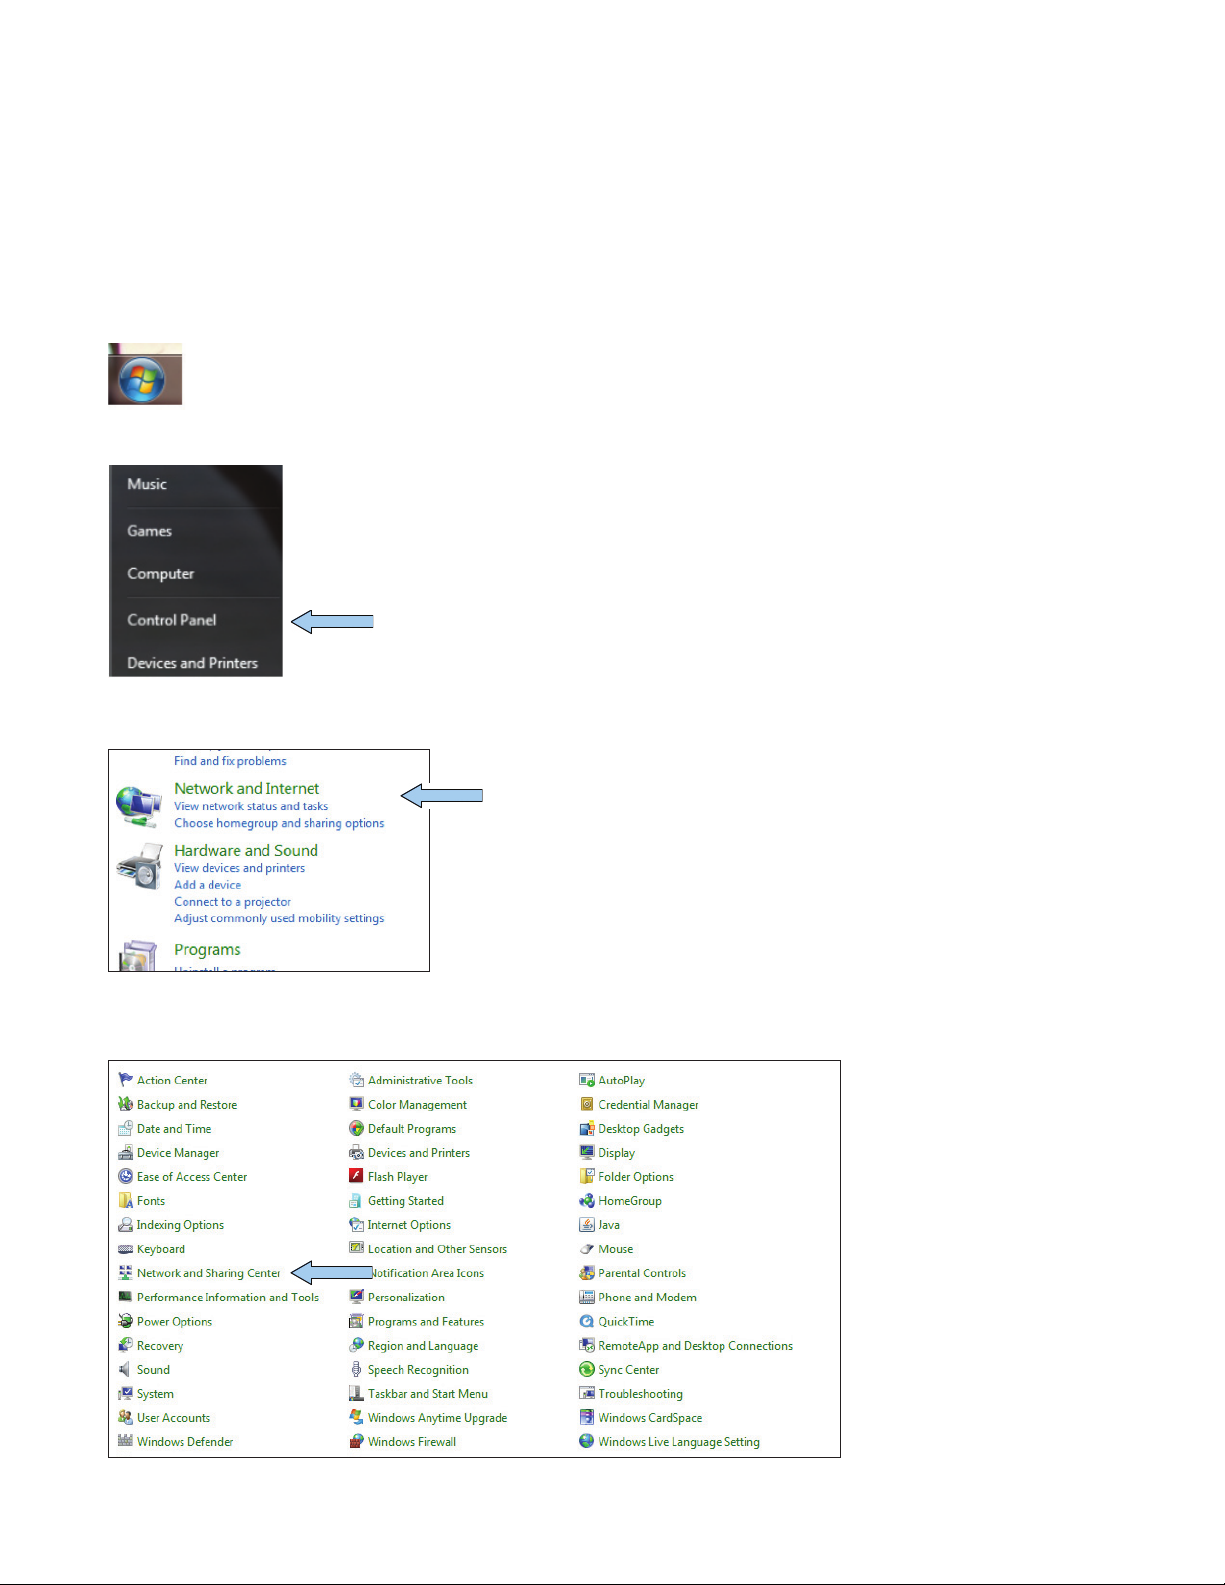
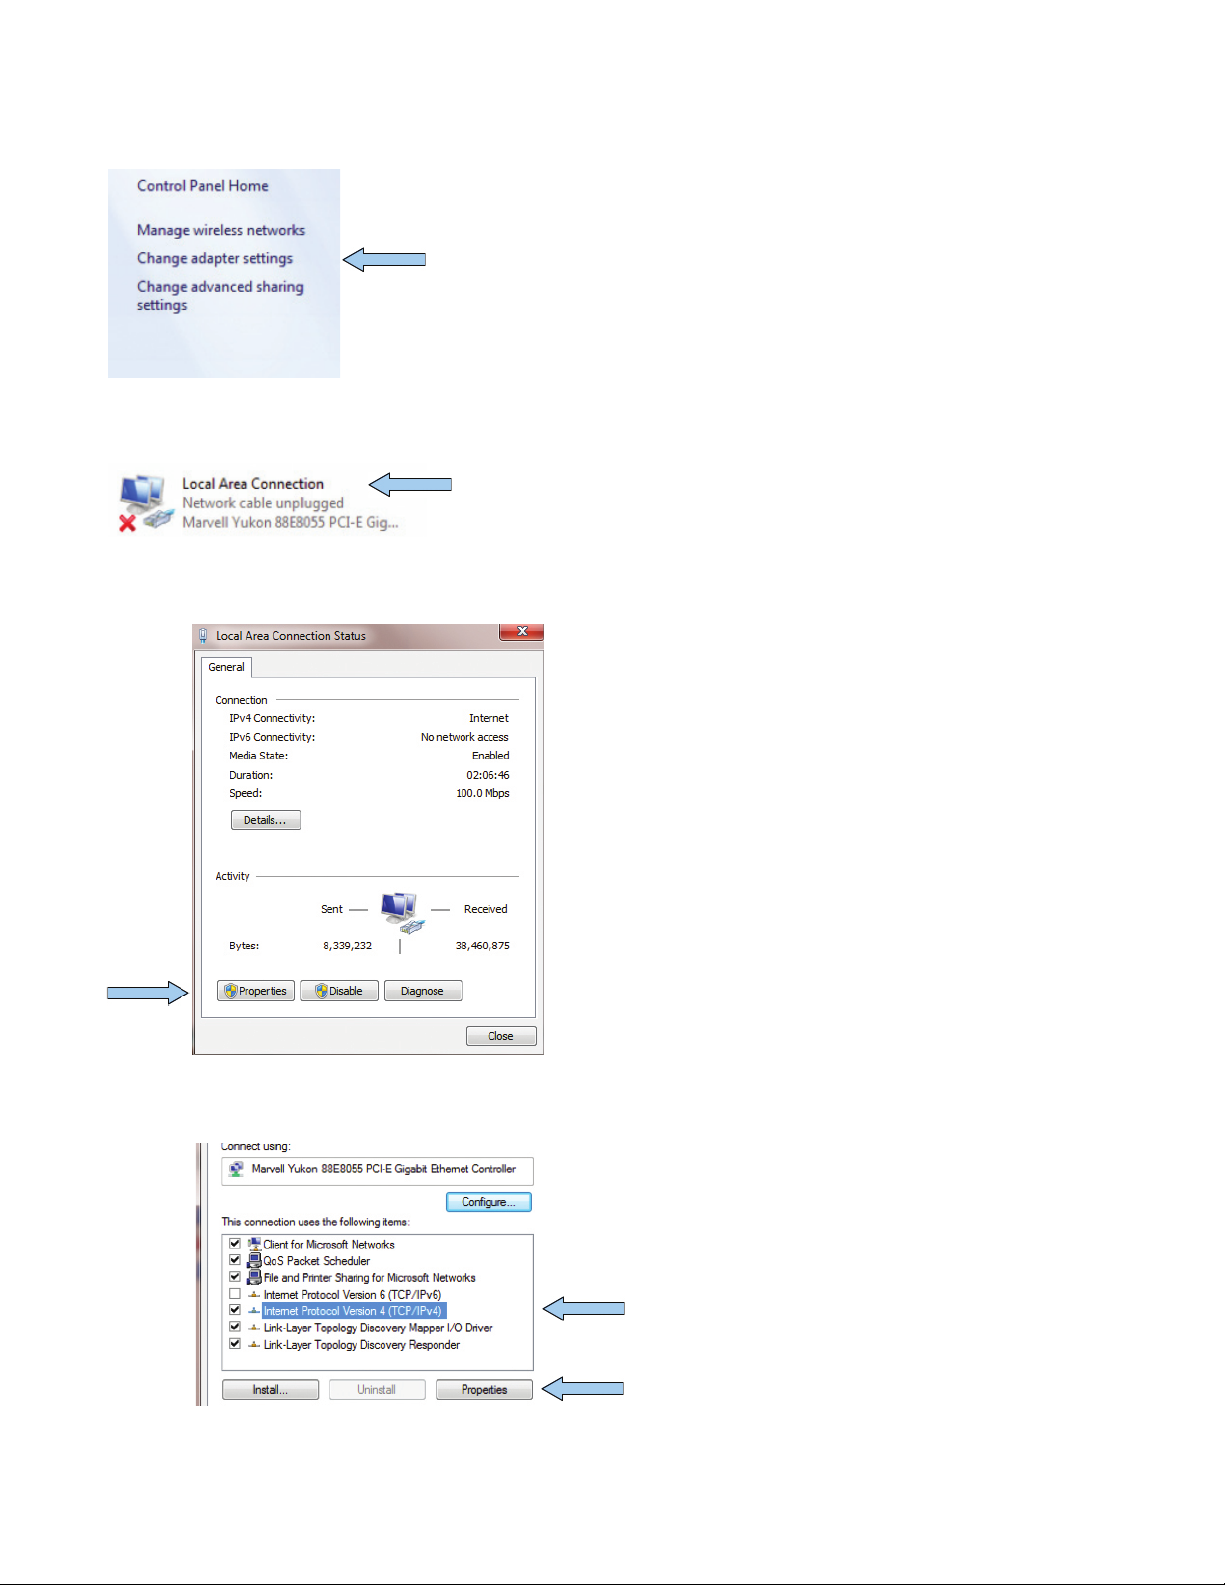
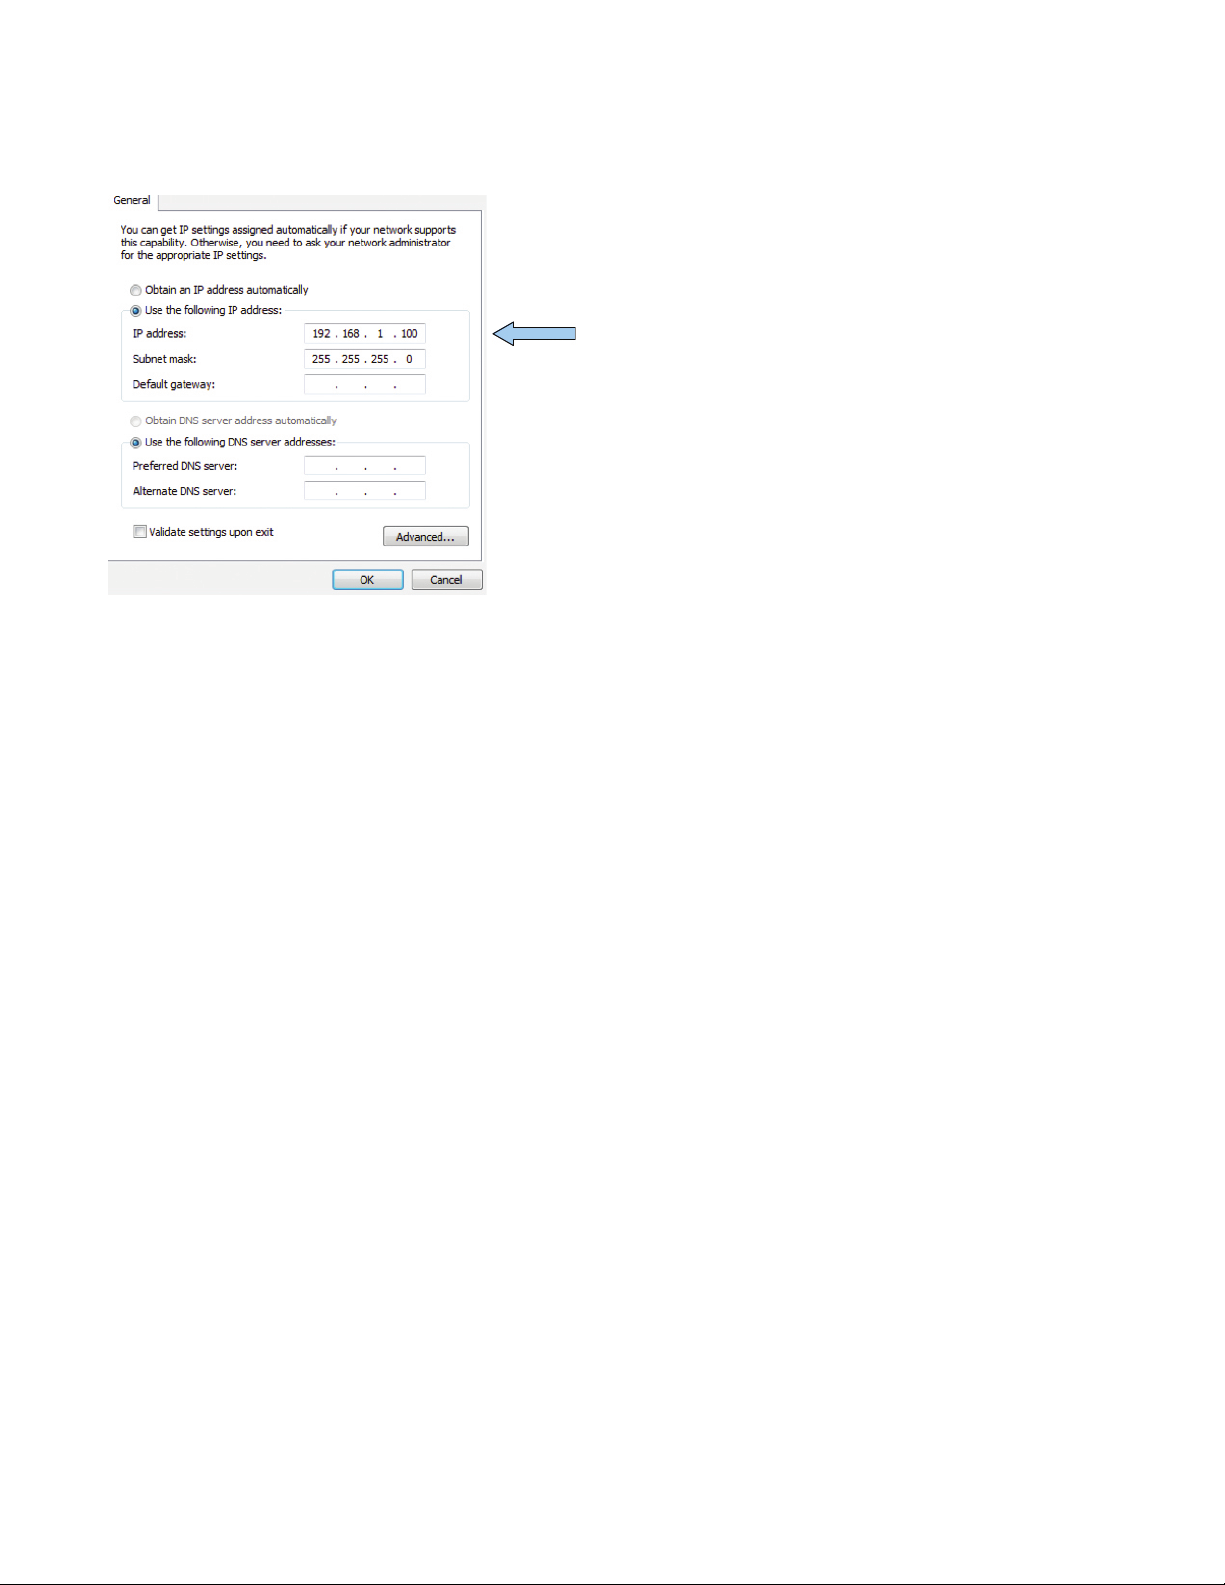
• AdjusttheCB6000andCM3000IPaddressesandnetworksettingstothoseprovidedbytheschoolsITdepartment.
• MakesurethattheMacroDefinitionsettingoftheCB6000istargetedtotheIPaddressoftheCM3000.
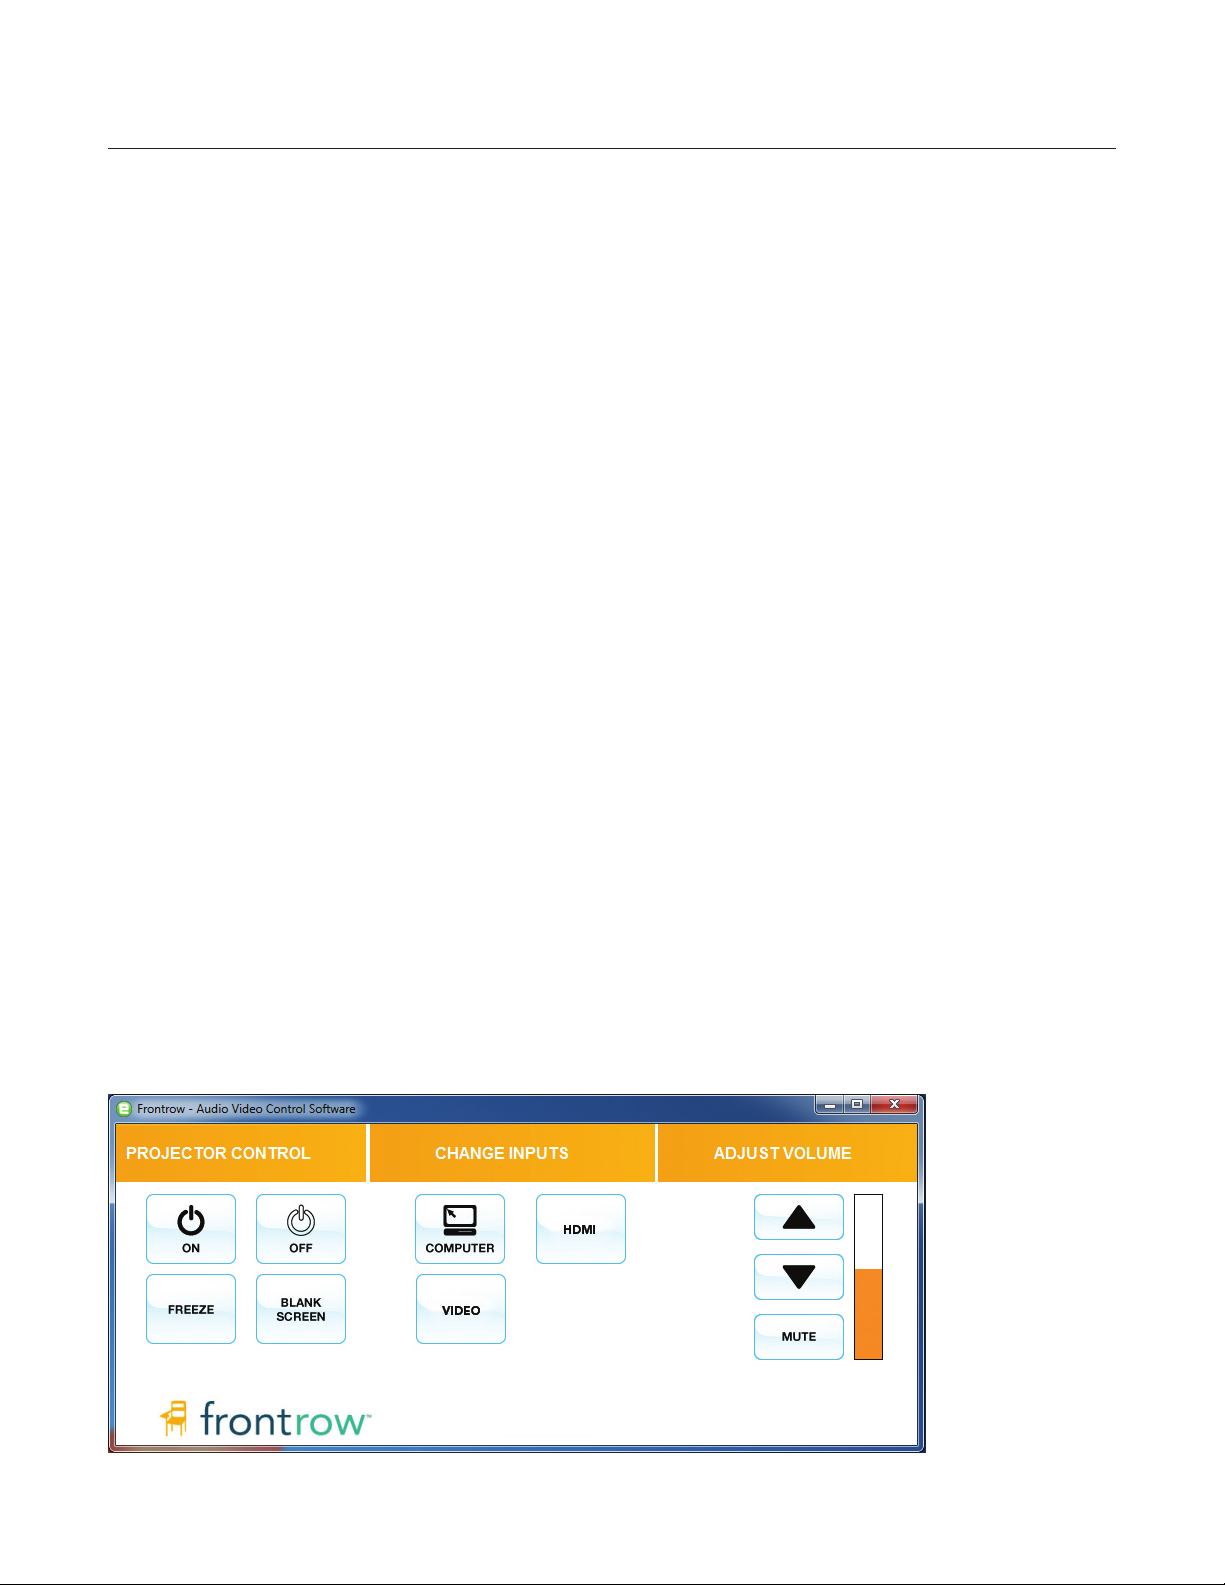
• InstalltheEncoresoftwareontotheteacher’sdesktop(ifthecomputerisaccessible).
• Physicalinstallation:
1. Cuttwodualgangholes,onefortheCB6000andonefortheAVwallplates.
2. Pullcablestotheirdestinations.
3. MounttheCB6000andAVwallplates.
4. Installtheceilingspeakers(insomeinstallationsthesemaybewallmounted).
5. MounttheezRoom(typicallylocatedneartheprojector).
6. MounttheIRdomesensor(nearthecenteroftheroomwithnoline-of-siteobstructionstotheteachersmicrophone).
7. AttachcablesandplugintheezRoomACpowercord.
8. Test the room.
FrontRowezRoomwithwall-mountspeakers
Step 1: Preparation
• Gather documents and configuration
filesfromFrontrowtechservices,make
sureyouhavetheseavailablewhile
installing.
• Bringalaptopwiththenormal
installation tools and equipment.
• Haveavailablethetechnicalmanual
of the projector that will be controlled.
Eveniftheconfigurationfilehas
already been created, you will need to
knowtheBaudrateoftheprojectors
serial port.
• Itisalsousefultohavetheremote
controloftheprojectoravailablein
caseyouneedtonavigatethrough
the menus.
• LoadtheprojectconfigurationfileintotheCB6000andmakeadjustmentstotheCM3000asnecessary.
1

FrontRow Grant Room Configuration File Installation Procedure
ThissectionwillstepyouthoughtheprocessofhowtoloadaprojectfileintotheCB6000.Youshouldreceivethisfileviaemail
fromFrontrowtechservices.Theseprojectfilesarespecifictoaprojectorandhowthetouchscreenbuttonsarearranged.
CB6000
Description:Touch-screenprogrammablewall-mountdevicecontroller
NOTE: ThisprocedureistobeusedifneithertheCB6000northeezRoomenclosurehasbeeninstalled.
• ProvidepowertotheezRoomandconnectyourcomputer/laptopnetworkconnectiontoLAN1oftheCM3000.Next
connectthenetworkport(silverconnector)oftheCB6000toCLAN3oftheCM3000.
• ChangeyourcomputersnetworkadaptersettingtoastaticIPaddresswithintherangeoftheCB6000andCM3000
default addresses. We suggest using 192.168.1.100asyourcomputerIPaddress.Seetheaddendumbelowifyouare
notfamiliarwithhowtomakethischange.
• Openawebbrowser(werecommendChrome,butotherscanbeused)andlogontotheCB6000byenteringintothe
browser’sURLthedefaultIPaddress 192.168.1.104.
• Ifthelog-inissuccessfulyouwillseethemainpageoftheCB6000,ifnotyouwillneedtocheckyourcomputer’s
networksettingsandthenetworkcablingbetweentheCB6000,CM3000andyourcomputer.
• HavetheappropriateCB6000projectfileavailableonyourcomputer.Youshouldreceivethisfileviaemailfrom
FrontRow,however,youcanalsodownloadat:http://gofrontrow.com/en/base-file
From the CB6000 web pages do the following:
1. “Save/Restore”–BrowsetowheretheCB6000projectfileislocated(.cfg).Selectandloadtheprojectfile.Thisprocess
willtakeabout30secondstocomplete.Oncethefileissuccessfullyloadedproceedtothenextstep.
2. “Macro Definition”–SelectthisCB6000tabandentertheIPaddressoftheCM3000intheMacroValueFieldcolumn.
TheCM3000isthetargetdestinationfortheCB6000whenitsendscontrolcommands.Makesurethatthe“I” remains in
placeatthebeginningoftheIPaddress.
2
Step 2: Configuring the Devices with Projector Specific Files

3
3. “Ethernet”–ThelaststepistoassigntheIPaddressandanyothernetworksettingspertheroomandschoollocation.
a. IPAddress=Roomaddress
b. SubnetMask=School’ssubnet
c. IPRouter=School’sIProuteraddress
d. RemotePort=7262
4. SAVEnetworksettings.Yourbrowserwilldisplaythatthewebsitecannotbereached,thatisOKastheCB6000IPrange
isnowdifferentthantheIPrangeofthelaptop.
5. NextchangethenetworksettingsoftheCM3000usingthesameprocedure.
Adjusting the CM3000 Serial Port
Introduction:WhendownloadingtheprojectorconfigurationfilesitisimportanttonotethattheCM3000serialportBaud
ratemustbesetidenticaltotheprojectorthatwillbecontrolledbytheCB6000.
Description:Howtochangetheserialport(alsoknownascomportorRS232)Baudratetomatchthatoftheprojector.
• ConnectviaEthernettotheCM3000fromyourcomputer/laptop
• PoweruptheCM3000usingtheprovidedpowersupply
• LogontotheCM3000usingawebbrowserandenterthedefaultIPaddress192.168.1.103
• Iflog-inissuccessfulyouwillseethemainpageoftheCM3000,ifnotyouwillneedtocheckyourcomputer’snetworksettings.
• HavetheappropriateprojectorspecificBaudrateavailable
From the CM3000 web page do the following:
1. “Serial ports”–SelecttheappropriateBaudrateandthenclickonSAVE

Common Projector Baud Rates
• Notethatthesearecommondefaultsbutaresubjecttochange.IfunsureoftheBaudrateusetheremotecontrolor
navigationbuttonsoftheprojectorandscrollthroughthevariousmenuoptionstofindtheprojectorssetting.
BenQ 115.2k
Epson 9600
Hitachi 19.2K
InFocus 115.2K
Mimio 19.2K
Mitsubishi 9600*some models fixed at 115.2K
NEC 38.4Kor19.2K(dependingonmodel)
Panasonic 9600
Sanyo 9600or19.2K(dependingonmodel)
Sharp 9600
Vivitek 9600(modelsthathavecommandsstartingwithHex7E)
Installing the Encore software:
ThissectionwillstepyouthoughtheprocessofhowtoloadtheEncoresoftwareontotheteacher’sdesktop.
• ContactFrontrowtechservicesandgettheprojectorspecificEncore.exeinstallationfile
• MovethefiletoaremovableUSBflashdrive
• InserttheUSBdriveintotheteacher’scomputer(youwilllikelyneedadminrightstoloadafileontothecomputer,
oranITrepresentative)
• MakesurethatthecomputerisconnectedtotheInternetforlicensing
• DoubleclickontheEncore.exe
• ThesoftwarewillstopjustonceandaskfortheIPaddress.ThisistheIPaddressthattheCM3000issetto.
• WhenfinishedyouwillnowseeadesktopIconlabeled“ProjectorControl”
NOTE:IftheEncoredoesnotgetalicensefromtheInternetthenyouwillneedtocalltechservicesforamanual
licensekeytobeentered.
TheEncoreDesktopAVControlSoftware
4

Step 3: Installing the Grant Room
5
Installation procedure:
• IdentifythelocationsfortheCB6000andtheAVwallplates.
• Cut2dualgangholesintothewalls,oneforwheretheCB6000willbemountedandoneforthewallplates.Typically
theAVwallplateisinaconvenientlocationnearthefloorbytheteacher’sdesk.TheCB6000isusuallylocatednearthe
teacher’sdesk,onasideofthewhiteboardornearthefrontdoor.Besuretoconsultwiththeschooltoidentifytheexact
locations.Inthecaseofhardwallsitmaybenecessarytoinstallsurfacemountboxesandraceway.
TheCB6000shouldbemountedataheightthatmakesitaccessiblebasedontheADAdrawingbelow:
• IdentifythelocationfortheezRoomplenumbox,typicallyjustbehindtheprojector.
• RemoveandcuttheceilingtilefortheezRoomenclosure.Thisenclosureismeanttositflushwiththeceilingtileinthe
opening that has been cut.
• Anchortheenclosuretoasolidstructureabovetheceilingusingthesteelcableprovided.
• ConnecttheACpowertotheavailableoutletthatissharedwiththeprojector.
• Attachthemicrophoneceilingsensortothebestavailablelocation.Trytokeepthesensorinalineofsighttowherever
the teacher may be within the classroom.
• Runallnecessarycables:(seenumbereddiagrambelow).
1. 2CAT5efromtheHDMIwallplatetotheenclosure,connecttotheHDMIreceiver.
2. 1CAT5efromtheCB6000silvernetworkconnectortotheenclosure,connecttoCLAN3orCLAN4oftheCM3000.
3. 1AVmulti-conductorcablefromtheanalogwallplatetotheenclosureandprojector(seediagram),VGAandVideo
traveltotheprojectorwhiletheaudiocablestraveltotheCM3000.
4. 4speakerswiresfromtheCM3000withintheenclosuretothespeakers.
5. 1MicrophonesensorcablefromtheIRdometotheSymbioreceiversensorconnection1,2or3.
6. SerialcablefromtheCM3000withintheenclosuretotheprojector.
7. AVcablesfromtheteacher’slocationandothersourcelocationtothewallplates.
8. ConnecttheschoolsLANcabletoLAN1orLAN2oftheCM3000(notethattheremaybesomeinstallationswhere
thatisnotpossible.ThegrantroomwillworkwiththeexceptionoftheEncoresoftwareandtheabilitytoremotely
logintothedevices).
9. ConnecttheHDMIcablefromtheHDMIaudioextractorinsideoftheezRoomtotheHDMIinputoftheprojector.

6
ezRoomStandardGrantRoomWiring
5
6
3
4
1
2
7
8
9

CB6000MainPage
Step 4: Testing Room
• TurntheprojectorONfromtheCB6000.
• Switchtoeachinputandmakesurethattheprojectorswitchesproperly.
• Insertanaudiosourceintothewallplatesandensurethattheaudioisheardandfollowtheappropriateprojectorinputs.
• HDMI–audioheardwillbefromtheHDMIsource(CM3000input3).
• PC–audioheardwillbefromtheDecoraVGA+Audioinsert(CM3000input1).
• Video–audioheardwillbefromtheRED/WHITERCAconnectorsontheDecoraRCAinsert(CM3000input2).
• TurntheprojectorOFFfromtheCB6000.
• Raiseandlowerthevolume.
• TesttheMUTEbuttontoensurethattheaudiomutes.PressingthemutebuttontogglesthemuteON/OFF.Alsoraising
andloweringthevolumebringstheaudiooutofmute.
• TestFREEZEandBLANKifavailableontheCB6000.
• RepeattheabovetestsfromtheEncoresoftwareifithasbeeninstalledontheteacher’scomputer.
• Testthemicrophonebyturningthemiconandspeaking.Walkaroundtheroomtoensurestrongcoveragefromallareas.
CB6000Page2
7
CB2000DefaultSetup CB2050DefaultSetup

Network Settings Addendum
How to change your computer’s wired network adapter from automatic (DHCP) to fixed (static)
ThescreenshotsforthisprocedureweretakenfromacomputerrunningWindows7.Otherversionswilllikelyhavea
differentlook,butthegeneralprocedureisidentical.Thegoalistogettothescreenwhereyoucanchangeyournetwork
adapterfrom“ObtainanIPaddressautomatically”(referredtoasDHCP)to“UsethefollowingIPaddress(referredtoas
static).MakingthischangeisessentialforconnectingyourcomputertoaFrontRownetworkdevice.
1. ClickontheWindowsstartbuttonlocatedonthelowerleftportionofyourscreen
2. Clickon “Control Panel”
3. Clickon “View network status and tasks”
NOTE: Depending on how your computer is setup you may see an alternate view such as below, if so select “Network and
Sharing Center”
8

4. Clickon “Change adapter settings”
NOTE: This selection may have different wording such as “Manage Network Connections”
9
5. Doubleclickon “Local Area Connection”
6. Clickon “Properties”
7. Select “Internet Protocol Version 4”, then select “Properties”

8. Select“UsethefollowingIPaddress”
9. EntertheIPaddressof192.168.1.100asadefaultforconnectingtoFrontRownetworkdevices
10
10. Clickinthesubnetmaskareaanditshouldautomaticallyfillin255.255.255.0, if not simply type it in
11. SelectOKthencloseeachwindowandbackoutofthesescreens
NOTE:TochangeyourcomputerbacktoDHCPfollowthesameprocessbutselect“ObtainanIPaddressautomatically”
fromtheGeneralnetworkpage.
Default IP addresses for Frontrow devices:
CB2000 192.168.1.104
CB6000 192.168.1.104
CM3000 192.168.1.103
CM800 192.168.1.103
CM800S 192.168.1.103
CMP500 192.168.1.103
Soundpost 192.168.1.103
DRS5000Server 192.168.1.99
ShuttlePC 192.168.1.98
Table of contents
Other FrontRow Conference System manuals