FujiFilm Fujinon Stabiscope S1640 User manual

日本語
ENGLISH
DEUTSCH
FRANÇAIS
ESPAÑOL
中文简
BL00005279-100
防抖望远镜
FUJINON STABISCOPE
S1240
S1640
取扱説明書
Instruction manual
Bedienungsanleitung
Mode d’emploi
Manual de instrucciones
使用说明书
製品を使用する前にこの取扱説明書をよく読んで、安全な場所に保管して下さい。
Read these instructions thoroughly before using the product and then store these in a safe
place.
Lesen Sie diese Anweisungen sorgfältig durch, bevor Sie das Produkt verwenden, und bewahren
Sie sie an einem sicheren Ort auf.
Veuillez lire ces instructions attentivement avant d’utiliser le produit, puis rangez-les en lieu sûr.
Lea estas instrucciones detenidamente antes de usar el producto y luego guárdelas en un
lugar seguro.
使用产品前请仔细阅读本使用说明书,并请妥善保管。

JA-1 日本語
目次
スタビスコープの特長......................................................................................... JA-1
各部の名称............................................................................................................. JA-2
操作方法................................................................................................................. JA-3
電池の入れ方 .......................................................................................................................................... JA-3
メインスイッチ ..................................................................................................................................... JA-4
ロックレバー .......................................................................................................................................... JA-4
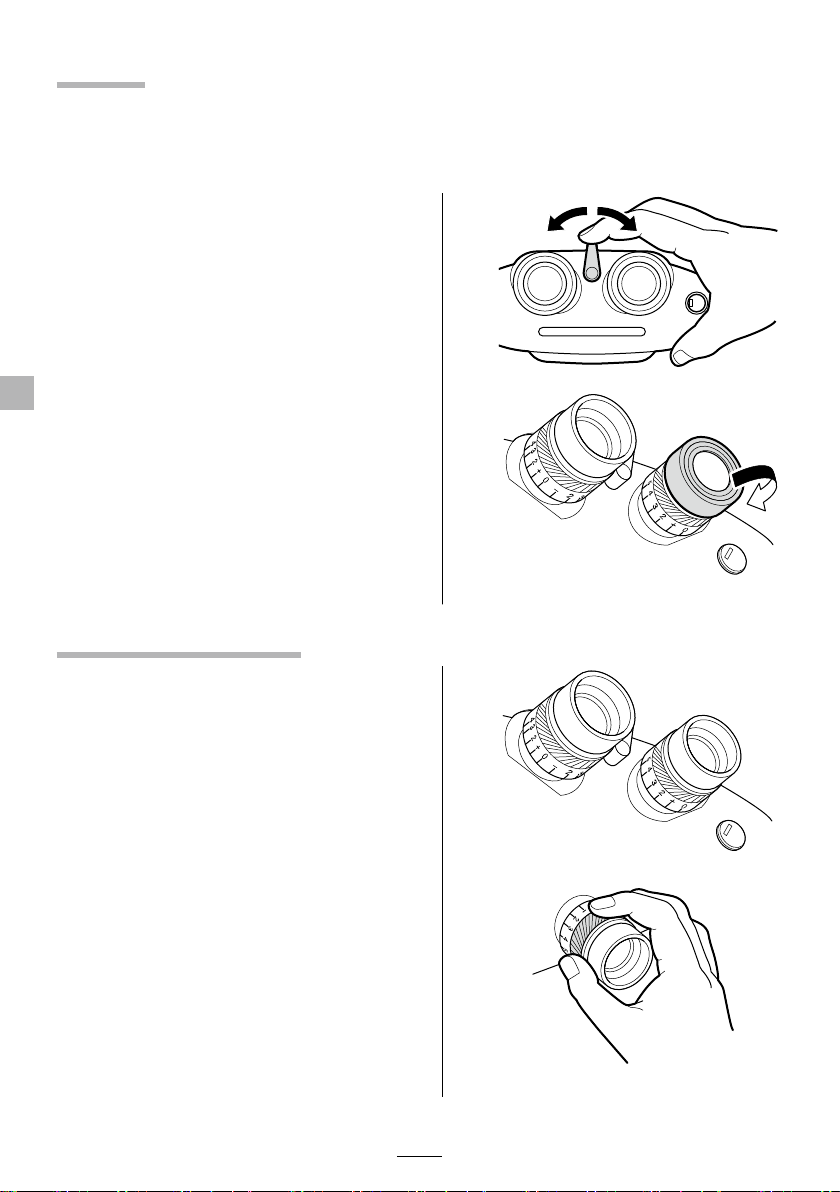
眼幅調整.................................................................................................................................................... JA-5
ピントあわせ
(視度調整)
................................................................................................................. JA-5
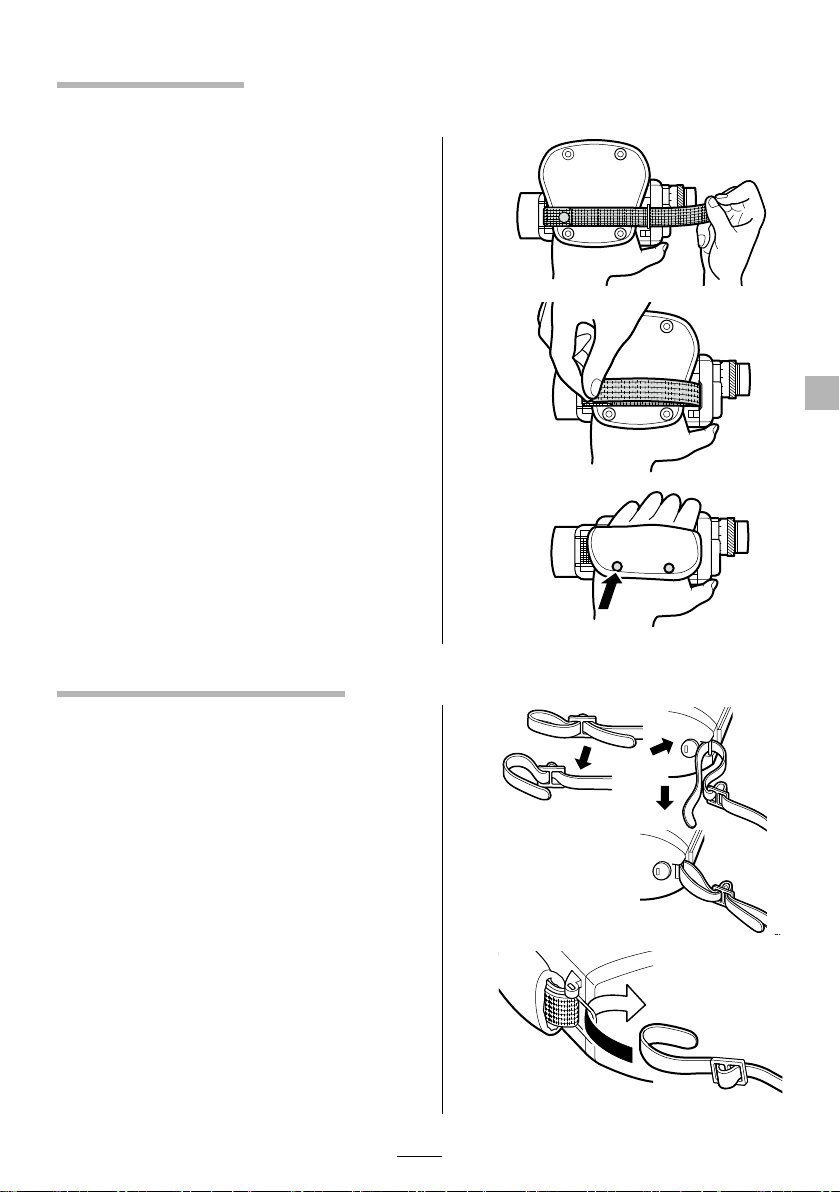
ハンドバンドの調整............................................................................................................................ JA-6
ネックストラップの取り付け方.................................................................................................... JA-6
フィルタの種類と取り付け方......................................................................................................... JA-7
外部電源の使い方................................................................................................................................. JA-7
手入れ..................................................................................................................... JA-8
アフターサービス................................................................................................. JA-9
性能諸元................................................................................................................ JA-10
安全にご使用いただくために ........................................................................... JA-11
スタビスコープの特長
スタビスコープは、船舶、航空機、車両上などの振動・動揺のある状況下において、視界の揺れを取り除き、
観察目標物の像を安定させるジャイロ機構を組み込んだ 12 倍/ 16 倍の双眼鏡です。このジャイロ機構
は電池または外部の電源によって駆動されますが、電源を用いない通常の双眼鏡と同様に簡単に取り扱
うことができます。また、本機は右手でも左手でも自由に持ち替えて、観察・操作ができるよう工夫され
ています。利き腕や状況に応じて、持ちやすいほうの手でお持ちください。

JA-2
日本語
各部の名称
詳しくは( )内に示されたベージをご覧ください。
外部電源用コネクタ(JA-7)
ハンドグリップ
ハンドバンド(JA-6)
電池カバー(JA-3)
電池カバー開閉レバー(JA-3)
対物レンズ(JA-7)
バンパー
ハンドグリップ
視度調整リング(JA-5)バンパー
眼幅調整レバー(JA-5)
ネックストラップ
取付軸(JA-6)
メインスイッチ(JA-4)
アイカップ(JA-5)
接眼レンズ(JA-5)
ロックレ バ ー ( JA-4)
ネックストラップ
取付リング
(JA-6)

JA-3 日本語
操作方法
電池の入れ方
1 電池カバー開閉レバーを図の矢印の方向に回し
て、電池カバーを開けます。(図 2 )
図2
2 単三電池の場合、図のように電池の方向を合
わせて入れます。(図 3 )
図3
3 リチウム電池(2CR5 型)の場合、図のように
凹みの方向に合わせ、接点の側を奥にして入
れます。(図4 )
図4
4 電池カバーを押し当てたまま、開閉レバーを赤
いマークが隠れるところまで "LOCK" の方向に
回します。(図 5 )
図5
電池について
• 連続使用される場合、アルカリマンガンタイプの単三電池では約 2時間、リチウム電池では
約5時間ご使用になれます。なお、リチウム電池は多少割高ですが、軽量で低温に強いという
特徴があります。
• 違った種類の電池、または、新しい電池と古い電池を混ぜないようにしてください。

JA-4
日本語
メインスイッチ
1 メインスイッチを軽く押し込むと、緑色の発光
ダイオードが点灯し、ジャイロモータが回転し
始めます。(図 6 )
2 ジャイロモータの回転が上がるまで、約 1分間
そのまま待ちます。
図6 グリップを左手で持った場合
グリップを右手で持った場合
ロックレバー
1 左手で操作する場合はロックレバーを図の矢印
の方向へ上げ、右手で操作する場合は図の矢
印の方向へ下げます。こうして、ジャイロ機構
をフリーにすると、像ブレのない観察が可能に
なります。(図 7 )
2 1の状態(ジャイロ機構がフリーになっている)
のときには、ロックレバーわきの赤色の発光ダ
イオードが点灯します。
3 メインスイッチを切ったままの状態でロックレ
バーをフリーにすると、
2の赤色の発光ダイオー
ドが点滅します。この状態が長く続かないよう
にご注意ください。
図7 グリップを左手で持った場合
グリップを右手で持った場合
d
注意
観察していないときやジャイロモータが回転していない(メインスイッチが OFF の状態)
ときには、ロックレバーを "LOCK" の位置にもどしておきましょう。ロックレバーがフリー
になった状態での運搬は、故障の原因ともなりますのでご注意ください。

JA-5 日本語
眼幅調整
*
眼幅調整とは?……
左右の目の間隔には個人差があります。接眼レンズの間隔を各々の人の眼幅に合わせ、いつでも最
適な状態で観察していただくためのものです。
1 接眼部のアイカップ(目当て)に両目を軽く当
てて覗いてください。
2 左右の視野が重なり合い、一つの円になるまで
眼幅調整レバーを動かします。(図 8 )
図8
3 メガネをかけたまま覗く場合には、図のように
アイカップを外側に引っ張るようにして折り返し
ておきます。(図 9 )
図9
ピントあわせ
(視度調整)
1 両目とも正視の方の場合、左右接眼部の視度
調整リングの目盛りを 0に合わせれば、そのま
ま遠方の観察物を鮮明に捉えることが可能で
す。(図 10)
図10
2 片目あるいは両目が遠視または近視の方は、
観察物が鮮明に見えるよう、左右それぞれの
視度調整リングを回してピントを調整します。
(図 11)
3 観察物の距離が近い場合も 2同様、ピント調
整を行ないます。
図11

JA-6
日本語
ハンドバンドの調整
*
グリップを持ち手にピッタリとフィットさせるために、ハンドバンドの長さ調節をしましょう。
1 ホックを はずします 。(図 12)図12
54 32
2 手をハンドバンドの中に通した状態で、バンド
の先端をひっぱり、手にフィットした状態でその
ままマジックテープで留めます。もし手にしっく
りこない場合には、ひっぱり具合を変えて、
2〜
3回調整してください。(図 13)
図13
54 32
3 ホックを留めます。(図 14)図14
54 32
ネックストラップの取り付け方
1 ネックストラップ の 留め 金 具に 2本通っている
ベルトの片側をはずし、ネックストラップ取付軸
に通した後、また元通りに留め金具を通します。
(図15)
図15
2 反対側のネックストラップ取付リングにも同様に
ベル卜を通します。(図 16)
図16

JA-7 日本語
フィルタの種類と取り付け方
1 フィルタは対物レンズの前部にねじこみます。
2 偏光フィルタは対物レンズの前部にねじこんだ
後、先端を自由に回すことができますので、観
察物が最もよく見える位置に回してください。
(図 17)
図17
フィルタの種類と特長
偏光フィルタ 水面やガラス面などのじゃまな表面反射を除去する効果があります。
オレンジフィルタ 散乱しやすい青系統の光を除去することによって、コントラストを高める効果があり
ます。
外部電源の使い方
*
航空機、車両等の直流電源があるところでは、付属の DC レギュレータを使うと電池が不要になりま
す。(本機の中に電池が入っていても DC レギュレータを通じて電気が供給されると、自動的に外部
電源の側に切り替わります。)
1 接続方法は、図の通りです。(図 18)
2 外部電源は DC 12 〜32V の範囲で使用可能
です。
図18
外部電源用
コネクタ 出力コード
入力コード
外部電源へ
DC
レギュレータ
3 コネクタキャップを利用して、図のように、ケー
ブルを曲げることもできます。(図 19)
図19
d
注意 外部電源のケーブルには、+ /―の極性があります。白のリード線が(+)、黒のリード線
が(―)です。お間違えのないよう配線してください。

JA-8
日本語
手入れ
レンズ面
レンズについた汚れや指紋は見え味を著しく低下させたり、焼きついて後日手入れをしても取れなくなる
場合もありますので、付属の拭き布で良く拭いてください。
ボディ
全体を柔らかい布で拭いてください。必要に応じて布に水をつけて拭いてください。表面が濡れている
場合には充分乾燥させてからキャリングケースに収納してください。
キャリングケース
外観はボディと同じく、全体を柔らかい布で拭いてください。必要に応じて布に水をつけて拭いてください。
内側のホコリやゴミは電気掃除機で取り除いてください。

JA-9 日本語
アフターサービス
A
故障の場合には、お買い上げいただいた販売店までご連絡ください。
B
お買い上げ後 1年間は無償修理とさせていただきます。ただし、お客様の間違った取り扱いによる
故障はこの限りではありませんのでご了承ください。
C
保障期間後の修理は原則として有償修理とさせていただきます。また、運賃諸掛りもお客様にご負
担願います。
D
本製品の補修用部品は、製造打ち切り後 7年間を目安に保有していますが、期間以後であっても修
理可能の場合もありますので、弊社営業グループまでお問い合わせください。
故障かな?と思ったら……
修理に出す前にまず次のことを確認してください。
症状 原因 処置
観察物の像が安定しない 電池の電圧低下 電池を新品と交換するか、また
は外部電源を利用する
モーターが動かない
発光ダイオードがつかない
電池の誤挿入
電池を正しく入れなおす
(JA-3 参照)
電池切れ 新しい電池に取り替える
像がボケている
ピントがあっていない
接眼レンズの視度を調整する
(JA-5 参照)
ガラス表面の汚れ
ガラス表面を清掃する
(JA-8 参照)
モヤ、カスミまたは強い反射光
がある
フィル タ を 使 用 す る
(JA-7 参照)

JA-10
日本語
性能諸元
光学諸元
S1240 S1640
A
倍率 12
倍16
倍
B
対物有効径 40mm 40mm
C
視界 4.7 度3.4 度
1000m における視界 82m 60m
D
射出瞳径 3.33mm 2.50mm
E
明るさ 11.10 6.25
F
アイレリーフ 17mm 12mm
形状
• 約210×200×90mm
(L×W×H)
(S1240)
• 約200×200×90mm
(L×W×H)
(S1640)
質量
• 約1.8kg(電池を含まず)(S1240、S1640)
電源
• 内部:
単三電池 4本またはリチウム電池 2CR5 型 1個
• 外部:
DC 12 〜32V(但し DC レギュレータ使用)
標準付属品
A
単三電池 .....................................................................4
B
ネックストラップ ........................................................1
C
ハンドバンド................................................................1
D
DC レギュレータ.......................................................1
E
入カコード(DC レギュレータ用)
.....................1
F
出カコード(DC レギュレータ用)
.....................1
G
拭き布...........................................................................1
H
取扱説明書.................................................................1
オプション
A
リチウム電池(2CR5 型)
B
キャリングケー ス
C
偏光フィルタ
D
オレンジフィルタ

JA-11 日本語
安全にご使用いただくために
• 製品の安全性には十分配慮しておりますが、下記の内容をよくお読みの上、正しくご使用下さい。
• この説明書はいつでも見られる場所に必ず保管して下さい。
d
警告 この表示を無視して誤った取り扱いをすると、人が死亡または重傷を負う可能性が想定
される内容を示しています。
d
注意 この表示を無視して誤った取り扱いをすると、人が傷害を負う可能性が想定される内容ま
たは、物的損害の発生が想定される内容を示します。
d
警告
• 太陽を絶対に見ないで下さい。失明の原因となります。
• 製品が熱くなる、煙が出る、焦げ臭いなどの異常を感じた時は、直ちに電源を切って電池を抜いて
下さい。発火や火傷の原因となります。(電池を抜く際、火傷には十分ご注意下さい。)
• 内部に水または金属や異物などが入ったときは直ちに電池を外して下さい。発熱・発火の原因となり
ます。
• 引火性の高いガスが充満している場所や、ガソリン・ベンジン・シンナーなどの近くで本製品を使用
しないで下さい。爆発や発火・火傷の原因となります。
• 加熱や火中への投入、落としたり、衝撃を加えないで下さい。破裂の原因となることがあります。
• 本製品を不安定な場所に置かないでください。倒れたり、落ちたりしてけがの原因となることがあり
ます。
• 本製品を歩行中に使用しないで下さい。衝突・転倒し、けがの原因となることがあります。
• 本製品の眼幅調整の際、指を挟み、けがをすることがあります。小さなお子様の使用につきまして
はご注意ください。
• 本製品を直射日光の当たる場所に置かないで下さい。火災の原因になることがあります。
• ゴム製目当ての長期間使用により、ゴムの劣化で皮膚に炎症を起こす恐れがあります。疑わしい症
状が現れた場合は、医師にご相談ください。
• キャップをお子様が飲み込んだ場合、直ちに医師に相談してください。
• ポリ袋(包装用)など小さなお子様の手の届くところに置かないで下さい。窒息の原因となること
があります。
• 分解は絶対にしないで下さい。けがの原因となることがあります。また、分解をされた場合は保証
の対象外となります。

JA-12
日本語
d
警告(電池)
• 電池の液漏れ、発熱により重大な事故の原因になるため、以下の電池は絶対に使用しないで下さい。
‐ 外装チューブが破れたり剥がれたりしている電池
‐ 公称電圧が 1.5V を超える(単三電池のみ)、もしくは確認できない電池
‐ 種類の異なる電池や異なる銘柄の電池を混ぜての使用
‐ 新しい電池と使用した電池を混ぜての使用
• 「単三リチウム電池」「単三マンガン電池」「単三形ニカド電池」は対応していないため、お客様の
安全のため使用しないで下さい。
• 電池の+と−の向きを間違えて使用しないで下さい。
• 電池を火中に投げ込んだり、ショート、加熱、分解などしないで下さい。発火・破裂し、けがの原因
となることがあります。
• 「単三アルカリ電池」「単三ニッケル水素電池」「リチウム電池(2CR5 型)」の保管・使用環境およ
び使用方法は、メーカの取扱説明書を確認の上使用して下さい。
d
注意
• 故障した場合は絶対に自分で修理しようとせずに、お買い上げの販売店にご相談下さい。
• 落下などにより内部が露出したときは絶対に触れないで下さい。けがの原因となることがあります。
• 電池ボックス内部の部品に金属を触れないで下さい。けがや故障の原因となることがあります。
• 長期間使用しないときは、電池を外して下さい。火災の原因となることがあります。電池を抜いた
後も保護のため電池カバーは本体に取り付けて保管して下さい。
• 小さいお子様の手の届くところに置かないで下さい。けがの原因となることがあります。
• 本製品を布や布団で覆ったりしないで下さい。熱がこもり、変形・火災の原因となることがあります。
• 電池の中の液が皮膚や衣服に着いたときは、水でよく洗い流して下さい。万一、目や口に入った場
合は、すぐに水で洗い流し、医師の診察を受けて下さい。

EN-1 ENGLISH
Contents
STABISCOPE Advantages............................................................................................................................... EN-1
STABISCOPE Features .................................................................................................................................... EN-2
Operating Instructions..................................................................................................................................EN-3
Battery Installation .................................................................................................................................................................................. EN-3
Main Switch.................................................................................................................................................................................................EN-4
Lock Lever.....................................................................................................................................................................................................EN-4
Interpupillary Distance Adjustment.............................................................................................................................................EN-5
Focusing........................................................................................................................................................................................................EN-5
Hand Strap Adjust ...................................................................................................................................................................................EN-6
How to install the neck strap ...........................................................................................................................................................EN-6
Filters and How To Use Them .......................................................................................................................................................... EN-7
How to use the DC Regulator Pack .............................................................................................................................................. EN-7
Maintenance ...................................................................................................................................................EN-8
Specifications .................................................................................................................................................EN-9
For Your Safety ............................................................................................................................................. EN-10
STABISCOPE Advantages
The STABISCOPE, the world’s rst high powered, internally gyro-stabilized binocular has been proven
on land sea, air and even in space…on NASA shuttle missions. Combining fully coated, computer-de-
signed optics with a patented high speed internal gyro-stabilized system, the STABISCOPE is the ulti-
mate optical instrument for long range observation, identication, tracking and survelance.
By stabilized only the high powered optics (not the entire device), weight is held to a minimum while
the image remains steady and clear—free from the eects of normal body tremor as well the motion
aboard boats, aircraft and land vehicles. The result is increased operator accuracy with less fatigue.
The new waterproof STABISCOPE S1240 and S1640 are lighter, more ecient and more exible and
easier to use. They operate on their own AA batteries or from an external 12-28 V DC souce. In addi-
tion, the STABISCOPE can now be operated comfortably right-handed or left-handed. That is because
it works right side up and upside down. All that’s needed is simply reversing the location of the hand
strap. Incidentally, when the power switch is turned o, the STABISCOPE may also be used as a conven-
tional binocular.

EN-2ENGLISH
STABISCOPE Features
Bumper
Hand grip
Hand strap (EN-6)
Battery cover (EN-3)
Objective
lens (EN-7)
Battery cover
open-close lever (EN-3)
DC Regulator
connecter (EN-7)
Interpupillary
Distance adjustment
lever (EN-5)
Hand grip
Neck strap
hanger (EN-6)
Neck strap
hanger (EN-6)
Lock lever (EN-4)
Eyepiece lens (EN-5)
Eyecup (EN-5)
Main Switch (EN-4)
Diopter ring (EN-5) Bumper

EN-3 ENGLISH
Operating Instructions
Battery Installation
1 Turn the open-close lever in the direction of
the arrow mark and open the battery cover.
(Fig. 2)
Fig. 2
2 When inserting 4 AA batteries (SUM-3), be
sure they are installed as shown, (Fig. 3) with
the positive + terminals facing the proper
direction.
Fig. 3
3 When using lithium battery (type 2CR5),
insert them in the direction of the slot, as
shown. Be sure to keep the contact side of
the batteries facing towards the back. (Fig. 4)
Fig. 4
4 While pressing the battery cover, turn the
open-close lever toward the “LOCK” posi-
tion until you hear a clicking sound. (Fig. 5)
Fig. 5
d
Battery Life
and Uses
• Alkaline manganese size “AA” dry batteries will permit about 2-hours of
continued use; lithium battery will allow approximately 5-hours of con-
tinued use.
Please note that lithium battery cost more, but they are lighter and oer
greater resistance against low temperatures.
• Do not use a dierent type of battery and mixture of new and used bat-
teries.

EN-4ENGLISH
Main Switch
1 Gently press the main switch. A green LED
will light and the gyro motor will start to ro-
tate. (Fig. 6)
2 Wait for about a minute until the gyromotor
reaches operating speed.
Fig.6 When hold a grip by left hand
When hold a grip by right hand
Lock Lever
1 When operating the STABISCOPE with your
left hand, raise the lock lever in the direction
of the arrow mark, as illustrated; when op-
erating with your right hand, lower it in the
direction of the arrow mark. When the lock
lever is released, the target can be observed
without vibration or shakiness of the image.
(Fig. 7)
2 As described in the condition of 1 above,
when the lock lever is released, a red LED
positioned by the lock lever will light.
3 The red will blink on· and o if the lock lever
is released while the main switch is in the o
position. Be careful not to let this condition
continue for a long period.
Fig.7 When hold a grip by left hand
When hold a grip by right hand
d
CAUTION!
When observation is not being performed or when the gyro motor is not rotat-
ing (when the main switch is OFF), keep the lock lever in the “LOCK” position.
Please be careful not to carry the STABISCOPE when the lock lever is released :
such action may result in problems.

EN-5 ENGLISH
Interpupillary Distance Adjustment
*Since the distance between the left and right eyes varies from person to person, in order to see com-
fortably while using the STABISCOPE, the distance in between the two eyepieces should be adjusted.
This can be done quickly and simply allowing anyone to use the STABISCOPE.
1 While looking through the STABISCOPE with
both eyes, move the interpupillary distance
adjustment lever until you see a single, per-
fectly circular eld of view. (Fig.8)
Fig. 8
2 If you wear glasses, simply follow step 1 after
folding the lubber eyecups back. (Fig.9)
Fig. 9
Focusing
1 If you have good vision and free of astigma-
tism, each eyepiece can be set at 0 on its di-
opter ring scale (Fig. 10). If you wear correc-
tive glasses, you should also be able to set
both eyepieces at 0.
In general, focusing need be done only once
for viewing distant subject. In some cases,
where the subject is very close, if may be
necessary to re-focus.
Fig. 10
2 When focusing is required, adjust one eye-
piece until the image is sharp; then adjust
the other until both eyes see the image with
equal clarity. (Fig. 11)
3 Manual focus as described above is also nec-
essary when the target is at a short-distance
Fig. 11

EN-6ENGLISH
Hand Strap Adjust
*Adjust the length of the hand strap so that it is aligned with the grip while you hold it.
1 Unhook it. (Fig.12) Fig. 12
54 32
2 With your hand placed through the hand
strap, pull the tip of the strap and fasten it
with the Velcro so that it ts snugly around
your hand. It may be necessary to repeat the
process until you get the right feel. (Fig. 13)
Fig. 13
54 32
3 Hook it. (Fig. 14) Fig. 14
54 32
How to install the neck strap
1 Remove one of the two straps passed
through the clasp. Pass it through point A
indicated in gure, and then pass it through
the clasp again, as it was before. (Fig. 15)
Fig. 15 A
2 Pass the strap through point B in the gure
in the same manner. (Fig.16)
Fig. 16
B

EN-7 ENGLISH
Filters and How To Use Them
The two most common types of lters used with the STABISCOPE are:
Polarizing ... eective for removing unwanted and distracting reections from surface of water or
glass. Also helpful for controlling contrast between sky and clouds.
Orange......... lters out bluish light (haze and mist) to improve contrast.
To install, simply place one lter over each objective
lens. With polarizing lters, you can rotate each lter
after placing it over the objective lens to control the
exact degree of polarizing eect (contrast or remov-
al of reection) you want to achieve. (Fig. 17)
Fig. 17
How to use the DC Regulator Pack
*No dry battery is required if an accessory DC regulator is used in areas where a direct current power
source is available; i. e., aircraft, vehicles, etc. (Even when dry batteries are provided in this unit, if
electricity is supplied through a DC regulator, the supply source of electricity will automatically be
changed over to the DC Regulator.)
1 The connecting method is as illustrated in
the gure. (Fig. 18)
2 The DC Regulator can be used within the
range of 12-32V DC.
Fig. 18
DC Regulator
connector
DC
Regulator
DC Power
Electric cable (out)
Electric cable (in)
3 It is also possible to bend the cable as illus-
trated in the gure using connector cap.
(Fig.19)
Fig. 19
d
CAUTION!
The cable of the external energizer has a+/- polarity. The white lead wire is posi-
tive and the black lead wire is negative. Please take care to make the proper con-
nection.
This manual suits for next models
1
Table of contents
Languages:
Other FujiFilm Binoculars manuals

FujiFilm
FujiFilm 8x50 FMTR-D/N User manual

FujiFilm
FujiFilm 25x150ED-D User manual

FujiFilm
FujiFilm FUJINON HYPER-CLARITY HC8x42 User manual

FujiFilm
FujiFilm S1240 D User manual

FujiFilm
FujiFilm TS12x28WP User manual

FujiFilm
FujiFilm MARINER 7X50 WP-XL User manual

FujiFilm
FujiFilm FUJINON FMT Series User manual

FujiFilm
FujiFilm FUJINON 25x150MT-SX User manual

FujiFilm
FujiFilm KF Series User manual

FujiFilm
FujiFilm TS-X 1440 User manual