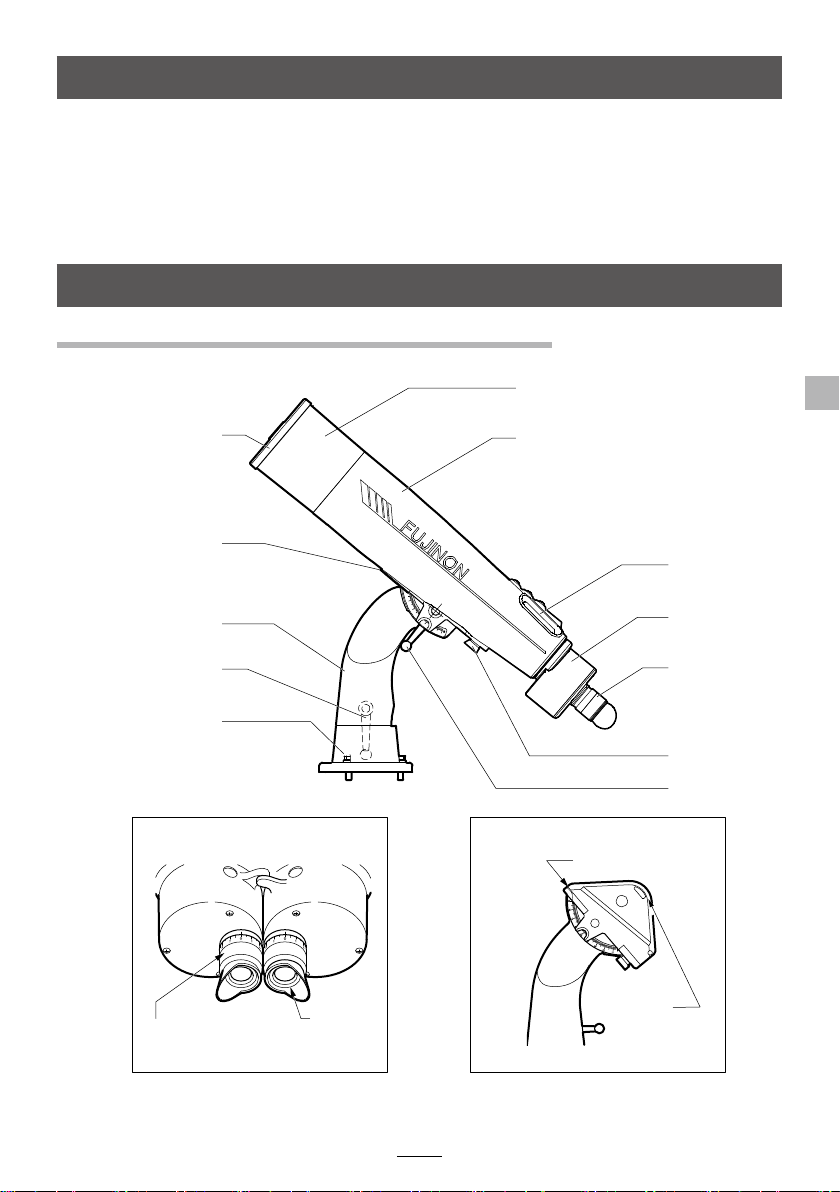
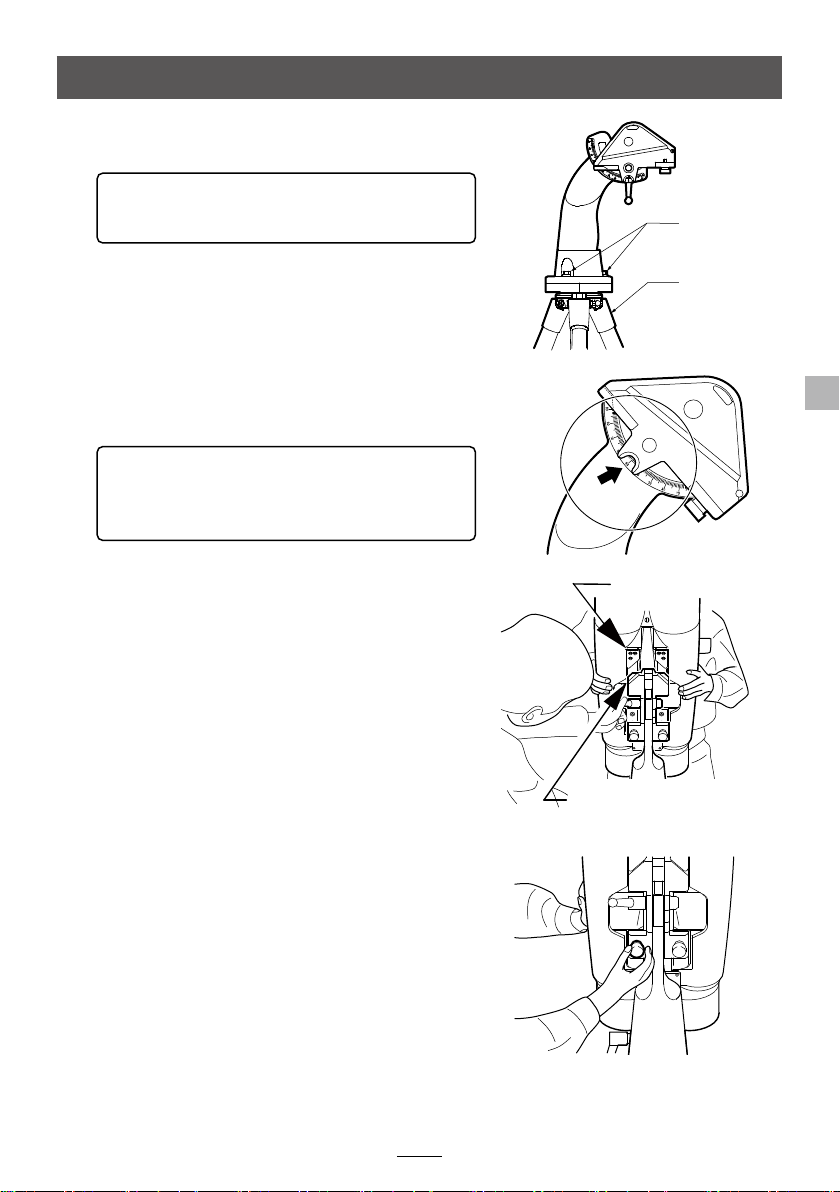
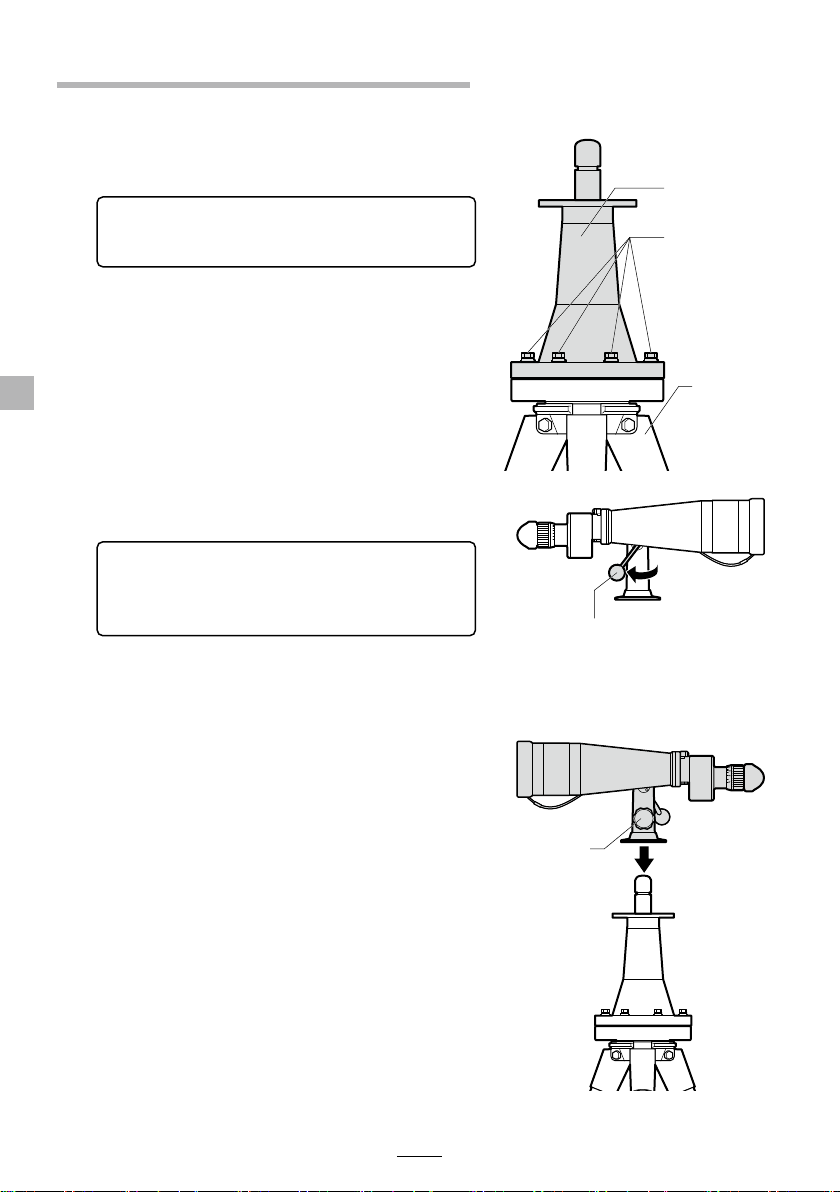
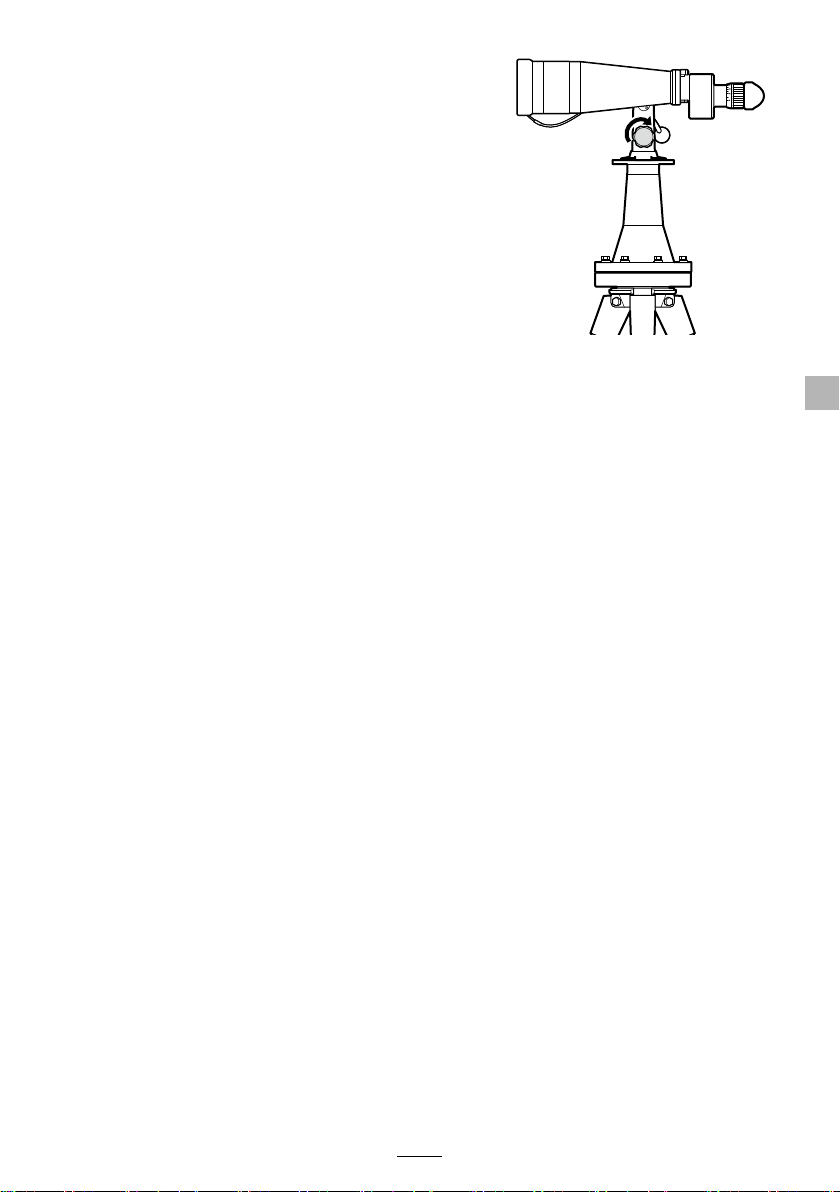
FujiFilm FUJINON 25x150MT-SX User manual

日本語
ENGLISH
DEUTSCH
FRANÇAIS
ESPAÑOL
中文简
BL00005281-100
望远镜
フジノン大型双眼鏡シリーズ
FUJINON LARGE-SIZE BINOCULARS
25x150MT-SX
25x150ED-SX
40x150ED-SX
15x80MT-SX
取扱説明書
Instruction manual
Bedienungsanleitung
Mode d’emploi
Manual de instrucciones
使用说明书
製品を使用する前にこの取扱説明書をよく読んで、安全な場所に保管して下さい。
Read these instructions thoroughly before using the product and then store these in a safe
place.
Lesen Sie diese Anweisungen sorgfältig durch, bevor Sie das Produkt verwenden, und bewahren
Sie sie an einem sicheren Ort auf.
Veuillez lire ces instructions attentivement avant d’utiliser le produit, puis rangez-les en lieu sûr.
Lea estas instrucciones detenidamente antes de usar el producto y luego guárdelas en un
lugar seguro.
使用产品前请仔细阅读本使用说明书,并请妥善保管。

JA-1 日本語
安全上の注意
ここでは、製品を安全に正しくご使用いただくために重要な注意事項を説明しています。必ずご使用前に
読み、記載内容に従って正しくご使用ください。
文章中の表示は次のことを表しています。
d
警告 この表示を無視して誤った取り扱いをすると、人が死亡または重傷を負う可能性が想定
される内容を示します。
d
注意 この表示を無視して誤った取り扱いをすると、人が障害を負ったり、
物的損害が発生する
可能性が想定される内容を示します。
d
警告
太陽を絶対に見ないでください。失明の原因になります。
d
注意
• この製品を不安定な場所に置かないでください。倒れたり、落ちたりしてけがの原因となることがあ
ります。
• この製品を振りまわさないでください。他人に当たりけがの原因となることがあります。
• この製品を直射日光の当たるところに置かないでください。火災の原因となることがあります。
• ゴム製目当ての長期間使用により、ゴムの劣化で皮膚に炎症をおこすことがあります。もし、疑わし
い状態があらわれましたら、医師にご相談ください。
• ポリ袋(包装用)など小さなお子さまの手の届くところに置かないでください。口にあて窒息の原
因になることがあります。
• 双眼鏡を取り扱うときに対物フードや接眼部を持って支えますと、破損・落下の恐れがありますので、
必ず鏡筒を持ってください。

JA-2
日本語
特徴
大型双眼鏡シリーズは、対物レンズに 150 mm、80
mmの大口径レンズを搭載し、さらに、各レンズエ
レメントには多層膜反射防止コート(EBC コート)を採用していますので、視界のすみずみまで明るくシャー
プな像が得られ、昼間における鮮明な解像力と、夜間での集光力に大きな威力を発揮します。
また、耐食性にも十分配慮した材料を使用し、防水構造を採用していますので、海洋などの過酷な自然
環境にも対応できます。
各部の名称
25x150MT-SX/25x150ED-SX/40x150ED-SX
対物キャップ
位置決め爪
架台(オプション)
方位固定レバー(背面)
架台固定用ボルト(3本)
対物フード
鏡筒
把手
プリズムボックス
接眼部
双眼鏡固定ねじ
俯仰固定レバー
フォーカスリング
架台頭部
位置決め斜面
アイカップ

JA-3 日本語
15x80MT-SX
対物レンズキャップ
目当てゴム
視度目盛環
方向固定ツマミ
上部架台
双眼鏡本体
眼幅目盛
俯仰固定レバー

JA-4
日本語
架台との組み合わせ方(15x80MT-SX 除く)
1 架台に付属している 3本の六角ボルトで、架台を三脚
などのしっかりした台に固定します
d架台をしっかり固定しないと、双眼鏡を載せ
た時に倒れる恐れがあり、大変危険です。
三脚
付属の
六角ボルト(× 3)
2 架台の指標線を、俯仰角度メモリの 50°くらいの位置に
合わせ、架台頭部が動かないように俯仰固定レバーを
しっかり締めて固定します。
d固定が緩いと、双眼鏡を載せた時に架台が
不安定になり、本体を落下させる危険があり
ます。
3 架台頭部へ鏡筒下面に開いている溝をかぶせるように
して鏡筒下面の位置決め爪を架台頭部の位置決め斜面
に噛み合わせます。
鏡筒下面位置決め爪
位置決め斜面
4 架台頭部に付いている 2本の双眼鏡固定ねじを締め、
双眼鏡と架台をしっかりと締結します。
双眼鏡を架台から外すときは、2を行ったあと、2本の双眼鏡固定ねじを緩め、3を逆の手順で行って
ください 。

JA-5 日本語
15x80MT-SX と架台を組み合わせる場合
15x80MT-SX は本体に上部架台が組み付けられています。
1 下部架台に付属している六角ボルトで、下部架台を三
脚などのしっかりした台に固定します。
d架台をしっかり固定しないと、双眼鏡を載せ
た時に倒れる恐れがあり、大変危険です。
三脚
付属の六角ボルト
2 本体が動かないように上部架台の俯仰固定レバーをしっ
かり締めて固定します。
d固定が緩いと、双眼鏡を載せた時に架台が
不安定になり、本体を落下させる危険があり
ます。
俯仰固定レバー
3 上部架台に付いている方向固定ツマミの回転位置によ
り、上部架台軸穴の内部にピンが飛び出していないこ
とを確認します。
4 本体に組み付いている上部架台を、下部架台の軸に通
して組み合わせます。
方向固定
ツマミ
下部架台

JA-6
日本語
5 上部架台の方向固定ツマミを締め、双眼鏡と下部架台
をしっかりと締結します。
双眼鏡を下部架台から外すときは、2を行ったあと、上部架台の方向固定ツマミを緩め、4を逆の手順
で行ってください。

JA-7 日本語
使用方法
眼幅の合わせ方
1 接眼部のアイカップに両目を軽く当てます。
2 左右のプリズムボックスに手を掛け、ゆっくり広げたり
狭めたりして、左右の視野が円形に重なってひとつの
円になるように、眼幅を合わせます。
フォーカスの合わせ方
フォーカスリングを回し、片方ずつ目標物が鮮明に見えるようにフォーカスを調整します。
※目標物を変えた場合も、同様にフォーカス調整を行ってください。
俯仰の合わせ方
1 俯仰固定レバーを緩め、俯仰の固定を解除します。
2 双眼鏡の把手に手をかけ、上下に動かして目標の角度に合わせます。
3 角度が決まったら、俯仰固定レバーで固定します。
方位の合わせ方
1 方位固定レバー(15x80MT-SX は方向固定ツマミ)を
緩め、方位の固定を解除します。
2 双眼鏡の把手に手をかけ、左右に動かして目標の角度
に合わせます。
3 角度が決まったら、方位固定レバー(15x80MT-SX は
方向固定ツマミ)で固定します。
※俯仰固定レバーと方位固定レバーは、レバーを外側に引っ張って回すと、レバーの回転位置を変える
ことができます。

JA-8
日本語
オプション(別売品)
架台
大型双眼鏡を三脚等に固定するときの専用台で、俯仰角度、方位角度の調整ができます。
• 俯仰角度:-20 〜+80°(15x80MT-SX は± 30°)
• 方位角度:360°
三脚
架台付の大型双眼鏡を支える堅牢な構造で、視界の揺れを最小限に抑えます。
アルミトランク
大型双眼鏡を収納するアルミ製トランクです。
手入れと保存
レンズ面の汚れ
ホコリ等 は 、 柔らかく油 気 の な い ハケで 、 払うようにして 取り除 い てくださ い 。
レンズ面に付いた汚れや指紋は、見え味を低下させるばかりではなく、焼きついて後日手入れをしても取
れなくなる場合がありますので、付属の拭布または柔らかい紙に、少量のアルコール、またはレンズクリー
ニング液等を浸み込ませて、レンズの中央から外側に向かって円を描くように軽く拭き取ってください。
※市販のレンズクリーニング液には、プラスチックを侵す可能性のある製品がありますので、ご注意く
ださい。
外観の汚れ
双眼鏡外観面に付いた汚れは、水や中性洗剤などを使い、柔らかい布等で軽く拭き取ってください。
※シンナー等の有機溶剤を使用しますと、塗装面が侵されることがありますので、ご使用にならないで
ください 。
保存
本双眼鏡を末永くご愛用いただくために、高温、多湿になる場所は避け、風通しの良い所に保存してくだ
さい。

JA-9 日本語
アフターサービス
• 故障の場合には、お買い上げいただいた販売店へご依頼ください。
• 保証期間中に修理をご依頼になるときには、保証書(販売店印、購入年月日が記入されているもの)
を提示してください。保証書がないと、保証期間中でも修理が有料になる場合があります。また、
保証期間中でも次のような場合は有料修理となります。
□使用上の誤り、または不当な修理や改造による故障および損傷。
□火災・公害・地震および風水害その他天災などを原因とする故障、損傷。
• 保証期間後の修理は原則として有償修理とさせていただきます。また、輸送費等はお客様にご負担
とさせていただきますのでご了承ください。
• 本製品の補修用部品は、製造打ち切り後 7年間を目安に保有していますが、期間以降であっても修
理可能な場合もありますので、弊社営業グループまでお問い合わせください。

JA-10
日本語
双眼鏡仕様
機種
項目
25x150MT-SX
25x150ED-SX 40x150ED-SX 15x80MT-SX
倍率 25 40 15
対物レンズ有効径(mm)150 150 80
射出瞳径(mm)6 3.8 5.3
明るさ 36 14.1 28.4
アイレリーフ(mm)18.6 15.0 15.7
実視界(°) 2.7 1.7 4
1000m 時での視界(m)47 30 70
眼幅調整範囲(mm)60 〜70 60 〜70 58 〜72
視度調整範囲(m-1)-7 〜+3 -7 〜+3 -4 〜+2
寸法 長さ(mm)962 946 510
幅(mm) 365 365 225
高さ(mm) 525 525 455
質量(kg)18.5 18.5 7.1

JA-11 日本語
外観図
25x150MT-SX/25x150ED-SX/40x150ED-SX
190
φ185
φ148
3×φ14
φ200
525
(430)
371
962 (25x150MT-SX, 25x150ED-SX)
946 (40x150ED-SX)
365

JA-12
日本語
15x80MT-SX
510
ij
225
(120)
58~72
(250)
(260)
(150)

EN-1 ENGLISH
Safety Precautions
This section describes important precautions to ensure safe and correct use of the product. Read
these precautions in advance and follow them carefully when using the product.
The indications in this section denote the following.
d
WARNING Denotes that misuse of the product ignoring this indication could lead to
death or serious injury.
d
CAUTION Denotes that misuse of the product ignoring this indication could lead to
disability or physical damage.
dWARNING
Do not use binoculars to look at the sun.
Doing so may result in vision loss.
dCAUTION
• Do not place the product on an unstable surface. It may fall or drop, resulting in injury.
• Do not swing the product around. Doing so may cause it to fall or drop, resulting in injury.
• To avoid the risk of re, do not place the product in an area where it will be exposed to direct
sunlight.
• With extended use, the rubber of the eyecups may deteriorate, resulting in skin irritation.
Consult a doctor if symptoms occur.
• To avoid the risk of choking, keep the polyethylene bag (packaging), etc. away from small
children.
• Only hold the binoculars by the tubes. Holding them by other parts like the objective lens
hood or eyepieces may result in damaging or dropping the binoculars.

EN-2ENGLISH
Features
The LARGE-SIZE BINOCULARS is equipped with 150 mm or 80 mm large-diameter objective lenses,
with each lens element implementing multi-layer anti-reective coating (Electron Beam Coating).
The result is a bright, clear image across the entire eld of view, with vivid resolution in daytime
and powerful light concentration at night.
In addition, the exceptionally corrosion-resistant materials and waterproof construction make
these binoculars ideal for viewing under even extreme environmental conditions such as at sea.
Names of Components
25x150MT-SX/25x150ED-SX/40x150ED-SX
Objective Lens Hood
Binoculars Tubes(Body)
Grip
Prism Box
Eyepieces
Binoculars
Mounting Screw
Elevation
Locking Lever
Mount Locking Bolts
(x3)
Azimuth Locking Lever
(rear)
Mount
(Optional Component)
Objective Lens Cap
Body Underside
Positioning Hook
Focusing Rings Rubber
Eyecups
Mount
Head
Slanted Positioning
Plate

EN-3 ENGLISH
15x80MT-SX
Objective Lens Cap
Eyecup Rubber
Diopter Scale Ring
Pan Fixing Knob
Upper Mount
Binoculars Body
Interpupillary Adjustment Scale
Tilt Fixing Knob

EN-4ENGLISH
Attach the Binoculars to the Mount
(except 15x80MT-SX)
1 Using the three mount locking bolts provided
with the mount, secure the mount to a stable
base such as a tripod.
dIf the mount is not rmly secured, the
mount and binoculars may fall o when
the binoculars are set on top, resulting in
damage or injury.
Mount
Locking
Bolts (x3)
Tripod
2 Align the indicator line on the mount with the 50°
position on the angle of elevation scale. Next,
tightly lock the elevation locking lever to prevent
the mount head from shifting in position.
dIf the mount is not secured tightly enough,
it may be destabilized when the binoculars
are set on top, causing them to fall o.
3 Position the binoculars so that the groove on the
bottom of the tubes covers the mount head, then
lock the body underside positioning hook of the
binoculars with the slanted positioning plate on
the mount head.
Body Underside
Positioning Hook
Slanted Positioning
Plate
4 Tighten the two screws on the mount head to fas-
ten the binoculars securely to the mount.
To remove the binoculars from the mount, rst perform 2, then loosen the the two binoculars
mounting screws and perform procedure in 3in reverse order.

EN-5 ENGLISH
Mounting the 15x80MT-SX
The 15x80MT-SX comes with the upper mount attached.
1 Use the supplied hexagonal mount locking bolts
to attach the lower mount securely to a tripod or
the like.
dIf the mount is not rmly secured, the
mount and binoculars may fall o when
the binoculars are set on top, resulting in
damage or injury.
Mount
Locking
Bolts
Tripod
Lower
Mount
2 Lock the tilt xing knob securely to prevent the
binoculars moving.
dIf the mount is not secured tightly enough,
it may be destabilized when the binoculars
are set on top, causing them to fall o.
Tilt Fixing Knob
3 Conrm that the pan xing knob is not rotated far
enough for the bolt to protrude into the upper
mount shaft hole.
4 Lower the upper mount attached to the binocu-
lars onto the lower mount shaft.
Pan Fixing
Knob

EN-6ENGLISH
5 Tighten the upper mount pan xing knob to se-
cure the binoculars to the lower mount.
When removing the binoculars from the lower mount, perform 2loosen the pan xing knob, and
then reverse 4.

EN-7 ENGLISH
Usage Instructions
Adjusting the Interpupillary Distance (IPD)
1 Bring your eyes up close to the rubber eyecups of
the eyepieces.
2 Place your hands on the right and left prism boxes
and slowly move the binoculars tubes farther or
closer together to adjust the interpupillary dis-
tance until both the right and left elds of view
overlap to form a single circular image.
Adjusting Focus
Turn the focusing rings to adjust the focus of each lens one at a time until the viewing object ap-
pears clear and distinct.
* Repeat the same process to adjust the focus for a new object.
Adjusting Elevation
1 Loosen the elevation locking lever to release the lock.
2 Place your hands on the grips of the binoculars and move them vertically to achieve the
desired angle.
3 Once the desired angle has been set, lock it with the elevation locking lever.
Adjusting Azimuth
1 Loosen the azimuth locking lever (or in the case of
the 15x80MT-SX, the pan xing knob) to release
the lock.
2 Place your hands on the grips of the binoculars
and move them horizontally to achieve the de-
sired angle.
3 Once the desired angle has been set, lock it with
the azimuth locking lever (or in the case of the
15x80MT-SX, the pan xing knob).
* The turning positions of both the elevation locking and azimuth locking levers can be ad-
justed by pulling the lever outward and then rotating it to the desired position.
This manual suits for next models
3
Table of contents
Languages:
Other FujiFilm Binoculars manuals

FujiFilm
FujiFilm 25x150ED-D User manual

FujiFilm
FujiFilm FUJINON HYPER-CLARITY HC8x42 User manual

FujiFilm
FujiFilm Glimpz 8.21 User manual

FujiFilm
FujiFilm 8x50 FMTR-D/N User manual

FujiFilm
FujiFilm Fujinon-Mariner 7x50WP-XL User manual

FujiFilm
FujiFilm TS12x28WP User manual

FujiFilm
FujiFilm FUJINON FMT Series User manual

FujiFilm
FujiFilm S1240 D User manual

FujiFilm
FujiFilm MARINER 7X50 WP-XL User manual

FujiFilm
FujiFilm KF Series User manual