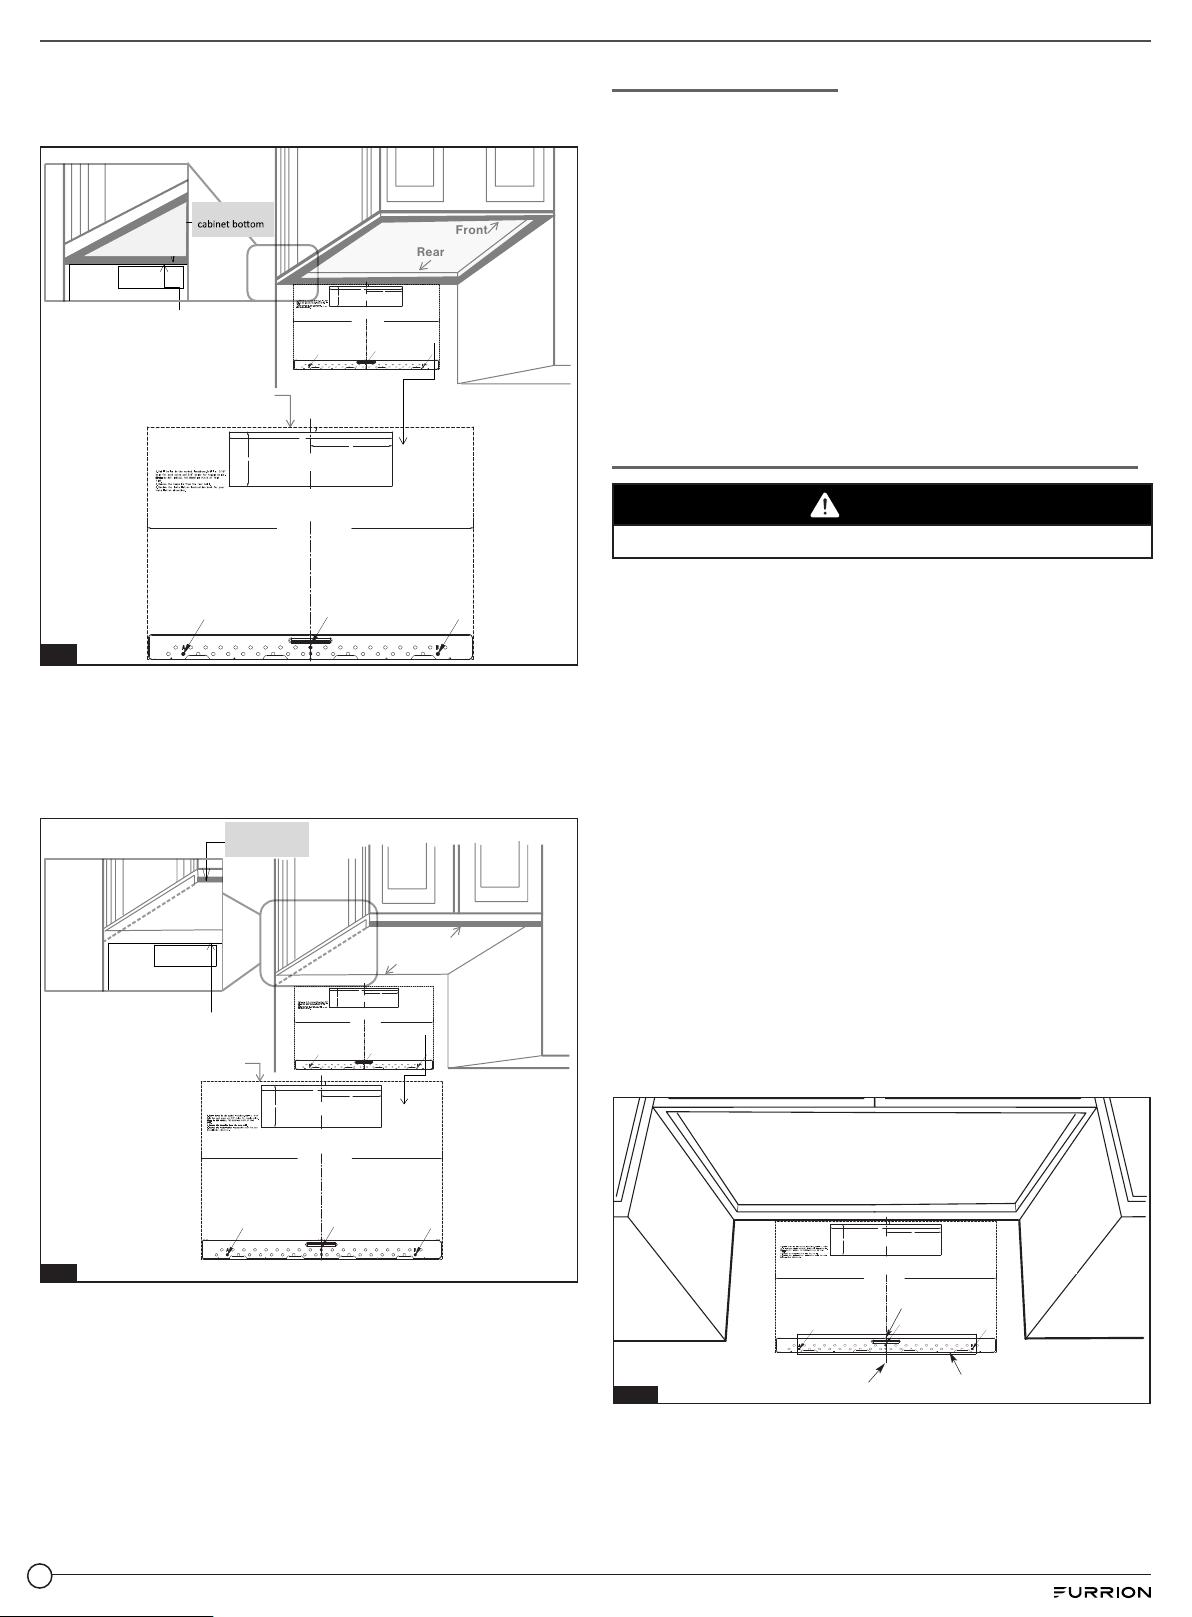
2. Beneath framed recessed cabinet (Fig. 4)
TOP LINE OF REAR WALL TEMPLATE must align with
the back frame of cabinet bottom.
F.CUT OUT FOR HORIZONTAL
OUTSI DE EXHAUST
CAUTION -IF EXHAUST ADAPTOR IS POSITIONED OUTSIDE
RECOMMENDED DIMENSION, GREASE-LADEN AIR WILL
DISCHARGE INTO HOUSE STRUCTURE
CUT HOLE THROUGH REAR WALL FOR EXHAUST ADAPTOR
TOP LINE OF REAR WALL TEMPATE
TOP LINE OF REAR WALL TEMPATE
Back frame of
Front
Rear
NOTE: IT IS VERY IMPORTANT TO
READ AND FOLLLOW THE DIRECTIONS
IN THE INSTALLIONS INSTRUCTIONS
BEFORE PROCEEDING WITH THIS
REAR WALL TEMPLATE.
This template is for locating the horizontal exhaust
cutout .Do not use this temlate for vertical or
recirculation exhaust.
1.Tape the template to the rear wall.
2. Use a saber or keyhole saw to cut out the
shaded area F.through the rear wall.
3. Remove the template from the rear wall.
4. Return to and proceed with the installation
instructions.
12"
4" K.CUT OUT FOR HORIZONTAL
OUTSIDE EXHAUST
3/8" TO EDGE
30" MINIMUM WIDTH REQUIRED
REAR WALL TEMPLATE
CAUTION -IF EXHAUST ADAPTOR IS POSITIONED OUTSIDE
RECOMMENDED DIMENSION,GREASE-LADEN AIR WILL
DISCHARGE INTO HOUSE STRUCTURE.
CUT HOLE THROUGH REAR WALL FOR EXHAUST ADAPTOR
NOTE:IT IS VERY IMPORTANT TO
READ AND FOLLOW THE DIRECTIONS
IN THE INSTALLATION INSTRUCTIONS
BEFORE PROCEEDING WITH THIS
REAR WALL TEMPLATE.
This Rear Wall Template serves to position the bottom
mounting plate and to locate the horizontal exhaust outlet.
1.Use a level to check that the template is positioned
accurately.
2.Locate and mark at least one stud on the left or right side
of the centerline.
Locate and mark holes to align with holes in the
mounting plate.
IMPROTANT:
LOCATE AT LEAST ONE STUD ON EITHER SIDE OF
THE CENTERLINE.
MARK THE LOCATION FOR 2 ADDITIONAL, EVENLY
SPACED TOGGLE BOLTS IN THE MOUNTING PLATE
AREA.
Trim the rear wall template along the dotted line.
ACB
6"
12"
4"
K.CUT OUT FOR HORIZONTAL
OUTSIDE EXHAUST
3/8" TO EDGE
24" MINIMUM WIDTH REQUIRED
REAR WALL TEMPLATE
CAUTION -IF EXHAUST ADAPTOR IS POSITIONED OUTSIDE
RECOMMENDED DIMENSION,GREASE-LADEN AIR WILL
DISCHARGE INTO HOUSE STRUCTURE.
CUT HOLE THROUGH REAR WALL FOR EXHAUST ADAPTOR
NOTE:IT IS VERY IMPORTANT TO
READ AND FOLLOW THE DIRECTIONS
IN THE INSTALLATION INSTRUCTIONS
BEFORE PROCEEDING WITH THIS
REAR WALL TEMPLATE.
This Rear Wall Template serves to position the bottom
mounting plate and to locate the horizontal exhaust outlet.
1.Use a level to check that the template is positioned
accurately.
2.Locate and mark at least one stud on the left or right side
of the centerline.
Locate and mark holes to align with holes in the
mounting plate.
IMPROTANT:
LOCATE AT LEAST ONE STUD ON EITHER SIDE OF
THE CENTERLINE.
MARK THE LOCATION FOR 2 ADDITIONAL, EVENLY
SPACED TOGGLE BOLTS IN THE MOUNTING PLATE
AREA.
Trim the rear wall template along the dotted line.
A
C
B
6"
Fig. 4
3. Beneath framed recessed bottom cabinet with front
overhang (Fig. 5)
TOP LINE OF REAR WALL TEMPLATE must align with
below cabinet bottom the same distance as the front
overhang of cabinet bottom.
F.CUT OUT FOR HORIZONTAL
OUTSI DE EXHAUST
CAUTION -IF EXHAUST ADAPTOR IS POSITIONED OUTSIDE
RECOMMENDED DIMENSION, GREASE-LADEN AIR WILL
DISCHARGE INTO HOUSE STRUCTURE
Front overhang of
cabinet bottom
Front
Rear
CUT HOLE THROUGH REAR WALL FOR EXHAUST ADAPTOR
NOTE: IT IS VERY IMPORTANT TO
READ AND FOLLLOW THE DIRECTIONS
IN THE INSTALLIONS INSTRUCTIONS
BEFORE PROCEEDING WITH THIS
REAR WALL TEMPLATE.
This template is for locating the horizontal exhaust
cutout .Do not use this temlate for vertical or
recirculation exhaust.
1.Tape the template to the rear wall.
2. Use a saber or keyhole saw to cut out the
shaded area F.through the rear wall.
3. Remove the template from the rear wall.
4. Return to and proceed with the installation
instructions.
12"
4"
K.CUT OUT FOR HORIZONTAL
OUTSIDE EXHAUST
3/8" TO EDGE
30" MINIMUM WIDTH REQUIRED
REAR WALL TEMPLATE
CAUTION -IF EXHAUST ADAPTOR IS POSITIONED OUTSIDE
RECOMMENDED DIMENSION,GREASE-LADEN AIR WILL
DISCHARGE INTO HOUSE STRUCTURE.
CUT HOLE THROUGH REAR WALL FOR EXHAUST ADAPTOR
NOTE:IT IS VERY IMPORTANT TO
READ AND FOLLOW THE DIRECTIONS
IN THE INSTALLATION INSTRUCTIONS
BEFORE PROCEEDING WITH THIS
REAR WALL TEMPLATE.
This Rear Wall Template serves to position the bottom
mounting plate and to locate the horizontal exhaust outlet.
1.Use a level to check that the template is positioned
accurately.
2.Locate and mark at least one stud on the left or right side
of the centerline.
Locate and mark holes to align with holes in the
mounting plate.
IMPROTANT:
LOCATE AT LEAST ONE STUD ON EITHER SIDE OF
THE CENTERLINE.
MARK THE LOCATION FOR 2 ADDITIONAL, EVENLY
SPACED TOGGLE BOLTS IN THE MOUNTING PLATE
AREA.
Trim the rear wall template along the dotted line.
AC B
6"
12"
4"
K.CUT OUT FOR HORIZONTAL
OUTSIDE EXHAUST
⅜" TO EDGE
30" MINIMUM WIDTH REQUIRED
REAR WALL TEMPLATE
CAUTION -IF EXHAUST ADAPTOR IS POSITIONED OUTSIDE
RECOMMENDED DIMENSION,GREASE-LADEN AIR WILL
DISCHARGE INTO HOUSE STRUCTURE.
CUT HOLE THROUGH REAR WALL FOR EXHAUST ADAPTOR
NOTE:IT IS VERY IMPORTANT TO
READ AND FOLLOW THE DIRECTIONS
IN THE INSTALLATION INSTRUCTIONS
BEFORE PROCEEDING WITH THIS
REAR WALL TEMPLATE.
This Rear Wall Template serves to position the bottom
mounting plate and to locate the horizontal exhaust outlet.
1.Use a level to check that the template is positioned
accurately.
2.Locate and mark at least one stud on the left or right side
of the centerline.
Locate and mark holes to align with holes in the
mounting plate.
IMPROTANT:
LOCATE AT LEAST ONE STUD ON EITHER SIDE OF
THE CENTERLINE.
MARK THE LOCATION FOR 2 ADDITIONAL, EVENLY
SPACED TOGGLE BOLTS IN THE MOUNTING PLATE
AREA.
Trim the rear wall template along the dotted line.
ACB
6"
TOP LINE OF REAR WALL TEMPATE
TOP LINE OF REAR WALL TEMPATE
Template must be at the same
distance below the cabinet bottom as
the FRONT EDGE OVERHANG.
Fig. 5
Your cabinets may have decorative trim that interferes with
the microwave installation. Remove the decorative trim to
install the microwave properly and to make it level.
Microwave Leveling
Use a level to make sure the cabinet bottom is level. If the
cabinets have a front overhang only, with no back or side
frame, top line of rear wall template must align with below
cabinet bottom, the same distance as the front overhang
depth. This will keep the microwave level.
1. Measure the inside depth of the front overhang.
2. Draw a horizontal line on the back wall an equal distance
below the cabinet bottom as the inside depth of the front
overhang.
3. For this type of installation with front overhang only, align
top line of rear wall template with this horizontal line, not
touching the cabinet bottom as described in “Aligning Top
Line of Rear Wall Template follows”.
Aligning Top Line of Rear Wall Template (Fig. 6)
CAUTION
Wear gloves to avoid cutting fingers on sharp edges.
1. Using a tape measure, draw a vertical line on the wall at
the center of the 30” (76.2cm) wide space.
2. Tape the rear wall template on the cabinet wall, align the
center markers on the rear wall template to the centerline
on wall, making sure it is level and that the top line of the
rear wall template is butted up against the bottom edge of
the upper cabinet.
3. According to the shape of cabinet, the location of the
wall template is compliant with the content part of
“Determining top line of rear wall template location under
your cabinet”.
4. While taping the rear wall template on the wall draw
circles on the wall at hole A,B,C (See Fig. 6 / actual plate
marked with arrows). THREE HOLES MUST BE USED
FOR MOUNTING. (If there are 2-wall studs in right and
left side based on center line Four hole must be used for
mounting)
5. Remove the rear wall template and check the marking
based on the actual mount plate (centerline, hole A,B,C).
6. Drill holes on the circle marks (A, B, C). Drill a ⁄” hole at C
for wood screw and two ⅝” holes at A, B for toggle bolts .
NOTE: DO NOT MOUNT THE PLATE AT THIS TIME.
Are a E
Center line
Cent r l ine notches
e
12"
4"
K.CUT OUT FOR HORIZONTAL
OUTSIDE EXHAUST
3/8" TO EDGE
30" MINIMUM WIDTH REQUIRED
REAR WALL TEMPLATE
CAUTION -IF EXHAUSTADAPTORIS POSITIONED OUTSIDE
RECOMMENDED DIMENSION,GREASE-LADEN AIR WILL
DISCHARGE INTOHOUSE STRUCTURE.
CUT HOLE THROUGH REAR WALL FOR EXHAUST ADAPTOR
NOTE:IT IS VERY IMPORTANT TO
READ AND FOLLOW THE DIRECTIONS
IN THE INSTALLATION INSTRUCTIONS
BEFORE PROCEEDING WITH THIS
REAR WALL TEMPLATE.
This Rear Wall Template serves to position the bottom
mounting plate and to locate the horizontal exhaust outlet.
1.Use a level to check that the template is positioned
accurately.
2.Locate and mark at least one stud on the left or right side
of the centerline.
Locate and mark holes to align with holes in the
mounting plate.
IMPROTANT:
LOCATE AT LEAST ONE STUD ON EITHER SIDE OF
THE CENTERLINE.
MARK THE LOCATION FOR 2 ADDITIONAL, EVENLY
SPACED TOGGLE BOLTS IN THE MOUNTING PLATE
AREA.
Trim the rear wall template along the dotted line.
ACB
6"
Fig. 6
5


M Service manual")