Fytech FY-201735A User manual

Owner’s Manual
The equipment is approved by following car manufacturers(China)
FY-201735A

This manual contains safety and operating instructions. Read it carefully before using or
servicing the device. Do not neglect to do this as improper handling may result in
personal injury and damage to the device.
Note!
1. The safety precaution is also printed on the top panel of the device. Make sure the
device is to be used under right circumstances and conditions. Otherwise, it may damage
the charger or devices connected to the charger, and injury to persons.
2. During the charge, the battery must be placed in a well ventilated area. Avoid flames
and sparks
3. To maintain the factory original performance of your device, use only
manufacturer suggested replacement parts. Model and serial number required
when ordering parts from your local distributor. Do not use the charge if it has
been dropped or damaged. Make sure the exterior appearance is in good
condition without any obvious damages, to avoid short circuit and other problems
caused by damage to the internal components.
4. The charger is designed for charging rechargeable batteries only. Do not use to charge
small batteries or non rechargeable batteries, otherwise it may cause the battery and
charger damage or even explosion. In case of the battery acid contact with the eyes or
skin, rinse well with water and see a doctor as soon as possible.
Caution!
1. Risk for electrical shock! All electrical connections must be made by a qualified
electrician. Make sure that the facility supply voltage and frequency are the same as
shown on the charger name plate. Make sure the supply cable also meets the
specifications of the charger unit.
2. Make sure the red clamp to the (+) and black clamp to the (-) of the battery. Keep the
charger clean.
3. Frequently inspect all power cables for damage or bare wiring. Replace cable
immediately if damaged.
4. Turn off the charger and disconnect the charger from the mains when not in use.
5. Disconnect input power supply before installing, checking, cleaning or changing parts.
6. Only qualified persons should install, operate, maintain and repair this charger. Consult

the manufacturer or supplier before servicing.
7.Keep charger as far away from children as practical. Properly install and ground this
equipment. Electric shock can kill.
To prevent dangers and accidents, a person to keep an eye on the device and battery
during the whole charging process is strictly required. Do not place or operate the
charger near water, in wet locations or outdoors.
Important!
1. Fully use the length of charging cables to keep the charger away from the battery when
connecting the charger to the battery.
2. Never place the charger on top of a battery.
3. Keep well-ventilated and dry condition.
4. Make sure the power supply and charging clamps is properly connected
5. Press Start/Stop button and disconnect the clamps to stop the charger during charging
process. Do not disconnect the power by simply unplugging the charger. After charging,
disconnect the charger from the mains, then disconnect the clamps from the car body and
then disconnect the clamp from the battery, in the indicated order.
6. It will take a longer time for the battery to be fully charged as there will be a relatively
longer time for floating charge.
7. Never attempt to charge a damaged or short-circuited battery.
Operation
Before starting the charger, it is very important to ensure that:
1. The facility supply voltage is the same as shown on the charger name plate.
2. The charger is correctly connected both to the mains and battery.
3. The battery type, battery voltage and operating mode are correctly selected. Otherwise
it may cause damage to the vehicle or charger.
This charger has 4 work modes, including 1 hidden mode.

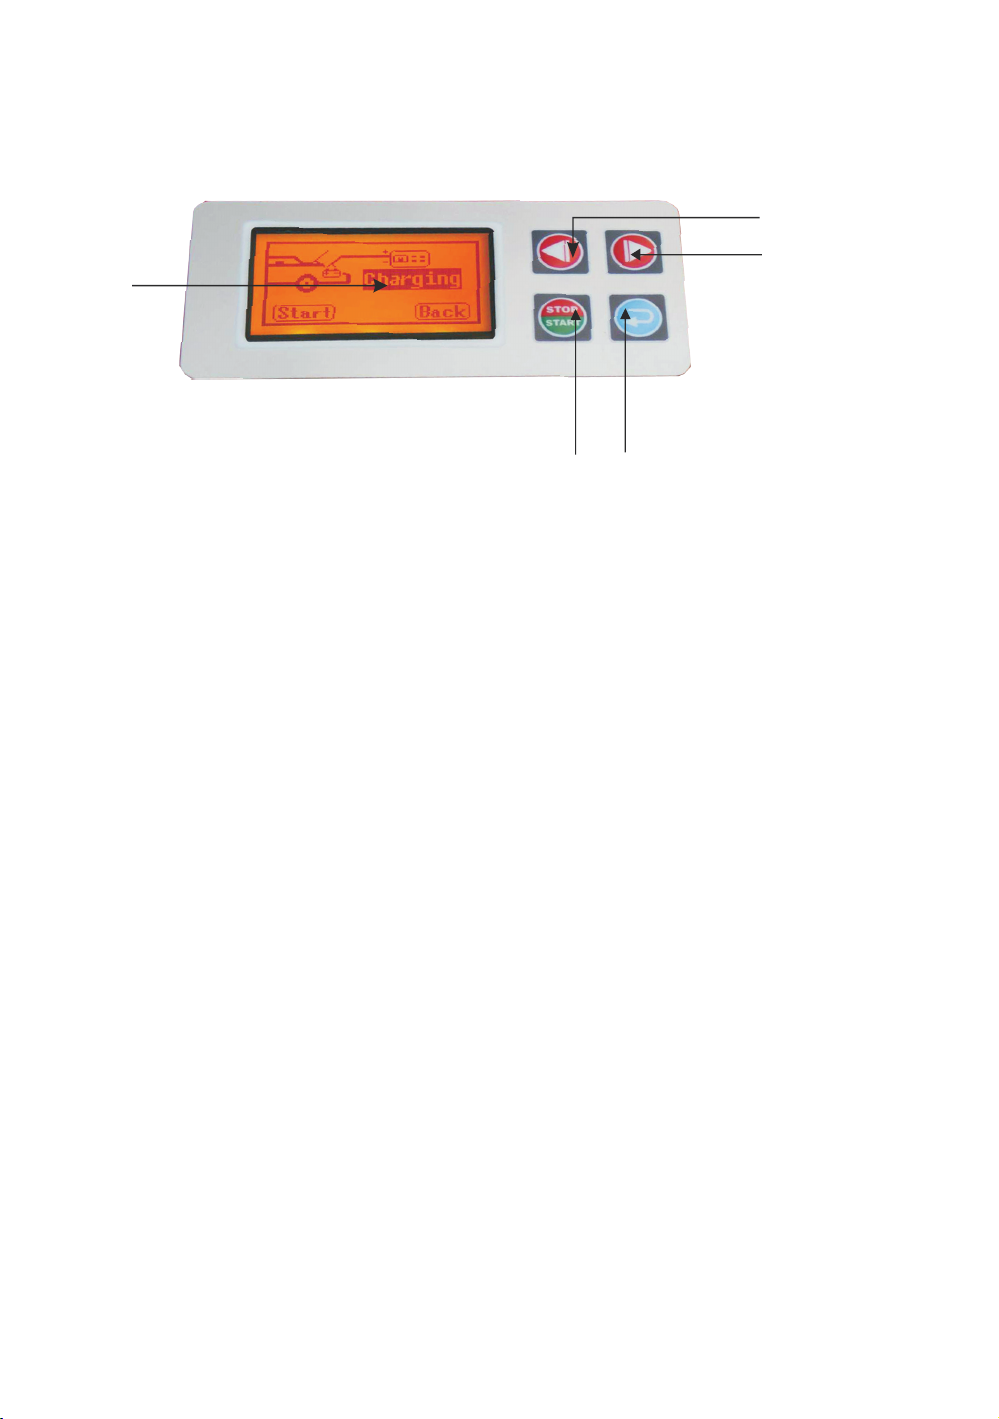
Charging Mode: This mode charges the selected battery type under normal conditions.
The charger will automatically change its charging cycle depending on the open-circuit
voltage of the battery. The charger will stop charging the battery automatically once the
battery is fully charged. It is very important that the correct battery type is selected to
protect both the battery and the charger.
Programming Mode: This mode provides a stable voltage source for the vehicle’s
electrical system allowing the electronics to be diagnosed and programmed in a safe
environment. Before selecting the programming mode, please ensure that the vehicles
battery has been fully charged to prevent instabilities in current due to charging. The
charger’s output voltage can be changed from 12 to 14.8V manually, please select the
appropriate voltage according to the service manual of the vehicle. Please note that this
charger has a maximum output of 35A, make sure that the load does not exceed this
value or damage may occur to the electrical system of the vehicle.
Showroom Mode: This mode provides power to a vehicle that is used for exhibition or
demonstration purposes to prevent deeply discharging or damaging the vehicles battery.
When this mode is selected, the vehicles battery will be maintained and kept fully charged.
Repair Mode (Hidden Mode): Once the charging mode is selected, this mode functions
automatically when the open-circuit voltage of battery is in a certain range. Batteries that
have not been used for long periods of time will be recovered by this mode.
Replacement mode: This mode should be used when the battery of a vehicle needs to be
replaced and the supply of power to the vehicle cannot be interrupted. In this mode, the
charger will supply power to the vehicle in the place of the battery. When replacing the
battery, ensure that all ancillary features are turned off to reduce the load on the system
to a minimum.
Alarm
Poor connection alarm: Indicates that the clamps and connections are not properly
secure. If this alarm still indicates poor connections once the connections have been
properly secured and the battery voltage is above 5V, remove the clamps and clean the
electrodes, and reconnect the clamps with the electrodes. If the alarm is still indicating
poor connections, please contact your distributor for further information.
High temperature alarm: Indicates that the temperature is too high for safe operation. In
this case remove the connecting clamps. DO NOT turn off the charger. It needs the built-in
cooling fan to cool the charger faster. The alarm will be canceled once the temperature
has returned to normal. If the alarm is indicated when first connecting the charger or the
temperature is not high, please do not attempt to use the charger and contact your
distributor for further information.

Controls
Display screen
1. Start/Stop
2. Return
3. Navigation button-Right
4. Navigation button-Left
Languages: Press the two buttons Start/Stop + Navigation Right at the same
time for switching between English and Chinese.
1. Overcharge Protection: During the charging process, the charger will automatically
identify the status of battery to determine whether it is full or not to prevent damage to
the battery caused by overcharging.
2. Overheat Protection: The system will automatically shut off the charger when a pre-
programmed temperature is reached. Do not turn off the charger while the cooling fan is
activated.
3. Under Voltage Protection: The system will automatically shut off the charger when the
input voltage is lower than required.
4. Short-circuit Protection: The system will automatically shut off the charger when
damage or short-circuit is detected.
1
5
4
23
5. Reverse Polarity Protection: The charger’s display screen will indicate if the clamps are
incorrectly connected.

Operation:
During the charging process, the charger will automatically adjust the charging voltage
and current to carry out the proper charging curve to the battery.
Below is an operation procedure for setting the mode by hand:
Charging Mode:
2.Set battery type to GEL,AGM or WET.
3. Set battery type to either WET or EFB 4. Select Work mode to Charging Mode
1.Battery voltage automatically
set to either 12V
Set by hand is also available.
Select other Work Modes:
Programming Mode Showroom Mode Replacement Mode
Using Up and Down Interface
buttons to adjust
voltage for programming
from 12- 14.8V

Technical Specification
Characteristic Units FY- 201735 A
Input Voltage
V
220 -240 V
Frequency Hz 50/60
Input Power
W
900 W
Max Current
RMS 35A
Charging Voltage
v
12
Programing PG VA
12~16V/2~35A
MAH
Ah
10~1000
Dimension cm 28×26.5×10
Weight Kg 2.5
Key Tips 1: Power connections must be equipped with circuit breaker!
Key Tips 2: User must follow the user manual and charger’s guidance to operate!
Key Tips 3: Charger must be serviced and maintained by professionals!
Key Tips 4: Must choose the proper battery type among Wet, AGM and GEL, in case of
potential loss such as battery damage and vehicle damage.
Key Tips 5: EFB battery and vehicle must be apart during charge process, in case of
vehicle damage!
Key Tips 6: Battery must be separated from vehicle during recovery process, in case of
vehicle damage!
Key Tips 7: Important! This charger cannot replace battery completely. Backup battery
must be connected during battery replacement!
Guard against danger
To prevent dangers and accidents, a person to keep an eye on the device and battery
during charging process is strictly required.

The equipment is approved by following car manufacturers (China)
Table of contents
Other Fytech Batteries Charger manuals