Gates EM7 CINE User manual

Page 1
EM7 CINE Underwater Monitor Housing
Setup, Use, and Care Guide

Page 2
Copyright 2023, Gates Underwater Products, Inc.
Photos © Gates Underwater Products
This manual and current revision is available in 8.5 x 11 size and full color at
GatesHousings.com
Gates Underwater Products, Inc.
13685 Stowe Drive
Poway, California 92064 USA
Phone: 858.391.0052
Web: GatesHousings.com

Page 3
Table of Contents
Setup, Use, and Care Guide.............................................1
1: Introducing the EM7 CINE................................................4
Features...........................................................................4
Warranty Disclaimer .........................................................4
Unpacking the EM7 CINE.................................................5
Cautions...........................................................................5
2: EM7 CINE Setup..............................................................6
Preparing the SmallHD CINE 7 LCD.................................6
Secure EM7 CINE to Camera Housing.............................6
Open the Housing Shell....................................................7
Insert CINE 7 LCD into to Rear Shell................................8
Visual Check ....................................................................9
Connect to Camera Housing...........................................10
EM7 CINE Controls ........................................................11
EM7 CINE Attaching Trim Float......................................12
EM7 CINE Battery Shell Installation (Optional)...............13
EM7 CINE Cable Replacement ......................................14
3: EM7 CINE Maintenance.................................................15
Housing Care and Maintenance .....................................15
O-Ring Care and Maintenance.......................................15
4: Customer Support ..........................................................16

Page 4
1: Introducing the EM7 CINE
Congratulations on owning a new Gates product: the EM7 CINE Underwater Monitor
Housing (EM7 CINE) for the SmallHD CINE 7 LCD. You’ve selected an underwater
imaging tool that will provide years of value and reliable service.
Please read through this entire guide to learn about the EM7 CINE so you can get the
most out of this imaging tool. In this section, we’ll introduce you to the features of the
monitor housing so you can get started.
Features
The EM7 CINE has several key features:
✓'Bulletproof' construction. Gates legendary reliability is inherent in the EM7 CINE:
machined aluminum shell, stainless hardware and reliable mechanical controls.
✓Designed specifically for the SmallHD CINE 7 LCD to create the smallest, most
compact and low-profile Underwater Monitor housing.
✓Bright 1800 nit LCD readily viewed underwater.
Warranty Disclaimer
The EM7 CINE is a tool that, like any tool, requires knowledge and understanding to be
effective.
Your responsibility is to learn the proper setup, use and care of the monitor housing.
Because we can only provide you with the information necessary to do so, Gates does
not warrant the contents of your housing (e.g. electronics) under any circumstance.
We warrant the EM7 CINE as an image acquisition tool for a period of 2 years.
If you have any questions about the setup, use and care of the EM7 CINE, contact
Gates directly. Details are in section 4.

Page 5
Unpacking the EM7 CINE
After you remove the monitor housing from its shipping container, carefully inspect it for
missing parts or damage that may have occurred during shipment. If you discover any
discrepancies, contact Gates or your dealer immediately for assistance.
Standard Parts
✓EM7 CINE External Monitor Housing
✓EM7 CINE Shade
✓Dovetail Swivel Mount. May be attached to EM7 CINE
✓Spare O-Ring
✓O-Ring Removal Tool
✓D-Tap Power Adapter Cable
✓Trim Float
Optional Parts
✓Shade Extension(s) (Additional Shade Extensions are stackable and available for
purchase.)
✓Extended Battery Shell. To accommodate self-powering the CINE 7 LCD with 2x
Sony L-Series batteries or equivalent.
Cautions
USER RESPONSIBILITY. This Setup, Use and Care guide contains important detailed
procedures for setup and use of the EM7 CINE. It is the user’s responsibility to read,
understand and employ these procedures. Failure to do so can result in poor or non-
operation of the monitor housing and may void your warranty.
Contact Gates if you have questions regarding this manual or using the EM7 CINE.

EM7 CINE Setup Page 6
2: EM7 CINE Setup
The EM7 CINE requires complete and thorough setup prior to use.
Preparing the SmallHD CINE 7 LCD
✓Auto boot. Setup the CINE 7 LCD to boot when power is present at the rear
connector.
MENU →POWER →AUTO RECOVER →ON
✓Pages. Refer to the CINE 7 User Guide for details on the ‘Pages’ feature. The LCD
will boot into a default page that must be set, as follows:
* With the LCD on, navigate to the ‘page’ you wish to use as default with your Gates
camera housing.
* Turn off the LCD via the POWER button. Then power back on. This ‘sets’ this
page as default for any auto boot.
Set Auto Recover here
to ON

EM7 CINE Setup Page 7
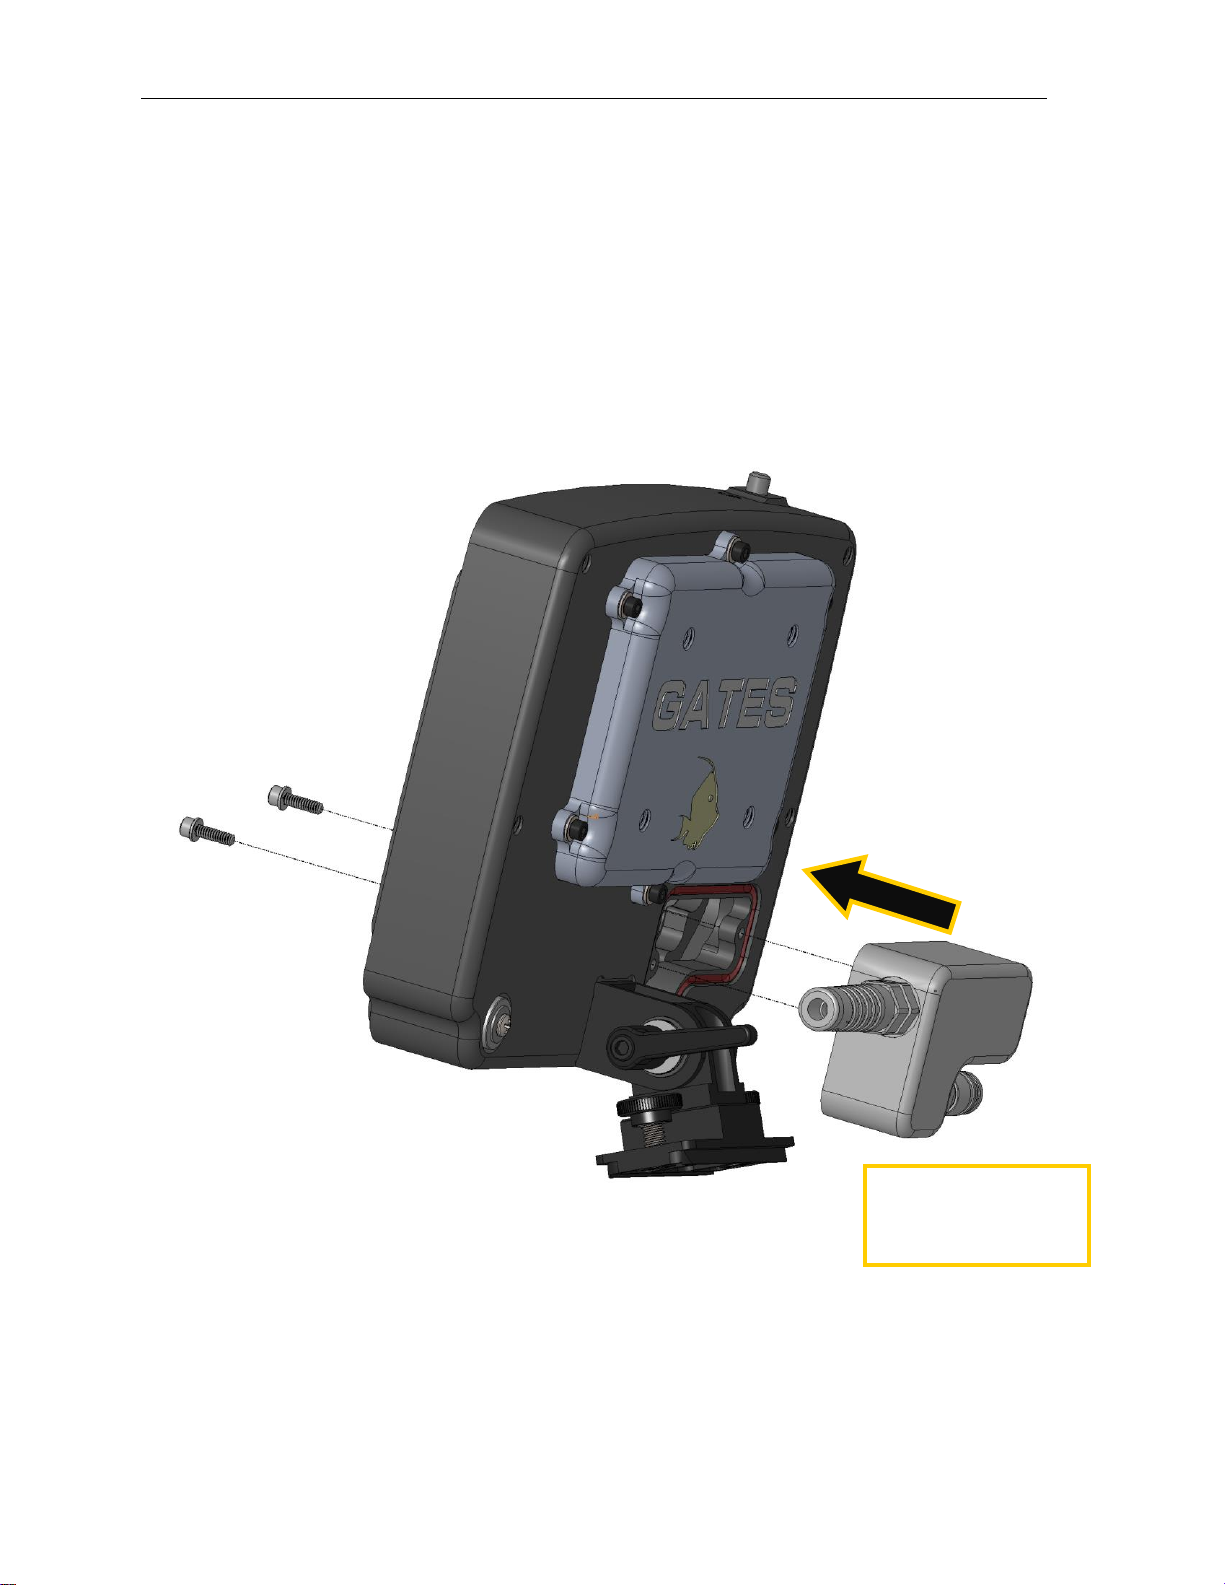
Secure EM7 CINE to Camera Housing
✓EM7 CINE Setup is best conducted with it secured to a camera housing.
✓Refer to the image for a typical mounting of the EM7 CINE to a housing.
Open the Housing Shell
✓Loosen four screws using the 5/32 ball driver. These screws are captive and will
not remove. Refer to the image below.
✓Remove the front shell to expose the LCD and power connector in the rear shell.
Loosen four screws and
then remove the front
shell.
Slide Monitor Dovetail
onto Housing and
tighten thumbscrews.
NOTE: EM503 shown.

EM7 CINE Setup Page 8
Insert CINE 7 LCD into to Rear Shell
✓First, connect video and power connectors as shown. Then seat into the rear
shell.
✓Make a visual check to verify the orange o-ring is clean and free of any foreign
matter.
✓Install the front cover.
✓Tighten fours screws as shown in the image below. Use a cross-pattern, and DO
NOT OVERTIGHTEN.
1
Then insert the CINE 7 LCD
into the rear shell. It will mate
flush. Inspect the o-ring is
clean.
Mate the front shell and
tighten 4 screws. DO
NOT overtighten.
First, connect
power and video
connectors
here.
2

EM7 CINE Setup Page 9
Visual Check
✓Inspect the gap where front and rear shells meet. Ensure it is even all around.
Refer to the image below, shown in highlight BLUE.
After closing, inspect the
seal line around the
housing, BLUE highlight. It
should be even with no
gaps.

EM7 CINE Setup Page 10
Connect to Camera Housing
✓Insert the monitor cable into the housing as shown below. Route the cable inside
the main housing to connect with the camera.
Connect BNC connector to the camera SDI output. Then connect power via the D-
Tap Power Adapter Cable (included) to an appropriate D-Tap output. Refer to your
Gates housings SU&C Guide for more details on specific camera connections.
Insert the EM7 CINE Monitor
Cable into the camera housing
as shown. Tighten the brass
collar until snug.

EM7 CINE Setup Page 11
EM7 CINE Controls
✓Power. Located on the top left is the On / Off pushbutton. See previous section for
setting up the EM7 CINE for booting into a default page.
On / Off Power Control

EM7 CINE Setup Page 12
EM7 CINE Attaching Trim Float
✓EM7 CINE kit includes a trim float that, when installed, makes the entire EM7 CINE
External Monitor neutrally buoyant. This applies only to the basic configuration
shown (i.e., without the optional battery shell)
Tighten the screws until finger tight. Do not overtighten.
Attach the Trim Float with
two thumbscrews.

EM7 CINE Setup Page 13
EM7 CINE Battery Shell Installation (Optional)
✓EM7 CINE options include an extended battery shell to accommodate 2x Sony-type
L-series batteries up to size NP-F970 or equivalent.
✓To install, remove 6 screws on the low-profile shell as shown below, replace the
shell with the larger battery shell, and secure with screws. Tighten firmly but do not
overtighten. Also shown is an additional buoyancy float, included with the optional
battery shell.
Remove 6 screws
and then remove the
low-profile shell.
Install the optional battery
shell with 6 screws. Tighten
firmly, but do not overtighten.
Also shown is an additional
buoyancy block for this
configuration.
EM7 CINE Setup Page 14
EM7 CINE Cable Replacement
✓Replacing the EM7 CINE cables is straightforward. Referring to the image below,
use a 9/64 hex tool to remove 2 screws securing the Cable Shell to the housing
shell. Carefully remove the cable with bulkhead adapter and replace with new.
Tighten the screws until snug. Do not overtighten.
EM7 CINE cable
shell only shown for
clarity.

EM7 CINE Maintenance Page 15
3: EM7 CINE Maintenance
Housing Care and Maintenance
Proper care of your Gates housing is important to provide you reliable operation and
long life. You’ll find all the guidelines in the “Housing Care and Maintenance” document
included with your Gates housing. You can also find it on Gates web site at
www.GatesHousings.com.
O-Ring Care and Maintenance
Your Gates EM7 CINE has 1 serviceable o-ring. It is located on the main housing the
front shell mates. Its color is orange.
Servicing the o-rings is easy and covered in the “Housing Care and Maintenance”
document in this package. It can also be found on the Gates website at
www.gateshousings.com.
CAUTION: Do not lubricate the large orange o-ring! It is a special silicone o-ring
and can be damaged by petroleum-based lubricants.
CAUTION: Never use metal tools or objects for removing o-rings!

Table of contents
Other Gates Camera Accessories manuals

Gates
Gates Z3 Housing User manual

Gates
Gates AX700 User manual

Gates
Gates EX1R User manual

Gates
Gates ALEXA 35 User manual

Gates
Gates Pro Action User manual

Gates
Gates C300 User manual

Gates
Gates DEEP WEAPON Upgrade User manual

Gates
Gates CX700 User manual

Gates
Gates AVCCAM AG-3DA1 Guide

Gates
Gates AX100 User manual


Popular Camera Accessories manuals by other brands


Trojan
Trojan GC2 48V quick start guide

Calumet
Calumet 7100 Series CK7114 operating instructions

Ropox
Ropox 4Single Series User manual and installation instructions

Cambo
Cambo Wide DS Digital Series Main operating instructions

Samsung
Samsung SHG-120 Specification sheet

Ryobi
Ryobi BPL-1820 Owner's operating manual