Gates XA10 User manual

p
XA10 and HFG10 Underwater Housings
Setup, Use, and Care Guide

Introducing the XA10 / HF-G10 Page 2
Copyright 2011, Gates Underwater Products, Inc.
Last document revision: May 2011
Product photos by Lee Petersen.
This manual and current revision is available in 8.5 x 11 size and full color at
http://www.gateshousings.com/documentation.html
Gates Underwater Products, Inc.
13685 Stowe Drive
Poway, California 92064 USA
Phone:800.875.1052 toll-free in the U.S.
858.391.0052 outside the U.S.
Fax: 858.391.0053
Web:
GatesHousings.com

Introducing the XA10 / HF-G10 Page 3
Table of Contents
Setup, Use, and Care Guide.............................................. 1
1: Introducing the XA10 / HF-G10 ......................................... 4
Features............................................................................. 4
Warranty Disclaimer .......................................................... 4
Unpacking the XA10 / HF-G10 .......................................... 5
2: Cautions............................................................................. 6
3: The XA10 / HF-G10 Setup................................................. 7
XA10 / HF-G10 Housing Preparation ................................ 7
Camera Preparation .......................................................... 8
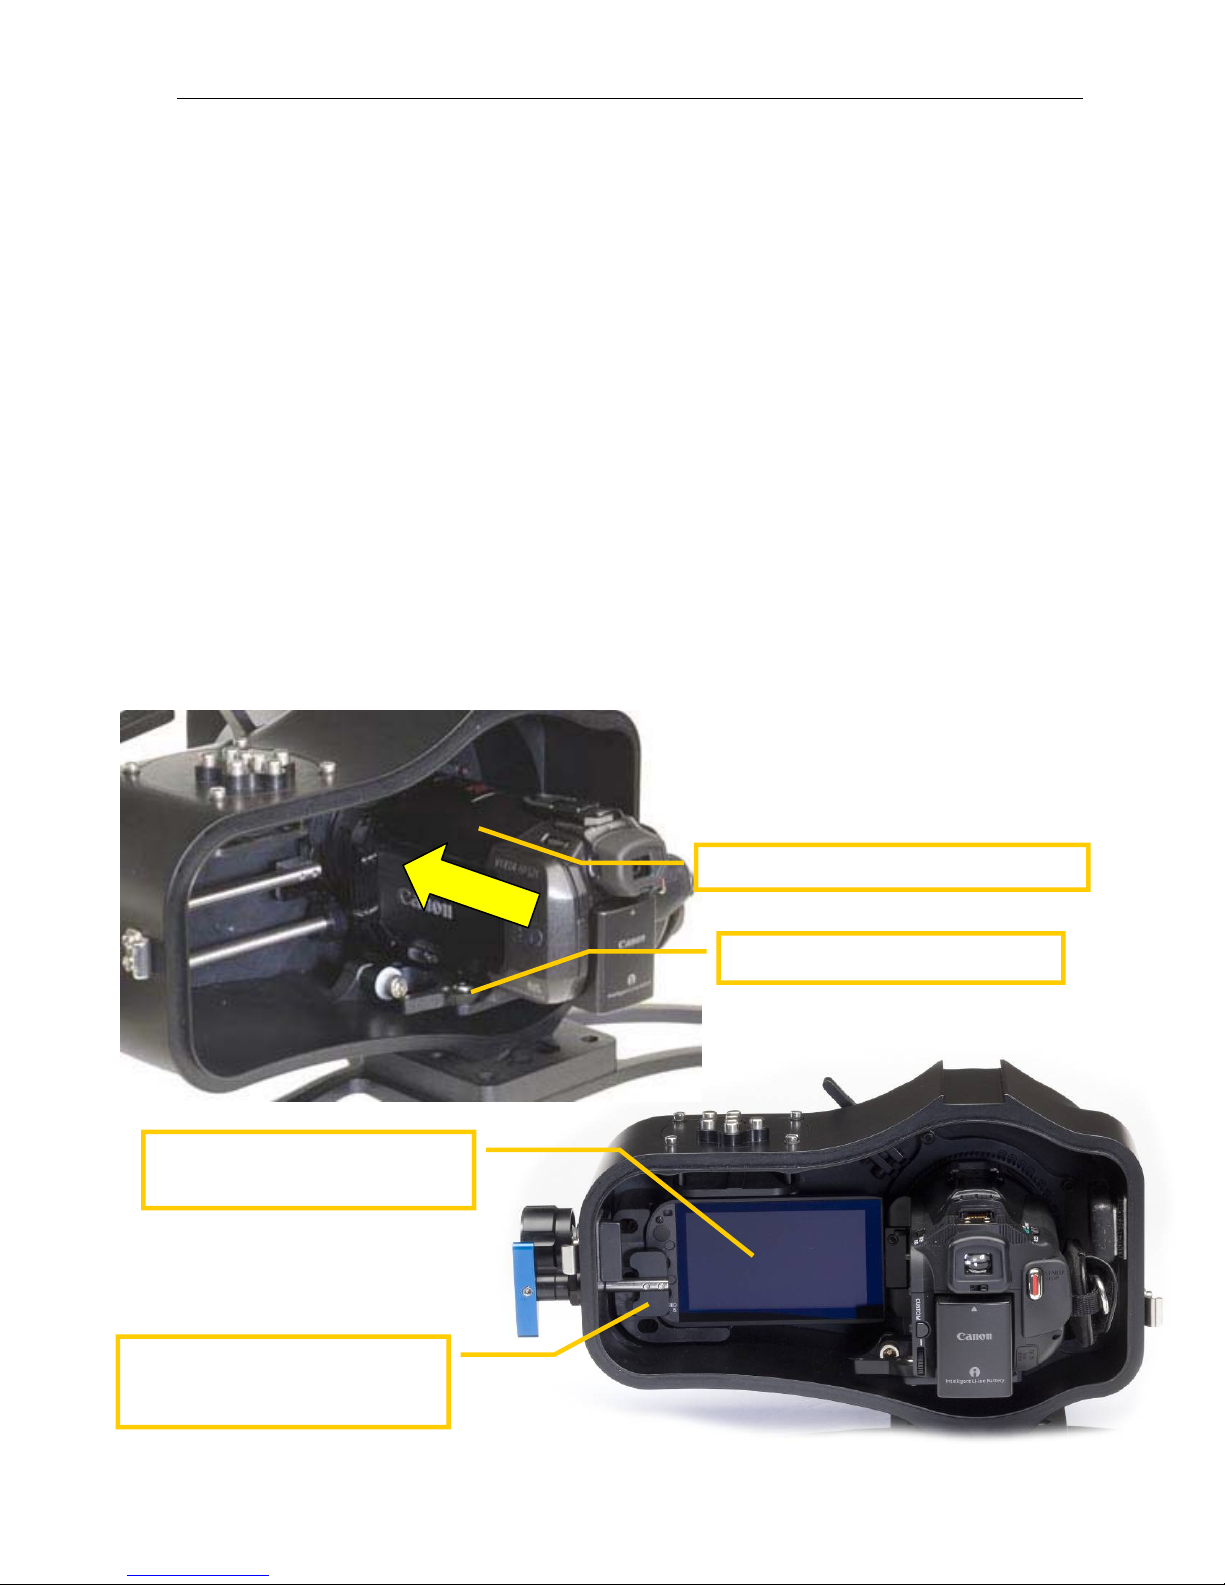
Installing the Camera into the Housing.............................. 9
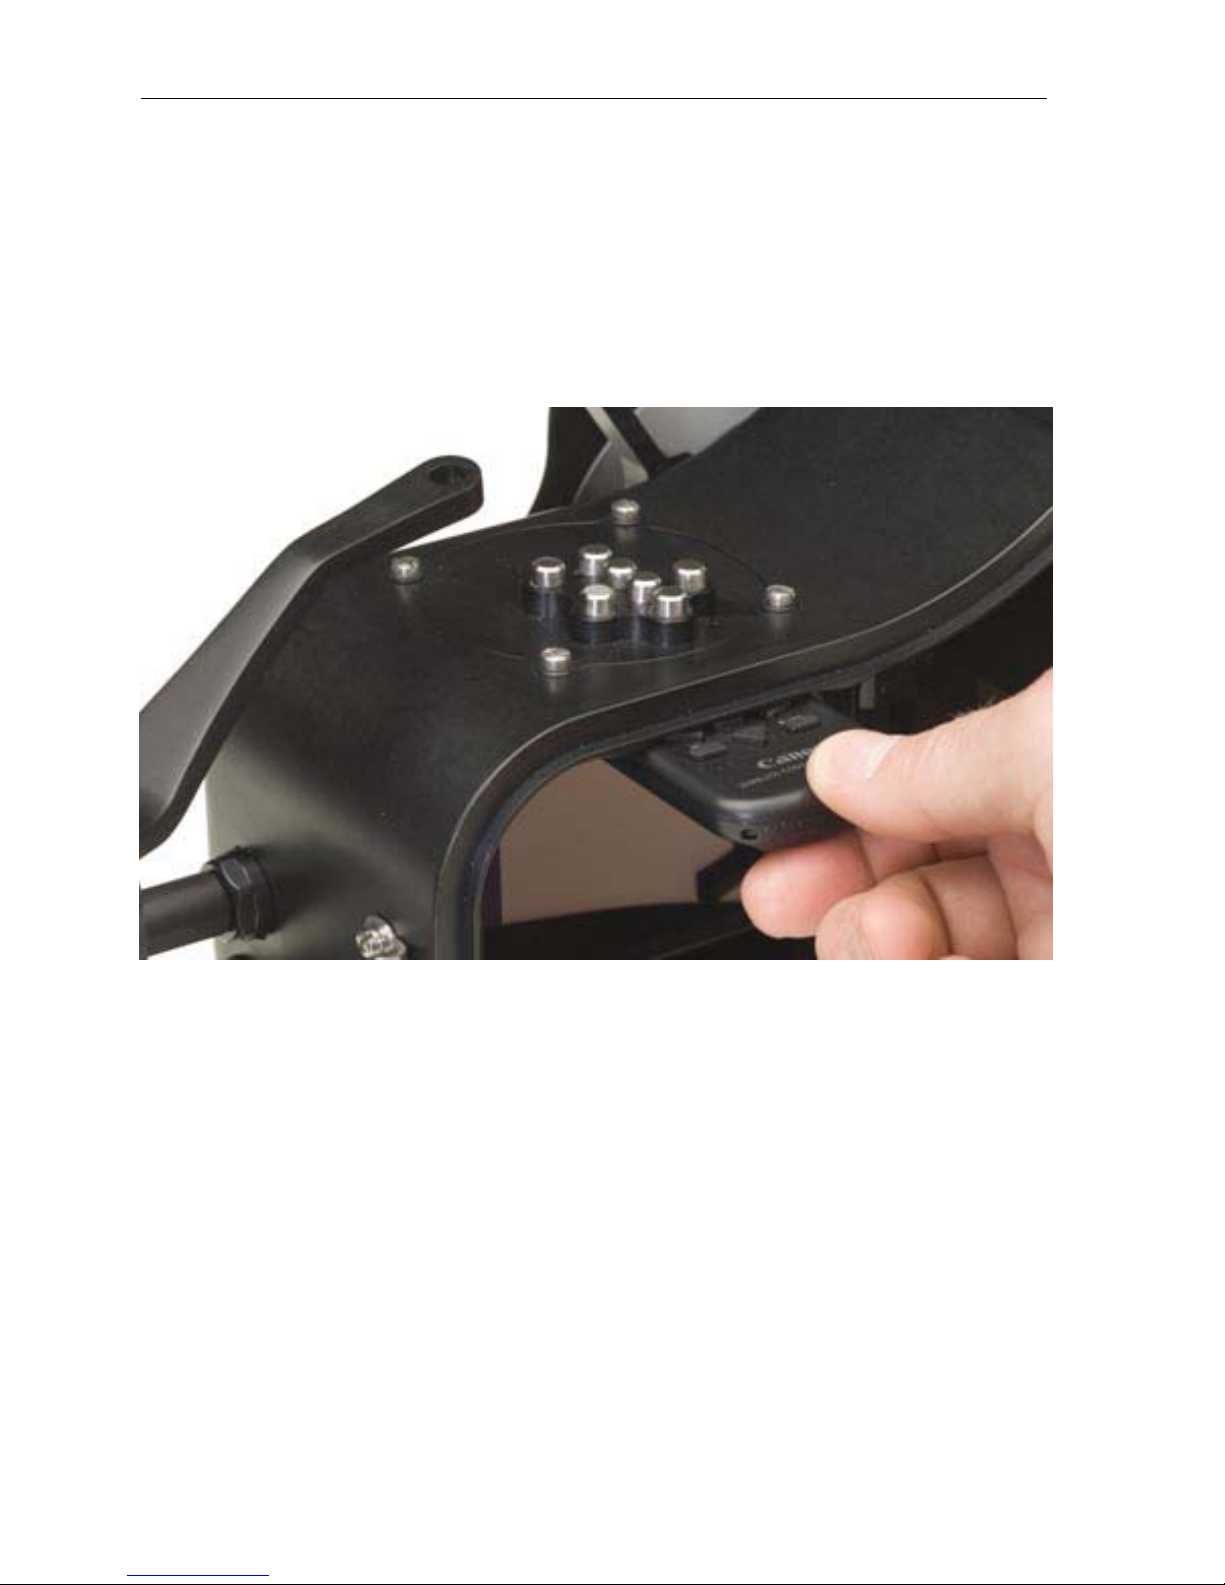
Installing Remote into Housing ........................................ 10
Closing the Housing......................................................... 11
Handle Installation ........................................................... 12
Remote Button Arm Installation ....................................... 13
Water Alarm (Optional) .................................................... 14
Seal Check (Optional)...................................................... 15
Video Out (Optional) ........................................................ 15
Microphone (Optional) ..................................................... 15
Final Checks .................................................................... 15
4: XA10 / HF-G10 Operation ............................................... 16
Right Side Controls.......................................................... 17
Top Controls .................................................................... 17
Rear Controls................................................................... 17
Left Side Controls ............................................................ 18
Front Controls .................................................................. 18
Remote Control................................................................ 19
Changing Filters............................................................... 20
Changing Ports ................................................................ 21
Cleaning Ports and Filters ............................................... 22
Diopters ........................................................................... 23
Buoyancy and Trim.......................................................... 23
Tips for Shooting Video with the XA10 / HF-G10 ............ 24
Lighting Systems ............................................................. 25
Housing Care and Maintenance ...................................... 25
O-Ring Care and Maintenance ........................................ 25
5: Customer Support............................................................ 26

Introducing the XA10 / HF-G10 Page 4
1: Introducing the XA10 / HF-G10
Congratulations on owning a new Gates product: the XA10 / HF-G10 housing. You’ve
selected a product that will provide years of value and reliable service. We designed the
XA10 / HF-G10 specifically for the Canon XA10 and HF-G10 digital video cameras.
Please read through this entire guide to learn about the housing so you can get the most
out of this imaging tool. In this section, we’ll introduce you to the features of the XA10 /
HF-G10 so you can get started.
Features
The XA10 / HF-G10 has several key features:
Small and Travel-friendly. At just a few pounds the XA10 / HF-G10 packs easily
into your luggage or dive gear.
‘Bulletproof’ construction. Gates legendary reliability is inherent in the XA10 /
HF-G10: machined aluminum shell, stainless hardware and reliable mechanical
controls.
Precision optics. The XA10 / HF-G10 allows the use of a variety of ports including
Wide and Macro.
Warranty Disclaimer
The XA10 / HF-G10 is a tool that, like any tool, requires knowledge and understanding to
be effective.
Your responsibility is to learn the proper setup, use and care of the XA10 / HF-G10.
Because we can only provide you with the information necessary to do so, Gates does
not warrant the contents of your housing (e.g. your camera and lenses) under any
circumstance. For the same reasons, Gates does not warrant optical performance or
image quality.
We warrant the XA10 / HF-G10 as an image acquisition tool for a period of 2 years. The
optional Seal Check unit is warranted for 1 year. Optics are warranted for a period of 1
year or 100 hours water contact, whichever comes first.
If you have any questions about the setup, use and care of the XA10 / HF-G10, contact
Gates directly. Details are in section 5.

Introducing the XA10 / HF-G10 Page 5
Unpacking the XA10 / HF-G10
After you remove the XA10 / HF-G10 from its shipping container, carefully inspect it for
missing parts or damage that may have occurred during shipment. If you discover any
discrepancies, contact Gates or your dealer immediately for assistance.
Standard Parts
The XA10 / HF-G10 comes with the following standard items:
The XA10 / HF-G10 Housing
The XA10 / HF-G10 Camera Mount (to which the XA10 / HF-G10 cameras
mount)
Various assembly and spare parts for the XA10 / HF-G10 including mounting
screws, o-rings and lubricant.
Port(s) of choice (Dome, Flat, Wide Angle, etc)
Handle Mount (which may already be affixed to the housing)
Remote Button Arm including mount and set screws.
4oz trim weight
Optional Parts
Your housing may also come with optional items:
Microphone
Water Alarm
Light System (user install)
Seal Check
Video Out

Cautions Page 6
2: Cautions
TRANSPORT. NEVER ship or transport your XA10 / HF-G10 camera inside the
housing. The housing was not designed for this purpose and severe damage may
result.
USER RESPONSIBILITY. This Setup, Use and Care guide contains important
detailed procedures for setup and use of the XA10 / HF-G10. It is the user’s
responsibility to read, understand and employ these procedures. Failure to do so
can result in poor or non-operation of the XA10 / HF-G10 and may void your
warranty.
Contact Gates if you have questions about this manual or using the XA10 / HF-G10.

The XA10 / HF-G10 Setup Page 7
3: The XA10 / HF-G10 Setup
The XA10 / HF-G10 housing requires complete and thorough setup prior to use.
XA10 / HF-G10 Housing Preparation
Open the XA10 / HF-G10 shell. Two stainless steel safety latches secure the
housing halves. They have a positive locking feature, so to open them you must
first depress the center bar release while lifting the rear lever.
Separate the rear half of housing from the front.
Remove the Camera Mount (CM). Rotate the lock counterclockwise and slide the
mount to the rear.
Retract and Rotate controls. Pull out the Focus, Assignable, Custom Button /
Dial, Zoom and Power control about one inch or until they stop.
Rotate the lock to this position and
slide the CDM out of the housing.
Release the latches and separate
the housing shell halves.

The XA10 / HF-G10 Setup Page 8
Camera Preparation
Your CANON camera will need some preparation before installing into the housing.
Remove any lens caps or external lenses you may have added to the front of the
camera.
Install a charged battery.
Tighten the hand strap to its shortest position and tuck the ‘tail’ back into the hand
strap.
CAUTION: Failure to perform this step may result in the hand strap becoming caught
in the housing seal and accidental flooding.
Install the camera onto the CM using one of the short ¼-20 flat head screws by
threading into the tripod mount found on the bottom of the camera. A screwdriver or
coin may be used to tighten snug, but do not over tighten.
Remove any lens
caps or filters.
Tighten the handstrap to
its shortest position.
Install the CDM as shown.
Tighten the ¼-20 screw
g
entl
y
and snu
g
.

The XA10 / HF-G10 Setup Page 9
Installing the Camera into the Housing
Carefully slide camera on its CM into the front housing half. The CM will mate and
slide into the mating mount on the housing.
Observe that the camera mates into the alignment collar at the front of the shell,
just behind the port opening.
Secure the camera by rotating the lock clockwise until snug.
Open the LCD fully as shown below.
Press in controls. When the camera is installed into the front housing half, press
in the Focus and Assignable controls to mate with the camera.
Check controls. At this point it’s a good idea to check all controls on the front shell
for proper operation. (See section 4 for controls mentioned here.)
Slide camera into housing until fully forward.
Open the LCD fully and make sure
Remote is pushed in all the way.
Secure by rotating the lock clockwise.
Carefully push in the Assignable
Control into position over the buttons
as shown.

The XA10 / HF-G10 Setup Page 10
Installing Remote into Housing
Carefully slide the remote onto rails with the top end first until it stops.

The XA10 / HF-G10 Setup Page 11
Closing the Housing
Carefully inspect o-ring on back half and the sealing surface on front half. Make
sure they are clean and in good condition.
Place back half onto the front housing half. You will clearly see when the
housing halves align and seat together properly.
Locate and close the two latches at the same time.
CAUTION: The safety latches must be closed and locked prior to use to avoid
opening underwater. It is your responsibility to make sure the latches are secure,
locked, and in good condition. DO NOT enter the water with a faulty latch. Gates
will replace a damaged or faulty latch free of charge.
Carefully inspect the parting line between front and rear housing. If this line is
not even all the way around, remove the back and determine the reason. (O-ring
out of place, hand strap interference, etc.) Failure To Do This May Result In A Wet
Camera!
Press controls in until they touch camera buttons. Note positioning of each
control as it touches the camera button/switch it is designed to actuate. (See
Section 4)
Power up the camera. Check all controls for the proper operation before entering
water. (See section 4)
Check the Port. It should be seated flush on the front bulkhead with no uneven
gaps. If the port is not seated properly, remove the port and re-install per directions
in a subsequent section of this document. Also check that the dot or indent on the
port is aligned with the dot on the housing.
Mate the shells and close the two
latches. The shells should mate
without obstruction.
Once closed, check the
parting line for gaps.

The XA10 / HF-G10 Setup Page 12
Handle Installation
Remove the knurled retainer from the handles, then place the handles just behind
the dovetail found on the bottom of the housing (see photo).
Slide the handles onto the housing dovetail. It may take firm pressure to fully
seat the handles until they come to a solid stop.
Attach the knurled retainer to secure the handles onto the housing.
Position the handles behind the
dovetail, then slide the handle forward
onto the housing until it stops.

The XA10 / HF-G10 Setup Page 13
Remote Button Arm Installation
The Remote Button Arm can be installed to aid actuation of the remote push buttons. It
provides a firm handle grasp closer to the buttons. The arm is a standard part included
with your housing, but not installed.
Locate Button Arm onto the top left handle with bend facing up and toward the
remote buttons.
Position the arm in the position you desire, then tighten the mount screw with the
5/32 allen tool.
Secure the arm in position by tightening the set screw using the 3/32 allen tool.
Tighten only enough to secure the arm, but do not overtighten.
Mount screw: Use 5/32 Allen tool.
Set screws: Use 3/32 Allen tool.

The XA10 / HF-G10 Setup Page 14
Water Alarm (Optional)
If you have the optional water alarm installed there are three alarm conditions to know:
Condition LED Siren
New Battery
(Insertion)
Bright Intense blink
while siren plays
Ascending tones played 4 times
Water Intrusion Bright Intense Blink Grating Warble sound. Alarm will
sound for duration of detection.
Low Battery Low Intensity fast blink Descending tones played 8 times
pausing approx. 20 seconds between
plays after alarm test or water
detection.
The alarm can tested anytime by shorting the detection contacts that lead to the water
alarm transducer. The water detection condition will activate for 6 seconds. If the battery
is drained the low battery condition will sound.
The water alarm requires a single 6V battery
like Radio Shack model 23-469 or A544.
Your battery should be removed when stored
(e.g. between dive trips). Check the battery
prior to every dive to ensure proper operation.
Change when indicated.
CAUTION: You must wait a minimum of
30 seconds between battery insertions to
allow the unit to fully discharge.
Typical Water Alarm installation.

The XA10 / HF-G10 Setup Page 15
Seal Check (Optional)
Seal Check Manual. Follow the procedures in the Seal Check manual for verifying
integrity of the housing and monitor.
NOTE. Pulling a vacuum on the XA10 / HF-G10 will take only a few seconds. Be
careful to avoid excessive vacuum greater than 8 in Hg.
Video Out (Optional)
Camera connection. If you have the video out installed, plug the video connector
into the camera after inserting the camera into the housing.
Microphone (Optional)
Camera connection. If you have the Submersible Microphone installed, plug the
audio connector into the camera just prior to inserting the camera into the housing.
Final Checks
Visual Inspection. Look closely at all seal mates – Port and Main Housing seal –
for gaps. Look over the housing one final time.
Verify operation. As a final check, power on the camera and verify all controls are
functioning normally.
Typical Seal Check fitting
installation.

XA10 / HF-G10 Operation Page 16
4: XA10 / HF-G10 Operation
Your Gates housing utilizes 100% mechanical controls to provide you with the most
reliable operation possible. They either rotate and/or depress to provide smooth and
consistent operation. (see ‘Housing Care and Maintenance’ section).
The housing controls are designed by Gates engineers, to the extent possible, to feel
and behave like the camera controls. With time and use, the housing controls will
become quite familiar and easy to use.
To help familiarize you with the housing controls, Gates recommends reviewing each
control individually, how it actuates the corresponding camera control, and operating it to
get a ‘feel’ for the control. You can view all front housing controls with the housing
open. After reviewing all controls, perform a ‘simulated’ dive by operating the controls as
you would in the water.
One final note about controls: when operating any control out of water, you may need to
press the control against the housing, into the position it would naturally find while under
water pressure. The controls are designed to operate properly in this position.

XA10 / HF-G10 Operation Page 17
Zoom
Record/
Standby
Power
Custom
Button
Right Side Controls
Record / Standby. The Record/Standby control is red and operates with a
momentary clockwise rotation.
Top Controls
Zoom. The Zoom control is blue and operates with a momentary rotation.
TIP: The Zoom control operates free and smooth when well lubricated. This should
be done after storage and often during heavy use (as much as every 2 or 3 dives).
To lubricate, pull up the control to expose a portion of the control shaft, and lightly
apply silicone. Push the control back in and rotate both directions until it operates
freely.
Rear Controls
Power. The Power button operates by with a momentary counter-clockwise
rotation.
Custom Dial

XA10 / HF-G10 Operation Page 18
Left Side Controls
Assignable Buttons. The Assignable Buttons access function that can be set for
your style of shooting. Refer to the XA10 and HF-G10 camera manuals for more
infomartion.
Focus Ring. This control rotates the focus ring on the camera.
Front Controls
Flip Filter. The Flip Filter moves the color correction filter in/out of position of the
camera view.
Flip Filter
Assignable
Buttons
Focus Ring

XA10 / HF-G10 Operation Page 19
Remote Control
The remote is used to give full menu access and access the white balance control. Each
button requires a simple push to operate.
White Balance/Tele Macro. Refer to the XA10 / HF-G10 camera user manual for
the specific sequence to access these functions.

XA10 / HF-G10 Operation Page 20
Changing Filters
The color correction filter in your housing may be changed to accommodate different
gradient filters. “Blue water” and “green water” are the two most common, recognizable
by their orange and purple color, respectively.
Removal. The color filter is held in place by a tension screw in the filter holder.
Loosen this screw with a 7/64 Allen tool.
Installation. Rest the filter in the holder and tighten with a 7/64 Allen tool. Tighten
just enough to secure the filter. Do not over tighten.
Cleaning. You will likely have fingerprints on the filter after installing, so clean the
filter according to the directions in the “Cleaning Ports and Filters” section.
Use a 7/64 Allen tool to
remove the filter from the
holder. The screw closest
to the filter is loosened.
This manual suits for next models
1
Table of contents
Other Gates Camera Accessories manuals

Gates
Gates C300 User manual

Gates
Gates AVCCAM AG-3DA1 Guide

Gates
Gates Pro Action User manual

Gates
Gates Z3 Housing User manual

Gates
Gates Z100 User manual

Gates
Gates EX1R User manual

Gates
Gates AX100 User manual

Gates
Gates CX700 User manual

Gates
Gates POVCAM AG-HCK10G Guide

Gates
Gates DEEP WEAPON Upgrade User manual
Popular Camera Accessories manuals by other brands

PAG
PAG Paglight PowerArc Instruction leaflet

Manfrotto
Manfrotto MKBFRTA4BK-BH instructions

Ikelite
Ikelite Canon 6081 Supplemental instructions

Bioenno Power
Bioenno Power BLF-1220W user manual

eisenblatter
eisenblatter 50463 Original instructions

Invacare
Invacare XPO110 Assembly, installation and operating instructions