Gates AX100 User manual
p
AX100 Underwater Housing
Setup, Use, and Care Guide

Introducing the AX100 Page 2
Copyright 2014, Gates Underwater Products, Inc.
Last document revision: June 2014
This manual and current revision is available in 8.5 x 11 size and full color at
http://www.gateshousings.com/documentation.html
Gates Underwater Products, Inc.
13685 Stowe Drive
Poway, California 92064 USA
Phone:800.875.1052 toll-free in the U.S.
858.391.0052 outside the U.S.
Fax: 858.391.0053
Web:
GatesHousings.com

Introducing the AX100 Page 3
Table of Contents
Setup, Use, and Care Guide.............................................. 1
1:Introducing the AX100 ....................................................... 4
Features............................................................................. 4
Warranty Disclaimer .......................................................... 4
Unpacking the AX100 ........................................................ 5
2:Cautions............................................................................. 6
3:The AX100 Setup .............................................................. 7
Handle Installation ............................................................. 7
AX100 Housing Preparation .............................................. 8
Camera Preparation .......................................................... 9
Installing the Camera into the Housing............................ 10
Closing the Housing......................................................... 12
Water Alarm (Optional) .................................................... 14
Seal Check (Optional)...................................................... 15
Hydrophone (Optional) .................................................... 15
Carry Handle (Optional)................................................... 16
Light Mounts (Optional) ................................................... 16
Tripod / Tripod Adapter (Optional) ................................... 17
Final Checks .................................................................... 18
4:AX100 Operation ............................................................. 19
Right Side Controls.......................................................... 20
Front Controls .................................................................. 20
Left Side / Rear Controls ................................................ 21
White Balance.................................................................. 22
Changing Filters............................................................... 24
Changing Ports ................................................................ 25
Cleaning Ports and Filters ............................................... 26
Diopters ........................................................................... 27
Buoyancy and Trim.......................................................... 27
Tips for Shooting Video with the AX100 .......................... 29
Housing Care and Maintenance ...................................... 29
O-Ring Care and Maintenance ........................................ 29
5:Customer Support............................................................ 30

Introducing the AX100 Page 4
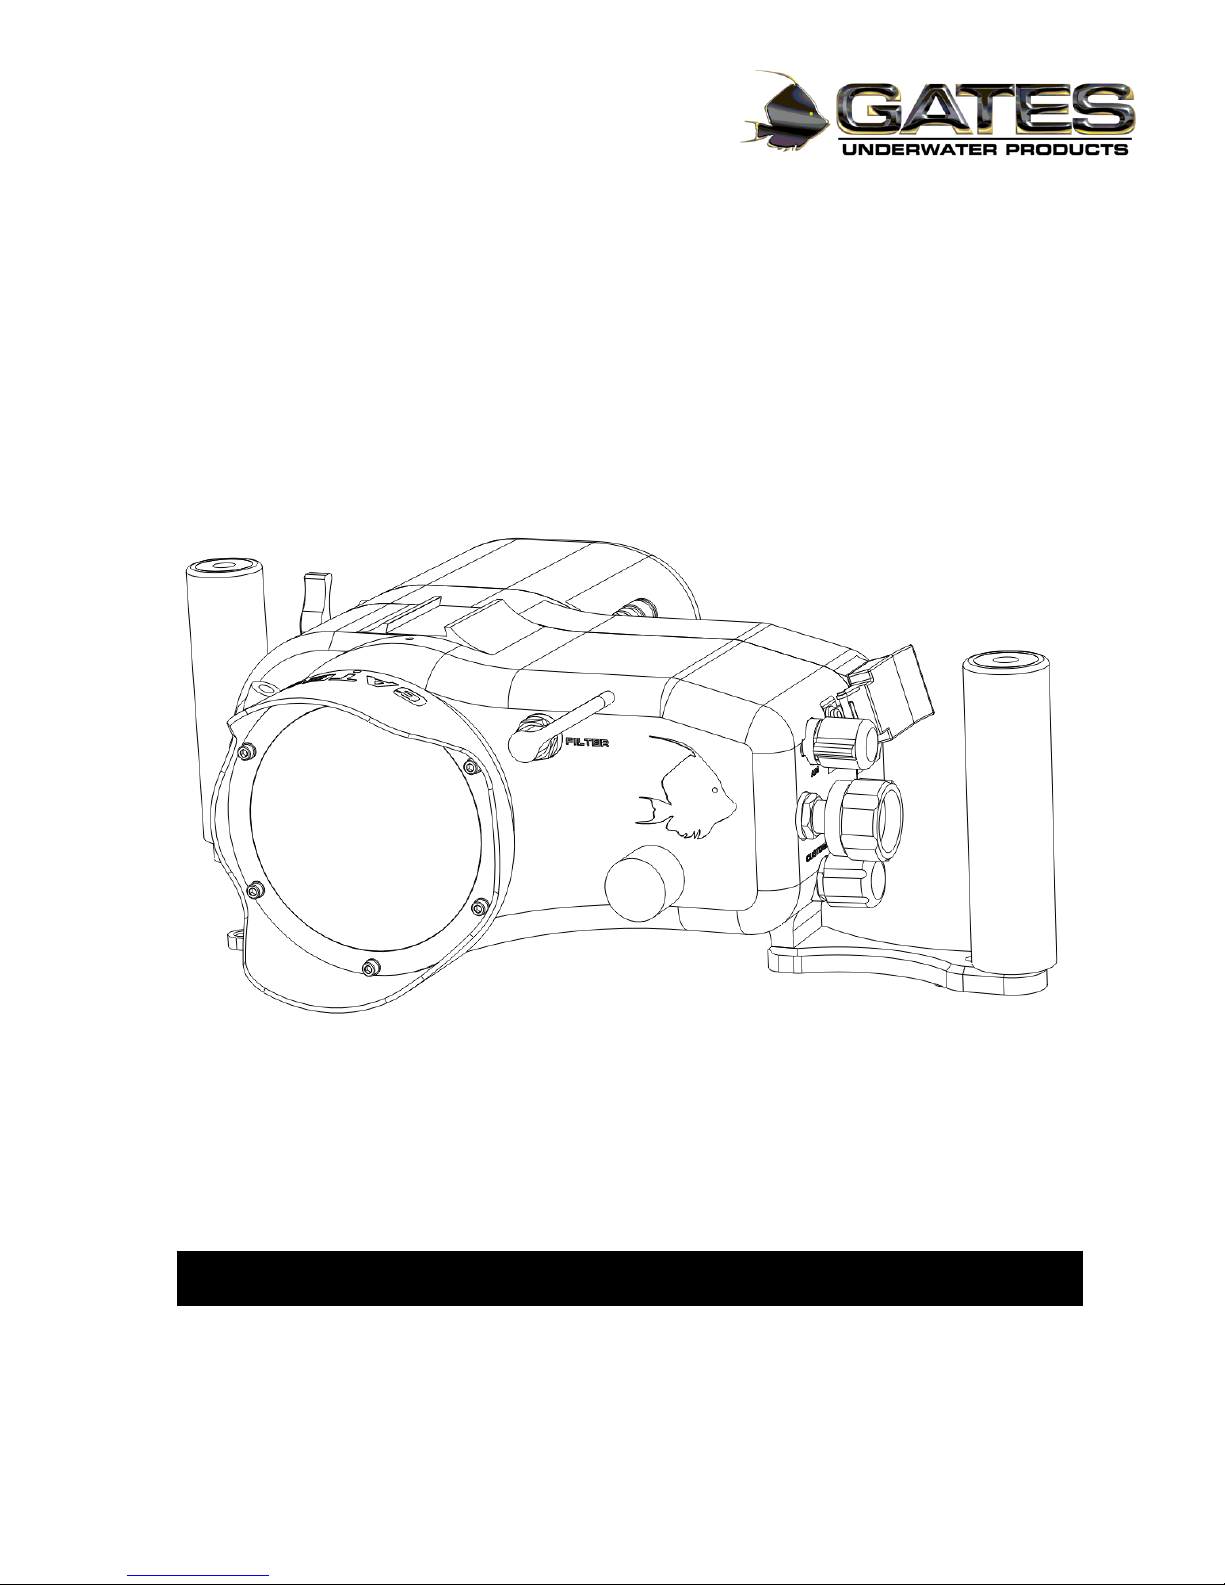
1: Introducing the AX100
Congratulations on owning a new Gates product: the AX100 housing. You’ve selected a
product that will provide years of value and reliable service. We designed the AX100
specifically for the Sony AX100 and CX900 digital video cameras.
Please read through this entire guide to learn about the housing so you can get the most
out of this imaging tool. In this section, we’ll introduce you to the features of the AX100
so you can get started.
Features
The AX100 has several key features:
Small and Travel-friendly. At just a few pounds, the AX100 packs easily into your
luggage or dive gear.
‘Bulletproof’ construction. Gates legendary reliability is inherent in the AX100:
machined aluminum shell, stainless hardware and reliable mechanical controls.
Precision optics. The AX100 allows the use of a variety of ports including Wide
and Macro.
Professional Imaging. The AX100 system includes many features for broadcast
TV and other professional uses.
Warranty Disclaimer
The AX100 is a tool that, like any tool, requires knowledge and understanding to be
effective.
Your responsibility is to learn the proper setup, use and care of the AX100. Because we
can only provide you with the information necessary to do so, Gates does not warrant
the contents of your housing (e.g. your camera and lenses) under any circumstance.
For the same reasons, Gates does not warrant optical performance or image quality.
We warrant the AX100 as an image acquisition tool for a period of 2 years. The optional
Seal Check unit is warranted for 1 year. Optics are warranted for a period of 1 year or
100 hours water contact, whichever comes first.
If you have any questions about the setup, use and care of the AX100, contact Gates
directly. Details are in section 5.

Introducing the AX100 Page 5
Unpacking the AX100
After you remove the AX100 from its shipping container, carefully inspect it for missing
parts or damage that may have occurred during shipment. If you discover any
discrepancies, contact Gates or your dealer immediately for assistance.
Standard Parts
The AX100 comes with the following standard items:
The AX100 Housing
Various assembly tools and spare parts for the AX100 including hex tools,
mounting screws, o-rings and lubricant.
Port(s) of choice (Dome, Flat and Wide Angle)
Removable Handles (which may already be affixed to the housing)
11 and 4 ounce weights
Optional Parts
Your housing may also come with optional items:
Water Alarm
Light System (user install)
Seal Check
Hydrophone
Carry Handle
Tripod / Tripod Adapter
62mm Diopters
Buddyphone/Comms Input
Standard Definition Video Out

Cautions Page 6
2: Cautions
TRANSPORT. NEVER ship or transport your AX100 camera inside the housing.
The housing was not designed for this purpose and severe damage may result.
USER RESPONSIBILITY. This Setup, Use and Care guide contains important
detailed procedures for setup and use of the AX100. It is the user’s responsibility to
read, understand and employ these procedures. Failure to do so can result in poor
or non-operation of the AX100 and may void your warranty.
Contact Gates if you have questions about this manual or using the AX100.

The AX100 Setup Page 7
3: The AX100 Setup
Handle Installation
If the handles are not already installed on the AX100 Housing, perform this step first.
Secure the handle arms to the housing using the 10-32 x 0.5”L socket cap screws.
Tighten with the supplied 5/32 hex tool.
Secure the grips to the handle arms using the 1/4-20 x 1” L socket cap screws.
Tighten firmly with the supplied 3/16 hex tool.
NOTE the handle grips are adjustable. They can be closer or further away from
the housing as shown in the image below. Remove the 1/4-20 x 1”L socket cap
screw and reposition as desired.
The grips can be adjusted to your
preference.
The AX100 Setup Page 8
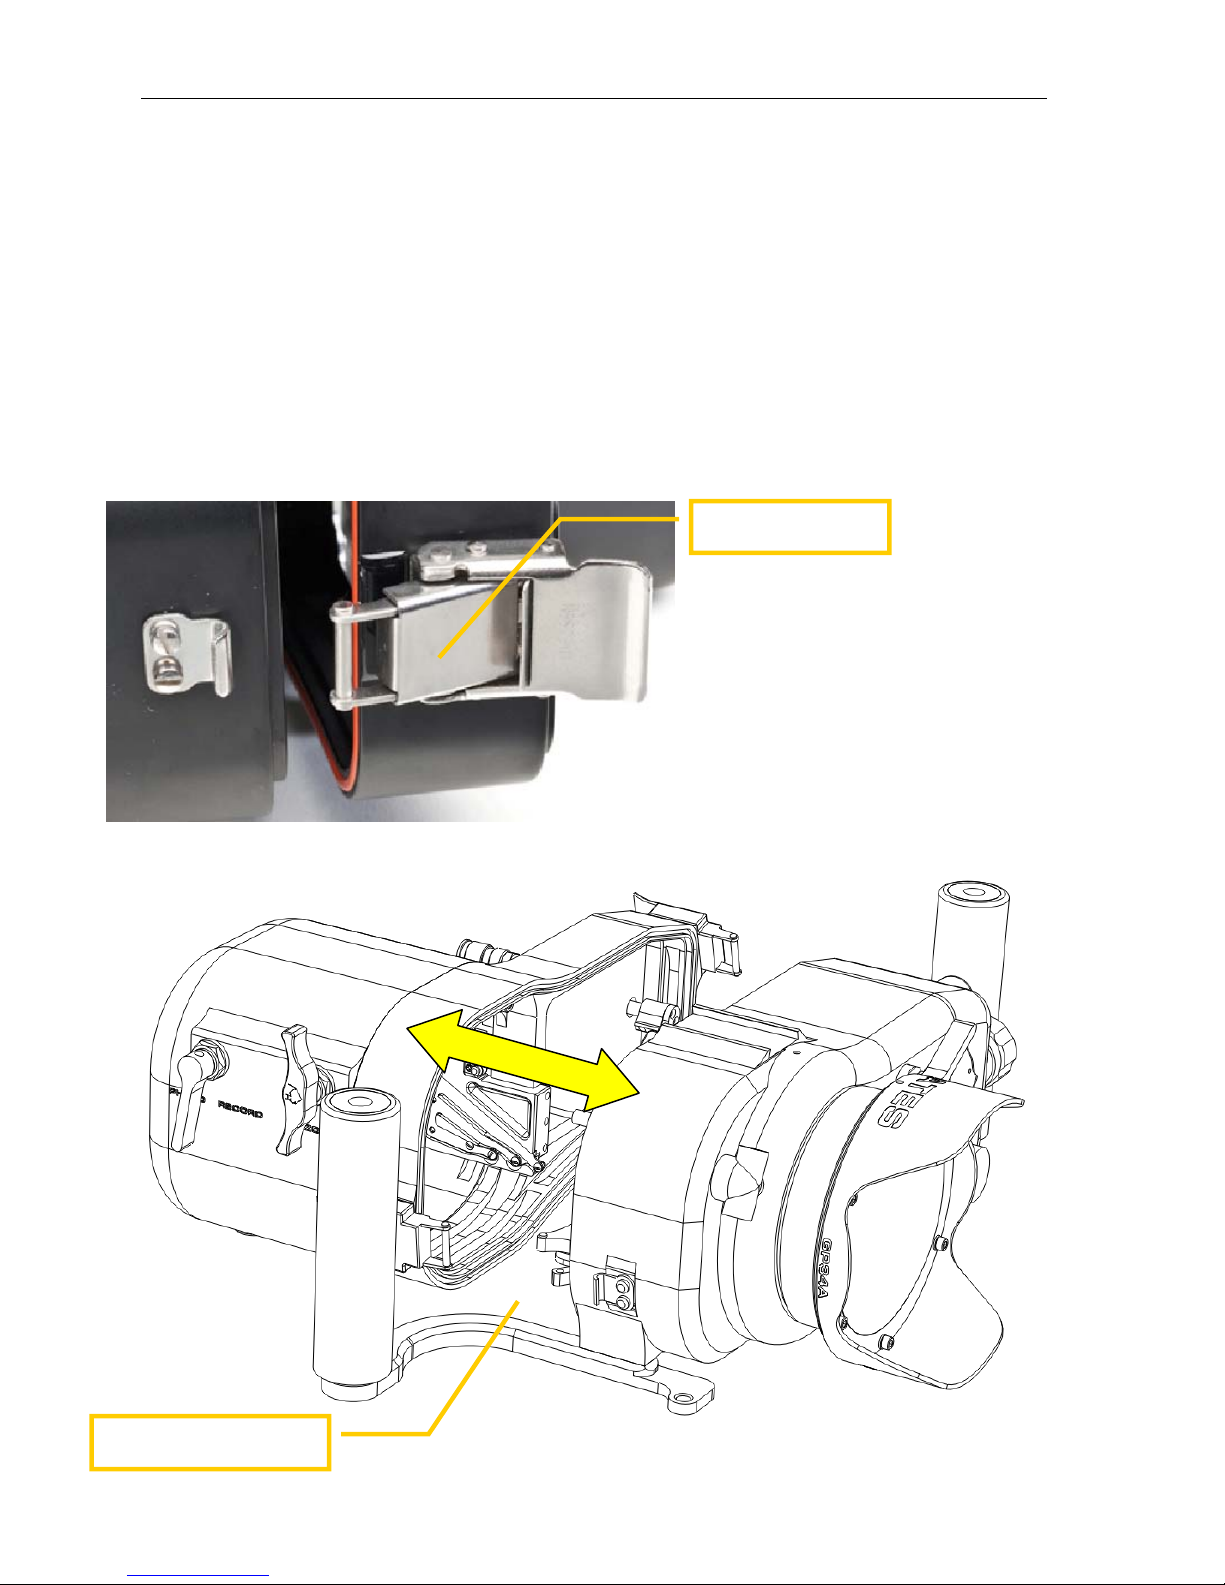
AX100 Housing Preparation
Open the AX100 shell. Two stainless steel safety latches secure the housing
halves. They have a positive locking feature, so to open them you must first
depress the center bar release while lifting the rear lever.
Separate the rear half of housing from the front.
Retract and Rotate controls. Pull out the Focus and Custom Wheel control about
one inch or until they stop.
Release the latches
Separate housing shells

The AX100 Setup Page 9
Camera Preparation
Your Sony camera will need some preparation before installing into the housing.
Remove any lens caps or external lenses you may have added to the front of the
camera. Install a charged battery and SD Cards.
Tighten the hand strap to its shortest position and tuck the ‘tail’ back into the hand
strap.
CAUTION: Failure to perform this step may result in the hand strap
becoming caught in the housing seal and accidental flooding.
Switch the camera to ‘MANUAL’ if you plan to use the ND filters. This switch is
just above the ND filter slider on the back of the camera. Otherwise, set the camera
to ‘AUTO’, and the camera will automatically add ND Filters as needed.
Turn ND Filter control on camera to the OFF position. This will aid in aligning the
ND Filter control on the housing.
Install Camera with mount screw.
Install a charged
battery and SD card.
Remove any lens cap
or filter.
Tighten the handstrap
to its shortest position.
Install Dovetail with
mount screw.
Turn the ND Filter
control to the OFF
position.

The AX100 Setup Page 10
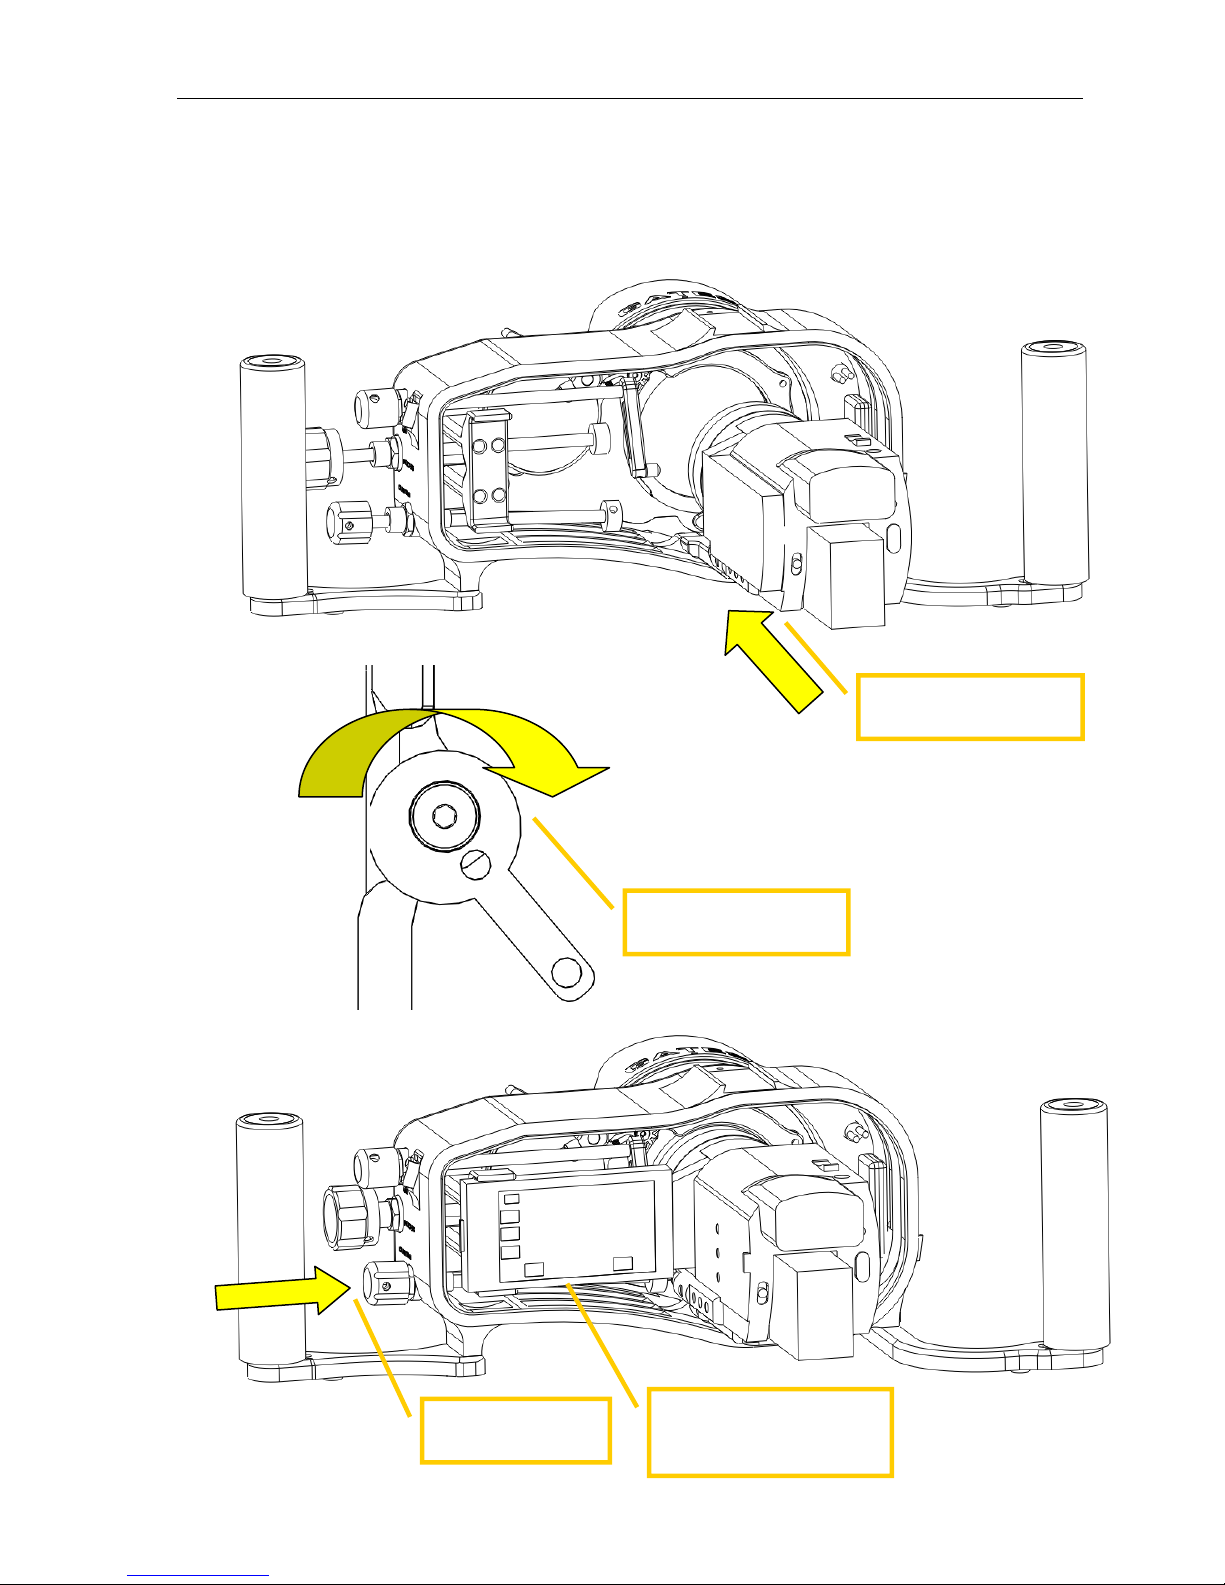
Installing the Camera into the Housing
Pull out Focus and Custom controls. The Focus and Custom control need only be
retracted ~ 1in / 2.5cm.
Carefully slide camera onto dovetail until it stops.
Secure the camera by rotating the cam lock clockwise.
Open the LCD fully as shown in the image on the next page. If necessary, gently
press it into the receiver on the left side of the housing.
Press in the Focus and Custom controls.
Check controls. At this point it’s a good idea to check all controls on the front shell
for proper operation. (See section 4 for controls mentioned here.)
Pull out Focus and
Custom controls.
The AX100 Setup Page 11
Slide in Focus and
Custom controls.
Slide camera onto
dovetail until it stops.
Rotate Cam Lock
clockwise to secure.
Open the camera LCD
and gently press it into
the holder on the housing.

The AX100 Setup Page 12
Closing the Housing
Carefully inspect o-ring on back half and the sealing surface on front half. Make
sure they are clean and in good condition.
Turn ND Filter control all the way down to the OFF position. This will help align the
housing control to the camera when the back half of the housing is installed.
Place back half onto the front housing half. You will clearly see when the
housing halves align and seat together properly.
Locate and close the two latches at the same time.
CAUTION: The safety latches must be closed and locked prior to use to avoid
opening underwater. It is your responsibility to make sure the latches are secure,
locked, and in good condition. DO NOT enter the water with a faulty latch. Gates
will replace a damaged or faulty latch free of charge.
Inspect the o-ring on the rear shell
and the sealing surface on the
front shell. They should be clean
and free of nicks, marks or
scratches.
Rotate ND Filter control to
the down / off position
before installing back half
of housing.

The AX100 Setup Page 13
Carefully inspect the parting line between front and rear housing. If this line is
not even all the way around, remove the back and determine the reason. (O-ring
out of place, hand strap interference, etc.) Failure To Do This May Result In A Wet
Camera!
Power up the camera. Check all controls for the proper operation before entering
water. If ND Filter Control is not seated properly on the camera it can be pulled out,
aligned over the camera control and pressed back in. (See section 4)
Install a port. Visually align the bayonet mount on the port with the housing. Mate
the port to the housing, and press. It should seat fully with no gaps around the
base. Rotate the port 90° either direction to fully engage the port. For specific
details, see the section Changing Ports on page 25.
Install back housing half
Inspect the parting
line.

The AX100 Setup Page 14
Water Alarm (Optional)
If you have the optional water alarm installed there are three alarm conditions to know:
Condition LED Siren
New Battery
(Insertion)
Bright Intense blink while
siren plays
Ascending tones played 4 times
Water Intrusion Bright Intense Blink Warble sound. Alarm will sound for
duration of detection.
Low Battery Low Intensity fast blink Descending tones played 8 times
pausing approx. 20 seconds between
plays after alarm test or water detection.
The alarm can tested anytime by shorting the detection contacts that lead to the water
alarm transducer. The water detection condition will activate for 6 seconds. If the battery
is drained the low battery condition will sound.
The water alarm requires a single 6V battery like Radio Shack model 23-469 or A544.
Your battery should be removed when stored (e.g. between dive trips). Check the
battery prior to every dive to ensure proper operation. Change when indicated.
CAUTION: You must wait a minimum of 30 seconds between battery insertions to
allow the unit to fully discharge.
Inside rear shell showing the Water
Alarm battery.
Water Alarm siren.
Water Alarm LED
will indicate here.
The AX100 Setup Page 15
Seal Check (Optional)
Seal Check Manual. Follow the procedures in the Seal Check manual for verifying
integrity of the housing and monitor.
NOTE. Pulling a vacuum on the AX100 will take only a few seconds. Be careful to
avoid excessive vacuum greater than 8 in Hg.
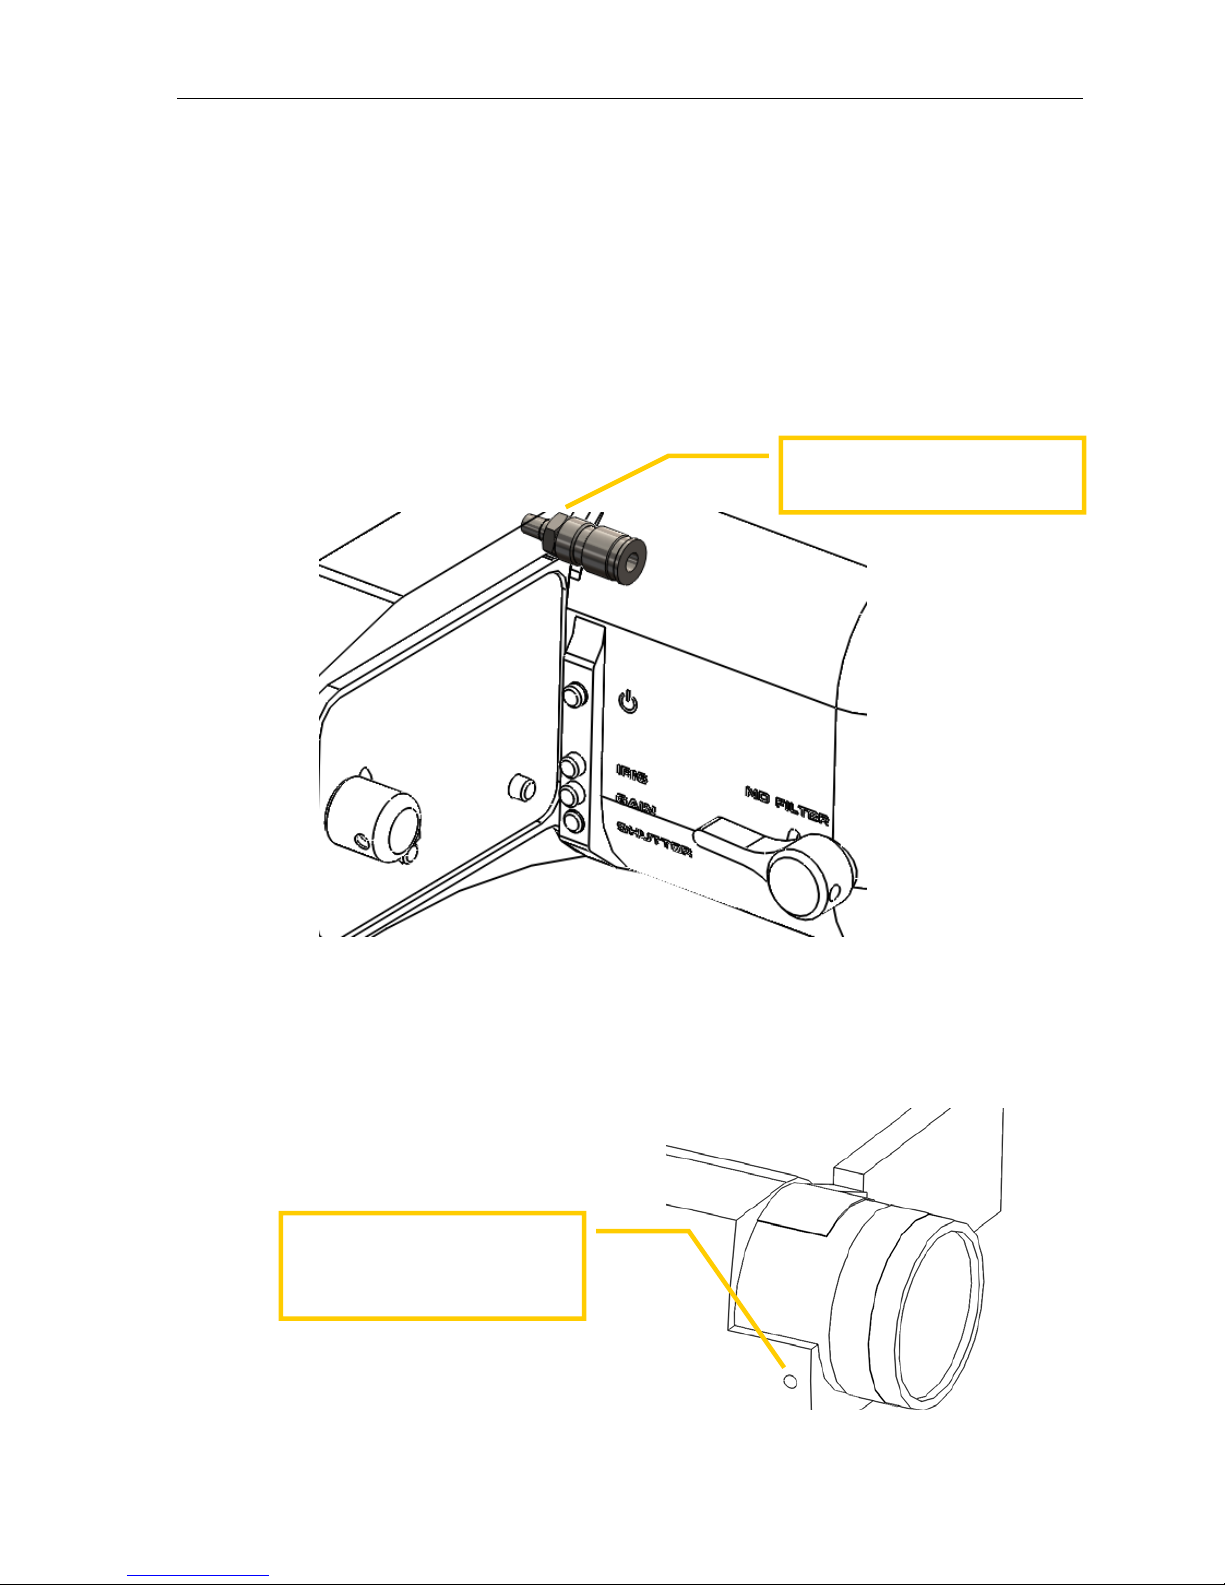
Hydrophone (Optional)
Camera connection. If you have the hydrophone installed, plug the connector into
the camera after before inserting the camera into the housing.
Seal Check Fitting on AX100
Housing.
Just prior to inserting the camera
into the housing, connect the
hydrophone to the camera's
microphone connector.

The AX100 Setup Page 16
Carry Handle (Optional)
Position the Carry Handle on the top dovetail, then secure by finger tightening the
thumbscrew.
Light Mounts (Optional)
The top of each handle grip has a 1/4-20 threaded insert for mounting lights or other
accessories. The Ultralight Control Systems (ULCS) AD-1420 ball mount threads
directly into this location.
1/4-20 threaded insert on
the top of each handle grip.
UCLS AD-1420 for
mountin
g
li
g
hts.
Slide the Carry Handle onto
the dovetails and secure
with the thumbscre
w
.
The AX100 Setup Page 17
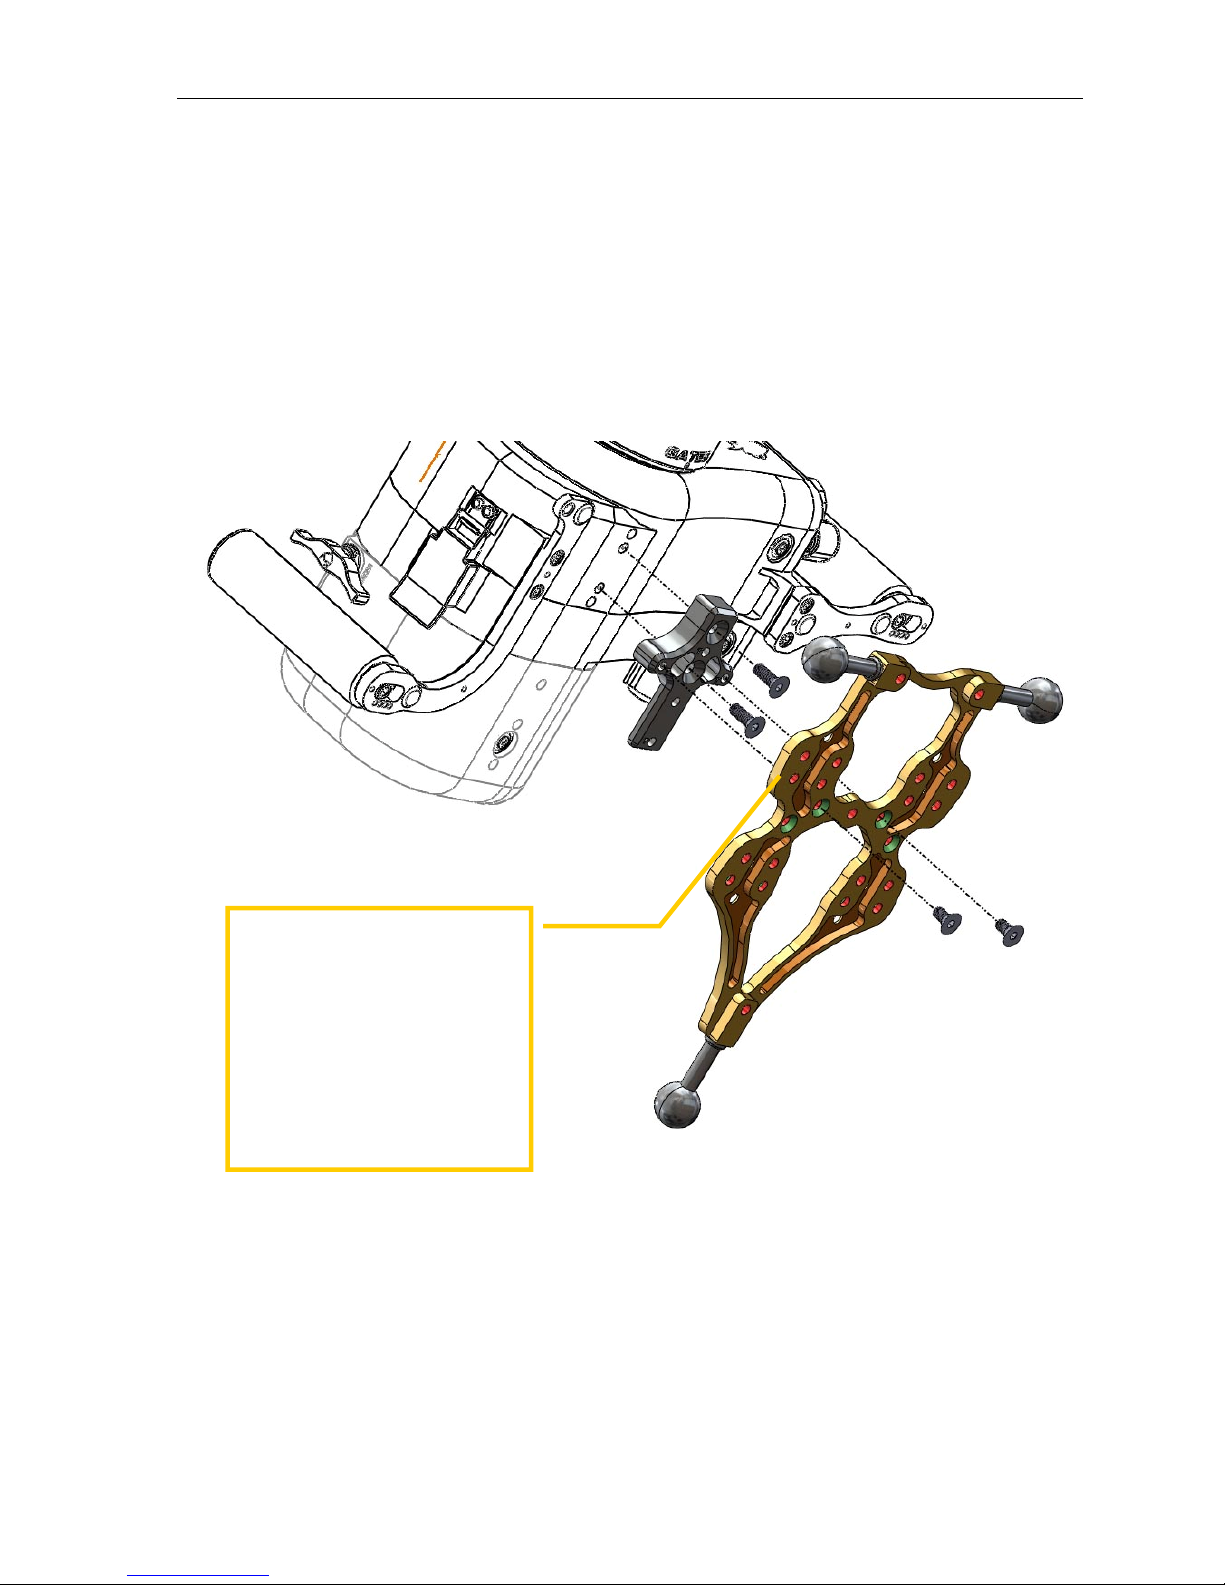
Tripod / Tripod Adapter (Optional)
Gates Tripod is a useful accessory for steady, locked down shots, particularly for macro
imaging. The Gates Tripod has extensible arms up to 18in/ 45cm that collapse close to
the housing when not in use.
The symmetric version of the
Gates Tripod. Use 1/4-20 x.75”L
flat head screws to mount the
adapter, and 1/4-20 x .5”L flat
head screws to mount the tripod
plate.
NOTE: only the Gates Tripod
plate is shown. The extensible
legs and clamps are omitted for
clarity.

The AX100 Setup Page 18
Final Checks
Visual Inspection. Look closely at all seal mates – Port and Main Housing seal –
for gaps. Look over the housing one final time.
Verify operation. As a final check, power on the camera and verify all controls are
functioning normally.
The asymmetric version of the
Gates Tripod. Use 1/4-20 x.75”L
flat head screws to mount the
adapter, and 1/4-20 x .5”L flat
head screws to mount the tripod
plate.
NOTE: only the Gates Tripod
plate is shown. The extensible
legs and clamps are omitted for
clarity.

AX100 Operation Page 19
4: AX100 Operation
Your Gates housing utilizes 100% mechanical controls to provide you with the most
reliable operation possible. They either rotate and/or depress to provide smooth and
consistent operation. (see ‘Housing Care and Maintenance’ section).
The housing controls are designed by Gates engineers, to the extent possible, to feel
and behave like the camera controls. With time and use, the housing controls will
become quite familiar and easy to use.
To help familiarize you with the housing controls, Gates recommends reviewing each
control individually, how it actuates the corresponding camera control, and operating it to
get a ‘feel’ for the control. You can view all front housing controls with the housing
open. After reviewing all controls, perform a ‘simulated’ dive by operating the controls as
you would in the water.
One final note about controls: when operating any control out of water, you may need to
press the control against the housing, into the position it would naturally find while under
water pressure. The controls are designed to operate properly in this position.

AX100 Operation Page 20
Right Side Controls
Record / Photo. The Record/Photo control is red and operates with a momentary
counter clockwise rotation for record and clockwise for photo.
Zoom. The Zoom control is blue and operates with a momentary rotation.
TIP: The Zoom control operates free and smooth when well lubricated. This should
be done after storage and often during heavy use (as much as every 2 or 3 dives).
To lubricate, pull out the control to expose a portion of the control shaft, and lightly
apply silicone. Push the control back in and rotate in both directions until it operates
freely.
Front Controls
Flip Filter. The Flip Filter moves the color correction filter in/out of position of the
camera view.
Flip Filter
Zoom Control
Record/Photo
Control
Other manuals for AX100
1
Table of contents
Other Gates Camera Accessories manuals

Gates
Gates CX700 User manual

Gates
Gates Pro Action User manual

Gates
Gates Z3 Housing User manual

Gates
Gates F55 User manual

Gates
Gates EX1R User manual

Gates
Gates DEEP WEAPON Upgrade User manual

Gates
Gates C300 User manual

Gates
Gates AX700 User manual

Gates
Gates ALEXA 35 User manual

Gates
Gates Z100 User manual


