Gates Z100 User manual

Z100 Underwater Housing
Setup, Use, and Care Guide

Table of Contents Page 2
Copyright 2014, Gates Underwater Products, Inc.
Last document revision:2-2014
This manual and current revision is available in 8.5 x 11 size and full color at
http://www.gateshousings.com/documentation.html
Gates Underwater Products, Inc.
13685 Stowe Drive
Poway, California 92064 USA
Phone: 800.875.1052 toll-free in the U.S.
858.391.0052 outside the U.S.
Fax: 858.391.0053
Web: GatesHousings.com

Table of Contents Page 3
Table of Contents
TABLEOFCONTENTS...................................................................................................................................3
WARRANTYDISCLAIMER.............................................................................................................................4
GATESWARRANTY......................................................................................................................................4
CAUTIONS...................................................................................................................................................5
FIRSTTIMEUSE...........................................................................................................................................7
CAMERA/HOUSINGSETUP.........................................................................................................................7
BUOYANCYANDTRIM................................................................................................................................18
CONTROLS..................................................................................................................................................20
USEANDCHANGEOFTHECOLORCORRECTIONFILTER...............................................................................25
USEANDCHANGEOFTHEFLIPMACRO.......................................................................................................25
USEOFOTHERDIOPTERS............................................................................................................................25
USINGTHESP44DOMEPORT.....................................................................................................................25
CHANGINGPORTS......................................................................................................................................26
CLEANINGPORTSANDFILTERS...................................................................................................................27
OPTIONALSUBMERSIBLEMICROPHONE.....................................................................................................28
OPTIONALWATERALARM..........................................................................................................................30
OPTIONALHD‐SDISURFACEFEED...............................................................................................................30
OPTIONALEXTERNALMONITOREM50OREM43........................................................................................31
LIGHTINGSYSTEMS....................................................................................................................................34
HOUSINGCAREANDMAINTENANCE..........................................................................................................34
O‐RINGCAREANDMAINTENANCE..............................................................................................................34
CUSTOMERSUPPORT.................................................................................................................................34

Warranty Disclaimer Page 4
Warranty Disclaimer
The Gates Z100 housing is a tool that, like any tool, requires knowledge and
understanding to be effective.
Your responsibility is to learn the proper setup, use and care of the Z100 product.
Because we can only provide you with the information necessary to do so, Gates does
not warrant the contents of your housing (e.g. your camera and lenses) under any
circumstance.
GATES Warranty
Warrantor: Gates Underwater Products, Inc (Gates).
Warranted Product / Duration (from date of purchase):
Housings and accessory products: Two Years
Seal Check product: One Year
Ports/Optics: One Year or 100 hrs water contact.
Batteries: Six Months.
Electronics: One Year.
Non Gates manufactured items: According to original manufacturer warranty.
What is covered (Limited Warranties): Defects in materials or workmanship.
What is not covered (Exclusions): The previous warranties do not apply to, and Gates
shall have no responsibility for:
Product damaged by misuse, accident, abuse or improper packaging during
shipment;
Product repaired, serviced or modified by other than Gates or Gates authorized
agent;
Failure to follow Gates documentation for proper operation and care of Gates
products;
Failure to activate these warranties by registration.
http://www.gateshousings.com/support/warranty-registration.php
Items contained within a Gates housing (such as camera, batteries or
electronics).
Image quality.
Products or components manufactured by third parties.
What we will do (Coverage): In the event your Gates product fails within the applicable
warranty period, Gates will inspect and test returned products to verify failure mode, and
determine warranty coverage. If the failure is due to material or workmanship, Gates will
repair or replace the product at no charge to you, including return shipment. Repair /
Replacement is the sole remedy under this warranty. Repair parts, materials or entire
replacement product may be remanufactured. Gates will inspect and pressure test returned
housings to verify failure mode and warranty coverage determination.

Cautions Page 5
Return Procedures:
• Contact Gates for authorization. Often a problem can be handled without
returning a product to Gates, saving you time and money. Provide proof of purchase details.
• Packaging. If it is determined your product should be returned, pack your unit in its
original packaging, if available. Otherwise pack the product very carefully and with plenty of
protection, inside a sturdy box to ensure warranty coverage.
• Shipping: Return your product, prepaid and insured, to:
Gates Underwater Products 13685 Stowe Dr. • Poway, CA 92064 • USA +1-858-
391-0052
• Inspection. Upon receipt, your return will be carefully inspected and assessed for
warranty coverage.
• Non-Warranty Repairs. For non-warranty repairs you will be advised as to repair
costs prior to any work being done.
Warranty Transfer Gates Limited Warranties are not transferable. Gates warranties can
be renewed on Gates products purchased second hand. Contact Gates for details.
Disclaimer. The express warranties described herein constitute the only warranties with
respect to Gates products and accessories, and there are no other warranties, express,
implied, statutory, by operation of law or otherwise including, without limitation, warranties of
merchantability, fitness for particular purpose, non-infringement or regulatory compliance.
Any other representations or warranties made by any person, including employees or
representatives of Gates, which are inconsistent herewith shall be disregarded by client and
shall not be binding upon Gates.
Cautions
TRANSPORT. NEVER ship or transport your Sony camera inside the Z100
housing. The housing was not designed for this purpose and severe damage may
result.
USER RESPONSIBILITY. This Setup, Use and Care guide contains important
detailed procedures for setup and use of Z100 . It is the user’s responsibility to read,
understand and employ these procedures. Failure to do so can result in poor or non-
operation of Z100 and may void your warranty.

Cautions Page 6
Unpacking the Z100
After you remove the Z100 from its shipping container, carefully inspect it for missing
parts or damage that may have occurred during shipment. If you discover any
discrepancies, contact Gates or your dealer immediately for assistance.
Included Items
Z100 Housing
Camera Tray
Trim Weights, 5lbs total
8 x 8oz
4 x 4oz
Monitor bulkhead pass through
plug.
Port(s) of choice: FP44, SP44 or
SWP44C Super Wide
Various assembly and spare parts
for the Z100 including bolts, set
screws and o-rings
Viewfinder tilt adjustment gauge
Port Options (a required but separately purchased item)
SP44 Dome Port (glass or acrylic)
FP44 Flat Port
SWP55C Super Wide Port
Optional Accessories
Microphone or Hydrophone
Water alarm
HD-SDI surface feed bulkhead
connector and cable
Light System
Tripod Adapters / Mounts
Seal Check system
Hard sided rolling case(s)
EM50 or EM43 External Color
Monitor
Carry Handle
Port Cleaner
Additional trim weights (4, 8 and 6
oz)

First Time Use Page 7
Gates Underwater Products, Inc
13685 Stowe Drive • Poway, CA • 92064 • 858.391.0052 • 800.875.1052 • Fax 858.391.0053
Customer.srvc@GatesHousings.com • www.GatesHousings.com
Gates Housing Setup and Use
Congratulations on owning a new Gates housing! You’ve selected a product that will
provide years of value and reliable service. This housing was custom designed for the
Sony Z100 camera as a rugged and transportable package. Please read through this
entire guide to familiarize yourself with the Gates Z100 housing. The following setup
guidelines will explain how to prepare and use your camera and housing so you’ll get the
best results from your imaging endeavors.
First Time Use
Every Gates housing is pressure tested before leaving the factory to ensure a watertight
seal. As a precaution, however, it’s a good idea to first use the housing without
your Sony PXW-Z100 or FDR-AX1 inside. Rough or abusive handling during shipment
could have caused unnoticed damage after leaving the factory. In addition, you can get
a good feel for the use of an underwater housing without worrying about getting a good
shot. You can simply concentrate on the technique of holding the housing in position
while fine tuning your personal buoyancy.
After removing the housing from its shipping container, carefully inspect for any damage
that may have occurred during shipment. If you discover any then contact Gates or your
dealer immediately for assistance.
Gates does not warranty the contents of your housing (eg. your camera and lenses).
Therefore the appropriate insurance should be maintained by the user.
Camera / Housing setup
Preparing the Z100 Camera
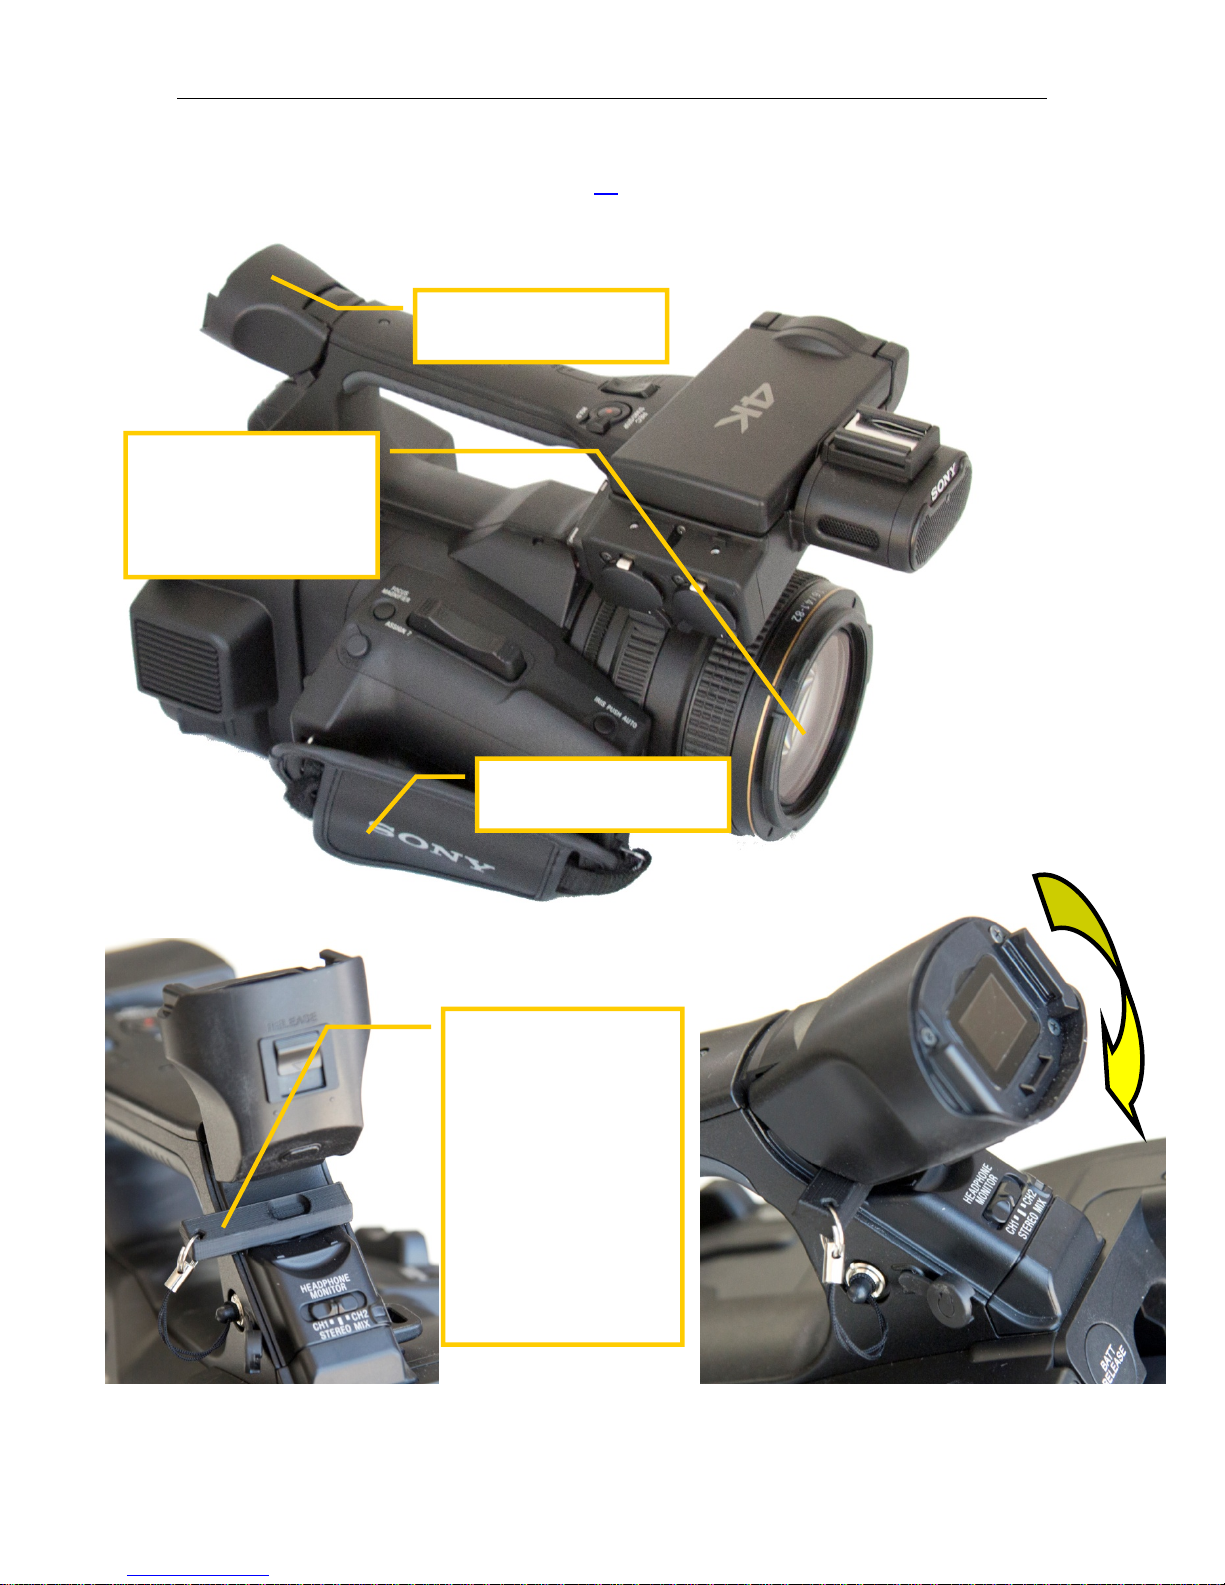
Your Sony Z100 will need some preparation before installing into the housing.
Remove the lens hood, cap and any external lenses/filters you may have added
to the front of the camera.
Remove the eyepiece from the rear viewfinder. The release button is underneath
the eyepiece.
Tighten the hand strap to its shortest position and tuck the ‘tail’ back into the hand
strap.
CAUTION: Failure to perform this step may result in the hand strap becoming
caught in the housing seal and allow water intrusion.
Align the camera viewfinder with the Viewfinder Alignment Gage as shown in the
photos on page 8. Place the Gage below the viewfinder, then rotate it into position
on the gage. This will align the camera viewfinder with the housing Magnified
Viewfinder.
Display information. The Z100 camera must be set to display information through
the optional external monitor. This is done by entering the menu of the camera and
selecting as follows: MENUVIDEO OUTPUT DISPLAY HDMI ON
Camera / Housing setup Page 8
Gates Underwater Products, Inc
13685 Stowe Drive • Poway, CA • 92064 • 858.391.0052 • 800.875.1052 • 858.391.0053
Customer.srvc@GatesHousings.com • www.GatesHousings.com
Microphone information. If you have the optional microphone installed, set the
camera as described in detail on page 27.
Install a memory card and charged battery.
Remove any caps,
lenses or filters from the
camera lens. Slide the
focus ring into the
forward position.
Tighten the handstrap to
it’s closest position.
Remove the eyepiece
from the viewfinder.
Place the Viewfinder
Tilt Gage as shown,
then rotate the
camera viewfinder
down onto the gage to
set alignment with the
housing Magnified
Viewfinder.
Note that the gage can
be secured to the
camera headphone
jack.

Camera / Housing setup Page 9
Gates Underwater Products, Inc
13685 Stowe Drive • Poway, CA • 92064 • 858.391.0052 • 800.875.1052 • Fax 858.391.0053
Customer.srvc@GatesHousings.com • www.GatesHousings.com
Preparing the Housing
Release the latches. Release the three stainless steel safety latches that secure
the housing halves. They have a positive locking feature, so to open them you must
first depress the center bar release while lifting the rear lever.
Open the housing. Separate the rear half of housing from the front.
Pull out the
controls on the
left side of the
housing.

Camera / Housing setup Page 10
Gates Underwater Products, Inc
13685 Stowe Drive • Poway, CA • 92064 • 858.391.0052 • 800.875.1052 • 858.391.0053
Customer.srvc@GatesHousings.com • www.GatesHousings.com
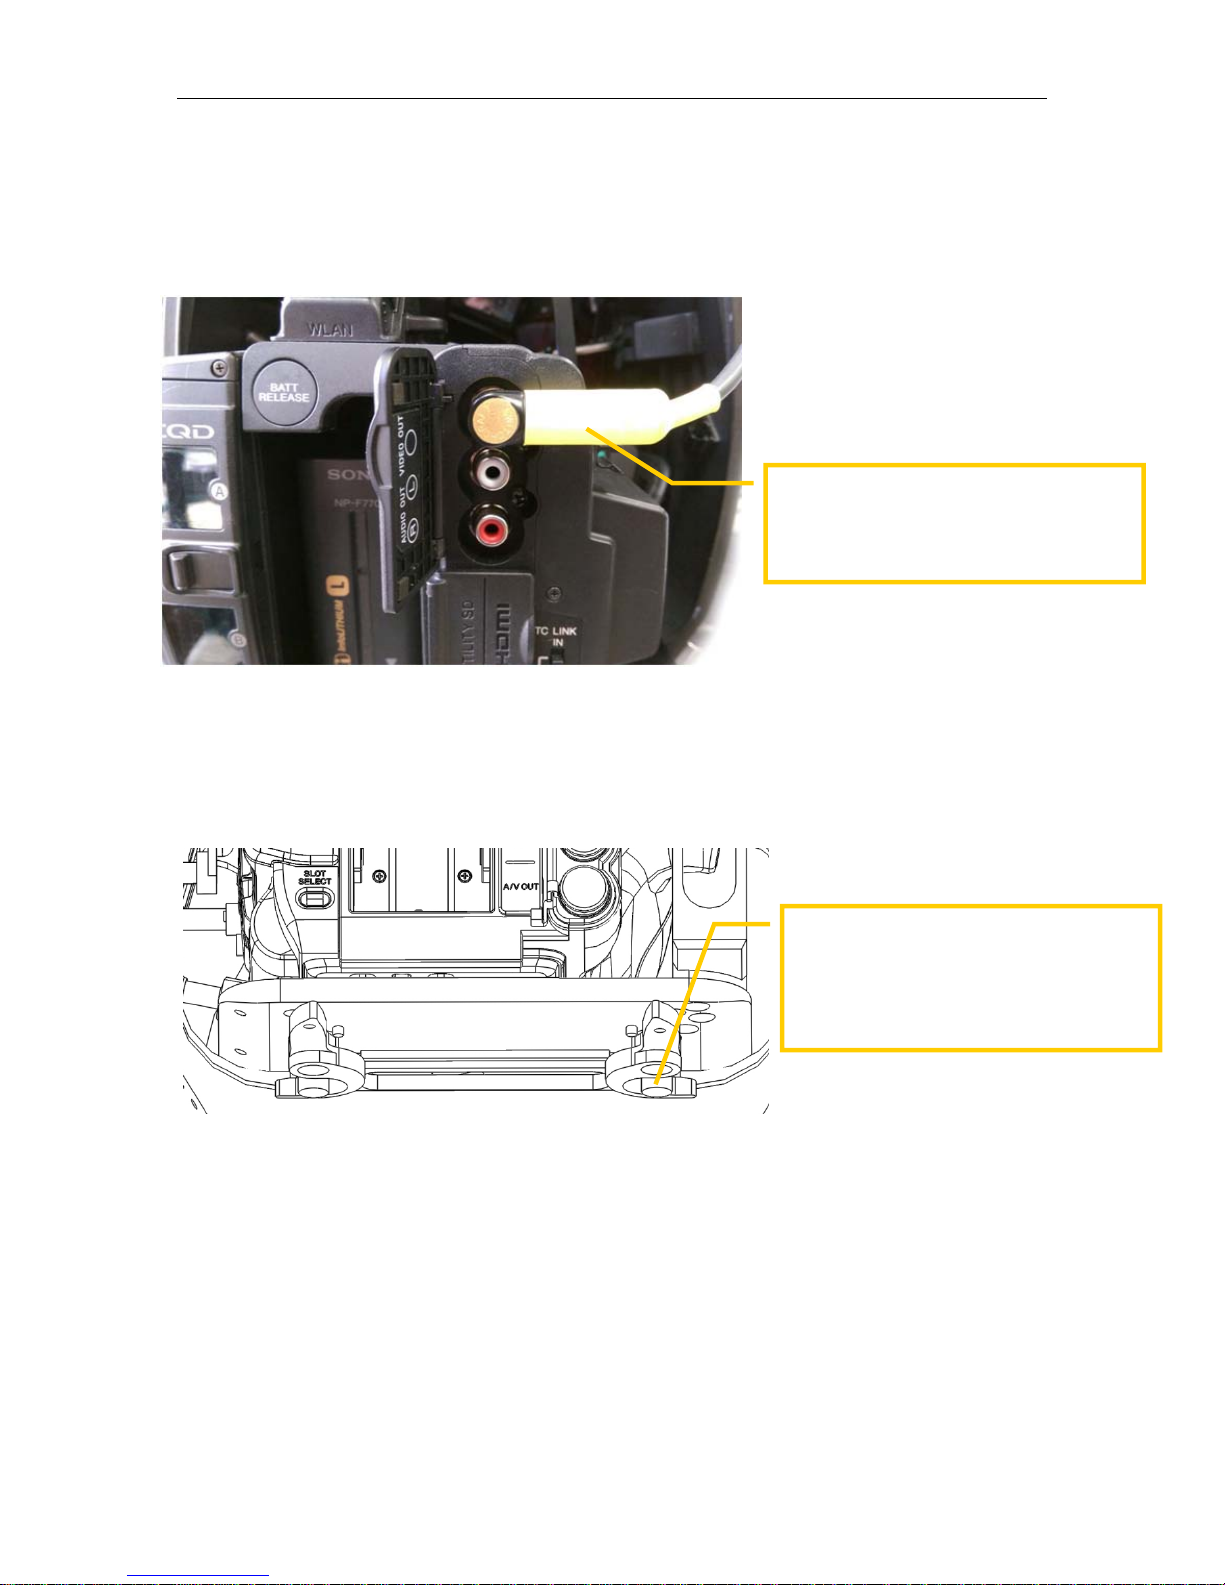
Remove the camera tray from the housing. The tray is released by rotating the
locking latches 90 degrees in opposite directions. Refer to the drawing below. Once
released, the tray will easily slide out of the housing.
Pull out controls on the left side of the front shell as far as they will go. Note that
controls will be addressed in greater detail in a subsequent section.
Pull out video and audio connectors (if applicable) and wrap to the side or top of
the housing out of the way for camera insertion.
To remove the camera
tray rotate the latches
90 degrees.

Camera / Housing setup Page 11
Gates Underwater Products, Inc
13685 Stowe Drive • Poway, CA • 92064 • 858.391.0052 • 800.875.1052 • Fax 858.391.0053
Customer.srvc@GatesHousings.com • www.GatesHousings.com
Installing the Z100 Camera into the Housing
Secure the camera to the tray with the thumbscrew. Tighten snugly but do not over
tighten. If necessary use a coin to tighten. The camera should be secure to the tray
with no play or movement.
Position the camera to enter the housing but do not insert.
Plug the mic connector (optional) into XLR channel 1 at this time. The connection
is found at the right side in front of the of the grip handle. Note that an adapter is
used between the 3.5mm mic plug and XLR connector.
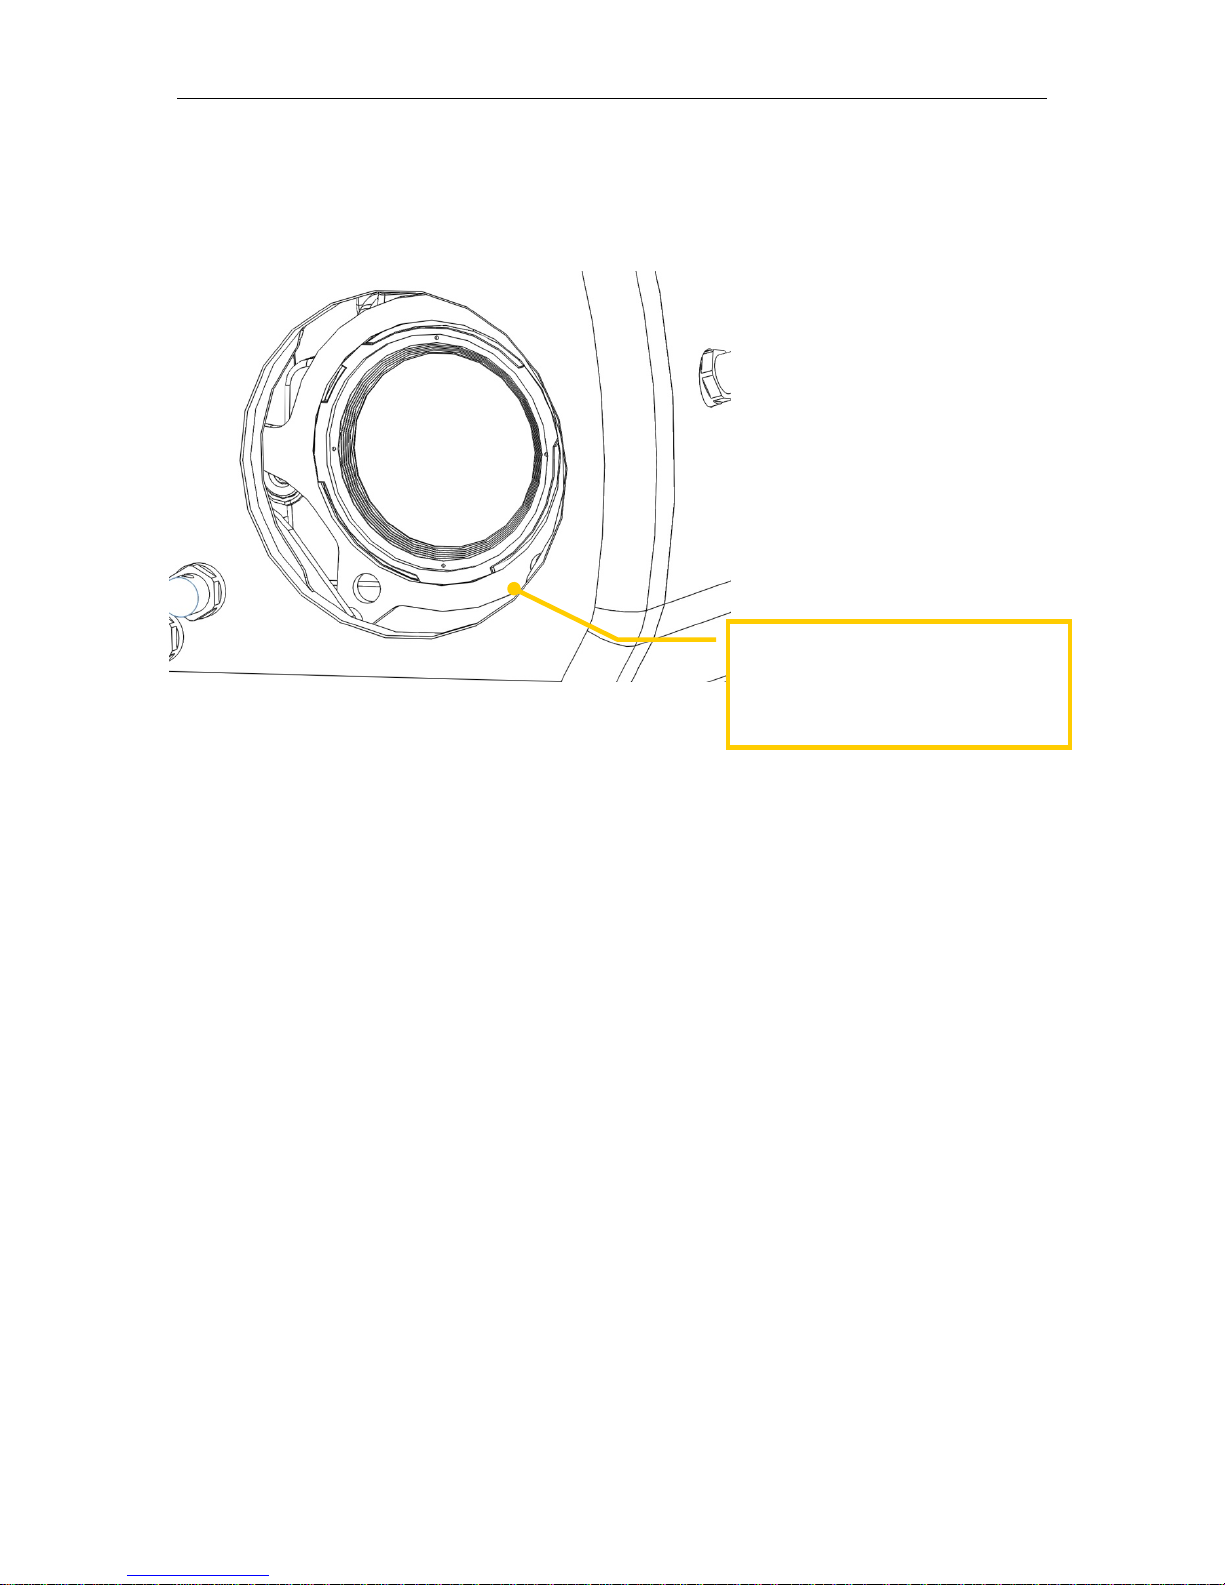
Carefully slide camera on its mount plate into the front housing half. You will
initially need to tilt camera clockwise so the camera’s LCD clears the housing. It
should insert without obstruction and mate with the alignment collar found just behind
the port opening. Be sure the mount tray latches are held to the sides of the tray
during insertion.
If there is obstruction, slide the camera back and look carefully for the obstruction. It
is most likely a control not fully retracted.
Secure camera to the tray
with the thumbscrew.

Camera / Housing setup Page 12
Gates Underwater Products, Inc
13685 Stowe Drive • Poway, CA • 92064 • 858.391.0052 • 800.875.1052 • 858.391.0053
Customer.srvc@GatesHousings.com • www.GatesHousings.com
If you have the microphone
installed, plug into the CH-1
connector.
Position the camera
tray latches to the side
as shown.
Tilt the viewfinder up
as noted on page 8.
Tilt camera and tray
clockwise so LCD will clear
housing.
Camera / Housing setup Page 13
Gates Underwater Products, Inc
13685 Stowe Drive • Poway, CA • 92064 • 858.391.0052 • 800.875.1052 • Fax 858.391.0053
Customer.srvc@GatesHousings.com • www.GatesHousings.com
Secure the camera in the housing by locking the latches. They will have a positive
‘snap’ into position when rotated to the rear of the tray.
Check controls. With the camera turned on and installed into the housing front,
press in each control and confirm proper operation (refer to the next section for more
detail on controls).
Tip:With the camera installed you can now get a good view inside the front
half of the housing and most controls. Use a flashlight if necessary to become
familiar with the operation and ‘feel’ of each control in their proper position prior to
closing the housing.
Slide the camera into the housing.
It should do so without obstruction
and mate with the alignment collar
behind the port opening.
Camera / Housing setup Page 14
Gates Underwater Products, Inc
13685 Stowe Drive • Poway, CA • 92064 • 858.391.0052 • 800.875.1052 • 858.391.0053
Customer.srvc@GatesHousings.com • www.GatesHousings.com
Plug in the video connector if you are using an external monitor.
Connect the optional HD-SDI Surface Feed BNC connector to the HD-SDI video
out connector.
Secure the camera tray by rotating the
locking latches 90 degrees to the rear.
Push in all controls and verify
operation.
If plugging the video cable into the
RCA jack, orient the connector as
shown.
Camera / Housing setup Page 15
Gates Underwater Products, Inc
13685 Stowe Drive • Poway, CA • 92064 • 858.391.0052 • 800.875.1052 • Fax 858.391.0053
Customer.srvc@GatesHousings.com • www.GatesHousings.com
Closing the housing
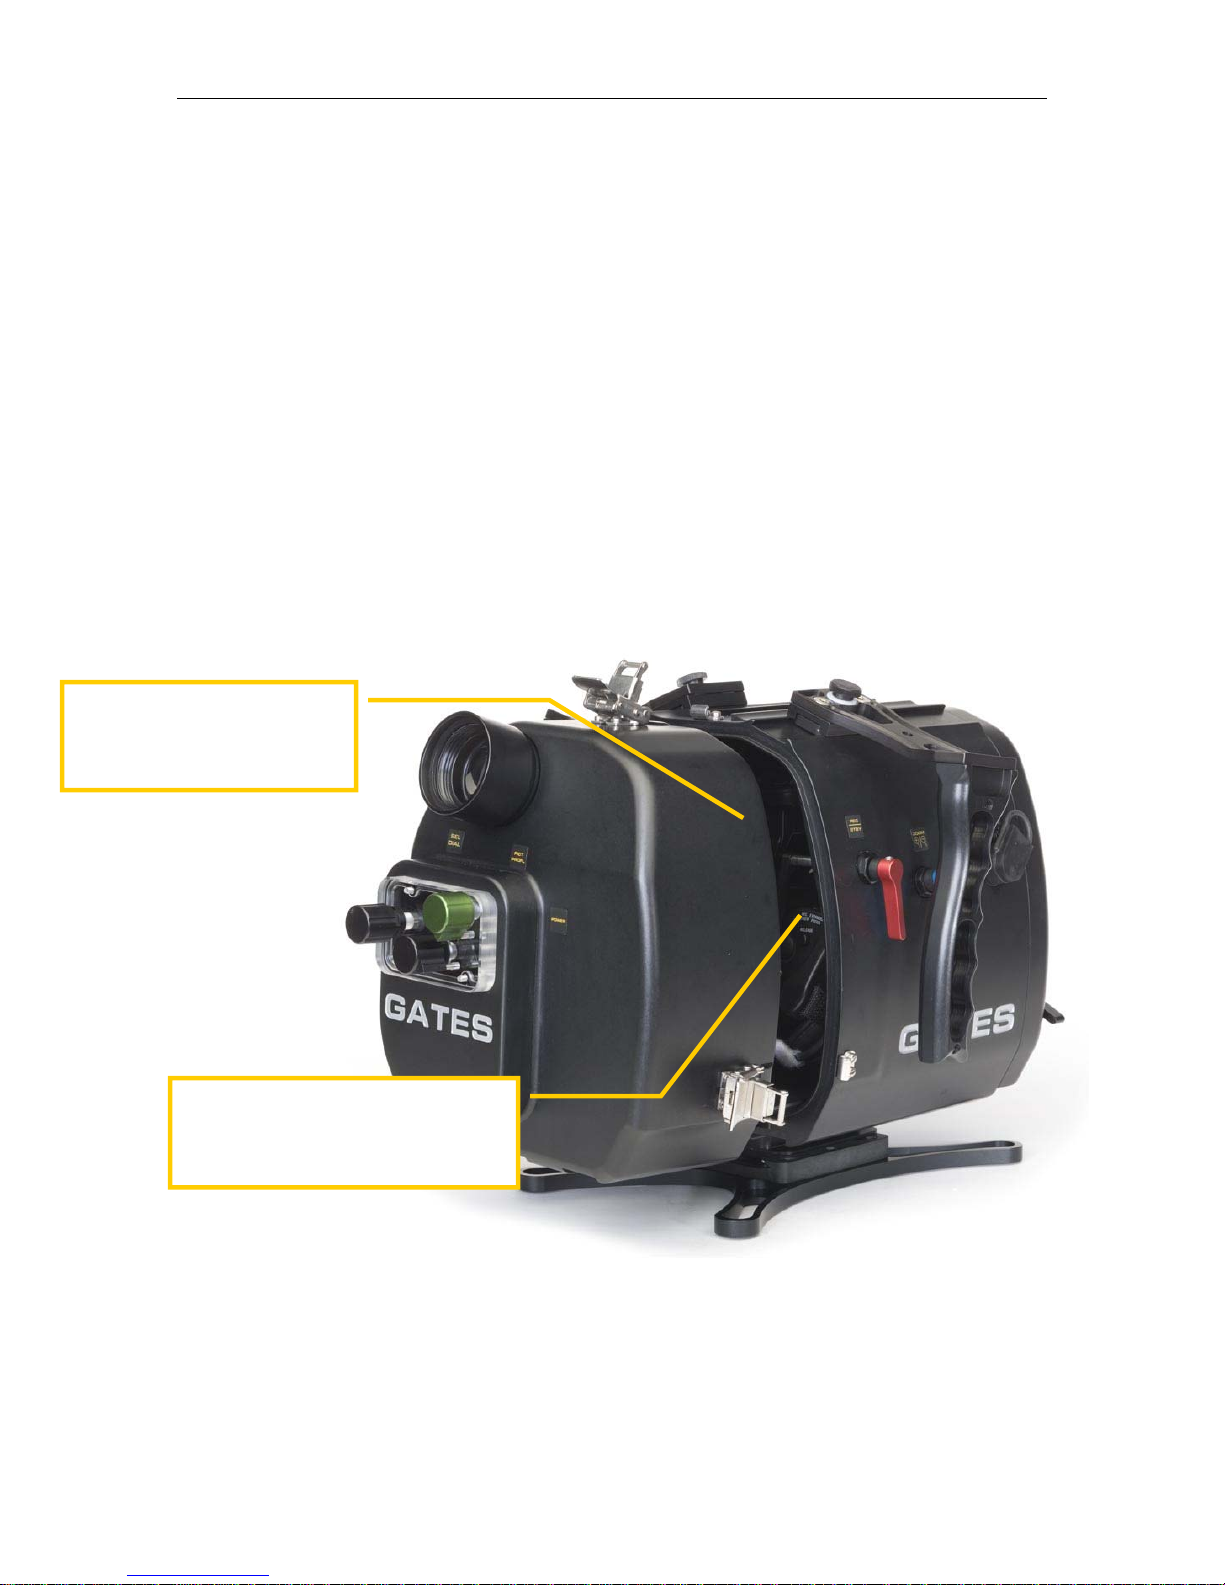
Carefully inspect o-ring on back half and sealing surface on front half. Make sure
they are clean and in good condition.
Mate the two halves of the housing. The housing halves should mate together
easily with no obstructions. If there are any obstructions, separate the halves and
identify the problem before trying again.
Locate and close the two bottom latches at the same time, followed by the top latch.
Caution:The safety latches must be closed and locked prior to use to avoid
opening underwater. It is your responsibility to make sure the latches are
secure, locked, and in good condition. DO NOT enter the water with a faulty
latch. Gates will replace a damaged or faulty latch free of charge.
Check the Magnified Viewfinder alignment. With camera turned on verify the
camera viewfinder is aligned with the magnified viewfinder on the back shell.
Caution:Keep the Magnified Viewfinder capped when not in use. Sunlight
entering the Magnified Viewfinder can damage the camera viewfinder.
The housing shells should mate
without obstruction.
Note: PMW-200 housing shown.
Inspect the o-ring and
sealing surface before
closing.
Camera / Housing setup Page 16
Gates Underwater Products, Inc
13685 Stowe Drive • Poway, CA • 92064 • 858.391.0052 • 800.875.1052 • 858.391.0053
Customer.srvc@GatesHousings.com • www.GatesHousings.com
Carefully inspect the parting line between front and rear housing. If this line is not
even all the way around, remove the back and determine the reason. (O-ring out of
place, hand strap interference, etc.) Failure To Do This May Result In A Wet
Camera!
Tip:A simple test of the main seal is to try and slip a piece of paper past the o-
ring. A properly sealed housing will have no gaps through which the paper can pass.
Tip:The optional Seal Check accessory is an excellent tool to determine
housing integrity. Contact your Gates dealer for more information.
Check the Power control to ensure proper operation.
Perform a final check of all controls for the proper operation.
Check the Port. It should be seated flush on the front bulkhead with no uneven
gaps. If the port is not seated properly, remove the port and re-install per directions
in a subsequent section of this document. Also check that the dot or indent on the
port is aligned with the dot on the housing.
Lock the side latches at the same
time, then the top latch.
Inspect that the parting line is even
and closed all the way around the
housing.
Note: PMW-200 housing shown.

/
Buoyancy and Trim Page 17
Gates Underwater Products, Inc
13685 Stowe Drive • Poway, CA • 92064 • 858.391.0052 • 800.875.1052 • Fax 858.391.0053
Customer.srvc@GatesHousings.com • www.GatesHousings.com
Handle Adjustment
Loosen the thumbscrew at the top of each handle and move forward or back for
optimal control access.
Tighten the thumbscrews to secure the handle in position.
Loosen the thumbscrew
to adjust the handle
forward and back for best
position.

/
Buoyancy and Trim Page 18
Gates Underwater Products, Inc
13685 Stowe Drive • Poway, CA • 92064 • 858.391.0052 • 800.875.1052 • 858.391.0053
Customer.srvc@GatesHousings.com • www.GatesHousings.com
4 oz and 8 oz trim weights shown.
Add/remove as necessary to
achieve the buoyancy you seek.
Move forward/back and
top/bottom to achieve trim.
Note: PMW-200 shown
Buoyancy and Trim
The Z100 housing utilizes trim weights on the bottom, sides and tops of the housing for
adjusting buoyancy and trim to your liking. The table below provides guidance for the
proper amount of weighting for different port / monitor configurations.
The weights can be moved forward/aft on the top and bottom accessory rails for trim.
Be sure to tighten the trim weight snugly so it will remain secure to the housing during
use. The trim weights can also be secured to the housing rear shell sides and footrail as
shown in the image page 18.
When adding lights, monitor or other accessory items the buoyancy / trim will change.
This requires removal and re-positioning of weights to keep system neutrally buoyant
and balanced.

/
Buoyancy and Trim Page 19
Gates Underwater Products, Inc
13685 Stowe Drive • Poway, CA • 92064 • 858.391.0052 • 800.875.1052 • Fax 858.391.0053
Customer.srvc@GatesHousings.com • www.GatesHousings.com
Trim weighting with SP44 and FP44 Ports
Monitor Trim Weights Required
EM50 5 lbs
EM43 4 lbs 8 oz
Trim weighting with SWP44C Port
Monitor Trim Weights Required
EM50 4 lbs
EM43 3 lbs 8 oz
Weight can be located on the sides
of the rear shell as shown.
To do so, loosen the thumbscrew
and remove mounting tab from the
weight, then thread it directly into
the weight bosses on the shell.

Controls Page 20
Gates Underwater Products, Inc
13685 Stowe Drive • Poway, CA • 92064 • 858.391.0052 • 800.875.1052 • 858.391.0053
Customer.srvc@GatesHousings.com • www.GatesHousings.com
Controls
Your Gates housing utilizes 100% mechanical controls to provide you with the most
reliable operation possible. They are all rotational in nature to provide smooth and
consistent operation. There are no batteries to change and require little maintenance
(see ‘Housing Care and Maintenance’ section).
The housing controls are designed by Gates engineers, to the extent possible, to feel
and behave like the camera controls. With time and use, the housing controls will
become quite familiar and you’ll find operating them requires similar skill as the actual
camera controls.
To help acquaint yourself with the housing controls, Gates recommends reviewing each
control individually, how it actuates the corresponding camera control, and operating it to
get a ‘feel’ for the control. You can view all front housing controls with the housing
open. After reviewing all controls, perform a ‘simulated’ dive by operating the controls as
you would in the water.
One final note about controls: when operating any control out of water, you may need to
press the control against the housing, into the position it would naturally find while under
water pressure. The controls are designed to operate properly in this position.
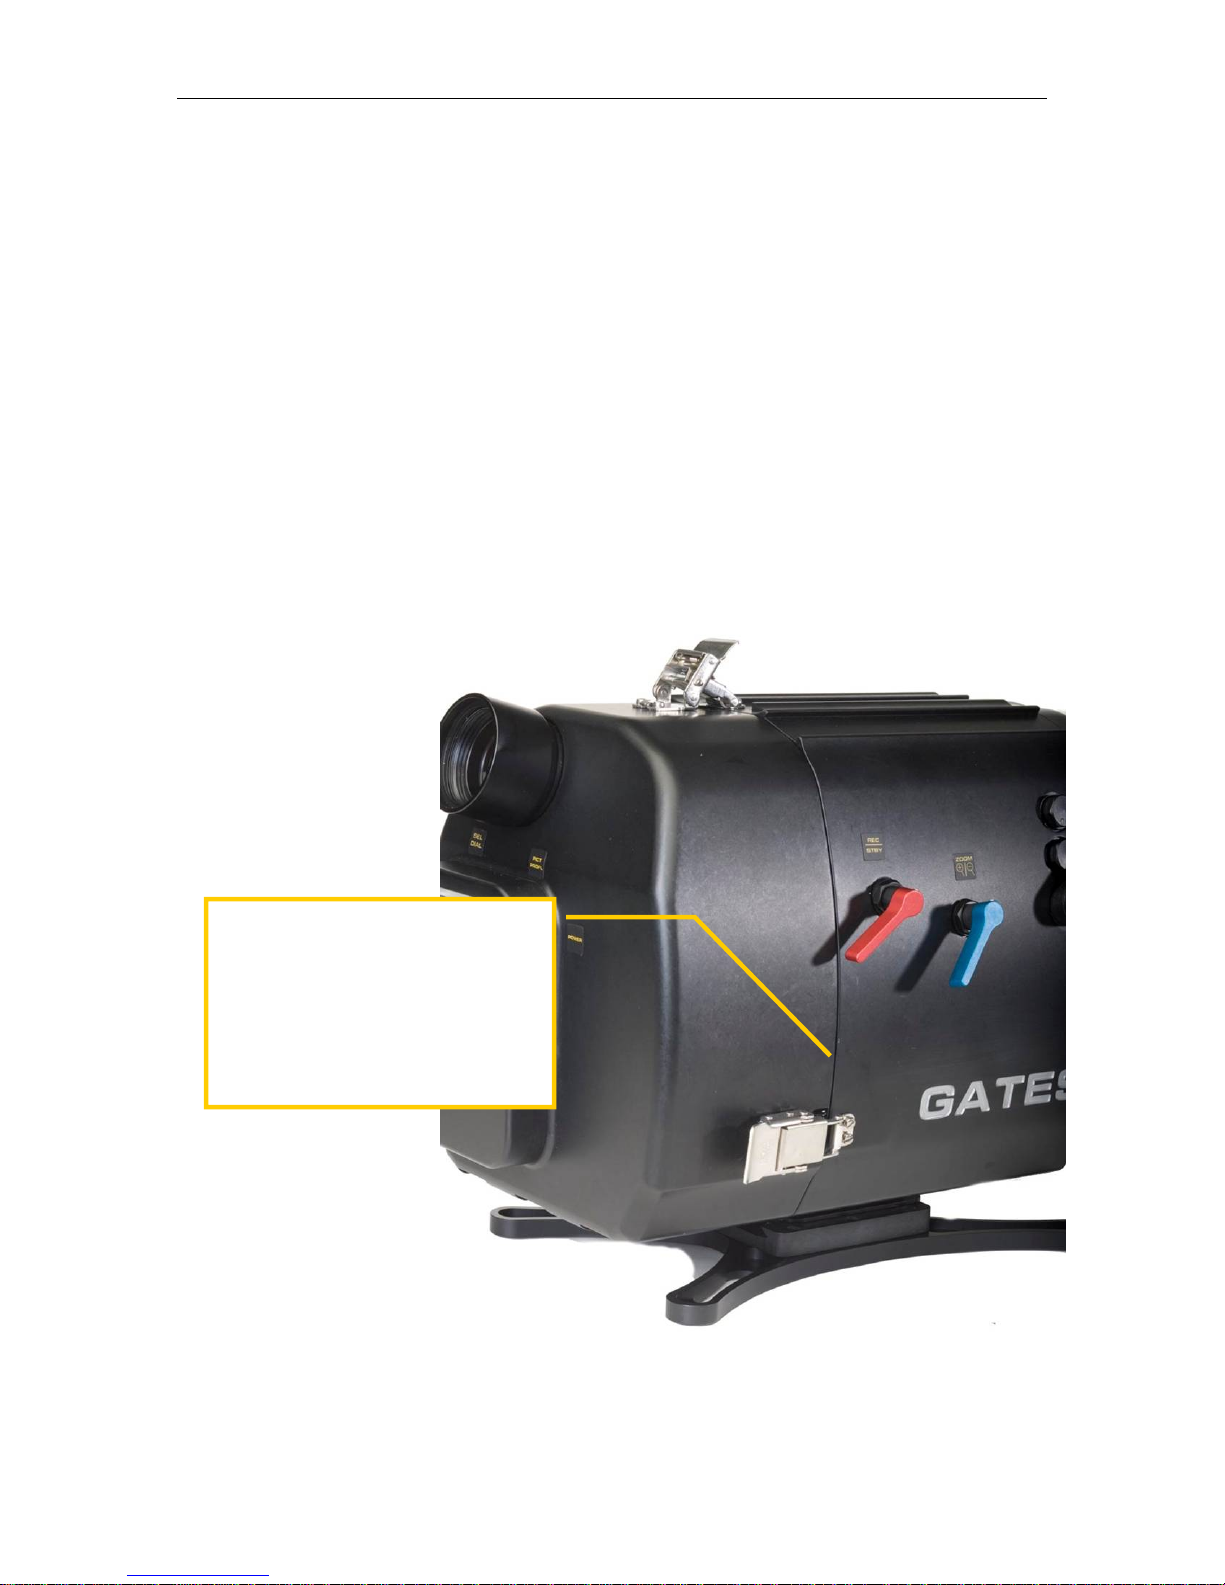
Zoom
Flip Filter
Flip Macro
Record / Standby
Table of contents
Other Gates Camera Accessories manuals


