Gator G2KSR1 User manual

!
Note: This manual is considered correct at time of printing but is subject to change.
For latest manuals and updates refer to the website.
www.gatordriverassist.com
OWNER’S MANUAL
2K
G2KSR1
2K q
HD 1080P
DaSH cam
+
wIFI / GPS / SSR / TLR

2
Table of contents...................................................2
Product overview..................................................3
Product features....................................................3
System contents...................................................4
Optional accessories.............................................4
Product structure...................................................5
Inserting Micro SD Card........................................7
Fixing the Dash Cam.............................................7
Installation of Dash Cam.......................................8
Button function......................................................9
Video recording screen.......................................10
Mode button........................................................11
Menu button (Settings/Setup).............................11
Video settings menu............................................12
Still picture settings menu...................................13
Playback settings menu......................................13
Setup menu (All modes)......................................14
Pairing to your Smartphone.................................15
Dash Cam startup screen....................................16
Dash Cam interface screen.................................17
Photo & Video file display screen........................18
Photo & Video download screen.........................19
Download to your phone.....................................20
GPS logger.........................................................20
Dash Cam features explained.............................21
Formatting the SD card.......................................23
Internal battery....................................................23
Factory reset.......................................................23
Connecting to a computer...................................24
Product specifications.........................................25
Trouble shooting guide........................................26
Safety information & warnings............................31
Infringement of copyright warning.......................31
Technical assistance...........................................32

3
Thank you for purchasing the Gator G2KSR1 2K QHD Dash
Cam. This product is a convenient and durable traveling
video and data recorder. Please ensure that you have read
the product manual and instructions in full, prior to
installation and use. Failure to do so may result in product
failure/damage or incorrect operation and therefore impact
the product performance.
Product overview
Product features
Video resolution 2K QHD 1440P
2.0" 4:3 High-resolution LCD screen
161 Degree wide angle lens
WiFi & GPS tracking via App
GPS Tracking (PC & MAC supported)
Speed sign speed limit recognition (SSR)
Traffic light recognition (TLR)
Stop & Go stationary vehicle function
G-Sensor function
Seamless cycle loop recording
Adhesive surface mount
12V in-car USB charger
16GB Micro SD card included
Supports Micro SD card class10 up to 128GB

4
System contents
Optional accessories (Sold separately)
Dash Cam & Adhesive Mount 16G Micro SD Card
Dash Cam GPS
power cable
NOTE: The GUNIHWC Hardwire Kit is a simple plug
and play solution to hardwire any Dash Cam or device
using Mini or Micro USB for power.
The Hardwire Kit is compatible with 12V/24V DC for car
or truck installations.
Video resolution 2K QHD 1440P
2.0" 4:3 High-resolution LCD screen
161 Degree wide angle lens
WiFi & GPS tracking via App
GPS Tracking (PC & MAC supported)
Speed sign speed limit recognition (SSR)
Traffic light recognition (TLR)
Stop & Go stationary vehicle function
G-Sensor function
Seamless cycle loop recording
Adhesive surface mount
12V in-car USB charger
16GB Micro SD card included
Supports Micro SD card class10 up to 128GB

5
Product structure
1. Led Indicator
2. Mounting bracket fixing point
3. Power/OK button
4. Mode button
5. Up button
6. Menu button
7. Down button
1
3
4
5
6
7
2

6
8. Speaker
9. Camera lens
10. Micro USB
Power socket
11. Reset button
12. Micro SD
card slot
9
10
11
12
8

!
7
Fixing the Dash Cam
Suggested

8
1. Check the mounting position of the Dash Cam
camera first before installation.
2. Ensure windscreen is clean and free of debris. Use
an Alcohol wipe to enhance adhesion.
3. Place mounting bracket on Dash Cam after checking
Dash Cam position. Remove backing off 3M tape and
press & hold firmly to windscreen for 60 seconds.
4. Fix where the vision is not blocked (Place close to
rear-view mirror is recommended). Do not install the
device on airbag or within its working range.
5. Insert Micro SD card into the Dash Cam
6. Insert power cable into the Micro USB port of the
Dash Cam. Connect the DC charging end of the power
cable into the 12V power socket of your vehicle.
7. Adjust the camera angle to get the best view. Ensure
1/4 of the vehicles bonnet is visible from the bottom of
the screen for alignment.
8. Turn vehicles ignition on, and the Dash Cam and it
will automatically start recording.
9. When recording the recording indicator LED will flash
red.
10. For the Dash Cam to work it must receive power
from the charging adapter. Once power is removed or
turned off the Dash Cam will save the current file and
turn off.
Installation of Dash Cam

9
1. To power ON and OFF, press and hold
for 3 seconds.
2. Short press to confirm selections.
3. When recording video, short press to
stop & start recording.
1. Short press it to switch modes when
not recording
2. During the recording process, short
press to turn microphone recoding ON
or OFF.
Short press to choose file or menu option
1. Short press to enter/exit menu mode &
playback features.
2. Short press in recording mode to lock
current video file.
1. Short press to choose file or menu
option
2. Short press in recording mode to open
WiFi function
Button function
Power/OK
Button
Mode
Button
UP
Button
Menu
Button
Down
Button
1
10 11 12
15
14
13
24
3 5 6 7 8 9
When connected to power the Dash Cam will
automatically turn on. Once power is disconnected it will
automatically turn off and save the last recorded file.
A video camera icon at the top left corner of the LCD
flashes to signify you are recording video. A timer will
appear on the top left. The LED recording indicator will
start flashing RED also. To stop and start recording,
simply press the Power button.
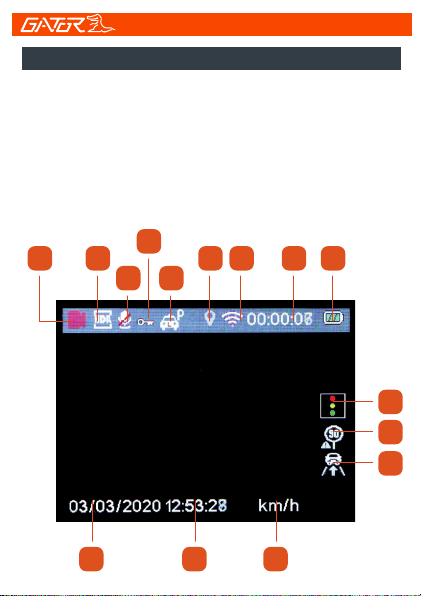
Video recording screen
10

!
11
1) Video mode
(Flashes when active)
2) WDR icon
3) Microphone icon
4) Locked file icon
4) Parking mode
5) GPS icon
6) Wifi icon
7) Recording timer
8) Battery meter
9) Date stamp
10) Time
11) Speed measurement
12) Traffic light recognition
(TLR)
13) Speed sign recognition
(SSR)
14) Stop & Go icon
Video recording screen cont...
Mode button
When in recording mode, stop recording and press the
Mode button to switch between Movie, Picture &
Playback modes.
Menu button (Settings/Setup)
Settings can only be accessed when not in recording
mode. Each mode has its own settings to edit. Press
the Menu button once to access settings, twice to
access setup settings for each mode.

12 !
!
DescriptionFunction
Resolution
Stop and go
Exit
HDR
Loop recording
Exposure
Record Audio
G Sensor
Date stamp
Traffic light
recognition (TLR)
Speed limit signs
traffic (SSR)
QHD P30, FHD P60, FHD P30,
HD P30
Off / On
Exit Menu
Off / On
OFF, 1, 3, 5 or 10 Minutes
+2/3,+1/3,+0.0,-1/3,-2/3,-1.0,
-4/3,-5/3,-2.0
Off / On
Off, Low, Medium or High
Off / On
Off / On
Off / On
Video settings menu
Settings can only be accessed when not in recording mode.

13
Exit
Still picture settings menu
Playback settings menu
DescriptionFunction
Capture Mode
Function
Delete
Quality
Resolution
ISO
Date Stamp
Anti-Shaking
Exit
Single, 2, 5, 10 second timer
Description
Delete Current / Delete All
Protect Lock or unlock video files
Slide Show Slide shows recorded files
Exit Menu
Fine, Normal, Economy
12/10/8/5/3/2/1.3 M & VGA
Auto, 100, 200, 400
Off, Date, Date/Time
Off / On
Exit Menu
14
Exit
Setup menu (All modes)
DescriptionFunction
WiFi
Parking Monitor
Format
Screen Saver
Date / Time
Delayed Power Off
Language
Beep Sound
Frequency
Speed Unit
GPS
Off / On
Off, Low, Medium or High
Format SD card on Dash Cam
Default Setting Restore default settings
Version System Version
Exit Menu
OFF, 15, 30 Seconds or 1 Minute
DD /MM / YY
5, 10 or 15 seconds
English, Vietnamese
Off, Low, Medium or High
50Hz, 60Hz
Off, MPH, KMH
Off / On

15
Pairing to your Smartphone
Recording video, taking photos, live streaming, GPS data,
download files and changing Dash Cam settings can all be
done via WiFi and downloading the ‘GATOR G2KSR1’
APP. For iPhones search the APP Store or for Android
devices via Google Play.
1. To pair the Dash Cam with your smartphone, go into the
setup menu on your Dash Cam and turn Wifi on.
2. The Dash Cam will display the SSID name and
password to connect to your phone.
3. Then go to your WiFi settings on your smartphone, turn
WiFi on, search for devices and it should display all
devices available for connection.
4. Select your Dash Cam model SSID name as displayed
on the Dash Cam’s screen.
5. Enter the password 12345678.
6. Once successfully paired to your DASH CAM the display
will say WiFi Connected
7. A green WiFi symbol will also appear on the top of the
Dash Cam’s screen
8. Then launch the ‘GATOR G2KSR1’ Dash Cam APP to
access functions and settings.
9. On the Home App screen select wording ‘WIFI
CAMERA’ and then your Smartphone should now display
your Dash Cam’s view in real time.

Dash Cam startup screen
16
Once your
Smartphone’s
WiFi is connected
to the Dash Cam,
press here to
connect with the
G2KSR1 APP.

17
Dash Cam interface screen
Current
Resolution
Start/Stop/
Take picture
View recorded
video &
photo files
Settings
Live View
Edit
Resolution
Video/Photo
modes
Disconnect from
Dash Cam

18
Photo & Video file display screen
Recorded file
Types
Select to
download
photo & video
files to your
Smartphone
Recorded file
File size

19
Photo & Video download screen
Check to
select files
Press to
download

20
To download recorded files to your Smartphone, select
the type of file, photo/video/lock video. If you have a lot of
videos, it may take a bit of time before it will load images
onto your screen, it may appear empty to start with, be
patient, the video images should appear in a minute.
Click on the circle icon at the top right of each thumbnail,
this will change to a tick icon ready for download. Then
click on the downward pointing arrow at the bottom left of
the screen. Patience is needed while it downloads the
videos, the more videos you select, the longer it will take
to download. Please keep in mind that this footage is
High definition and is quite large. (Make sure there is
sufficient space on your phone).
The GPS data is automatically saved to the video files.
In order to see the GPS data, you will need to download
the video from the Dash Cam to your computer and view
it through the free downloadable software (GPSPlayer)
from our website. Go to www.gatordriverassist.com and
search for the model G2KSR1. This viewer is for both PC
& MAC format.
NOTE: To avoid any possible GPS signal interference,
make sure the Dash Cam is away from any other car
audio equipment.
GPS logger
Download to your phone
Table of contents
Other Gator Dashcam manuals

Gator
Gator GRV43SKT User manual

Gator
Gator GHDVR82W Operational manual

Gator
Gator GRV90MKT User manual

Gator
Gator GDVR110 User manual

Gator
Gator DUAL-TECH GRv43MDT Operational manual

Gator
Gator GHDVR310 User manual

Gator
Gator HDDVR308 User manual

Gator
Gator GDVR190 User manual

Gator
Gator GHDVR380 User manual

Gator
Gator HDDVR 186 User manual

Gator
Gator HDVR303 User manual

Gator
Gator HDVR245H User manual

Gator
Gator GHD5MR User manual

Gator
Gator GHDVR370 User manual

Gator
Gator HDDVR427 User manual

Gator
Gator GHDVR291 User manual

Gator
Gator HDDVR250 User manual

Gator
Gator GR430EDR User manual

Gator
Gator GHDVR80W User manual

Gator
Gator GHDVR350 User manual


