Gator GDVR110 User manual

!
Resolution Screen Size
1.5”
140
Wide AngleFile
Locking
G Sensor
Suction
Mount
SOS
720P
HD
HD 720P
DaSH cam
Manual
GDVR110
!
2
Introduction
Product features
Product overview
HD 1280 x 720 @ 30FPS
140 Degree HD wide angle lens
Time and date stamp
G-Sensor function
Mini USB interface
Seamless cycle loop recording
Suction cup car mount
Built-in MIC and Speaker
12Vin-car USB charger
4 GB Micro SD Card (Supports up to 32GB, class10)
Thank you for purchasing the Gator GDVR110 HD 720P Dash Cam.
Please ensure that you have read the product manual and instructions in
full, prior to installation and use. Failure to do so may result in product
failure/damage or incorrect operation and therefore impact the product
performance.
The Gator GDVR110 Dash Cam has been designed to provide high
definition recordings of your trips for security and evidence in the case of an
accident. The Dash Cam simply mounts to the windscreen and records
footage onto a Micro SD memory card.It has a G-sensor with adjustable
sensitivity and loop recording functionality.

3
Table of Contents
Introduction 2
2
2
3
Package components 4
Product structure 5
Installation of Dash Cam 6
7
Indicator lights 7
8
9
Dash Cam functions
Menu setting features explained
Resetting Dash Cam
Product specifications
Infringement of copyright warning
10
10
12
12
15
17
17
18
Product overview
Product features
Table of contents
Video/Photo playback
Dash Cam glossary
Safety information & warnings
Technical assistance
Fixing the Dash Cam
16Trouble shooting guide
Instructions for video and photo operation

!
4
Package components
GDVR110 Mounting
Bracket
USB to Mini USB Car Charger
GDVR110 User
Guide
4G Micro SD
Card

!
5
Product structure
1) Up
2) Menu
3) Down
4) Mini USB
5) Lens
6) Speaker
7) OK Button
8) Mode/Lock Button
9) Power Button
10)LCD
11)Micro SD Card Slot
12)Mounting Slot
13)MIC
14)Reset
15)IR LED

6
!
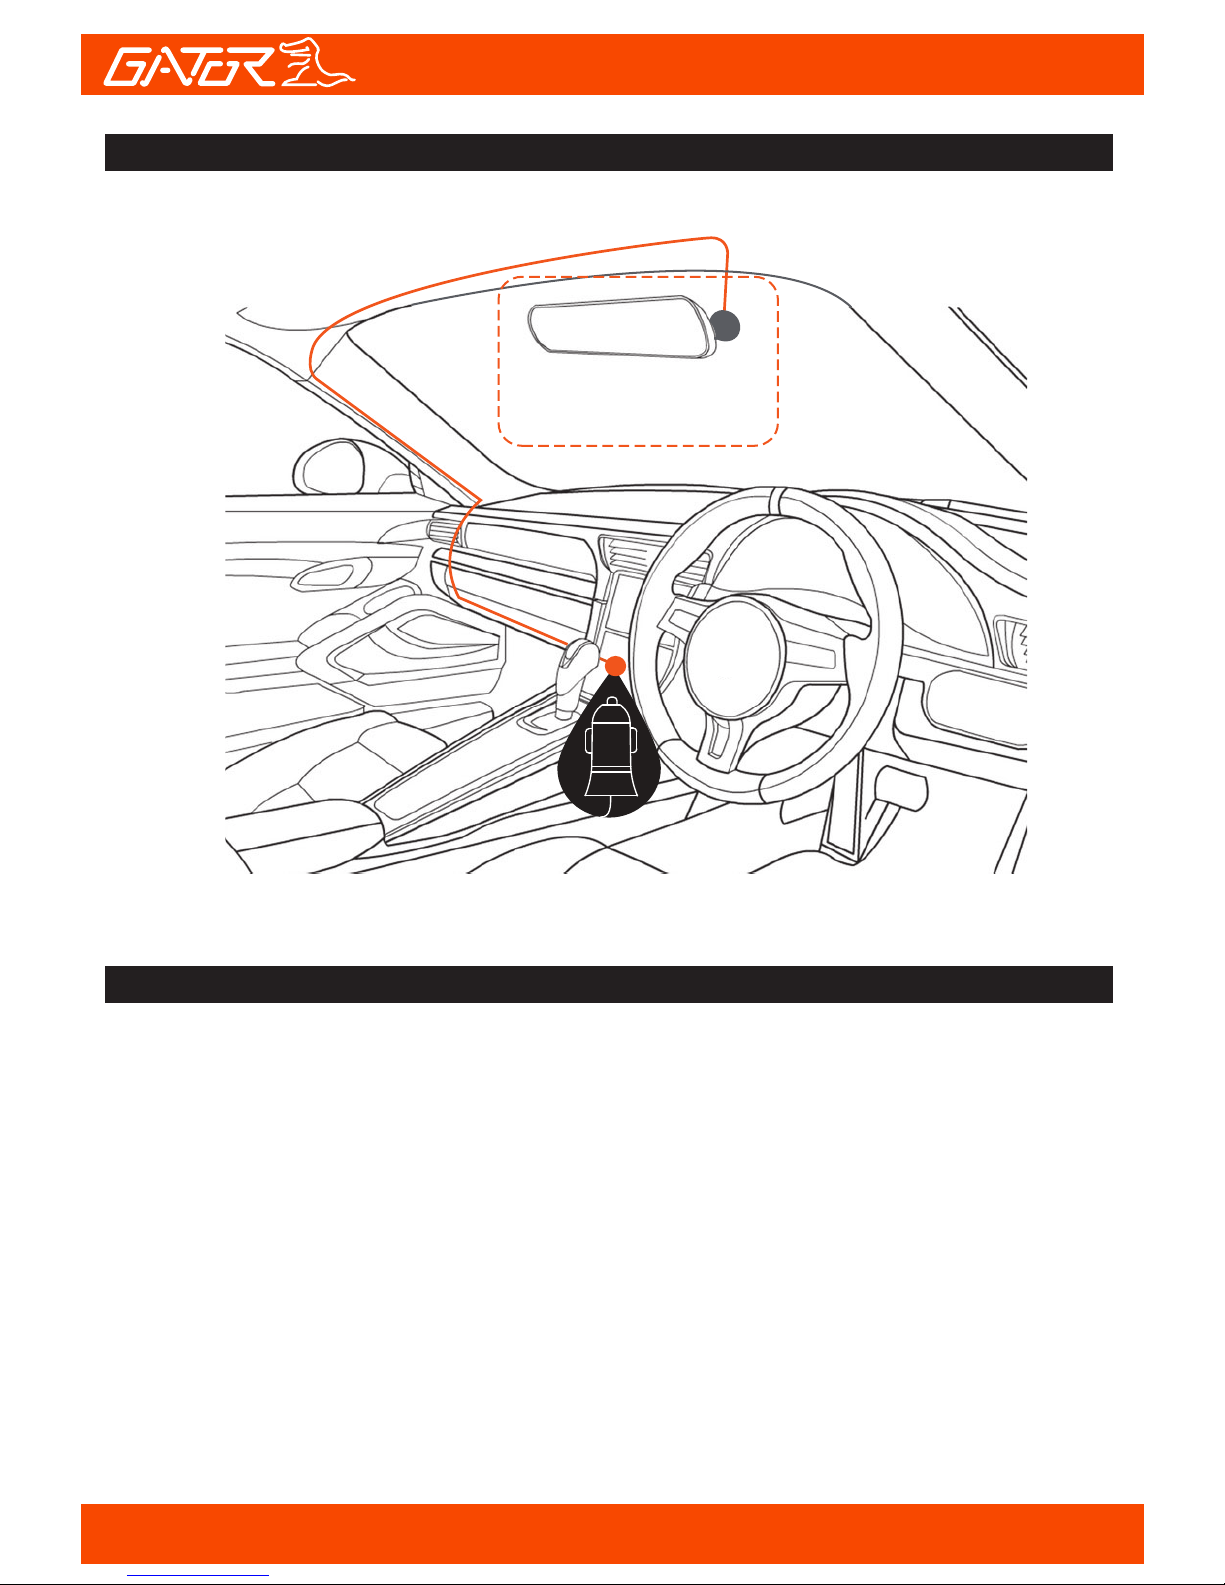
Installation of Dash Cam
1. Ensure windscreen is clean and free of debris. Attach suction cup to
the windscreen and lock into position with the lever.
2. Fix where the vision is not blocked (Place close to rear-view mirror
is recommended). Don't install device on airbag or within its working
range.
3. Insert Micro SD card into the Dash Cam
4. Insert Mini USB end of the power cord into the Mini USB interface/
charging point of the Dash Cam. Connect USB charging end of the
cable into USB socket adapter, place adapter into 12V power socket
of vehicle.
5. Adjust the mounting bracket and rotate the camera direction to get
the best view. Ensure of the vehicles bonnet is visible from the
bottom of the screen
for alignment.
6. Turn vehicles ignition to accessories, push the power button on the
Dash Cam and it will power ON and start recording automatically, you
will hear an audible tone once powered.
7. A blue LED will start flashing when recording has started.
8. A solid red LED will show when the Dash Cam is receiving power.
9. For the Dash Cam to work it must receive power from the charging
adapter. Once power is removed or turned off the Dash Cam will save
the current file and turn off.
7
Suggested
Indicator lights
Fixing the Dash Cam
1. When the blue LED is flashing, the Dash Cam is in recording mode.
3. When the red LED is on, the Dash Cam is being powered by the car.
2. When the blue LED is solid the Dash Cam is in standby mode.
/
To turn on the Dash Cam press the power key once, the red indication
lamp will be light up if it is connected to a power source. To turn it off, hold
down the power button and the device will turn off.
Press the Mode button to switch to video mode if not already. To start
recording in video mode press the OK button to start the recording. You
know it is recording by the red circle indicator on the top left corner of the
LCD. To stop the recording, simply press the OK button again.
Press the Mode button to switch to photo mode. There is a camera icon at
the top left corner of the LCD to signify you are on photo mode. To take a
photo, press the OK button. The screen will flash and make a camera sound
when a picture is taken. Pressing the Menu button in photo mode will allow
you to adjust the photo resolution, image quality and other photo settings.
Powering device on and off:
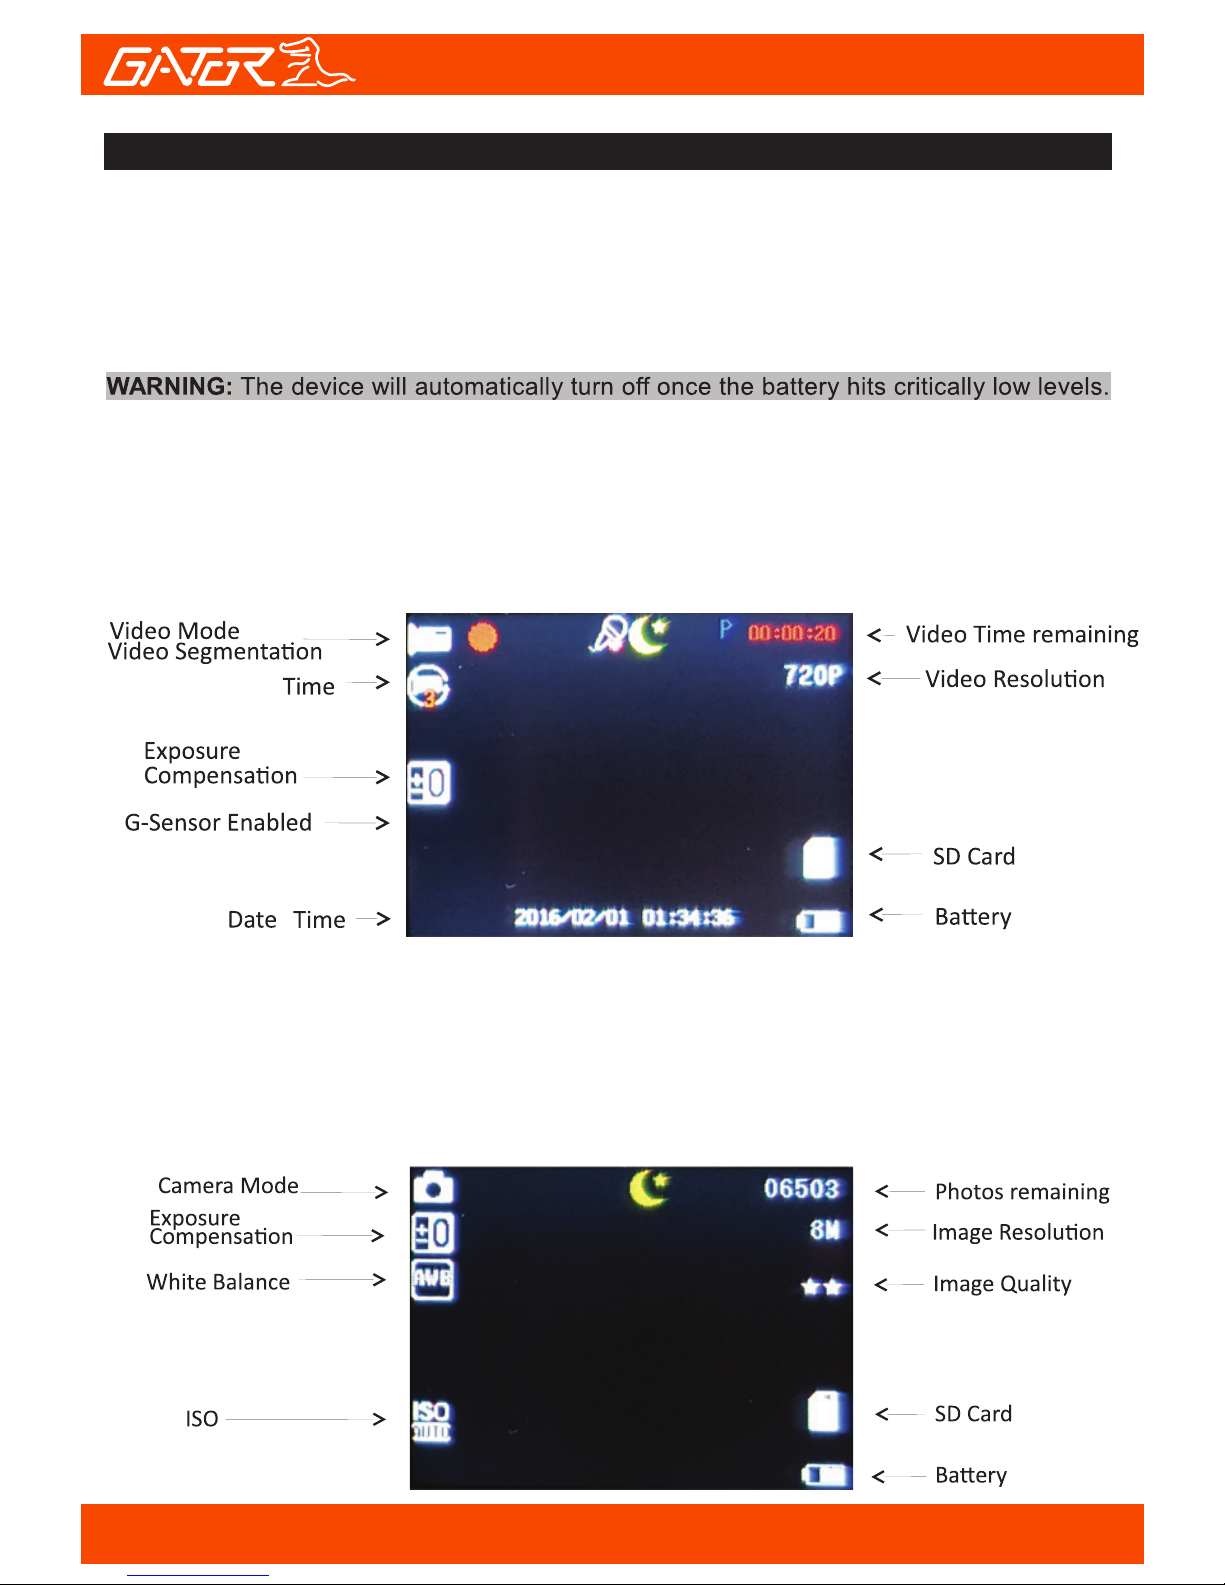
Video Mode
Photo Mode
8
Instructions for video and photo operation
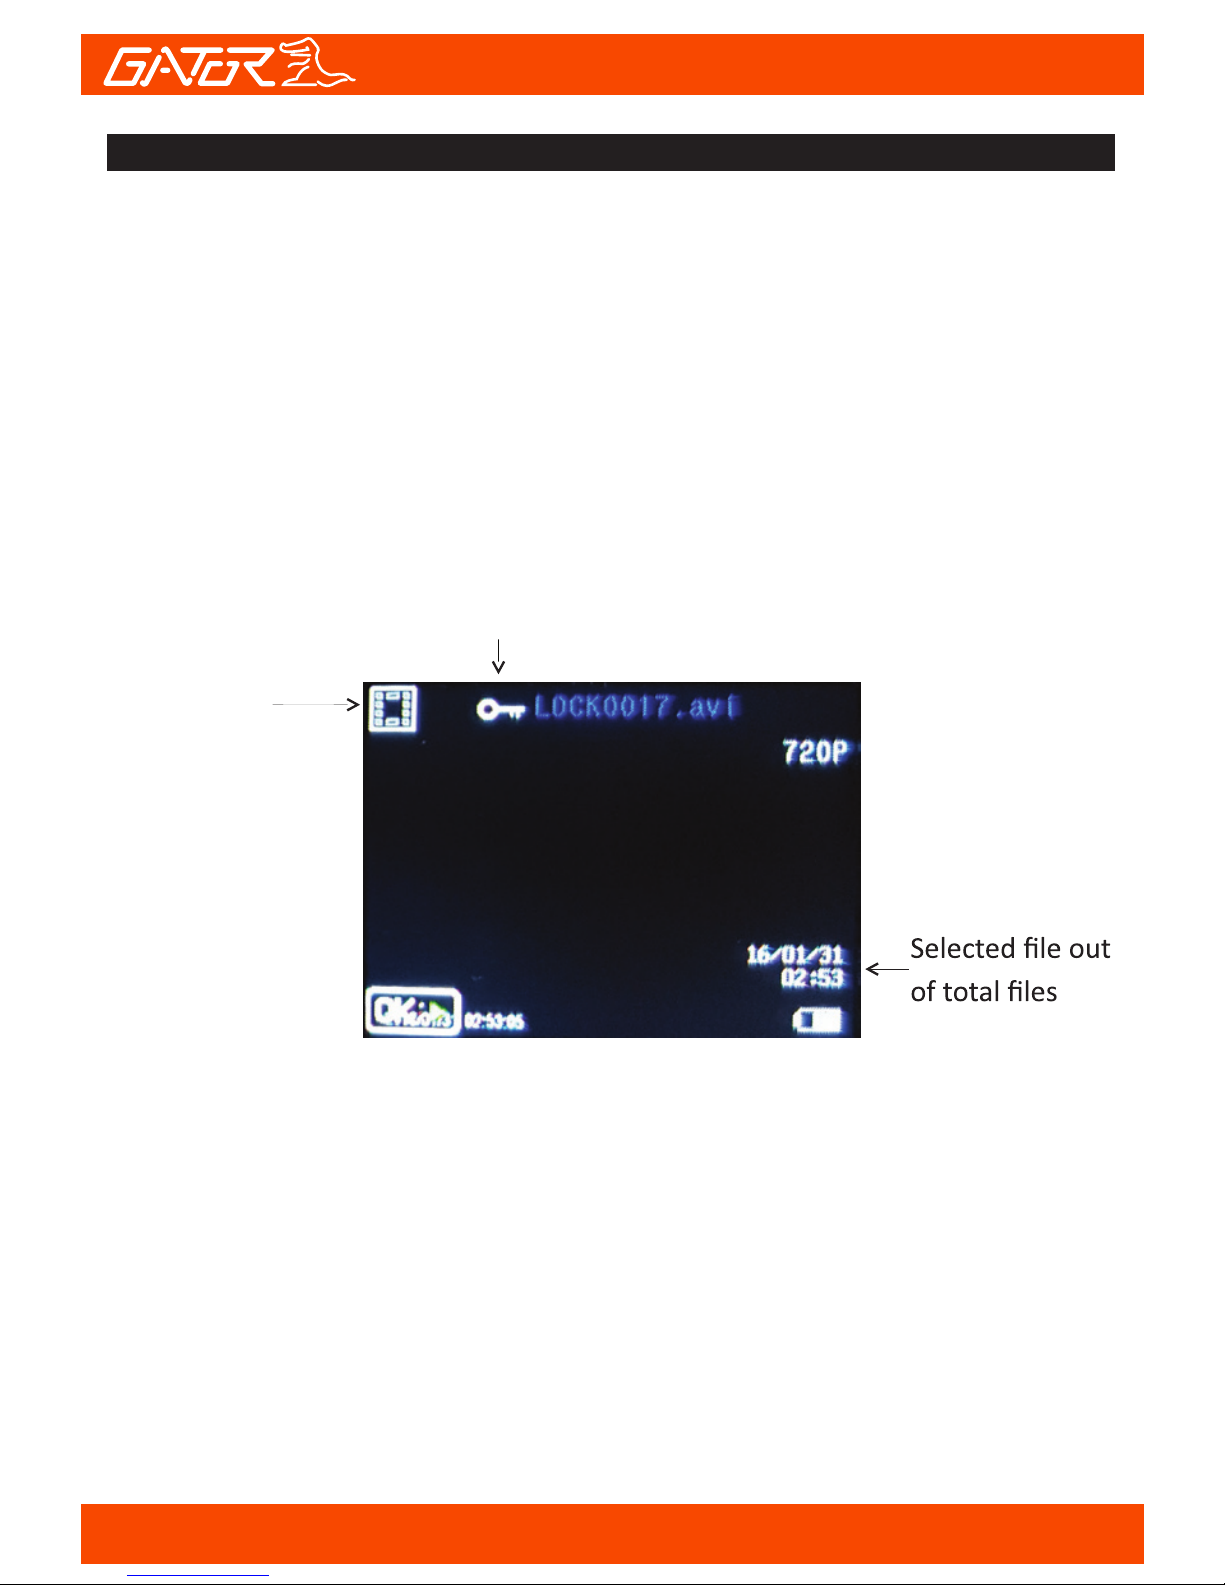
Press the mode button until you see the video reel icon on the top left of
the screen representing playback mode. Using the arrow buttons, you can
choose between all your recorded videos or photos. The protected files
have a lock icon meaning they cannot be deleted until unlocked. Press the
OK button to select a file for playback. Pressing the Menu/Mode button will
give the option to delete the file or unlock the file. Simply press the Mode
button again to return to video mode.
Playback Icon
Protected File
Video/Photo playback
9

Menu Settings
Press the Menu button to get into the menu settings. You can navigate the
settings menu by using the Up/Down buttons. To change or edit a selected
setting, press the OK button. Press the menu button again to get out of the
menu settings.
USB Mode
When connecting a USB cable with a PC, the Dash Cam will present two
options. ‘Mass Storage’ allows you to transfer your videos and photos to
your PC.The ‘PC Camera’ option allows you to use your Dash Cam as a
webcam for your computer.
When the Dash Cam is charging, a red indicator on the Dash Cam glows
red. The Dash Cam takes about 2 hours to fully charge. When the Dash
Cam hits full charge, the red indicator will turn off. The Dash Cam can be
charged multiple ways:
1. Using the provided Mini USB cable to connect to a USB interface for
charging. 2. Using the provided car charger
Menu setting features explained
Resolution:
The recommended resolution should be set at ‘720p 1280x720’ in
order to get the best quality footage.
Loop Recording:
This feature allows you to set the size of the files your Dash Cam will
record before saving and creating a new file. We recommend the Dash
Cam to be set to ‘3’ minute files
Exposure:
This feature will change the white input. We recommend it always be
set at ‘+0.0’.
Record Audio:
This Feature will allow you to turn the Dash Cam’s recording sound on
or off. If you want to stop the Dash Cam recording sound in the cab of your
vehicle, set this feature to ‘off’.
DASH CAM functions
10

Date Stamp:
This feature will stamp the date and time on all your footage produced by
your Dash Cam.
G Sensor:
This feature allows you to set the sensitivity of the Gravity sensor in the Dash
Cam. We recommend this be set to ‘4G’ to help stop false or irrelevant readings.
Parking Mode:
When enabled, the Dash Cam will automatically turn on and start recording
when it detects a impact against the car when parked. A ‘P’ icon appears on
the screen when on. Settings are 2G, 4G & 8G for sensitivity. We recommend
8G (less sensitive) for false triggers.
Beep Sound:
Allows you to turn the beeping sound on or off.
Date/Time:
This feature will allow you to change the year, month, day and time. To change
the date simply use the arrow keys to go up or down. Press the OK button to
move onto the next section. Again, use the arrow buttons to go up or down.
Once through all the sections, pressing OK again will finish the setup.
Language:
Allows you to choose from a selection of languages that include: English,
French, Spanish, Dutch, Italian, Simplified Chinese, Traditional Chinese,
Russian, Japanese, Korean and Czech.
Frequency:
This feature allows the best recording in conditions where street lights and
ac lighting is used. The Australian standard frequency is 50HZ so it should
be set to ‘50hz’.
Screen savers:
This feature will turn your LCD off after 1, 3 or 5 minutes but will continue to
record regardless. This feature is useful for night driving as having the LCD
on could be a distraction.
Format:
This feature allows you to format/delete all the files off your micro SD card
and also reinstalls your DCIM directory and Dash Cam software on your SD
card so the micro SD card can operate with your Dash Cam free of errors.
Default Setting:
This feature will reset all your settings and return your Dash Cam to the factory
standard settings.
Version:
This simply shows the firmware/software employed by the Dash Cam’s hardware.
11

Resetting DASH CAM
To hard reset the device in the case of a system jam or crash. Insert a
fine point paper clip into reset hole on the top of the unit.
DASH CAM glossary
Micro SD Slot:
Where the Micro SD card is inserted (Max size is 32GB Class 10).
USB Interface:
The USB charging adapter is used to power the Dash Cam with the Micro
USB cable. This cable can also be used to connect to a computer for data
transfer.
G-sensor Function:
The G-sensor function activates in the case of a car accident by determining
the gravitational acceleration (1g = 9.8 meters/second^2). When this function
activates, the Dash Cam will take a picture.
Ignition Auto Power On/Off:
Once power is connected to the device (ie: when the vehicles ignition is
turned on), the Dash Cam will automatically turn on and start recording.
When the power is disconnected, or car is turned off, the Dash Cam will
automatically save the file and shutdown.
MIC:
Audio receiver for video recording.
Resolution:
Resolution is 1280x720 @ 30P
Record Time (Loop):
This feature allows the Dash Cam to record over the oldest recoded files
once the card is full. The card records video in 3 minute files. If you want to
keep any of the files it is best to upload them to your computer.
12

Mute microphone:
Turns microphone recording sound on or off. If you want to stop the Dash
Cam recording sound in the cab of your vehicle, set this feature to ‘off’. The
microphone can be muted in the video menu settings of the Dash Cam.
WDR (Wide Dynamic Range):
Wide Dynamic Range can allow for better quality footage in areas where
both bright light and no light are present.
Language:
Allows you to choose from a selection of languages that include: English,
Simplified Chinese, Traditional and Japanese.
Format:
This feature allows you to format/delete all the files off your micro SD card
and also reinstalls your EVENT (SOS locked files) and NORMAL (Video and
jpegs) directories on your Micro SD card.
Park Mode
When park mode is active(P) letter near the record counter top right the
Dash Cam will record instantly when the car is hit with a force this will switch
on the device and record for 20 seconds after 20 secs the device will
switch off and go to sleep. In this mode the device must have a full charge
as it is using the internal battery. 2G sensitive, 4G mid sensitive, 8G least
sensitive.
Maintaining the Battery:
To prolong the battery life you must charged your Dash Cam on a 5 volt
home charger at least once a week for 2-3 hours with the dash cam off, if
you don't use the car daily, for cars that are used daily for more than 1 hour
you can charge the Dash cam once every 3 weeks for 2-3 hours.
It is not recommended to power the dash cam with only the battery.
The battery will only run for 15 mins continuously, always use the charger
provided.
13

Formatting Card:
It is advisable to format the card weekly if you have the setting G-sensor
and park mode setting active, all footage that are locked in G-sensor and
park mode will fill up the card causing it to stop recording any footage.
IR Function:
Press the power button once to switch between night symbol and sun you
will see the 2 symbol alienate on the screen night symbol means infrared
is ON. The IR is only affective when the Dash Cam is facing in side of the
cabin if you want to record you and the passenger. The range of the IR is
approximately 1 metre
Lock Footage:
Press and hold M/Lock symbol button on the right side of the display for 3
seconds to activate the lock footage function, this will save any footage
from getting erased from the card ,to remove locked footage you must
format the card on the device or computer.
14

General plus1248+GC1024CPU
1.5-inch LCD screenDisplay
BlackColor
AVIVideo
720P 1280*720 at 30fps
WVGA 848*480 at 30fps
VGA 640*480 at 30fps
12M/10M/8M/5M/3M/2MHD/1.3M/VGAPicture
JPGPicture format
140 degree view angleViewing Angle
1pc infrared lightInfrared Night Vision
G-Sensor, Loop recordingFunctions
Support 2G,4G,8GParking monitor
English, Russian, Chinese, etcOSD Language
Built-in Microphone and speakerAudio
Micro SD card (4GB included)4GB-32GB Class 10 MaxStorage
USBInput / Output
200mAh lithium batteryBattery
6.8*4.5*3.3CM(L*W*H)Dimension
Car mount, Car charger, USB cable, User ManualAccessories
Product specifications
15

Technical assistance
If you need assistance setting up or using your Gator product now or in the
future, call Gator Support.
Australia
TEL: 03 – 8587 8898
FAX: 03 – 8587 8866
Mon-Fri 9am – 5pm AEST
Please retain this user guide for future reference.
If you would like to download a digital copy of this manual, or other Gator
manuals/software, please visit the http://gatordriverassist.com website and
click on ‘Firmware & Manuals” for information on
where to find the manuals/software.
For PC users a video viewing App is also available to download from the
website
This manual is considered correct at time of printing but is subject to
change. For latest manuals and updates refer to the website.
Copyright © 2017 by TDJ Australia
All rights reserved. No part of this publication may be reproduced,
distributed, or transmitted in any form or by any means, including
photocopying, recording, copying or other electronic or mechanical
methods, without the prior written permission of the author.
18
Troubleshooting guide
Under normal operating conditions, if there are problems with the device,
please refer to the following methods to resolve.
Cannot take pictures or record video?
Please check whether there is enough space on the micro
SD card or internal storage.
Stopping automatically while recording?
Due to the high amount of HD video data being recorded, please use a
high-speed Micro SD card. To tell if you have the required high speed card,
check if it has the ‘Micro SDHC’ logo on the SD card and 8GB class 10 or
above is recommended. Make sure that your card is labeled Micro SDHC
and not Micro SDXC as SDXC cards will not work with this Dash Cam.
Fuzzy/dirty image?
Please check if the lens is filled with dirt or fingerprints and clean carefully.
Please clean lens with cloth before shooting.
The DASH CAM is jammed or not responding?
Please reset the device by pushing in the reset button on the underside of
the Dash Cam.
Why is the DASH CAM not turning on in the car?
Please check and make sure that there is power in the cigarette lighter
socket of your car.
Micro SD card not recognised by DASH CAM?
Format card in the Dash Cam’s menu setting’s before use.
A coloured tinge showing up in the video?
Make sure to peel off the transparent protective sticker on the front of the
Dash Cam's lens.
16

Safety information & warnings
Infringement of copyright warning
17
Do not use the Dash Cam in damp working conditions; the Dash Cam is
not waterproof
Do not try opening the shell or trying to repair the Dash Cam by yourself. If
the accessories for the Dash Cam have any problems, please take it to an
authorised repair agent for repair.
Do not use a chemical substance, cleaning solvent or cleaner to clean the
Dash Cam, please use a moist soft cloth if you would like to clean the
Dash Cam.
Do not use the Dash Cam under conditions where dust is present.
Please pay attention to cleaning the lens surface, use a moist soft cloth to
clean the lens before use, to avoid poor video footage.
Please note that this product is for personal use only, the method of use shall
not violate the goods, or infringe on domestic or international copyright laws.
Recorded images are for personal use only, please note that in some cases to
use this product to record performances, exhibitions or business activities
may infringe the copyright or other legal rights and interests of others.
Table of contents
Other Gator Dashcam manuals

Gator
Gator DVR50M User manual

Gator
Gator HDVR400L User manual

Gator
Gator GRV43SKT User manual

Gator
Gator GDVR189 User manual

Gator
Gator GHDVR291 User manual

Gator
Gator GRV90MKT User manual

Gator
Gator GHDVR292 User manual

Gator
Gator HDDVR308 User manual

Gator
Gator HDDVR302 User manual

Gator
Gator HDDVR250 User manual

Gator
Gator G2KSR1 User manual

Gator
Gator GHDVR310 User manual

Gator
Gator GHDVR82W Operational manual

Gator
Gator G180SPCR User manual

Gator
Gator HDDVR550 User manual

Gator
Gator HDVR245H User manual

Gator
Gator DUAL-TECH GRv43MDT Operational manual

Gator
Gator HDVR303 User manual

Gator
Gator GHDVR370 User manual

Gator
Gator GHDVR410 Operational manual


