Para Guardar un Número de Remarcación
1. Repita los pasos 1 a 6 en Para Guardar Nombre y Número en Memoria.
2. Presione el botón REDIAL.
3. Presione el botón MEMORY para guardar el número. Usted escuchará un tono
de confirmación.
Para reemplazar una Memoria Antigua con un Nuevo
Número de Remarcación
1. Repita los pasos 1 a 6 en Para Guardar Nombre y Número en Memoria.
2. Presione el botón REDIAL.
3. Presione el botón MEMORY, y REMPLAZAR MEMO? se muestra en la pantalla.
4. Presione el botón MEMORY para reemplazar la memoria antigua con el nuevo
número de remarcación. Usted escuchará un tono de confirmación.
Cambio de un Número Guardado
1. Repita los pasos 1 a 7 en Para Guardar Nombre y Número en Memoria.
REMPLAZAR MEMO? se muestra en la pantalla.
2. Presione el botón MEMORY para guardar el número. Escuchará un tono de
confirmación.
Para marcar un Número Guardado
1. Asegúrese de que el teléfono esté en ON presionando el botón TALK/callback.
2. Presione el botón MEMORY.
3. Presione el número (0-9) para la ubicación de memoria deseada. El número se
marca automáticamente.
-O-
1. Asegúrese de que el teléfono esté en OFF (no en modo TALK).
2. Presione el botón MEMORY.
3. Use el botón CID/VOL (flecha izquierda o derecha) para desplazarse a través
de los números almacenados en memoria hasta que el número deseado se
muestre.
4. Presione TALK/callback. El número se marca automáticamente.
Marcación en Cadena desde Memoria
Use esta modalidad para hacer llamadas que requieran una secuencia de
números, tales como usar una tarjeta de llamadas para un número de larga
distancia al que se llama frecuentemente. Usted simplemente marque cada
parte de la secuencia de número de memoria. El ejemplo siguiente le muestra
cómo puede usar la marcación en cadena para hacer una llamada a través de un
servicio de larga distancia:
El Número Para Ubicación en Memoria
Número de acceso de larga distancia 7
Código de autorización 8
Número de larga distancia al que se llama con frecuencia 9
1. Asegúrese de que el teléfono esté en ON presionando el botón TALK/callback.
2. Presione el botón MEMORY y luego presione la tecla 7.
3. Cuando usted escuche el tono de acceso, presione MEMORY otra vez y luego
presione la tecla 8.
4. En el siguiente tono de acceso, presione MEMORY y luego la tecla 9.
TIP: Espere los tonos de acceso antes de presionar el botón MEMORY, o su
llamada puede fallar.
Inserción de una Pausa en la Secuencia de
Marcación
Presione el botón PAUSE# una vez para insertar una demora en la secuencia
de marcación de un número telefónico guardado. Es necesaria una pausa para
esperar un tono de marcación (por ejemplo después de que usted marque 9
para una línea exterior, o para esperar el tono de acceso a una computadora).
PAUSE se muestra la pantalla como una P. Cada pausa cuenta como 1 dígito en la
secuencia de marcación. Si usted necesita una pausa más larga, presione el botón
PAUSE# dos veces.
Revisión y Eliminación de Números Guardados
1. Presione el botón MEMORY.
2. Use el botón CID/VOL (flecha izquierda o derecha) para desplazarse a la
ubicación de memoria deseada o presione la ubicación de memoria
deseada (0-9).
3. Mientras el registro se visualiza, presione el botón CHAN/delete para eliminar
el registro. La pantalla muestra BORRAR?.
4. Presione CHAN/delete otra vez para confirmar. La pantalla muestra BORRADOR.
Usted escuchará un tono de continuación.
Configuración del Sistema de Contestadora
Esta sección le muestra cómo configurar su sistema de contestadora para grabar
llamadas entrantes. Antes de comenzar la instalación, usted debe activar el
sistema de la contestadora.
• Presione el botón on/off para activar o desactivar el sistema de contestadora.
El indicador MESSAGES se ilumina cuando el sistema de contestadora está
activo. El indicador parpadea alternativamente entre CL (reloj) y 0, indicando
que se necesita programar día/hora y 0 mensajes están guardados.
NOTA: El sistema de contestadora muestra “- -” cuando está apagado.
Para Programar el Idioma de las Indicaciones
Orales
La voz de fábrica es en inglés.
Para cambiar el idioma de la voz de las indicaciones, oprima y sostenga el
botón para saltar (“skip”) durante dos segundos. El aparato anuncia que ha
“SELECCIONADO ESPANOL”.
NOTA: Para cambiar a inglés (“English”), oprima y sostenga el botón para saltar
(“skip”) nuevamente durante dos segundos.
NOTA: En modalidad de acceso por control remoto, el sistema sigue con el
idioma seleccionado previamente. El idioma de la voz que da las indicaciones no
puede ser cambiado a control remoto.
Marcador Día/Hora de Voz
1. Presione y sostenga el botón day/check para establecer el día de la semana y
luego suelte.
2. Presione el botón hour para establecer la hora (a.m. ó p.m.).
3. Presione el botón min para establecer los minutos. Cuando usted presiona y
suelta el botón min, el tiempo avanza en intervalos de 5 minutos.
4. Presione y suelte el botón day/check para revisar las selecciones de día y hora.
Volumen del Altavoz
Use los botones de volumen izquierda o derecha para ajustar el volumen de
la bocina a un nivel confortable. Presione la flecha derecha para aumentar el
volumen y la fecha izquierda para disminuir el volumen. L8 es el máximo y L1 es
el nivel mínimo.
Instrucciones de Voz
Si usted necesita ayuda adicional, presione el botón review (flecha izquierda)
cuando conecte el sistema de contestadora y siga las instrucciones de voz.
Para Grabar el Saludo de Salida
Para mejores resultados al grabar, usted debería estar a unos 9 pulgadas de la
apertura del mic (micrófono) para eliminar tanto ruido de fondo como sea posible.
1. Presione y sostenga el botón announce. Sostenga el botón hacia abajo hasta
que usted termine el saludo.
2. Comience a hablar después de escuchar el bip. Usted tiene hasta dos minutos
de tiempo de grabación.
3. Suelte botón cuando termine su saludo.
Si usted elige no grabar un saludo de salida, un saludo establecido de fábrica es
reproducido en su lugar. Para regresar al saludo de fábrica después de que usted
haya grabado su propio saludo de salida, presione el botón announce y suelte
cuando escuche el bip, o presione el botón erase mientras el saludo se reproduce.
Muestra de Saludo de Salida
Hola, hablar (use su nombre aquí), no puedo responder el teléfono ahora, por favor deje su nombre,
número y un breve mensaje después del tono, y le llamaré después. Gracias.
Revisión del Saludo
• Presione y suelte el botón announce para revisar su saludo de salida.
Selección de Timbre
Coloque el conmutador RING SELECT situado en la parte posterior de la unidad
para elegir el número de veces que usted quiere que el teléfono timbre antes
de que el sistema de contestadora responda la llamada. Puede elegir 3 ó 5
timbrados.
Operación del Sistema de Contestadora
Esta sección explica los botones y modalidades del sistema de contestadora.
Indicador de Mensajes
El indicador MESSAGES muestra cuántos mensajes tiene usted. Parpadea si hay
mensajes nuevos. El botón answer on/off debe estar en ON para que el indicador
de MESSAGES funcione.
Monitoreo de las Llamadas desde la Base
Usted puede monitorear las llamadas entrantes esperando que quien llame
comience a dejar un mensaje (para escuchar quién es), luego levantar el auricular,
y presionar TALK/callback a hablar con quien llama. El sistema de contestadora
detiene automáticamente la grabación cuando usted activa el auricular o levanta
un teléfono de extensión.
TIP: Asegúrese de que el volumen en la base esté seleccionado suficientemente
alto para que usted escuche sus llamadas entrantes.
Reproducción de Mensaje
El indicador de mensajes le permite saber cuando usted llene mensajes. Para
reproducir mensajes, presione el botón PLAY/STOP.
While a message is playing, you can do the following:
• Press the el botón PLAY/STOP to stop the message playback.
• Presionar y soltar el botón REVIEW para reiniciar el mensaje actual; continuar
presionando y soltar el botón REVIEW para ir a los mensajes previos.
• Presionar y soltar el botón SKIP para ir al siguiente mensaje.
• Presionar el botón VOLUME (flecha izquierda o derecha) para ajustar el
volumen de reproducción.
Para Borrar Mensajes
Usted puede borrar mensajes de tres formas:
• Para borrar un solo mensaje, presione PLAY/STOP en la base, y presione
y suelte el botón erase en la base para borrar el mensaje actualmente en
reproducción.
• Para borrar todos los mensajes revisados, presione y sostenga el botón erase
en la base hasta que la unidad emita un bip.
• Para borrar un mensaje usando el auricular:
1. Presione el botón FORMAT/answerer en el auricular.
2. Presione el botón play/stop (la tecla 2) en el auricular.
3. Presione el botón erase en el auricular para borrar un mensaje durante la
reproducción.
NOTA: Los mensajes borrados no se pueden restaurar. Tenga cuidado al
presionar el botón erase porque si el siguiente mensaje no escuchado ha
comenzado a reproducirse, también será borrado.
Para Dejar un Memo
Use la opción memo para dejar un mensaje.
1. Presione y sostenga el botón memo. Mantenga el botón presionado hasta que
termine de grabar el mensaje.
2. Comience hablar después de que escuche el bip.
3. Suelte el botón memo cuando haya terminado.
Acceso Remoto
Esta sección explica dos tipos de acceso remoto: usando el auricular para accesar
el sistema de contestadora y accesando el sistema de contestadora desde otro
teléfono.
El auricular contiene botones integrados que le permiten accesar la máquina
contestadora con el auricular.
Usted puede también accesar su sistema de contestadora desde cualquier
teléfono que sea compatible con marcación por tonos ingresando un código de
seguridad de 3 dígitos después de que usted escuche el saludo de salida.
El siguiente sistema de menú le guía a través de todos los procedimientos.
Sistema de Menú de Voz
Para Presione este Botón
Revisar mensaje 1
Reproducir mensaje 2
Detener reproducción de mensaje 2
Borrar mensaje 0 (durante la reproducción del mensaje)
Saltar Mensaje 3
Activar/desactivar sistema de contestadora 4
Revisar opciones de menús de voz 7
Uso del Auricular
Presione el botón FORMAT/answerer para accesar el sistema de contestadora
desde el auricular inalámbrico.
Después de que usted accese el sistema de contestadora, use las teclas marcadas
en el auricular como si usted estuviera presionando los botones correspondientes
en la base (ver “Operación del Sistema de Contestadora”). Las funciones están
listadas en el auricular arriba de cada número. Por ejemplo, para reproducir
mensajes:
1. Presione el botón FORMAT/answerer. La pantalla muestra ANSWERER
REMOTE.
2. Presione el botón play/stop (la tecla 2) o siga el Sistema de Menú de Voz.
3. Cuando termine de escuchar sus mensajes, presione FORMAT/answerer
otra vez.
Monitoreo de Llamadas desde el Auricular
Use el auricular para monitorear llamadas aún cuando usted no pueda oír del
sistema de contestadora. Cuando el sistema de contestadora tome la línea:
1. Presione el botón FORMAT/answerer para accesar el sistema de contestadora.
2. Escuche conforme quien llama deja un mensaje.
3. Presione el botón TALK/call back para hablar con la persona o presione
FORMAT/answerer para detener el monitoreo de la llamada.
Memoria Llena
Cuando la memoria del sistema de contestadora está llena, el sistema responde
después de 10 timbrados, emite bips y espera a que usted ingrese el código de
seguridad de 3 dígitos. Si usted no ingresa el código de seguridad en 10 segundos
después de que la unidad emita los bips, el teléfono cuelga. Usted debería borrar
algunos mensajes de forma que el sistema de contestadora pueda grabar nuevos
mensajes.
NOTA: La unidad también responde después del décimo timbrado si está
apagada. Para accesar al sistema de contestadora, ingrese su código de seguridad
de tres dígitos después de escuchar el bip.
Para Accesar el Sistema de Contestadora desde
Otra Ubicación Location
Usted puede accesar su sistema de contestadora desde un teléfono de tonos
ingresando su código de seguridad de 3 códigos después de escuchar el saludo
de salida.
1. Marque el número de teléfono para el sistema de contestadora.
2. Cuando el sistema de contestadora responda, permite que el mensaje de salida
se reproduzca hasta el final, escuche el tono, y luego ingrese su código de
seguridad.
3. Siga el menú de voz para usar las funciones remotas del sistema de
contestadora.
La modalidad remota le permite ejecutar las Opciones del Sistema de Menú de
Voz anteriormente listadas.
TIP: Usted puede saltar el saludo de salida presionando cualquier tecla de
número en el teclado numérico mientras el saludo está en reproducción.
Luego, usted puede ingresar su código de seguridad para accesar el sistema de
contestadora.
Cambio del Código de Seguridad
El código de seguridad de fábrica para accesar la contestadora desde otra
ubicación 1 2 3. Usted debe usar el auricular para cambiar el código de seguridad.
Con el teléfono pagado, siga estos pasos:
1. Presione el botón FORMAT/answerer.
2. Presione TONE*/exit.
3. Ingrese los tres números a ser usados como el nuevo código de seguridad.
4. Presione TONE*/exit otra vez.
5. Usted escuchará el nuevo código de seguridad siendo repetido para confirmar
el cambio.
Operación del Clip para Cintura y del
Audífono
Conexión de un Audífono Opcional al Auricular
Operación Manos Libres:
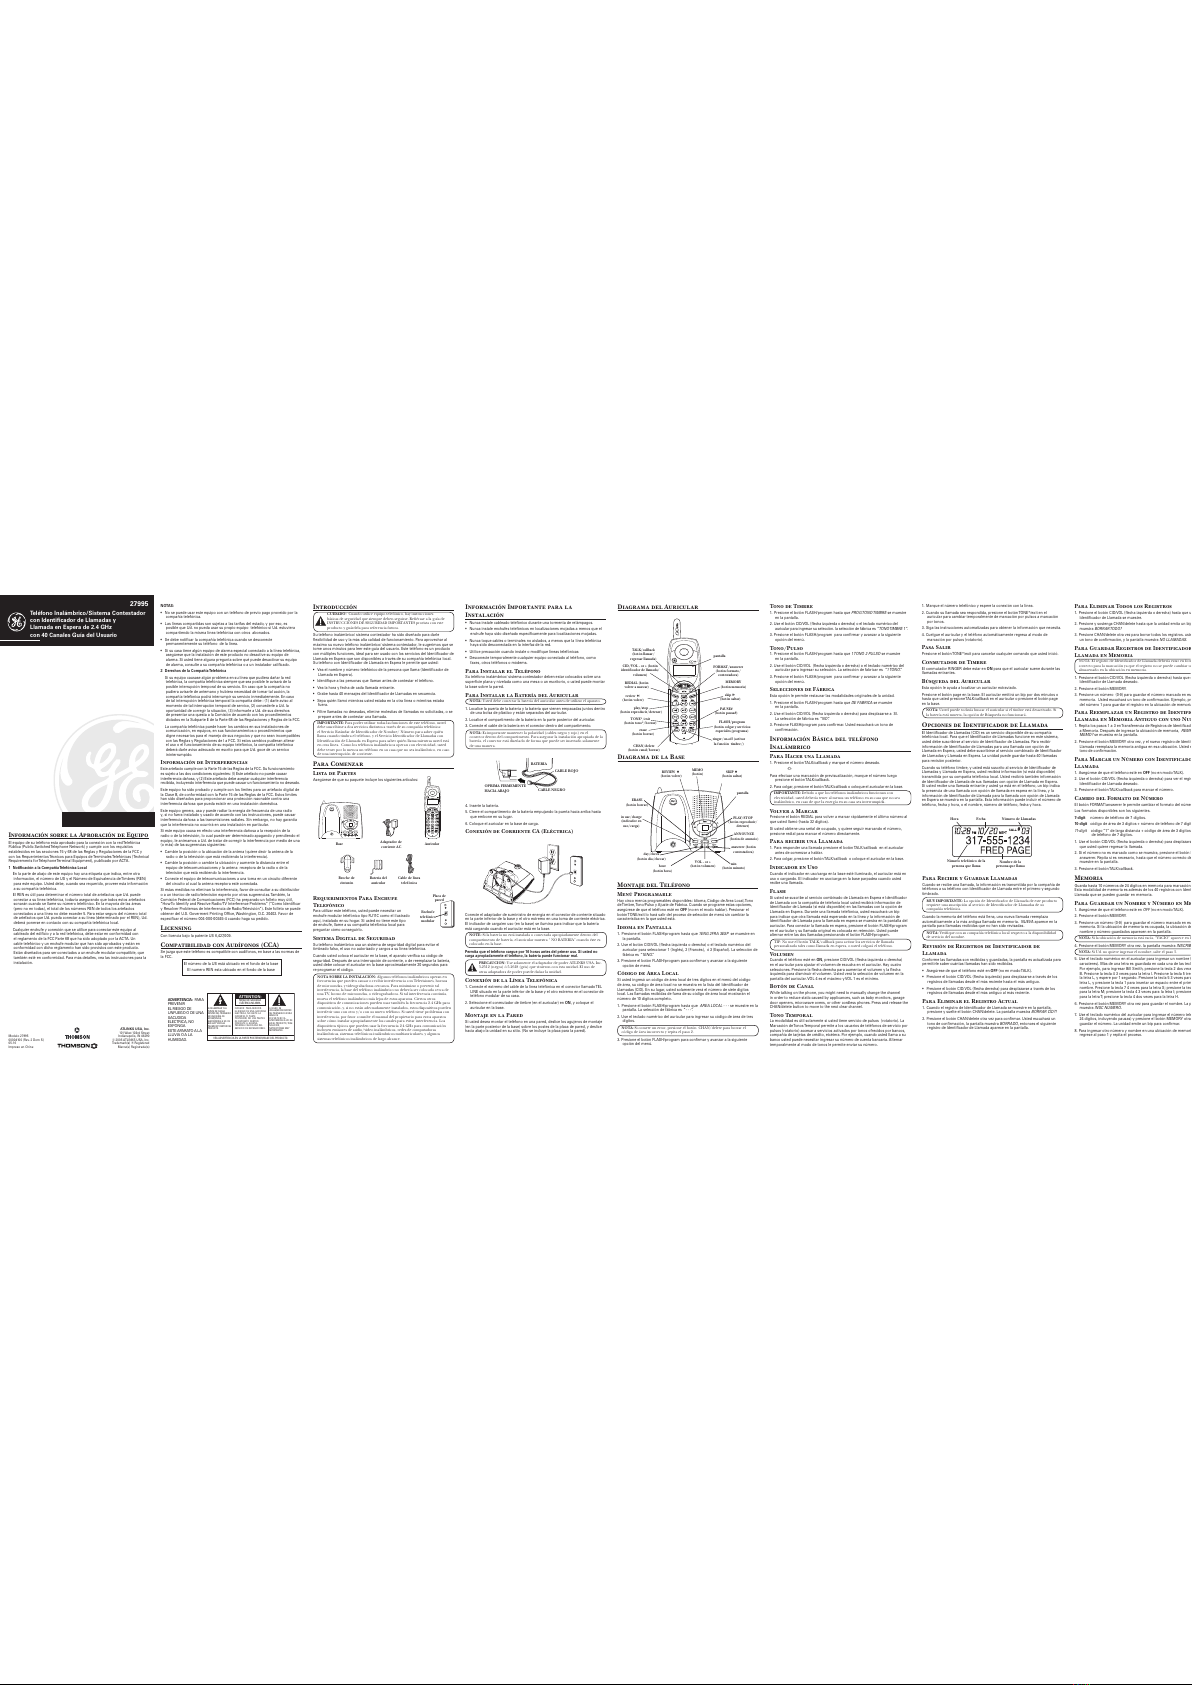
1. Connect the headset to the HEADSET jack on the side of the handset. The
Conecte el audífono a la entrada HEADSET a un lado del auricular. El receptor
y micrófono del auricular son deshabilitados cuando el audífono es conectado.
2. Ajuste el audífono para que descanse confortablemente en la parte superior de
su cabeza y sobre su oído. Mueva el micrófono a aproximadamente dos a tres
pulgadas de su boca.
3. Presione el botón TALK/callback para responder una llamada o hacer llamadas
usando el audífono.
4. Para regresar a la operación normal, desconecte el audífono de la entrada.
Conexión del Clip para Cintura
Para sujetar el clic para la cintura, inserte los lados del clic para cintura en las
ranuras de cada lado del auricular. Embone los extremos del clip para cintura en
su lugar.
Cambio de la Batería
Asegúrese de que el teléfono esté en OFF antes de reemplazar la batería.
1. Retire la puerta de compartimento de la batería.
2. Desconecte el conector de la batería del receptáculo dentro del compartimento
de la batería y retire la batería del auricular.
3. Inserte la nueva batería y conecte el cable en el receptáculo dentro del auricular.
4. Coloque en su lugar la puerta de; compartimento de la batería.
5. Coloque el auricular en la base para cargar.
NOTA: Si la batería no es instalada o conectada apropiadamente dentro del
compartimento de la batería. El auricular muestra “NO BATERIA” cuando éste es
colocado en la base.
6. Permita que la batería del auricular cargue apropiadamente (por 16 horas)
antes del primer uso o cuando usted instale una nueva batería. Si usted
no carga apropiadamente el teléfono, la batería puede no funcionar
adecuadamente.
PRECAUCION: Para reducir el riesgo de fuego o lesión personal, use
solamente las baterías listadas en la Guía del Usuario.
Precauciones de Seguridad de la Batería
• No queme, desarme, mutile, o perfore. Como otras baterías de este tipo, se
pueden liberar materiales tóxicos que podrían causar lesiones.
• Para reducir el riesgo de fuego o lesión personal, use solamente las batería
listadas en la Guía del Usuario.
• Mantenga las baterías lejos del alcance de los niños.
• Retire las baterías almacenadas por más de 30 días.
Cuidado General del Producto
Para mantener su teléfono funcionando y con buena apariencia, siga estos
lineamientos:
• Evite colocar el teléfono cerca de aparatos domésticos que generen calor y
de dispositivos que generen interferencia eléctrica (por ejemplo, motores, o
lámparas fluorescentes(.
• NO lo exponga a la luz directa del sol o a humedad.
• Evite tirar la unidad y otros tratamientos rudos.
• Limpie con un paño suave.
• Nunca use un agente de limpieza fuerte o polvo abrasivo porque esto dañará el
terminado.
• Retenga el empaque original en caso de que necesite embarcar el teléfono
posteriormente.
• Periódicamente limpie los contactos de carga en el auricular y en la base con
un paño suave
Señales de Sonido del Auricular
Señal Significado
Un largo tono susurrante Señala una llamada entrante
(con el timbre activado)
Tres cortos bips (varias veces) Señal de búsqueda
Un sólo bip cada 7 segundos Advertencia de batería baja
Visualización y Mensajes de Identificador
de Llamada
Los indicadores siguientes muestran el estatus de un mensaje o de la unidad..
ANSWERER REMOTE Indica que la contestadora está siendo accesada
ACC REMOTO CONT remotamente.
BLOCKED CALL La persona está llamando desde un número que ha
LLAMADA PRIVADA sido bloqueado de la transmisión.
BLOCKED NAME El nombre de la persona está bloqueado de la
NOMBRE PRIVADO transmisión.
BLOCKED NUMBER La persona está llamando desde un número que ha
NUMBERO PRIVADO sido bloqueado de la transmisión.
CALL WAITING Indica que una llamada está esperando en la línea.
LLAMD EN ESPERA
DELETE ALL? Indicación preguntándole si quiere borrar todos los
BORRAR TODO? registros de Identificador de Llamada.
DELETE CALL ID? Indicación preguntándole si quiere borrar un Registro
BORRARDA TO INDEN de Identificador de Llamada.
DELETED Indicación confirmando que el registro de
BORRADO Identificador de Llamada está borrado.
EMPTY Indica que una ubicación en memoria está vacante.
VACIO
END OF LIST Indica que no hay información adicional en la
FIN DE LISTA memoria del Identificador de Llamada.
ENTER NAME Indicación pidiéndole que ingrese el nombre para una
INSCRIBA NOMBRE de las 10 ubicaciones en memoria.
ENTER TEL NUMBR Indicación pidiéndole que ingrese el número
INSCRIBA NUMERO telefónico para una de las 10 ubicaciones en memoria.
INCOMPLETE DATA La identificación de quien llama ha sido interrumpida
DATO INCOMPLETO durante la transmisión o la línea telefónica es
excesivamente ruidos.
LOW BATTERY IIndica que la batería necesita ser cargada.
BAJA BATERIA
NEW Indica que la llamada o llamadas no han sido
NUEVO revisadas.
NO BATTERY Indicates the battery pack is missing or not properly
NO BATERIA installed in the the battery compartment.
NO CALLS Indica que no se han recibido llamadas.
NO LLAMADA
NO DATA Ninguna información de Identificador de Llamada se
NO ENVIADO recibió.
PAGING El botón PAGE ha sido presionado en la base.
LOCALIZAR
PRESS TALK KEY Indica que el número CID es un Número de Marcación
OPR BOTON TALK de Dirigir (DDN) y no puede ser formateado..
REPT Repetir todo el mensaje. Indica que una nueva
REPETIR llamada del mismo número se recibió más de una vez.
UNKNOWN NAME/ La llamada entrante es desde un área que no
CALLER/NUMBER tiene servicio para Identificador de Llamada o la
NOM DESCONOCIDO/ información no fue enviada.
DESCONOCIDO/
NUM DESCONOCIDO
Mensajes de Visualización del Sistema de
Contestadora
Los siguientes indicadores muestran el estatus de la máquina contestadora.
- - Contestadora apagada.
0-59 Número total de mensajes.
An (parpadeando) Respondiendo actualmente a una llamada.
CL (parpadeando) El registro de día/hora de voz necesita ser establecido.
F (parpadeando) La memoria está llena.
LA (Línea de Acceso) Contestadora remota de línea externa.
Sies barras (parpadeando) Grabando un memo o saludo.
Guía de Solución de Problemas
Soluciones para el Teléfono Inalámbrico.
No hay tono de marcación
• Checar la instalación:
Asegúrese de que el cable de corriente de la base esté conectado a una toma
de corriente eléctrica que funcione.
• Conecte otro teléfono a la misma conexión modular, si el segundo teléfono no
funciona, el problema podría ser con su cableado o el servicio local.
• El auricular por estar fuera del rango de la base. Muévase más cerca de la base.
• Asegúrese de que la batería esté correctamente cargada (para 16 horas).
• Asegúrese de que la batería esté correctamente instalada.
• ¿Emitió un bip el auricular cuando usted presionó el botón TALK/callback? ¿Se
iluminó el indicador in use/charge? La batería puede necesitar carga.
• Coloque el auricular en la base por lo menos 20 segundos.
El auricular no timbra
• Asegúrese de que el conmutador RINGER en el auricular esté activado.
• Muévase más cerca de la base. El auricular puede estar fuera de rango.
• Usted puede tener demasiados teléfonos de extensión en su línea. Trate de
desconectar algunos teléfonos.
• Busque un tono de marcación.
Usted experimenta estática, ruido, o debilitamiento de entrada y salida
• Cambie de canales.
• Muévase más cerca de la base. El auricular puede estar fuera de rango.
• Reubique la base. Asegúrese de que la base no esté conectada en una toma
eléctrica con otro aparato electrodoméstico.
• C ambie la batería.
La unidad emite bips
• Coloque el auricular en la base por 20 segundos; si todavía emite bips, cargue
la batería por horas.
• Limpie los contactos de carga en el auricular y en la base con un paño suave.
• Vea las soluciones para “Sin tono de marcación.”
• Reemplace la batería.
La Marcación de Memoria no funciona
• Asegúrese de que usted programó las teclas de ubicación de memoria
correctamente.
• ¿Siguió usted la secuencia de marcación apropiada?
El teléfono marca con pulsos en servicio de tonos
• Asegúrese de que el teléfono esté en el modo de marcación por tonos.
El teléfono no marca con servicio de pulsos
• Asegúrese de que el teléfono esté en el modo de marcación por pulsose.
Soluciones de Identificador de Llamadas
No se visualiza
• La batería debe estar completamente cargada. Trate de reemplazar la batería.
• Asegúrese de que la unidad esté conectada a una toma eléctrica no conmutada.
Desconecte la unidad del conector y vuélvala a conectar.
• Usted debe estar suscrito al servicio de Identificador de Llamadas de su
compañía telefónica local para recibir registros de Identificador de Llamada.
Mensaje de Error del Identificador de Llamadas
• La unidad muestra este mensaje si detecta algo distinto de la información de
Identificador de Llamada válido durante el período de silencio después del
primer timbre. Este mensaje indica ya sea la presencia de ruidos en la línea, o
que un mensaje inválido ha sido enviado desde la compañía telefónica.
NOTA: El sello RBRC en la batería usada en su
producto ATLINKS USA, Inc. indica que estamos
participando en un programa para recolectar y reciclar
baterías de Níquel Cadmio en los Estados Unidos. Por
favor llame al 1-800-8-BATTERY para información o
contacte a su centro de reciclado local.
Soluciones del Sistema de Contestadora
No se pueden escuchar mensajes, bip, etc.
• Ajuste del volumen de la bocina.
El ajuste de Día/Hora se quedó en las Time/Day 12 a.m. del Lunes.
• Ajuste el reloj.
Responde al timbre número 10
• Asegúrese de que el sistema de la contestadora esté activado.
• La memoria del teléfono puede estar llena.
Los mensajes entrantes están incompletos
• ¿Fue levantado un teléfono de extensión?
• La memoria del teléfono está llena
• Usted accidentalmente presionó al botón play/stop durante la reproducción y
detuvo el mensaje.
No responde a los comandos remotos.
• Usted debe usar un teléfono de marcación por tonos para acceso remoto.
• Usted debe ingresar el código de seguridad correcto.
• ¿Se colgó la unidad? Si usted no toma una acción por un período de tiempo, el
sistema automáticamente cuelga.
Causas de Mala Recepción
• Paredes de aluminio.
• Soporte de cintas en el aislamiento.
• Ductos de calor y otras construcciones de metal que bloquean las señales de
radio.
• Usted está demasiado cerca de electrodomésticos tales como microondas,
estufas, computadoras, etcétera.
• Condiciones atmosféricas, tales como fuertes tormentas.
• La base está instalada en el sótano con el piso inferior de la casa.
• La base está conectada a una toma de corriente CA con otros dispositivos
electrónicos.
• El monitor de bebés está usando la misma frecuencia.
• La batería del auricular está baja.
• Usted está fuera del alcance de la base.
• El horno de microondas está usando la misma frecuencia.
Servicio
Si se experimentan problemas con este equipo, para información sobre
reparación o garantía, por favor contacte a servicio al cliente al 1-800-448-0329.
Si el equipo está causando daños a la red telefónica, la compañía de teléfonos
puede requerirle que desconecte el equipo hasta que el problema sea resuelto.
A este producto se le puede dar servicio solamente por el fabricante o sus
agentes de servicio autorizados. Los cambios o modificaciones no aprobados
expresamente por ATLINKS USA, Inc. podrían invalidar la autoridad del usuario
para operar este producto. Para instrucciones sobre cómo obtener servicio,
consulte la garantía incluida en esta guía o llame a servicio al cliente
al 1-800-448-0329.
O envíe sus preguntas a:
ATLINKS USA, Inc.
Manager, Consumer Relations
P O Box 1976
Indianapolis, IN 46206
Adjunte su recibo de compra al manual para futura referencia o para anotar la
fecha en que este producto fue recibido como obsequio. La información será
valiosa en caso de requerir servicio durante el período de garantía.
Fecha de compra ______________________________________________________
nombre de la tienda ______________________________________________________
Garantía Limitada
Qué cubre su garantía:
• Defectos en materiales o mano de obra.
Por cuánto tiempo después de su compra:
• Un año, desde la fecha de compra.
(El período de garantía para unidades en renta comienza con la primera renta o 45 días
desde la fecha de embarque a la compañía que renta, lo que ocurra primero.)
Qué haremos nosotros:
• Suministrarle una unidad nueva, o a nuestra opción, una reconstruida. La unidad de
intercambio está bajo garantía por el resto del período de garantía del producto
original.
Cómo obtiene usted servicio:
• Empaque apropiadamente su unidad. Incluya todos los cables, etcétera, que fueron
originalmente suministrados con el producto. Recomendamos usar la caja y el
empaque original.
• “Prueba de compra en la forma de una nota de venta o factura recibida lo cual
es evidencia de que el producto está dentro del período de garantía, se deben
presentar para obtener servicio en garantía.” Para compañías de renta, la prueba de
la primera renta es también requerida. También anote su nombre y dirección y una
descripción del defecto. Debe enviarlo por UPS servicio estándar o su equivalente a:
ATLINKS USA, Inc.
c/o Thomson Inc.
11721 B Alameda Ave.
Socorro, Texas 79927
• Pague cualesquier cargos facturados a usted por el Centro de Intercambio por
servicios no cubiertos por la garantía.
• Asegure su embarque por pérdida o daño. ATLINKS no acepta responsabilidad en
caso de daño o pérdida.
• Una unidad nueva o reconstruida le será enviada con flete prepagado.
Lo que su garantía no cubre:
• Instrucciones al cliente. (Su Manual del Propietario le proporciona información
respecto a las instrucciones operativas y controles de usuario. Cualesquier
información adicionales, deberían ser obtenidas de su distribuidor.)
• Instalación y ajustes de servicio en la instalación.
• Baterías.
• Daño por mal uso o negligencia.
• Productos que hayan sido modificados o incorporados dentro de otros productos.
• Productos comparados o que se les dio servicio fuera de los EE.UU..
• Actos de la naturaleza, tales como, pero sin limitación a daño por relámpagos.
Registro de Producto:
• Favor de completar y enviar por correo la Tarjeta de Registro de Producto empacada
con su unidad. Esto hará más fácil contactarlo en caso necesario. El envío de la
tarjeta no es requerido para cobertura en garantía.
Limitaciones de Garantía:
• La garantía indicada anteriormente es la única garantía aplicable a este producto.
Todas las otras garantías, expresas o implícitas (incluyendo todas las garantías
implícitas comerciales o de adecuación para un propósito particular) son por el
presente renunciadas. Ninguna información verbal o escrita proporcionada por
ATLINKS USA, Inc., los agentes, o empleados creará una garantía o en forma alguna
incrementará el alcance de esta garantía.
• El reemplazo o reparación conforme se provee bajo esta garantía es el recurso
exclusivo del consumidor. ATLINKS USA, Inc. no será responsable por daños
incidentales o consecuenciales resultantes del uso de este producto o que surja
de cualquier rompimiento de cualquier garantía expresa o implícita sobre este
producto. Esta renuncia de garantías y garantía limitada están gobernadas por las
leyes del estado de Indiana. Excepto en el grado prohibido por la ley aplicable,
cualesquier garantía implícita comercial o de adecuación de uso para un propósito
particular en este producto está limitada al período de garantía aplicable establecido
anteriormente.
Cómo se relaciona la ley estatal con esta garantía:
• Algunos estados no permiten la exclusión de ni la limitación de daños incidentales
o consecuenciales, o limitaciones en la duración de una garantía implícita de forma
que las limitaciones o exclusiones anteriores pueden no aplicársele a usted.
• Esta garantía le da derechos legales específicos, y usted puede también tener otros
derechos que varían de estado a estado.
Si usted compró su producto fuera de los EE.UU.:
• Esta garantía no aplica. Contacte a su distribuidor para información sobre la garantía.
Información de Accesorios
Para ordenar, tenga lista su tarjeta Visa, Mastercard o Discover y llame al 1-800-338-0376.
Se aplicará un cargo por envío al ordenar. La ley nos requiere que cobremos el impuesto
sobre la venta apropiado para cada estado, condado y área individuales a las cuales se
envíe la mercancía.
Los artículos están sujetos a disponibilidad.
*Los precios están sujetos a cambios sin previo aviso.
DESCRIPCIÓN NÚMERO DE CATÁLOGO
NEGRO BLANCO
Adaptador de corriente AC 5-2512 5-2618 (gris)
Audífono 5-2425 5-2444
Batería de Repuesto del Auricular 5-2459
Broche de cinturón 5-2657