GE Monogram ZDBT240 User manual

Owner’s
Manual
Privacy Glass
Beverage Center
ZDBT240
monogram.com

2
Consumer Information
Beverage Center
Introduction
Your new Monogram everage center makes an eloquent statement of style,
convenience and kitchen planning flexi ility. Whether you chose it for its purity of design
or the assiduous attention to detail, you will find that your Monogram everage center’s
superior lend of form and function will delight you for years to come.
The information on the following pages will help you operate and maintain your everage
center properly.
If you have any other questions, visit our We site at: monogram.com
Contents
Care and Cleaning . . . . . . . . . . . . . . . . . . .11, 12
Consumer Services . . . . . . . . . . . . . . . . . . . . .19
Controls and Features . . . . . . . . . . . . . . . .8–10
Model and Serial Num ers . . . . . . . . . . . . . . . .2
Pro lem Solver . . . . . . . . . . . . . . . . . . . . . .13–15
Product Registration . . . . . . . . . . . . . . . . . . . . .2
Repair Service . . . . . . . . . . . . . . . . . . . . . . . .3, 19
Safety Instructions . . . . . . . . . . . . . . . . . . . . .4–7
Warranty . . . . . . . . . . . . . . . . . . . . . .Back Cover
Before
using your
beverage
center
Read this manual carefully. It is intended to
help you operate and maintain your new
everage center properly.
Keep it handy for answers to your
questions.
If you don’t understand something or
need more help, there is a list of toll-free
consumer service num ers included in
the ack section of this manual.
OR
Visit our We site at: monogram.com
Write
down the
model &
serial
numbers
You will find them on a la el on the ceiling
inside the everage center. Please write these numbers here:
Model Num er
Serial Num er
Use these num ers in any correspondence
or service calls concerning your everage
center.
ATTENTION CONSUMER!
This unit is designed for storing and cooling beverages.
Do not store perishable foods in this unit.
ATTENTION CONSOMMATEUR !
Cet appareil m nager est conçu pour conserver et rafraîchir des boissons.
Ne mettez pas de biens perissables dans cet appareil m nager.

3
If you received
a damaged
appliance
The warranty does not cover damage
caused after delivery. Immediately contact the dealer (or uilder)
that sold you the everage center.
If you
need
service
To o tain service, see the Consumer
Services page in the ack of this manual.
We are proud of our service and want you
to e pleased. If for some reason you are
not happy with the service you receive,
here are steps to follow for further help.
For customers in the USA:
FIRST, contact the people who serviced your
appliance. Explain why you are not pleased.
In most cases, this will solve the pro lem.
NEXT, if you are still not pleased, write
all the details—including your phone
num er—to:
Manager, Customer Relations
GE Appliances
Appliance Park
Louisville, KY 40225
For customers in Canada:
FIRST, contact the people who serviced your
appliance. Explain why you are not pleased.
In most cases, this will solve the pro lem.
NEXT, if you are still not pleased, write
all the details—including your phone
num er to:
Manager, Consumer Relations
Ma e Canada Inc.
1 Factory Lane, Suite 310
Moncton, N.B. E1C 9M3
Consumer Information
Beverage Center
After
installation
is completed
• The location should not e su ject to
direct sunlight, heat or moisture.
• Promptly inspect your new Monogram
everage center. If it has een damaged,
contact the Installer or Dealer
immediately.
• This everage center must e properly
leveled to ensure correct door alignment
and door closure. Contact the Installer if
the unit is not level.
• The unit should e centered in the
opening. The front face of the door
should e 1″forward of adjacent
ca inetry. Contact the installer if
clearance is not correct.
• Test the door swing. Carefully open and
close the door. The door should not ru
or catch on adjacent ca inetry. Notify
the installer if the door makes contact
with ca inetry.
Please Contact the Installer or Dealer if
you experience any of these problems.
Your everage center is shipped with a lack
toekick on the front of the unit. For shipping
purposes, an optional stainless steel toekick
is secured to the ack or on the inside of the
unit. That toekick should have een removed
and installed, or given to you. Keep the
unused toekick and other unused or
removed parts for possi le future use.
Remove
packaging
Before using, e sure all packing materials
and tape have een removed.
To assure no damage is done to the finish
of the product, the safest way to remove
the adhesive left from packaging tape on
new appliances is an application of
household liquid detergent. Apply with
a soft cloth and allow to soak. Wipe dry
and then apply an appliance polish to
thoroughly clean and protect the surface.
Save time
& money
Before you request service, check the
Pro lem Solver in the ack of this manual. It lists causes of minor operating pro lems
that you can correct yourself.

4
R FRIG RANTS
All refrigeration products contain
refrigerants, which under federal law must
e removed prior to product disposal.
If you are getting rid of an old refrigeration
product, check with the company handling
the disposal a out what to do.
wDANGER: RISK OF CHILD NTRAPM NT
Child entrapment and suffocation
are not pro lems of the past. Junked or
a andoned refrigeration products are
still dangerous…even if they will sit for
“just a few days.” If you are getting rid
of your old appliance, please follow these
instructions to help prevent accidents.
Before You Throw Away Your Old
Refrigeration Product:
•Take off the doors.
•Leave the shelves in place so that children
may not easily clim inside.
IMPORTANT SAFETY INSTRUCTIONS
R AD AND SAV TH S INSTRUCTIONS
BEFORE IT IS USED, THE APPLIANCE MUST BE PROPERLY INSTALLED AND
LOCATED AS DESCRIBED IN THIS MANUAL.
DO NOT US AN ADAPT R PLUG OR XT NSION CORD
(Adapter plugs not permitted in Canada)
Do not use an adapter plug to connect
the refrigerator to a 2-prong outlet.
Do not use an extension cord with this
appliance.

wDANGER! RISQU S POUR L S NFANTS
Les enfants pris au piège ou morts
d’asphyxie sont toujours d’actualité.
Les appareils de réfrigération a andonés
sont toujours aussi dangereux, même
si on n’attend que “quelque jours” pour
s’en dé arasser. Si vous ne gardez pas
votre ancien appareil, veuillez suivre
les directives ci-dessous afin de prévenir
les accidents.
Avant de vous d barasser de votre vieux
appareil de r frig ration :
•Démontez les portes.
•Laissez les clayettes en place afin
d’empêcher les enfants de grimper
à l’intérieur.
RÉFRIGÉRANTS
Tous les appareils de réfrigération
contiennent des refrigerants qui,
conformément aux lois fédérales,
doivent être enlevés avant toute
élimination de l’appareil.
Si vous vous dé arrassez de vieux
appareils de réfrigération, vérifiez,
auprès de la société qui s’occupe de
leur élimination, ce que vous devez faire.
IMPORTANTES INSTRUCTIONS DE SÉCURITÉ
LIR T CONS RV R C S INSTRUCTIONS
5
AVANT D’ÊTRE UTILISÉ, L’APPAREIL MÉNAGER DOIT ÊTRE BIEN INSTALLÉ ET
SE TROUVER À L’ENDROIT DÉCRIT DANS CETTE MANUEL.
N PAS UTILIS R D FICH D’ADAPTATION OU
D CORDON PROLONGAT UR
(Fiches d’adaptation non permises au Canada)
N’utilisez pas de fiche d’adaptation pour
rancher le réfrigérateur dans une prise
à 2 roches.
N’utilisez pas de cordon prolongateur avec
cet appareil.

6
HOW TO CONN CT L CTRICITY
Do not, under any circumstances, cut
or remove the third (ground) prong from
the power cord. For personal safety, this
appliance must be properly grounded.
The power cord of this appliance is
equipped with a 3-prong (grounding)
plug which mates with a standard 3-prong
(grounding) wall outlet to minimize the
possi ility of electric shock hazard from
this appliance.
Have the wall outlet and circuit checked
y a qualified electrician to make sure
the outlet is properly grounded.
Where a standard 2-prong wall outlet
is encountered, it is your personal
responsi ility and o ligation to have
it replaced with a properly grounded
3-prong wall outlet.
The appliance should always e plugged
into its own individual electrical outlet which
has a voltage rating that matches the rating
plate. This provides the est performance
and also prevents overloading house wiring
circuits which could cause a fire hazard
from overheated wires.
Never unplug an appliance y pulling on
the power cord. Always grip the plug firmly
and pull straight out from the outlet.
Repair or replace immediately all
power cords that have ecome frayed
or otherwise damaged. Do not use a cord
that shows cracks or a rasion damage
along its length or at either end.
When moving the appliance, e careful not
to roll over or damage the power cord.
IMPORTANT SAFETY INSTRUCTIONS
SAV TH S INSTRUCTIONS

7
RACCORD M NT ÉL CTRIQU
Ne coupez ni retirez en aucun cas
la troisième broche (mise à la terre)
de la fiche du cordon d’alimentation.
Pour votre s curit , cet appareil doit
être correctement mis à la terre.
Le cordon d’alimentation de cet appareil
est muni d’une fiche à 3 roches (mise
à la terre) qui se ranche dans une prise
mural ordinaire à 3 alvéoles (mise à la terre)
pour réduire au minimum les risques du
chocs électriques.
Faites examiner la prise de courant et
le circuit par un électricien qualifié pour
vous assurer que la prise est correctement
mise à la terre.
Si la prise murale est du type standard
à 2 alvéoles, il vous incom e de la faire
remplacer par une prise à 3 alvéoles
correctement mise à la terre.
Le appareil doit toujours être ranché dans
sa propre prise de courant, dont la tension
nominale est identique à celle indiquée sur
la plaque signalétique.
Cette précaution est recommandée pour
garantir un rendement optimum et éviter
une surcharge des circuits électriques de
la résidence, ce qui pourrait créer un risque
d’incendie par surschauffe des fils.
Ne dé ranchez jamais l’appareil
en tirant le cordon d’alimentation. Saisissez
fermement la fiche du cordon et tirez droit
pour la retirer de la prise.
Réparez ou remplacez immédiatement tout
cordon effiloché ou endommagé. N’utilisez
pas un cordon fendillé ou présentant des
signes d’usure.
Lorsque vous déplacez l’appareil du mur,
faites attention de ne pas la faire rouler
sur le cordon d’alimentation afin de ne pas
l’endommager.
IMPORTANTES INSTRUCTIONS DE SÉCURITÉ
CONS RV Z C S DIR CTIV S

Controls and Features
Beverage Center
Interior lighting
and glass
activation
The interior light makes it easy to view
your everage la els and enhances the
display of your collection. The privacy
glass allows you to view your wine and
everages with a simple press of a utton,
without opening the door. These two
features work jointly to display your
everages.
Normal operation
When the door is opened, the light will
come on and the door will ecome clear.
Special features
The light and glass activation utton,
located at the top of the handle, will switch
the glass from opaque to clear and will, at
the same time, turn on the light. The light
will stay on and the glass will remain clear
for one hour from the last time the utton
was pressed. To turn the light off and make
the glass opaque, press the utton again.
The opaque setting conceals the contents
from view.
The light will come on only when the door
is opened or the utton is pressed. If you
choose to activate the light and door while
the door is open, you may notice that the
word ON is displayed. If you press the light
utton a second time, while the door is
open the word OFF will e displayed.
For est viewing, do not store a ottle
on the top shelf directly under the light.
Remem er to turn off the light when it
is no longer needed.
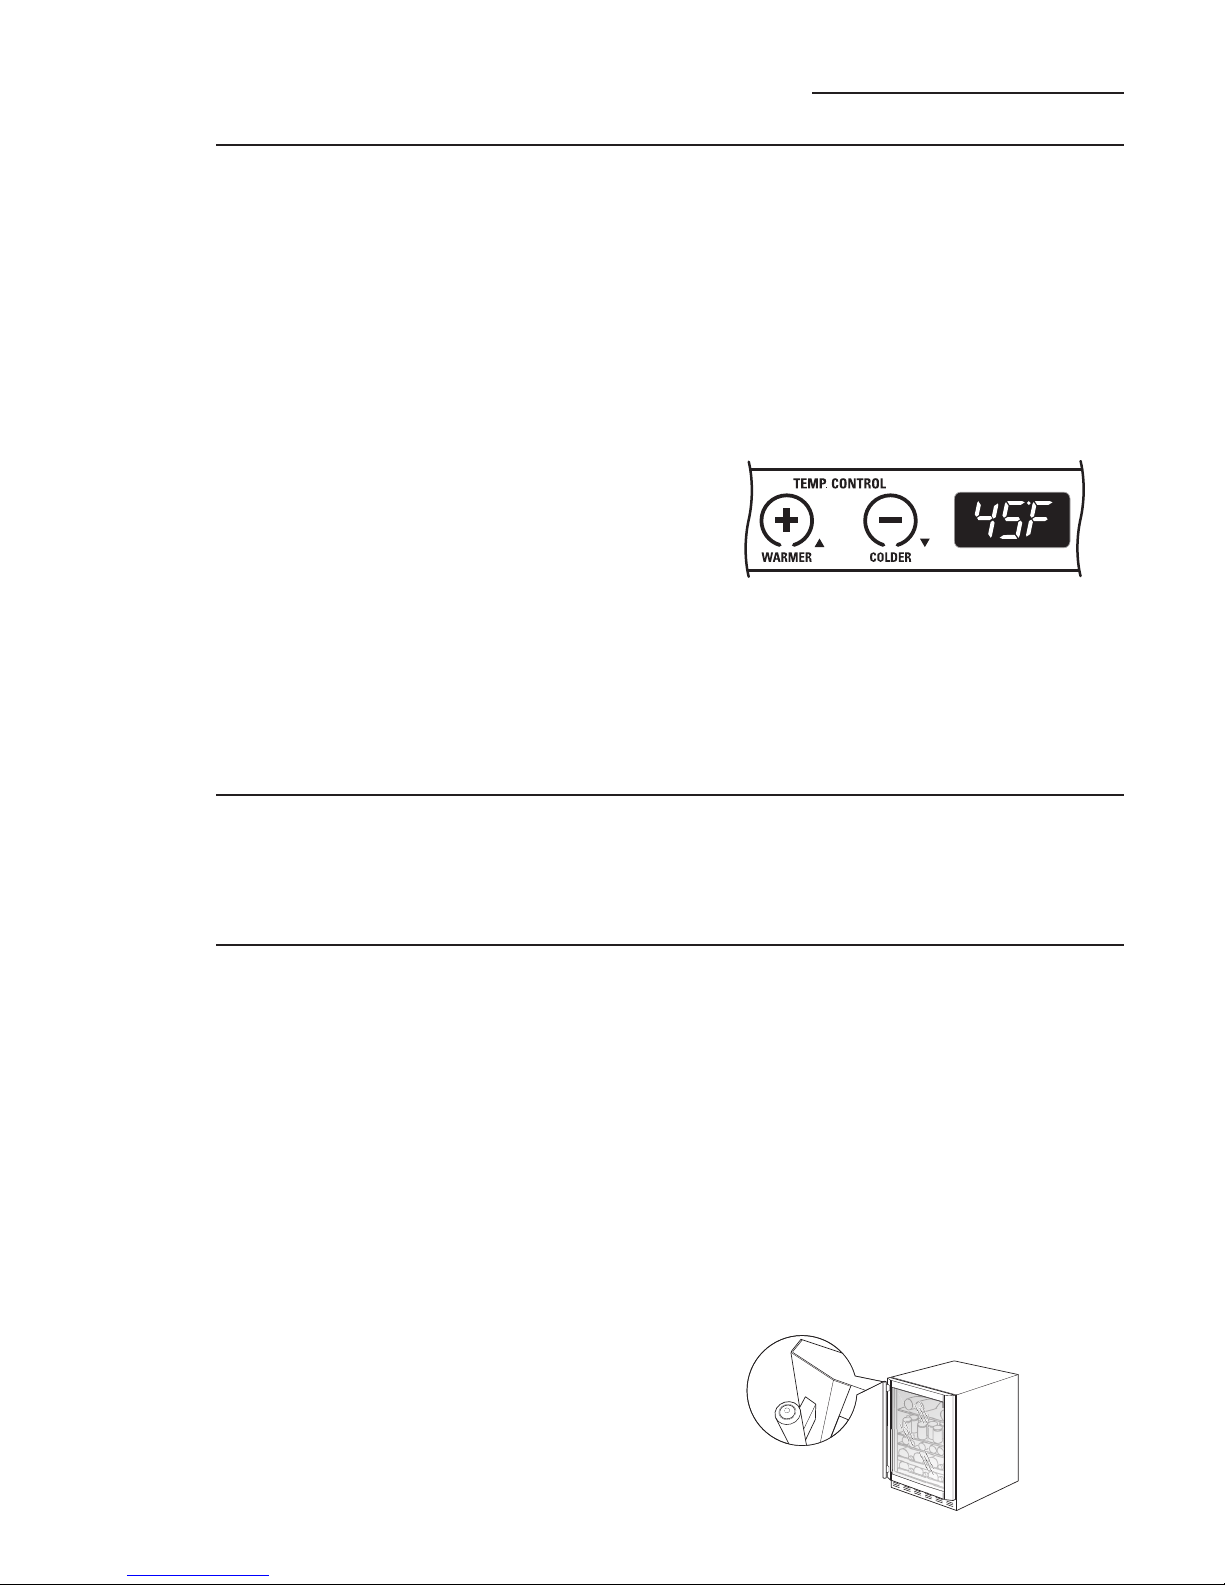
Temperature
control
The operating temperatures of the
everage center range from 40°F to 65°F.
This appliance is not a refrigerator and
does not maintain temperatures like a
refrigerator ( elow 40°F).
Do not install the everage center where
the temperature will go elow 55°F or
a ove 90°F.
As with any refrigeration-type product,
there is a slight temperature variance at
different locations within the ca inet.
The temperature display shows the actual
temperature of the everage center. The
actual temperature may vary slightly from
the set temperature ased on factors such
as door openings, amount of everages
and room temperature. After making
adjustments, allow 12 to 24 hours for the
everage center to reach the temperature
you have set and efore making any
further adjustments. The factory setting
is 45°F.
To change the temperature settings,
press the + and – pads until you reach
the desired set temperature. After several
seconds, the display will return to the actual
temperature. The actual temperature will e
displayed while the unit moves toward the
set temperature.
Allow 12 to 24 hours for the everage
center to reach the temperature you have
set and efore making any adjustments
to the initial setting.
NOTES:
•This unit is designed for storing and
cooling everages. It is not intended
for the storage of perisha le foods.
•The lowest temperatures are found on
the lower shelves/racks and toward the
rear of the shelves/racks.
8
Child control
lockout
This child control lockout feature prevents
unwanted changes to your temperature
settings.
After the desired temperature is set, the
temperature can e locked. To lock, press
oth the +and –pads at the same time for
five seconds. To unlock, press oth +and –
pads for five seconds.

Controls and Features
Beverage Center
Glass
shelves
Tempered glass shelves in the everage
center unit are remova le for easy cleaning
or for storing larger items.
To remove a shelf, open the door
completely to avoid potential damage to
the gasket. Lift up on the ack of the shelf
slightly. Tilt the shelf to one side at an angle
while pulling forward.
Appearance may vary
To replace a shelf, open the door
completely to avoid potential damage
to the gasket. Tilt the shelf to one side
at an angle and slide toward the ack wall,
placing one side onto the shelf support.
Place the other side onto the opposite
shelf support. Ensure rear locking ta s are
engaged. When installed properly, the shelf
will not slide forward when gently pulled.
9
To remove, lift up on the ack of the shelf Tilt the shelf at an angle while removing
or replacing
Place in slots when replacing the shelf
QuickSpace
™
shelf
This shelf splits in half and slides under itself
for storage of tall items on the shelf elow.
Step 1: Lift the ack edge of the front half
of the shelf.
Step 2: Pull slightly forward.
Step 3: Lower the ack edge of the front half
of the shelf while sliding it underneath the
ack half.
The entire Quick Space shelf can e removed
and replaced (see Glass Shelves section).
Step 3
Step 1
Step 2

Controls and Features
Beverage Center
Loading
tips and
suggestions
The ottom two full extension drawers hold
five ottles each and are loaded with necks
facing the rear. Tall ottles should not e
loaded on the ottom drawer ecause they
may prevent the door from closing.
•Do not block the thermistor, located on
the right hand side, just a ove the third
shelf of the everage center. Blocking
the thermistor could impair the air
circulation and temperature control.
NOTE: This unit is for storing everages
only and not intended for the storage of
perisha le foods. Bottom drawer arrangement
Removing
full
extension
drawers
The ottom full extension drawers pull
out so ottles can conveniently e added
or removed.
The upper full extension slide can e
removed for magnums or larger ottles.
To remove:
1. Pull the full extension drawer out to the
STOP position.
2. Push the ta on right drawer guide down
while pulling the ta on left guide up, and
pull the drawer out.
To replace:
1. Push the drawer slide arm ack into
the unit.
2. Pull the small slide su -assem ly
completely forward.
3. Insert the sides of the drawer ack
into the guides.
4. Push until the ta s lock into place.
Ta (push ta down on right
drawer guide, pull ta up on
left drawer guide)
Wood
drawer
fronts
The full extension drawer fronts on the
everage center are unfinished cherry
wood. During use, oil from hands may
accumulate and stain the wood.
•The drawer fronts may e stained and
sealed to match adjacent ca inetry. The
tinted glass will make the stained wood
appear darker. A true color match can e
seen only when the door is opened.
•Apply the stain and sealer according to
the manufacturer’s instructions. To avoid
unpleasant odor, keep the door open to
ventilate and allow the stain/sealer to dry
completely efore using the product.
NOTE: Natural wood may vary slightly in
grain and color.
10
NOTE: Make sure the ta s on the full
extension drawer guides are fully engaged
efore loading any ottles. Pull the drawers
out all the way to the STOP position and
push ack in several times to make sure
locking ta s are properly engaged.
To replace, push drawer slide
arm ack into unit
Pull small slide su -assem ly
completely forward
Appearance may vary
Su -assem ly Su -assem ly

Glass door
Use a glass cleaner or mild soap and water
and a soft cloth to clean the glass door.
Do not use any a rasive powders.
Avoid cleaning cold glass with hot
water because the extreme temperature
difference may cause it to break. Rough
handling of tempered glass can cause it
to shatter.
Do not place magnets on or near
the glass door. Magnets may cause
permanent damage to the door.
Door gasket
The vinyl gasket may e cleaned with mild
soap and water, a aking soda solution or
a mild scouring powder. Rinse well.
After cleaning the door gasket, apply a thin
layer of paraffin wax or petroleum jelly to
the door gasket at the hinge side. This helps
keep the gasket from sticking and ending
out of shape.
Light bulb
replacement
Unplug the beverage center before
replacing the light bulb. If the unit is
in a built-in location, remove power
at the circuit breaker.
To remove the light shield, push in the ta
on the left side of the shield and lower it.
Replace with a 15 watt appliance ul .
In the event
of a power
failure
If the power fails, open the door as
infrequently as possi le to maintain
the temperature.
Do not store or use gasoline or other
flammable vapors and liquids in the
vicinity of this or any other appliance.
Care and Cleaning
Beverage Center
Unplug the beverage center before cleaning. If the unit is in a built-in location,
remove power at the circuit breaker.
Cleaning
the outside
The exterior surfaces can e washed with
mild soap and water. Rinse thoroughly with
clear water. Never use a rasive scouring
powders.
Do not use scouring pads, powdered
cleaners, bleach or cleaners containing
bleach because these products can scratch
and damage the finish.
Warranty does not cover damage due to
improper cleaning methods.
Preparing
to move
Secure all loose items such as shelves and
drawers y taping them securely in place to
prevent damage.
Be sure the beverage center stays
in an upright position during moving.
11
For your
safety

Care and Cleaning
Beverage Center
Cleaning
the inside
Unplug the beverage center before
cleaning. If the unit is in a built-in location,
remove power at the circuit breaker. Use a
slightly damp cloth or sponge when cleaning
around switches, lights or controls.
Use warm water and aking soda solution—
a out a ta lespoon (15 ml) of aking soda
to a quart (1 liter) of water. This oth cleans
and neutralizes odors. Thoroughly rinse and
wipe dry.
Other parts of the beverage center unit—
including the door gaskets, full extension
drawers and glass shelves—can e cleaned
the same way.
Avoid cleaning cold glass shelves with hot
water because the extreme temperature
difference may cause them to break. Handle
glass shelves carefully. Rough handling of
tempered glass can cause it to shatter.
Drain hole
Periodically check the drain hole and channel
for any de ris. If the drain is locked,
condensation will not drain properly.
To check and clean the drain hole, remove
the ottom two glass shelves. Sweep a damp
cloth along the channel in the ack of the
everage center. Use a finger to sweep
away any de ris from the drain hole.
12
Unplug the beverage center before cleaning. If the unit is in a built-in location,
remove power at the circuit breaker.
Drain hole
Appearance may vary
For your
safety

13
•You may hear cracking or popping sounds
when the appliance is first plugged in. This
happens as the appliance cools to
the correct temperature.
•Expansion and contraction of cooling
coils during and after defrost can cause
cracking or popping sounds.
•The electronic control oard may cause
a clicking sound when relays activate to
control appliance components.
•The flow of refrigerant through the
appliance cooling coils may make
a gurgling noise like oiling water.
•A water dripping noise may occur as
water from the evaporator flows into
the drain pan.
•Closing the door may cause a gurgling
sound due to pressure equalization.
Normal
operating
sounds
Newer appliances sound different from older appliances. Modern appliances have more
features and use newer technology.
HUMMM
WHOOSH
CLICKS, POPS,
CRACKS and CHIRPS
WATER SOUNDS
Do you hear what I hear? These sounds are normal
•The new high efficiency compressor
may run faster and longer than your
old appliance and you may hear a high-
pitched hum or pulsating sounds while
it is operating.
•Sometimes the appliance runs for an
extended period, especially when the
doors are opened frequently.
•You may hear a whooshing sound when
the doors close. This is due to pressure
equalizing within the appliance.
•You may hear the fans spinning at
high speeds. This happens when the
appliance is first plugged in, when the
door is opened frequently or when
large amounts of everages are added
to the appliance. The fans help maintain
desired temperatures.
•If the door is open for over 3 minutes,
you may hear a fan come on in order
to cool the appliance.
•The fans change speeds in order to
provide optimal cooling and energy savings.
The Pro lem Solver
Beverage Center

Questions?
Use this
problem
solver!
PROBLEM POSSIBLE CAUSE
APPLIANCE • Appliance is so quiet that most of the time you will hear low or no
DOES NOT OPERATE operating noise.
• Appliance may e in defrost cycle when compressor motor does not
operate for up to 2 hours.
• If interior light is not on, appliance may not e plugged in at
wall outlet. Push the plug completely into the wall outlet.
• The fuse is lown/circuit reaker is tripped. Replace fuse or reset
the reaker.
VIBRATION OR • Adjust the leveling legs as shown in the Installation Instructions.
RATTLING (Slight
vibration is normal.)
COMPRESSOR • Normal when appliance is first plugged in. Wait 24 hours for the
MOTOR OPERATES appliance to completely cool down.
FOR LONG PERIODS • Often occurs when large amounts of everages are placed in appliance.
OR CYCLES ON AND This is normal.
OFF FREQUENTLY • Door left open or package holding door open.
• Hot weather or frequent door openings. This is normal.
• Temperature control set at the coldest setting.
See Temperature Control. Allow 24 hours for temperature to change.
COMPARTMENT • Temperature control not set cold enough.
TOO WARM See Temperature Control. Allow 24 hours for temperature to change.
• Warm weather or frequent door openings.
• Door left open for long time.
• Package may e holding door open.
• Thermistor may e locked, which can affect the overall temperature.
The thermistor is located on the right-hand side, just a ove the
third shelf.
APPLIANCE • Interior needs cleaning. See Care and Cleaning.
HAS ODOR • Keep open ox of aking soda in appliance; replace every 3 months.
DOOR NOT • Door gasket is sticking or folding over. Apply petroleum jelly
CLOSING or paraffin wax to the face of the gasket.
PROPERLY • The door is hitting an internal component inside the appliance.
Adjust interior components to prevent interference.
MOISTURE FORMS • Not unusual during periods of high humidity. If othersome,
ON OUTSIDE OF wipe surface dry; otherwise, moisture will evaporate in time.
APPLIANCE • Door left open or package holding door open.
FROST OR MOISTURE • Too frequent or too long door openings.
COLLECTS INSIDE • In humid weather, air carries moisture into appliance when door
is opened. Unit will dissipate moisture in time. If othersome,
wipe surface dry.
• Temperature control set at coldest setting.
• Thermistor may e locked, which can affect the overall temperature.
The thermistor is located on the right-hand side, just a ove the
third shelf.
The Pro lem Solver
Beverage Center
14

15
Questions?
Use this
problem
solver!
PROBLEM POSSIBLE CAUSE
INTERIOR LIGHT • No power at outlet.
DOES NOT WORK • Light ul needs replacing. See Care and Cleaning.
• Controls are set to OFF. Press ON/OFF pad on control panel.
HOT AIR FROM • Normal air flow cools the motor. In the refrigeration process,
BOTTOM OF it is normal that heat e expelled in the area under the appliance.
APPLIANCE Some floor coverings are sensitive and will even discolor at these
safe and normal temperatures.
APPLIANCE • Adaptive defrost keeps compressor running during door openings.
NEVER SHUTS OFF This is normal. The appliance will cycle off after the door remains
BUT TEMPERATURES closed for two hours.
ARE OK • Normal operation in extreme temperatures.
TEMPERATURE • Temperature may e in lockout mode. Press oth +and –pads for
WILL NOT ADJUST 5 seconds to unlock the temperature.
• Thermistor may e locked, which can affect the overall temperature.
The thermistor is located on the right hand side just a ove the
third shelf.
LIGHT REMAINS ON • Normal operation. The light and door can e activated y pressing
AND DOOR IS CLEAR the utton at the top of the handle. The light will remain on for one
WHILE DOOR IS hour. Press the utton to turn the door to opaque and turn the light off.
CLOSED
OPAQUE GLASS • Normal operation. The light and glass features work jointly at all
BECOMES CLEAR times. See Interior lighting and glass activation in Controls and
WHEN THE DOOR Features section for more details.
IS OPEN
The Pro lem Solver
Beverage Center

16
Wine or Beverage Storage and Handling Notes
Beverage Center

Wine or Beverage Storage and Handling Notes
Beverage Center
17

Wine or Beverage Storage and Handling Notes
Beverage Center
18

19
Consumer Services
Beverage Center
With the purchase of your new Monogram appliance, receive the
assurance that if you ever need information or assistance from
GE, we will be there All you have to do is call—toll-free!
GE Answer
Center
®
In the USA:
800 626 2000
Whatever your question a out any Monogram major appliance, GE Answer Center®
information service is availa le to help. Your call—and your question—will e answered
promptly and courteously. And you can call any time. GE Answer Center®service is open
24 hours a day, Monday through Saturday.
OR
Visit our We site at: monogram.com
In Canada, call 1 800 561 3344
In-Home
Repair
Service
In the USA:
800 444 1845
In Canada:
1 800 561 3344
A GE consumer service professional will provide expert repair service, scheduled at a time that’s
convenient for you. Many GE Consumer Service company-operated locations offer you service
today or tomorrow, or at your convenience (7:00 a.m. to 10:00 p.m. weekdays, 8:00 a.m. to 6:00 p.m.
Saturday and Sunday). Our factory-trained technicians know your appliance inside and out—so most
repairs can e handled in just one visit. In Canada: Monday to Friday, 7:00 a.m. to 8:00 p.m. and
Saturday, 8:00 a.m. to 5:00 p.m. EDST.
For
Customers
With Special
Needs…
In the USA:
800 626 2000
GE offers Braille controls for a variety of GE appliances, and a rochure to
assist in planning a arrier-free kitchen for persons with limited mo ility.
Consumers with impaired hearing or speech who have access to a
TDD or
a conventional teletypewriter may call 800.TDD.GEAC (800.833.4322)
to request information or service.
Service
Contracts
In the USA:
800 626 2224
In Canada:
1 800 561 3344
You can have the secure feeling that GE Consumer Service will still e there after your warranty
expires. Purchase a GE contract while your warranty is still in effect and you’ll receive a su stantial
discount. With a multiple-year contract, you are assured of future service at today’s prices.
Parts and
Accessories
In the USA:
800 626 2002
In Canada:
1 800 561 3344
Individuals qualified to service their own appliances can have parts or accessories sent directly
to their home. The GE parts system provides access to over 47,000 parts…and all GE Genuine Renewal
Parts are fully warranted. VISA, MasterCard and Discover cards are accepted.
User maintenance instructions contained in this manual cover procedures intended to be
performed by any user. Other servicing generally should be referred to qualified service
personnel. Caution must be exercised, since improper servicing may cause unsafe operation.

YOUR MONOGRAM BEVERAGE CENTER WARRANTY
Staple sales slip or canceled check here Proof of original
purchase date is needed to obtain service under warranty
Warranty
Beverage Center
WHAT IS
COVERED
From the Date
of the Original
Purchase
LIMITED ONE-YEAR WARRANTY
For one year from date of original purchase, we will provide, free of charge, parts and service la or in your home
to repair or replace any part of the unit that fails ecause of a manufacturing defect.
LIMITED FIVE-YEAR WARRANTY
For five years from date of original purchase, we will provide, free of charge, parts and service la or
in your home to repair or replace any part of the sealed refrigerating system (the compressor, condenser,
evaporator and all connecting tu ing) that fails ecause of a manufacturing defect.
This warranty is extended to the original purchaser and any succeeding owner for products purchased for
ordinary home use in the 48 mainland states, Hawaii, Washington, D.C. or Canada. If the product is located
in an area where service y a GE Authorized Servicer is not availa le, you may e responsi le for a trip charge
or you may e required to ring the product to an Authorized GE Service location for service. In Alaska the
warranty is the same except that it is LIMITED ecause you must pay to ship the product to the service shop
or for the service technician’s travel costs to your home.
All warranty service will e provided y our Factory Service Centers or y our authorized Customer Care®
servicers during normal working hours.
Should your appliance need service, during warranty period or eyond, in the USA call 800.444.1845.
In Canada: 800.561.3344. Please have your serial num er and model num er availa le when calling for service.
Some states/provinces do not allow the exclusion or limitation of incidental or consequential damages, so the
a ove limitation or exclusion may not apply to you. This warranty gives you specific legal rights, and you may
also have other rights which vary from state to state/province to province. To know what your legal rights are
in your state/province, consult your local or state/provincial consumer affairs office or your state’s Attorney
General.
Warrantor in USA: General Electric Company,
Louisville, KY 40225
Warrantor in Canada: Mabe Canada Inc.,
Burlington, Ontario
WHAT IS NOT
COVERED
• Service trips to your home to teach you how
to use the product.
• Replacement of house fuses or resetting of circuit
breakers.
• Damage to the product caused by accident, fire,
floods or acts of God.
• Failure of the product if it is used for other than
its intended purpose or used commercially.
• Damage caused after delivery.
• Improper installation, delivery or maintenance.
If you have an installation problem, contact
your dealer or installer. You are responsible for
providing adequate electrical, plumbing and
other connecting facilities.
• Replacement of the light bulbs, if included.
• Loss of food due to spoilage (in the USA only).
• Incidental or consequential damage caused
by possible defects with this appliance.
• Product not accessible to provide required
service.
197D5891P015
49-60438-3
Printed in Slovenia
07-08 JR
EXCLUSION OF IMPLIED WARRANTIES—Your sole and exclusive remedy is product repair as provided in
this Limited Warranty Any implied warranties, including the implied warranties of merchantability or
fitness for a particular purpose, are limited to one year or the shortest period allowed by law
GE Consumer & Industrial
Appliances
General Electric Company
Louisville, KY 40225
ge.com
Other manuals for Monogram ZDBT240
4
This manual suits for next models
1
Table of contents
Other GE Kitchen Appliance manuals