Para utilizar este teléfono, usted puede necesitar un
enchufe modular telefónico tipo RJ11C como el ilustrado
aquí, instalado en su hogar. Si usted no tiene este tipo
de enchufe, llame a su compañía telefónica local para
preguntar cómo conseguirlo.
• Nunca instale cableado telefónico durante una tormenta de relámpagos.
• Nunca instale enchufes telefónicos en localizaciones mojadas, a menos que
el enchufe esté especícamente diseñado para mojarse.
• Nunca toque cables o terminales no aislados, a menos que la línea telefónica
haya sido desconectada en la interfaz de la red.
• Utilice precaución cuando instale o modique líneas telefónicas.
• Desconecte temporalmente cualquier equipo conectado con el aparato
telefónico como máquinas de fax, otros teléfonos, o módems.
Su teléfono está diseñado para darle exibilidad de uso y funcionamiento de
alta calidad. Para obtener el máximo rendimiento de su teléfono, le sugerimos se
tome unos minutos ahora mismo para leer este manual de instrucciones.
Asegúrese de que su paquete
incluye los artículos mostrados aquí
:
Se juzga que este teléfono es compatible con audífonos, en base a las normas de la FCC.
Con licencia bajo la patente US 6,427,009.
El equipo de su teléfono esta aprobado para la conexión con la red Telefónica Pública (Public
Switched Telephone Network) y cumple con los requisitos establecidos en las secciones 15
y 68 de las Reglas y Regulaciones de la FCC y con los Requerimientos Técnicos para Equipos
de Terminales Telefónicas (Technical Requirements for Telephone Terminal Equipment),
publicado por ACTA
.
En la parte de abajo de este equipo hay una etiqueta que indica, entre otra información,
el número de US y el Número de Equivalencia de Timbres (REN) para este equipo. Usted
debe, cuando sea requerido, proveer esta información a su compañía telefónica.
El REN es útil para determinar el número total de artefactos que Ud. puede conectar
a su línea telefónica, todavía asegurando que todos estos artefactos sonarán cuando
se llame su número telefónico. En la mayoría de las áreas (pero no en todas), el total
de los números REN de todos los artefactos conectados a una línea no debe exceder
5. Para estar seguro del número total de artefactos que Ud. pueda conectar a su línea
(determinado por el REN), Ud. deberá ponerse en contacto con su compañía telefónica
local.
Cualquier enchufe y conexión que se utilice para conectar este equipo al cableado del
edicio y a la red telefónica, debe estar en conformidad con el reglamento de la FCC
Parte 68 que ha sido adoptado por la ACTA. Un cable telefónico y un enchufe modular
que han sido aprobados y están en conformidad con dicho reglamento han sido
provistos con este producto. Están diseñados para ser conectados a un enchufe modular
compatible, que también esté en conformidad. Para más detalles, vea las instrucciones
para la instalación.
• No se puede usar este equipo con un teléfono de previo pago proveído por la compañía
telefónica.
• Las líneas compartidas son sujetas a las tarifas del estado, y por eso, es posible que Ud.
no pueda usar su propio equipo telefónico si Ud. estuviera compartiendo la misma línea
telefónica con otros abonados.
• Se debe noticar la compañía telefónica cuando se desconecte permanentemente su
teléfono de la línea.
• Si su casa tiene algún equipo de alarma especial conectado a la línea telefónica,
asegúrese que la instalación de este producto no desactive su equipo de alarma. Si usted
tiene alguna pregunta sobre qué puede desactivar su equipo de alarma, consulte a su
compañía telefónica o a un instalador calicado.
Si su equipo causase algún problema en su línea que pudiera dañar la red telefónica,
la compañía telefónica siempre que sea posible le avisará de la posible interrupción
temporal de su servicio. En caso que la compañía no pudiera avisarle de antemano y
hubiera necesidad de tomar tal acción, la compañía telefónica podrá interrumpir su
servicio inmediatemente. En caso de tal interrupción telefónica temporal la compañía
debe : (1) darle aviso al momento de tal interrupción temporal de servico, (2) concederle
a Ud. la oportunidad de corregir la situación, (3) informarle a Ud. de sus derechos de
presentar una questa a la Comisión de acuerdo con los procedimientos dictados en la
Subparte E de la Parte 68 de las Regulaciones y Reglas de la FCC.
Este artefacto cumple con la Parte 15 de las Reglas de la FCC. Su funcionamiento es sujeto
a las dos condiciones siguientes: (l) Este artefacto no puede causar interferencia dañosa, y
(2) Este artefacto debe aceptar cualquier interferencia recibida, incluyendo interferencia que
puede causar un funcionamiento no deseado.
Este equipo ha sido probado y cumple con los límites para un artefacto digital de la Clase
B, de conformidad con la Parte 15 de las Reglas de la FCC. Estos límites han sido diseñados
para proporcionar una protección razonable contra una interferencia dañosa que pueda
existir en una instalación doméstica.
La aislamiento de comunicaciones no puede ser asegurada al usar este producto.
Este equipo genera, usa y puede radiar la energía de frecuencia de una radio y, si no fuera
instalado y usado de acuerdo con las instrucciones, puede causar interferencia dañosa a
las transmisiones radiales. Sin embargo, no hay garantía que la interferencia no ocurrirá en
una instalación en particular.
Si este equipo causa en efecto una interferencia dañosa a la recepción de la radio o de la
televisión, lo cual puede ser determinado apagando y prendiendo el equipo, le animamos
a Ud. de tratar de corregir la interferencia por medio de una (o más) de las sugerencias
siguientes:
• Cambie la posición o la ubicación de la antena (quiere decir la antena de la radio o de la
televisión que está recibiendo la interferencia).
• Cambie la posición o cambie la ubicación y aumente la distancia entre el equipo de
telecomunicaciones y la antena receptora de la radio o de la televisión que está
recibiendo la interferencia.
• Conecte el equipo de telecomunicaciones a una toma en un circuito diferente del circuito
al cual la antena receptora esté conectada.
Si estas medidas no eliminan la interferencia, favor de consultar a su distribuidor o a un
técnico de radio/televisión experto por otras sugerencias. También, la Comisión Federal
de Comunicaciones (FCC) ha preparado un folleto muy útil, “How To Identify and Resolve
Radio/TV Interference Problems” (“Como Identicar y Resolver Problemas de Interferencia
de Radio/Televisión”). Este folleto se puede obtener del U.S. Goverment Printing Ofce,
Washington, D.C. 20402. Favor de especicar el número 004-000-00345-4 cuando haga su
pedido.
Aviso: Los cambios o las modicaciones no no expreso aprobados por el partido responsable
de conformidad podían anular la autoridad del usuario para funcionar el equipo.
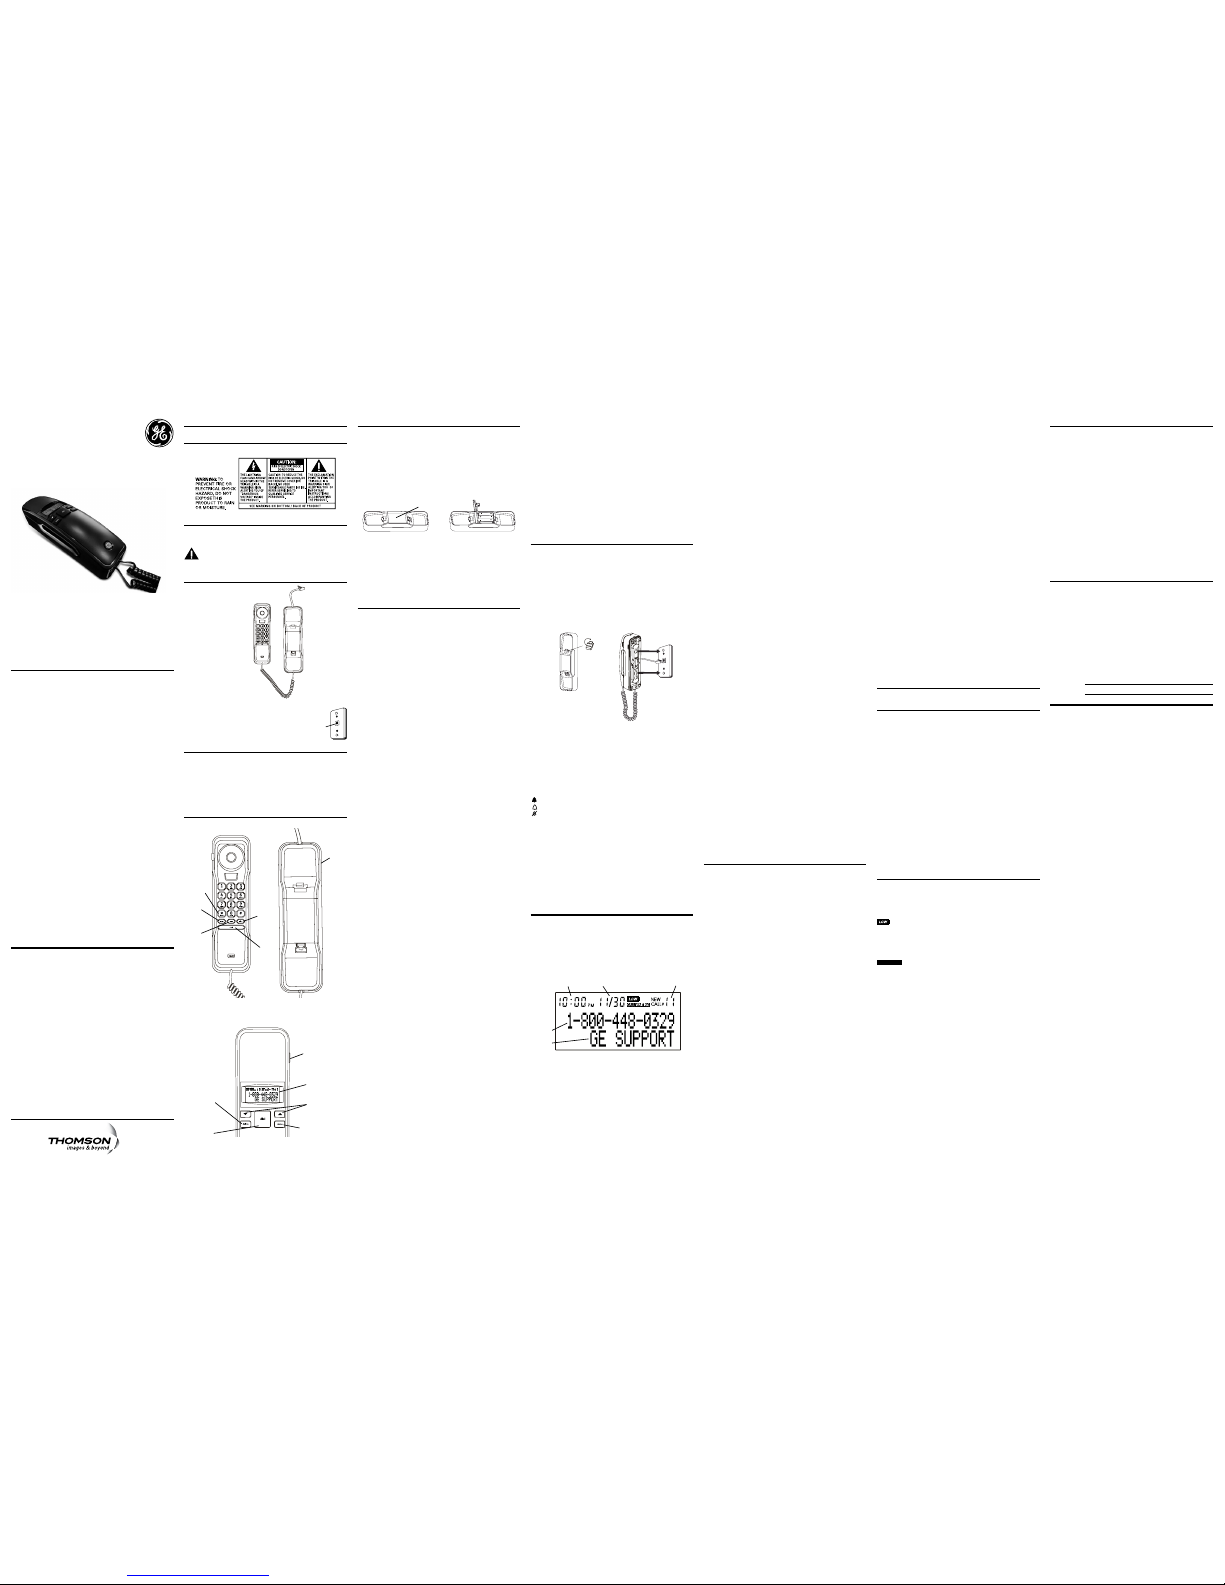
Su teléfono con Identicador de Llamadas usa 3 baterías alcalinas tamaño AA
para recibir y almacenar archivos del Identicador de Llamadas y para mantener
los números que usted utiliza para marcar por memoria.
1. Si la línea telefónica cuerda está conectada, desconéctela de la pared.
2. Abra la puerta del compartimiento de baterías con su dedo o pulgar.
Modelo 29281
00021389 (Rev. 1 Dom E/S)
08-05
Impreso en China
101 West 103rd Street
Indianapolis, IN 46290-1102
© 2008 Thomson Inc.
Trademark(s) ® Registered
Marca(s) Registrada(s)
3. Oprima el botón para mostrar la programación de contraste actual. Hay
5 niveles de contraste y el nivel 3 es el nivel programado de fábrica.
4. Para disminuir el contraste, oprim a el botón 6 (-). Para aumentar el
contraste, oprima el botón 5 (+).
5. Oprima el botón para almacenar la programación y regresar al menú
de contraste (SELECT CONTRAST).
Este ajuste le permite seleccionar la modalidad para marcar por tono (tone) o por
pulso (rotatorio).
1. Oprima el botón hasta que la indicación de programación
SET5OR6 aparezca en la pantalla.
2. Oprima el botón 5 (+) hasta que la indicación de modalidad para marcar T/P
DIAL MODE aparezca en la pantalla.
3. Oprima el botón para mostrar la modalidad para marcar actual. La
modalidad programada de fábrica es tono.
4. Para cambiar la modalidad para marcar, oprima los botones 5 (+) o6 (-). La
pantalla alternará entre las dos modalidades.
5. Oprima el botón para almacenar la programación y regresar al menú
de modalidad para marcar (T/P DIAL MODE).
Para salir inmediatamente de la modalidad de programación, seleccione el menú
EXIT SETUP y oprima el botón .
1. Conecte el cable recto y largo de la línea en un receptáculo telefónico de
pared.
2. Coloque el auricular en la base.
Su teléfono puede ser montado en una placa de pared (no incluida).
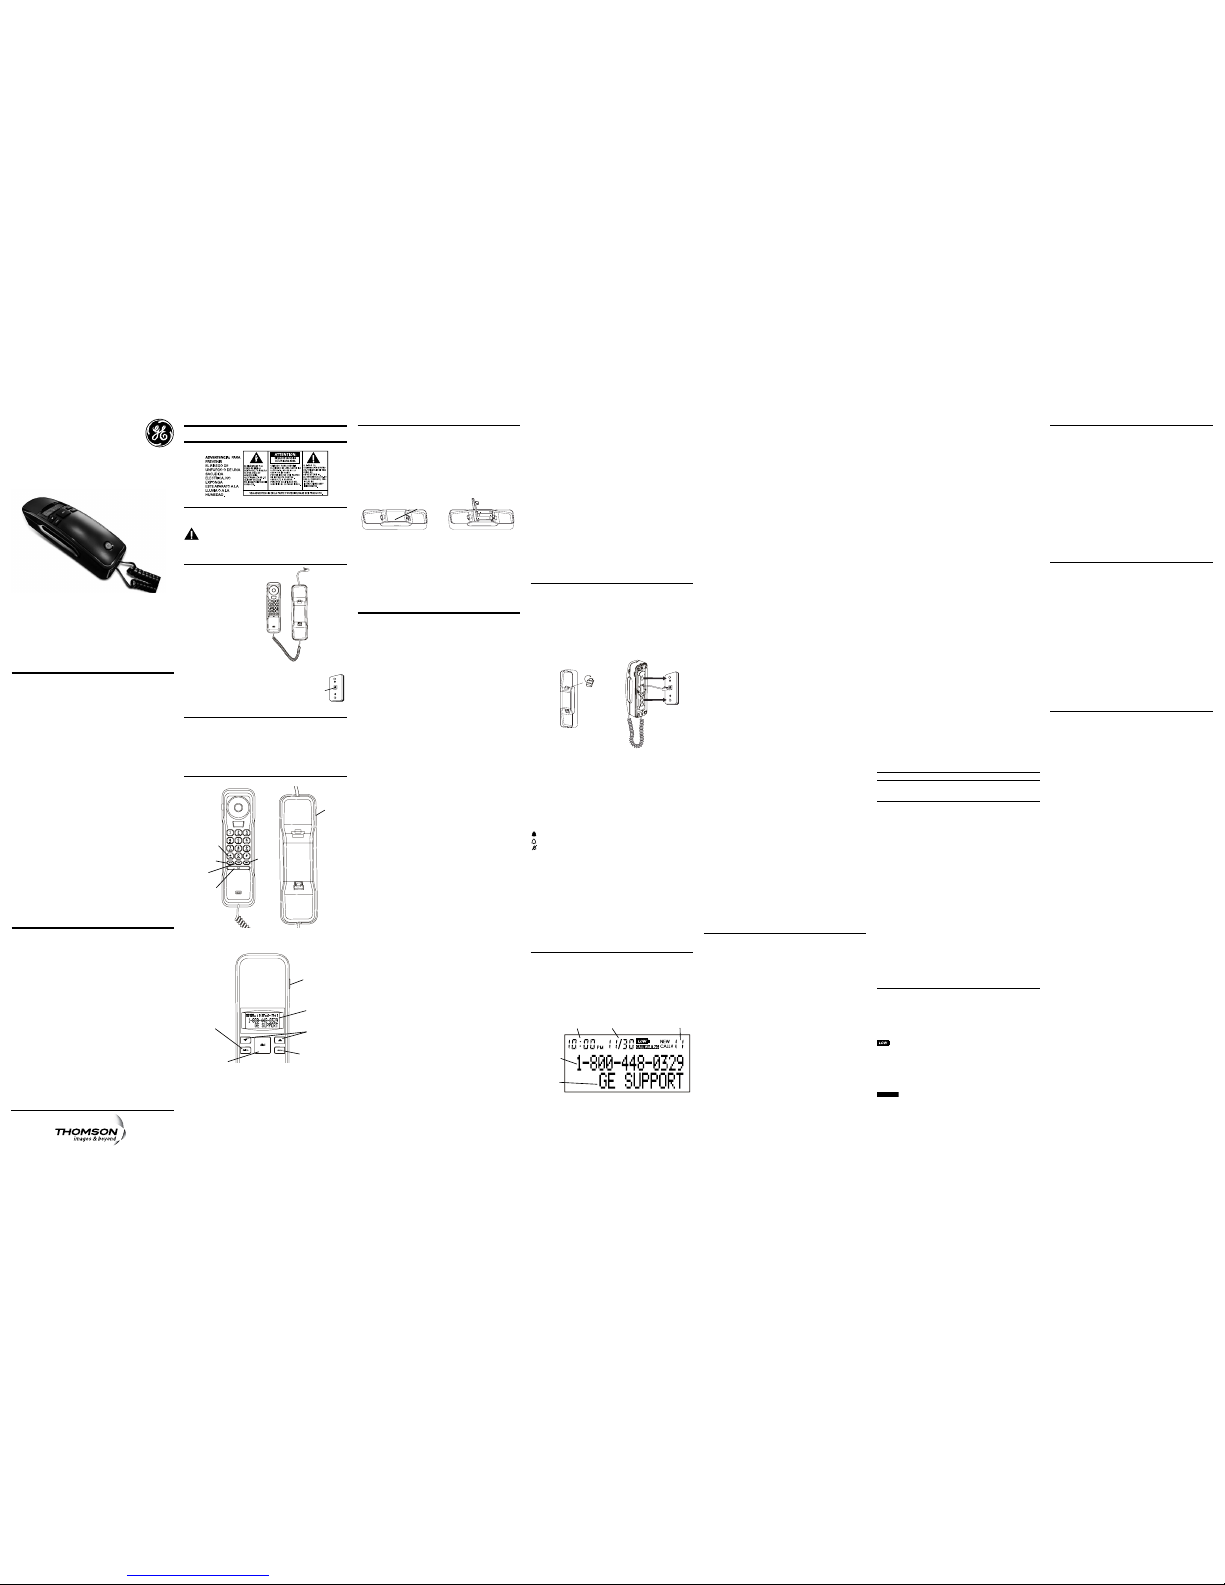
Cuando usted recibe una llamada, la información es transmitida entre el primero
y el segundo timbre. La información del Identicador de Llamadas aparece en
la pantalla mientras el teléfono timbra, dándole a usted la oportunidad de ver la
información y decidir si quiere o no contestar la llamada.
Si vous êtes absent ou ne pouvez répondre, la mémoire de l’afcheur mémorise
les données des 50 plus récents appels reçus pour vous indiquer qui a appelé
pendant que vous n’étiez pas disponible. À la réception du 51e appel, le plus
ancien dossier d’appelant (1er appel) est automatiquement supprimé.
Vous pouvez consulter l’information mémorisée en tout temps. Les appels
reçus depuis la dernière consultation sont indiqués comme étant NOUVEAU
dans l’afcheur. Les appels qui n’ont pas été écoutés précédemment mais qui
proviennent du même numéro plus d’une fois afchent REPT à l’écran.
A medida que se reciben y se almacenan archivos del Identicador de Llamadas,
la pantalla se actualiza para hacerle saber cuántas llamadas se han recibido.
Para recorrer los archivos del identicador de Llamadas:
1. Oprima los botones 5 (+) o6 (-) para ver el archivo de llamadas más
nuevo.
2. Oprima el botón 6 (-) para recorrer los archivos de llamadas desde el más
reciente hasta el más viejo.
3. Oprima el botón 5 (+) para recorrer los archivos de llamadas desde el
más viejo hasta el más reciente.
4. Cuando todos los archivos han sido revisados, la indicación COMIENZO/
FINAL aparece en la pantalla.
• Para borrar el archivo que se muestra en la pantalla, oprima y suelte el botón
una vez.
• Para borrar todos los archivos mientras los revisa, oprima y sostenga el
botón hasta que la indicación BORRAR TODO? aparezca en la pantalla
entonces oprima el botón otra vez para conrmar.
Cuando esté revisando los archivos del Identicador de Llamadas (Caller
ID), usted puede volver a marcar el número que se muestra en la pantalla,
oprimiendo el botón .
1. Oprima los botones 5 (+) o6 (-) para mostrar el número que usted quiera
marcar.
• Si usted ve un número de 7 dígitos (por ejemplo, 555-1234), entonces esa
llamada fue recibida desde su misma clave de área. Sin embargo, esto no
garantiza que la llamada sea local.
• Si usted ve un número de 11 dígitos (por ejemplo, 1-234-555-1234), entonces
esa llamada no fue recibida desde su misma clave de área.
2. Oprima el botón y la pantalla muestra la indicación LEVANTE o AJUSTE.
Un temporizador empieza a contar el tiempo en la esquina superior derecha
de la pantalla, para hacerle saber el tiempo que falta antes de que la pantalla
vuelva a la Pantalla Sumario. Si usted ajusta el número que será marcado, el
temporizador vuelva a ajustarse solo, automáticamente.
3. Para ajustar el formato del número telefónico, oprima el botón . Por
ejemplo, un número local de 7 dígitos algunas veces no puede marcarse
porque requiere un formato de 10 dígitos o de 11 dígitos. Oprima
repetidamente el botón para recorrer los números de 7, 10 y 11 dígitos.
número telefónico de 7 dígitos (ejemplo, 555-5555).
clave de área de 3 dígitos + el número telefónico de
7 dígitos (ejemplo 425-555-5555).
clave de larga distancia 1 + clav e de área de 3 dígitos
+ el número telefónico de 7 dígitos (ejemplo 1-425-555-5555).
4. Para marcar el número mostrado levante el auricular antes de que el
temporizador llegue a 0. La indicación DISCANDO AHORA aparece en la
pantalla y el número se marca.
Si usted No Programó su Clave de Area en el Menú de Programación
1. Utilice los botones 5 (+) o6 (-) para mostrar el número que usted quiera
marcar. Usted únicamente verá números de 10 dígitos, (234-555-1234).
2. Vea los pasos del 2 al 4 en la sección anterior para completar el proceso de
volver a llamar.
LEVANTE TELEFON
Antes de almacenar cualquier número telefónico en la memoria, asegúrese
que la modalidad para marcar esté correctamente programada para el tipo de
servicio que usted tiene. La modalidad preprogramada es por tono (touch-tone),
así que si usted tiene servicio de pulso (rotatorio), usted debe primero cambiar la
modalidad para marcar. Vea “Modalidad para Marcar por Tono/Pulso”
1. Levante el auricular.
2. Oprima el botón .
3. Oprima el botón de la localización de memoria deseada (0-9).
4. Oprima el botón .
5. Utilice el teclado numérico del auricular para inscribir el número telefónico
(hasta 16 dígitos) y oprima el botón .
6. Cuelgue el auricular.
Repita la secuencia para almacenar explicada arriba. El nuevo número
reemplaza al viejo en la localización de memoria.
1. Levante el auricular.
2. Oprima el botón .
3. Presione los botones 5 (+) ó 6 (-) para la ubicación de memoria que se desea
borrar.
4. Presione y sostenga el botón por tres segundos hasta que el número en
pantalla sea borrado.
5. Cuelgue el auricular.
5
6
1. Levante el auricular y oprima el botón .
2. Oprima 0-9 para la localización de memoria. El número se marca
automáticamente.
O
1. Levante el auricular y oprima el botón .
3. Introduzca 3 baterías alcalinas tamaño AA (no incluidas) como se muestra
dentro del compartimiento.
4. Vuelva a colocar la puerta del compartimiento.
5. Vuelva a conectar la línea telefónica en la pared y verique las
localizaciones de memoria. Si la instalación tarda más de 60 minutos,
usted debe re-programar sus localizaciones de memoria.
1. Coloque el auricular sobre la base.
2. Oprima el botón . La indicación de programación SET5OR6 aparece
en la pantalla.
3. Oprima el botónes 5 (+) or 6 (-) para recorrer las 7 pantallas de menú, que
son:
• SET 5 OR 6 (MENU DE PROGRAMACIÓN)
• LOCAL AREA CODE (CLAVE DE AREA LOCAL , preprogramado - - -)
• REGIONAL AC’S-1 (CLAVE DE AREA REGIONAL,
preprogramado - - - - - - - - -)
• CID LANGUAGE (IDIOMA, preprogramado inglés)
• SELECT CONTRAST (CONTRASTE, preprogramado 3)
• T/P DIAL MODE (MODALIDAD PARA MARCAR T/P, preprogramado tono)
• EXIT SETUP (PARA SALIR DE PROGRAMACIÓN)
NINGUNA LLAMADA
El teléfono utiliza la clave de área programada para determinar cuál formato de
número debe mostrarse cuando una señal válida del Identicador de Llamadas
es recibida. También se utiliza para la función de Volver a Marcar Dialback.
1. Oprima el botón . La indicación de programación SET5OR6 aparece
en la pantalla.
2. Oprima el botón 5 (+) hasta que la indicación de clave de área local
LOCAL AREA CODE:_ _ _ aparezca en la pantalla.
3. Para inscribir o cambiar la clave de área, oprima el botón para opciones. La
pantalla muestra la clave de área almacenada en la memoria. El dígito del
extremo izquierdo o un signo de resta (-) parpadea, indicando que el aparato
está listo para aceptar la inscripción de la clave de área.
4. Appuyez sur le bouton 5 (+) et sélectionnez un numéro de 0 à 9 en ordre
ascendant. Ou appuyez sur le bouton 6 (-) pour sélectionner un numéro
de 9 à 0 en ordre descendant.
5. Appuyez sur le bouton pour passer au chiffre suivant.
6. Après avoir entré le troisième et dernier chiffre, appuyez sur le bouton
pour enregistrer l’indicatif régional et passer au réglage suivant.
Igual que con la Clave de Área Local, el teléfono utiliza las claves de área
programadas para determinar el formato del número que debe mostrarse
cuando entra una señal válida del Identicador de Llamadas. Las llamadas cuyas
claves de área regional sean iguales que las claves de área programadas, se
muestran en un formato de 10 dígitos. Esta programación es especialmente útil
en regiones que tienen múltiples códigos regionales o locales que requieren 10
dígitos para ser marcados.
1. Oprima el botón . La indicación de programación SET5OR6 aparece
en la pantalla.
2. Oprima el botón 5 (+) hasta que la indicación de clave de área regional
REGIONAL AC’S-1: _ _ _ _ _ _ _ _ _ aparezca en la pantalla.
3. Para inscribir o cambiar la clave de área, oprima el botón para opciones. La
pantalla muestra la clave de área almacenada en la memoria. El dígito del
extremo izquierdo o un signo de resta (-) parpadea, indicando que el aparato
está listo para aceptar la inscripción de la clave de área.
4. Oprima el botón 6 (-) y seleccione un dígito del 9-0 para el primer dígito de la
clave de área.
5. Cuando el dígito deseado esté parpadeando, oprima el botón 5 (+) para
avanzar al siguiente dígito.
6. Oprima nuevamente el botón para inscribir la siguiente clave de área
regional de tres dígitos y repita los pasos 4 y 5 hasta que todos los dígitos
para su clave de área regional (REGIONAL AC’S-1 (RAC#1) ) y (REGIONAL AC’S-2
(RAC#1) ) estén inscritos. Un total de 6 juegos de Claves de Área Regionales
pueden ser inscritos.
7. Oprima el botón para almacenar la programación y regresar al menú
de clave de área regional REGIONAL AC’S.
8. Oprima el botón para salir del menú.
Este ajuste le permite que usted exhiba mensajes del aviso del Identicador de
Llamadas en inglés, francés, o español.
1. Oprima el botón . La indicación de programación SET5OR6 aparece
en la pantalla.
2. Oprima el botón 5 (+) hasta que la indicación de idioma CID LANGUAGE
aparezca en la pantalla.
3. Oprima el botón para mostrar la programación de idioma actual. El
idioma programado de fábrica es inglés.
4. Oprima el botón5 (+)o6 (-) para cambiar el idioma.
5. Oprima el botón para almacenar la programación y regresar a la
pantalla de idioma (CID LANGUAGE).
This adjustment allows you to select the contrast of the display.
1. Oprima el botón hasta que la indicación de programación
SET5OR6 aparezca en la pantalla.
2. Oprima el botón 5 (+) hasta que la indicación de contraste de la pantalla
(SELECT CONTRAST) aparezca en la pantalla .
1. Empuje con el pulgar el gancho del auricular hacia arriba y fuera de la
ranura en la base, gire el gancho 180°, y vuelva a colocarlo en la ranura.
2. Alimente el cable de línea liso a través de las ranuras y enhebre el cable en la
pieza provista para ello en la parte de abajo de la base.
3. Alimente el cable en la ranura que está en la pieza del lado opuesto a donde
está enhebrado, y conecte el extremo en el enchufe modular telefónico.
4. Deslice los agujeros para montaje en la base (en la parte de debajo de la base)
por encima de los postecitos de pared y deslice rmemente el aparato hacia
abajo hasta que entre en su sitio.
Usted puede controlar el nivel de volumen del timbre con el interruptor
ubicado a un lado de la base.
= Es el sonido más fuerte
= El sonido será más bajo
= El teléfono no timbrará
Usted puede controlar el nivel de volumen con el selector VOLUME, que tiene tres
niveles. Permanece en el último nivel que usted haya escogido hasta que sea
cambiado.
Si usted quiere marcar nuevamente el último número que fue marcado, (hasta 32
dígitos), utilice la función para volver a marcar.
1. Levante el auricular.
2. Oprima el botón .
3.
El último número que haya sido marcado se vuelve a marcar automáticamente.
Si el último número al que usted llamó está ocupado, usted puede
inmediatamente volver a marcarlo oprimiendo el botón sin haber colgado
el auricular.
Este aparato recibe y muestra información transmitida por su compañía
telefónica local. La información puede incluir el número telefónico, fecha y hora;
o el nombre, número telefónico, fecha y hora. Cada auricular puede guardar en
memoria hasta 40 llamadas para ser revisadas después.
Suponiendo que usted está suscrito al servicio de Identicador de Llamada en
Espera a través de su compañía telefónica; si usted recibe una llamada entrante
y usted está utilizando la GE multi ja a mano el sistema, una señal sonora indica
que la presencia de Llamada en Espera llamada invita la línea. La información de
Identicador de Llamada en Espera será exhibida y almacenada en la historia de
todos los auriculares en el sistema.
• Cuando usted escuche el tono de llamada en espera en la bocina del
auricular, prima el botón para poner la llamada actual en espera y
poder contestar la llamada entrante. Presione otra vez para volver a la
llamada original.
No hay tono de marcar
• Verique el cableado para asegurarse de que las conexiones están conectadas
adecuadamente y no están dañadas.
• Verique el gancho del auricular: ¿Regresa a su lugar cuando se levanta el auricular de la
base?
La Pantalla no Muestra Nada
• Cambie las baterías.
• Asegúrese de que las baterías están instaladas adecuadamente.
No hay Información del Identicador de Llamadas después de que el Teléfono Timbra
• Para recibir la información del Identicador de Llamadas con este aparato, usted debe estar
suscrito al servicio de Identicador de Llamadas que ofrece su compañía telefónica local.
• Asegúrese de esperar al segundo timbre antes de contestar.
El Teléfono no Timbra
• Asegúrese que el selector del timbre esté activado y en la posición “HI.
• Usted puede tener demasiadas extensiones del teléfono en su línea. Desconecte algunos
teléfonos.
• Verique si hay tono de marcar. Si no hay tono, vea la sección “No Hay Tono de Marcar.”
La Otra Persona no Puede Escucharle
• Asegúrese que el cable telefónico esté conectado adecuadamente.
• Asegúrese que las demás extensiones del teléfono estén colgadas mientras usted está
usando el teléfono. Es normal que baje el volumen si se utilizan otras extensiones al mismo
tiempo.
El Teléfono no Da Línea Hacia fuera
• Asegúrese que la modalidad de marcado por tono/ pulso esté programada de acuerdo al
servicio al que usted está suscrito.
Si usted experimenta problemas con este equipo, para información de garantía,
comuníquese con el departamento de servicio al cliente al . Si el
equipo está causando daños a la red telefónica, la compañía telefónica puede
requerir que desconecte su equipo hasta que el problema haya sido resuelto.
Cualquier reparaciones o cambio o modicación no aprobados expresamente por
Thomson Inc. podría ser motivo de anulación de la autoridad del usuario para operar
este producto. Para las instrucciones en cómo obtener una unidad del reemplazo,
reera a la garantía incluida en este servicio de cliente de la guía o de la llamada en
.
O envíe sus preguntas a:
Adjunte su recibo al folleto, para futura referencia, o anote la fecha en la que se
compró o recibió este producto como regalo. Esta información será valiosa si se
llegase a requerir durante el período de garantía.
Fecha de Compra ___________________________________________________
Nombre de la Tienda ________________________________________________
• Defectos de materiales o de trabajo.
• Un año, a partir de la fecha de compra.
(El periodo de garantía para unidades arrendadas se inicia con la primera renta
o 45 días de la fecha del embarque a la rma de arrendamiento, lo que ocurra
primero).
• Proporcionarle una unidad nueva. La unidad de intercambio quedará bajo garantía
por el resto del periodo de garantía del producto original.
• Empaque bien la unidad, incluyendo todos los cables, etc., que originalmente
venían con el producto. Se recomienda usar el cartón y materiales de empaque
originales.
• “Prueba de compra como factura o recibo de compra, que ofrezca evidencia de
que el producto está dentro del periodo de garantía, debe ser presentado para
obtener servicio bajo garantía.” Para compañías de arrendamiento, se requiere
como evidencia el primer contrato de renta. También escriba claramente su
nombre, dirección y la descripción del defecto. Mande vía UPS o un servicio de
paquetería equivalente a:
• Asegure su empaque para prevenir pérdida o daño. Thomson Inc. no acepta
responsabilidad en caso de pérdida o daño.
• Un aparato nuevo se le enviará con los cargos pagados.
• Instrucciones al cliente. (Su manual de propietario le proporciona la información
con respecto a las instrucciones de operación y los controles del usuario. Cualquier
información adicional debe obtenerse con su agente de ventas.
• Ajustes de instalación y de preparación del servicio.
• Baterías.
• Daño por mal uso o negligencia.
• Productos que han sido modicados o incorporados a otros productos.
• Productos comprados o que han recibido servicio fuera de los Estados Unidos.
• Desastres naturales, por ejemplo y sin limitarse a ellos, daños por relámpagos.
• Por favor visite www.ge.com/phones para registrar su unidad. Esto facilitará
contactarlo en caso necesario. El registro no es requerido para cobertura en
garantía.
• Algunos estados no permiten la exclusión ni limitación de daño incidental o
derivado de alguna consecuencia, o la limitación con respecto al período de
tiempo que debe aplicarse para garantías implícitas, por lo tanto las limitaciones y
exclusiones mencionadas anteriormente pueden no ser aplicables para usted.
• Esta garantía le ofrece derechos legales especícos, y usted puede tener otros
derechos legales que varían de estado a estado.
• Esta garantía no se aplica. Vea a su distribuidor para información sobre la garantía.
5
6
2. Oprima los botones 5 (+) o6 (-) para llegar a la localización de memoria
deseada.
3. Oprima el botón para marcar el número.
O
1. Oprima el botón mientras el auricular está todavía sobre la base.
2. Oprima oprima los botones 5 (+) o6 (-) para llegar a la localización
de memoria deseada, levante el auricular y el número se marca
automáticamente.
1. Oprima el botón .
2. Oprima 0-9 para la localización de memoria. El número aparece en la pantalla.
1. Levante el auricular.
2. Oprima cualquiera de los botones 5 (+) o6 (-) para mostrar en la pantalla el
número que usted quiere copiar.
3. Oprima el botón .
4. Oprima 0-9 para la localización de memoria. La pantalla parpadea si esa
localización de memoria está ocupada.
5. Oprima dos veces el botón y reemplazar la información nueva con la
vieja, u oprima cualquiera de los botones 5 (+) o6 (-) para seleccionar una
localización vacía. El número es automáticamente almacenado.
6. Oprima el gancho del auricular para salir.
1. Levante el auricular.
2. Oprima el botón .
3. Oprima 0-9 para la localización de memoria. La pantalla parpadea si esa
localización de memoria está ocupada. Oprima cualquiera de los botones 5
(+) o6 (-) para seleccionar una localización diferente. La pantalla parpadea si
esa localización de memoria está ocupada.
4. Oprima nuevamente el botón para conrmar.
5. Oprima los botones 5 (+) o6 (-) y después oprima nuevamente el botón
.
6. Oprima el botón , o el gancho del auricular para salir.
El botón tiene una función doble. Se convierte en un botón de pausa
cuando el botón para almacenar se oprime primero. Es válido únicamente
cuando se almacena un número en la memoria. Utilice el botón
para introducir una pausa cuando un retraso es necesario en la secuencia
demarcado. Por ejemplo, cuando usted tiene que marcar un 9 para obtener línea
externa, o cuando usted inscribe un código para tener acceso a su compañía de
larga distancia.
Usted puede necesitar ajustar la duración de la pausa. Puede ser ajustada de 1 a
9 segundos. La programación de fábrica es de 4 segundos.
1. Levante el auricular.
2. Oprima el botón .
3. Oprima el botón .
4. Oprima del 1 al 9 (1 = 1 segundo, 2 = 2 segundos, etc.)
5. Oprima nuevamente el botón .
6. Oprima el botón o el gancho del auricular para salir.
Este proceso le permite marcar una sucesión de números almacenados en
localizaciones de memorias diferentes. Esta función es útil cuando usted debe
llamar varias secuencias de números, como llamadas frecuentes a través de su
proveedor de larga distancia.
Por ejemplo Localización de Memoria
Número de acceso a la compañía de larga distancia 6
Código de autorización (ID) 7
Número telefónico de larga distancia 8
1. Levante el auricular.
2. Presione el botón y después oprima el 6.
3. Cuando usted escuche el tono de acceso, oprima nuevamente el botón
y después oprima el 7.
4. Al siguiente tono de acceso, oprima el botón y después oprima el 8.
Este botón se utiliza para activar servicios especiales que le son disponibles a
través de su compañía telefónica local, como Llamada en Espera. Estos servicios
generalmente requieren una tarifa mensual adicional. Si usted se suscribe a
cualquiera de estos servicios, por favor reérase a los manuales de instrucciones
de la compañía telefónica para informarse sobre cómo funciona el botón .
• Después de que usted escucha el tono de Llamada en Espera, oprima y
suelte el botón . La primera llamada se pone en espera para que usted
pueda contestar la segunda llamada.
• Oprima y suelte nuevamente el botón . La primera llamada continúa
mientras que la segunda llamada se pone en espera.
Si usted tiene servicio para marcar por pulso, usted puede cambiar
temporalmente su servicio de pulso a tono. Después de marcar el número
telefónico, oprima y suelte el botón de tono en el aparato. Esta función les
permite a los usuarios de servicio telefónico de Pulso (rotatorio), tener acceso a
los servicios para marcar de teclado (touch-tone) como los servicios bancarios o
de larga distancia. Después de que usted cuelga el auricular, el teléfono regresa
automáticamente al servicio rotatorio.
Los siguientes mensajes especiales indican el estado actual de un mensaje o del
aparato:
La memoria de llamadas está vacía.
La llamada entrante no tiene servicio de Identicador de
Llamadas o el área de servicio de la persona que llama no
está conectada con la suya. Si la indicación DESCONOCIDO
aparece junto con el número que llama, la información del
nombre para ese número no esta a disponible.
La corriente de la batería está baja. Por favor cambie la
batería tan pronto como le sea posible para poder mantener
intacta la operación del Identicador de Llamadas.
La persona haciendo la llamada entrante está registrada
como Número Privado y sus datos de Identicador de
Llamadas no serán revelados.
Usted está al principio o al nal del registro del registro de
memoria del Identicada de Llamadas.