GE LanPro 11 U User manual

GE Digital Energy
g
INSTALLATION / USER MANUAL
UNINTERRUPTIBLE POWER SUPPLY
LanPro 11 U
5/6/8/10 kVA
Manufactured by:
GE Digital Energy
General Electric Company Telephone +41 (0)91 / 850 51 51
CH – 6595 Riazzino (Locarno) Fax +41 (0)91 / 850 51 44
Switzerland Website www.gedigitalenergy.com
Technology for the Digital World. ver. 2.1 US
LanPro-U UPS

LX: OPM_LPA_11U_5K0_10K_1US_V021 1GE DE LanPro-11U UPS: Installation / User Manual 2.1 (US)
GE Digital Energy
g
USER MANUAL LanPro 5/6/8/10-11U UPS
LX-DOCFile: OPM_LPA_11U_5K0_10K_1US_V021
Software version R2.9
INSTALLATION / USER MANUAL
UNINTERRUPTIBLE POWER SUPPLY
LanPro®11 U
5/6/8/10kVA
Preface
We thank you for selecting a GE (General Electric) Digital Energy Uninterruptible Power Supply (UPS) and
recommend that you read these instructions carefully before installation and start-up of the LanPro®-U UPS.
Please keep this manual in a safe place for future reference and carefully read the important safety instructions in
chapter 1 before installation of this device.
Tested
GE Digital Energy is committed to quality and individually tests each LanPro®-U UPS to ensure reliable
performance for the user. All units have passed GE DE's quality control standards and conform to the tolerances in
the enclosed specifications.
About GE Digital Energy
GE Digital Energy is a leading provider of mission critical power equipment, and bridges the gap between the
traditional electricity supply and the critical power requirements of today’s businesses. GE designs, develops and
delivers extremely reliable and intelligent power solutions, from desktop UPS to self-contained premium power
systems which are supported through a global services network.
© General Electric Digital Energy. All rights reserved; reproduction in whole or in parts without permission prohibited. This manual may be
subject to change; no liability can be accepted for any error or omission.
LanPro®-U is a registered trademark of GE Digital Energy. Trademarks of other companies used in this document are registered trademarks of
their respective owners.

LX: OPM_LPA_11U_5K0_10K_1US_V021 2GE DE LanPro-11U UPS: Installation / User Manual 2.1 (US)
GE Digital Energy
g
CONTENTS
1 IMPORTANT SAFETY INSTRUCTIONS ..................................... 4
1.1 Save these instructions
1.2 General
1.3 Installation
1.4 Storage
1.5 Batteries
2 INTRODUCTION ......................................................................... 5
3 FUNCTIONAL EXPLANATION .................................................... 6
3.1 Principles of Operation
3.2 Normal Conditions
3.3 Utility Failure
3.4 Automatic Bypass Switch
3.5 Manual Bypass Switch
4 INSTALLATION ............................................................................ 8
4.1 Unpacking
4.2 Package Contents
4.3 Location
4.4 Installation
4.4.1 Installation Procedures
4.4.1.1 Standard installation procedure: Vin 208-240Vac, Vout 120/208/220/230/240Vac
4.4.1.2 Installation procedure: Vin 120Vac (optional 5/6kVA), Vout 120/208/220/230/240Vac
4.4.2 Available input voltages: hardware modifications
4.4.2.1 Input voltage 208 or 240Vac
4.4.2.2 Input voltage 120Vac (optional, 5/6kVA only)
4.4.3 Available output voltages: hardware modifications
4.4.3.1 Output voltage 208Vac
4.4.3.2 Output volatge 120Vac split-phase
4.4.3.3 Output voltage 220/230/240Vac
4.4.3.4 Output voltage 120Vac single phase
4.4.4 Input / output voltages: Software modification
4.4.5 Installation of GE DE LanPro battery extension pack(s)
4.4.6 LanPro-11U series: 2 / 3 / 4 parallel operating units – additional info
4.4.6.1 Notes concerning installation of a parallel system
4.4.6.2 Notes concerning starting up the parallel system
4.4.6.3 Notes concerning use / maintenance of a parallel system
5 OPERATION...............................................................................21
5.1 Description of Front and Rear Panel
5.2 Start-up
5.3 Use
5.3.1 Information menu
5.3.2 Status and alarm menu
5.3.3 Service menu
5.3.4 Setup menu
5.4 Test Screens
5.4.1 Battery test, general
5.4.2 Quick battery test
5.4.3 Deep battery test
5.5 Other Features
5.5.1 Shutdown
5.5.2 Mains start
5.5.3 Sleep and wake-up
5.5.4 Overload protection in bypass mode
5.5.5 ECO-Mode
5 5.6 Auto restart
5.5.7 Superior battery management

LX: OPM_LPA_11U_5K0_10K_1US_V021 3GE DE LanPro-11U UPS: Installation / User Manual 2.1 (US)
GE Digital Energy
g
6 INTERFACING FEATURES.......................................................34
6.1 RS232/Contact Interface
6.2 Emergency Shutdown
6.3 Relay Card (optional)
6.4 SNMP Interface (optional)
7 OPTIONAL FEATURES .............................................................35
7.1 Extended Runtime
7.2 Plug-in Cards
7.3 RPA-Facility (Redundant Parallel Architecture)
7.4 PDM: Power Distribution Module
7.5 Seismic Anchors
7.6 120Vac Single Phase Option Kit
8 MAINTENANCE .........................................................................37
8.1 General
8.2 Cooling fan
8.3 Batteries
8.4 Safety
8.5 Storage
9 TROUBLESHOOTING ............................................................... 38
10 SPECIFICATIONS...................................................................... 39
APPENDIX: INSTALLATION DRAWINGS

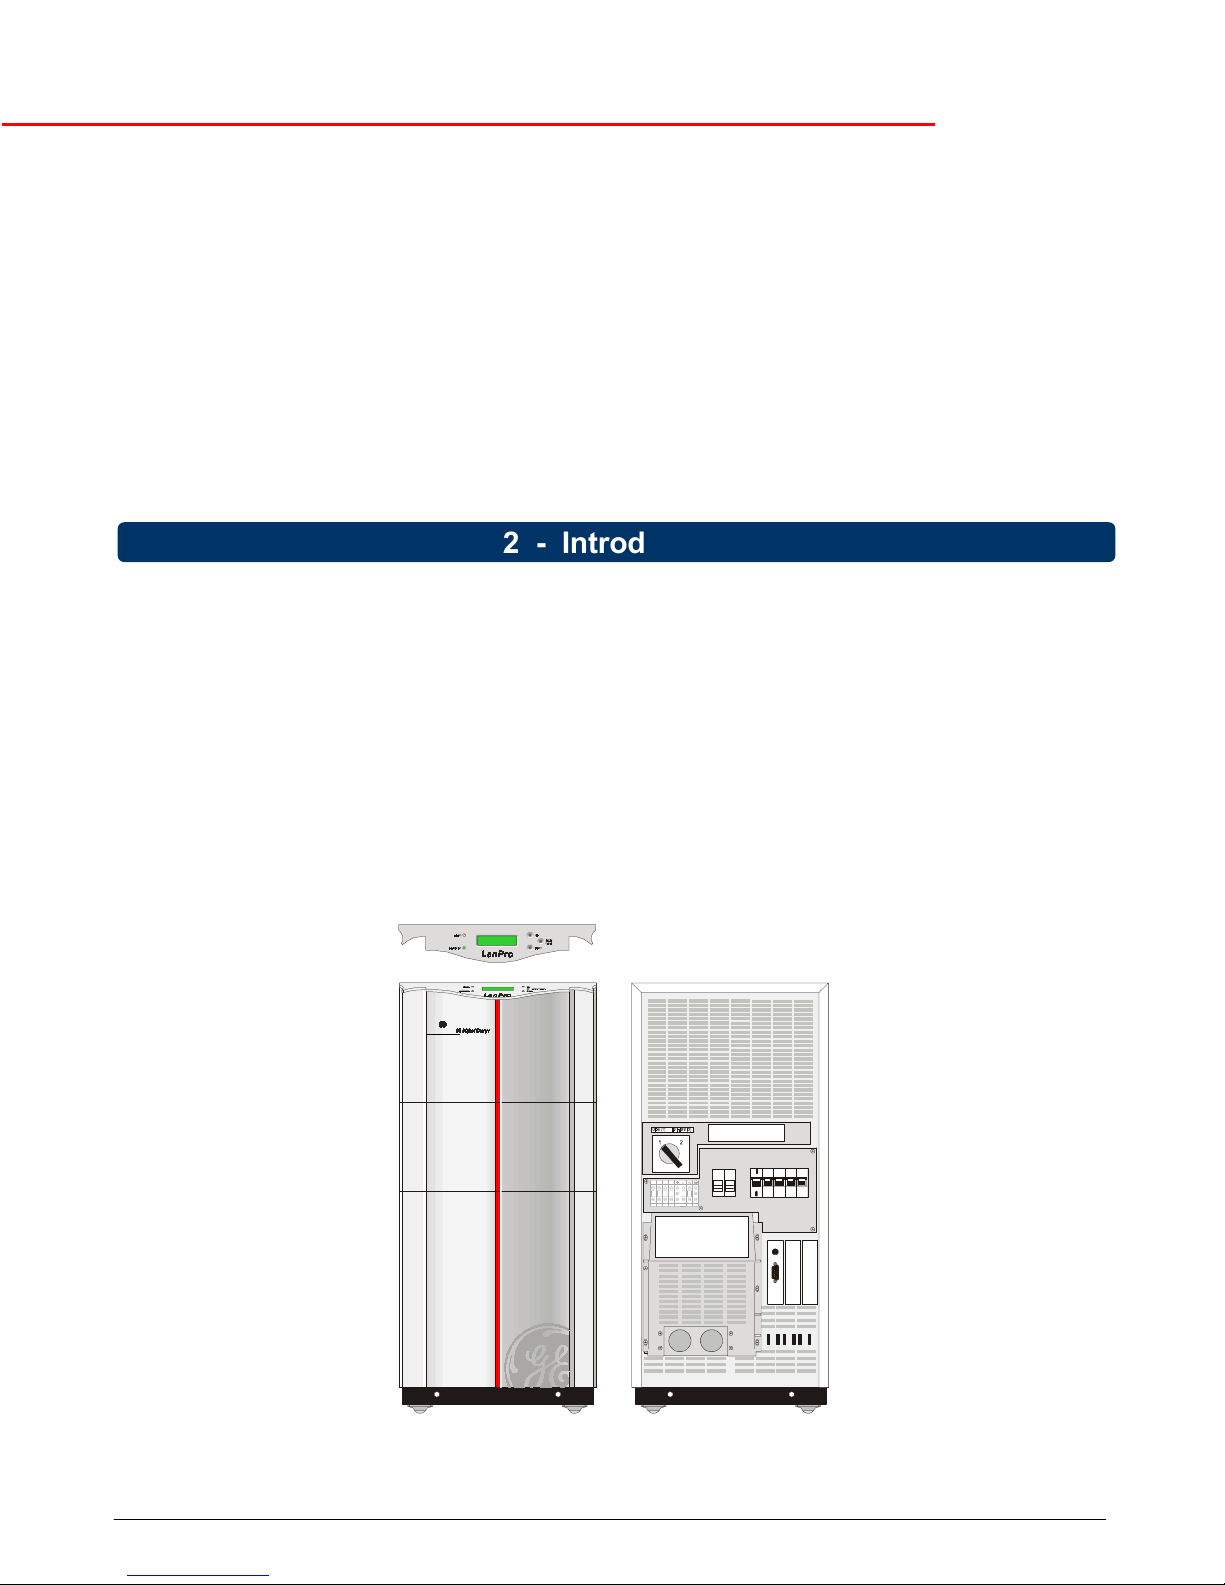
LX: OPM_LPA_11U_5K0_10K_1US_V021 4GE DE LanPro-11U UPS: Installation / User Manual 2.1 (US)
GE Digital Energy
g
1.1 Save these instructions
This manual contains important instructions for LanPro®-11U Series UPS, that should be followed during
installation and maintenance of the UPS and batteries.
Before attempting to install and start up the UPS, carefully read this manual. Keep this manual next
to the UPS for future references.All servicing must be done by qualified personnel. Do not attempt
to service the UPS unless you have had proper training.
CAUTION:By opening or removing covers you run the risk of exposure to dangerous voltages!
While every care has been taken to ensure the completeness and accuracy of this manual, GE
Digital Energy assumes no responsibility or liability for any loss or damage resulting from the use
of the information contained in this document.
This document shall not be copied nor reproduced without the permission of GE Digital Energy.
Due to technical improvements, some of the information contained in this manual may be changed
without notice.
1.2 General
-CAUTION: RISK OF ELECTRIC SHOCK Do not remove the cover, there are no user serviceable parts
inside. All maintenance and service work should be performed by qualified service personnel. The UPS
contains batteries. The appliance outlet may be electrically live, even when the UPS is disconnected from
the utility supply. Dangerous voltages may be present during battery operation. The batteries must be
disconnected during maintenance or service work.
-The UPS contains potentially hazardous voltages.
-Do not remove fuse F4A or F4B during operation. This can result in a flame arc.
1.3 Installation
- This UPS is intended to be used in a controlled environment indoors and free of conductive contaminants.
- The UPS should only be powered from a single phase, three wire AC source equipped with an earth
connection.
- In this manual "Earth" is represented with two different symbols:
= Field wiring equipment grounding terminal,
= Grounding terminals.
- Do not install the UPS in an excessively humid environment or near water.
- Avoid getting liquids or any foreign object into the UPS.
- The unit must be placed in a sufficiently ventilated area; the ambient temperature should not exceed 40°C
(104°F). Optimal battery lifetime is obtained if the ambient temperature does not exceed 30°C (86°F).
- It is important that the unit has adequate ventilation. Maintain air movement around and through the unit. Do
not block the air vents.
- Avoid placing the unit in direct sunlight or near heat sources.
-Do not plug household appliances such as electric heaters, toasters or vacuum cleaners into the UPS.
- Use insulated copper input and output wiring, rated 90°C (194°F) wire size based on the ampacities given in
Tables 310-16 of the Nation Electrical code, ANSI/NFPA 70-1993. Specified in table 2 and table 3.
1.4 Storage
- Store the UPS with its batteries fully charged in a dry location, storage temperature must be within -20°C
and +45°C (-4°F and 113°F).
If the unit is stored for an extended period of time, the batteries must be recharged periodically, for 24 hours.
Connect the unit to the utility and switch it on:
- if the storage temperature is within -20 and +30°C (-4°F and 86°F), recharge the batteries every 6 months.
- if the storage temperature is within -20 and +45°C (-4°F and 113°F), recharge the batteries every 4 months.
1.5 Batteries
-NOTE: Servicing of batteries should be performed or supervised by personnel knowledgeable of batteries
and the required precautions. Keep unauthorized personnel away from batteries.
-When replacing the batteries, use only the same number, type and size battery.
Preferably for LanPro®5/6-11U: Kobe HV7-12 or Panasonic LC-R127R2P
LanPro®8/10-11U: Kobe HV12-12 or Panasonic LC-RA1212P
- Proper disposal or recycling of the batteries is required. Refer to your local codes for disposal requirements.
1 - Important Safety Instructions

LX: OPM_LPA_11U_5K0_10K_1US_V021 5GE DE LanPro-11U UPS: Installation / User Manual 2.1 (US)
GE Digital Energy
g
-CAUTION: Never dispose of batteries in a fire. The batteries may explode.
-CAUTION: Do not open or mutilate batteries. Released electrolyte is harmful to the skin and eyes. It may be
toxic. If exposed to electrolyte, wash immediately with plenty of water.
- Avoid charging in a sealed container.
-CAUTION: A battery can present a risk of electrical shock and high short circuit current. The following
precautions should be observed when working on batteries:
•Remove watches, rings or other metal objects.
•Use tools with insulated handles.
•Wear rubber gloves and boots.
•Do not lay tools or metal parts on top of batteries.
•Disconnect charging source prior ro connecting or disconnect battery terminals.
•Determine if the battery is inadvertently grounded. If inadvertently grounded, remove source of ground.
Contact with any part of a grounded battery can result in electrical shock. The likelihood of such shock
will be reduced if such grounds are removed during installation and maintenance.
More than ever before, today's advanced electronic equipment, with complex integrated circuits and other sensitive
electronics, needs a stable and continuous AC power supply to operate correctly. While the power coming from the
wall outlet is often unreliable, a GE Digital Energy LanPro®-U UPS provides the security of completely
uninterrupted power.
A compact, truly on-line system, the GE Digital Energy LanPro®-U UPS protects your equipment from all forms of
power interference, including complete power failure. A simple and elegant circuit design, together with extensive
protection against abnormal operating conditions (e.g. overload, short circuit, overheating), makes the LanPro®-U
exceptionally reliable.
The LanPro®-U UPS offers complete galvanic isolation of input and output, also when operating in bypass mode. As
a result, input and output voltages do not necessarily have to be equal, making the UPS suitable for almost every
situation.
All units are standard equipped with a backfeed protection relay.
Figure 1: The GE Digital Energy LanPro®-11U UPS
2 - Introduction

LX: OPM_LPA_11U_5K0_10K_1US_V021 6GE DE LanPro-11U UPS: Installation / User Manual 2.1 (US)
GE Digital Energy
g
3.1 The Principles of Operation
The LanPro®-U UPS stores electric energy in batteries. This allows the UPS to supply output power even when the
incoming utility power is cut off completely.
Energy is stored as Direct Current (DC), while input and output energy must be Alternating Current (AC). Therefore
the UPS contains an input converter (AC to DC) and an output converter (DC to AC). (fig.2)
3.2 Normal Conditions
Under normal conditions, energy from the utility is channelled through the input converter, which supplies the output
converter and the battery charger. The batteries are kept in a fully charged state, and the output converter
synthesizes a completely new AC output sine wave to supply the load (electrical equipment).
3.3 Utility Failure
In the event of a utility power failure (i.e. absent or outside tolerance) the system uses the energy reserve stored in
the battery to continue to produce AC power, ensuring unbroken output (fig. 3). No interruption or alteration will ever
be noticed in the output power.
In the event of an extended utility failure, the output converter will stop when the battery has been discharged. At this
point, the UPS is no longer able to power the connected equipment.
When the utility is re-established within tolerance, the output converter will be supplied again by the input converter
and the batteries will be recharged, making them ready to support future power failures.
OUTPUT:
PERFECT UPS POWER
OUTPUT
INPUT:
UTILITY POWER WITH DISTURBANCES
RFI
FILTER
P.F. = 1
CONVERTER
BYPASS
FILTER
STATIC
BYPASS
OUTPUT
CONVERTER
BATTERY
CHARGER
RECTIFIER
OPTIONAL
BATTERY
EXTENSION
MICRO-PROCESSOR CONTROL
BATTERY
SYSTEM
ON/OFF
FRONT
PANEL
OUTPUT
TRANSFORMER
RFI
FILTER
OPTION
SLOTS for:
RPA CARD
SNMP CARD
RELAY CARD
std. installed:
RS232/
CONTACT
INTERFACE
UTILITY
INPUT
MANUAL BYPASS
SWITCH
BACKFEED
PROT.
Figure 2. Block diagram of the LanPro
®
-11U UPS, utility present
OUTPUT:
PERFECT UPS POWER
OUTPUT
NO INPUT:
UTILITY FAILURE
RFI
FILTER
P.F. = 1
CONVERTER
BYPASS
FILTER
STATIC
BYPASS
OUTPUT
CONVERTER
BATTERY
CHARGER
RECTIFIER
OPTIONAL
BATTERY
EXTENSION
MICRO-PROCESSOR CONTROL
BATTERY
SYSTEM
ON/OFF
FRONT
PANEL
OUTPUT
TRANSFORMER
RFI
FILTER
MANUAL BYPASS
SWITCH
BACKFEED
PROT.
OPTION
SLOTS for:
RPA CARD
SNMP CARD
RELAY CARD
std. installed:
RS232/
CONTACT
INTERFACE
Figure 3. Block diagram of the LanPro
®
-11U UPS, utility failure
3 - Functional Explanation

LX: OPM_LPA_11U_5K0_10K_1US_V021 7GE DE LanPro-11U UPS: Installation / User Manual 2.1 (US)
GE Digital Energy
g
3.4 Automatic Bypass Switch
If the output converter is unable to deliver the demanded output power because of overload or overtemperature, the
automatic bypass switch will automatically transfer the load to the utility. When the situation is corrected the UPS will
switch back to normal operation, i.e. the load is tranferred back to the output converter. Though the automatic
bypass switch is shown as a simple mechanical switch in figures 2-5, the transfers are done by means of thyristors,
i.e. electronically, without any interruption of the power supplied to the load.
In case of a severe overload or short-circuit the magnetic bypass circuit breaker (rear panel) may trip in order to
protect the UPS. If the current is insufficiently high to trip the breaker, the UPS will be switched off by the software in
order to protect the UPS and connected equipment.’
If a power failure occurs during bypass operation, load power may be lost. If the UPS functions under overload
conditions it may not be able to protect the load.
3.5 Manual Bypass Switch (Service switch)
The system can be bypassed manually using the manual bypass switch located at the rear panel. It is a two-position
switch: the normal position is '1': as in figures 2-4. Position '2' is the service position: the load is directly connected to
the utility input. This way maintenance of the UPS (e.g. battery replacement, as in fig. 5) is possible without
interruption of the power supplied to the load.
CAUTION: REFER SERVICE TO QUALIFIED PERSONNEL ONLY.
THE RFI FILTERS AND OUTPUT TRANSFORMER ARE ALWAYS ACTIVE.
Figure 4 . Bypass operation: Automatic bypass
Figure 5 . Bypass operation: Manual bypass
OUTPUT
RFI
FILTER
BYPASS
FILTER
STATIC
BYPASS
OUTPUT
CONVERTER
BATTERY
CHARGER
RECTIFIER
OPTIONAL
BATTERY
EXTENSION
MICRO-PROCESSOR CONTROL
BATTERY
SYSTEM
ON/OFF
FRONT
PANEL
OUTPUT
TRANSFORMER
RFI
FILTER
UTILITY
INPUT
MANUAL BYPASS
SWITCH
BACKFEED
PROT.
P.F. = 1
CONVERTER
OPTION
SLOTS for:
RPA CARD
SNMP CARD
RELAY CARD
std. installed:
RS232/
CONTACT
INTERFACE
OUTPUT
BYPASS
FILTER
STATIC
BYPASS
OUTPUT
CONVERTER
BATTERY
CHARGER
RECTIFIER
OPTIONAL
BATTERY
EXTENSION
MICRO-PROCESSOR CONTROL
SYSTEM
ON/OFF
FRONT
PANEL
OUTPUT
TRANSFORMER
RFI
FILTER
UTILITY
INPUT
MANUAL BYPASS
SWITCH
BACKFEED
PROT.
P.F. = 1
CONVERTER
RFI
FILTER
OPTION
SLOTS for:
RPA CARD
SNMP CARD
RELAY CARD
std. installed:
RS232/
CONTACT
INTERFACE

LX: OPM_LPA_11U_5K0_10K_1US_V021 8GE DE LanPro-11U UPS: Installation / User Manual 2.1 (US)
GE Digital Energy
g
4.1 Unpacking
Cut the two wrapping bands, and remove the shipping box. Loosen the four bolts with which the UPS is fixed to the
pallet. Remove the UPS from the pallet. BE CAREFUL! HEAVY WEIGHT! Never try to lift the unit by yourself! The
UPS is equipped with castors, that allow easy displacement of the unit. Please take appropriate measures to avoid
damage on vulnerable floors.
4.2 Package Contents
The shipping box contains a LanPro®-U UPS, a CD-ROM, an RS232 cable, a link (5/6kVA models only, see 4.4.3) a
safety guide and this manual. If the UPS is equipped with an RPA plug-in card (Redundant Parallel Architecture,
right option slot at the rear of the unit) the shipping box also contains a yellow network cable and one bus terminator.
Inspect the UPS for damage after unpacking. If any damage is present please notify the carrier and place of
purchase immediately.
4.3 Location
Please refer to section 1.3 of ‘IMPORTANT SAFETY INSTRUCTIONS’.
4.4 Installation
IMPORTANT:
Before making any connection and switching on the LanPro®-U UPS, please check the following conditions:
•The voltage and frequency of your utility supply is 120/208/230/240 Vac and 50 or 60 Hz; from the factory the
input and output of the UPS are set to 208 Vac / 60 Hz.
•Be sure that the UPS is wired for the present utility voltage. This is indicated on the packaging of the UPS, as
well as at the I/O terminals.
•Overcurrent protection for the AC circuit is to be provided by others.
•CAUTION: To reduce risk of fire, connect only to a circuit input/output provided with
branch circuit overcurrent protection in accordance with the National Electrical
Code, ANSI / NFPA 70, as indicated below:
UPS model Input overcurrent protection
(Amps)
Output overcurrent protection
(Max. Amps)
Operating input voltage 120V 208V 240V 120V
(1 X)
120V
(2X)
208V 240V
L5-11U 35 30 40 20 25 20
L5-11U /120V 60 40 20 25 20
L6-11U 40 35 50 25 30 25
L6-11U /120V 70 50 25 30 25
L8-11U 60 45 70 35 40 35
L10-11U 70 60 80 40 50 40
Table 1. external input fuse value
•Ensure that the total power requirement of the equipment to be protected does not exceed the rated output
power of the UPS. (output power for your unit is indicated on the rating label on the rear panel).
•When using the 120V split phase outputs make sure that the load per 120V output does not exceed half the
rating.
•The UPS may only be installed by trained personnel. The UPS must be grounded when in use: Connect the
UPS to a single phase, three wire AC source equipped with an earth connection.
4 - Installation

LX: OPM_LPA_11U_5K0_10K_1US_V021 9GE DE LanPro-11U UPS: Installation / User Manual 2.1 (US)
GE Digital Energy
g
•Use insulated copper input and output wiring, rated 90°C derated to 40°C wire size based on the ampacities
given in Tables 310-16 of the National Electrical code, ANSI/NFPA 70-1993.
This wiring shall have the following minimum sizes:
INPUT WIRING:
Utility voltage
UPS model 120V 208V 240V
L5-11U 6 AWG 10 AWG 10 AWG
L6-11U 4 AWG 8 AWG 10 AWG
L8-11U N/A 6 AWG 8 AWG
L10-11U N/A 4 AWG 6 AWG
Table 2. Input wiring
OUTPUT WIRING:
Output voltage
UPS model 120V 208V 240V
L5-11U 8 AWG 10 AWG 10 AWG
L6-11U 8 AWG 10 AWG 10 AWG
L8-11U 6 AWG 8 AWG 8 AWG
L10-11U 4 AWG 8 AWG 8 AWG
Table 3. Output wiring
TIGHTENING TORQUE FORCE:
UPS model Tightening torque force
L5/6-11U/120V 22 Lbs/inch
All other models 18-20 Lbs/inch
Table 4. Tightening torque force

LX: OPM_LPA_11U_5K0_10K_1US_V021 10 GE DE LanPro-11U UPS: Installation / User Manual 2.1 (US)
GE Digital Energy
g
4.4.1 Installation Procedures
4.4.1.1 Standard installation procedure: input voltage 208-240Vac, output voltage 120/208/220/230/240Vac.
If a battery extension pack is to be installed, please proceed with section 4.4.5.
If 2, 3 or 4 parallel operating units will be installed, please proceed with section 4.4.6.
The numbers between (brackets) refer to figure 19 in section 5.1.
1. Mount the levellers: position A to fix the UPS to the floor,
position B to lift the castors from the floor.
2. Loosen the screws and remove the conduit box (17) and
the metal cover plate (11).
3. Make sure that all circuit breakers (7-8-9) are in ‘off’
position (down).
4. Input/output connection:
Lead the input/output cables through the cable inlet. If the
cables come from below (recommended for 8kVA and
10kVA models), you can rotate the cable inlet 90 degrees.
Connect the input/output wires to the I/O terminals (11a
and 11b). Please refer to section 4.4.2 1 (input) and 4.4.3
(output) for detailed information.
5. Re-install the metal cover plate (11) and the conduit box
(17).
6. An emergency shutdown switch can be connected to
connector J3 on the RS232/Contact Interface Card,
between pins 3 and 4. See section 6.2 for more
information.
7. For advanced communication possibilities, the
RS232/contact interface port (12a) can be connected to a
computer system. See section 6.1 for more information.
8. The middle ‘option slot’ (13) allows easy installation of
plug-in cards: SNMP Card or Relay Card. See sections
6.3 and 6.4 for more information.
9. The right ‘option slot’ (14) allows easy installation of the
RPA-card (Redundant Parallel Architecture). If the card is
already mounted, and if the unit is intended to be used
stand-alone, a bus terminator (delivered with the unit) has
to be placed in one of the two bus connectors on the card.
If the unit will be part of a parallel system, see sections
4.4.6 and 7.3 for more information.
10. Connect the utility power to the UPS.
11. If hardware modifications were necessary in step 4
because the I/O voltages are different from the default
(208Vac), software modifications should be performed as
well. Proceed with 4.4.4.
12. For a quick start proceed with section 5.2 ‘Start-up’.
Figure 6. LanPro
®
5/68/10-11U:
Standard installation procedure
1
A
B
2
3
UPS UTIL. BYPASS
ON
OFF
L1 L2
4
5
67
89
1-2 BATTE RY
DISCONNECTED
3-4 EMERGENCY
SHUTDOWN
see 6.3-4
see 4.4.6 / 7.3
stand-alone,
and RPA card
available:

LX: OPM_LPA_11U_5K0_10K_1US_V021 11 GE DE LanPro-11U UPS: Installation / User Manual 2.1 (US)
GE Digital Energy
g
4.4.1.2 Installation procedure:
input voltage 120Vac (optional, 5-6kVA only), output voltage 120/208/220/230/240Vac.
If a battery extension pack is to be installed, please proceed with section 4.4.5.
If 2, 3 or 4 parallel operating units will be installed, please proceed with section 4.4.6.
The numbers between (brackets) refer to figure 19 and 20 in section 5.1.
1. Mount the levellers: position A to fix the UPS to the floor,
position B to lift the castors from the floor. Please refer to
figure 6, step 1.
2. Loosen the screws and remove the conduit boxes (17, 2x)
and the cover plate (11).
3. Make sure that all circuit breakers (7-8-9) are in ‘off’
position (down). Please refer to fig. 6, step 3.
4. Input/output connection:
Lead the input/output cables through the cable inlet. If the
cables come from below (recommended for 8kVA and
10kVA models), you can rotate the cable inlet 90 degrees.
Connect the input wires to the input terminals (11b).
Connect the output wires to the output terminals (11a).
Please refer to section 4.4.2.2 (input) and 4.4.3 (output)
for detailed information.
5. Re-install the cover plate (11) and the conduit boxes (17,
2x).
6. An emergency shutdown switch can be connected to
connector J3 on the RS232/Contact Interface Card,
between pins 3 and 4. See section 6.2 for more
information.
7. For advanced communication possibilities, the
RS232/contact interface port (12a) can be connected to a
computer system. See section 6.1 for more information.
8. The middle ‘option slot’ (13) allows easy installation of
plug-in cards: SNMP Card or Relay Card. See sections
6.3 and 6.4 for more information.
9. The right ‘option slot’ (14) allows easy installation of the
RPA-card (Redundant Parallel Architecture). If the card is
already mounted, and if the unit is intended to be used
stand-alone, a bus terminator (delivered with the unit) has
to be placed in one of the two bus connectors on the card.
If the unit will be part of a parallel system, see sections
4.4.6 and 7.3 for more information.
10. Connect the utility power to the UPS.
11. If hardware modifications were necessary in step 4
because the output voltage is different from the default
(208Vac), software modifications should be performed as
well. Proceed with 4.4.4.
12. For a quick start proceed with section 5.2 ‘Start-up’.
Figure 7. LanPro
®
5/6-11U:
Installation procedure 120V input
2
LN
4
5
67
89
1-2 BATTE RY
DISCONNECTED
3-4 EMERGENCY
SHUTDOWN
see 6.3-4
see 4.4.6 / 7.3
stand-alone,
and RPA card
available:

LX: OPM_LPA_11U_5K0_10K_1US_V021 12 GE DE LanPro-11U UPS: Installation / User Manual 2.1 (US)
GE Digital Energy
g
4.4.2 Available input voltages: hardware modifications
The following input voltages are possible: 208, 240 Vac (see 4.4.2.1) and 120 Vac (see 4.4.2.2)
4.4.2.1 Input voltage 208 or 240Vac.
1. Input voltage is 208 Vac. This is the factory setting. Proceed with step 3.
2. Input voltage is 240Vac. In this case the bypass tap on the output transformer must be changed. Please refer
to fig. 8 and 8a. Proceed as follows:
2.1 Remove the blue wire B from faston 74 (connect) and place this wire on faston 72 (park).
2.2 Remove the yellow wire A from faston 61 (park) and place this wire on faston 74 (connect).
3. Connect the utility supply wires to terminals 6 (L1), 7 (L2) and 8 (equipment grounding conductor). See
figure 9. Ground connection is essential!
If a neutral wire is part of the site wiring provided, we suggest to isolate this wire for future use or other
applications.
4. For the output voltage proceed with 4.4.3.
12345 67 8
gnd
L2Ngnd L1
Figure 9. LanPro 5/6/8/10-11U:
Input/output terminals
Figure 8. LanPro
®
5/6/8/10-11U:
Bypass tap change
Figure 8a. LanPro
®
5/6/8/10-11U:
Rear view
T1
A
To manual bypass switch
Bypass tap factory setting: 208 Volt
Bypass tap changed to 240 Volt
61
72
74
73
65
66
67
B
14
(park) 61
(park) 72
(connect) 74
73
(park) 61
(park) 72
(connect) 74
73
A
B
14
PCB1113-D
PCB1113-D T1

LX: OPM_LPA_11U_5K0_10K_1US_V021 13 GE DE LanPro-11U UPS: Installation / User Manual 2.1 (US)
GE Digital Energy
g
4.4.2.2 Input voltage 120Vac (optional, 5/6kVA only).
LanPro®-U UPS equipped with an (optional) step-up transformer (5/6kVA models only) can be connected to an
input voltage of 120Vac.
1. Connect the utility supply wires to terminals L, N and GND (equipment grounding conductor). See figure 10.
Ground connection is essential!
2. For the output voltage proceed with 4.4.3.
4.4.3 Available output voltages: hardware modifications
The off-factory setting is 208 Vac: a link is placed between terminals 2 and 3. An extra link was delivered with the
unit (in a plastic bag) to enable other output voltages (5/6kVA models only).
The following voltages are available: 120, 208, 220, 230, 240 Vac.
4.4.3.1 Output voltage 208Vac
This is the off-factory setting. There is a link between terminal 2 and 3.
1. Connect the output wires to the terminals 1 (L1) and 4 (L2).
2. Connect the ground wire to terminal 5. Ground connection is essential! See figure 11.
3. Return to either 4.4.1.1 step 5 or 4.4.1.2 step 5
gnd
NL
Figure 10. LanPro
®
5/6-11U:
120Vac Input terminals
12345 67 8
gnd
L2Ngnd L1
208V
Figure 11. LanPro
®
5/6/8/10-11U:
208 Vac output connection

LX: OPM_LPA_11U_5K0_10K_1US_V021 14 GE DE LanPro-11U UPS: Installation / User Manual 2.1 (US)
GE Digital Energy
g
4.4.3.2 Output voltage 120Vac split-phase
1. The factory setting of the output tap (208Vac) has to be changed to 240Vac. Please refer to fig. 12 and 12a.
Proceed as follows:
1.1 Remove the yellow wire L from faston 67 (connect) and place this wire on faston 65 (park).
1.2 Remove the brown wire F from faston 66 (park) and place this wire on faston 67 (connect).
2. Connect the load wires between the terminals 1 (L1) and 2 (N) (120V), and between the terminals 3 (N) and 4
(L2) (120V). Connect the ground wire to terminal 5. Ground connection is essential! Do not remove the link
between terminals 2 and 3. See figure 13.
3. Return to either 4.4.1.1 step 5 or 4.4.1.2 step 5
Figure 13. LanPro
®
5/6/8/10-11U:
120 Vac split-phase output connection
12345 67 8
gnd
L2Ngnd L1
120V 120V
Figure 12. LanPro 5/6/8/10-11U:
Output tap change
Figure 12a. LanPro 5/6/8/10-11U:
Rear view
61
72
74
73
65
66
67
Output tap factory setting: 208 Volt
Output tap changed to 240 Volt
1113-D
O
(park) 65
(park) 66
(connect) 67
F
L
64
62
63
32V
88V
120V
PCB1113-C
T1
O
(park) 65
(park) 66
(connect) 67
F
L
64
62
63
32V
88V
120V
PCB1113-C
1113-D
T1

LX: OPM_LPA_11U_5K0_10K_1US_V021 15 GE DE LanPro-11U UPS: Installation / User Manual 2.1 (US)
GE Digital Energy
g
4.4.3.3 Output voltage 220/230/240Vac
1. The factory setting of the output tap (208Vac) has to be changed to 240Vac. Follow the procedure as described
in section 4.4.3.2 steps 1.1 and 1.2.
2. Connect the load wires between the terminals 1 (L1) and 4 (N). Connect the ground wire to terminal 5. Ground
connection is essential! Do not remove the link between terminals 2 and 3. See figure 14.
3. Return to either 4.4.1.1 step 5 or 4.4.1.2 step 5
4.4.3.4 Output voltage 120Vac single phase
1. The factory setting of the output tap (208Vac) has to be changed to 240Vac. Follow the procedure as described
in section 4.4.3.2 steps 1.1 and 1.2.
2. Remove the link between terminals 2 and 3.
Proceed as follows: LanPro®-U 5/6kVA: step 3-6,
LanPro®-U 8/10kVA: step 7-10.
For LanPro®-U 5/6kVA:
3. Place this link between terminal 1 and 2.
4. Place the extra link (delivered with the unit) between terminals 3 and 4.
5. Connect the load wires between connectors 1 (or 2) and 3(or 4).
6. Return to either 4.4.1.1 step 5 or 4.4.1.2 step 5.
Figure 14. LanPro
®
5/6/8/10-11U:
220/230/240 Vac output connection
12345 67 8
gnd
L2Ngnd L1
220/230/240 V
Figure 15. LanPro
®
5/6/-11U:
120 Vac single phase output connection
12345 67 8
gnd
L2Ngnd L1
120 V

LX: OPM_LPA_11U_5K0_10K_1US_V021 16 GE DE LanPro-11U UPS: Installation / User Manual 2.1 (US)
GE Digital Energy
g
For LanPro®-U 8/10kVA:
7. Install the optional 120Vac Single Phase Kit, art no.
8114001300550, according to fig. 15a
8. Connect the load wires to the terminals of the Single
Phase Kit, according to fig. 15a.
9. Connect the ground wire to terminal 5. Ground
connection is essential! See figure 15a.
10. Return to either 4.4.1.1 step 5 or 4.4.1.2 step 5
4.4.4 Input/output voltages: Software modification.
NOTE: following this procedure you realize that the values shown in the LCD match the the actual
input/output voltages.
1. Switch on the circuit breakers 'utility' (8) and 'bypass' (9) (see also section 5.2, step 1-2)
2. Go to the setup menu. See 5.3.4 ‘Setup Menu’
3. Using the push-buttons 'up' and 'down' you can scroll through the several setup screens. 'Enter/reset' confirms
the screen choice. Go to the setup screen 'INPUT VOLTAGE'.
4. Here you can change the input voltage to 240 Volt. The value of the input voltage blinks. Scroll through its
settings by using the push-buttons 'up' and 'down', the new setting is confirmed by pressing 'enter/reset'.
5. Go to the setup screen 'OUTPUT VOLTAGE'.
6. Here you can change the output voltage to 240 Volt. The value of the input voltage blinks. Scroll through its
settings by using the push-buttons 'up' and 'down', the new setting is confirmed by pressing 'enter/reset'.
7. To return to the default screen scroll to the setup screens first and press 'Enter/reset'. You can also wait 20
seconds: the time-out period of no key activity.
8. You can now proceed with 5.1 or 5.2.
6(7836&5((16
(17(55(6(7H[LW
,138792/7$*(
9
,138792/7$*(
&+$1*(72
9
28738792/7$*(
9
,138792/7$*(
&+$1*(72
9
Figure 15a. output cable splitting for
8/10kVA 120V 2-wire, using the optional
120Vac Single Phase Kit
12345678
gnd gnd
L1 L2
gnd
LN
N

LX: OPM_LPA_11U_5K0_10K_1US_V021 17 GE DE LanPro-11U UPS: Installation / User Manual 2.1 (US)
GE Digital Energy
g
4.4.5 Installation of GE Digital Energy LanPro®-U battery extension pack(s)
The numbers between (brackets) refer to figures 19-21 in section 5.1.
Battery extension pack(s) are shipped with all materials necessary to connect them to the UPS. The pack(s) can be
connected to the DC connector (15) at the rear panel of the UPS. Be sure to switch off the UPS before proceeding:
be sure that the UPS can be switched off without causing damage to the load, and turn all circuit breakers (7-8-9)
into ‘off’ position (down).
1. Open the DC fuse holders at the rear of the battery pack
(16) and make sure that the fuses have been removed.
1a. Open the DC fuse holders at the rear of the UPS (16) and
make sure that the fuses have been removed.
2. UPS rear panel: loosen the screws, and remove the cover
plate (11) and conduit box (17).
CAUTION! The battery voltage is 240Vdc and is
NOT isolated from the utility.
3. Break out the indicated part of the conduit box, fix the
gland of the DC cable in this opening.
4. Connect the DC connector of the battery pack (15a) to the
DC socket of the UPS (15). Be sure that the colours
match. You will hear a click when the cable is properly
installed.
5. Re-install the cover plate and conduit box.
6. In case of 14Ah battery packs: using the DC connector of
the battery pack (15) you can install a second, third, etc.
pack. 7Ah battery packs cannot be connected in parallel.
NOTE: A maximum of two GE Digital Energy 14Ah
battery cabinets can be connected without additional
fusing. Every two additional GE Digital Energy 14Ah
battery cabinets must be connected over a 60Amp fuse,
rated for 300Vdc.
NOTE: Third party battery cabinets must be connected
over a 60Amp fuse, rated for 300Vdc, using the GE
Digital Energy external battery cable (order separately).
7. Insert the 2 (7Ah) or 4 (14Ah) DC fuses of the (each)
battery pack, insert the DC fuses of the UPS and close the
fuse holder(s) of battery pack and UPS (16).
8. In order to calculate the available back-up time related to
the actual load, information on the capacity of the battery
set is stored in the UPS. As the total battery capacity
changes when battery extension packs are installed, the
battery capacity must be re-programmed. See 5.3.4.
In case of a custom-built battery extension set you may want to
install a ‘battery disconnected’ alarm device.
9. Be sure that the UPS is switched off, and disassemble the
RS232/Contact Interface Card (12) from the unit. If the
card is disassembled during normal operation the UPS will
shut down!
Remove the wire from connector J3 (pin 1 and 2). Install
the wiring of a normally closed contact (e.g. an auxiliary
contact of a circuit breaker) to pin 1 and 2. Re-install the
interface card. If the contact is opened, the UPS will
generate an ‘EXTERNAL BATTERY FUSE FAILURE’.
See 5.3.2 for more information.
Proceed with 4.4.1 or 5.2.
11a
2
3
4
5
Figure 16. LanPro
®
5/6/8/10-11U:
Installation of battery pack

LX: OPM_LPA_11U_5K0_10K_1US_V021 18 GE DE LanPro-11U UPS: Installation / User Manual 2.1 (US)
GE Digital Energy
g
4.4.6 LanPro®11U series: 2 / 3 / 4 parallel operating units – additional info
The RPA option (Redundant Parallel Architecture) allows you to create a redundant UPS system in which 2, 3 or 4
LanPro®-U units operate in parallel. The following should be considered when installing units in parallel.
This section gives aditional information on:
- installation (4.4.6.1)
- start-up (4.4.6.2)
- use / maintenance (4.4.6.3)
4.4.6.1 Notes concerning installation of a parallel system
1. All inputs of the UPSs must be supplied from the same phase. This is to enable bypass operation of the
parallel system. All inputs must be individually protected by fuses in the installation. The values of these fuses
should correspond to the values mentioned in section 4.4 table 1.
2. All outputs must be connected together, supplying the load. It is advised to install switches (S 1-4, fig. 17) in
the output wiring, in order to be able to isolate a unit from the remaining system for service and maintenance
purposes. It is advised to make a Neutral-to-Ground bounding in the output junction.
3. The diameter of input and output cables must be according to the table in the installation drawings (see
appendix). Cables with different diameters can cause tripping fuses in the UPS and/or the installation.
4. The length of all input cables from the input junction (Li, fig. 17) to the UPS inputs should be equal. The same
applies to the cables from the outputs to the output junction (Lo, fig. 17). The minimum length of the input as
well as the output cables is 3 meters / 10 feet.
Figure 17. Installation of parallel operating LanPro®-U UPSs
F1 F2 F3 F4
LanPro
IN
OUT
INPUT JUNCTION
OUTPUT JUNCTION
TO LOAD
1-PHASE 3-WIRE INPUT
Li Li
LiLi
Lo Lo
LoLo
YELLOW NETWORK
CABLES AS DELIVERED
WITH THE UPS
Li / Lo: LENGTH OF I / O WIRING
- EQUAL FOR EACH UPS
- MINIMUM 3 METERS / 9.8 FEET
S 1 - 4
SWITCH ALLOWS
ISOLATION OF
A UNIT FROM
THE SYSTEM
F 1 - 4
DISTRIBUTION
FUSE OR BREAKER
VALUES ACCORDING
TO TABLE 1
LanPro
IN
OUT
LanPro
IN
OUT
LanPro
IN
OUT
RPA
CARD
BUS
TERMINATOR
S1 S2 S3 S4
BUS
TERMINATOR
RPA
CARD
RPA
CARD
RPA
CARD
MAKE
NEUTRAL-TO-GROUND
BOUNDING HERE

LX: OPM_LPA_11U_5K0_10K_1US_V021 19 GE DE LanPro-11U UPS: Installation / User Manual 2.1 (US)
GE Digital Energy
g
5. The right option slot (14) at the rear of the unit contains the the RPA-card. Before the parallel system can be
put into operation a unique number has to be appointed to each UPS in the system. This can be 0, 1, 2 or 3.
Start with 0 for the first unit, 1 for the second, 2 for the third and 3 for the last unit:
-loosen the screws, remove the RPA-card
-set the dipswitch to the appointed number (fig. 18)
-re-install the RPA-card, fasten the screws.
Do NOT install the network cables between the RPA-cards of the units yet!
6. In the UPS many parameters can be set. It is advised to keep the same setting for each parameter in each
UPS in the parallel system. In any case the following parameters are critical and should have equal settings:
-autorestart (on/off, see 5.3.3)
-output voltage (120/208/220/230/240 Vac, see 5.3.4)
-output frequency (50/60 Hz, see 5.3.4)
It is absolutely required that these parameters are set to the same value. Off factory this is the case. If you’re
not sure that the units have equal settings:
-be sure that the RPA-cards of the units have not been interconnected yet
-be sure that utility power is connected to the UPS
-start each unit individually (see 5.2), check / change the parameters, and switch the unit off again.
7. Interconnect the RPA-cards of the units, using the network cable that came with the UPS. See figure 17
(dotted line). Only install the cables that were delivered with the UPSs! Of the first and the last UPS in the
system only one RPA-socket is used to interconnect the UPSs. A bus terminator must be placed in the other
(free) RPA-socket. The required bus terminators have been delivered with the unit.
4.4.6.2 Notes concerning starting up the parallel system
For starting up the system please refer to section 5.2.
After switching on all units the LanPro®-U UPSs will show the following display:
After pressing the enter/reset button on one of the units the system will start up. All units will display the standard
screen. The number in the lower right corner indicates the number of the UPS in the system.
If the parameters mentioned in 4.4.6.1 step 6 are not set to the same value the UPS will display the following screen
after start-up:
In this case check and correct the setting of the parameters as mentioned in 4.4.6.1, step 6.
$8725(67$572))
6(77,1*0,60$7&+
$8725(67$572))
35(66(17(5
/DQ3UR8
/2$'
Figure 18. Appointing a unique
number to each UPS in the system
= ‘on’ (3 = 1+2 ‘on’)
Table of contents
Other GE UPS manuals

GE
GE FGC TLE Series User manual

GE
GE TLE Scalable Series User manual

GE
GE SG 225 User manual

GE
GE Digital Energy SG Series User manual

GE
GE SG Series User manual

GE
GE Digital Energy SitePro 400 VAC CESeries 7 User manual

GE
GE Digital Energy VH 700 User manual

GE
GE Match lite 500 User manual

GE
GE Amersham Imager 600 User manual

GE
GE SG SERIES 10 User manual