manuals.online logo
Brands
  1. Home
  2. •
  3. Brands
  4. •
  5. Gecko
  6. •
  7. Control System
  8. •
  9. Gecko in.xm2 Technical manual

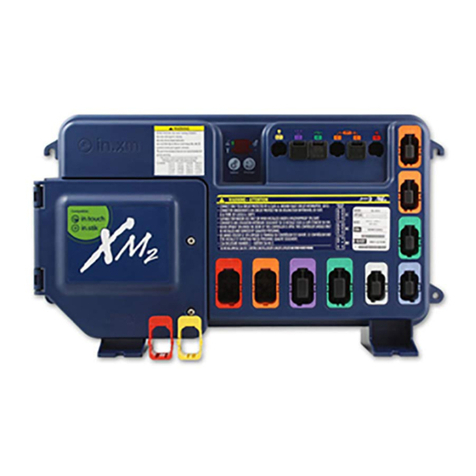
Gecko in.xm2 Technical manual

Quick Start Card
in.xm2™
For 240 VAC (*3 wires)
*If connected to a
3 wire system (without
neutral), all 120 VAC
components will not
work.
For 240 VAC (4 wires)
Correct wiring of the
electrical service box,
GFCI, and pack terminal
block is essential. Call an
electrician if necessary.
2- Connect the input cable
Fuses
Power box display and buttons
Main power
entry connection
Main power
cable input entry Mounting feet
Installation brackets
Output connectors for in.therm™
remote heating system (240 vac)
Pump 1
Light or CoolRays
connector General I/O connector
(IR receiver)
in.keys™ main and
aux. keypad connectors
Communication connector
Connector for direct
120/240 vac 5 Amp
output (for in.play™
audio, video accessories
or in.clear™)
Typically Blower
(max. 5 Amp)
Typically Circulation Pump
(max. 5 Amp)
Pump 2 Pump 3
1- Connect all outputs & keypads
Don't forget that the voltage is determined by the cable used (120 or 240V cable)!
3- Set breaker
Press Select button once to activate the
breaker setting menu. Once activated, the display shows “br” and, in
succession, the maximum current rating of the breaker.
Press Change button to change setting.
Press Select to confirm. You will exit menu automatically (in.xm™ will also
reset).
Selecting Breaker (Br) settings
Br values displayed by
the system correspond
to 80% of the maximum
amperage capacity of
the GFCI.
GFCI Br
60 Amp 48 Amp
50 Amp 40 Amp
40 Amp 32 Amp
30 Amp 24 Amp
Make sure all accessories are linked to the bonding connector and connected to
pack. Make sure the spa pack door is closed. Turn on the breaker.
Bonding lug
Ozone
4- Select Low Level
Press and hold Select button for 5 seconds to activate low level programming.
Once activated, the display shows “LL” and, in succession, the current preset low level conguration selected.
Press Change button repeatedly to select the same appropriate conguration for the spa.
See low level programming table.
Press Select to conrm. You will exit menu automatically. The in.xm™ will then reset.
You need to activate all the pumps and blower with the keypad to remove the air in the system. This step is important to do before learning.
After resetting, the system starts a "learning sequence" in which each individual output is activated and its peak current displayed and saved.
Selecting Low Level & learning
Note: if unusual current readings e.g.: 4 to 6 amps are detected on the high speed of any pump, all pumps must be primed and the learning
mode should be restarted.
All manuals and user guides at all-guides.com
all-guides.com
9919-101177-C
Rev. 01-2015
Low level programming table
P1: Pump 1
CP: Circulation Pump
VSP: VSP Pump
1sp: 1 speed pump
2sp: 2 speeds pump
x: Installed
Note: This low level conguration table is valid for the sofware #181 revision 1.
This information is displayed on top side keypad at spa pack power-up.
Software number is displayed rst (ex: , , ), followed by revision
(ex: ). For in.k600™ (menu-driven interface), you will nd the information
in Info sub-menu located in Options menu.
8
For complete Techbook or more information, see our website: www.geckoalliance.com
Config #. Pump 1 Pump 2 Pump 3 Pump 4 Pump 5 BL Fan TV lifter Sanitation Circ. Pump Heat with
P1 or CP? Filtration/Ozone with
P1 or CP?
12sp --- --- --- --- --- --- --- --- --- P1 P1
22sp --- --- --- --- --- --- --- --- xCP CP
32sp 2sp --- --- --- --- --- --- --- --- P1 P1
42sp 2sp --- --- --- --- --- --- --- xCP CP
52sp 2sp --- --- --- x--- --- --- --- P1 P1
62sp 2sp --- --- --- x--- --- --- xCP CP
72sp 2sp x--- --- --- --- --- --- --- P1 P1
82sp 2sp x--- --- --- --- --- --- xCP CP
92sp 2sp x--- --- x--- --- --- --- P1 P1
10 2sp 2sp x--- --- x--- --- --- xCP CP
11 2sp 2sp x--- --- --- x--- --- --- P1 P1
12 2sp --- --- --- --- x--- --- --- --- P1 P1
13 2sp --- --- --- --- x--- --- --- xCP CP
14 1sp 1sp --- --- --- --- --- --- --- xCP CP
15 1sp 1sp --- --- --- x--- --- --- xCP CP
16 1sp 2sp x--- --- --- --- --- --- xCP CP
17 1sp 2sp x--- --- x--- --- --- xCP CP
18 2sp 1sp --- --- --- --- --- --- --- --- P1 P1
19 2sp 1sp --- --- --- x--- --- --- --- P1 P1
20 2sp 2sp x--- --- --- --- --- --- --- P1 P1
21 2sp 1sp x--- --- x--- --- --- --- P1 P1
22 2sp 1sp --- --- --- --- --- --- --- xCP CP
23 2sp 1sp --- --- --- x--- --- --- xCP CP
24 2sp 2sp x--- --- --- --- --- --- xCP CP
25 2sp 2sp x--- --- x--- --- --- xCP CP
26 1sp 2sp x--- --- --- --- --- --- xCP CP
27 1sp 2sp x x --- --- --- --- --- xCP CP
28 1sp 2sp x x x --- --- --- --- xCP CP
29 VSP 2sp VSP --- --- --- --- x x --- P1 P1
30 VSP 2sp --- --- --- --- --- x x --- P1 P1
31 VSP --- VSP --- --- --- --- x x --- P1 P1
© Groupe Gecko Alliance Inc., 2015
All trademarks or registered trademarks
are the property of their respective owners.
Printed in Canada
All manuals and user guides at all-guides.com

Other Gecko Control System manuals

Gecko Y Series User manual

Gecko

Gecko Y Series User manual

Gecko in.yj-2-CE Technical manual

Gecko

Gecko in.yj-2-CE Technical manual

Gecko in.xm2 Technical manual

Gecko

Gecko in.xm2 Technical manual

Gecko in.yj-2-V3 Technical manual

Gecko

Gecko in.yj-2-V3 Technical manual

Gecko in.yt-7-CE Technical manual

Gecko

Gecko in.yt-7-CE Technical manual

Gecko in.yj-3-ce Technical manual

Gecko

Gecko in.yj-3-ce Technical manual

Gecko Y Series User manual

Gecko

Gecko Y Series User manual

Gecko in.yj-2 Technical manual

Gecko

Gecko in.yj-2 Technical manual

Gecko in.yj-2 Technical manual

Gecko

Gecko in.yj-2 Technical manual

Gecko Aeware Swim spa solution User manual

Gecko

Gecko Aeware Swim spa solution User manual

Popular Control System manuals by other brands

2VV IC3-CONTROL Installation and operation manual

2VV

2VV IC3-CONTROL Installation and operation manual

JWM Patrol WM-5000X1 user manual

JWM

JWM Patrol WM-5000X1 user manual

Norac John Deere 4720 installation manual

Norac

Norac John Deere 4720 installation manual

Daikin DCS601C51 Operation manual

Daikin

Daikin DCS601C51 Operation manual

btsr SMART CLEARER operating manual

btsr

btsr SMART CLEARER operating manual

Wireless Solution W-DMX TRX Implementation guide

Wireless Solution

Wireless Solution W-DMX TRX Implementation guide

Mircom PRO-2000 Series Operation manual

Mircom

Mircom PRO-2000 Series Operation manual

Eaton Rapid Link RAMO5 manual

Eaton

Eaton Rapid Link RAMO5 manual

Philips LIGHTOLIER CONTROLS LYTESCENE ILSCLTSII user guide

Philips

Philips LIGHTOLIER CONTROLS LYTESCENE ILSCLTSII user guide

Extron electronics TLI Pro 201 user guide

Extron electronics

Extron electronics TLI Pro 201 user guide

Invacare Linx REM500 user manual

Invacare

Invacare Linx REM500 user manual

DYNANAV Dynaflow 2 Installation and operation guide

DYNANAV

DYNANAV Dynaflow 2 Installation and operation guide

ProFire PF3100 Series product manual

ProFire

ProFire PF3100 Series product manual

Bartec APEX (APC) 07-3704 Series operating instructions

Bartec

Bartec APEX (APC) 07-3704 Series operating instructions

DAHAO BECS-185 owner's manual

DAHAO

DAHAO BECS-185 owner's manual

Pro-Line Boats CND1 28 quick start guide

Pro-Line Boats

Pro-Line Boats CND1 28 quick start guide

PRESSCON ExitOxy user manual

PRESSCON

PRESSCON ExitOxy user manual

Honeywell Experion LX 8 series Installation instruction

Honeywell

Honeywell Experion LX 8 series Installation instruction

manuals.online logo
manuals.online logoBrands
  • About & Mission
  • Contact us
  • Privacy Policy
  • Terms and Conditions

Copyright 2025 Manuals.Online. All Rights Reserved.