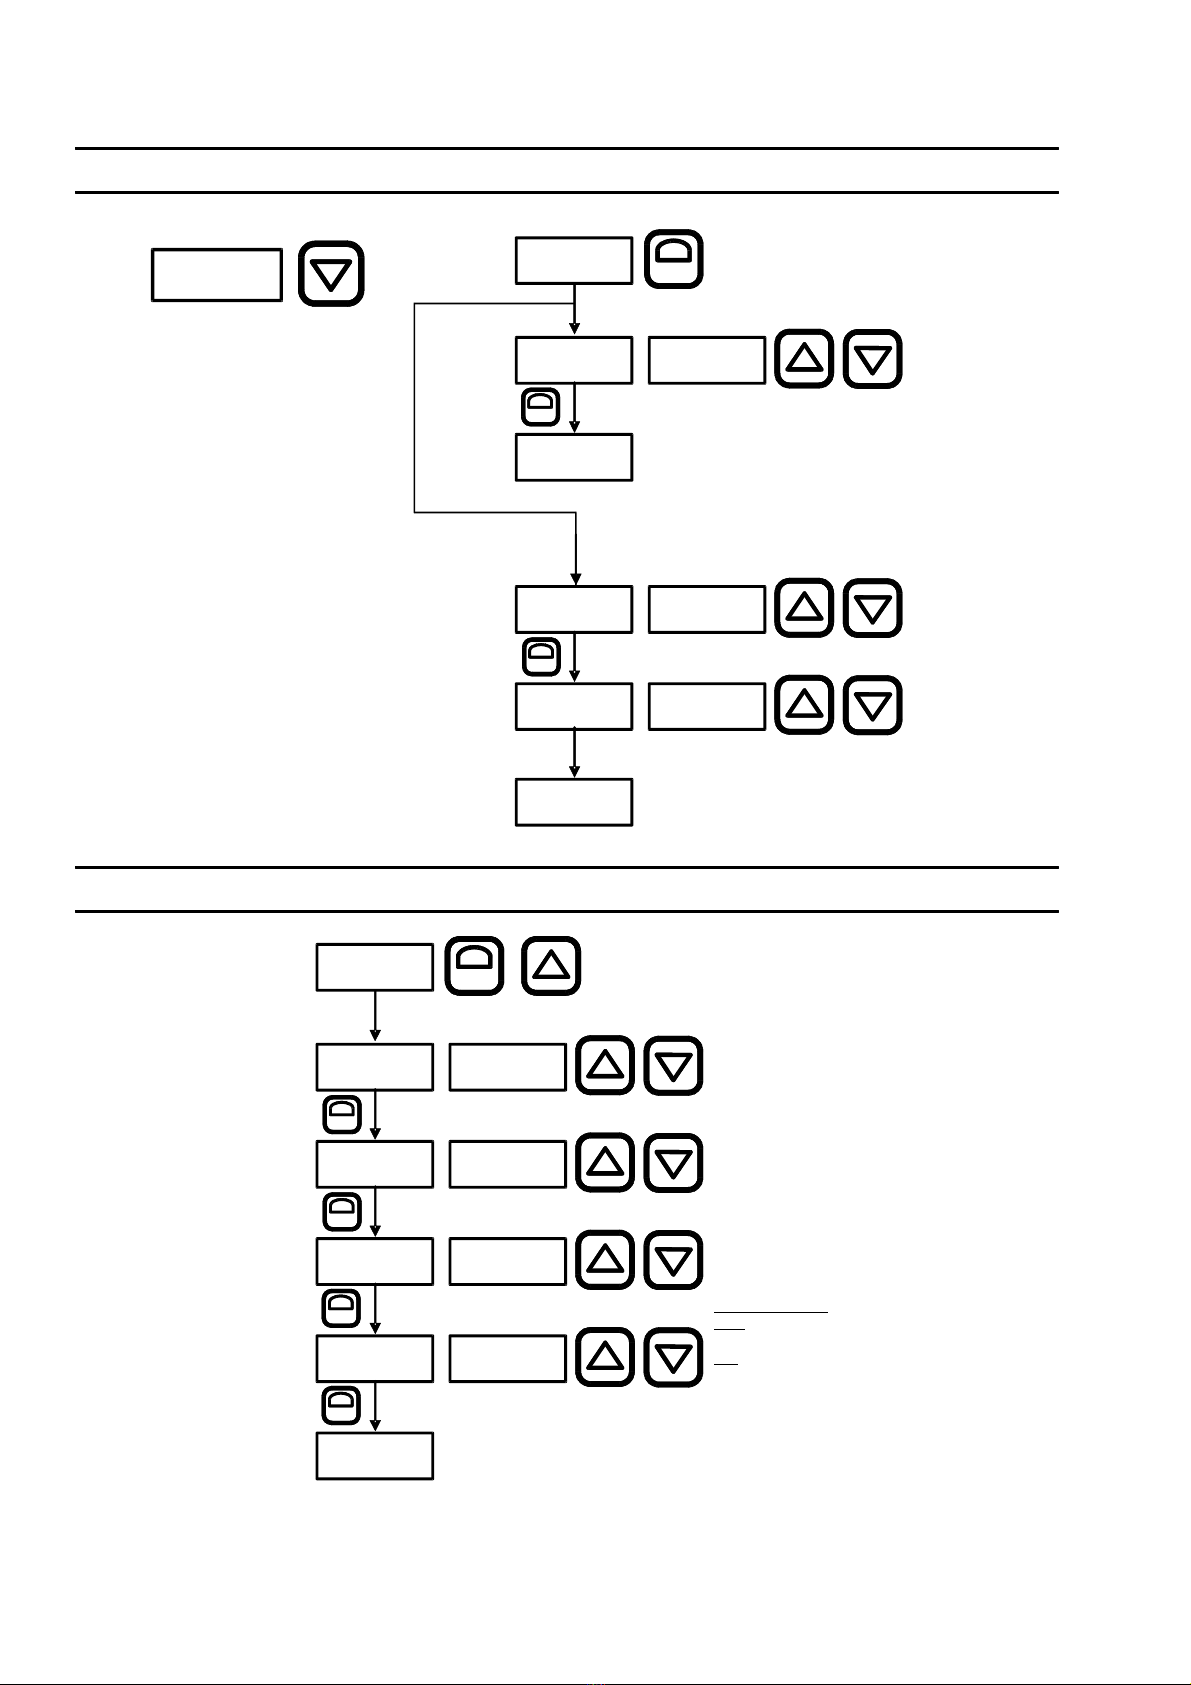
manuals.online logo
Brands
  1. Home
  2. •
  3. Brands
  4. •
  5. Gemo
  6. •
  7. Timer
  8. •
  9. Gemo DZ304 User manual

Gemo DZ304 User manual

GEMO
GEMOGEMO
GEMO DZ304
DIGITAL TIMER
Attention High Voltage, Double / Reinforced NOT CE Mark
Risk of Danger, Risk of Insulation Litter
Warning Electric Shock
TECHNICAL SPECIFICATION
•Dimensions : 48x48mm
•Panel Cut-out : 45,5x45,5mm
•Display : 2x4 Digits 7 Segment
•Inputs : START / RESET / GATE
3 x max. 32VDC (OFF:0..2VDC, ON:7..24VDC)
•GATE Input : Inhibits count-down/up when GATE is ON
•Output : Out Relay (NO-O-NC), 250VAC, 2A, Resistive load
SS Out; open collector (NPN), 30V,100mA max.
•Time Base : Selectable; 99:59 hours / 99:59 minutes / 599.9 seconds
•Resolution : 1 min. / 1 sec./ 0.1 sec.
•Accuracy : ± 0,5 % (Over full scale)
•Modes : Selectable 13 different modes
•Sensor Supply Out : 12VDC, 50mA max. (unregulated)
•Supply Voltage : 100..240VAC, 50-60Hz or 24Vac/dc (optional)
•Power Consumption : < 6VA
•Humidity : 80% up to 30
o
C, then linearly decreases to 50% at 50
o
C (non-condensing)
•Altitude : < 2000 m
•EMC : EN 61000-6-1, EN 61000-6-3 (Only light industrial environment)
•Safety : EN 61010-1; Pollution degree 1, measurement category I, (Only light industrial
environment, double/reinforced isolated, non-conductive pollution environment)
•Protection Class : IP20; according to EN 60529
•Storage Temperature : -10
o
C .. 60
o
C (no icing)
•Operation Temp. : 0 .. 50
o
C
•Weight : < 0.5 kg
•Key : Micro switch
•Torque for screwing : Max. 0.5 N.m
no:
normally open
nc:
normally closed
Gürbüzoğlu Elektronik San. ve Tic. Ltd. Şti. http://www.gemo.com.tr
Çamlıtepe Cad. No:297 / 3-4 Siteler, Ankara, Türkiye e-posta: i[email protected]om.tr
Tel: +90-312-3503900, Fax: +90-312-3511117
1
9 9+12V 50mA +12V 50mA
10 10START START
11 11RESET RESET
12 12GATE GATE
SSOut SSOut
13 13
14
14
Gnd
Gnd
+
+
++
-
Out
Out
Out
PNPProximity
Switch
PNPProximity
Switch
PNPProximity
Switch
GATE
Switch
RESET
Switch
START
Switch
9+12V 50mA
10START
11RESET
12GATE
SSOut 13
14Gnd
+
-
3 Vdc
(Max)
2
(*)
(**)
(*)SSOut
return should
directl
connected to
GND pin.
be y
(**) Usefree-
wheeling diode
to protectSS Out.
GEMO
INSTALLATION, USE and WARNINGS
●This device and its packing is NOT litter and may NOT be disposed of with domestic waste. Please return
this device and its packing to an appropriate recycling point at the end of its service life.
●Please read this user manual carefully and completely before installation and use. Please take into
consideration all warnings mentioned in this manual.
●DZ304 is suitable only for permanent panel type mounting
●Installation and use of this device must be done by qualified, authorized and trained technical personnel only.
●Inspect device carefully before installation. Do not install and use broken and defective devices.
●Do not disassemble device. Do not make any repair on any part of the device. There is no accessible part
inside the device. Please contact to manufacturer for broken and defective devices.
●Do not use device in environments subject to flammable, explosive and corrosive gases and/or substances.
●This device is designed for applications only in light industrial environments. This device is not suitable for
medical and residential use. This device is not suitable for use related with human health and safety. This
device is not suitable for automotive, military and marine use.
●Do not allow children and unauthorized people to use this device.
●Before installation and any technical work, disconnect the power supply and mains connections.
●Check the power supply voltage level before power on, and make sure voltage level is in specified limits.
Check quality of neutral line. Improper neutral line may give permanent damage to the device.
●Connect an external power switch and an external fuse (1A, 250VAC) to the power supply line that are easily
accessible for rapid intervention. Connect an external fuse (2A, 250VAC) for each relay output separately.
●Use appropriate cables for power supply and mains connections.Apply safety regulations during installation.
●Install the device in a well ventilated place. Install the device permanently into a proper panel cut-out. Fix the
device with two fasteners supplied with the device. Only front panel must be accessible after installation is
completed.
●Do not operate the device other then the environmental conditions given in Technical Specification.
●Do not operate the device in environments that may cause conductive pollution.
●Take precautions against negative environmental conditions like humidity, vibration, pollution and high/low
temperature during installation.
●Keep device, signal cables and communication cables away from circuit breakers, power cables and
devices/cables emitting electrical noise. Use shielded and twisted signal and communication cables and
connect shield to earth ground on device side. Keep length of signal and communication cables less than 3m.
●In your applications, always use separate and independent mechanical and/or electromechanical
devices/apparatus to support DZ304 to handle emergency cases..
●Use insulated cable end-sleeves at the end of cables screwed to the device connector terminals.
●Maximum torque for screwing; 0.5 N.m.
●Please check www.gemo.com.tr for latest device and documentation updates regularly. All updates and all
information are subject to change without notice.
GENERAL SPECIFICATION
●This device is designed for basic timer applications only in light industrial environments.
●µP based Digital Timer with START/RESET/GATE input
●2x4 7 Segment LED display
●Selectable 13 different modes
●Counts hour / minute / second
●Loads Timer value & OUT status at the latest power failure after the first power on
●24VDC inputs (compatible with PNP proximity switch output)
●Displays SET or remaining time
●EEPROM memory to store settings
●48x48mm
●Easy connection with plug-in connectors
Gürbüzoğlu Elektronik San. ve Tic. Ltd. Şti. http://www.gemo.com.tr
Çamlıtepe Cad. No:297 / 3-4 Siteler, Ankara, Türkiye e-posta: i[email protected]om.tr
Tel: +90-312-3503900, Fax: +90-312-3511117
2
GEMO
FRONT PANEL RESET PROGRAMMING TIMER SET VALUE
SELECTING TIME BASE & MODES
Gürbüzoğlu Elektronik San. ve Tic. Ltd. Şti. http://www.gemo.com.tr
Çamlıtepe Cad. No:297 / 3-4 Siteler, Ankara, Türkiye e-posta: i[email protected]om.tr
Tel: +90-312-3503900, Fax: +90-312-3511117
3
Press for 3 sec.
SETSET
t.On/t.A
Prog. end
Upper Display
Lower
Display
t.oFF/t.B
Upper Display
Lower
Display
SETSET
t.SEt
Set Value
Upper Display
Lower
Display
If Out is selected as;
0-7,11,12.
Second : 000.0 .. 599.9
Minute : 00.00 .. 99.59
Hour : 00.00 .. 99.59
Prog. end
SETSET
Set Value
Set Value
Enter t.ON / t.A;
Second : 000.0 .. 599.9
Minute : 00.00 .. 99.59
Hour : 00.00 .. 99.59
Out = 8,9,10
Enter t.OFF/t.B
Second : 000.0 .. 599.9
Minute : 00.00 .. 99.59
Hour : 00.00 .. 99.59
Press for 2 sec.
RESET
Press for 3 sec.
SETSET
t.bAS
Sec,Min,Hour
Prog. end
Upper Display
Lower
display
+
Out 0..12
Upper Display
Lower
display
SETSET
SETSET
P.rES YEs, no
Upper Display
SETSET
Lower
display
Cod Enter 162
Upper Display
Lower
display
SETSET
Enter fixed password; 162
Sec: Second (000.0 .. 599.9)
Min: Minute (00.00 .. 99:59)
Hour: Hour (00.00 .. 99:59)
Select mode of operation
Power-on Reset:
Yes: Timer SET value is reset
after power-on
No:
Loads Timer value & OUT status
at the latest power failure after
the first power on.
GEMO
MODES OF OPERATION
Notes:
1. For Modes 8 & 9; t.On and t.OFF are accepted as min. 000.1 sec, 00.01 min. and 00.01 hr. .
2. Timer counts up for Mode 11 & 12, and down for other modes.
3. For all modes; counting is inhibited (or freeze) when GATE is ON.
CLAEANING
Do not use any solvents (alcohol, thinners, benzine, acid, etc.) or corrosive substances to clean the device.
Use only a dry and clean non-abrasive cloth. Before cleaning, disconnect the power supply and mains
connections.
Gürbüzoğlu Elektronik San. ve Tic. Ltd. Şti. http://www.gemo.com.tr
Çamlıtepe Cad. No:297 / 3-4 Siteler, Ankara, Türkiye e-posta: i[email protected]om.tr
Tel: +90-312-3503900, Fax: +90-312-3511117
4
tA tB
t.On
t.On
t.On
t.On
t.OFF
t.OFF
t.OFF
t.OFF
t.SEt
t.SEt
t.SEt
t.SEt
t.SEt
t.SEt
t.SEt
Mode : 0;
ON Delay
Mode : ;
7
One Shot after ON and OFF
Mode : ;8 Flashing with START
Mode : 9;
Flashing with START/RESET
Mode : ; - Count with START11 Chronometer
Mode : 2; - Count with START, Reset with RESET
1 Chronometer
Mode : 10; Delayed One Shot after OFF
Mode : 1; Pulsed Delay, OFF with RESET
Mode : 2; Retriggerable One Shot
Mode : 3; Non-retriggerable One Shot
Mode : 4; Delay after Power ON
Mod : ;e 5 OFF Delay
Mode : 6; One Shot after OFF
t.SEt
Start Start
Start
Out Out
Out
Out becomes ON "t.SEt" after START
input is ON. Out is OFF when START
input is OFF. Out is OFF when RESET
input is ON .
Out becomes ON when START input is
triggered (OFF > ON) or (ON > OFF) and
becomes OFF after "t.SEt". START input
can re-trigger when Out is ON. Out is OFF
when RESET input is ON.
Out is periodically first ON for "t.On" and then
OFF for "t.OFF" when START input is ON. Out
is OFF when START input is OFF. Tx is OFF
when RESET input is ON
Out is periodically first ON for "t.On" and then
OFF for "t.OFF” after START input is triggered
(OFF > ON). Out is OFF when RESET input
is ON.
Out is ON and timer counts up when START
is ON. Timer freezes when START is OFF.
Timer resets when START is OFF if Timer
has elapsed `T.SEt` time. Out is OFF when
RESET input is ON.
Timer counts up when START is ON. Timer
freezes when START is OFF. Out is ON if Timer
has elapsed `T.SEt` time. Timer resets and Out
is OFF when RESET input is ON.
Out is first ON after "tA" and then OFF after
"tB" when START is triggered (ON > OFF).
START input does not re-trigger before "tB"
elapses. Out is OFF when RESET input is ON.
t.SEt
Start
Start
Start
Start
t.SEt
t.SEt
Start
Reset
Reset
Gösterge
Gösterge
Out
Out
Out
Out
Out
Reset
Out becomes ON "t.SEt" after START
input is triggered (OFF > ON). START
input can not re-trigger timer until it is
reset with RESET input. Out is OFF
when RESET input is ON .
t.SEt
Start
Out
Out becomes ON when START input
is triggered (OFF > ON) and becomes
OFF after "t.SEt". START input can
re-trigger when Out is ON. Out is OFF
when RESET input is ON .
t.SEt
Start
Out
Out becomes ON when START input is
triggered (OFF > ON) and becomes OFF
after "t.SEt". START input can not
re-trigger when Out is ON. Out is OFF
when RESET input is ON .
Enerji
Start
Start
Out
Out
Out
Out becomes ON "t.SEt" after Power ON.
START input does not trigger timer.
Out is OFF when RESET input is ON .
Out becomes ON when START input is
ON. Out becomes OFF "t.SEt" after START
input is triggered (ON > OFF). Out is OFF
when RESET input is ON .
Out becomes ON when START input is
triggered (ON > OFF) and becomes OFF
after "t.SEt". Out is OFF when START
is ON. Tx is OFF when RESET input is O .

Other Gemo Timer manuals

Gemo DZ961 User manual

Gemo

Gemo DZ961 User manual

Gemo DZ307 User manual

Gemo

Gemo DZ307 User manual

Gemo DZ309 User manual

Gemo

Gemo DZ309 User manual

Gemo AZ961 User manual

Gemo

Gemo AZ961 User manual

Popular Timer manuals by other brands

MULTISPAN DI-22U manual

MULTISPAN

MULTISPAN DI-22U manual

Swylite LST200 Installation & operating instructions

Swylite

Swylite LST200 Installation & operating instructions

OEZ MAE-D16-001-A230 Instructions for use

OEZ

OEZ MAE-D16-001-A230 Instructions for use

Ingram Products APT-9S quick start guide

Ingram Products

Ingram Products APT-9S quick start guide

Holman QuikDial user guide

Holman

Holman QuikDial user guide

Tork SS721Z Programming instructions

Tork

Tork SS721Z Programming instructions

Kitronik 2121 Teaching Notes

Kitronik

Kitronik 2121 Teaching Notes

Robic SC-544 Instruction guide

Robic

Robic SC-544 Instruction guide

Component Design PT1A instructions

Component Design

Component Design PT1A instructions

Stanley TIMERMAX DIGISLIM TWIN 28426 quick start guide

Stanley

Stanley TIMERMAX DIGISLIM TWIN 28426 quick start guide

claber Aquauno LOGICA user manual

claber

claber Aquauno LOGICA user manual

STRAINSENSE INTUITIVE INT4-I Installation & operating manual

STRAINSENSE

STRAINSENSE INTUITIVE INT4-I Installation & operating manual

schmersal SRB-E-402FWS-TS operating instructions

schmersal

schmersal SRB-E-402FWS-TS operating instructions

Pioneer DT-540 Service manual

Pioneer

Pioneer DT-540 Service manual

Han Seung SIT-20A user guide

Han Seung

Han Seung SIT-20A user guide

Velleman VM102 operating instructions

Velleman

Velleman VM102 operating instructions

MULTISPAN UTR 1044 operating manual

MULTISPAN

MULTISPAN UTR 1044 operating manual

Entes DTR-20 user manual

Entes

Entes DTR-20 user manual

manuals.online logo
manuals.online logoBrands
  • About & Mission
  • Contact us
  • Privacy Policy
  • Terms and Conditions

Copyright 2025 Manuals.Online. All Rights Reserved.