Geobrugg GBE-1000A User manual

European Technical
Assessment
ETA 09/0262
ETAG 027: Category A
Energy class 3: ≥1000 kJ
Height: 4 – 5 m
Attending testing institute:
Swiss Federal Institute for
Forest, Snow and Landscape
Research WSL
Birmensdorf, Switzerland
Date: 08.10.2018
Edition: 16
© Geobrugg AG
CH-8590 Romanshorn
Product Manual
GBE-1000A
ROCKFALL BARRIER

Page 2/41
© Geobrugg AG, CH-8590 Romanshorn, Switzerland GBE-1000A / 16

Page 3/41
© Geobrugg AG, CH-8590 Romanshorn, Switzerland GBE-1000A / 16

Page 4/41
© Geobrugg AG, CH-8590 Romanshorn, Switzerland GBE-1000A / 16
FUNCTION AND STRUCTURE OF THE MANUAL
This product manual ensures that Geobrugg rockfall protection systems are manufactured without errors in ac-
cordance with the latest technical findings, that their area of application is clearly defined, that their functionality is
guaranteed, and that their installation is performed and checked properly.
The product manual is divided into the following parts:
•Proof of quality assurance
•System overview/rope guide
•Staking out
•Assembly details
•ISO 9001 certificate
This document does not claim to be exhaustive. Before starting an installation, it must be ensured that the copy of
the product manual is up-to-date. It is designed for general standard applications and does not take into account
any project-specific parameters. Geobrugg cannot be held liable for any additional costs which may arise in spe-
cial cases. If anything is unclear, please contact the manufacturer. Geobrugg AG's general terms and conditions
apply.
RESPONSIBILITY FOR THE CONTENT:
Geobrugg AG
Protection Systems
Aachstrasse 11
PO Box
CH-8590 Romanshorn, Switzerland
www.geobrugg.com
Romanshorn, 24. May 2018
(Stamp / legally valid signatures)

Page 5/41
© Geobrugg AG, CH-8590 Romanshorn, Switzerland GBE-1000A / 16
I RANGE OF APPLICATION
The design of rockfall protection systems is based on detailed investigations by specialized engineering firms,
particularly taking into account the following geotechnical aspects to define the range of possible applications:
•Previous Rockfall events
•Condition of the rockfall breakout zone
•Stability assessment of the entire rockfall zone
•Rockfall frequency
•Size of the blocks to be intercepted
•Trajectories and bounce heights of stones
•Calculation of kinetic energies
•Positioning of the barrier (considering the local topography)
•Anchorage conditions
II QUALITY OF THE SYSTEM COMPONENTS
Geobrugg AG, formerly the Geobrugg Schutzsysteme (Geobrugg Protection Systems) department of Fatzer AG,
Romanshorn, has been certified according to the quality management system requirements (ISO 9001:2008) un-
der the registration number CH-34372 since August 22nd, 1995. The certification center is the SQS (Swiss Asso-
ciation for Quality and Management Systems), which is a member of IQNet. The quality manual specifies in full
the way in which the individual system components (basic material, commercial products, and end products) are
checked extensively to eliminate poor quality. You can find the corresponding certificates in the appendix.
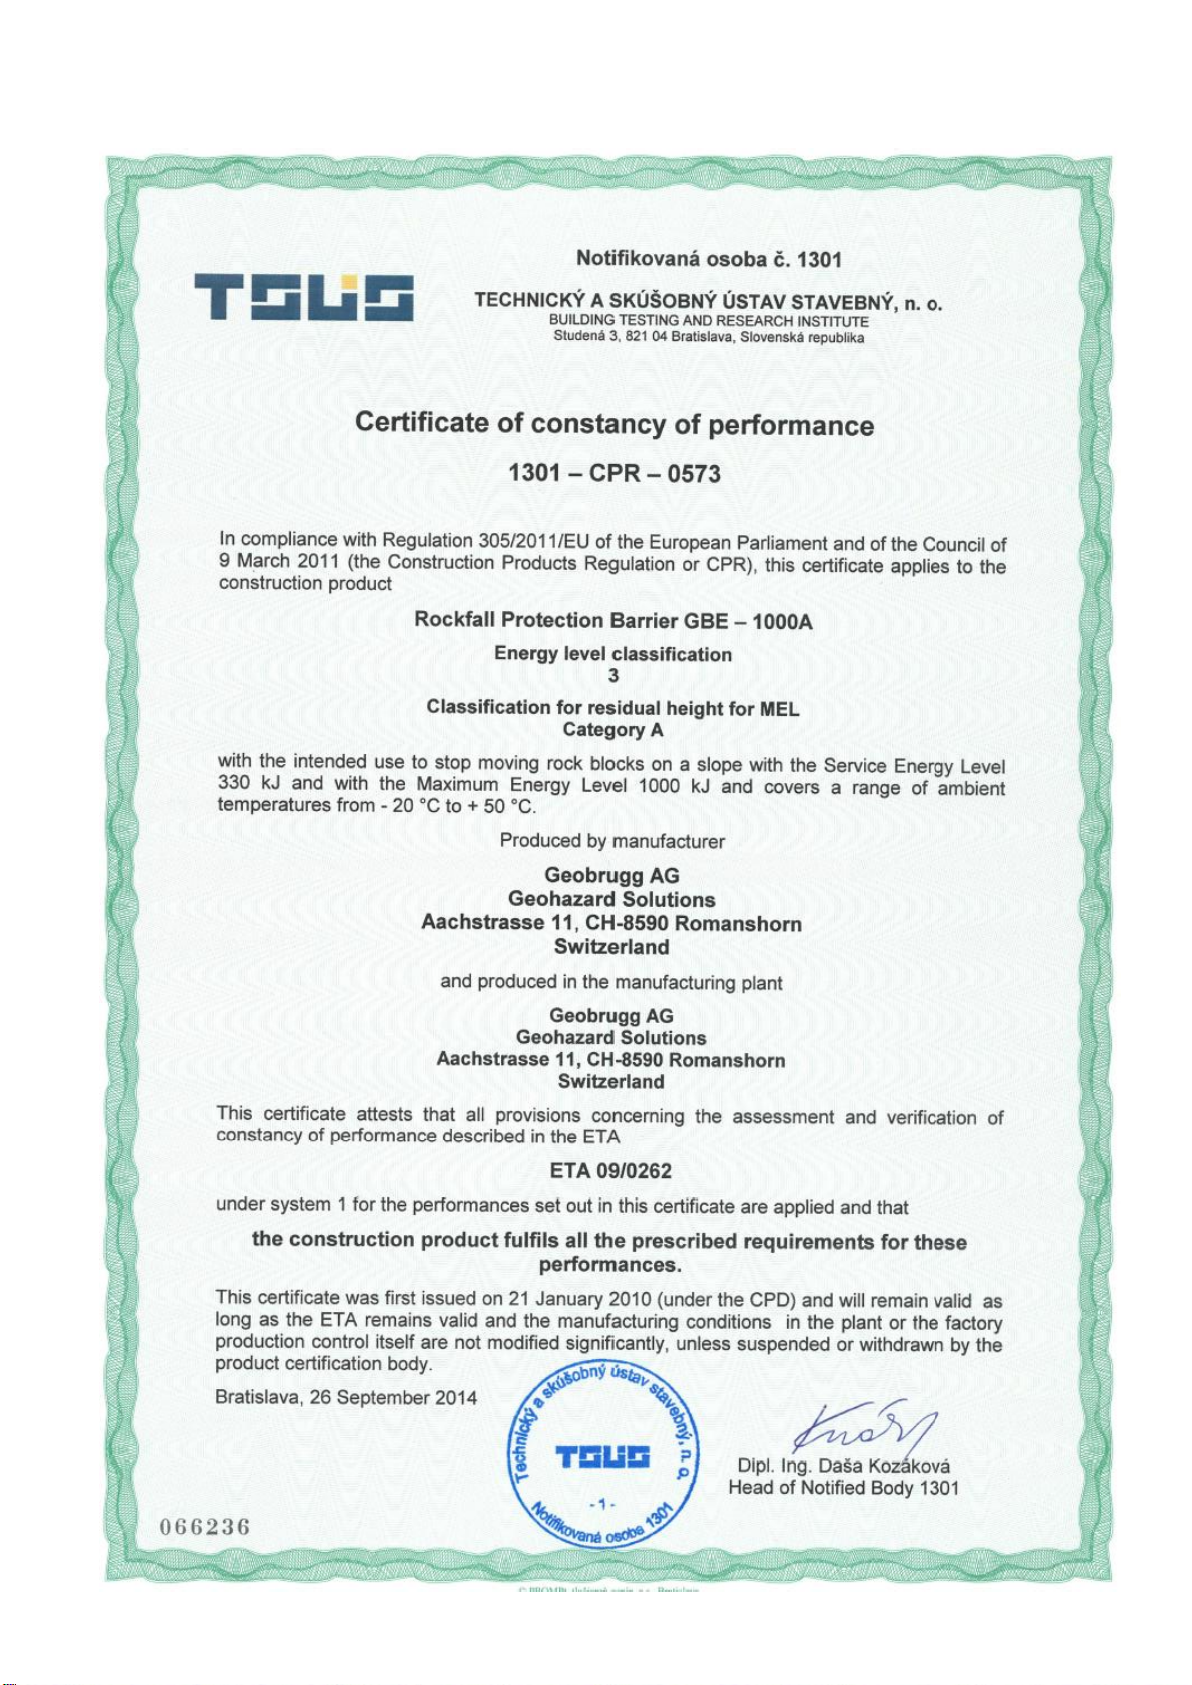
III FUNCTIONAL EFFICIENCY OF THE BARRIER SYSTEMS
The functional efficiency of the system is based on one-to-one rockfall tests, carried out and tested in accordance
with the guidelines for approval of rockfall protection nets ETAG 027. The one-to-one rockfall tests are carried out
by dropping a block vertically into the middle field of a three-field barrier. The distance between posts is 10 m, and
an impact velocity of 25 m/s is reached. The full-scale test is approved by a notified test body and the European
Technical Approval (ETA) has the number ETA –09/0262.
IV QUALITY CONTROL FOR INSTALLATION
This product manual describes in detail the different steps for installation of the barriers. These steps must be
faithfully followed by local contractors.

Page 6/41
© Geobrugg AG, CH-8590 Romanshorn, Switzerland GBE-1000A / 16
V PRODUCT LIABILITY
Rockfall, landslides, debris flows or avalanches are sporadic and unpredictable. The cause is human (buildings,
etc.), for example, or forces beyond human control (weather, earthquakes, etc.). The multiplicity of factors that
may trigger such events means that guaranteeing the safety of persons and property is not an exact science.
However, the risks of injury and loss of property can be substantially reduced by appropriate calculations that ap-
ply good engineering practices, and by using predictable parameters along with the corresponding implementa-
tion of flawless protective measures in identified risk areas.
Monitoring and maintenance of such systems are an absolute requirement to ensure the desired safety level.
System safety can also be diminished through events, natural disasters, inadequate dimensioning or failure to
use standard components, systems and original parts, but also through corrosion (caused by environmental pollu-
tion or other man-made factors as well as other external influences).
In contrast to the one-to-one rockfall tests, which indeed test an extreme load case but still only demonstrate a
standardized situation, in the field the layout and design of a protection system can vary greatly because of the
topography. The influence of such alterations and adaptations cannot always be determined exactly. Critical
points are, for example, post spacing, changes in direction, placement angle of the rope anchor, and the direction
and velocity of impact.
Geobrugg can assist with estimating the influence of larger deviations and special situations, and can offer rec-
ommendations for feasible solutions. Geobrugg cannot, however, guarantee the same behaviour as in the one-to-
one rockfall tests. In critical cases, it is advisable to reinforce particular components as compared with the stand-
ard barrier.

Page 7/41
© Geobrugg AG, CH-8590 Romanshorn, Switzerland GBE-1000A / 16
TABLE OF CONTENT
1HAZARD STATEMENT ....................................................................................................... 8
2INSTALLATION TOOLS ..................................................................................................... 9
3USING THE WIRE ROPE CLIPS ....................................................................................... 10
4STAKING OUT DEPENDING ON THE TERRAIN............................................................... 12
5STAKING-OUT GEOMETRY ............................................................................................. 14
6ROPE ANCHOR - PLACEMENT ........................................................................................ 18
7ANCHORING THE BASE PLATE ...................................................................................... 19
8PREPARING THE POSTS AND NETS ............................................................................... 22
9IN CASE OF CRANE OR HELICOPTER INSTALLATION................................................... 25
10 INSTALLING THE SUPERSTRUCTURE ........................................................................... 26
11 ASSEMBLY DETAILS ....................................................................................................... 28
12 ADDITIONAL SOLUTION TO THE STANDARD................................................................. 37
13 FINAL INSPECTION......................................................................................................... 38

Page 8/41
© Geobrugg AG, CH-8590 Romanshorn, Switzerland GBE-1000A / 16
EXPLANATION OF USED SYMBOLS
Safety indication: essential to follow
Note / Reminder that the system is correctly installed easily
A consultation with Geobrugg is recommended
Upslope
Downslope
1 HAZARD STATEMENT
QUALIFICATION OF THE GROUP LEADER
The management of installation may only be done by a qualified group leader.
CABLES WITH PRETENSION
Cables are under tension. During installation and pretensioning of the cables, make sure that there are no
persons in the danger zone.
RELEASING OF PARTS WITH PRETENSION
Releasing or cutting of components with pretension should be avoided. Should there still be necessary,
the utmost caution.

Page 9/41
© Geobrugg AG, CH-8590 Romanshorn, Switzerland GBE-1000A / 16
2 INSTALLATION TOOLS
MARKING
•30 –50 m measuring tape
•Measure stick
•5 red and white ranging poles
•Inclinometer
•Spray can
•Wooden peg or iron peg (min. 3x for each field)
•Hammer/mallet
•Manual
INSTALLATION
•Open-ended or ring wrench
•Socket wrench set with ratchet
•Torque wrench, range 25 –400 Nm (see tightening torque required for wire rope clips
and base plate fastening nuts)
•Open-ended wrench for base plate fastening nuts
•Felco C16 or C112 wire rope cutter or similar; 12 mm cutting capacity
•Cutting-Off wheel or hammer wire cutter; 28 mm cutting capacity
•pincers, flat-nose pliers
•2 mm galvanized wire strands or wire
•Angle spirit level
•Roll of adhesive tape
•Rope clamp, small 8 –16 mm/large 14 –26 mm (min. 2x)
•At least 2 tension belts
•Cable winch hoist, e.g. LUG-ALL
•Chain hoist or HABEGGER wire rope hoist, min. 1.5 t (15 kN)
•Auxiliary ropes

Page 10/41
© Geobrugg AG, CH-8590 Romanshorn, Switzerland GBE-1000A / 16
t
e
3 USING THE WIRE ROPE CLIPS
Instructions below apply to all wire rope clips according FF-C-450 type 1 class 1
(similar EN 13411-5 type 2) delivered by Geobrugg AG.
The distance ebetween the wire rope clips should be at least 1 x t but not exceed 2
x t , where tis the width of the clamping jaws. The loose rope end has to be 3 x e at
a minimum. Geobrugg recommends looping up the remaining free section and fixing
it directly behind the last wire rope clip on the tightened rope.
If you are using a thimble in the loop structure, the first wire rope clip must be at-
tached directly next to the thimble. For loops without a thimble the length hbetween
the first wire rope clip and the point of load incidence must minimally be 15-time the
nominal diameter of the rope. In unloaded condition the length hof the loop should
be not less than the double of the loop width h/2.
The clamping brackets (U-brackets) must always be fitted to the unstressed end of the rope, the clamping jaws
(saddle) must always be fitted to the strained rope („never saddle a dead horse“).
During tightening the nuts have to be tensioned equally (alternately) until the required tightening torque is
reached.
The required tightening torques with lubrication apply to wire rope clips whose
bearing surfaces and the threads of the nuts have been greased with Panolin CL
60 multipurpose lubricant spray (or an equivalent lubricant).
FF-C-450 type 1 class 1
min. 3 x e
h/2
h

Page 11/41
© Geobrugg AG, CH-8590 Romanshorn, Switzerland GBE-1000A / 16
Wire rope di-
ameter
[mm]
Size
of the
wire rope clip
Required
amount of
wire rope clips
Required
tightening
torque lubricat-
ed
[Nm]
Required
tightening
torque
unlubricated
[Nm]
Wrench
size
[mm]
14 - 15
9/16“
3
50
150
24
18 - 20
3/4‘‘
4
90
180
27
A visible contusion of the wire ropes positively indicates that the wire rope clips have been tightened to
the required tightening torque.
Undamaged wire rope clips could be reused. Especially the threads and clamping jaw have to be
checked.
Wire rope clips always have to be installed and used with the required tensioning torque.
After the first load application the tightening torque has to be checked and if
not fulfilled adjusted to the required value.

Page 12/41
© Geobrugg AG, CH-8590 Romanshorn, Switzerland GBE-1000A / 16
4 STAKING OUT DEPENDING ON THE TERRAIN
GENERAL PRINCIPLES FOR STAKING OUT
Position of barrier
To determine the optimal position of the barrier Geobrugg suggest carrying out rockfall modelling using simulation
software, as this will provide some indicative information on bounce heights and where shadowing may occur.
Lining
Where possible, the barrier should be installed so that is in a straight line and that all posts are at the same level
horizontally. This will make the installation process easier.
Foundation
The baseplate foundation is to be implemented to the terrain that the bottom support rope is kept close to the
ground.
The placement of the foundations is to be designed that the bottom support rope bypass the foundation edges
and it is not damaged on the foundation edges.

Page 13/41
© Geobrugg AG, CH-8590 Romanshorn, Switzerland GBE-1000A / 16
Difference in level of the barrier line
h: barrier height
x: post distance
n: modification of length of the mesh
h: difference in height between two neighbouring posts
Tab. 2
Post distance
6-8 m
8-10 m
10-12 m
h
< 0.50 m
< 1.00 m
< 1.50 m
No adjustment necessary
h
> 0.50 m
> 1.00 m
> 1.50 m
Net must be adjusted
If the height difference is greater than in Tab.2 you must contact Geobrugg to enable the correct length of
nets to be determined.
h
h
x
x
n

Page 14/41
© Geobrugg AG, CH-8590 Romanshorn, Switzerland GBE-1000A / 16
5 STAKING-OUT GEOMETRY
GENERAL PRINCIPLES FOR STAKING OUT GEOMETRY
Standard staking out dimensions
If the standard staking out dimensions and tolerances are adhered to, the barrier can be installed easily and will
function correctly.
Adaptation to the terrain
Depending on the terrain, it may not be possible to follow standard stake-out procedure. Making lots of small ad-
aptations to the cross-section or lengths of nets, ropes, posts, and so on is sufficient to guarantee that the struc-
ture will function perfectly even in such cases.
If Geobrugg is informed of any problems with the stake out, a customized solution may be possible.
1)
Rope anchor
Lateral anchor
2)
Upslope change in
direction
Downslope anchor rope
3)
Intermediate anchor
rope
with support rope
separation
4)
Downslope change in
direction
Retaining rope
5)
Intermediate
anchor rope
without support
rope separation
1
)
5
)
3
)
4
)
2
)
1)
2)
3)
5)
4)

Page 15/41
© Geobrugg AG, CH-8590 Romanshorn, Switzerland GBE-1000A / 16
a
x
x/2
c
d
A
B,C
D
D
x/2
h
STANDARD STAKING OUT IN STRAIGHT BARRIER LINE
UPSLOPE CHANGE IN DIRECTION
The following table applies to a ground slope of 30°- 90°
Dimensions in m; dimension tolerance ± 0,20 m
h
a
c
d 1)
e
3.00
4.50
1.00
5.10
1.50
4.00
6.00
1.30
6.80
2.00
5.00
7.50
1.65
8.50
2.50
1) In a ground slope of less than 30°, the distance between post
and retaing rope anchor is modified.
lengths
h: barrier height
x: post spacing
anchor point
A: top support rope
B: bottom support rope
C: lateral rope
D: retaining rope
1
)
Tab. 3
Length
d: see Tab.3
e: see Tab.3
Anchor point
D: retaining rope anchor
T: Downslope anchor
rope
1)
0°- 29°
d
e
D
T

Page 16/41
© Geobrugg AG, CH-8590 Romanshorn, Switzerland GBE-1000A / 16
UPSLOPE CHANGE IN DIRECTION
An additional downslope anchor rope (T) is required if the barrier changes its direction by an angle of 5° - 15°
upslope. The rope anchor is located downslope at a distance of (e) from the post.
The downslope anchor rope has a rope diameter of d = 16 mm.
Length
e: see Tab.3
x: post distance
y: angle of change in
direction
Anchor point
T: downslope anchor
rope
2)
e
T
x/2
5°<y<15°1)
x/2
x
2
)
Intermediate anchor rope
15°<y<25°
a
a
Z
Z
c
c
If the barrier line changes upslope more than 15° an intermediate anchor
rope is required. In this case the downslope anchor rope is no longer
necessary.
Length
a: see Tab.3
c: see Tab.3
y: angle of change in
direction
Anchor point
Z: intermediate
suspension
5)

Page 17/41
© Geobrugg AG, CH-8590 Romanshorn, Switzerland GBE-1000A / 16
ROPE ANCHOR FOR SUPPORT ROPE SEPARATION WITH INTERMEDIATE SUSPENSION
A support rope separation includes an intermediate suspension. A support rope separation is needed every 60
m –100 m.
Note: If the upslope change in direction is more than 25° a support rope separation is to install in addition
to the intermediate suspension.
DOWNSLOPE CHANGE IN DIRECTION
For a downslope change in direction of more than 30° an additional retaining rope (D) is mounted on the post
head (three ropes instead of two). The maximum angle for a downslope change in direction is 40°.
c
a
a
B,Z
B,Z
30°<y<40°
d
D
D
4
)
Length
d: see Tab.3
y: angle of direction
change
Anchor position
D: retaining rope
4)
Length
a: see Tab.3
c: see Tab.3
Anchor position
B: bottom support rope
Z: intermediate
suspension
3)

Page 18/41
© Geobrugg AG, CH-8590 Romanshorn, Switzerland GBE-1000A / 16
6 ROPE ANCHOR - PLACEMENT
The post angle is dependent on the terrain slope, see table 4.
For a slope inclination with < 30° und > 45° small adjustments may be made with respect to the
stakeout such as length of the retaining ropes, angle between retaining rope and post inclination of the
ground plate, etc.
Depending on the terrain conditions but in any case, if terrain slope angle > 45° it is recommended to
use bavettes (additional mesh between the terrain and bottom part of the mesh).
The anchor holes are drilled in the pulling direction, with a minimum angle of > 15° to the horizontal.
ß
Ω
0°-30°
15°
32°
17°
34°
19°
36°
21°
38°
23°
40°
25°
42°
27°
44°
29°
45°
30°
: The angle must be between 60° - 85°.
: The angle between slope and post is 75°
as standard.
Tab. 4

Page 19/41
© Geobrugg AG, CH-8590 Romanshorn, Switzerland GBE-1000A / 16
7 ANCHORING THE BASE PLATE
STANDARD BASE PLATE (TYPE 1)
LOOSE GROUND:
•Permitted installation position of the base plate 29: Inclined 0 –30°
to the horizontal
•Drill hole for the main anchor 05
•Prepare the concrete foundation 111; the concrete foundation is di-
mensioned and reinforced in accordance with the information from
the project engineer (Geobrugg recommendation: 0.6 x 0.4 x 0.15 m)
•Insert the anchor 05, spacers 09, and fastening nuts 10; the project
engineer calculates the lengths of the anchors
•Optional: stabilization tube 04 for vertical anchor
•Important: Spacers and fastening nuts must be fixed on both
sides of the base plate 29
•Mortar the main anchor 05 in the loose ground 110
•Drill and install securing anchor 06 by using the base plate as tem-
plate. Length min. 1.0 m
•Fill in the concrete foundation 111
•Tighten the fastening nuts 10 to
approx. 30 kN pretensioning force
CONCRETE:
•Can be used for all types of soil and rock
•Dig a hole for the concrete foundation 111
•Drill the rear anchoring 07; the project engineer calculates the
lengths of the anchors
•Prepare the concrete foundation 111; the concrete foundation is di-
mensioned and reinforced in accordance with the information from
the project engineer
•Mortar in the rear anchoring 07 with the fastening nuts 10 and spac-
ers 09
•Install both anchors 08 with the help of the base plate 29. Spacers
09 and fastening nuts 10 must be fixed on both sides of the
base plate;
length of anchor 08 L = 0.5 m
•Fill in the concrete foundation 111
•Tighten the fastening nuts 10 to approx. 30 kN pretensioning force
09,10
09,10
09,10
09,10
07
29
09,10
111
07
08
04,05
06
09,10
110
0.15 m
0.4 m
0.6 m
29
111

Page 20/41
© Geobrugg AG, CH-8590 Romanshorn, Switzerland GBE-1000A / 16
ROCK:
•Remove rock around the base plate 29 at 0 –30° to the horizontal
•Drill holes for the anchor 08 that are vertical to the base plate 29 in-
to the rock 112
•Mortar in the anchor 08; the project engineer calculates the lengths
of the anchors
•Position the base plate 29
•Tighten the fastening nuts 10 with the spacers 09 to approx. 30 kN
pretensioning force after the mortar has fully hardened
OPTIONAL BASE PLATE (TYPE 2)
LOOSE GROUND:
•Permitted installation position of the base plate 29: Inclined 0 –30°
to the horizontal
•Drill holes for the anchors (vertical and inclined 45° to the base plate
to accommodate inclined anchors)
•Prepare the concrete foundation 111; the concrete foundation 111 is
dimensioned and reinforced in accordance with the information from
the project engineer (Geobrugg recommendation: 0.6 x 0.4 x 0.15 m)
•Insert the anchor 05, spacers 09, and fastening nuts 10; the project
engineer calculates the lengths of the anchors
•Optional: stabilization tube 04 for vertical anchors
•Important: Spacers and fastening nuts must be fixed on both
sides of the base plate 29
•Mortar the anchor 05 in the loose ground 110
•Fill in the concrete foundation 111
•Tighten the fastening nuts 10 to approx. 30 kN pretensioning force
09,10
29
08
08
09,10
112
09,10
09,10
04,05
110
29
0.15 m
0.5 m
0.6 m
09,10
05
111
Table of contents
Other Geobrugg Safety Equipment manuals
Popular Safety Equipment manuals by other brands

Berner
Berner 185165 operating instructions

Werner
Werner A114002 Operation and instruction manual

FTC
FTC SRT FOOTLOOP Use and maintenance instructions

Guardian Fall Protection
Guardian Fall Protection CB-18 Anchor instruction manual

Reer
Reer EOS2 X quick start guide

Classic Accessories
Classic Accessories 79507 quick start guide