Georg Bechter Licht System Dot 28 User manual

LED-KONSTANTSTROMQUELLE
LED-CONSTANT CURRENT SOURCE
DIMM-AKTOR
DIMMING DEVICE
SCHALTPLAN:
For technical suport +43 662 85 01 63 - 0
Dimm-Aktoren, optional und in Abhängigkeit der
Konstantstromquelle! Dimming actuators, optional
and depending on the constant current source!
Optional dimmbar mittels 0-10V oder DALI/Push
Dimming optional with 0-10V or DALI/Push
Die Sekundärseite darf keinen Schalter oder zusätz-
lichen Dimmer enthalten! There must be no switch or
additional dimmer on the secondary side.
Die Anzahl der Leuchten ist abhängig von der
Leistung der Konstantstromquelle. Bitte beachten Sie
dazu die Angaben auf den Geräten oder in unseren
Planunterlagen. The number of luminaires depends
on the power of the constant current source. Follow
the specications on the devices and in our planning
documents.
Die Leuchten müssen seriell verkabelt werden
(Reihenschaltung). The luminars need to be
wired in series (series connection).
optional optional
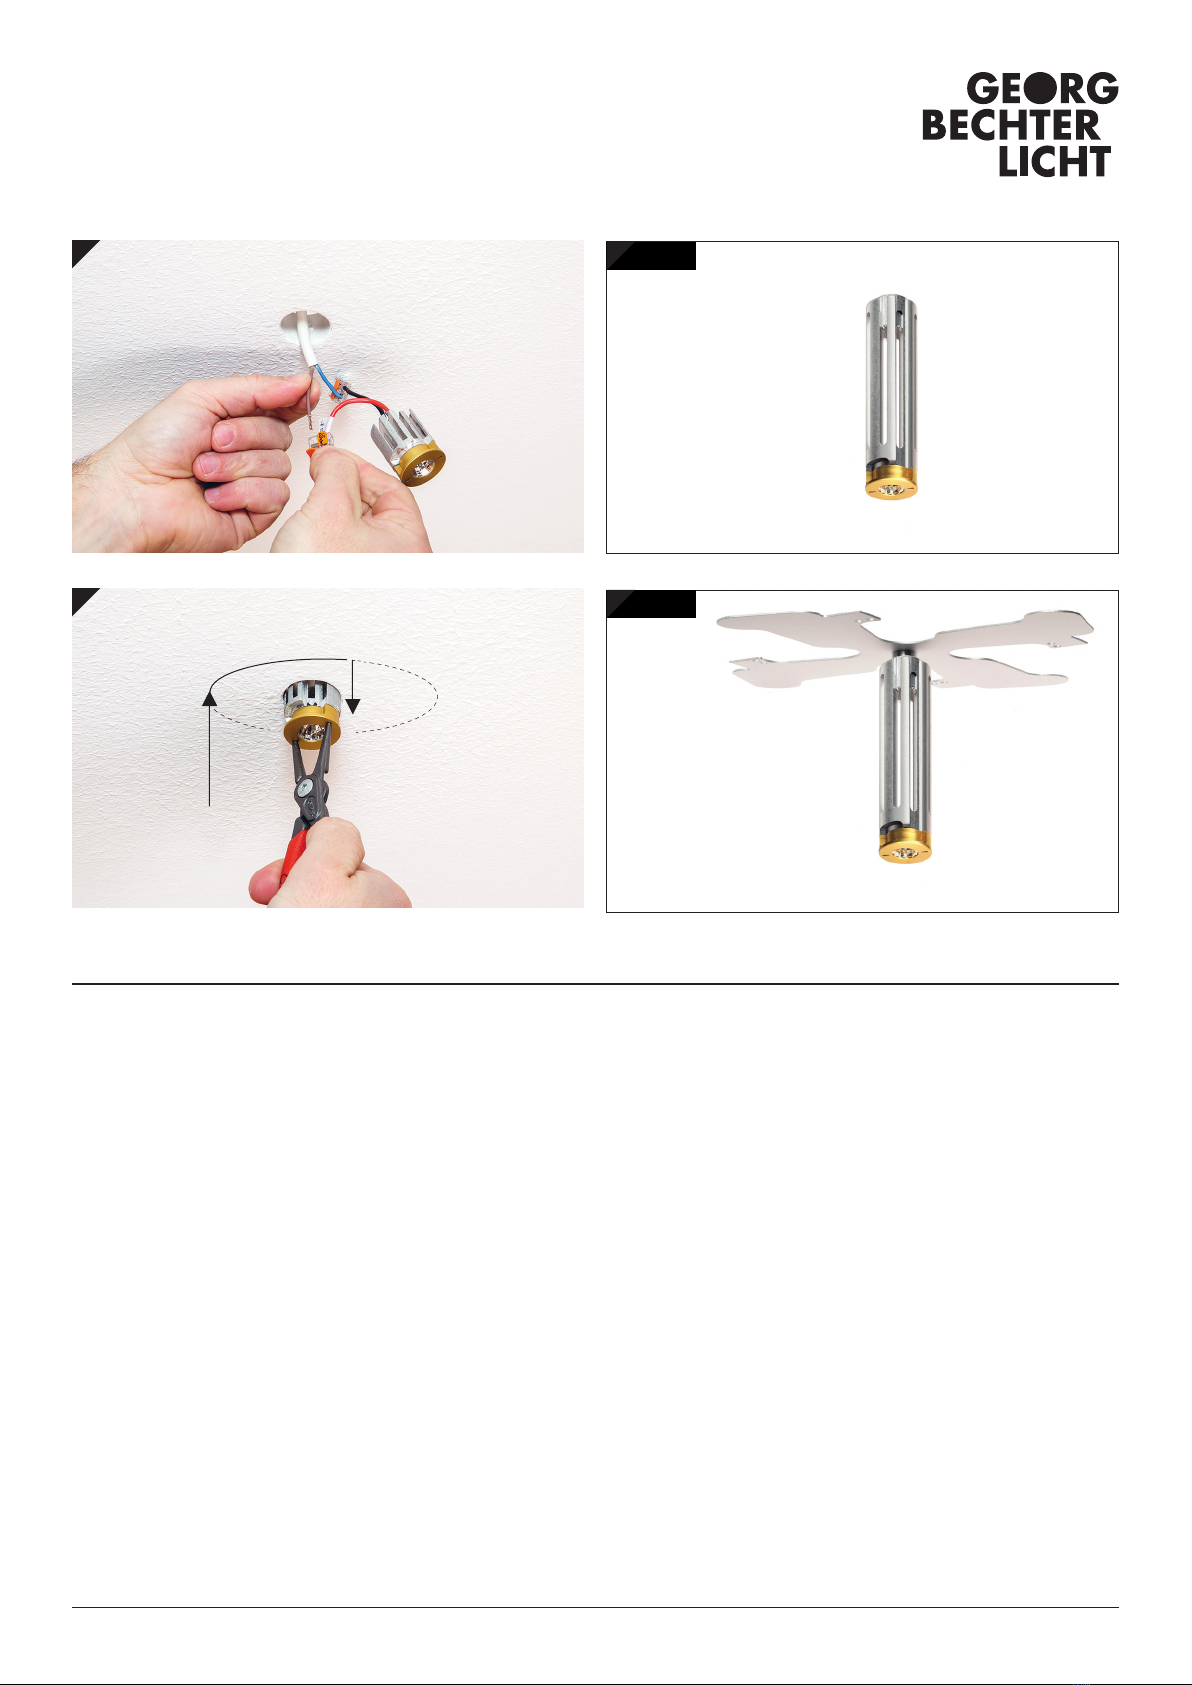
SYSTEM DOT 28 - LEUCHTEN
INSTALLATIONSANLEITUNG
ELEKTROINSTALLATION
ELECTRICAL INSTALLATION
Die gesamten Elektroinstallationen und Wartungsarbeiten sind
von einem befugten Elektroinstallateur Ihres Vertrauens gemäß
den örtlichen Sicherheitsvorschriften durchzuführen. All electrical
installations and maintenance work must be carried out by an
authorised electrician according to local safety regulations.
Jede Leuchte wird vor dem Versand im Echtbetrieb getestet.
All luminaires are tested live working before packaging.
Beachten Sie den beigefügten Schaltplan. Aktuelle Hinweise und
Updates nden Sie auf WWW.GEORGBECHTERLICHT.ATPlease observe
the circuit diagram enclosed. Go to WWW.GEORGBECHTERLICHT.AT
HINWEIS NOTE
Die handgefertigten Eloxalbeschichtungen können
chargenabhängige Farbabweichungen haben.
Our handmade anodised parts may vary in colour.
LEUCHTE NICHT UNTER SPANNUNG ANSCHLIESSEN, ABSCHLIESSEN
ODER TAUSCHEN! Bei der Montage und Demontage der Leuchte
muss der Konverter mindestens 10-15 Sekunden von der
Netzspannung getrennt sein! HOT PLUG führt zu einem direkten
Schaden an der LED, welcher nicht unter die Gewährleistung fällt!
DO NOT CONNECT, LOCK OR REPLACE LUMINAIRES UNDER VOLTAGE!
For mounting and dismounting the luminaire the converter has
to be disconnected from the supply voltage for at least 10-15
seconds! HOT PLUG causes direct damage to the LED, which is not
covered by warranty.
ACHTUNG: KEINE GEWÄHRLEISTUNG
BEI HOT PLUG CAUTION: NO
WARRANTY IN CASE OF
HOT PLUG

mind. 1dm³ Luftraum für DOT 28
max. Bestromung 350 mA 700 mA 1050 mA
Produkte
DOT 28
SFERE 28 | ORB 28
CONO 28 | DOT 35 | VERVE
DOT 28 POWER DOT 28 POWER
mit Kühlächen-
erweiterung in Beton
Sichtbetonkapseln
Putzkapsel
Trockenbaukapsel
Holzkapsel
(ohne Überdämmung)
mind. 10dm³ Luftraum,
Kühlächenerweiterung erforderlich
nicht möglich
Gipseinbaumodule
Spachteleinsatz
Spachtelring
Holzeinbauring
mind. 1dm³ Luftraum
mind. 5dm³ Luftraum nicht möglich
MASSIVBAULEICHTBAU
MAXIMALE BESTROMUNG
je nach Einbausituation
MAXIMALE ANSCHLUSSLEISTUNG UNBEDINGT BEACHTEN!
I IS CRUCIAL TO OBSERVE MAXIMUM POWER INPUT!
350mA
für DOT 28, SFERE 28, ORB 28, CONO 28, DOT 35, VERVE
for DOT 28, SFERE 28, ORB 28, CONO 28, DOT 35, VERVE
bis zu 700mA up to 700mA
für DOT 28 POWER (je nach Einbausituation)
for DOT 28 POWER (depending on mounting conditions)
bis zu 1050mA up to 1050mA
für DOT 28 POWER nur mit Kühlächenerweiterung in Beton
for DOT 28 POWER only in concrete with added cooling surface
Für die maximale Bestromung sind die oben angeführten
Anforderungen an die Einbausituation einzuhalten (siehe grasche
Übersicht). Make sure to adhere to maximum current feed
restrictions for each installation situation, as listed above.
ET
ACHTUNG CAUTION
Genügend Luftraum für den Kühlkörper vorsehen.
Mindesteinbautiefe ist einzuhalten. Darf weder überdämmt noch
mit einer Dampfbremse, einem Vlies oder Folie überspannt werden!
Reserve enough space for cooling element. Observe minimum
installation depth. Do not cover with insulation material, steam
brake, eece or lm!
Der Installierende haftet für die richtige Betriebsart. Überbestromung führt zum Ausfall und Überhitzung der umliegenden Bauteile! The
installer is liable for the right operation mode. Too high current feed causes breakdown and overheating of the surrounding components.

1
2
Beachten Sie die allgemeinen Informationen zur Elektro-
installation und zur maximalen Bestromung! Observe general
information regarding electrical installation and maximum
power input.
1. Schließen Sie die Leuchte fachgerecht an die Zuleitung des
entsprechenden Konverters an (Konstantstrom, max. 350mA).
Der Konverter muss unbedingt von der Netzspannung getrennt
sein. Es ist darauf zu achten, dass die Konstantstromquelle
direkt vor dem Anschließen der Leuchten für mind. 10-15
Sekunden vom Netz getrennt war! Connect the luminaire
correctly to the feed of the converter (constant feed, max.
350mA). The converter must be disconnected from the power
supply! It is essential to ensure that the constant current source
has been disconnected from the mains for at least 10-15
seconds before lights are connected
2. Nehmen Sie die Sicherungszange (Art.Nr. 168101), um die
Leuchte in die Bajonettaufnahme einzuführen. Drehen Sie den
DOT 28 vorsichtig um 90° nach rechts und ziehen ihn wieder
nach unten, bis er ächenbündig in der Decke sitzt.
Use fuse tongs (Art.Nr. 168101) to insert luminaire into bayonet
mechanism. Carefully rotate DOT 28 by 90° to the right and pull
down until it sits ush with the ceiling.
Für die Deinstallation muss der DOT 28 wieder angehoben und um
90° zurückgedreht werden. To de-install, lift DOT 28 and rotate
counter-clockwise by 90°.
ACHTUNG CAUTION
Es ist mindestens 1dm³ Luftraum für den DOT 28 vorzusehen.
Mindesteinbautiefe ist einzuhalten. Darf weder überdämmt noch
mit einer Dampfbremse, einem Vlies oder Folie überspannt werden!
Provide at least 1dm³ airspace for DOT 28. Observe minimum
installation depth. Do not cover with insulation material, steam
brake, eece or lm!
1
2
3
Stand August 2019
DOT 28
max.350 ma

1
2
Beachten Sie die allgemeinen Informationen zur
Elektroinstallation und zur maximalen Bestromung!
Observe general information regarding electrical installation
and maximum power input.
1. Schließen Sie die Leuchte fachgerecht an die Zuleitung des
entsprechenden Konverters an (Konstantstrom, max. 700mA,
ist eine Kühlächenerweiterung installiert, kann in Beton mit
max. 1050mA bestromt werden). Der Konverter muss unbedingt
von der Netzspannung getrennt sein. Connect the luminaire
correctly to the feed of the converter (constant feed, max.
700mA, if an additional ccoling surface is installed power supply
with max. 1050mA is possible in concrete). The converter must
be disconnected from the power supply!
2. Nehmen Sie die Sicherungszange (Art.Nr. 168101), um die
Leuchte in die Bajonettaufnahme einzuführen. Drehen Sie
den DOT 28 vorsichtig um 90° nach rechts und ziehen ihn
wieder nach unten, bis er ächenbündig in der Decke sitzt. Use
fuse tongs (Art.Nr. 168101) to insert luminaire into bayonet
mechanism. Carefully rotate DOT 28 by 90° to the right and pull
down until it sits ush with the ceiling.
Für die Deinstallation muss der DOT 28 wieder angehoben und um
90° zurückgedreht werden.
To de-install, lift DOT 28 and rotate counter-clockwise by 90°.
ACHTUNG CAUTION
Genügend Luftraum für den Kühlkörper vorsehen. Mindest-
einbautiefe ist einzuhalten. Darf weder überdämmt noch mit einer
Dampfbremse, einem Vlies oder Folie überspannt werden! Reserve
enough space for cooling element. Adhere to minimum installation
depth. Do not cover with insulation material, steam brake, eece or
lm!
MAXIMALE ANSCHLUSSLEISTUNG BEACHTEN!
PLEASE CHECK MAXIMUM POWER INPUT!
Bestromung bis zu 700mA
je nach Einbausituation, siehe Allgemeine Information
Current feed up to 700mA
depending on mounting conditions; for further information, view
general Information
Bestromung bis zu 1050mA
nur mit Kühlächenerweiterung in Beton möglich
Current feed up to 1050mA
only with additional cooling surface in concrete
700mA
1050mA
Stand Juli 2020
nur mit Kühlächenerweiterung in Beton
1
2
3
DOT 28 POWER
700mA
mit kühlflächenerweiterung in beton | 1050mA
This manual suits for next models
7
Other Georg Bechter Licht Lighting Equipment manuals
Popular Lighting Equipment manuals by other brands

NBG Home
NBG Home SMRTLite DS18979 Use and care guide

LED World
LED World HH-S2835P-60-24-5M-PINK Important instructions

Hama
Hama SpotLight Steady 120 II operating instructions

Avlite
Avlite AV-OL-MI Installation & service manual

Harman
Harman Martin ERA 400 Performance CLD user manual

Simx Lighting
Simx Lighting LHT0251 installation instructions