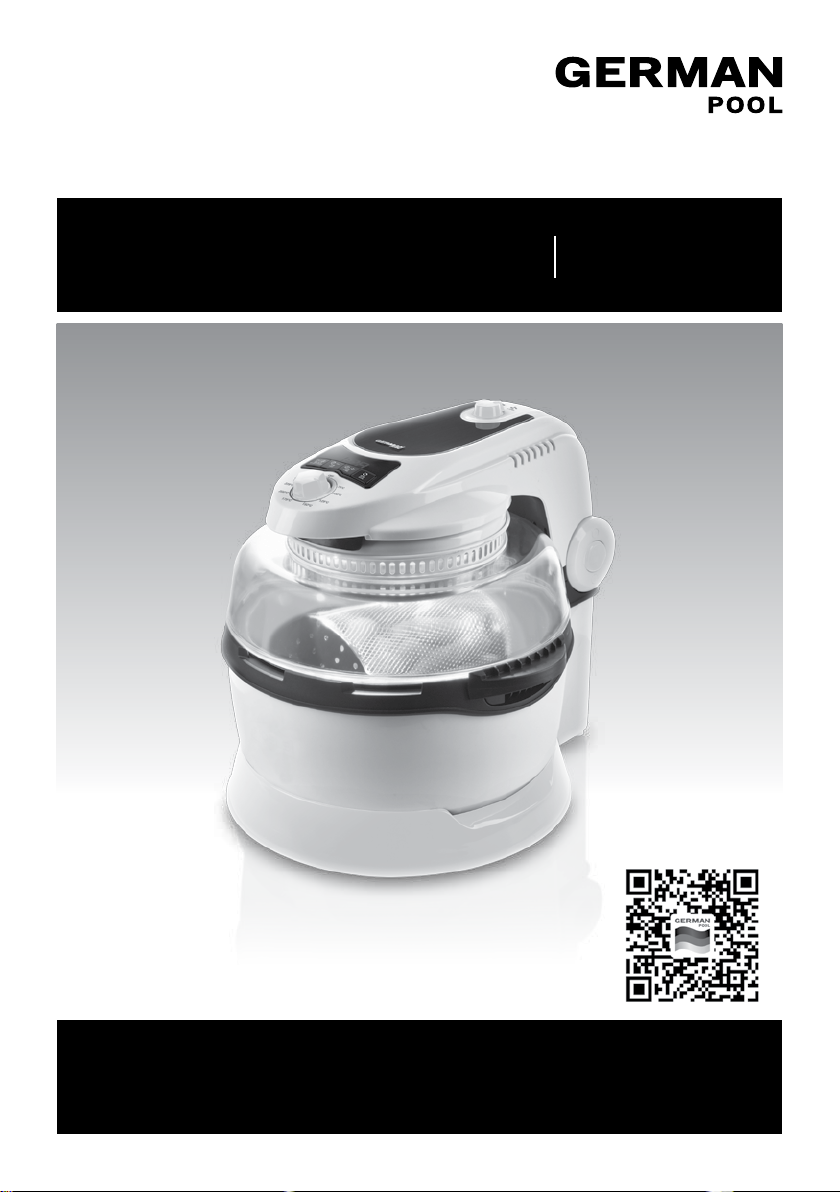
German pool CKF-215 User manual

P.1
Please read these instructions and warranty information carefully
before use and keep them handy for future reference.
Online Warranty Registration
3D Auto-Spin Healthy Air Fryer CKF-215
USER MANUAL

P.3P.2
Table of Contents
Warnings and Recommendations 04
Product Structure 06
Operating Instructions 07
Cleaning & Maintenance 09
Accessories 10
Technical Specications 10
Warranty Terms & Conditions 19
請即進行保用登記﹗
有關保用條款細則,請看本說明書最後一頁。
Please register your warranty information now!
For Warranty Terms & Conditions,
please refer to the last page of this user manual.

P.5P.4
1. Use of any electrical appliances require the following safety rules
• Do not use the appliance outdoors.
• Use the original supplied Pot. Do not use any other substitute pots and pans.
• Keep it away from other cookers.
• Do not use it too close to ammable materials such as curtains, cabinets, and the wall.
• Keep it away from any hot stove or oven.
2. When turning off the power
• Turn off the power before removing the plug from the socket.
• Do not expose the power cord to hot surfaces; allow the product to cool down completely before
unplugging the power cord.
3. To properly use the product
• Keep the product out of reach of children. When using this product, do not let children get close
to it.
4. Safety considerations
• Do not use the product if damaged or malfunctions. Do not use accessories not recommended by
the manufacturer, as this can lead to re hazard and electric shock.
• Do not use this product other than its intended purposes.
• When the cooker is switched off, unplug it from the wall socket.
• The Pot can be immersed in water to cool down.
• The Glass Cover of the product is breakable, please handle with care.
• If there is a problem with the cooker, do not repair it yourself. Repair should be handled by a
professional.
5. Electrical requirements
• Check if the rated voltage of the appliance matches the local mains voltage.
• If the socket does not match the plug, install the right plug before using the unit.
6. Warning
• To prevent the risk of electric shock, do not splash water on the Power Cord or Plug.
• Do not disassemble the product arbitrarily, as incorrect conguration may cause electric shock
when used.
• Do not touch the lid with bare hand during operation.
• If the Pot has not been cooled, use oven gloves or a piece of cloth to cover the sides of the Pot
when taking it out.
Warnings and Recommendations Warnings and Recommendations
7. Operating Instructions
• Please note: when using the product for the rst time, you may smell a slight odor. Do not worry.
This is due to the combustion of production residue, which is completely normal. It will slowly
disappear.
8. Introduction to Operation
• Please read the Instruction Manual and the Label on the product before use.
• Only use after full understanding.
• Use soapy water to clean the Pot and the Lid, but make sure it is dry before use.
• Product accessories, such as Spinning Air-Fry Basket, Rotisserie, Dual Rack and Plate Lifter are
allowed to be washed clean.
• Do not immerse the entire unit in water. Use a soft dish cloth to wipe the dirty parts, especially
around the Inner Cover where the Halogen Light is. Wait for it to dry before use.
• Do not spray water on the appliance, lest water seeps into the appliance and damage its electrical
components to cause accidents.
• The appliance can only be used with the Pot put in place.

P.7P.6
Product Structure
Control Panel
Main Body
LED Display
Control Panel
Temperature Knob
Glass Cover
Pot
Speed Knob
Pot Handle
Lid
Lid Handle
Base
LED Display
Spin Button
Start/Cancel/
Delay Start
Time + /
-
Temperature Knob
Operating Instructions
Standby Mode
After the power is turned on, the buzzer gives a beep sound, the LED display starts,
and the time displays “0:00” to enter the Standby Mode.
Cook Mode
There are two ways to start cooking :
1. During Standby Mode, set the Time by using the “TIME +/- ” Button
and set the Temperature by turning the Knob. Press “START/CANEL” Button
to conrm.
2. During Standby Mode, set the Temperature and set the Time. Press “START/CANEL” Button
to conrm.
Delay Start Function
1. During the Standby Mode, the LED display shows “0:00”. Press both “START/CANEL” Button
and “TIME –“ Button at the same time, hold down for 3 seconds, the machine will continue
to beep until the entire setting is done. The LED display will be blinking “P”, “0:00” and “A” one
by one. Set the time for Delay Start by pressing “Time +” , and then press “START/CANEL”
Button to conrm. Set the Cooking time for by pressing “Time +” , and then press
“START/CANEL” Button to conrm. Then turn the knob to set the temperature. The product
defaults to SPIN. If you do not require the SPIN function, press the “SPIN” Button to turn it off.
2. Setting is now done. The beep sound stopped. If the Delay Start is set for 2 hours, the LED display
will be blinking “P”, “2:00”, and “A” if spinning is required. If no spinning is required, the LED display
will be blinking “P” and “2:00” alternatively.
Changing the Time Setting
During the Standby Mode or Delayed Start Mode, can change the time setting by pressing the “TIME
+/- ” Button to set the Delay Start Time or Cooking Time. The LED display records the
time changes. Press the “TIME +/- ” Button each time adds or minus 1 minute. Press
and hold the “TIME +/- ” Button each time adds or minus 10 minutes. The range of time
adjustment is from 0:00 to 9:59 and can be adjusted cyclically.
Auto-Spin Function
During the Cook Mode, the product defaults to spin. Press the “SPIN” Button to stop spinning, and
press the “SPIN” Button again to resume spinning.
Watch the video clip

P.9P.8
Operating Instructions
Temperature Adjustment
1. After setting the time, adjust the Temperature by turning the Temperature Knob so that the Knob
Arrow indicator points to the desired Temperature, then press the “START/CANEL” Button
to enter the Cook Mode with Burner Motor and the Optical Tube turned on.
2. After setting the time, press the “START/CANEL” Button , the motor of the burner spins
automatically, then adjust the Temperature by turning the Temperature Knob to start heating.
During In the heating, press the “START/CANEL” Button , the LED display time is displayed
as 0:00, then the motor continues to work until the Temperature of the Pot dropped to below 100°C
to stop working.
Motor Speed Adjustment
During the Cook Mode, can adjust the Motor Speed by turning the Knob. There are two gears: High
Speed and Low Speed .
Pause Function
During the Cook Mode, when the Lid is lifted and the LED Display showing remaining cooking time will
be paused and saved, any other buttons will be locked, and the Motor and Optical Tube will stop working.
The cooking and LED display time countdown will resume from where it is left behind once the Lid is put
back in place. However, the countdown towards delayed start time won’t be affected by lifting the Lid.
Sleep Mode
After the power is turned on and the Standby Mode is reached, if there is no operation for 10 seconds,
the LED display will go out until any button is pressed or the Knob is turned. If the operation is to press
any of the 4 Buttons, the LED display will only display 0:00 (so the secondary button only wakes up the
LED display, not the function setting), when the display shows 0:00, then Start the above setup operation.
Care & Maintenance
Note:
• Unplug power cord and cool down cooking pot before cleaning or washing.
• While cleaning the cooking pot, avoid any form of tapping, knocking or
striking against the glass container lest cracks or breakage may result.
1. The glass container and the lid can be cleaned by soap water. Dry the unit
thoroughly after cleaning.
2. Product accessories, such as Spinning Air-Fry Basket, Rotisserie, Dual Rack and Plate Lifter are
allowed to be washed clean.
3. Do not immerse the whole unit in water. Instead, gently wipe stains with a soft cloth. Thoroughly dry
the unit for the next application.
4. Do not spray water on the appliance lest water seeps into the appliance and damage its components.
Watch the video clip
Table of contents
Other German pool Fryer manuals

German pool
German pool ISF-620 User manual

German pool
German pool FRY-133 User manual

German pool
German pool FRY-233 User manual

German pool
German pool DFC-516R User manual

German pool
German pool DFC-515 User manual

German pool
German pool CKF-110 User manual

German pool
German pool ISF-623 User manual

German pool
German pool FRY-123 User manual