manuals.online logo
Brands
  1. Home
  2. •
  3. Brands
  4. •
  5. Gevi
  6. •
  7. Coffee Maker
  8. •
  9. Gevi GECME020DE-U Operating and maintenance instructions

Gevi GECME020DE-U Operating and maintenance instructions

GECME020DE-UOperation Tips and MaintenanceInstructions
CONTENTSThe lack of maintenance of the machine would not only affect your coffee taste but also lower the perf-ormance or even shorten the lifespan of your mac-hine. For you to better maintain your machine, we’ve prepared some helpful tips for you as follows.The 3-in-1 smart coffee machine is mainly composed of a grinder, a brewer and a steam wand.Grinder0101-10PARTBrewer0211-31PARTMilk-Frothing0332-39PARTCONTENTS
01Grinder0101
02Make Every Sip Count
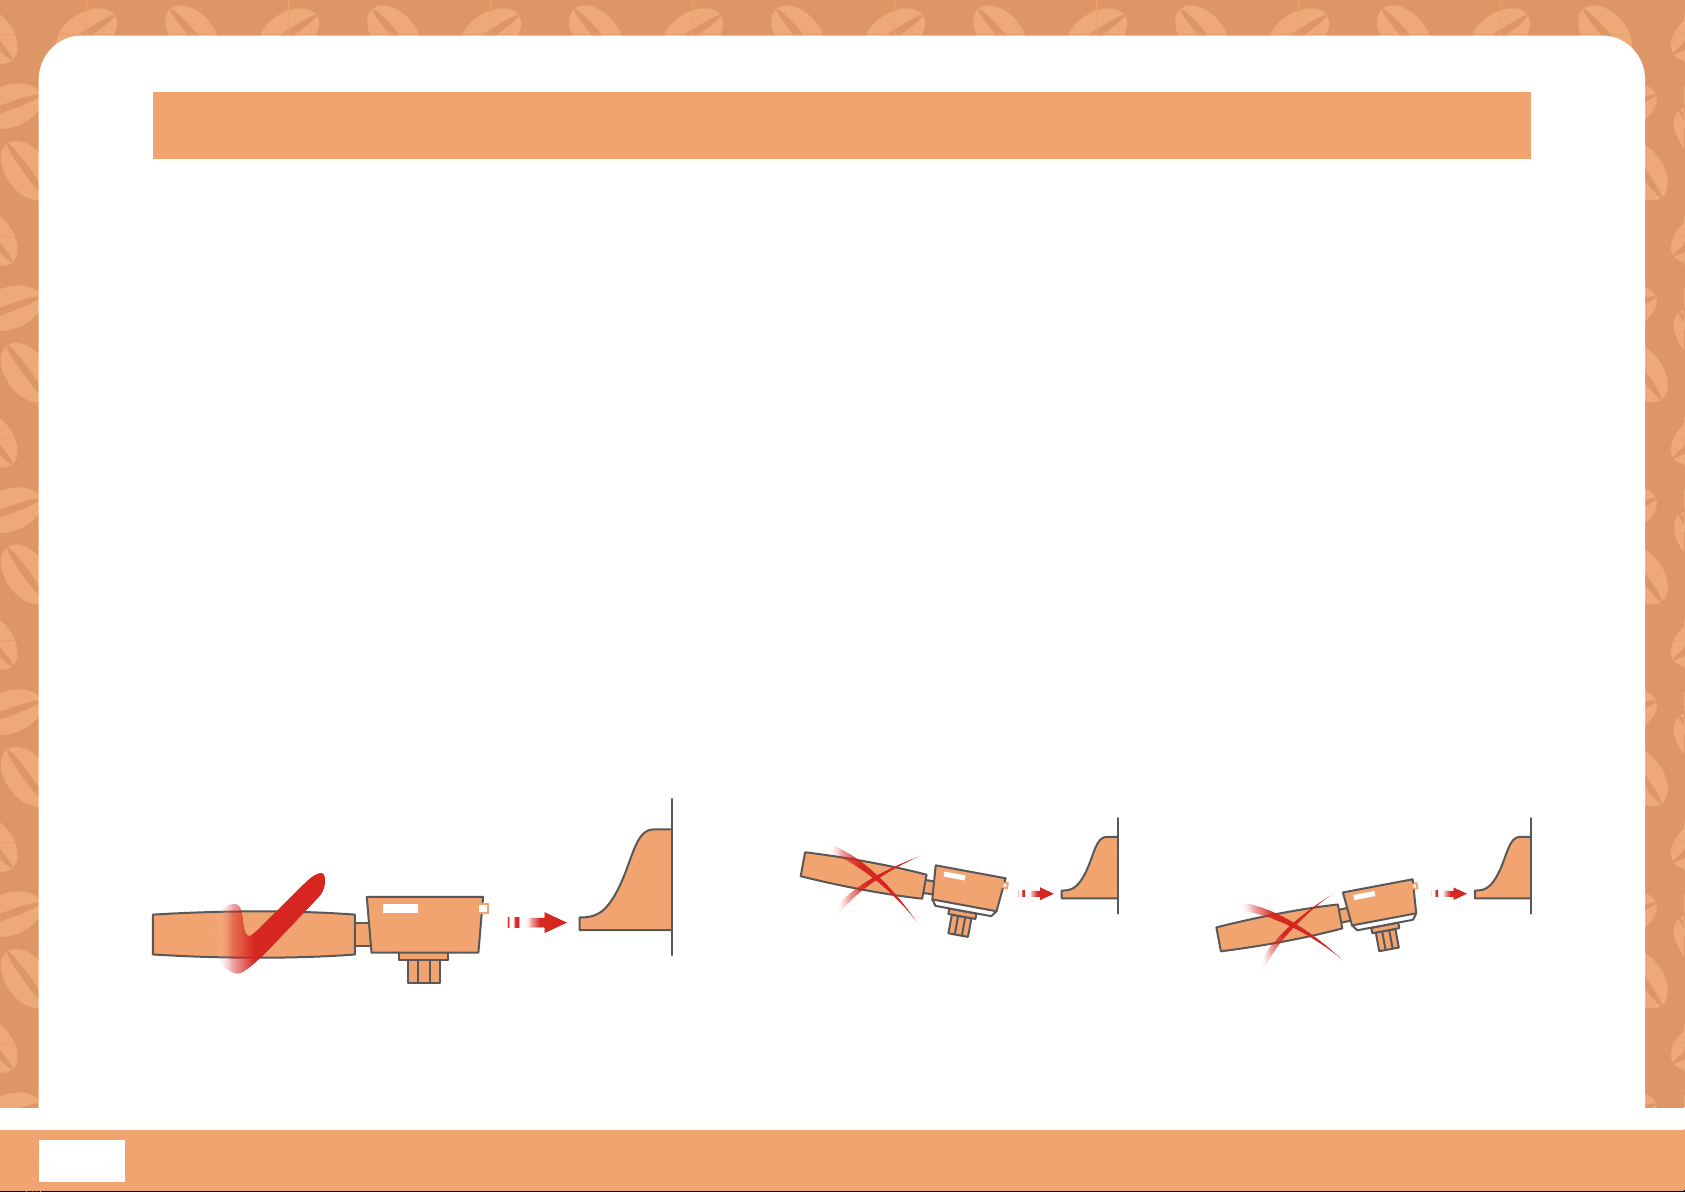
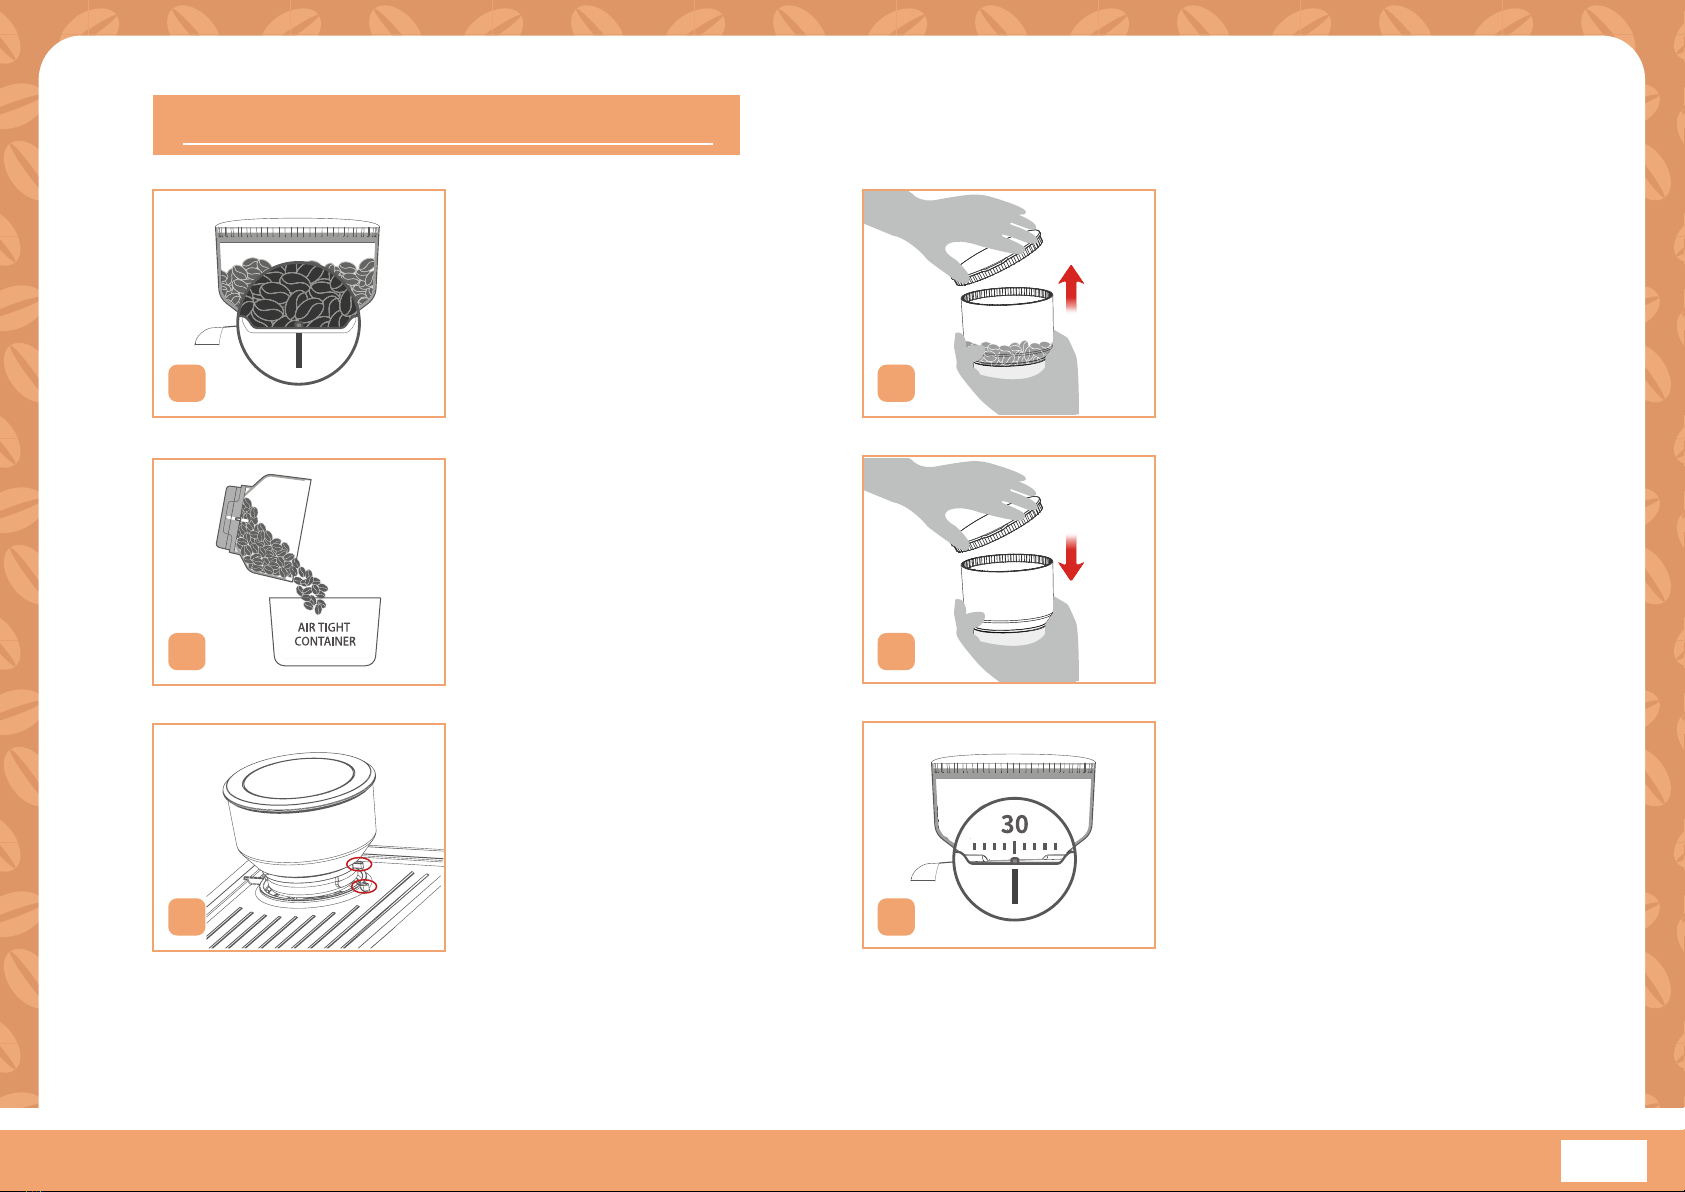
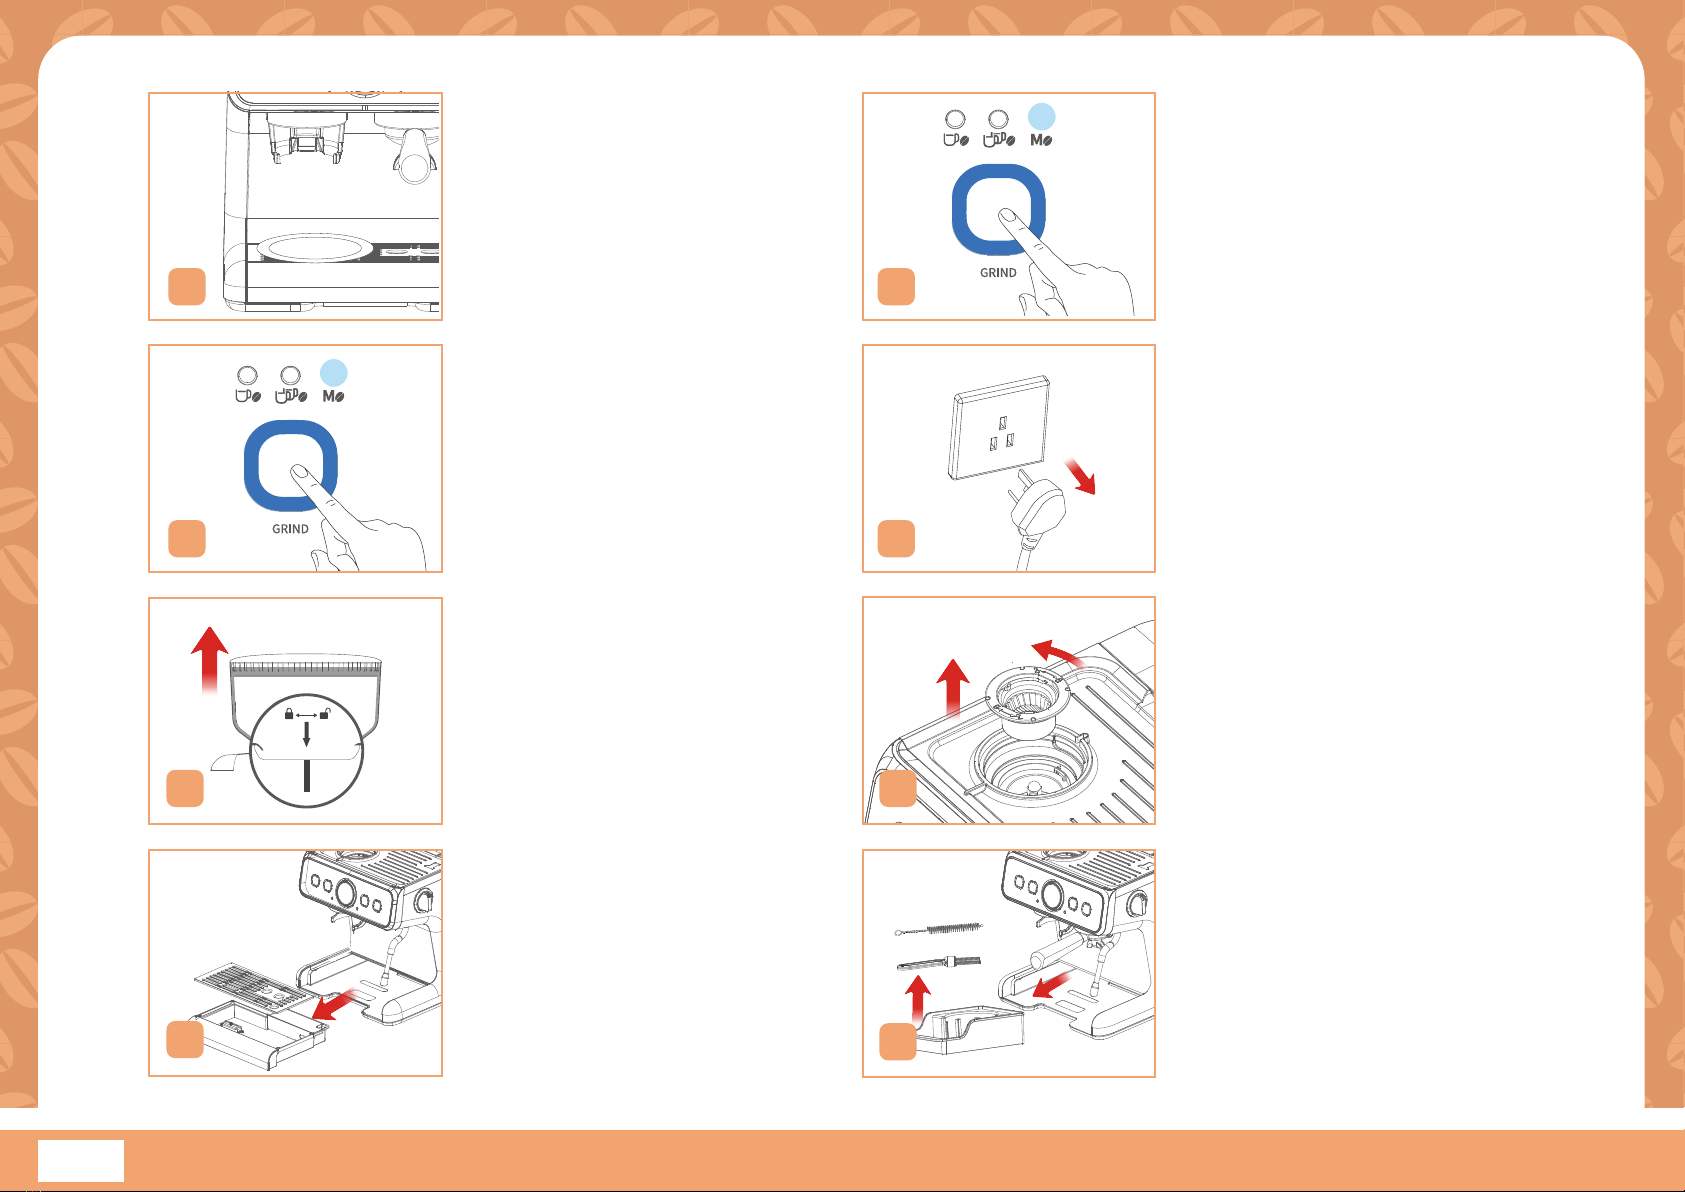
D. Do not fill the bean hopper with frozen or coated beans, moisture will seep into the burr and ground channels. Over time this will cause the same problem as that in point A.E. Do not add any liquid flavorings or syrups to the beans, otherwise it will cause the same result as point A.1. Before UseA. The grind settings 0-15 are suitable for medium or dark roasted beans, 15 and above can be used for light, medium, and dark roasted beans, but very dark beans are not suitable for very fine grind settings, and 8 and above are more suitable, otherwise, your grinder will be easily blocked. So the deeper the roast level, the more oily the beans would be, and the more frequent deep cleaning is required.B. If you maintain and clean the grinder properly, as those beans can leave some greasy residue in the burrs and feeder channels. The oil residue can cause the ground coffee to stick in the feeder passages and clog. Over time, this slows down the flow of ground coffee. The amount of ground coffee beans is controlled by the selection of coffee cups or grinding time. Therefore, you will find that fewer and fewer coffee grinds would be produced by grinding with the same cup setting or time setting.C. Do not use light roasted beans with the grind settings below 15, because the lightly roasted beans are of high density and hard to grind, if you grind them with a fine setting, fewer coffee grinds will come out and they would be sticky, which can cause the ground coffee to stick in the feeder passages and clog. Over time, this slows down the flow of ground coffee. The amount of ground coffee beans is controlled by the selection of coffee cups or grinding time. Therefore, you will find that fewer and fewer coffee grinds would be produced by grinding with the same cup setting or time setting.
03Make Every Sip Count
A. Use the correct method to adjust the grind size settings.If you want to adjust the grind size setting, there are some notes listed below you need to be aware of:B. To properly dose the portafilter with coffee grounds, place it on the cradle instead of holding it.Situation 1: When you want to adjust a fine setting to a coarser setting, just rotate the Grind Regulator directly before grinding.Situation 2: When you want to adjust a coarse setting to a finer setting.- But if there are coffee beans inside the grinder, you cannot rotate the Grind Regulator forcibly, otherwise, grinder damage may occur. In this case, you can either grind all the coffee beans inside the grinder and then adjust the grind setting directly, or grind beans and rotate the Grind Regulator simultaneously to achieve your fine setting. - If there are no coffee beans inside the grinder, you can rotate the Grind Regulator directly to achieve your setting;2. In Use
Make Every Sip Count 04Please strictly follow the instructions and requirements below to clean the coffee-grinding part and its accessories, otherwise, the flavors of your coffee will be affected or the lifespan of the brewer will be shortened.Rotate the Bean Hopper counterclockwise to the end,align the lock mark with the convex point, and take out the Bean Hopper;Open the Hopper lid of the Bean Hopper, empty the coffee beans in the bean hopper into an empty jar, and install the Hopper lid of the Bean Hopper;12Insert bean hopper into the grinder collar, lightly pushing down, turn the bean hopper in a clockwise direction to select the coarsest setting. Align the hopper guide with the red grinder interlock.34
30
3. After UseA. After Each Use
Make Every Sip Count
9Tap the top 3-5 times, then remove the plate and discard the ground coffee.Use a straw cleaning brush to poke in and out of the powder channel from above, clean the channel, and poke 30-50 times.Put a dish under the powder outlet.Press the Grind button 3 times, wait for 2 seconds the grinder will start grinding automatically.65When you hear the sound of the machine idling, press the Grind button to stop working. Unplug the power after turning off the machine.81071211Wipe the surface of the Drip Tray with a clean cloth.Wipe the powder outlet.05
04Make Every Sip Count 06B. After 15 Days or After 100 UsesOpen the Hopper lid of the Bean Hopper.Rotate the Bean Hopper counterclockwise to the end, align the lock mark with the convex point, and take out the Bean Hopper;12Empty the coffee beans in the bean hopper into an air tight Container.Install the Hopper lid of the Bean Hopper.436Align the hopper guide with the red grinder interlock. Insert bean hopper into the grinder collar, lightly pushing down,turn the bean hopper in a clockwise direction to select the coarsest setting. 5
Make Every Sip Count
07Press the Grind button 3 times,wait for 2 seconds the grinder will start grinding automatically.Put a dish under the powder outlet.Unplug the power after turning off the machine.When you hear the sound of the machine idling, press the Grind button to stop working.Rotate the Bean Hopper counterclockwise to the end, align the lock mark with the convex point,and take out the Bean Hopper.Rotate the Upper Conical Burr counterclockwise to unlock, take out the Upper Conical Burr.TurnRemoveTurnRemoveTake out the cleaning brush and straw cleaning brush.Remove the drip tray from machine.7891011121413
Make Every Sip Count
Insert bean hopper into the grinder collar, lightly pushing down,turn the bean hopper in a clockwise direction to select the thickest gear. Insert the Power Plug into a 120V AC power outlet & switch the power on.Clean the Upper Conical Burr with a cleaning brush.Clean the surrounding area with a cleaning brush.Use a straw cleaning brush to poke in and out of the powder channel from above, clean the channel, poke 30-50 times.Tap the machine 3-5 times. Remove the dish and discard the ground coffee.Align the hopper guide with the red grinder interlock.Install the Upper Conical Burr and lock it clockwise.TurnRemove151617181920222108
Make Every Sip Count When you hear the sound of the machine idling, press the Grind button to stop working.Press the Grind button 3 times,wait for 2 seconds the grinder will start grinding automatically.LIGHTS are always on in blue =Espresso Machine ready for use.Press POWER button, the POWER Light will illuminate & pulse to indicate the Thermoblock is heating up. 1 Min Heat UpRepeat the previous steps 10-21 if idling does not work after cleaning.The brushs put into the room saving toolbox.RepeatStep 10-21 Wipe the powder outlet and surrounding area and the surface of the Drip Tray with a clean cloth.Install the drip tray back into the machine.232425262728302909
Make Every Sip Count 10Wrap the straw cleaning brush with oil-absorbing paper and poke it in and out of the powder channel to clean, poke it 30-50 times.Clean the area around the lower burr with oil-absorbing paper.After soaking, take out the accessories, wash the accessories with clean water.Soak the Upper Conical Burr, straw cleaning brush and cleaning brush in the descaling agent for 1 hour.Wipe the accessories with a damp cloth.For operation guide, refer to steps in section “After 15 Days or After 100 Uses”,page 06, and then add the following steps after step 18:C. After a Long Time of Use or the Machine is Clogged12345
11Brewer02
Make Every Sip Count
1. Before UseA. Please make sure that the rubber plug of the water outlet of the water tank is removed;B. It is recommended to use pure water;C. Please fill enough water in advance but not exceed the MAX line of the water tank, and do not add too little water, otherwise when the water runs out the water pump will make a loud noise and affect the coffee effect;D. A great espresso is about achieving the perfect balance between sweetness, acidity, and bitterness. The flavour of your coffee will depend on many factors, such as the freshness of coffee beans, the roast degree of coffee beans, grind size, grind dose, tamping force, water temperature, cup size and shot volume. Experiment by adjusting these 11 factors just one at a time to achieve the taste of your preference.A. Adding your daily amount of coffee beans into the bean hopper. Don’t add too many once.After coffee beans are added to the bean hopper, press the bean hopper lid tight to avoid coffee beans being moisturized.1-Bean RequirementB. Do not fill the bean hopper with frozen or coated beans, moisture will seep into the burr and ground channels. C. Freshness of Beans: We recommend quality 100% Arabica beans with a “Roasted On” date stamped on the bag, not a “Best Before” or “Use By” date. Buy in small batches to reduce the storage time. Coffee beans are best consumed between 5‒20 days after the “Roasted On” date. Stale coffee may pour too quickly from theportafilter spouts and taste bitter and watery. 12
Make Every Sip Count
For making espresso, medium- or dark-roasted coffee beans are well-suited. If you use light-roasted coffee beans, the final coffee will be lighter in both its color and flavor. 2- Roast Degree of Coffee BeansTo make a good espresso, a fine grind is a must. When grinding coffee beans, the grind size should be fine but not too fine. The grind size will affect the rate at which the water flows through the ground coffee in the filter basket and the taste of the espresso. If the grind is too fine (looks like powder and feels like flour when rubbed between the fingers), the water will not flow through the coffee even when under pressure. The resulting espresso will be OVER EXTRACTED, dark in colour and bitter in flavour. Besides, a too-fine grind will more easily lead to a blockage in which water overflows through the edges of the portafilter. If the grind is too coarse, the water will flow through the ground coffee in the filter basket too quickly. The resulting espresso will be UNDER EXTRACTED and lacking in color and flavor.A. The grind size setting range is 8-10 for espresso. The grind size will affect the rate of water flow through the coffee in the filter basket and the flavor of the espresso. If the grind is too coarse the water will flow through the ground coffee in the filter basket too quickly. The resulting espresso will be UNDER-EXTRACTED and lacking in color and flavor.B. We suggest you start at setting 10 and adjust as required. Adjust size towards left or right as required so the top edge of the metal cap on the tamper should be level with the top of the filter basket after the coffee has been tamped. (The smaller the number, the finer the grind size; the larger the number, the coarser the grind size.)3- Grind SizeC. It is normal that the Grind Size Selector will need to be adjusted a few times to achieve the correct extraction rate. Start with the suggested settings, extract an espresso, then refer to the Extraction Guide to determine what adjustments need to be made. 13
Make Every Sip Count 14In total four filter baskets are included in the box. Two of them are designed for brewing one cup of coffee, while the other two are made for brewing two cups.A. When you receive the machine, please brew espresso with the dual-wall filter. It is friendly for beginners and good for you to make coffee if you use pre-ground coffee or when you are not so familiar with the machine as well as not experienced in brewing coffee.We strongly suggest you follow this guideline.5- Suitable Filter A. Add a proper amount of coffee grinds to the portafilter. The suitable dose for the single cup is around 13-15 grams, and for the double cup is around 18-20 grams. After the coffee grinds are tamped, the surface of the grinds should not pass the MAX marking on the filter.4- Grind DoseB-Grind dose of the Single-shot and Double-shot may need to be reset after a change of coffee bean type or grind setting. Filter TypeDual Wall Filter for 1 CupDual Wall Filter for 2 CupSingle Wall Filter for 1 CupSingle Wall Filter for 2 CupFront SideBack SideStraight SideB. Use single-wall filters if you grind fresh whole beans and when you are very familiar with the machine as well as experienced in brewing coffee because brewing with a single wall filter requires fresher coffee grounds and a higher level of brewing techniques.
Make Every Sip Count
15Before brewing, make sure that the pre-heating process finishes. At this point, the POWER, GRIND, BREW, and PROGRAM buttons are always on in blue, and the STEAM/HOT WATER Light is always on in white.7- Water TemperatureTamped the coffee grounds with the portafilter hanged in the air, which will lead to uneven tamping force. NOTETap the portafilter several times to collapse and distribute the coffee evenly in the filter basket. Place the portafilter on a hard, horizontal table, holding the portafilter in one hand, and another hand for the tamper. Using the tamper, tamp down the coffee grinds firmly with pressure around 10-15kg but not too hard to avoid a blockage, in which water overflows through the edges of the portafilter. As a guide, the top edge of the cap on the tamper should be level with the top of the filter basket AFTER the coffee has been tamped. The amount of pressure is not as important as the consistent pressure every time. After tamping, make sure to wipe away any excess coffee grinds on the edges of the portafilter before installing it into the group head.6- Tamping ForceBefore placing the portafilter into the group head, run a short flow of water through the group head by pressingthe BREW button. This will stabilize the temperature prior to extraction. 8- Purging the Group Head
Make Every Sip Count 16E. Place the handle of the portafilter in the INSERT position of the machine, put it upward into the Group Head, and rotate it counterclockwise until the handle of the portafilter is at a 90-degree angle to the machine and the three ears of the portafilter should be stuck on the machine.https://www.youtube.com/watch?v=1TQBZedtQGoSubject: Correct Extraction Guidehttps://drive.google.com/file/d/1OVIiOr0bqXIiw3Cpvte5xdpoIcpKLZJ0/view?usp=sharingFor you to better understand the above, we have made videos and guide for you to show how to make good espresso as below: Subject: How to Make 2 Cups of Perfect Espresso CoffeeIf for 2 shots with 1 cup, it is recommended that the capacity of the cup is about 100mL. While for 2 shots with 2 cups or 1 shot with 1 cup, it is recommended that each cup is about 70mL. The cups without pre-heating or too large will make the temperature of the espresso drop quickly, resulting in a poor flavor.9- CupsIf the group head, filter basket, and portafilter are not blocked, as a guide, the espresso will start to flow after 8-12 seconds (infusion time) and should be the consistency of dripping honey. If the espresso starts to flow after less than 7 seconds, you have either under-dosed the filter basket and /or the grind is too coarse. This is an UNDER EXTRACTED shot. If the espresso starts to drip but doesn’t flow after 12 seconds, the grind is too fine. This is an OVER EXTRACTED shot.10- Extracting Espresso SpeedAround 50mL per cup is recommended.11- Shot Volume
Make Every Sip Count
17A. If the water runs out midway, refill the water tank. To ensure the best flavor of the coffee, discard the used coffee grinds, and restart brewing with fresh coffee grinds.B. Do not remove the portafilter when it is in use to avoid scalding.C. If the portafilter is not installed in place during brewing, press the BREW Button to stop the brewing and then wait for 20 seconds before detaching the portafilter.2. In Use
Make Every Sip Count 183. After UseDiscard the coffee puck in the portafilter.To avoid coffee powder in the portafilter splashing and colla-psing, accompanied by a "bang" sound, wait 20 seconds to let the machine relieve the pressure then twist the portafil-ter out of the machine clockwi-se;TurnREMOVERinse the front and back of the filter under the faucet, and finally rinse the inner holes and the outer holes with water.To remove filters from the porta-filter, use the flat end of the cleaning brush to lift the filter out of the portafilter. After regular use, water can cause mineral build-up in and on many of the inner functioning components, reducing the brewing flow, brewing temperature, power of the machine, and the taste of the espresso, or even shortening the lifespan of your machine. Please strictly follow the instructions and requirements below to clean the coffee-brewing part and its accessories to keep your machine’s best performance and your coffee taste.1234A. After Each Brew

Other manuals for GECME020DE-U

1

Other Gevi Coffee Maker manuals

Gevi GECMD276-U User manual

Gevi

Gevi GECMD276-U User manual

Gevi GECME003D-U User manual

Gevi

Gevi GECME003D-U User manual

Gevi GECMA409-U User manual

Gevi

Gevi GECMA409-U User manual

Gevi GECME020DE-U User manual

Gevi

Gevi GECME020DE-U User manual

Gevi GECMA121B-U User manual

Gevi

Gevi GECMA121B-U User manual

Gevi GECMD008-U User manual

Gevi

Gevi GECMD008-U User manual

Gevi GECME400BA-U User manual

Gevi

Gevi GECME400BA-U User manual

Gevi GECMD627BK-U User manual

Gevi

Gevi GECMD627BK-U User manual

Gevi GECME022-U User manual

Gevi

Gevi GECME022-U User manual

Gevi GECMD627BK-U User manual

Gevi

Gevi GECMD627BK-U User manual

Gevi GECMA160A-U User manual

Gevi

Gevi GECMA160A-U User manual

Gevi GECME003D-U User manual

Gevi

Gevi GECME003D-U User manual

Gevi GECME403-U User manual

Gevi

Gevi GECME403-U User manual

Gevi GECMD329AE-U User manual

Gevi

Gevi GECMD329AE-U User manual

Gevi GECME022-U User manual

Gevi

Gevi GECME022-U User manual

Gevi CM7015-NM User manual

Gevi

Gevi CM7015-NM User manual

Gevi GECMA091A-U User manual

Gevi

Gevi GECMA091A-U User manual

Gevi GECME022-U User manual

Gevi

Gevi GECME022-U User manual

Gevi GECME418E-U User manual

Gevi

Gevi GECME418E-U User manual

Gevi GECMA025AK-U User manual

Gevi

Gevi GECMA025AK-U User manual

Gevi GECMA409-U User manual

Gevi

Gevi GECMA409-U User manual

Gevi GECMD627BK-U User manual

Gevi

Gevi GECMD627BK-U User manual

Gevi GECME003D-U User manual

Gevi

Gevi GECME003D-U User manual

Gevi GECME003D-U User manual

Gevi

Gevi GECME003D-U User manual

Popular Coffee Maker manuals by other brands

Bella Pro Series Black Stainless Steel 9006 instruction manual

Bella

Bella Pro Series Black Stainless Steel 9006 instruction manual

Black & Decker DCM900B Use and care book

Black & Decker

Black & Decker DCM900B Use and care book

Cuppaz Sleek Quick guides

Cuppaz

Cuppaz Sleek Quick guides

Oster LMX Series user manual

Oster

Oster LMX Series user manual

Melitta SINGLE 5 THERM operating instructions

Melitta

Melitta SINGLE 5 THERM operating instructions

Tower Hobbies T13005 Safety and instruction manual

Tower Hobbies

Tower Hobbies T13005 Safety and instruction manual

Bunn DUAL / GPR-DBC Installation and operating guide

Bunn

Bunn DUAL / GPR-DBC Installation and operating guide

Yoo Digital PICKYOO user manual

Yoo Digital

Yoo Digital PICKYOO user manual

Nespresso Pixie Clips C60C instruction manual

Nespresso

Nespresso Pixie Clips C60C instruction manual

Asko CM8477B Safety regulations

Asko

Asko CM8477B Safety regulations

AEG LM 3200 Amodo Mio Instruction book

AEG

AEG LM 3200 Amodo Mio Instruction book

La San Marco Preziosa 80 12 Use and maintenance

La San Marco

La San Marco Preziosa 80 12 Use and maintenance

Melitta aromaboy operating instructions

Melitta

Melitta aromaboy operating instructions

Curtis ALP3GT15A826 Service manual

Curtis

Curtis ALP3GT15A826 Service manual

Schaerer Ambiente 2 Service manual

Schaerer

Schaerer Ambiente 2 Service manual

Saeco HD8869/47 Instruction

Saeco

Saeco HD8869/47 Instruction

Jura Impressa C9 One Touch Quick reference guide

Jura

Jura Impressa C9 One Touch Quick reference guide

Animo DE 5 manual

Animo

Animo DE 5 manual

manuals.online logo
manuals.online logoBrands
  • About & Mission
  • Contact us
  • Privacy Policy
  • Terms and Conditions

Copyright 2025 Manuals.Online. All Rights Reserved.