Gevi GECME022-U User manual

2-in-1 Smart
Espresso Coffee Machine
Brewer | Frother
GECME022-U
INSTRUCTION BOOKLET
Please read all the owner’s instruction booklet before use.

1. Important Safeguards
2. Know Your Machine
3. More Details
4. Before First Use
5. Espresso Making Guide
6. Milk Frothing Guide
7. Other Functions
7.1 Water Shortage Guide
7.2 High-temperature Alarm Guide
7.3 Pre-infusion Function
7.4 Descaling Warning Guide
8. Cleaning & Maintenance
9. Troubleshooting
10. Warranty
11. Coffees To Try
Contents
. . . . . . . . . . . . . . . . . . . . . . . . . . . . . . . . . . . . . . . . . 01
. . . . . . . . . . . . . . . . . . . . . . . . . . . . . . . . . . . . . . . . . . . . . . . 28
. . . . . . . . . . . . . . . . . . . . . . . . . . . . . . . . . . . . . . . . . . . 05
. . . . . . . . . . . . . . . . . . . . . . . . . . . . . . . . . . . . . . . . . . . . . . . . . . . 07
. . . . . . . . . . . . . . . . . . . . . . . . . . . . . . . . . . . . . . . . . . . . . . . 09
. . . . . . . . . . . . . . . . . . . . . . . . . . . . . . . . . . . . . . . . . . . . 24
. . . . . . . . . . . . . . . . . . . . . . . . . . . . . . . . . . . . . . . . 28
. . . . . . . . . . . . . . . . . . . . . . . . . . . . . . . 29
. . . . . . . . . . . . . . . . . . . . . . . . . . . . . . . . . . . . . 29
. . . . . . . . . . . . . . . . . . . . . . . . . . . . . . . . . . . . . . . . 29
. . . . . . . . . . . . . . . . . . . . . . . . . . . . . . . . . . . . . . . 30
. . . . . . . . . . . . . . . . . . . . . . . . . . . . . . . . . . . . . . . . . . . . . . . . 49
. . . . . . . . . . . . . . . . . . . . . . . . . . . . . . . . . . . . . . . . . . . . . . . . . . . . . 47
. . . . . . . . . . . . . . . . . . . . . . . . . . . . . . . . . . . . . . . . . . . . . . 41
. . . . . . . . . . . . . . . . . . . . . . . . . . . . . . . . . . . . . . . . 11

21
1. Important Safeguards 1. Important Safeguards
When using electrical machines, basic safety precautions should
always be followed to reduce the risk of fire, electric shock, and/
or injury to persons including the following:
1. Read all instructions before using this machine.
2. Do not touch hot surfaces. Use handles or knobs.
3. Do not leave the machine unattended when in use.
4. Never use the espresso machine without water in the water tank.
5. To protect against electric shock, do not place or immerse cord,
plugs, or machine in water or other liquid.
6. Before using, check the output voltage of the wall outlet should
be correspond to the rated voltage marked on the machine’s
rating plate.
7. This machine is not intended for use by children or by persons
with reduced physical, sensory, or mental capabilities, or lack of
experience and knowledge. Close supervision is necessary when
any machine is used near children. Children should be supervised
to ensure that they do not play with the machine. Keep the machine
and its cord out of reach of children.
8. Unplug from outlet when either the machine or display clock (if
provided) is not in use, and before cleaning. Allow to cool before
putting on or taking off parts, and before cleaning the machine.
9. Do not operate any machine with a damaged cord or plug or after
the machine malfunctions, or has been damaged in any manner.
Do not attempt to replace or splice a damaged cord. Return machine
to an Authorized Service Center for examination, repair or adjustment.
10. The use of an accessory not recommended by the machine
manufacturer for use with this machine may result in fire, electric
shock or injury to persons.
11. Do not use outdoors or for commercial purposes.
12. Do not let cord hang over edge of table or counter, or touch hot
surfaces.
13. Do not place on or near a hot gas or electric burner, or in a heated
oven.
14. Be careful not to get burned by the steam.
15. Do not touch the hot surface of the steam wand and filter holder
when boiling directly. Use handle or knobs.
16. Relieve pressure through steam wand before removing portafilter.
17. Always attach plug to machine first, then plug cord into the wall
outlet (for machines with detachable cords). To disconnect, turn
any control to the off position, then remove plug from wall outlet.
18. To eliminate a choking hazard for young children, remove and
safely discard the protective cover fitted to the power plug of the
espresso machine.
19. Do not use machine for other than intended use. Misuse can cause
injuries.
20. Never remove the portafilter during the brewing operation as the
machine is under pressure.
WARNING
Always properly engage the Group Head to the locking mechanism.
Failure to do so may disengage the Group Head during the brew cycle
and cause injuries.

43
21. Models intended to be used with sealed capsules: Only use
capsules intended for this machine. If the capsule does not fit,
do not force the capsule into the machine.
22. Models with coffee grinders: Check hopper for presence of foreign
objects before using.
23. Household Use Only.
For machines with service panels:
1. Place the machine on a hard, flat, level surface to avoid interruption
of airflow underneath the espresso maker.
2. Do not operate the machine with an empty water tank.
A short power-supply cord (or detachable power-supply cord) may
be provided to reduce risks resulting from becoming entangled in or
tripping over a longer cord. Longer detachable power- supply cords
or extension cords are available and may be used if care is exercised
in their use. If a long detachable power-supply cord or extension cord
is used:
1. Important Safeguards 1. Important Safeguards
WARNING
TO REDUCE THE RISK OF FIRE OR ELECTRIC SHOCK, DO NOT REMOVE
THIS COVER. NO USER‒SERVICEABLE PARTS INSIDE. REPAIR SHOULD
BE DONE BY AUTHORIZED SERVICE PERSONNEL ONLY.
NOTE
For electronic instruction manual, please contact Gevi support team.
North American models with grounded plugs:
POWER CORD INSTRUCTIONS:
PRODUCT NOTICES
This machine has a polarized plug, (one blade is
wider than the other). As a safety feature to reduce
the risk of electrical shock, this plug is intended to fit in a polarized outlet only
one way. If the plug does not fit fully in the outlet, reverse the plug. If it still does
not fit, contact a qualified electrician. Do not attempt to defeat this safety feature
or modify the plug in any way. If the plug fits loosely into the AC outlet or if the
AC outlet feels warm do not use that outlet.
POLARIZED PLUG
a. The marked electrical rating of the detachable power-supply cord
or extension cord should be at least as great as the electrical rating
of the machine;
b. If the machine is of the grounded type, the extension cord should
be a grounding type 3-wire cord;
c. The longer cord should be arranged so that it will not drape over
the counter top or table top where it can be pulled on by children
or tripped over unintentionally.
Do not pull, twist or otherwise abuse the power cord.

65
Electrical parameters: 120V~ 60Hz 1350W
Model: GECME022-U
2. Know Your Machine 2. Know Your Machine
51mm Single
Cup Filter
51mm Double
Cup Filter
Spoon &
Tamper
Steam Wand
Cleaning Pin
❺
❹
❻
❼
Tank Handle Lift the water tank upwards via the handle
located inside.
Removable Water Tank Push back the tank lid & fill with clean water, or
remove the water tank by opening the lid.
Espresso/Steam Knob Turn right to select steam, turn left to select coffee.
Rubber Handle Allows for moving the steam wand without
burning fingers.
Steam Wand
Ball joint movement with a stainless steel cover.
Able to create silky smooth micro-foam in the
milk under the right steam pressure.
Steam Wand Cover Removable for easy cleaning.
Buoy In the drip tray to indicate the water level.
On/Off Switch For turning on/off the machine.
❶
❽
❾
❿
⓬
⓭
⓫
⓮
⓯
❷
❸
❶
❸
❹
❺
❻
❼
❽
❷
Description SpecificationRe.
❾
❿
⓫
Removable Cup Shelf Removable for easy cleaning.
Group Head Compatible with coffee grinds or pod espresso.
Has two positions, lock and unlock, for easy cleaning.
Portafilter Holds and fixes the filter to achieve a better
coffee extraction.
Manual Shot Button Press the MANUAL button to start and stop
the brewing.
2 SHOT Button - Pours 2 shot of espresso then automatically stops.
- Customize espresso by setting range 60-130mL.
1 SHOT Button - Pours 1 shot of espresso then automatically stops.
- Customize espresso by setting range 25-60mL.
Removable Drip Tray Includes a buoy that will float through the grill
when it is full and requires emptying.
⓬
⓭
⓮
⓯

Cup Warming Plate
Manual Shot Volume Control
Manually control low pressure pre-infusion
time and shot volume without re-
programming the preset shot volume.
Auto Shot Volume Control
- Auto Shot is the easiest way to create
a great espresso. Just press the 1 SHOT
Button or 2 SHOT Button to pour right
amount, then it will automatically stop.
- All Extraction Buttons can be customised
to deliver the shot volumes preferred.
A heated metallic plate on top of the machine
keeps your cups warm, so that the coffee
flavour will not be influenced by cold parts.
1.2L Food Grade Removable
Transparent Water Tank
Can directly know how much water left
removable, easy to add and clean water.
Thermoblock Fast Heating System
- The thermoblock heats the water so that
the esPresso extracts at 198℉(just below
boiling point) for potimum extraction of
oils from the coffee grinds. Temperatures
above this will burn the grinds resulting
in a bitter taste.
- Two separate thermostats allow for
controlling the temperature of espresso
extraction and the milk frothing separately,
so that the taste of coffee and milk foam
can reach the ideal state.
Powerful Steam Wand
Stainless steel steam wand for effortless
milk frothing.
Compact Design
Convenient storage, suitable for home
kitchens.
Filter Baskets
The filter baskets allow a more consistent
grind compaction, resulting in a better tasty
coffee. Used espresso pucks can be easily
emptied.
1350W High Power
1350W High power can provide a fast
and stable extraction, making espresso
more fragrant and richer in crema.
Pre-Infusion
Small amounts of water are released
onto the tamped coffee grinds prior to
the steady flow of waterfor a richer
flavored espresso.
2-in-1 Portafilter
The Portafilter holds coffee grinds for a true
cafe tasting coffee. Its perfect size ensures the
grinds are more evenly spread and easier to fill
for imporved flavor extraction.
20 BAR Pump
The thermoblock works in conjunction with the
pump to deliver the correct water temperature
at the correct pressure for complete extraction
of oils, coffee solids and aroma.
A Buoy Inside The Drip Tray
Remind you the water is full. It's detachable
for easy cleaning.
87
3. More Details

109
4. Before First Use
and affect the coffee effect.
Step 4 - Set up the water tank vertically and align the buckles
to the hole on the back of the machine, and then press it
down to be parallel to the top of the machine.
Step 1 - Make sure the knob is in the “ ” position.
Step 2 - Insert the Power Plug into a 120V AC power outlet & switch the power
on.
Step 3 - Press the ON/OFF button to turn on the machine.
- The 3 buttons start to blink blue light slowly to indicate
the machine is heating up.
- When the 3 buttons are solid on, the machine is in the
READY state for all features.
Step 1 - Align the marking dot on the filter with the
portafilter's groove, and then install the filter to the
portafilter, twist and fix the filter.
Step 2 - Hold the machine with one hand and the
portafilter with the other hand.
Step 3 - Place the portafilter underneath the group head
so that the handle is aligned with the INSERT position.
Insert the portafilter into the group head and rotate the
handle towards the center until resistance is felt.
More simply, the water tank can also be filled without
being extracted by pouring the water directly from a jug.
NOTE
• Power
• Insert Portafilter
CENTRE
1.ALIGN
& INSERT
CENTRE
INSERT
2.TURN
4. Before First Use
Step 1 - Please make sure that the rubber plug of the
water outlet of the water tank is removed.
Step 2 - Extract the tank by pulling it upwards.
Do not clean or soak the portafilter in any descaling solution, otherwise,
it would be damaged.
NOTE
These priming steps must be completed prior to first use.
IMPORTANT
Ensure all packaging has been removed.
4.1 Remove Packaging
Ensure the espresso machine is always positioned onto a dry, stable, flat
horizontal counter top.
4.2 Position Machine
Wash the parts listed below in warm water:
- Stainless Steel Single Cup Filter - Portafilter
- Stainless Steel Double Cup Filter - Drip Tray
- Steam Wand Cleaning Pin - Spoon & Tamper
- Removable Water Tank
Rinse & allow thorough air drying.
4.3 Wash & Dry Parts
4.4 Prime the Machine
• Fill Water Tank
Turning the Portafilter to the centre position might be tight for the first
few uses.
NOTE
Step 3 - Open the lid and fill enough pure water(recommended) in advance
but not exceed the MAX line of the water tank, and do not add too little water,
otherwise when the water runs out the water pump will make a loud noise

1211
4. Before First Use
Step 1 - Put a container under the Group Head.
Step 2 - Press the 2 SHOT button, and water should start
flowing from the Group Head. Allow some water to run through until the
machine stops. The machine will return to the READY state.
Step 1 - Position the Steam Wand over the Drip Tray, or
place a container with a minimum capacity of 100mL
under the steam wand outlet.
Step 2 - Turn the Espresso/Steam knob to the Steam icon. Allow water to run
through for 20 seconds.
Step 3 - Return the Espresso/Steam Knob to the " " icon position, and the
machine will return to the READY state.
If there is no water flowing out, please refer to Troubleshooting, page 41.
NOTE
• Cleaning
Clean the Group Head
Clean the Steam Wand
5. Espresso Making Guide
1 - All of the flavor comes from the beans, choose different kinds of roasts and
beans according to the type of coffee you make.
2 - For making espresso, medium- or dark-roasted coffee beans are well-suited.
If you use light-roasted coffee beans, the final coffee will be lighter in both its
color and flavor.
3 - Fresh, quality coffee beans will give you the best possible extraction. Bad
beans will not only affect your grinding results but also ruin your final coffee.
There are many types of beans on the market. To ensure best grinding results,
high quality beans are recommended.
4 - Old coffee beans, no matter what the grind setting is, will have a fast extraction
and will produce an under extracted tasting espresso.
5 - Buy coffee grinds well-suited for espresso if you don’t want grinding. When
using pre-ground bagged grinds, try to dose in half the grinds then tamp &re-
peat again.
5.2 Tips for Making the Perfect Espresso
1 - Coffee Beans/Grinds
5. Espresso Making Guide
5.1 Brief Introduction
2 SHOT Button
Manual Shot
Button
1-Press the 2 SHOT button to start
brewing then the machine will
automatically stop.
2-Customize espresso volume by
setting range 60-130mL.
Press the Manual Shot button to start
brewing, and then press the button
again to stop the brewing when the
desired shot volume is reached.
1-Press the 1 SHOT button to start
brewing then the machine will
automatically stop.
2-Customize espresso volume by
setting range 25-60mL.
1 SHOT Button
single cup
double cup
The grind size will affect the rate of water flow through the coffee in the filter
basket and the flavor of the espresso. To make good espresso, a fine grind is
a must. Coarse coffee grinds can make the extraction too fast and lead to an
under extraction. But also note don’t use too fine grinds to avoid water
blockage or overflow from the portafilter. After tamping, make sure wipe
away any excess coffee grinds on the edges of the portafilter before installing
it to the machine.
2 - Grind Size
Add a proper amount of coffee grinds to the portafilter, the
dose of the single cup is around 7 grams, and the double
cup is around 14 grams but not past the MAX line.
3 - Grind Dose
around 14g
around 7g

1413
5. Espresso Making Guide 5. Espresso Making Guide
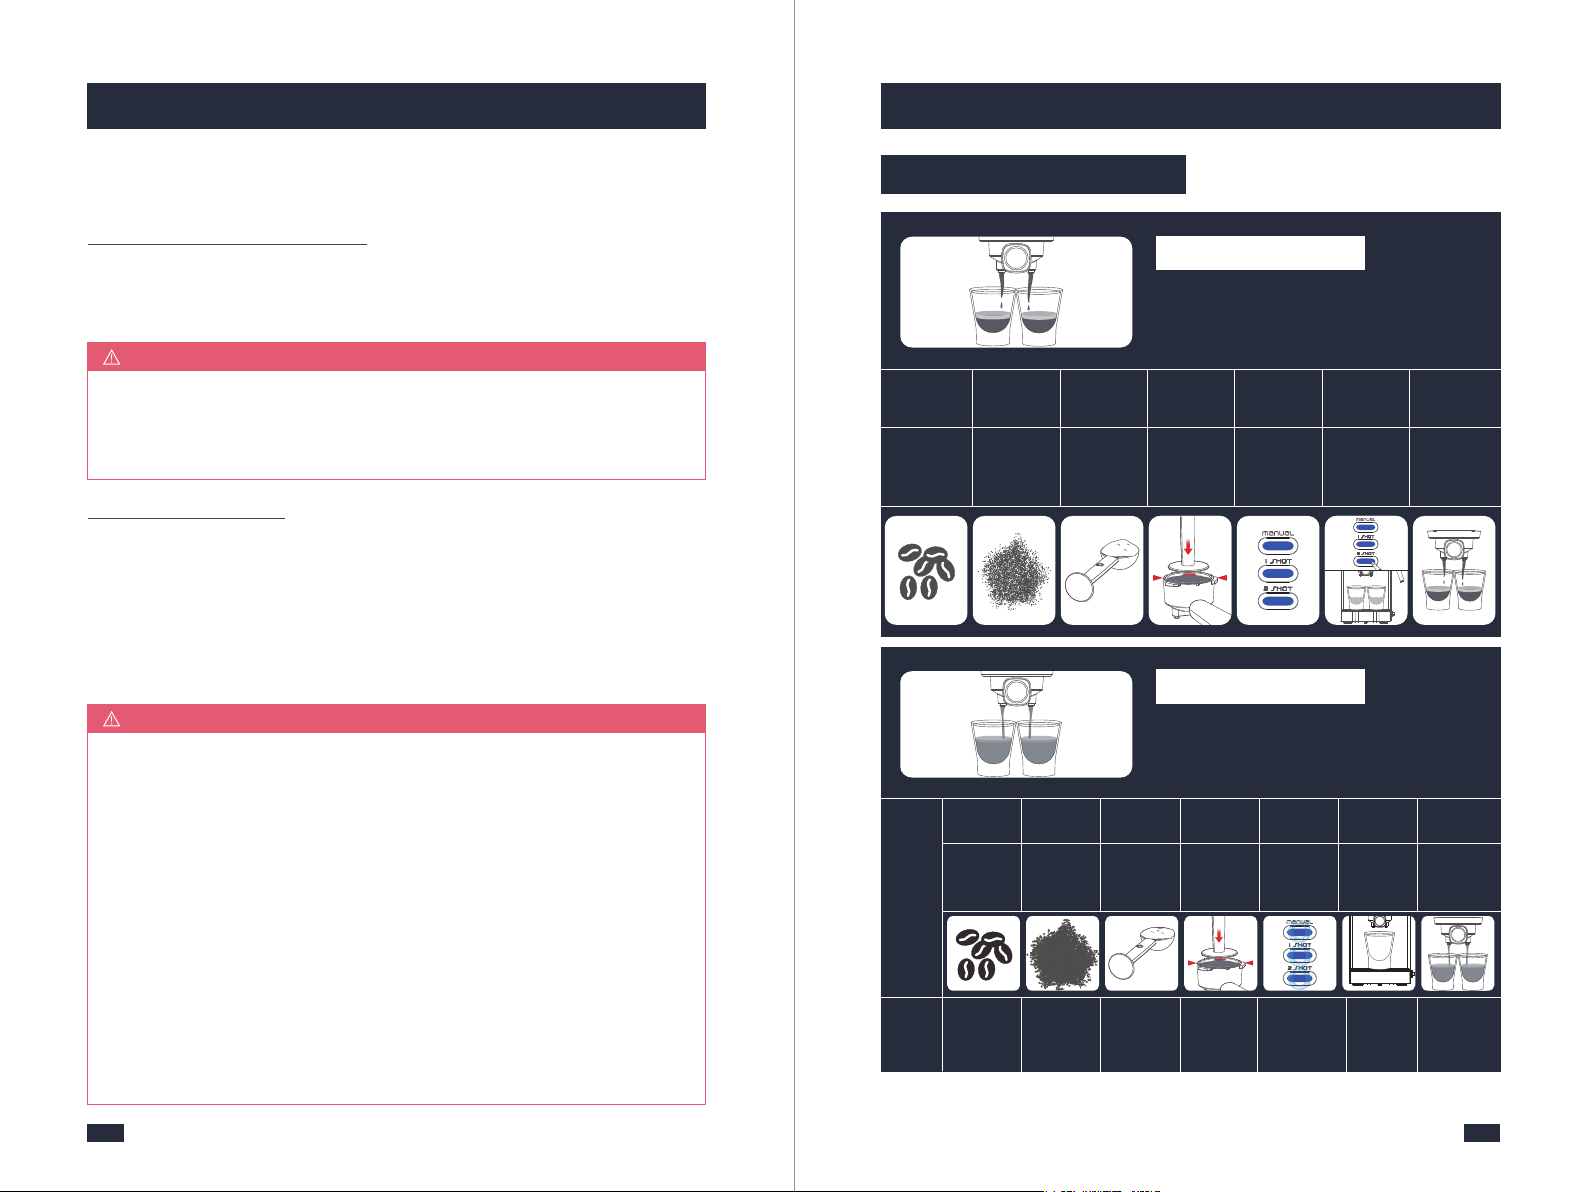
1 - A spoon of flat coffee grinds is approximately equal to 7g. Collect the
coffee grinds with the spoon and shake it gently to make the surface flat,
the amount of coffee grinds is around 7g. One spoon coffee grinds (7g)
can make one cup of top-grade coffee, while two spoons (14g) are two
cups of top-grade coffee.
2 - Use the Single-cup Filter when brewing a single cup and the Double-
cup Filter when brewing two cups or a stronger single cup or mug.
3 - You may need to experiment with how much coffee is put into the
filter or how long your grinder needs to run to achieve the correct dose.
4 - Tap the portafilter several times to distribute the coffee grinds evenly
in the filter basket.
5 - It is normal for the correct dose of coffee grinds to appear overfilled
in the filter before tamping.
NOTE
Tamp the coffee grinds firmly with pressure around 10-15kg
but not too hard to avoid water blockage or overflow from the
portafilter. After tamping, make sure wipe away any excess
coffee grinds on the edges of the portafilter before installing
it to the machine.
4 - Tamping Force
1 - Isolating changes to grind size & tamping force will assist in producing
a consistent taste every time.
2 - After tamping make sure wipe away any excess coffee grinds on the
edges of the portafilter before installing it to the machine.
3 - If the coffee grinds exceed the MAX line after being tamped, you can
continue to tamp. If the grinds are too firm to tamp down, take some
grinds out and then re-tamp.
NOTE
Before brewing,make sure the knob is in the“ ”position and the temperature
is suitable,at this point, the Manual, 1SHOT and 2SHOT buttons will be solid
blue light on.
5 - Water Temperature
The Single-shot Mode & Double-shot Mode use duration to control espresso
volume. The duration times are preset, but can be reprogrammed (We sug-
gest pre-setting the volumes of your shot modes, about 40mL per cup is
7 - Shot Volume
If for 2 shots with 1 cup, it is recommended that the capacity of the cup is about
100ML. While for 2 shots with 2 cups or 1 shot with 1 cup, it is recommended that
each cup is about 50ML. The cups without pre-heating or too large will make the
temperature of the espresso drop quickly, resulting in a poor flavor.
6 - Cups
Take note of the below 2 cases of misoperation:
The machine is just turned on and in the process of pre-heating, the 3 buttons
start to blink blue light slowly, so it has not reached a suitable temperature for
brewing coffee. Before brewing coffee, make sure the pre-heating process has
finished, at this point, the Manual, 1 SHOT and 2 SHOT buttons will be solid blue
light on.
CASE 1 - Low Temperature
The suitable temperature for brewing coffee is around 92 degrees Celsius(198
degrees Fahrenheit). If you accidentally turn the knob to the Steam icon or
immediately brew coffee after steaming, the temperature will be too high, and
it is not suitable for brewing coffee.
CASE 2- High Temperature
What to do ?
If you accidentally turn the knob to the steam icon, return the knob to the " "
position, and the pressure relief hole will make a loud “CiCi” noise with some
steam coming out from the drip tray, wait to cool down to an appropriate tem-
perature for coffee, at this point, the Manual, 1SHOT and 2SHOT buttons will be
solid blue light on, then turn the knob to the coffee icon, press the button of the
cup volume to brew coffee.
If the machine just finished steaming, do not brew coffee immediately. Make sure
to return the knob to the " " position, you can follow the above for cooling down
the machine till to the suitable temperature and then brew coffee, otherwise, the
machine will release high-temperature water from the group head and cause the
coffee to burn.

1 - The amount of espresso extracted in the cup will vary depending on
your grind size and grind dose settings.
2 - If you want to end brewing in the 1 SHOT/2 SHOT Mode, press the
corresponding button to stop brewing.
NOTE
Press either the 1 SHOT button or the 2 SHOT button to extract espresso at the
preset volume. The extraction will start using the low-pressure pre-infusion. The
machine will stop after the preset volume has been extracted.
1 SHOT Mode & 2 SHOT Mode
1615
5. Espresso Making Guide5. Espresso Making Guide
1 - Due to pre-infusion time, the espresso will not start to flow immediately.
2 - As a guide, the espresso will start to flow after 4‒7 seconds (infusion time)
and should be the consistency of dripping honey.
3 - If the espresso starts to flow after less than 3 seconds you have either
under dosed the filter, the grind is too coarse and/or the tamping force is
too light. This is an UNDER EXTRACTED shot.
4 - If the espresso starts to drip but doesn’t flow after 8 seconds, then you
have either over dosed the filter, the grind is too fine and/or the tamping
force is too heavy. This is an OVER EXTRACTED shot.
5 - A great espresso is about achieving the perfect balance between sweet-
ness, acidity and bitterness. The flavor of your coffee will depend on many
factors, such as the type of coffee beans, degree of roast, freshness, coarseness
or fineness of the grind, dose of coffee grinds, and tamping force.
6 - Experiment by adjusting these factors just one at a time to achieve the
taste of your preference, see ‘Extraction Guide’, page 16.
TIPS
Manually control the low-pressure pre-infusion time and shot volume without
reprogramming the preset shot volume.
Step 1 - Press MANUAL button and the extraction process will enter low pressure
pre-infusion.
Step 2 - Press the MANUAL button again when the desired volume of espresso has
been extracted.
Manual Shot Volume
recommended. For more details, refer to ‘Re-programming Shot Volume’,
page 22).
5.3 Extraction Guide
Correct Extraction
• Flow slow like warm honey
• Crema is golden brown with a fine mousse texture
• Espresso is dark brown
Roast
Degree
Grind
Size
Grind
Dose
Tamping
Force
Water
Temp Cups Shot
Volume
Medium or
Dark Roasts
A Fine
Grind
Around 14
Grams
(Double Cup)
Pressure
Around 10-
15kg
Lights are fully
illuminated
blue.
Pre-heated
and Suitable
Size
Around
40mL
Per Cup
MAX
10-
15kg
Watery Extraction
• Flow fast like water
• Crema is thin and pale
• Espresso is pale brown
• Tastes bitter/sharp, weak and watery
Roast
Degree
Possible
Causes
What
to Do
Grind
Size
Grind
Dose
Tamping
Force
Water
Temp Cups Shot
Volume
Use Light
or too Dark
Roasts.
Medium or
Dark Roasts
Adjust to a
Finer
Grind Size.
Add More
Ground
Coffee.
Increase
Tamping
Force.
Cool the ma-
chine until
lights are fully
illuminated blue.
Brew
Less
Coffee.
Too
Coarse
Too
Little
Too
Light
Too High
Temp
Without
Preheating
and not
suitable size
Too
Much
MAX
<10kg
Preheat and
Change to a
Smaller Cup.

1817
5. Espresso Making Guide
5.4 Operation
5. Espresso Making Guide
Ensure coffee beans or pre-ground grinds are fresh, as old coffee beans no
matter the Grind Setting will have a low flavor and bad taste.
NOTE
2 3
4 5 6
11
9
10
Extract the tank by pulling it
upwards. Fill the water tank
with clean and fresh water(
Do not exceed the MAX line).
Set up the water tank vertically
and align the buckles to the hole
on the back of the machine, and
then press it down to be parallel
to the top of the machine.
Insert the Power Plug. Press the
ON/OFF button to turn the mac-
hine on, the 3 buttons start to
blink blue light slowly to indicate
it's heating up.
LIGHTS all fully illuminated =
Espresso Machine is ready for
use.
Place a cup under the Group
Head. Turn the knob to coffee
icon.
Press the 2 SHOT button to dis-
pense water. Half fill the cup with
hot water to preheat the cup.
Place a filter into the portafilter.
Select either the Single-cup filter,
or the Double-cup filter.
Align the marking dot on the
filter with the portafilter's gro-
ove, and then install the filter
to the portafilter, twist and fix
the filter.
Dose the filter with coffee grinds.
- One spoon of fine grinds for
the Single cup filter.
- Two spoons of fine grindds for
the Double cup filter.
Evenly tamp(press) the grinds to
the level indicated.
Wipe away any excess grinds to
clear the edges of the portafilter.
Place the portafilter underne-
ath the group head so that the
handle is aligned with the
INSERT position.
1
1-2 Min Heat Up
OR
ONE SHOT TWO SHOT
7 8
Single
cup
Double
cup
MAX
CENTRE
INSERT
12
• Flow drips or not at all
• Crema is dark and spotty
• Espresso is very dark brown
• Tastes bitter and burnt
Over Extraction
Roast
Degree
Grind
Size
Grind
Dose
Tamping
Force
Water
Temp Cups Shot
Volume
Use Light
or too Dark
Roasts.
Too
Fine
Too
Much
Too
Heavy
Too High
Temp
Without
Preheating
and not
suitable size
Too
Little
Possible
Causes
Medium or
Dark Roasts
Adjust to a
Coarser Grind
Size
Add Less
Ground
Coffee.
Reduce
Tamping
Force.
Brew
More
Coffee.
MAX
>15kg
What
to Do
Preheat and
Change to a
Bigger Cup.
Cool the ma-
chine until
lights are fully
illuminated blue.

2019
5. Espresso Making Guide
13 14
16 17 18
19 20 21
5. Espresso Making Guide
24
25 26 27
Insert the portafilter into the
group head and rotate the
handle towards the center
until resistance is felt.
Empty the cup. Position the cup on the drip
tray, under the portafilter.
Remove the drip tray cover if
the cup is too tall.
Press 1 SHOT/2 SHOT button
to make coffee. The correspo-
nding button will blink blue
light slowly.
Extraction begins and will aut-
omatically stop. The crema of
the coffee is golden brown with
a fine mousse texture.(Around
40mL per cup is recommended.)
Return the Espresso/Steam
Knob to the " " icon.
Wait 20 seconds to let the ma-
chine relieve the pressure then
twist the portafilter out of the
machine clockwise to avoid
coffee grinds in the portafilter
splashing and collapsing, and
accompanied by a "bang" sound.
Discard the coffee puck in the
portafilter.
Align the marking dot on the
Filter Basket with the groove
on the portafilter and remove
it from the portafilter.
Rinse the front and back of the
filter basket under the faucet,
and finally rinse the inner holes
and the outer holes with water.
Rinse the inner and outer holes
of the portafilter with clean
water. Do not wash it with
any descaler.
Use a clean cloth to wipe the
filter and portafilter dry.
Turn the knob to the coffee icon
when the blue lights of the ON/
OFF Button, 1 SHOT Button, 2
SHOT Button, and MANUAL
button are solid on.
Press the 1 SHOT Button to di-
spense water once to clean the
coffee grounds around the
Group Head.
Return the Espresso/Steam
Knob to the " " icon.
Use a clean cloth to wipe the
coffee grinds left on the Group
Head.
Remove the drip tray and pour
away the water.
Rinse the drip tray and cup
shelf with clean water.
CENTRE
INSERT
TURN
CENTRE
15
CENTRE
INSERT
22 23
28 29 30

2221
5. Espresso Making Guide
34 Re-programming 1 SHOT Volume Mode
5. Espresso Making Guide
5.5 Re-programming Shot Volume
1 2 3
Make sure the knob is in the coffee icon position before beginning
re-programming or resetting default volumes.
NOTE
1 - To achieve a better taste, we suggest completing the above cleaning
steps 19-33 before each brewing.
2 - When the water tank is pulled up, the water will flow out from the outlet
at the bottom of the water tank as it is a movable part. If you have pulled
up several times and have not wipe the water immediately, it will
accumulate more and more and run to the bottom of the machine,
maybe will leave the table full of water. It's not leaking.
3 - When the machine starts to work, there will be some noise from the
machine as it is pumping water under high pressure.
NOTE
4 - If the water runs out midway, refill the water tank. To ensure the best
flavor of the coffee, discard the used coffee grinds, and restart brewing
with fresh coffee grinds.
5 - Do not remove the portafilter when it is in use to avoid scalding.
6 - If the portafilter is not installed in place during brewing, turn off the
ON/OFF Button to stop the brewing, and then wait for 20 seconds before
detaching the portafilter.
NOTE
Wipe them with a clean cloth. Put it back. Wipe down the machine with a
clean cloth.
Align the marking dot on the
filter with the groove on the
portafilter and put it back to
the portafilter.
Put the portafilter back to the
machine for next use.
To begin re-programming,
press the 1 SHOT button for
2 seconds to enter the shot
volume programming mode.
Press 1 SHOT button to start.
After get the desired amount of
coffee, press this button again
to stop.(Shot Volume Range: 25-
60mL)
Press the 1 SHOT button within
15 seconds, this button will blink
white light for 3 times and the
new settings will be saved.
31 32 33
CENTRE
INSERT
35

2423
Resetting Default 1 SHOT Volume Mode
5. Espresso Making Guide
Re-programming 2 SHOT Volume Mode
3
Resetting Default Volumes
Press any button within 30 seconds, the programming will exit but not
save the new shot volume.
NOTE
5. Espresso Making Guide
Resetting Default 2 SHOT Volume Mod
To begin re-programming,
press the 2 SHOT button for
2 seconds to enter the shot
volume programming mode.
Press 2 SHOT button to start.
After get the desired amount of
coffee, press this button again
to stop.(Shot Volume Range: 60-
130mL)
Press the 2 SHOT button within
15 seconds, this button will blink
white light for 3 times and the
new settings will be saved.
Hold and long press together
1 SHOT button and MANUAL
button.
The the 1 SHOT button flash
white light, the machine is rest-
ored to the default value and
will back to ready mode.
Hold and long press together
2 SHOT button and MANUAL
button.
The 2 SHOT button flash white
light, the machine is restored to
the default value and will back
to ready mode.
1 2
6. Milk Frothing Guide
The steam only heats the milk. The milk also needs to be aerated (add air) to
create the micro-foam, and needs to be blended well together. Milk that has
been frothed correctly has been heated to between 140-149°F, and has a
thick, rich micro-foam with a silky sheen. It’s all about the temperature,
positioning of the Steam Wand and when you move the Milk Jug.
6.1 Brief Introduction
Milk frothing is the steaming of milk.
Key Elements of Frothed Milk
Use whole milk instead of skim milk, as skim milk is not suitable for frothing.
Use fresh whole milk at 38 - 46℉ (3-8℃).
Use about 100mL of milk
1-Milk variety
2-Milk temperature
3-Milk volume
6.2 Tips for Making the Perfect Milk Frothing
1 2
1 2

2625
NOTE
Never over the small air vent, otherwise, poor milk foam will result.
6. Milk Frothing Guide
6.3 Operation
LIGHTS all fully illuminated =
Espresso Machine is ready for
use.
Place a cup on countertop and
position Steam Wand. Turn the
Knob to the steam icon.
Release some steam out from
the steam wand before perfor-
ming milk frothing.
Extract the tank by pulling it
upwards. Fill the water tank
with clean and fresh water(
Do not exceed the MAX line).
Set up the water tank vertically
and align the buckles to the hole
on the back of the machine, and
then press it down to be parallel
to the top of the machine.
Insert the Power Plug. Press
the ON/OFF button to turn the
machine on, the 3 buttons start
to blink blue light slowly to
indicate it's heating up.
2123
4
Hold the position below the tip
of the milk foam cup and the
bottom of the milk foam cup
with your left hand, and hold
the handle of the milk foam
cup with your right hand.
The steam wand arm is at 12
o'clock. The steam wand outlet
is at 3 o'clock. The milk is just
soak to the 2mm position of the
steam wand outlet.
8 97
1
READY
5
Pause steam by returning knob
to the " " icon.
6
12 O CLOCK
,
3 O CLOCK
,
1-2 Min Heat Up
6. Milk Frothing Guide
25
Please wait for the MANUAL,1 SHOT, and 2 SHOT buttons to stop flashing ste-
adily, this means the heating is complete.
5-Water temperature
Step 1 - Turn the knob to the steam icon, and release some steam out from the
steam wand before performing milk frothing, return the knob to the " " icon.
Step 2 - Hold the position below the tip of the milk foam cup and the bottom
of the milk foam cup with your left hand, and hold the handle of the milk
foam cup with your right hand. Arms at 12 o'clock.
Step 3 - The steam wand outlet is at 3 o'clock, and the milk just soaks to the
2mm-4mm position of the steam wand outlet, never over the small air vent,
otherwise, poor milk foam will result.
Step 4 - The position of the left hand is fixed, and the right-hand turn the knob
to the steam icon to start frothing the milk.
6-Use the correct method to froth milk
Use a 300-350mL stainless steel milk foam cup.
4-Milk foam cup
NOTE
Frothing makes a smooth hissing sound.
Step 5 - Check that the milk is swirling.
Step 6 - As the milk level rises, lower the milk foam cup to keep the steam wand
outlet below the surface.
Step 7 - When the desired micro-foam is reached, submerge the steam wand
halfway.
Step 8 - Milk frothing is complete when the base of the milk foam cup is too hot
to touch for 3 seconds.
Step 9 - Return the knob to the " " icon;
Step 10 - Use the damp cloth to move the position of the Steam Wand so as to
avoid scalding due to the high temperature of the Steam Wand.
Step 11 - Remove the milk foam cup from the Steam Wand.

2827
6. Milk Frothing Guide
As the milk level rises, lower the
milk foam cup to keep the steam
wand outlet below the surface.
When the desired micro-foam is
reached, submerge the steam
wand halfway.
The position of the left hand is
fixed, and the right hand turns
the Espresso/Steam Knob to the
steam icon to start frothing the
milk.
Frothing makes a smooth
hissing sound.
Check that the milk is swirling.
11
TIPS
After the milk foam
cup base is too hot
to touch for 3 seco-
nds, the milk frothi-
ng is finished. If you
need more milk froth,
you can continue
to froth or stop
according to your
needs.
Wrap the Steam wand cover with
a damp cloth and remove it.
10 12
Pause steam by returning knob
to the " " icon.
15
Remove the milk foam cup away
from the steam wand.
16
Milk frothing is complete when
the base of the milk foam cup
is too hot to touch for 3 secon-
ds.
14
17
13
6. Milk Frothing Guide
19
21
Put it aside and place the cloth
under the steam outlet.
Turn the Espresso/Steam Knob
to the steam icon.
Release steam for 60 seconds to
flush away the milk stains in the
steam wand outlet.
Use a damp cloth to wipe off
the milk stains on the outside
of the steam wand.
20
7. Other Functions
7.1 Water Shortage Guide
- During the brew, if the water tank is out of water, the
machine’s 3 buttons(1 SHOT Button, 2 SHOT Button and
MANUAL Button) will blink blue light simultaneously and
the machine will automatically stop brewing.
- Press any button to return the machine to the READY state. Then refill the water
tank with clean water immediately.
Pause steam by returning knob
to the " " icon.
Install the steam wand cover
back to the cleaned steam
wand.
2322
18

3029
7.2 High-temperature Alarm Guide
- If you accidentally turn the Knob to the steam icon or immediately brew coffee
after steaming, the temperature will be too high, and it is not suitable for
brewing coffee, there will be a high-temperature alarm by pressing the 1 SHOT
button or 2 SHOT button, at this point, the machine’s 3 buttons(1 SHOT Button,
2 SHOT Button, and MANUAL Button) will blink blue light simultaneously for
12 times and the machine will automatically stop brewing.
- Rotate the Espresso/Steam knob back to the " " icon, the pressure relief
hole will make a loud noise with some steam coming out from the drip tray.
because the machine will relieve the pressure automatically.
7.3 Pre-infusion Function
Applies low water pressure at the start of the extraction to gently expand grinds
for an even extraction for a richer flavored espresso.
7.4 Descaling Warning Guide
1 - In daily use, limescale gradually builds up inside the machine’s water pipes and
heaters where water flows through. This machine can brew coffee or froth milk
independently and these 2 functions with independent water pipes, hence each
time either brewing coffee or frothing milk will be considered as one count of use.
2 - We suggest descaling the machine when the machine reaches a certain count
of use. The number “100” mentioned below is the total count of use that includes
both coffee brewing and milk frothing.
The descaling warning will be shown when the machine has cumulatively worked
for 100 cycles. At that moment, the 1 SHOT, 2 SHOT, and MANUAL buttons will
flash white light simultaneously for about 10 seconds. The descaling cycle can
be exited at any point by pressing any button. But the descaling warning will be
shown every time after canceling the descaling warning as the machine hasn't
finished the descaling yet. To finish descaling, refer to "8. Cleaning & Maintenance",
page 32.
7. Other Functions
Make sure to clean the ground coffee from the group head after each use, as
some older coffee grinds may be sitting inside your machine and will affect
the quality of your next batch. For operation guide, refer to page 19, steps 19-35
in section“5.4 Operation”.
After Use
After Each Brew
8. Cleaning & Maintenance
8.1 Cleaning & Maintenance - Brewer
1 - Please make sure that the rubber plug of the water outlet of the water tank
is removed;
2 - It is recommended to use pure water;
3 - Please fill enough water in advance but not exceed the MAX line of the water
tank, and do not add too little water, otherwise when the water runs out the
water pump will make a loud noise and affect the coffee effect;
4 - Ensure that coffee is made according to the 7 requirements,refer to "5.2 Tips
for Making the Perfect Espresso", page 12.
Before Use
1 - If the water runs out midway, refill the water tank. To ensure the best flavor
of the coffee, discard the used coffee grinds, and restart brewing with fresh
coffee grinds.
2 - Do not remove the portafilter when it is in use to avoid scalding.
3 - If the portafilter is not installed in place during brewing, turn off the ON/OFF
button to stop the brewing and then wait for 20 seconds before detaching the
portafilter.
In Use
The lack of maintenance of the machine would not only affect your coffee taste
but also lower the performance or even shorten the lifespan of your machine.
To make sure your machine operates efficiently, it is necessary to clean the mac-
hine periodically.

3231
8. Cleaning & Maintenance 8. Cleaning & Maintenance
Fill the water tank with water to
the MAX marking that is 1100mL,
and then add 28 grams of
descaler into the water tank,
then mix them evenly.
Set up the water tank vertically
and align the buckles to the hole
on the back of the machine, and
then press it down to be parallel
to the top of the machine.
Wait for the heating of the mach-
ine to complete, that is, the
Manual, 1 SHOT and 2 SHOT
button will be solid on.
Make sure that the knob is on
the " " icon.(It’s normal that
water and steam simultaneously
enter the drip tray to make a
sound of pressure relief)
Wait 20 seconds to let the mach-
ine relieve the pressure then
twist the portafilter out of the
machine clockwise to avoid
coffee grinds in the portafilter
splashing and collapsing, and
accompanied by a "bang" sound.
Pour out the remaining water in
the water tank.
Descaling Cycle
Turn the knob to the coffee icon. Put a container under the Group
Head.
Press the 1 SHOT button to disp-
ense some discaling solution.
1 3
5 6
7 9
1.TURN
2.REMOVE
CENTRE
INSERT
2
4
8
1 - In daily use, limescale gradually builds up inside the machine’s water
pipes and heaters where water flows through. This machine can brew
coffee or froth milk independently and these 2 functions with independent
water pipes, hence each time either brewing coffee or frothing milk will be
considered as one count of use.
2 - We suggest descaling the machine when the machine reaches a certain
count of use. The number “100” mentioned below is the total count of use
that includes both coffee brewing and milk frothing.
NOTE
The Descaling Cycle can be exited at any point by pressing any button. But des-
caling warning will be shown every time after cancel the descaling warning as
the machine hasn’t finished the descaling yet.
You have 3 options:
a. One espresso machine descaling tablet.(Espresso Machine Cleaning Tablets
are available for purchase online or through major retailers.) or
b. Liquid descaler. or
c. White vinegar & warm water.
You can also use powder descalers or others to clean your machine as you like.
For specific cleaning methods, please refer to the instructions provided by your
descaler provider.
Descaling warning will be shown when the machine has
cumulatively worked for 100 cycles. At that moment, 3 lights
of the 1 SHOT button, 2 SHOT button and MANUAL buttun are
white and blink simultaneously about 10 seconds.
After 100 Uses or Descaling Warning Shows Up
Descaling Solution
READY

3433
8. Cleaning & Maintenance 8. Cleaning & Maintenance
Turn the knob back to the " "
icon.
Let the machine stand for 5
hours to make sure the lime-
scale is in better contact with
the descaling solution and
totally dissolved.
After 5 hours, turn the knob to
the coffee icon, press the MANUAL
button, and the machine starts
to dispense discaling solution.
10 12
Turn the knob to the coffee icon. Press the MANUAL button, and
the machine starts to dispense
clean water.
Wait until running out all the
water in the tank and press the
MANUAL button again to stop.
Remove the drip tray and pour
away the water.
Rinse the drip tray and cup shelf
with clean water.
Wipe the drip tray and cup shelf
with a cloth.
Turn the knob back to the " "
icon.
Repeat step 17-22 for several
times until there is no descaler
smell.
Use a clean cloth to wipe the co-
ffee grounds and water left on
the Group Head.
19 20 21
22 23
Remove the drip tray and pour
away the water.
Fill the water tank with clean
water to the MAX marking.
Put a container under the Group
Head.
Wait until running out all the
descaling solution in the tank
and press the MANUAL button
again to stop.
Turn the knob back to the " "
icon.
Take out the container, pour
away the descaling solution.
13 14
17 18
11
15
Repeat
Step 17-22 for
2-3 times
with clean water
27
16
24
25 26

3635
8. Cleaning & Maintenance8. Cleaning & Maintenance
Install it back. Use a cloth to wipe the machine
clean.
If 5 hours are not long enough in the step 11 , let the descaling solution soak
the limescale for 3 days instead. Other steps are the same.
Whenever the Coffee or Water Output of the Machine is Less Than Usual
8.2 Descaling & Maintenance - Frother
1 - Please make sure that the rubber plug of the water outlet of the water tank
is removed;
2 - It is recommended to use pure water;
3 - Please prepare enough water in advance but not exceed the MAX line of the
water tank, and do not add too little water, otherwise the water pump will make
a loud noise and affect the coffee effect.
4 - Make sure to make milk foam according to the 6 requirements, refer to "6.2
Tips for Milk Frothing", page 24.
Before Use
1 - Use the correct method to froth milk, refer to "6.3 Operation", page 26.
2 - If you stop frothing milk midway, restart with fresh milk and don’t use the
frothed milk.
3 - During milk frothing, if the water is running out, the machine will suddenly
make louder noises, check if there is enough water, and add water timely.
In Use
Make sure to clean the steam wand after each use to keep its best performance.
For operation guide, refer to page 27, steps 17-22 in “ 6.3 Operation” section.
After Use
After Each Froth
The steam function will become weaker after a period of use, not as strong as
before. To make sure your frother operates efficiently, it is necessary to descale
the frother periodically. We recommend descaling your frother every 2 weeks
or 100 cycles.
After 100 Uses
Turn off and unplug the machine
from the power outlet.
Wrap the steam wand cover with
a damp cloth, remove it and put
it aside.
Place the cloth under the steam
outlet.
1 2
After the Steam Wand cools down,
use a steam wand cleaning pin
to clear the steam wand outlet,
insert and pull out about 30-50
times.
Prepare 800mL of water in a cup
and add 30 grams of descaler.
Mix them evenly. Fill the water
tank with the descaling solution.
Put the steam wand cover in the
container.
65
3
28 29
4
Other manuals for GECME022-U
4
Table of contents
Other Gevi Coffee Maker manuals

Gevi
Gevi GECME003D-U User manual

Gevi
Gevi GESCMA705-U Operator's manual

Gevi
Gevi GECME022-U User manual

Gevi
Gevi GECME418E-U User manual

Gevi
Gevi GECME003D-U User manual

Gevi
Gevi GECME403-U User manual

Gevi
Gevi GECMD008-U User manual

Gevi
Gevi GECMD008-U User manual

Gevi
Gevi GECME400BA-U User manual

Gevi
Gevi GECMA025AK-U User manual

Gevi
Gevi GECME403L-U User manual

Gevi
Gevi GECMA025A-U User manual

Gevi
Gevi GECME022-U User manual

Gevi
Gevi GECMA162A-U User manual

Gevi
Gevi GECMA068-U User manual

Gevi
Gevi GECME022-U User manual

Gevi
Gevi GECMD627BK-U User manual

Gevi
Gevi GECME403-U User manual

Gevi
Gevi GECMD627BK-U User manual

Gevi
Gevi GECMA082T-U User manual