Gewiss Chorus NAXOS GW19201WH User manual

Istruzioni per l’installazione IT
EN
Installation instructions
GW19201WH - GW19201BK
NAXOS
24806600

2
203 31
108
1
2
A
B

3
3
4

4
5
1
2
AL
B
+
–
MM
6
M1M2
SW4

5
1
MICRO SD
2
7 8
RESET
9

6
IT
Naxos è l’innovativo videocitofono a colori touch
screen, pensato per gli impianti sistema a due li.
L’audio viva voce e la cornetta integrata permettono
una comunicazione semplice e immediata.
CARATTERISTICHE TECNICHE
• Display16:9widescreen4.3”,480x272pixel,touch
screen.
• Alimentazione:
14÷24VDClocale(12÷16VAClocale).
• Assorbimento:
0.75A(1.5Adipicco)12VAC,
0.5A(1.1Adipicco)16VAC,
0.31A(0,81Adipicco)18VDC
0.23A(0,58Adipicco)24VDC.
• Dimensioni:203x108x31mm.
ISTRUZIONI PER IL MONTAGGIO
AVVERTENZE PER L’INSTALLAZIONE
•NonesporreloschermoLCDallalucedirettadel
sole.
•Siraccomandadiinstallareilvideoterminale
inun
ambienteasciuttolontanodastillicidioospruzzi
d’acqua.
Installazione
Sganciare l’apparecchio dal supporto metallico, fa-
cendolo scorrere su di esso dopo aver premuto il
pulsante plastico.
Fissare il supporto metallico alla scatola d’incasso ton-
daØ60mm(g.2A)oppureallascatolarettangolare
503(g.2B),utilizzandolevitiindotazioneerispet-
tandol’indicazioneALTO.
La scatola deve essere installata ad un’altezza ade-
guata all’utente.
Su pareti non perfettamente piane evitare il serrag-
gio eccessivo delle viti.
Eettuatiicollegamenti(g.3)(vedere“ISTRUZIO-
NI PER IL COLLEGAMENTO”) agganciare il video-
terminale al supporto metallico come indicato in
gura 4.
Persganciarel’apparecchiodalsupportometallico
premere il gancio plastico e sollevare il terminale
NAXOS Videocitofono a colori Touch Screen
come indicato in gura 5.
PeraccedereallaschedaMICROSDprocederecome
indicato in gura 7/8.
ATTENZIONE. Prima di inserire o togliere la MI-
CRO SD, togliere l’alimentazione al videotermi-
nale rimuovendo le morsettiere M1 e M2.
ISTRUZIONI PER IL COLLEGAMENTO
Ilvideoterminalepuòesserealimentatosiaincor-
rentecontinuachealternata.
Funzione dei morsetti (fig.6)
MorsettieraM1
BUSduefili
B
+ingresso chiamata dal
pianerottolo
–
ingresso allarme
(attivoversomassa)
AL
MorsettieraM2
BUSMultiMaster
MM
14÷24VDC12÷16VAC
alimentazione locale
Perpermettereilfunzionamentosincronizzatodi
più Videocitofoni Naxos all’interno della stessa
abitazione(funzioneopzionale),ènecessarioche
essisiano connessi fraloro mediante ilbus Mul-
tiMaster.
ATTENZIONE. Una volta eseguiti i cablaggi rein-
serire attentamente le morsettiere come indica-
to in figura 6.

7
IT
Funzione del pulsante RESET
Ogni volta che anomalie di funzionamento, inter-
venti e altre ragioni tecniche richiedono il reset
dell’apparecchio, premere leggermente il pulsante
collocato all’interno dell’apertura al di sotto della
scoccadeldispositivo(vedi figura 9), utilizzando il
pennino in dotazione; rilasciare il pulsante appe-
na lo schermo si oscura e attendere che riappaia il
menù principale prima di riprendere l’uso normale
dell’apparecchio.
NOTA.Questa operazione NON comporta la cancel-
lazione di eventuali programmi che saranno ripristi-
nati, assieme agli altri dati, al riavvio dell’apparec-
chio.
Funzione del ponticello SW4
(Resistenza di chiusura)
L’apparecchiodisponediunponticelloSW4(g.6),
perl’impedenzadichiusuradinelinea.Togliereil
ponticello se la linea prosegue verso altri derivati in-
terni videocitofonici.
PROGRAMMAZIONE
Programmazione della chiamata da posto
esterno in impianti due fili:
Per la programmazione della chiamata in impianti
due li riferirsi al paragrafo “Programmazionederi-
vatiinterni” presente nelle istruzioni relative ai posti
esterni due li oppure nell’alimentatore.
Per la programmazione del videocitofono a colori
touchscreenNAXOSprocederecomediseguito:
a. Dalla schermata principale del terminale Naxos
selezionare l’icona “Setup”, ⇒“Citofonia”, ⇒e
premere il pulsante .
b.Premere sul posto esterno il tasto di chiama-
ta che si vuole associare al terminale Naxos.
Si possono associare no a 3 chiamate; per la
programmazione della 2ae 3achiamata dal posto
esterno è suciente premere i tasti corrispondenti
successivamente al primo pulsante di chiamata.
NOTA.Nonusciredallaprogrammazionedelde-
rivato interno prima di avere associato tutte le
chiamatedesiderate.
Per la programmazione delle chiamate interco-
municanti vedere le istruzioni allegate al selettore
GW19308.
Programmazione del dispositivo mediante
software
Épossibileprogrammarel’impiantomedianteisof-
twareGW19373(consultarelerelativeistruzioni).
Per l’invio del“serial number” procedere come se-
gue:
dalla schermata principale del terminale Naxos sele-
zionarel’icona“Setup”, ⇒“Citofonia”, ⇒e premere
il pulsante .
Attivazionedellafunzione“building”Qualora l’im-
pianto preveda la presenza di un centralino di porti-
neria,saràpossibileattivaresulterminalelafunzione
buildingseguendolaseguenteprocedura:
DallaschermataprincipaledelterminaleNaxos se-
lezionarel’icona“Setup”, ⇒“Citofonia”, ⇒e preme-
re il pulsante .
Sincronizzazione dei terminali
DallaschermataprincipaledelterminaleNaxos se-
lezionarel’icona“Setup”, ⇒“Citofonia”, ⇒e preme-
reilpulsante“MM”.
Attivandolafunzione“MM”verrannosincronizza-
te,lefunzioniorologio,data, segreteria e privacy
traiterminaliconnessimediantebusMM.
Salvare la configurazione del terminale
DallaschermataprincipaledelterminaleNaxos se-
lezionare il pulsante per salvare all’interno della
schedamicroSDidatidiimpiantoimpostatilocal-
mente nel pannello. Selezionare il pulsante per
recuperaredallaschedamicroSDidatidell’impianto
salvato.
Questa operazione permette di salvare la confi-
gurazione del terminale nella scheda di memoria
removibile.
L’operazione è di notevole importanza nei casi in
cuisidebbaaggiornareilfirmwaredelterminaleo
nel caso in cui si voglia trasferire una configurazio-
ne da un terminale ad un altro con stesso codice
chiamata.

8
IT
Impostare lo standard del segnale video
dell’impianto.
DallaschermataprincipaledelterminaleNaxos se-
lezionarel’icona“Setup”, ⇒“Citofonia”, ⇒e preme-
re il pulsante “PAL -> NTSC” perpassaredaPALa
NTSC,premereilpulsante“NTSC->PAL” per passare
daNTSCaPAL.
PAL Standardvideo50Hz(paesiEuropei)
NTSC Standard video 60 Hz
Pertuttelealtreinformazioniconsultareilmanuale
d’usodelvideoterminale.
SMALTIMENTO
Assicurarsiche ilmateriale d’imballaggiononven-
ga disperso nell’ambiente, ma smaltito seguendo
le norme vigenti nel paese di utilizzo del prodotto.
Allanedelciclodivitadell’apparecchioevitareche
lostessovengadispersonell’ambiente.
Lo smaltimento dell’apparecchiatura deve essere ef-
fettuato rispettando le norme vigenti e privilegian-
do il riciclaggio delle sue parti costituenti.
Sui componenti, per cui è previsto lo smaltimento
conriciclaggio,sonoriportatiilsimboloelasigladel
materiale.

9
EN
Naxos is the innovative colour touch screen video
entry control, designed for 2 wires systems. The
hands-freeaudioandtheintegratedreceiverallow
simple, immediate communications.
TECHNICAL FEATURES
• 16:9 wide screen 4.3” 480x272 pixel touch screen
display
• Powersupply:
14÷24VDClocal(12÷16VAClocal).
• Absorption:
0.75A(1.5Apeak)12VAC,
0.5A(1.1Apeak)16VAC,
0.31A(0.81Apeak)18VDC
0.23A(0.58Apeak)24VDC
• Dimensions:203x108x31mm.
ASSEMBLY INSTRUCTIONS
INSTALLATION TIPS
• DonotexposetheLCDscreentodirectsunlight.
• Werecommendinstallingthevideoterminalin
adryareaprotectedfromseepageorsplashes
ofwater.
Installation
Removetheunit from the metallic supportby sli-
dingitafterpressingtheplasticbutton.
Fastenthemetallicsupporttotheroundbuilt-inbox
of¯60mm(g.2A)ortotherectangularbox503(g.
2B),usingthescrewsprovidedandcomplyingwith
theUPindication.
Therecessedboxmustbettedatasuitableheight
in relation to the user.
Avoidexcessivetighteningofscrewsonwallsthat
arenotperfectlyat.
Aftermakingtheconnections(g.3)(see“CONNEC-
TION INSTRUCTIONS”), hook the video terminal to
the metal support as illustrated in gure 4.
To release the appliance from the metal support,
presstheplastichookandlifttheterminalasillus-
trated in gure 5.
ToaccesstheMICROSDcardproceedasillustrated
in gure 7/8.
ATTENTION. Before inserting or removing the
NAXOS Colour touch screen video entry control
MICRO SD, cut off the power supply to the video
terminal by removing the terminal boards M1
and M2.
CONNECTION INSTRUCTIONS
Thevideoterminalcanbepoweredbybothdirect
andalternatingcurrent.
Function of the terminals (g.6)
TerminalblockM1
2wiresBUS
B
+
groundoorcallinput
–
alarm input
(activetowardsearth)
AL
TerminalblockM2
MultimasterBUS
MM
14÷24VDC12÷16VAC
localpowersupply
TosynchronizetheoperationofmoreVideoentry
panelNaxosinthesamehouse(optionalfeature),
theymustbeconnectedtooneanotherbyMul-
tiMasterbus.
ATTENTION. Once wiring is complete, carefully re-
insert the terminal boards as shown in figure 6.
Function of the RESET button
Any time that operating anomalies, servicing or
othertechnicalreasonsrequiretheunittobereset,
presslightlyonthebuttonlocatedinsidetheope-
ning under the body of the device (see gure 9),
usingthepenprovided.Releasethebuttonassoon
asthescreengoesdarkandwaitforthemainmenu
toreappearbeforeresumingnormaluseoftheunit.

10
EN
NOTE. This operation does NOT delete any pro-
grammes, which will be restored, along with other
data, when the unit is restarted.
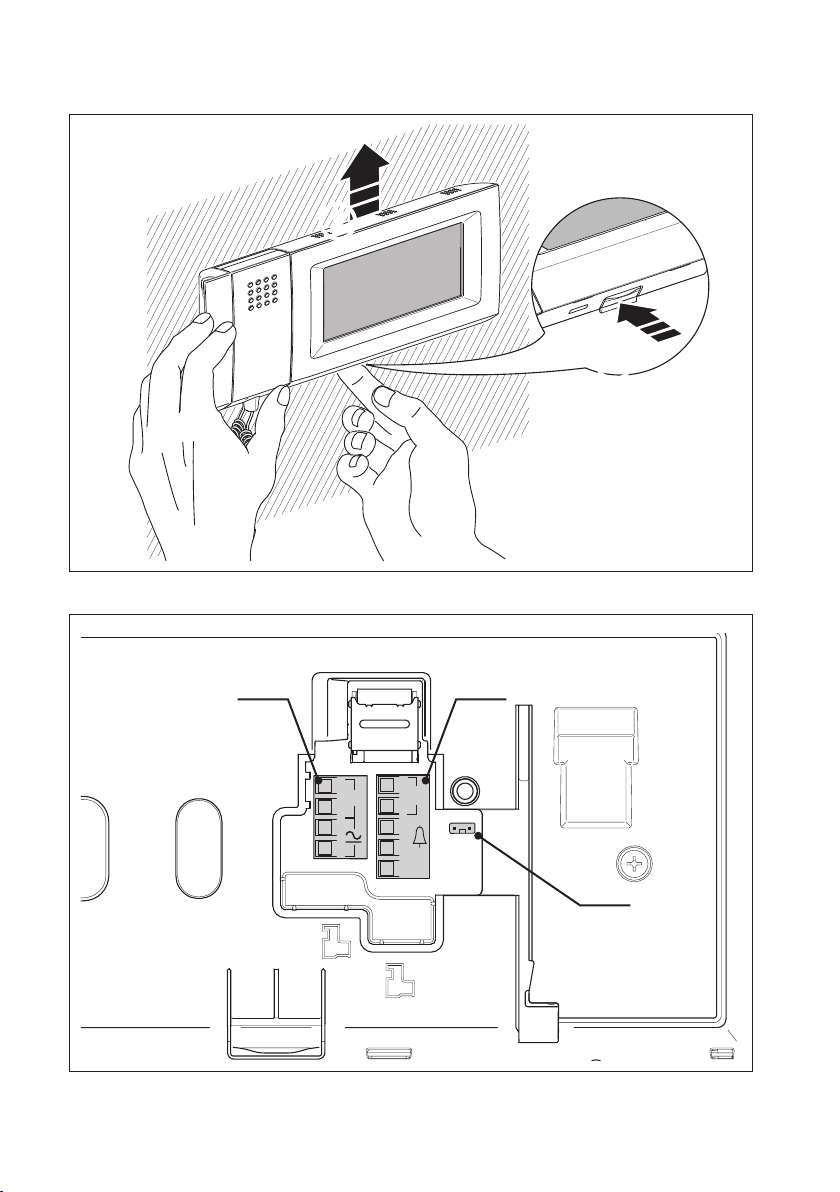
Function of the jumper SW4
(Closure resistance)
TheapplianceisequippedwithanSW4jumper(g.
6),forendoflineclosureimpedance.
Remove the jumper if the line continues towards
othervideoentrycontrolreceivers.
PROGRAMMING
Entry panel call programming in 2 wires sys-
tems:
Toprogrammecallsin2wiressystems,refertothe
paragraph “Programminginternalextensions” in-
cludedintheinstructionsforthe2wiresentrypa-
nelsorinthepowersupplier.
ToprogrammetheNAXOStouchscreencolourvi-
deoentrycontrol,proceedasfollows:
a. Select the “Setup”, ⇒“Doorentry”, ⇒from the
main screen of the Naxos terminal and press the
button.
b.On the entry panel, press the call key that you
wishtoassociatewiththeNaxosterminal.
Itispossibletoassociateupto3calls;toprogram-
me the 2nd and 3rdcallfromtheentrypanel,just
pressthekeyscorrespondingsuccessivelytothe
rstcallbutton.
NOTE. Do not exit receiver programming before
associatingallthedesiredcalls.
Toprogrammeintercomcalls,seethe instructions
providedwithselectorGW19308.
Programming the device using software
The system can be programmed using GW19373
software(seetherelativeinstructions).
Tosendthe“serialnumber”,proceedasfollows:
select the “Setup”, ⇒“Door entry“, ⇒from the
main screen of the Naxos terminal and press the
button.
Activationofthe“building”function
Whenthesystemenvisagesthepresenceofaporter
switchboard,itwillbepossibletoactivatethebuild-
ingfunctionontheterminalbyfollowingthefollow-
ingprocedure:
Select the “Setup”, ⇒“Doorentry”, ⇒ from the
main screen of the Naxosterminal and press the
button.
Terminals synchronization
Select the “Setup”, ⇒“Door entry”, ⇒from the
main screen of the Naxos terminal and press the
“MM”button.
Activating the “MM” functions you can synchro-
nize:clock,date,secretarialandprivacy,between
terminalsconnectedthroughbusMM.
Save the terminal configuration
Select buttonfromthemainscreenoftheNa-
xos terminal to save on the micro SD the system
datasetlocallyonthepanel.Select buttonto
retrievethesavedsystemdatafromthemicroSD.
Thisoperationallowsyoutosavetheconfiguration
oftheterminalintheremovablememorycard.
The operation is of considerable importance in
caseswhereweshouldupdatethefirmwareofter-
minalorincaseyouwanttotransferaconfiguration
fromaterminaltoanotherwiththesamecodecall.
Setting the standard video signal
Select the “Setup”, ⇒“Door entry”, ⇒from the
main screen of the Naxos terminal and press the
button“PAL->NTSC”toswitchfromPALtoNTSC,
press the button “NTSC -> PAL” to switch from
NTSCtoPAL
PAL Standardvideo50Hz(Europeancountries)
NTSC Standard video 60 Hz
Foranyotherinformationrefertothevideotermi-
nal’susermanual.
DISPOSAL
Donotlittertheenvironmentwithpackagingma-
terial:makesureitisdisposedofaccordingtothe
regulationsinforceinthecountrywheretheprod-
uct is used.
Whentheequipmentreachestheendofitslifecy-
cle, avoid discarding in the environment.
Theequipmentmustbedisposedofincompliance
with current regulations, recycling its component
partswhereverpossible.

11
EN
Componentsthatqualifyasrecyclablewastefeature
therelevantsymbolandmaterialacronym.

12
NAXOS
M1
M2
AL
B
MM
–
+
SW2
SW4
SW3
GW19306
34
IN
SW4
SW0
GW19305
–
+
18V
230V
PRI
SEC
+ 18V –
230V
230V50Hz 18V 10VA
NAXOS
M1
M2
AL
B
MM
–
+
SW4
GW19305
–
+
18V
230V
PRI
SEC
+ 18V –
230V
230V50Hz 18V 10VA
12
OUT
B
A
+
–
-
+
-
+
GW19302
M2
SENA
BUS
LOCAL
SKMCL.RES
M1
B
AL
3
2
1
IMPIANTOVIDEOCITOFONICOPLURIFA-
MILIARE(SISTEMA2FILI).
MULTIPLE APARTMENT VIDEO ENTRY
CONTROL SYSTEM (2 WIRES SYSTEM).

13
B
A
+
-
+12V
BIN1
BIN2
BIN3
BOUT
GW19301
CN2
RS232
M1
-
-
-
+
-
KARALI
S
12V
M2
BOUT
M1

14
NAXOS
M1
M2
AL
B
MM
–
+
GW19306
SW4
GW19305
–
+
18V
230V
PRI
SEC
+ 18V –
230V
230V 50Hz18V 10VA
B
NAXOS
M1
M2
AL
B
MM
–
+
SW4
GW19305
–
+
18V
230V
PRI
SEC
+ 18V –
230V
230V 50Hz18V 10VA
NAXOS
M1
M2
AL
B
MM
–
+
SW4
GW19305
–
+
18V
230V
PRI
SEC
+ 18V –
230V
230V 50Hz 18V 10VA
SW2
SW4
SW3
SW0
12
OUT
34
IN
1A
1B
1C
IMPIANTO VIDEOCITOFONICO MONO-
FAMILIARE(SISTEMA2FILI).
SINGLE APARTMENT VIDEO ENTRY CON-
TROL SYSTEM (2 WIRES SYSTEM).

15
B
A
+
-
+12V
BIN1
BIN2
BIN3
BOUT
GW19301
CN2
RS232
M1
-
-
-
+
-
KARALIS
12V
M2
BOUT
M1

24h
Ai sensi dell’articolo 9 comma 2 della Direttiva Europea 2004/108/CE e dell’articolo R2 comma 6 della Decisione 768/2008/CE si informa che responsabile dell’immissione
del
prodotto sul mercato Comunitario è:
According
to article 9 paragraph 2 of the European Directive 2004/108/EC and to article R2 paragraph 6 of the Decision 768/2008/EC, the responsible for placing th
e
apparatus
on the Community market is:
GEWISS
S.p.A Via A. Volta, 1 - 24069 Cenate Sotto (BG) Italy Tel: +39 035 946 111 Fax: +39 035 945 270 E-mail: qualityma[email protected]
+39 035 946 111
8.30 - 12.30 / 14.00 - 18.00
lunedì ÷ venerdì - monday ÷ friday
+39 035 946 260
sat@gewiss.com
www.gewiss.com
ULTIMAREVISIONE12-2013 Cod.7.01.6.238.3
Other manuals for Chorus NAXOS GW19201WH
1
This manual suits for next models
1
Table of contents
Other Gewiss Intercom System manuals

Gewiss
Gewiss Chorus KARALIS GW19016TG Owner's manual

Gewiss
Gewiss Chorus City Vision NORA GW19236 User manual

Gewiss
Gewiss Chorus City Vision NORA GW19236 User manual

Gewiss
Gewiss Chorus Digital Vision User manual

Gewiss
Gewiss Chorus KARALIS GW19137TG User manual

Gewiss
Gewiss Chorus NAXOS GW19201WH User manual

Gewiss
Gewiss Chorus KARALIS GW19011TG User manual

Gewiss
Gewiss Chorus ANTAS GW19061 User manual

Gewiss
Gewiss Chorus City Vision Series User manual

Gewiss
Gewiss Chorus KARALIS GW19051TG Owner's manual