Glacier bay QL033Y User manual

THANK YOU
We appreciate the trust and confidence you have placed in Glacier Bay through the purchase of this laundry cabinet. We strive to continually
create quality products designed to enhance your home. Visit us online to see our full line of products available for your home improvement
needs. Thank you for choosing Glacier Bay!
USE AND CARE GUIDE
MANUAL DEL USARIO
ALL-IN-ONE LAUNDRY CABINET WITH SINK AND FAUCET
GABINETE CON FREGADERO Y GRIFO TODO EN UNO
Questions, problems, missing parts?
Before returning to the store, call Glacier Bay Customer Service
8:00 am - 7:00 pm, EST, Monday - Friday, 9:00 am - 6:00 pm, EST, Saturday
Preguntas, problemas, piezas faltantes?
Antes de devolver el producto a la tienda, llame al Servicio al cliente de Glacier Bay
8 a 19 horas, hora del este, lunes a viernes, 9:00 a.m. - 6:00 p.m., hora del este, sábado
1-855-HD-GLACIER
HOMEDEPOT.COM
Item #QL033Y
Model #1001362761

2
Table of Contents
Table of Contents ...................................2
Safety Information ..................................2
Warranty ..........................................3
Lifetime Limited Warranty ...........................3
Warranty Claim Procedure...........................3
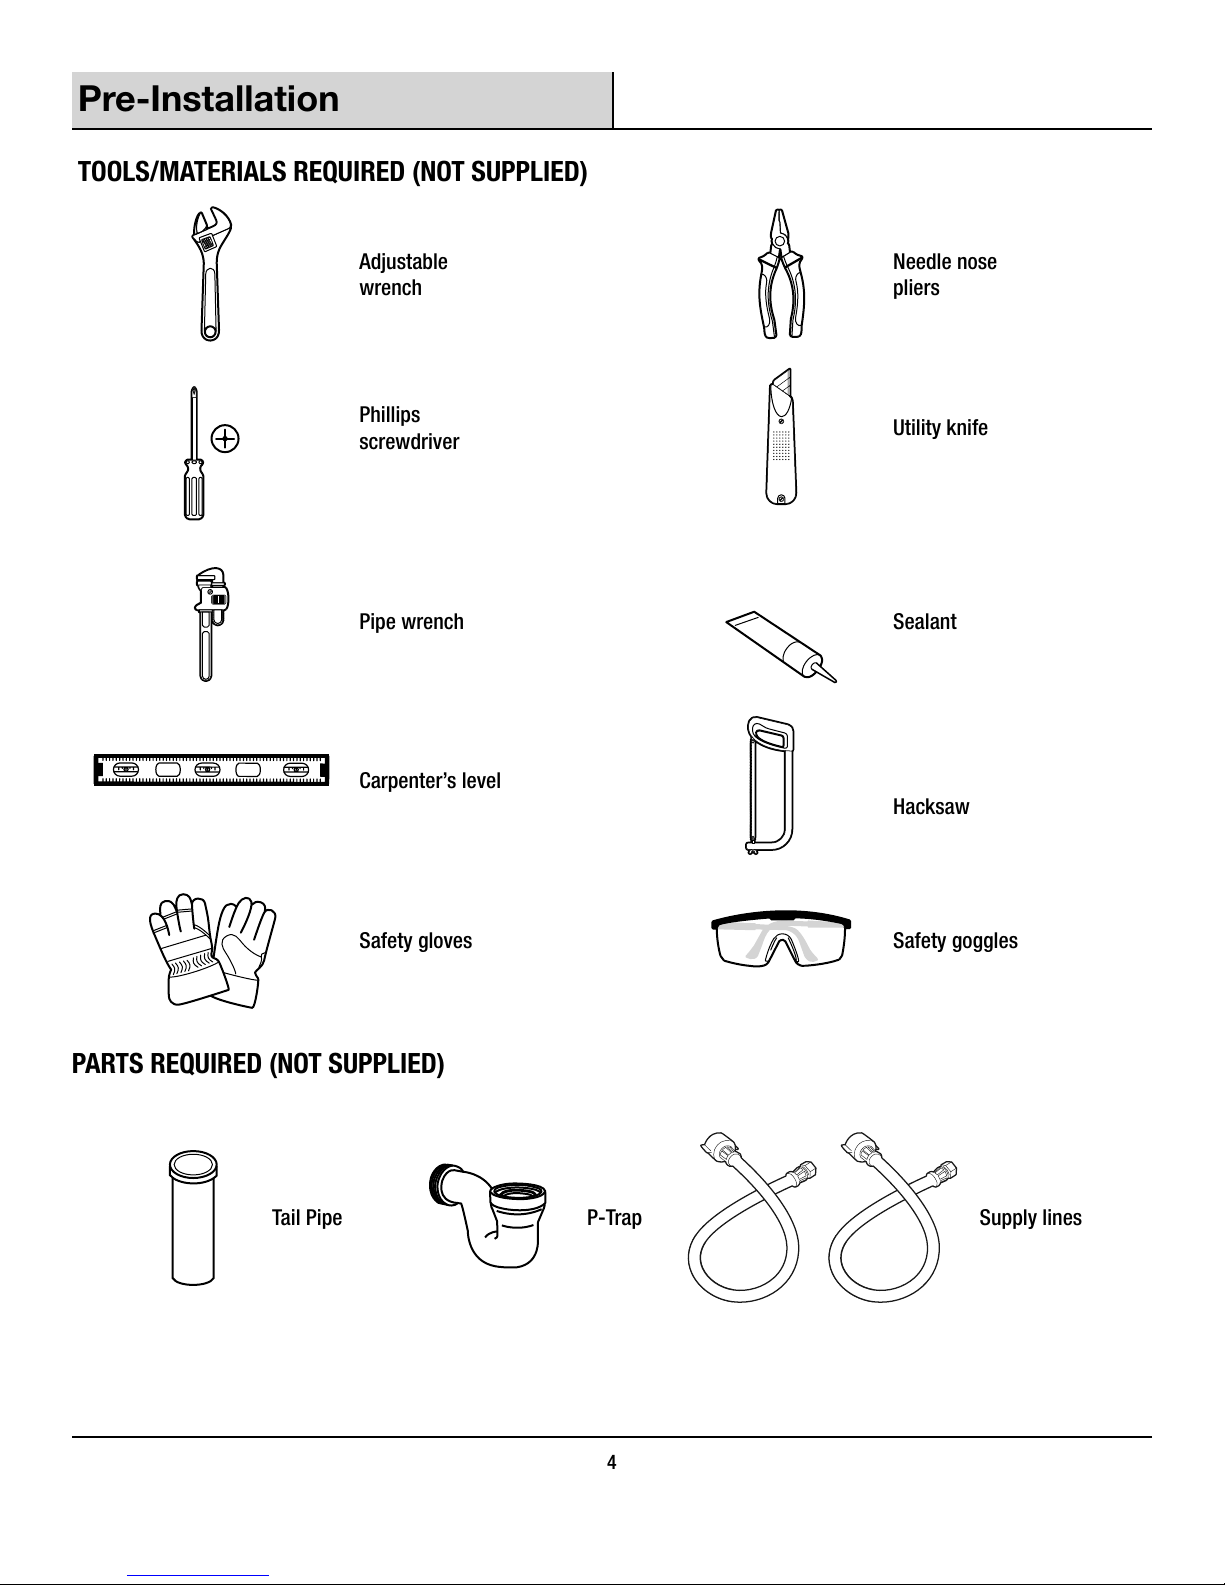
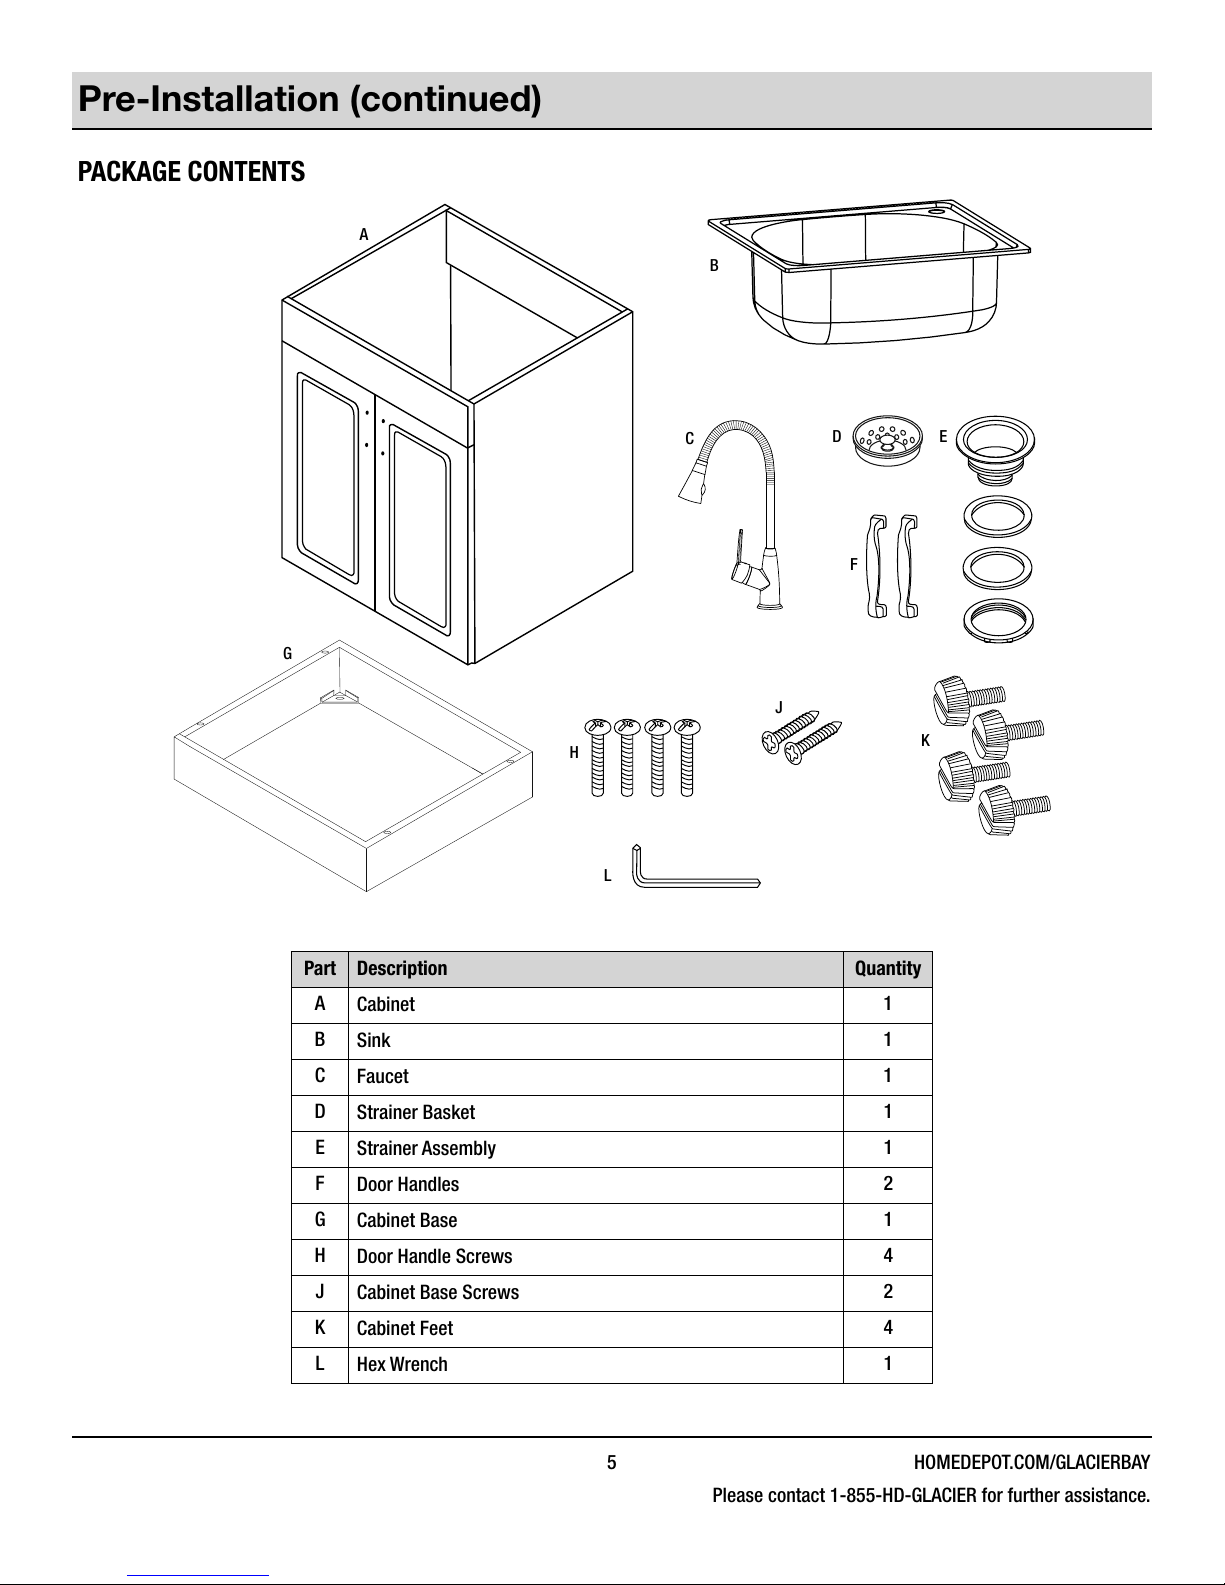
Pre-Installation.....................................4
Tools/Materials Required ............................4
Package Contents .................................5
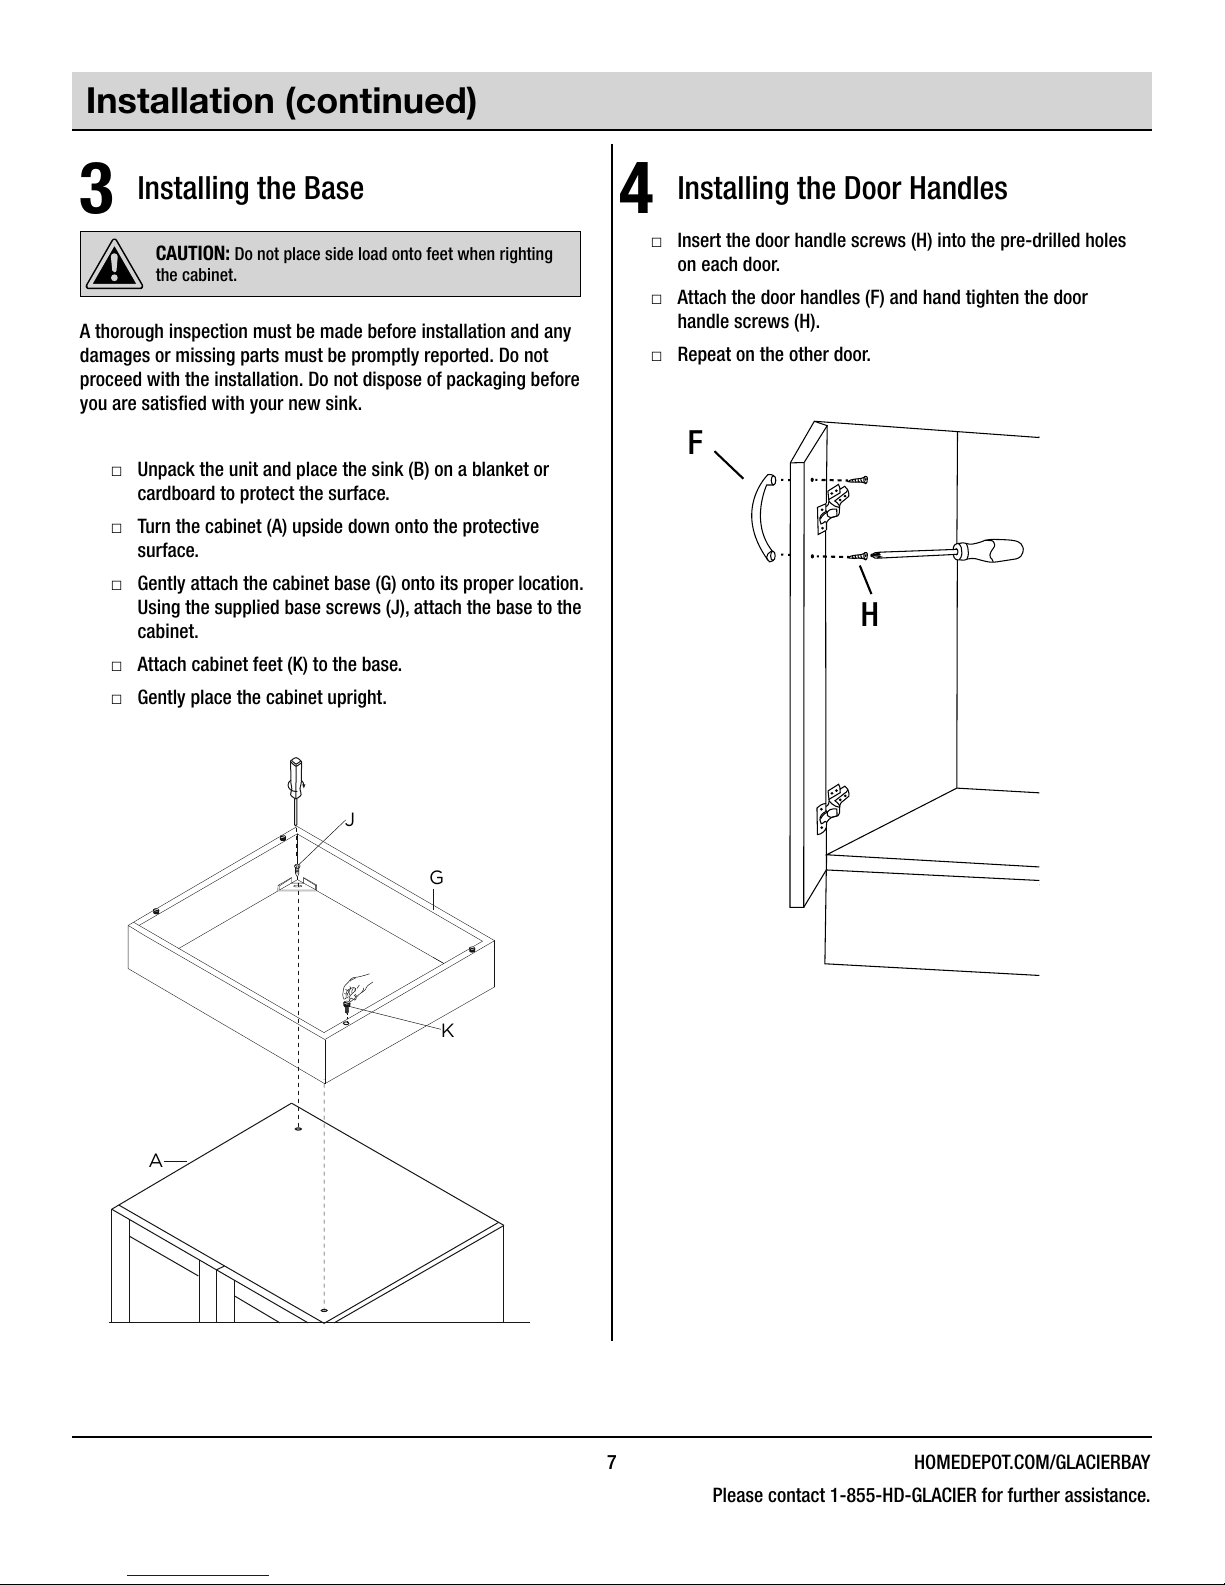
Installation ........................................6
Installing the Faucet Assembly .......................6
Installing the Strainer ..............................6
Installing the Base .................................7
Installing the Door Handles ..........................7
Adjusting the Door Position ..........................8
Mounting the Sink .................................8
Placing the Cabinet ................................9
Supply Line Assembly ..............................9
Maintenance .......................................9
Cartridge Replacement .............................9
Care and Cleaning .................................10
Sink ...........................................10
Cabinet.........................................10
Service Parts......................................11
MANUAL DEL USARIO ...............................12
Safety Information
READ AND SAVE THESE INSTRUCTIONS
□Inspect your unit before proceeding. Once you unpack your unit,
check for chips, scratches, cracks, dents or scuff marks. If any
damage is noticed, do not install.
□Use this unit only in the manner intended by the manufacturer. If
you have any questions, contact the manufacturer.
□Installation work and plumbing must be done by qualified
person(s) in accordance with all applicable codes and standards.
□Protect the entire surface during installation.
□All holes drilled into the unit must be done from the finished
surface side with extreme care and caulked very carefully to
form a watertight barrier.
DANGER: Always wear safety goggles and gloves in order
to avoid personal injury.
MANUFACTURER’S REQUIRED MINNESOTA DISCLOSURE. IMPORTANT HEALTH NOTICE:
SOME OF THE BUILDING MATERIALS USED IN THIS HOME (OR THESE BUILDING MATERIALS) EMIT FORMALDEHYDE. EYE, NOSE, AND
THROAT IRRITATION, HEADACHE, NAUSEA AND A VARIETY OF ASTHMA-LIKE SYMPTOMS, INCLUDING SHORTNESS OF BREATH, HAVE
BEEN REPORTED AS A RESULT OF FORMALDEHYDE EXPOSURE. ELDERLY PERSONS AND YOUNG CHILDREN, AS WELL AS ANYONE
WITH A HISTORY OF ASTHMA, ALLERGIES, OR LUNG PROBLEMS, MAY BE AT GREATER RISK. RESEARCH IS CONTINUING ON THE
POSSIBLE LONG-TERM EFFECTS OF EXPOSURE TO FORMALDEHYDE.
REDUCED VENTILATION MAY ALLOW FORMALDEHYDE AND OTHER CONTAMINANTS TO ACCUMULATE IN THE INDOOR AIR. HIGH
INDOOR TEMPERATURES AND HUMIDITY RAISE FORMALDEHYDE LEVELS. WHEN A HOME IS TO BE LOCATED IN AREAS SUBJECT TO
EXTREME SUMMER TEMPERATURES, AN AIR-CONDITIONING SYSTEM CAN BE USED TO CONTROL INDOOR TEMPERATURE LEVELS.
OTHER MEANS OF CONTROLLED MECHANICAL VENTILATION CAN BE USED TO REDUCE LEVELS OF FORMALDEHYDE AND OTHER
INDOOR AIR CONTAMINANTS.
IF YOU HAVE ANY QUESTIONS REGARDING THE HEALTH EFFECTS OF FORMALDEHYDE, CONSULT YOUR DOCTOR OR LOCAL
HEALTH DEPARTMENT.

3 HOMEDEPOT.COM/GLACIERBAY
Please contact 1-855-HD-GLACIER for further assistance.
Warranty
LIFETIME LIMITED WARRANTY
A thorough inspection must be made before installation and any damage must be promptly reported. We will not be liable for failures or
damage that could have been discovered or avoided by proper inspection and testing prior to installation.
We warrant this product to be free from defects in materials or workmanship for as long as the original consumer purchaser owns this product.
Proof of purchase (original sales receipt) from the original consumer purchaser must be made available to us for all warranty claims.
This warranty is non-transferable and shall be voided if the unit is removed from its initial installation or if it is not installed following the
manufacturer’s instructions. It does not apply in the event of product damage due to the use of other than our genuine replacement parts,
(Replacement parts may be obtained by calling 1-855-HD-GLACIER, 8:00 am - 7:00 pm, EST, Monday – Friday, 9:00 am - 6:00 pm, EST,
Saturday) installation error, abuse, misuse or improper care and maintenance (whether performed by a plumber, contractor, service provider or
member of the purchaser’s household). The warranty excludes damage due to aggressive air or water conditions, harsh or abrasive cleaners
and/or materials.
Under no circumstance shall we be held liable for personal injury or property damage resulting from improper installation or use of this
product. We will not be held liable for inconvenience caused by loss of use of this product, costs incurred for labour or materials, removal
and installation of replacement units, or any other incidental or consequential damages. Costs relating to obtaining access for repair or
replacement are the responsibility of the user.
Our obligation shall be limited to the repair or replacement of a unit (at our discretion) that may prove, by our sole examination, to be defective
under normal use and service during the warranty period.
Any failure of this product that is not traceable to a defect in material or workmanship is not covered by this warranty. These non-warrantable
items include, but are not limited to:
□Improper installation not in accordance with manufacturer’s instructions.
□Dents and/or scratches incurred during shipping, handling, or installation.
□Change in colour or finish due to chemical usage.
□Damage caused by failure to follow care and cleaning guidelines, including damage caused by the use of abrasive cleaners.
□Alterations made to the unit by the purchaser or installer.
□Damage caused by accidental impact, fire, flood, freezing, and normal wear.
□Bends and warping caused by forced connections, over-tightened fittings, and inadequate support during installation.
This warranty does not extend to commercial and institutional installation or use.
WARRANTY CLAIM PROCEDURE
If a claimable defect occurs or replacement parts are needed, please contact our customer service team at 1-855-HD-GLACIER
(8:00 am - 7:00 pm, EST, Monday – Friday, 9:00 am - 6:00 pm, EST, Saturday). Before you make your call, please ensure that you have:
□Model number or description.
□Proof of sale.
□Details regarding the defect and/or part number.
□Name(s) and address(es) of the owner and/or installer

4
Pre-Installation
TOOLS/MATERIALS REQUIRED (NOT SUPPLIED)
Adjustable
wrench
Needle nose
pliers
Phillips
screwdriver Utility knife
Pipe wrench Sealant
Carpenter’s level
Hacksaw
Safety gloves Safety goggles
PARTS REQUIRED (NOT SUPPLIED)
Tail Pipe P-Trap Supply lines

5 HOMEDEPOT.COM/GLACIERBAY
Please contact 1-855-HD-GLACIER for further assistance.
Pre-Installation (continued)
PACKAGE CONTENTS
A
B
C
F
G
H
J
L
K
D E
Part Description Quantity
ACabinet 1
BSink 1
CFaucet 1
DStrainer Basket 1
EStrainer Assembly 1
FDoor Handles 2
GCabinet Base 1
HDoor Handle Screws 4
JCabinet Base Screws 2
KCabinet Feet 4
LHex Wrench 1

6
Installation
1 Installing the Faucet Assembly
□Carefully take out all the parts of the faucet assembly (C).
The faucet is pre-assembled, except for the sprayer head.
□Take the washer, gasket and retaining ring off of the faucet
body.
□Place the faucet body carefully through the hole in the sink
(B). A second person may be required to hold the body in
place until the faucet installation is complete.
□From underneath, slide the washer, gasket and retaining
ring over the end of the copper pipe and up to the exposed
threaded section of the faucet. Tighten the retaining ring by
hand until it is snug. Using a wrench or pliers, tighten the
assembly.
□Gently tighten the two screws on the retaining ring.
Do not over tighten.
□Screw the sprayer head onto the gooseneck pipe.
□Connect the water supply lines (not supplied) to the faucet.
Sprayer
head
Gooseneck pipe
Faucet body
Faucet handle
Gasket Washer
Threaded section
Retaining ring
Screws
2 Installing the Strainer
□Apply a ring of sealant to the underside of the strainer
flange.
□Insert the strainer body into the sink.
□Assemble the rubber gasket, friction washer and locknut
onto the strainer body from under the sink.
□Hand tighten the locknut. Do not over tighten the locknut as
it may split or deform the strainer body.
Sealant
Basket
Strainer body
Rubber gasket
Friction washer
Locknut

7 HOMEDEPOT.COM/GLACIERBAY
Please contact 1-855-HD-GLACIER for further assistance.
Installation (continued)
3 Installing the Base
CAUTION: Do not place side load onto feet when righting
the cabinet.
A thorough inspection must be made before installation and any
damages or missing parts must be promptly reported. Do not
proceed with the installation. Do not dispose of packaging before
you are satisfied with your new sink.
□Unpack the unit and place the sink (B) on a blanket or
cardboard to protect the surface.
□Turn the cabinet (A) upside down onto the protective
surface.
□Gently attach the cabinet base (G) onto its proper location.
Using the supplied base screws (J), attach the base to the
cabinet.
□Attach cabinet feet (K) to the base.
□Gently place the cabinet upright.
K
G
J
A
4 Installing the Door Handles
□Insert the door handle screws (H) into the pre-drilled holes
on each door.
□Attach the door handles (F) and hand tighten the door
handle screws (H).
□Repeat on the other door.
F
H

8
Installation (continued)
5 Adjusting the Door Position
If the doors need to be repositioned, the hinges can be adjusted to
ensure a precise fit with the cabinet.
□The lateral adjustment screw adjusts the door left or right.
□Horizontal adjustment of the screws adjust the door
forward and backward.
□Vertical adjustment of the screws adjust the door up and
down.
1
2
3
6 Mounting the Sink
□Carefully place a bead of sealant all around the top of the
cabinet (A).
□Ease the sink (B) into the cabinet (A), ensuring that it is
placed evenly and is centered on the cabinet. Wipe off any
excess sealant. Use masking tape to hold the sink in place
until the sealant dries.
B
A
Sealant

9 HOMEDEPOT.COM/GLACIERBAY
Please contact 1-855-HD-GLACIER for further assistance.
Installation (continued)
7 Placing the Cabinet
Move the assembled unit to its final location. Final hook up of the
supply lines and drain system can now be completed.
NOTE: Supply lines are not included.
The supply lines that attach the faucet to the household water
system, are not supplied with this unit. They need to be purchased
separately.
Follow the manufacturers instructions for proper installation of the
supply lines.
Maintenance
CARTRIDGE REPLACEMENT
□Before proceeding, turn off the water supply to the faucet.
□Take off the plastic water indicator by hand, then use the
Allen key to remove the screw and pull out the handle body.
The top lever of the cartridge will be exposed.
□Unscrew the cap and rings, making sure not to damage the
threads.
□Pull out the cartridge and replace it with a new 35 mm
(1.4 in.) ceramic cartridge.
□Replace the rings and the cap.
□Place the handle body on the cartridge. Lock the screw onto
the handle body and tighten it with the hex wrench. Do not
over tighten.
□Put the plastic water indicator back into the hole, make sure
the red is on the left and blue is on the right.
Handle
body
Water indicator
Screw
Cap
Rings
Cartridge
Faucet body

10
Care and Cleaning
SINK CABINET
Do Do
□After use, always rinse your sink with tap water to dilute and
remove deposits.
□Towel dry after use whenever possible to prevent water spots.
Should water spots occur, clean with a mild solution of vinegar
and water followed by a thorough rinse.
□Use liquid soap, a general household cleaner, or a weak solution
of vinegar and water for regular cleaning.
□Only use plastic scouring pads recommended for use in stainless
steel sinks, and only use them in the bowl of the sink. Scrub in
the direction of the satin finish lines.
□Remove dust and dry dirt with a soft, damp cloth.
□Clean grease, oil, paint and ink stains with isopropyl
(rubbing alcohol). Immediately rinse with water after stain
removal.
Do not Do not
□Do not allow any food, detergent, soap or grease to dry or sit for
extended periods of time on the surface of the sink.
□Never use abrasive cleaning products, as they will dull and
scratch the finish.
□Do not use scouting pads on the deck, as they will dull the mirror
finish.
□Never use steel wool pads, as they will leave iron particles on the
sink, which will cause corrosion.
□Never leave steel or cast iron pans in your sink for extended
periods of time, as this can cause corrosion.
□Do not allow your cabinet surface to come into contact with
products such as acetone (nail polish remover), nail polish,
dry cleaning solution, lacquer thinners, gasoline, pine oil, etc.
□Use caution when using sharp instruments that may fall and
scratch the surface.
Your sink is manufactured with the highest grade stainless steel and will provide you many years of enjoyment with the proper care.
SCRATCH, SPOT, AND BLEMISH REMOVAL AND SURFACE RESTORATION:
Little rust spots and blemishes that periodically appear in the sink are typically the result of the steel interacting with the chemicals
found in the vast spectrum of substances that sinks are commonly exposed to. They may also get transferred from other objects
placed or left in the sink. Scratches are the result of regular wear and tear.
To remove scratches, spots, and blemishes from the sink, rub them with a non-metallic scouring pad (e.g. Scotch-Brite®) combined
with a mild abrasive cleaner (e.g. Barkeeper’s Friend®). Always rub the surfaces in the direction of the grain of the steel. When
nished, rinse the sink with water and dry it with a towel to allow the sink to form a protective outer layer. This procedure can also be
used to renew all of the surfaces of the sink.

11 HOMEDEPOT.COM/GLACIERBAY
Please contact 1-855-HD-GLACIER for further assistance.
Service Parts
If you are missing parts or if you require replacement parts, please contact our customer service team at 1-855-HD-GLACIER,
8:00 am - 7:00 pm, EST, Monday – Friday, 9:00 am - 6:00 pm, EST, Saturday. Identify the required part(s) and have the part number(s) ready.
A
D
GH J
E F
B C
Part Description Code Quantity Part Description Code Quantity
A Door Handles QHL140 2 F Ceramic Cartridge QHS121 1
B Door Handle Screws QHL104 4 G Sprayer Head QHL131 1
C Base Screws QHL108 2 H Strainer Basket QHS101 1
D Cabinet Feet QHL107 4 JStrainer Assembly QHS150 1
E Cabinet Hinges QHL111 4

12
Tabla de materias
OWNER’S MANUAL ..................................2
Tabla de materias ..................................12
Información de seguridad ...........................12
Garantía. . . . . . . . . . . . . . . . . . . . . . . . . . . . . . . . . . . . . . . . . . 13
Garantía limitada de por vida........................13
Procedimiento de reclamación de garantía.............13
Preinstalación.....................................14
Herramientas/Materiales requeridos ..................14
Contenido del paquete.............................15
Instalación. . . . . . . . . . . . . . . . . . . . . . . . . . . . . . . . . . . . . . 16
Cómo instalar el grifo. . . . . . . . . . . . . . . . . . . . . . . . . . . . . . 16
Cómo instalar el colador ...........................16
Cómo instalar la base del armario....................17
Cómo instalar las manijas de las puertas ..............17
Ajuste de la posición de las puertas ..................18
Cómo instalar el fregadero .........................18
Colocación ......................................19
Ensamblaje del tubo de abastecimiento de agua ........19
Mantenimiento ....................................19
Reemplazo del cartucho ...........................19
Cuidado y limpieza .................................20
Fregadero. . . . . . . . . . . . . . . . . . . . . . . . . . . . . . . . . . . . . . . 20
Armario ........................................20
Piezas de repuesto .................................21
Información de seguridad
LEA Y GUARDE ESTAS INSTRUCCIONES
□Examine la unidad antes de proceder. Verifique si la superficie presenta
defectos o daños, abolladuras, curvaturas, golpes o marcas por
rozaduras. Si observa algún daño, no le instale.
□Utilice esta unidad exclusivamente de la manera concebida por el
fabricante; si tiene preguntas, comuníque con el fabricante.
□El trabajo de instalación y de plomería deben ser hechos por personas
calificadas de acuerdo con todos los códigos y normas aplicables, e
incluye una construcción calificada a prueba de incendio.
□Proteja la superficie total del producto durante la instalación para evitar
daños.
□Todos los agujeros perforados deben ser hechos por la parte superior
externa con extremo cuidado y calafatear cuidadosamente para formar
una barrera impermeable.
PRECAUCIÓN: Use guantes y gafas de seguridad en todo
momento para evitar lesiones personales.
DIVULGACIÓN REQUERIDA POR EL FABRICANTE DE MINNESOTA. IMPORTANTE AVISO DE SALUD:
ALGUNOS DE LOS MATERIALES DE CONSTRUCCIÓN UTILIZADOS EN ESTA VIVIENDA (O ESTOS MATERIALES DE CONSTRUCCIÓN) EMITEN FORMALDEHÍDO.
SE HAN INFORMADO CASOS DE IRRITACIÓN DE OJOS, NARIZ Y GARGANTA, DOLORES DE CABEZA, NÁUSEAS Y GRAN VARIEDAD DE SÍNTOMAS SIMILARES
AL ASMA —POR EJ., DIFICULTAD PARA RESPIRAR—, COMO RESULTADO DE LA EXPOSICIÓN AL FORMALDEHÍDO. LAS PERSONAS MAYORES Y LOS NIÑOS,
ASÍ COMO CUALQUIER OTRA PERSONA CON ANTECEDENTES DE ASMA, ALERGIAS O PROBLEMAS PULMONARES, PUEDEN CORRER UN MAYOR PELIGRO. SE
CONTINÚA INVESTIGANDO ACERCA DE LOS EFECTOS A LARGO PLAZO QUE PUEDE PROVOCAR LA EXPOSICIÓN AL FORMALDEHÍDO.
LA VENTILACIÓN REDUCIDA PUEDE GENERAR LA ACUMULACIÓN DE FORMALDEHÍDO Y OTRAS SUSTANCIAS CONTAMINANTES DEL AIRE EN ESPACIOS
CERRADOS. LAS TEMPERATURAS Y LA HUMEDAD ELEVADAS EN ESPACIOS CERRADOS AUMENTAN LOS NIVELES DE FORMALDEHÍDO. CUANDO UNA
VIVIENDA SE ENCUENTRA EN ÁREAS QUE ESTÁN SUJETAS A TEMPERATURAS DE VERANO EXTREMAS, SE PUEDE UTILIZAR UN SISTEMA DE AIRE
ACONDICIONADO PARA CONTROLAR LAS ELEVADAS TEMPERATURAS EN ESPACIOS CERRADOS. ASIMISMO, SE PUEDEN UTILIZAR OTROS MEDIOS DE
VENTILACIÓN MECÁNICA CONTROLADA PARA REDUCIR LOS NIVELES DE FORMALDEHÍDO Y OTRAS SUSTANCIAS CONTAMINANTES DEL AIRE EN ESPACIOS
CERRADOS.
SI TIENE ALGUNA PREGUNTA CON RESPECTO A LOS EFECTOS DEL FORMALDEHÍDO EN LA SALUD, CONSULTE A SU MÉDICO O A SU DEPARTAMENTO DE SALUD
LOCAL.

13 HOMEDEPOT.COM/GLACIERBAY
Por favor, llamé al 1-855-HD-GLACIER para obtener más ayuda.
Garantía
GARANTÍA LIMITADA DE POR VIDA
Debe hacerse una inspección a conciencia antes de la instalación y cualquier daño debe ser reportado inmediatamente. No seremos
responsables de los fallos o daños que pudieran haberse descubierto o evitado con una inspección y pruebas adecuadas antes de la instalación.
Garantizamos este producto contra todo defecto en los materiales o en la fabricación, durante el tiempo que el comprador/consumidor original
sea el propietario de este producto. Una prueba de compra (factura original) del comprador/consumidor deberá acompañar toda reclamación
hecha a nosotros.
Esta garantía no es transferible y será anulada si la unidad se quita del lugar donde se instaló inicialmente o si no se instala de acuerdo con las
instrucciones del fabricante. La garantía no se aplica en caso de daños al producto debido al uso de otros repuestos, (las piezas de repuesto
pueden obtenerse por llamando al 1-855-HD-GLACIER, 8 a 19 horas, hora del este, lunes a viernes, 9:00 a.m. - 6:00 p.m., hora del este,
sábado) error de instalación, abuso, mal uso, cuidado incorrecto o mal mantenimiento (ya sea realizada por un plomero, fontanero, contratista,
proveedor de servicios o un miembro de la familia del comprador). La garantía excluye los daños causados por condiciones agresivas de aire,
agua, abrasivos, limpiadores y/o materiales.
Bajo ninguna circunstancia seremos responsables de lesiones personales o daños a la propiedad que resulten de una instalación o de un
uso inapropiado de este producto. No seremos responsables por inconvenientes ocasionados por pérdida de uso de este producto, costos
incurridos en mano de obra o materiales, retiro e instalación de unidades de remplazo, ni ningún otro daño incidental o consecuente. Los
costos relacionados con la reparación o el reemplazo son la responsabilidad del usuario.
Nuestra obligación se limita a la reparación o reemplazo de una unidad (a nuestra discreción) que pueda comprobarse, únicamente al
examinarla por nosotros, que tiene defectos bajo un uso y servicio normal durante el periodo de garantía.
Cualquier fallo de este producto que no sea identificable como un defecto en materiales o de fabricación no estará cubierto por la garantía.
Estos artículos que no se pueden garantizar incluyen, pero no se limitan a:
□Instalación indebida que no siga las instrucciones del fabricante.
□Abolladuras, golpes y marcas ocasionadas durante el transporte, manejo o instalación.
□Cambio de color o en el acabado debido al uso de productos químicos.
□Daños ocasionados por no seguir las instrucciones de cuidado y limpieza, incluyendo daños ocasionados por el uso de limpiadores
abrasivos.
□Alteraciones hechas a la unidad por parte del comprador o el instalador.
□Daños ocasionados por impacto accidental, fuego, inundaciones, congelamiento y por el desgaste normal.
□Dobleces y deformaciones a consecuencia de conexiones forzadas, accesorios apretados en exceso y soporte inadecuado durante
la instalación.
Esta garantía no cubre el uso o la instalación comercial ni institucional.
PROCEDIMIENTO DE RECLAMACIÓN DE GARANTÍA
Si ocurre un defecto por el que se puede presentar una reclamación, por favor contacte nuestro equipo de servicio al cliente
1-855-HD-GLACIER (8 a 19 horas, hora del este, lunes a viernes, 9:00 a.m. - 6:00 p.m., hora del este, sábado).
Antes de llamar para presentar una reclamación, por favor asegúrese que tiene:
□La descripción o el numéro de modelo.
□El comprobante de venta.
□Los detalles del defecto.
□Nombre(s) y domicilio(s) del propietario y del instalador.

14
Preinstalación
HERRAMIENTAS/MATERIALES REQUERIDOS (NO SUMINISTRADOS)
Llaves Alicates
Desarmador en
cruz
Cuchillo de
uso general
Llave de tubos Sellador de
silicona
Nivel de
carpintero
Sierra de
mano
Guantes de
seguridad
Gafas de
seguridad
PIEZAS REQUERIDAS (NO SUMINISTRADAS)
Tubo finalP Trampa Líneas de
alimentación

15 HOMEDEPOT.COM/GLACIERBAY
Por favor, llamé al 1-855-HD-GLACIER para obtener más ayuda.
Preinstalación (continuación)
CONTENIDO DEL PAQUETE
A
B
C
F
G
H
J
L
K
D E
Pieza Descripción Cantidad
AArmario 1
BFregadero 1
CGrifo 1
DColador 1
EConjunto de colador 1
FManijas de las puertas 2
GBase del armario 1
HTornillos de las manijas 4
JTornillos de la base del armario 2
KPatas del armario 4
LLlave hexagonal 1

16
Instalación
1 Cómo instalar el grifo
□Retire todas las piezas del ensamblaje del grifo (C) con
cuidado. El grifo está previamente ensamblado, excepto por el
difusor.
□Retire la arandela, la junta y el anillo de retención del cuerpo
del grifo.
□Inserte el cuerpo del grifo a través del orificio del lavabo (B).
Puede necesitar la ayuda de otra persona para sujetar el
cuerpo en su lugar hasta que haya completado la instalación
del grifo.
□Desde la parte inferior, deslice la junta y la arandela, y
atornille el anillo de retención sobre el extremo del tubo de
cobre y hacia la sección roscada del grifo. Apriete el anillo de
retención con la mano hasta que quede bien ajustado. Con
ayuda de una llave inglesa o pinzas, apriete el ensamblaje.
□Apriete delicadamente los dos tornillos en el anillo de
retención. No apriete demasiado.
□Atornille el difusor a la tubería con cuello de cisne.
□Conecte la línea de abastecimiento de agua (no incluida) al
grifo.
Difusor
Tubería con
cuello de cisne
Cuerpo del grifo
Manija del grifo
Junta Arandela
Sección roscada
Anillo de
retención
Tornillos
2 Cómo instalar el colador
□Aplique un anillo de pasta o sellador de plomería (no
incluidos) en la parte inferior de la brida del cuerpo del
escurridor.
□Inserte el cuerpo del escurridor en el fregadero.
□Monte el empaque de caucho, la arandela de fricción y la
contratuerca en el cuerpo del escurridor, por debajo del
fregadero.
□Apriete la contratuerca con la mano. No apriete demasiado
la contratuerca o la tuerca de conexión, ya que podría
romper o deformar el cuerpo del escurridor.
Sellador de
silicona
Colador
Cuerpo del colador
Junta de goma
Arandela de fricción
Tuerca

17 HOMEDEPOT.COM/GLACIERBAY
Por favor, llamé al 1-855-HD-GLACIER para obtener más ayuda.
Instalación (continuación)
3 Cómo instalar la base del armario
PRECAUCIÓN: No ponga todo el peso sobre las patas
laterales cuando lo coloque su lugar.
Una minuciosa inspección debe realizarse antes de la instalación y
cualquier daño o pieza faltante debe comunicarse de inmediato. No
continúe con la instalación. No se deshaga del embalaje antes de
quedar satisfecho del nuevo fregadero.
□Desempaque la unidad y coloque el fregadero (B) sobre
una cobija o cartón para proteger la superficie.
□Coloque el armario (A) de cabeza sobre la superficie
protectora.
□Coloque cuidadosamente la base (G) del armario en su
lugar. Una la base al armario con los tornillos de la base (J).
□Coloque las patas del armario (K) en la base.
□Coloque el armario boca arriba con cuidado.
K
G
J
A
4 Cómo instalar las manijas de las
puertas
□Inserte los tornillos de las manijas (H) en los orificiosde
cada puerta.
□Coloque las manijas (F) y apriete los tornillos (H).
□Repita la misma operación en la otra puerta.
F
H

18
Instalación (continuación)
5 Ajuste de la posición de las puertas
Si necesita reubicar las puertas, ajuste las bisagras para garantizar
que embonen con el armario.
□Si ajusta los tornillos lateralmente, la puerta se ajustará a
la izquierda y a la derecha.
□Si ajusta los tornillos horizontalmente, la puerta se ajustará
hacia adelante y hacia atrás.
□Si ajusta verticalmente los tornillos, la puerta se ajustará
hacia arriba y hacia abajo.
1
2
3
6 Cómo instalar el fregadero
□Agregue un poco de sellador en la parte superior del
armario (A) con cuidado.
□Descanse el fregadero (B) en al armario (A), y asegúrese
de colocarlo de forma pareja y centrado. Elimine el exceso
de sellador.
B
A
Sellador

19 HOMEDEPOT.COM/GLACIERBAY
Por favor, llamé al 1-855-HD-GLACIER para obtener más ayuda.
Instalación (continuación)
7 Colocación
Mueva la unidad ya armada a su ubicación final. La conexión de los
tubos de abastecimiento y el sistema de drenaje pueden ahora ser
completados.
NOTA: Las líneas de abastecimiento. no vienen
incluidos con en esta unidad
Las líneas de abastecimiento, que conectan el grifo al suministro
de agua de la casa, no vienen incluidos con en esta unidad. Se
compran por separado.
Siga las instrucciones del fabricante para instalar las líneas de
abastecimiento de manera adecuada.
Mantenimiento
REEMPLAZO DEL CARTUCHO
□Antes de continuar, cierre el suministro de agua al grifo.
□Retire el plástico del indicador de temperatura del agua con
la mano, luego, con la llave Allen, remueva el tornillo y tire
del cuerpo de la manija. La palanca superior del cartucho
quedará expuesta.
□Desenrosque la tapa y los anillos, asegurándose de no dañar
las roscas.
□Extraiga el cartucho y remplácelo con el cartucho cerámica
de 35 mm (1.4 pulgadas).
□Vuelva a colocar los anillos y luego la tapa.
□Después, coloque el cuerpo de la manija sobre el cartucho.
Fije el tornillo sobre el cuerpo de la manija y apriételo con la
llave Allen. No apriete demasiado.
□Coloque nuevamente el indicador de temperatura de agua en
el orificio, asegúrese de que el rojo esté en el lado izquierdo
y el azul en el derecho.
Manija
Indicador de la temperatura del agua
Tornillo
Tapa de rosca
Anillos
Cartucho
Cuerpo del grifo

20
Cuidado y limpieza
FREGADERO ARMARIO
Hacer Hacer
□Después de cada uso lave el fregadero con el agua del grifo para
diluir y quitar cualquier depósito.
□Cuando pueda, seque el fregadero con una toalla para evitar
que se formen marcas de agua. En caso de que se formen,
límpielas con una solución de vinagre y agua, y luego enjuague
minuciosamente.
□Utilice jabón líquido, limpiador doméstico multiusos o una
solución de vinagre y agua para la limpieza regular.
□Use únicamente esponjas plásticas recomendadas para uso en
fregaderos de acero inoxidable, y solo úselas en la cubeta del
fregadero. Restriegue en el sentido de las líneas de lavabado.
□Elimine el plvo y la suciedad con un paño suave y húmedo.
□Limpie la grasa, aceite, pintura y manchas de tinta con
isopropílico (alcohol para fricciones). Lavar immediatamente
con agua después de la eliminación de las manchas.
No Hacer No Hacer
□Evite que se seque o deposite cualquier residuo de comida,
detergente, jabón, grasa o condimentos por un periodo
prolongado en la superficie del fregadero.
□Nunca utilice productos abrasivos, ya que opacarán y rayarán el
acabado.
□No utilice esponjas en el exterior del fregadero, ya que opacarán
el acabado de espejo.
□Nunca utilice esponjas de lana de acero, ya que dejarán partículas
de acero en el fregadero y lo corroerán.
□Nunca deje cacerolas de acero o hierro fundido en el fregadero
por períodos prolongados, ya que esto puede provocar corrosión.
□No permita que la superficie del mueble entre en contacto
con productos como la acetona (quitaesmalte), el esmalte
de uñas, la solución de limpieza en seco, los disolventes de
lacas, la gasolina, el aceite de pino, etc.
□Evite el uso de novajas de afeitar y otros instrumentos que
puedan caer y rayar la superficie.
Este fregadero está fabricado con acero inoxidable de la mejor calidad y podrá utilizarlo durante muchos años siempre y cuando lo cuide y
le dé el mantenimiento adecuado.
ELIMINAR LOS RAYONES, LAS MANCHAS Y LAS MARCAS, Y RENOVAR LA SUPERFICIE
Las pequeñas marcas y manchas de óxido que con frecuencia aparecen en el lavabo son resultado, por lo general, de la interacción entre el acero y los productos
químicos que se encuentran en la gran variedad de sustancias a las que los lavabos están expuestos comúnmente. También es posible que esas sustancias se
transeran al lavabo desde otros objetos colocados o dejados en él. Los rayones son ocasionados por el uso y el desgaste normales.
Para eliminar los rayones, las manchas y las marcas del lavabo, tállelos con una bra no metálica (p. ej., Scotch-Brite®) junto con un limpiador ligeramente abrasivo
(p. ej., Barkeeper’s Friend®). Siempre talle las supercies en la dirección de la veta del acero. Al terminar, enjuague el lavabo con agua y séquelo con una toalla, para
permitir que se forme en él una capa protectora exterior. El mismo procedimiento puede usarse para renovar todas las supercies del lavabo.
This manual suits for next models
1
Table of contents
Languages:
Other Glacier bay Kitchen Appliance manuals

Glacier bay
Glacier bay VT3322D1 User manual

Glacier bay
Glacier bay VR415A1 User manual

Glacier bay
Glacier bay QL050 User manual

Glacier bay
Glacier bay QK011 User manual

Glacier bay
Glacier bay QK024 User manual

Glacier bay
Glacier bay QK004 User manual

Glacier bay
Glacier bay QK008 User manual

Glacier bay
Glacier bay QK001 User manual

Glacier bay
Glacier bay QK053 User manual

Glacier bay
Glacier bay QL046 User manual