GME Commercial CP40 Series User manual

CP40 & CP50 Series
Commercial Analogue Portable Radios
INSTRUCTION MANUAL

2 INSTRUCTION MANUAL CP40 & CP50
CONTENTS
INTRODUCTION ......................................................... 3
IN THE BOX................................................................ 3
CP40 & CP50 Series................................................................... 3
KEY FEATURES.....................................................................3
CP40 Series................................................................................ 3
CP50 Series................................................................................ 3
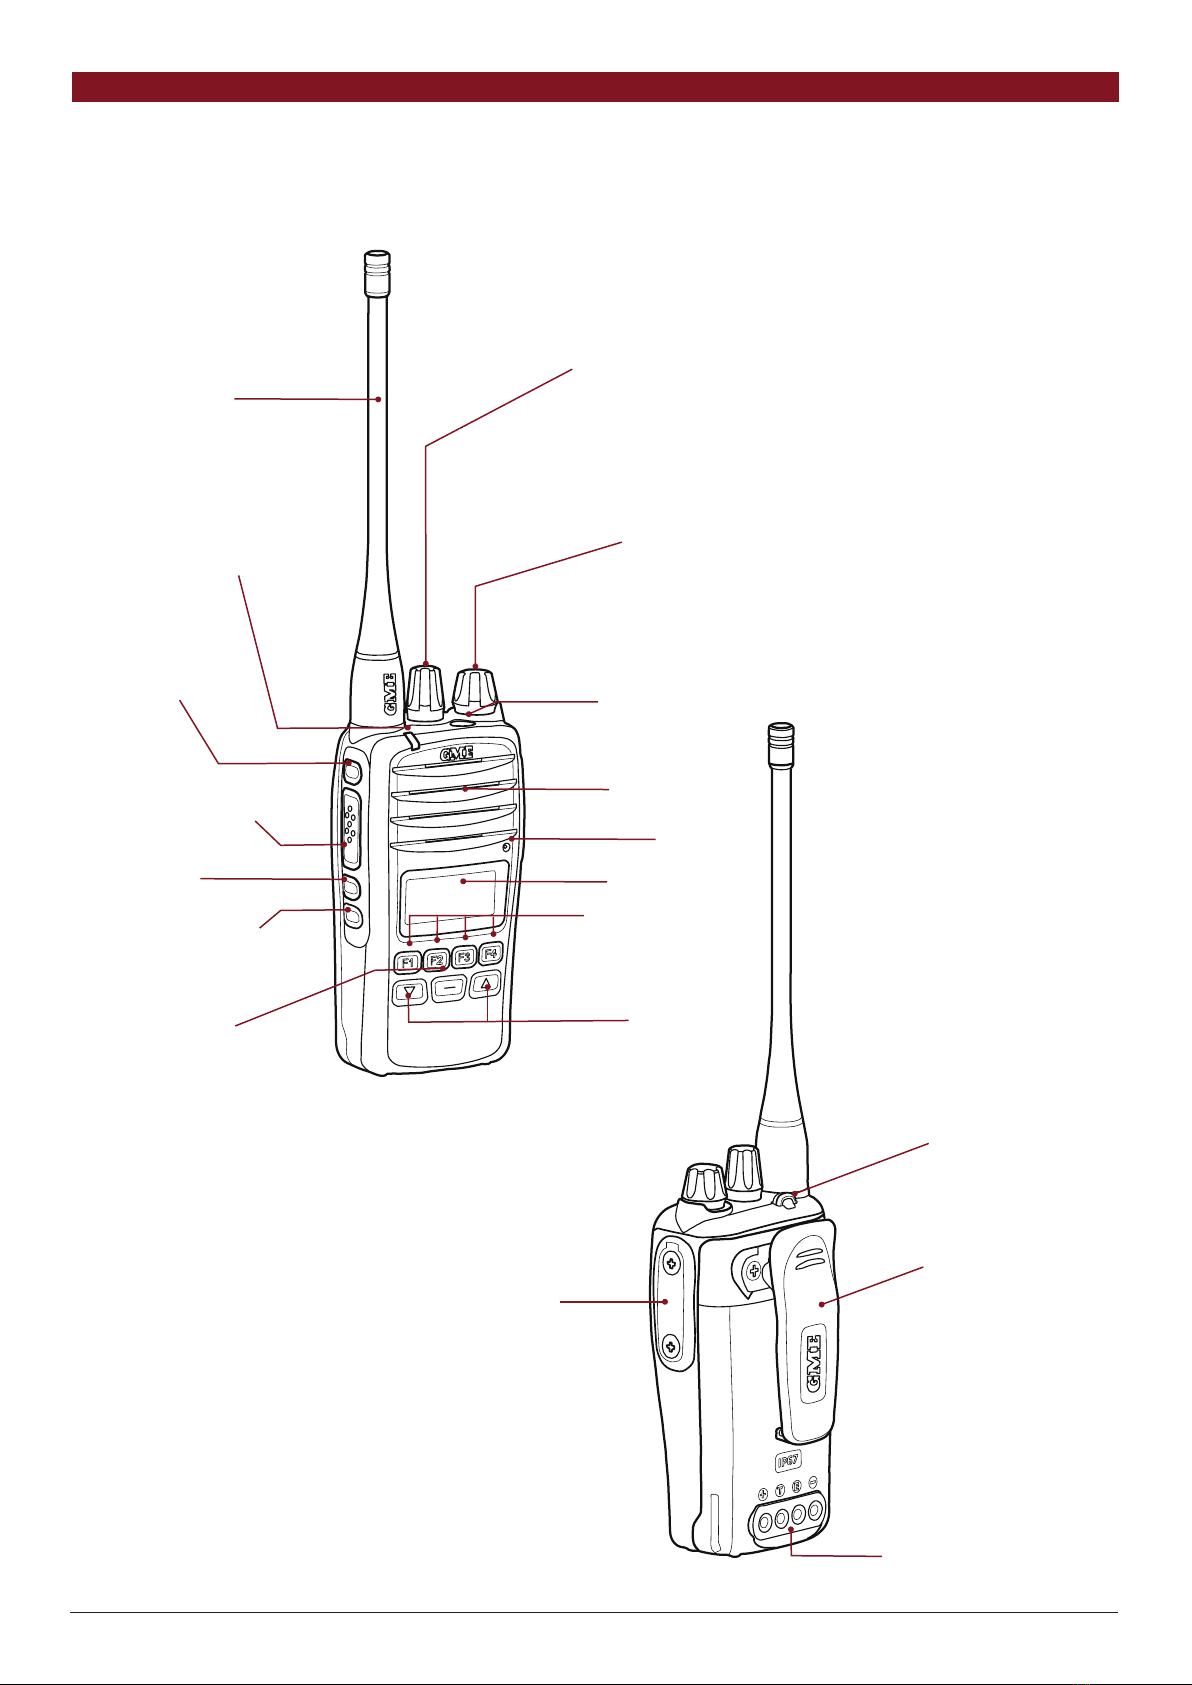
CONTROLS ...........................................................................4
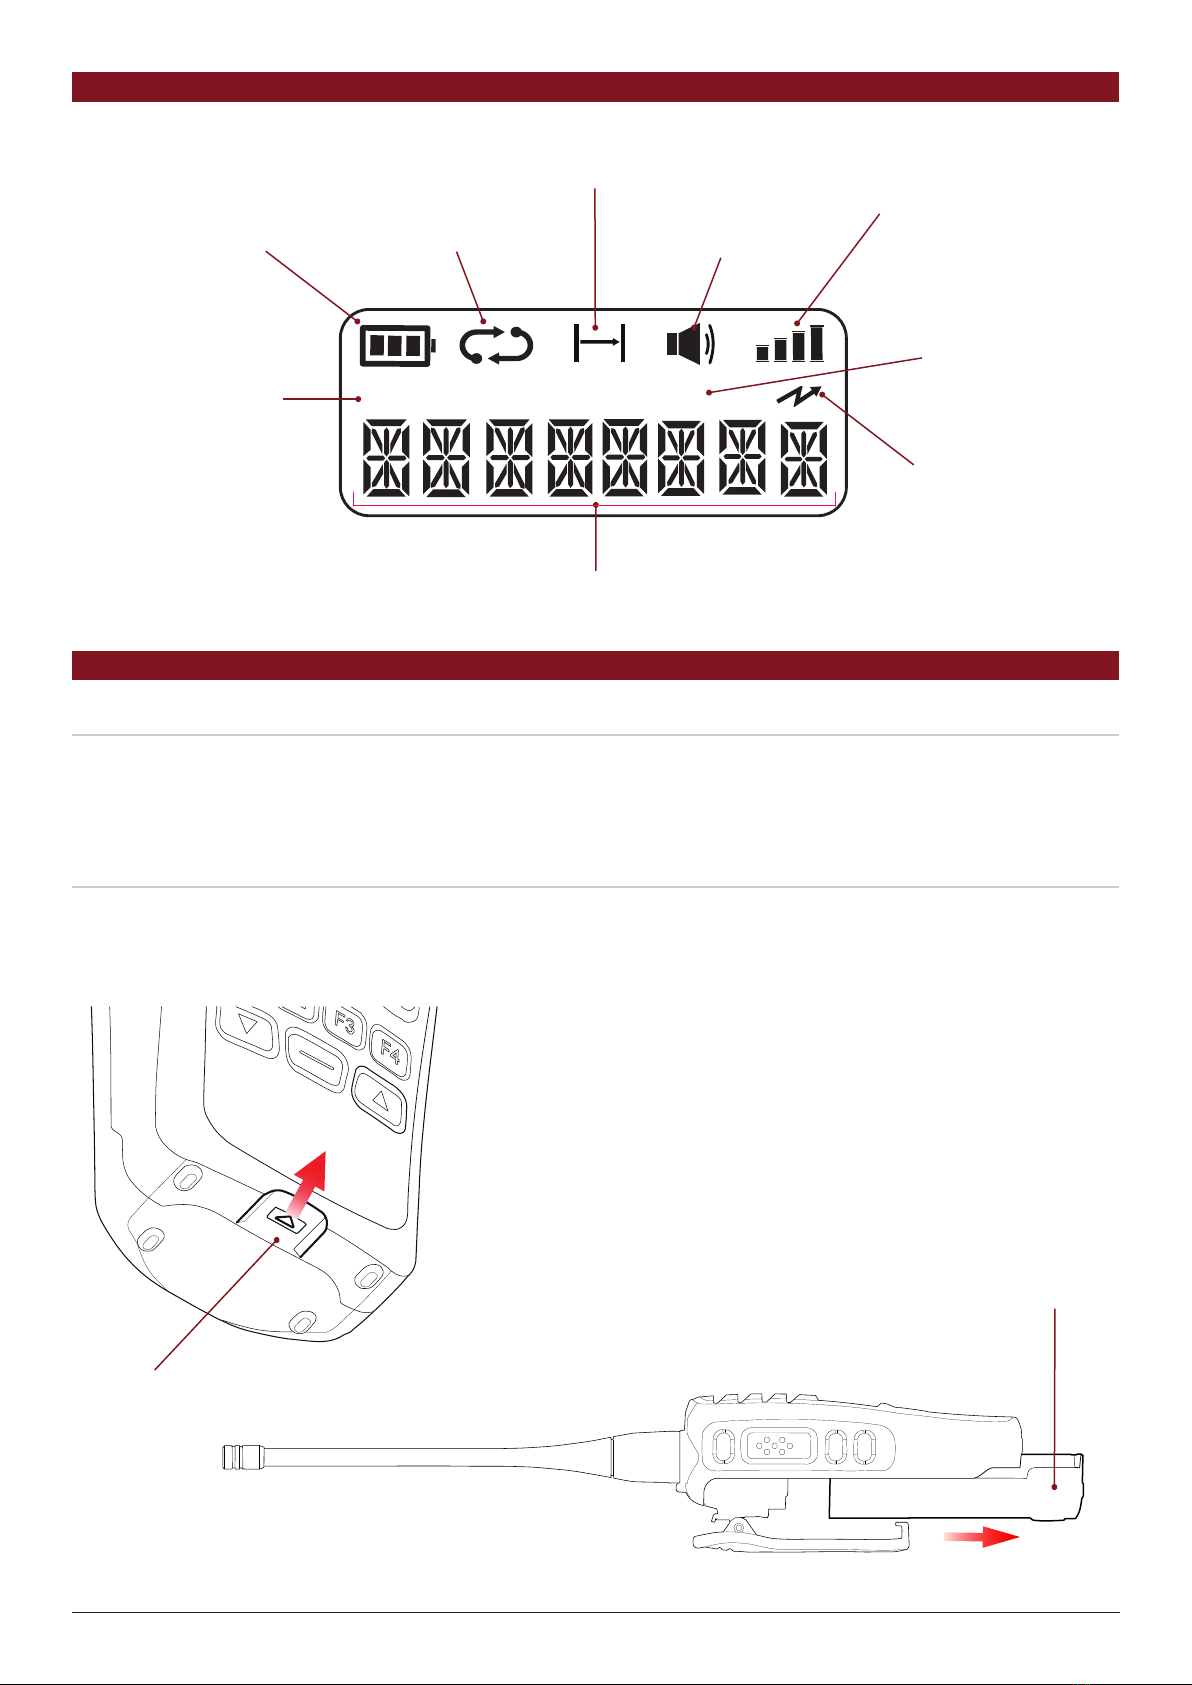
DISPLAY................................................................................5
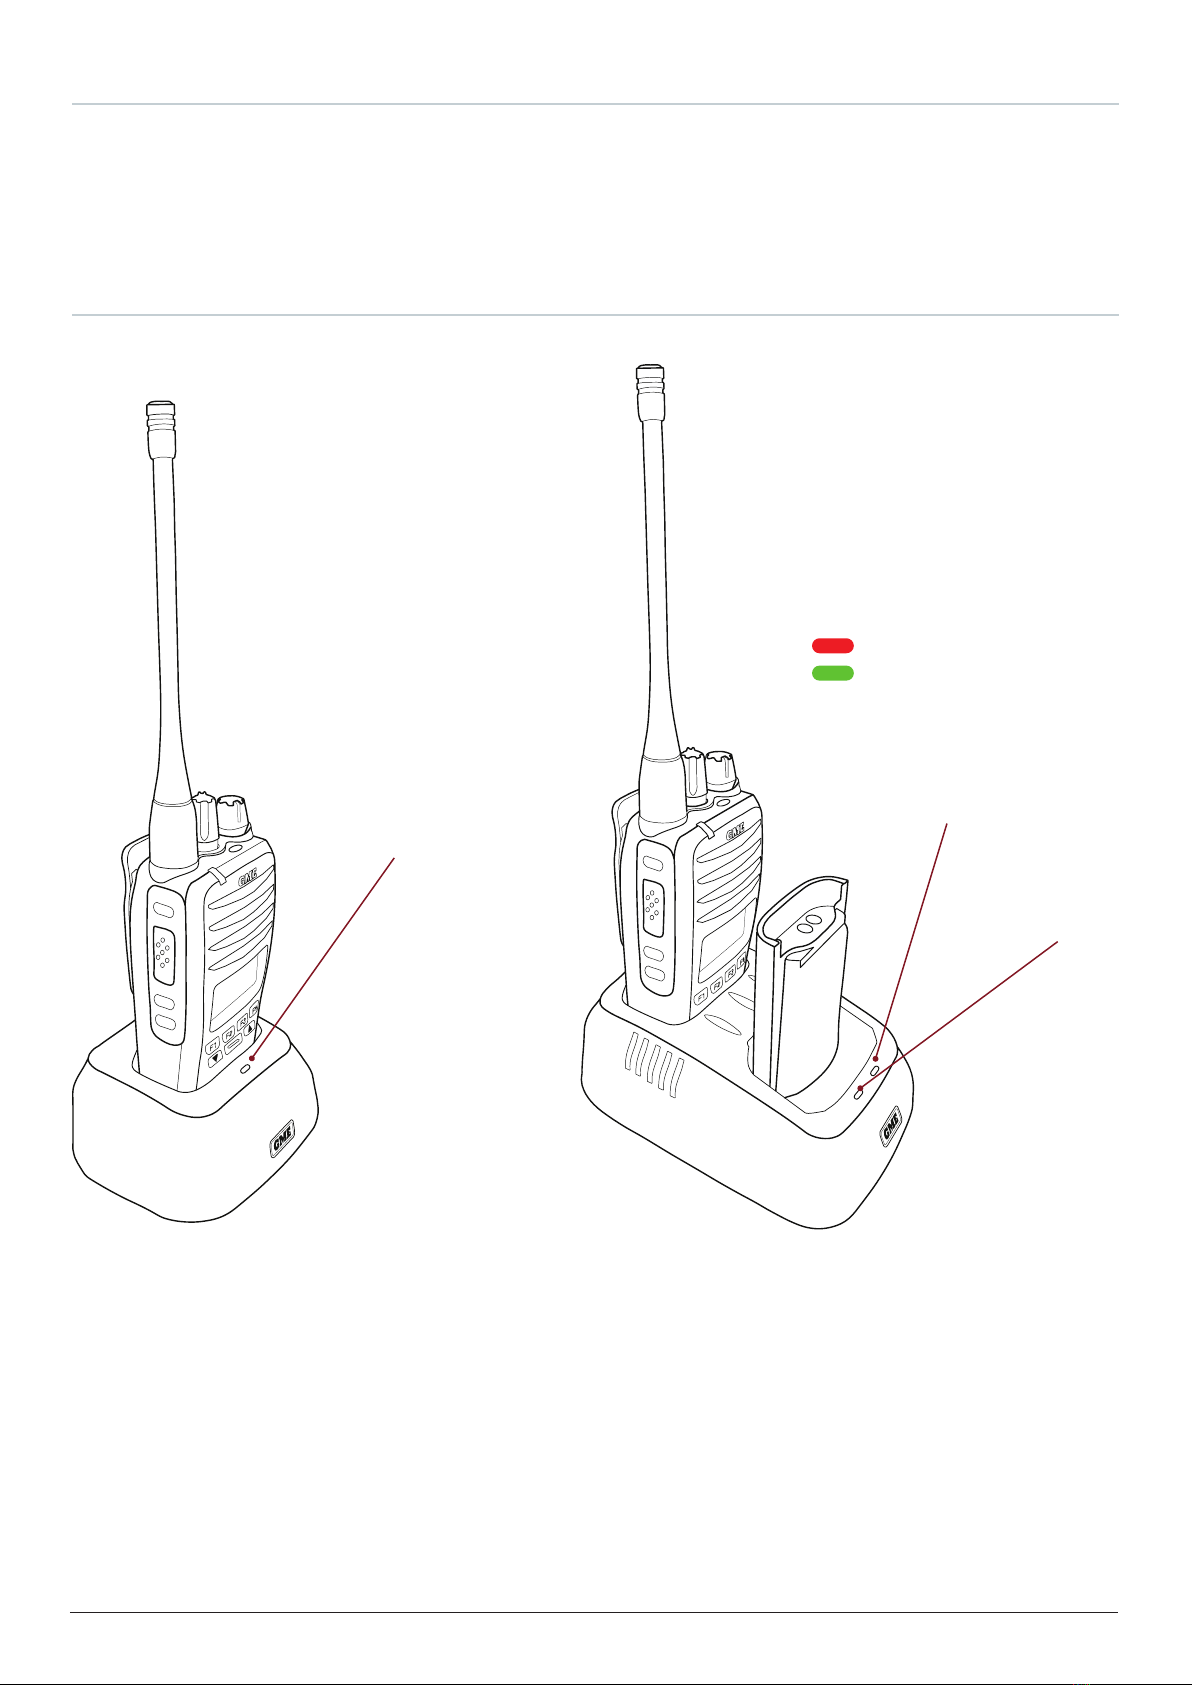
CHARGING THE BATTERY....................................................5
Removing the Battery ................................................................ 5
Fitting the Battery ...................................................................... 5
Charging the Battery .................................................................. 6
Using the Desktop Charger......................................................... 6
In-Vehicle Charging.................................................................... 7
GENERAL OPERATION .........................................................8
Turning The Radio On / Off & Volume:......................................... 8
Selecting Channels:.................................................................... 8
Transmitting:.............................................................................. 8
Receiving: .................................................................................. 8
ADVANCED OPERATION......................................................9
CP40 & CP50 FEATURES.......................................................9
Programmed Shortcut Keys:........................................................ 9
Menu Key:.................................................................................. 9
To activate the Beeper:............................................................. 11
Squelch.................................................................................... 12
To open or close the squelch:.................................................... 12
From a preprogrammed Squelch shortcut key: ........................... 12
Squelch Level ........................................................................... 12
To set the squelch level ............................................................ 12
To set the power level:.............................................................. 13
To activate Keylock:.................................................................. 13
To deactivate Keylock: .............................................................. 13
To activate Channel Announcements:........................................ 14
To enable Talk Around: ............................................................. 15
To send a Selcall from a Contact List:........................................ 17
To send a Selcall to a predefined contact on a preselected channel:...17
Receiving a Selcall:................................................................... 17
To switch the Selcall Mode: ...................................................... 18
Quiet Channel:......................................................................... 18
To enable Quiet Mode operation:.............................................. 19
Receiving Signals in the QUIET Mode:....................................... 19
Transmitting while in Quiet Mode: ............................................ 19
To make a DTMF call to a contact selected from a list:............... 20
To make a DTMF call to a predefined contact:........................... 20
To cancel the emergency:.......................................................... 21
To cancel the alarm: ................................................................. 21
To set the Power Save:.............................................................. 22
CP50 FEATURES ...................................................................9
To operate the Man Down feature: ........................................... 24
To operate the Lone Worker feature:......................................... 24
To calibrate the tilt sensor:........................................................ 25
DIAGNOSTICS ....................................................................25
CP50 DIAGNOSTICS ONY ..................................................27
SERVICES............................................................................28
Sending a Check Request: ........................................................ 30
Sending a Stun Request:........................................................... 31
Sending a Revive Request:........................................................ 32
ADDENDUM.......................................................................33
Programmable Key Options: CP40 & CP50...................................... 34
Programmable Key Options: CP50 .................................................. 36
NOTICES & WARNINGS .....................................................37
Copyright Notice: ..................................................................... 37
Interference With Vehicle Electronics: ........................................ 37
Using The Radio In Explosive Atmospheres Or Blasting Areas .... 37
POSTFACE ..........................................................................38
GME WARRANTY AGAINST DEFECTS ..............................40

CP40 & CP50 INSTRUCTION MANUAL 3
INTRODUCTION
The CP40 and CP50 has been designed and made in Australia by GME Pty Ltd specifically to meet the
requirements of commercial radio users.
Please read this user manual thoroughly. It provides information on the features, parts, controls and
specifications of the radio.
IN THE BOX
CP40 & CP50 Series
BP028 2600mAh Li-Ion Battery to suit CP40/ CP50
AE4028 450-520 Mhz Wide Band Antenna to suit CP40/ CP50
BCD022 240V Single Unit Desktop Charger to suit CP40/ CP50
PS005 AC Adapter for BCD022
MB058 Belt Clip to suit CP40/ CP50
KEY FEATURES
CP40 Series
• 119 Private Channels
• 80 UHF CB/ PRS Channels
• 10 Zones
• 5 Watt Transmission Power
• 1.5W Audio Output (internal)
• 750mW Audio Output Aux Port (external)
• 450-520 Mhz
• IP67 Ingress Protection
• MIL-STD 810G
• 5 Tone Selcall
• MDC1200 Compatible
• DTMF
CP50 Series
• 2047 Channel Capacity
• 80 UHF CB/PRS Capable
• 50 Zones
• 5 Watt Transmission Power
• 1.5W Audio Output (internal)
• 750mW Audio Output Aux Port (external)
• 450-520 MHz
• IP67 Ingress Protection
• MIL-STD 810G
• 5 Tone Selcall
• MDC1200 Compatible
• DTMF
• RSSI and Busy Voting
• Man Down
• Lone Worker

4 INSTRUCTION MANUAL CP40 & CP50
CONTROLS
The instructions below describe the locations and generic functions of the controls on the handheld
radio. Each of these controls have been configured by your dealer for your application.
If required, please refer to your dealer for more detailed operating instructions relating to the specific
programming of your radio.
Charger Port
Belt Clip
Lanyard Point
External Microphone /
Programming Port
Scroll Buttons
Programmable Keys
LCD Screen
Microphone
Speaker
Emergency Button
Antenna
Status LED
Programmable
Side-top Button
Push-To-Talk (PTT)
Button
Programmable
Side-middle Button
Programmable
Side-bottom Button
Programmable Keys
On-Off / Volume Knob
Channel Selector Knob
Rotate past the click to switch
the radio On or Off and to
adjust the volume level.
Rotate to change channels or
browse Menu options.
Press for Menu or to select
Menu options.

CP40 & CP50 INSTRUCTION MANUAL 5
DISPLAY
CHARGING THE BATTERY
Removing the Battery
1. Locate the battery latch on the base of the radio.
2. Pull the battery latch forward while sliding the battery downwards from the radio.
Once the battery has been released, lift it away from the radio.
Fitting the Battery
1. Align the slots in the battery pack with the metal tabs on the radio chassis.
2. With the battery pressed against the radio, slide it upwards until it ‘clicks’.
IN CALL LO
In Call Icon
(Indicates that a
call is in progress)
Channel / Menu Display
(Displays channel name / menu option)
Battery Icon
(Displays the level
of battery charge)
Talkaround Icon
(Indicates that the radio
is in Talkaround mode)
Receive Icon
(Appears when radio
is receiving signals)
Transmit Icon
(Appears when radio
is transmitting)
Scan Icon
(Indicates selected
channel is in Scan
Group. Flashes when
radio is scanning)
Signal Strength
Indicator
(Displays the level of
signal receive strength.
More bars mean
stronger signals)
Battery Latch
Slide to release
Battery
Slide to open
LO Icon
(Displayed when
in either 1 Watt or
0.1 Watt mode)

6 INSTRUCTION MANUAL CP40 & CP50
Charging the Battery
The desktop charger is designed to charge the battery while it is attached to the radio.
Alternatively, the battery can be removed and charged separately. When charging the battery
separately, slide the battery into the slot at the rear of the desktop charger compartment.
While the battery is charging, the indicator LED is red. The LED turns Green once the battery is charged.
Using the Desktop Charger
Single Desktop
Charger Cradle
(BCD022)
Dual Desktop
Charger Cradle
(BCD023)
CHARGER LED INDICA
TORS
Red LED - Charging
Green LED - Fully charge
d
FRONT
REAR
LED
Front LED
Rear LED

CP40 & CP50 INSTRUCTION MANUAL 7
In-Vehicle Charging
Insert radio vercally in
to
mounng bracket
12V In-Vehicle
Lighter Power Plug
Power Indicator
Connector
Mounting
Bracket

8 INSTRUCTION MANUAL CP40 & CP50
GENERAL OPERATION
Please refer to the diagrams on the ‘Controls’ page for a general description of the controls and keys.
TURNING THE RADIO ON / OFF & VOLUME:
Rotate the Volume knob clockwise past the ‘click’ to switch the radio on.
Continue to rotate the Volume knob clockwise to increase the volume.
Rotate the Volume knob counter-clockwise to decrease the volume.
Continue to rotate the Volume knob counter-clockwise past the ‘click’ to switch the radio off.
NOTE: If there are no signals available when adjusting the volume, setting the volume knob to the
10 o’clock position will ensure sufficient volume to hear incoming signals when they occur.
SELECTING CHANNELS:
To select a channel, rotate the Channel Knob or press
or
.
If your radio has only one channel, an alert beep will be heard when you try to select
another channel.
NOTE: Your dealer can program your radio to save individual channels to programmable keys for
quick selection. Please refer to your dealer.
TRANSMITTING:
Before transmitting, check if the channel is already in use. If the channel is busy, wait until it is clear
before transmitting.
1. Press and hold the Push-to-Talk (PTT) key. Hold the radio 3-5 cms from your mouth and
speak into the microphone at a normal voice level.
2. Release the PTT key when you have finished talking.
When transmitting, the status LED is Red and the icon appears on the LCD.
RECEIVING:
When receiving a signal, the busy icon will appear, the signal meter will show the relative
strength of the incoming signal (more bars indicates a stronger signal) and the status LED will be
Green. During this time the signal will be heard in the speaker.
If your radio is programmed to accept subtones on the selected channel and the incoming signal’s
subtone doesn’t match yours, the busy icon and the signal meter will still appear on the
display but the status LED will not light and the speaker will remain quiet. This indicates the call was
not meant for you.

CP40 & CP50 INSTRUCTION MANUAL 9
ADVANCED OPERATION
CP40 & CP50 FEATURES
The CP40 & CP50 radios have a large range of customizable features and settings. Your dealer will
have preprogrammed the required features into your radio and can provide with you with details on
how to access them.
PROGRAMMED SHORTCUT KEYS:
There are 9programmable shortcut keys on the CP50 radio.
These are the F1, F2, F3, F4 and — keys on the front panel, the Top, Middle and Bottom keys on the
left side adjacent to the PTT switch and the red Emergency key on the top panel.
Please refer to the ‘Controls’ diagram on the page 4 to confirm the location of these keys.
Your dealer may have configured one or more of these keys for quick access to specific channels,
radio functions or menu options. Each key can hold up to two separate functions. If available, use
a short press to access the first function and a long press to access the second. Some key presses
may activate the selected function immediately while others may provide a list of options that can be
selected using the Channel Knob or the
or
or
keys.
Please refer to your dealer for details on how the programmable keys on your radio have been configured.
MENU KEY:
Your radio may be programmed with a designated Menu key.
Your dealer will indicate if the Menu is available in your radio.
In this case, selected functions may be accessible through the Menu by pressing either the
programmed Menu key or the Channel Knob.
• To enter the main menu or select the displayed menu item:
◊ Press the Channel Knob or the programmed Menu key.
• To scroll through the menu options:
◊ Rotate the Channel Knob or press
or
.
• To step back to the previous menu level:
◊ Press and hold the Channel Knob or the programmed Menu key.

10 INSTRUCTION MANUAL CP40 & CP50
Zones
Zones are used to organise selected channels into groups. The CP40 supports up to 10 zones while
the CP50 supports up to 127 zones, each containing a different combination of channels. Each zone
can be programmed with a unique identifying label.
Zones can be selected either from a preprogrammed Zone key or from the ZONE option via the
programmed Menu key (whichever is available).
TO SELECT A ZONE:
From a preprogrammed Zone shortcut key:
1. Press the preprogrammed Zone shortcut Key. The current Zone is displayed.
2. Rotate the Channel Knob or press
or
to select the desired zone.
When the desired zone is displayed, wait up to 25 seconds for the radio to return to normal operation.
From the programmed Menu key:
1. Press the programmed Menu key.
2. Rotate the Channel Knob or press
or
to select ZONE then press the programmed Menu key.
3. Rotate the Channel Knob or press
or
to select the desired Zone then press the
programmed Menu key.
4. The radio returns to normal operation.
You can now rotate the Channel Knob or press the
or
keys to select channels.
Backlight
The Backlight illuminates the LCD for viewing under low light conditions.
The backlight has three settings: ON | OFF | TIMER. Select ON to switch the backlight On or select
OFF to switch it Off. Select TIMER and the backlight will switch on when a key is pressed but will
automatically switch off again after 5 seconds.
Backlight
ON
Backlight
OFF
Backlight
Timer
You can select the Backlight setting either from a preprogrammed Backlight key or Backlight Menu
key or via the BACKLIGHT option on the programmed Menu key (whichever is available).
From a preprogrammed Backlight shortcut key:
1. Press the programmed Backlight shortcut key to select a backlight setting. Each press will cycle to the
next setting. Shortly after the desired setting is displayed, the radio will return to normal operation.
From a preprogrammed Backlight MENU shortcut key:
1. Press the programmed Shortcut key. The current backlight setting will be displayed.
2. Rotate the Channel Knob or press the
or
keys to cycle through the backlight settings.
3. When the desired Backlight setting is displayed, briefly press the programmed Menu key.
The radio will return to normal operation.

CP40 & CP50 INSTRUCTION MANUAL 11
From the programmed Menu key:
1. Press the programmed Menu key.
2. Rotate the Channel Knob or press the
or
to select SETTINGS then press the programmed
Menu key.
3. Rotate the Channel Knob or press the
or
to select BACKLIGHT then press the
programmed Menu key.
4. Rotate the Channel Knob or press the
or
keys to cycle through the backlight settings.
5. When the desired Backlight setting is displayed, briefly press the programmed Menu key.
The radio will return to normal operation.
Beeper
The beeper provides audible beeps to alert you to various actions within the radio.
The Beeper has three settings. Select ON to enable beeps for key presses and alerts. Select ALERTS to
enable beeps only for alerts. Select OFF to disable all beeps.
Beeper
ON
Beeper
OFF
Beeper
ALR
TO ACTIVATE THE BEEPER:
From a preprogrammed Beeper shortcut key:
1. Press the preprogrammed Beeper shortcut key repeatedly to cycle through the Beeper settings.
When the desired Beeper setting is displayed, wait a few seconds and the radio will return to
normal operation.
From a preprogrammed Beeper Menu shortcut key:
1. Press the preprogrammed Beeper Menu shortcut key. The current Beeper setting will be displayed.
2. Rotate the Channel Knob or press the keys
or
to cycle through the Beeper settings.
3. When the desired Beeper setting is displayed, briefly press the programmed Menu key.
The radio will return to normal operation.
From the programmed Menu key:
1. Press the Menu key.
2. Rotate the Channel Knob or press
or
to select SETTINGS then press the Menu key.
3. Rotate the Channel Knob or press
or
to select BEEPER then press the Menu key.
4. Rotate the Channel Knob or press the keys
or
to cycle through the Beeper settings.
5. When the desired Beeper setting is displayed, briefly press the programmed Menu key.
The radio will return to normal operation.
NOTE: If Channel Announce is also enabled, channel announcements will take priority over the
Beeper when selecting channels.

12 INSTRUCTION MANUAL CP40 & CP50
Squelch
The Squelch is used to eliminate the annoying background noise when there are no signals present.
The radio features a preset squelch system which can be switched ON or OFF from the Menu. When
the squelch is OFF, the receiver’s background noise can be heard when there are no signals present
(unless Quiet is enabled). When the squelch is ON, the receiver will remain quiet while there are no
signals, but an incoming signal will overcome the squelch and be heard in the speaker.
TO OPEN OR CLOSE THE SQUELCH:
From a preprogrammed Squelch shortcut key:
Press the preprogrammed Squelch shortcut key repeatedly to toggle SQL OPEN or SQL CLS. When
the desired setting is displayed, wait a few seconds for the radio to return to normal operation.
From a preprogrammed Squelch Menu shortcut key:
1. Press the preprogrammed Squelch Menu shortcut key. The current Squelch setting will be displayed.
2. Rotate the Channel Knob or press
or
keys to toggle SQL OPEN or SQL CLS. When the
desired setting is displayed, wait a few seconds for the radio to return to normal operation.
From a programmed Menu key:
1. Press the programmed Menu key.
2. Rotate the Channel Knob or press
or
to select SETTINGS then press the Menu key.
3. Rotate the Channel Knob or press
or
to select SQUELCH then press the Menu key.
4. Rotate the Channel Knob or press
or
to select SQL OPEN or SQL CLS. When the desired
setting is displayed, wait a few seconds for the radio to return to normal operation.
When the squelch is open the icon is displayed, the status LED is green and you will hear the
receiver’s background noise.
When the squelch is closed the icon disappears, the status LED is Off and radio remains quiet
when there are no signals.
Squelch Level
The squelch level determines the sensitivity of the squelch to incoming radio signals. If the squelch
level is set too high, incoming signals may become broken or ‘chopped’ by the squelch action. If the
level is too low the squelch may be opened unnecessarily by noise or unwanted signals.
To set the squelch level
From a preprogrammed Squelch Level shortcut key:
1. Press the programmed Squelch Level shortcut key. The current Squelch level is displayed.
2. Rotate the Channel Knob or
or
to adjust the squelch level from 1 (minimum) to 9 (maximum).
When the desired setting is displayed, press the programmed Menu key. The radio will return
to normal operation.
From a programmed Menu key:
1. Press the programmed Menu key.
2. Rotate the Channel Knob or
or
to select SETTINGS then press the programmed Menu key.
3. Rotate the Channel Knob or
or
to select SQL LVL then press the programmed Menu key.
4. Rotate the Channel Knob or
or
to adjust the squelch level from 1 (minimum) to 9
(maximum). When the desired setting is displayed, press the programmed Menu key.
The radio will return to normal operation.
NOTE: The squelch adjustment is live, so if you are experiencing interference, simply adjust the level
until the squelch remains closed to the interference.

CP40 & CP50 INSTRUCTION MANUAL 13
TX Power
The TX Power setting allows you to change the power level of the transmitter.
The radio has three power level settings: 100mW, 1W and 5W. Each selection of the TX Power setting
will automatically cycle the TX power to the next setting.
100mW 1W 5W
TO SET THE POWER LEVEL:
From a preprogrammed TX Power shortcut key:
1. Press the preprogrammed TX Power shortcut key repeatedly to cycle through the TX Power
settings. Each press will display 100MW, 1W or 5W.
After a few seconds the radio will return to normal operation.
From a preprogrammed TX Power Menu shortcut key:
1. Press the preprogrammed TX Power Menu shortcut key. The current TX Power setting will be
displayed.
2. Rotate the Channel Knob keys to
or
cycle through 100MW, 1W or 5W.
When the desired setting is displayed, wait a few seconds for the radio to return to normal operation.
From a programmed Menu key:
1. Press the programmed Menu key
2. Rotate the Channel Knob or press
or
to select SETTINGS then press the programmed
Menu key.
3. Rotate the Channel Knob or press
or
to select TX POWER then press the programmed
Menu key.
4. Rotate the Channel Knob keys or press
or
to cycle through 100MW, 1W or 5W.
After a few seconds the radio will return to normal operation.
NOTE: When the 100mW and 1W settings are selected, LO is displayed to indicate a Low Power
mode is selected. When 5W is selected, LO disappears from the display to indicate High Power.
Keylock
The Keylock feature disables the keys to prevent accidental key presses from changing the radio’s
settings. When the keys are locked, all controls are disabled except the PTT, the Volume control and
the designated Keylock key.
There is no ‘Keylock’ icon displayed when keylock is active, however rotating the Channel Knob or
pressing
or
keys will display PRESS ‘XX’ TO UNLOCK where ‘XX’ is the designated Keylock key.
Key presses to all remaining preprogrammed keys will be ignored.
The Keylock feature is accessible using a preprogrammed shortcut key.
TO ACTIVATE KEYLOCK:
Press the preprogrammed Keylock shortcut key. PRESS ‘XX’ TO UNLOCK is displayed where ‘XX’ is
the designated Keylock key. The keys are now locked.
TO DEACTIVATE KEYLOCK:
Press the preprogrammed Keylock shortcut key. UNLOCKED is displayed.

14 INSTRUCTION MANUAL CP40 & CP50
Recall Channel
To recall a preselected channel assigned to a preprogrammed key
1. Press the preprogrammed Recall Channel shortcut key. The radio immediately switches
to the preselected channel. If Channel Announce is active the new channel number will be
announced.
Channel Announce
Channel Announce provides audible voice announcements when changing channels. Channel
Announce has two settings: ON or OFF. When Channel Announce is set to ON, the channel number
will be announced whenever a channel is selected or when switching Zones. If the Beeper is switched
On, Channel Announcements will take priority over the Beeper.
TO ACTIVATE CHANNEL ANNOUNCEMENTS:
From a preprogrammed CH Announce shortcut key
Press the preprogrammed CH Announce shortcut key repeatedly to cycle between ANN ON and
ANN OFF. When the desired Channel Announce setting is displayed, wait a few seconds and the
radio will return to normal operation.
From a preprogrammed CH Announce Menu shortcut key:
1. Press the preprogrammed CH Announce Menu shortcut key. The current CH Announce
setting will be displayed.
2. Rotate the Channel Knob or press
or
to cycle between ANN ON and ANN OFF.
3. When the desired CH Announce setting is displayed, briefly press the programmed Menu key.
The radio will return to normal operation.
When the desired CH Announce setting is displayed, wait a few seconds and the radio will return to
normal operation.
From a programmed Menu key:
1. Press programmed Menu key.
2. Rotate the Channel Knob or press
or
to select SETTINGS then press the
programmed Menu key.
3. Rotate the Channel Knob or press
or
to select ANNOUNCE then press the
programmed Menu key.
4. Rotate the Channel Knob or press
or
to cycle between ANN ON and ANN OFF.
5. When the desired CH Announce setting is displayed, briefly press the programmed Menu key.
The radio will return to normal operation.

CP40 & CP50 INSTRUCTION MANUAL 15
Talk Around
Talk Around allows you to communicate directly with a nearby radio if the local repeater is out of
range or is not working. When enabled, the radio transmits and receives on the configured receive
frequency, effectively bypassing the repeater. The radio you are talking to will also need to select Talk
Around and be within direct communication range of your radio.
When Talk Around is switched ON the icon is displayed.
When Talk Around is switched OFF the icon disappears.
TO ENABLE TALK AROUND:
From a preprogrammed Talk Around shortcut key:
1. Press the preprogrammed Talk Around shortcut key repeatedly to cycle the Talk Around
setting ON or OFF.
From a preprogrammed Talk Around MENU shortcut key:
1. Press the preprogrammed Talk Around Menu shortcut key. The current Talk Around setting
will be displayed.
2. Rotate the Channel knob or press the keys to cycle the Talk Around setting ON or OFF.
3. Press the programmed Menu key to return to normal operation.
From the programmed Menu key:
1. Press the programmed Menu key.
2. Rotate the Channel Knob or press
or
to select SETTINGS then press the programmed
Menu key.
3. Rotate the Channel Knob or press
or
to select TALK AROUND then press the
programmed Menu key.
4. Rotate the Channel Knob or press
or
to select TA ON or TA OFF then press the Menu
key.
NOTE: Talk Around can only be selected on channels that have been programmed to allow Talk Around.

16 INSTRUCTION MANUAL CP40 & CP50
Scan
Use Scan to quickly scan through a number of selected channels while searching for signals. If a signal
is found, the radio pauses on that channel to allow the signal to be heard. When the signal has gone,
the radio resumes scanning for further signals.
To activate the Scan press the programmed Scan shortcut key. The scan icon will flash on the
display and the channel ID will change rapidly as the channels are scanned.
If a signal is received the scan will pause on the busy channel to allow the signal to be heard.
The following additional preprogrammed shortcut key options may be enabled on your radio:
Scan Hold: Press the preprogrammed Scan Hold key while paused on a busy channel to stay on that
channel. Press the Scan Hold key again to resume scanning.
Scan Resume: Press the preprogrammed Scan Resume key to force the radio to resume scanning
when paused on a busy channel and temporarily remove the busy channel from the scan for 30
seconds.
This function can also be duplicated by rotating the Channel Knob or pressing
or
while paused
on a busy channel.
Scan Remove: Press the programmed Scan Remove key to force the radio to resume scanning
when paused on a busy channel and remove the busy channel from the scan for the duration of the
scan session. This is useful when constant interference on one or more Scan channels is disrupting the
scan.
When the Scan is next restarted, any removed channels will be restored.
Scan Toggle: Adds or removes the selected channel from the scan memory.
While Scan is not active, select the desired channel by rotating the Channel Knob or pressing
or
then press the programmed Scan Toggle key. The radio will display Channel Removed or Channel
Added to indicate the status of the channel in the Scan memory. Channels that are added will be
scanned when Scan is activated.

CP40 & CP50 INSTRUCTION MANUAL 17
Selcall
Selcall (Selective Calling) is a reliable signalling system that allows individual radios to be selectively
called on a shared channel. If your radio receives a Selcall, it will beep to alert you to the call and will
display IN CALL along with the caller’s ID.
To send and receive a Selcall, each radio must be preprogrammed with its own unique radio ID.
TO SEND A SELCALL FROM A CONTACT LIST:
From a preprogrammed Selcall Menu shortcut Key:
1. Press the programmed Selcall Menu shortcut key. The Selcall contact list is displayed.
2. Rotate the Channel Knob or press
or
to select the desired radio from the contact list
then press the programmed Menu key to send the call. Your radio displays IN CALL and the
icon appears as your radio transmits the Selcall. Your radio then listens for a response.
From a programmed Menu key:
1. Press the programmed Menu key.
2. Rotate the Channel Knob or press
or
to select SELCALL then press the Menu key.
3. Rotate the Channel Knob or press
or
to select the desired radio from the contact list
provided, then press the Menu key to send the call. Your radio displays IN CALL and the
icon appears as your radio transmits the Selcall. Your radio then listens for a response.
TO SEND A SELCALL TO A PREDEFINED CONTACT ON A PRESELECTED CHANNEL:
From a preprogrammed Recall & Dial Selcall key:
1. Press the preprogrammed Recall & Dial Selcall key. The radio switches to the preselected
channel and Zone, then displays IN CALL and the icon appears as your radio transmits
the Selcall to the predefined contact. If Channel Announce is active, the preselected channel
number will be announced. Your radio then listens for a response on the preselected channel.
If your Selcall is received successfully, you will receive an acknowledgment transmission from the
other radio. IN CALL and the Ident of the other radio will then remain on the display.
To communicate with the other radio, press the PTT and talk in the usual way.
This will clear the IN CALL information from the display and restore the radio to normal operation.
NOTE: If you do not receive an acknowledge, the radio you are calling may be on a different channel
or out of range.
RECEIVING A SELCALL:
When your radio receives a Selcall, it will beep to alert you to the call and IN CALL will be
displayed along with the Ident of the caller. During this time your radio will quickly transmit an
acknowledgment response back to the caller, causing the icon to appear and red Status LED to
light briefly.
If Quiet mode was enabled on your radio, it will be cancelled and you will be able to hear signals on
the channel.
To respond to the call, press the PTT and talk in the usual way. This will cancel the beeps, clear
the IN CALL information from the display and restore the radio to normal operation. After your
communication is complete you may re-enable Quiet mode by pressing the Quiet Mode button.

18 INSTRUCTION MANUAL CP40 & CP50
Selcall Mode
The Selcall mode switches the Selcall contact list display between numeric and Alpha (text) mode.
When Alpha mode is ON, Selcall contacts are identified by their text labels. When Alpha mode is OFF,
Selcall contacts are identified by their numeric Selcall ID.
TO SWITCH THE SELCALL MODE:
From a preprogrammed Selcall Mode shortcut key:
1. Press the programmed Selcall Mode shortcut key. The current Selcall Mode is displayed.
2. Rotate the Channel Knob or press
or
to select between ALPHA ON and ALPHA OFF.
After a few seconds the radio will return to normal operation.
From a programmed Menu key:
1. Press the programmed Menu key.
2. Rotate the Channel Knob or press
or
to select SETTINGS then press the programmed
Menu key.
3. Rotate the Channel Knob or press
or
to select SELCALL MODE then press the
programmed Menu key. Th current Selcall Mode is displayed.
4. Rotate the Channel Knob or press
or
to select between ALPHA ON and ALPHA OFF.
After a few seconds the radio will return to normal operation.
Quiet
The Quiet feature prevents incoming signals from being heard through the speaker until you receive
a Selcall. In this way, you can monitor a busy channel for Selcalls without being disturbed by
unwanted signals.
NOTE: Quiet operation is only available on channels that have been programmed to allow it.
The Quiet feature has two settings - Quiet Channel and Quiet Mode.
QUIET CHANNEL:
Quiet Channel operates in conjunction with the Quiet Mode to let you control which channels will
remain quiet when Quiet Mode is switched on.
Using the Quiet Channel setting, you can select individual channels for Quiet operation. Once you
have selected your Quiet Channels, switching on Quiet Mode will cause these channels to remain
quiet to all signals unless you receive a Selcall. All other channels will continue to remain open to
incoming signals.
Switching Quiet Mode off will open all channels to incoming signals again.
To select channels for Quiet Channel Operation:
Rotate the Channel Knob or press
or
to select the desired channel.
From a preprogrammed Quiet Channel shortcut key:
1. Press the preprogrammed Quiet Channel shortcut key repeatedly to cycle between QC ON
and QC OFF.
From a preprogrammed Quiet Channel Menu shortcut key:
1. Press the preprogrammed Quiet Channel Menu shortcut key.
2. Rotate the Channel Knob or press
or
to cycle between QC ON and QC OFF.
With QC ON, the selected channel will operate in the Quiet mode when Quiet Mode is switched on.
With QC OFF, the selected channel will receive all signals irrespective of the Quiet Mode setting.
Repeat the steps above to set further channels to operate in the Quiet mode.

CP40 & CP50 INSTRUCTION MANUAL 19
Quiet Mode:
The Quiet Mode setting enables quiet operation on any channels that have been selected using the
Quiet Channel setting.
TO ENABLE QUIET MODE OPERATION:
From a preprogrammed Quiet Mode shortcut key:
1. Press the preprogrammed Quiet Mode shortcut key repeatedly to cycle between Q ON and
Q OFF. After a few seconds the radio will return to normal operation.
From a preprogrammed Quiet Mode Menu shortcut key:
1. Press the preprogrammed Quiet Mode Menu shortcut key.
2. Rotate the Channel Knob or press
or
to cycle between Q ON and Q OFF.
3. When the desired Quiet Mode setting is displayed briefly, press the programmed Menu key.
The radio will return to normal operation.
From a programmed Menu key:
1. Press the programmed Menu key.
2. Rotate the Channel Knob or press
or
to select SETTINGS then press the programmed
Menu key.
3. Rotate the Channel Knob or press
or
to select QUIET then press the programmed
Menu key.
4. Rotate the Channel Knob or press
or
to cycle between Q ON and Q OFF.
5. When the desired Quiet Mode setting is displayed briefly, press the programmed Menu key.
The radio will return to normal operation.
When Quiet Mode is ON, you will not hear any signals on the selected channel(s) unless someone
specifically calls you using Selcall.
When Quiet Mode is OFF, you will be able to hear all signals on all channels.
RECEIVING SIGNALS IN THE QUIET MODE:
• If a normal signal is received on a QUIET channel, the icon will be visible but no sound will
be heard from the speaker and QUIET will be displayed for the duration of the signal. This means
you will not be disturbed by the signal.
• If a normal signal is received on a channel that has not been selected as a Quiet Channel, the
signal will be heard in the usual way.
• If a Selcall is received on a Quiet channel, the alarm will beep to alert you to the call, the callers
Ident will be displayed and the Quiet mode will be cancelled. You can now press the PTT and talk
in the usual way.
Once your communication is complete you should reactivate the Quiet mode again.
TRANSMITTING WHILE IN QUIET MODE:
If you press the PTT while in Quiet mode on a Quiet Channel, QUIET will be displayed and the radio
will not transmit. To transmit, either switch off Quiet Mode or switch off the Quiet Channel setting on
that channel.

20 INSTRUCTION MANUAL CP40 & CP50
DTMF
DTMF (Dual Tone Multiple Frequency) is an analog signalling system that allows the radio to dial
telephone numbers on a network that uses Telephone Connect hardware.
TO MAKE A DTMF CALL TO A CONTACT SELECTED FROM A LIST:
From a preprogrammed DTMF Menu shortcut key:
1. Press the preprogrammed DTMF Menu key. The DTMF contact list will be displayed.
2. Rotate the Channel Knob or press
or
to select the desired DTMF contact from the list
provided then press the programmed Menu key.
The icon appears and the radio displays DIALLING as it transmits the DTMF call. The radio then
returns to normal operation.
From a programmed Menu key:
1. Press the programmed Menu key.
2. Rotate the Channel Knob or press
or
to select DTMF then press the Menu key.
3. Rotate the Channel Knob or press
or
to select the desired DTMF contact from the list
provided then press the programmed Menu key.
The icon appears and the radio displays DIALLING as it transmits the DTMF call. The radio then
returns to normal operation.
TO MAKE A DTMF CALL TO A PREDEFINED CONTACT:
From a preprogrammed Dial DTMF shortcut key:
1. Press the preprogrammed Dial DTMF key.
The icon appears and the radio displays DIALLING as it transmits the DTMF call. The radio then
returns to normal operation.
TO MAKE A DTMF CALL TO A PREDEFINED CONTACT ON A PRESELECTED CHANNEL:
From a preprogrammed Recall & Dial DTMF shortcut key:
1. Press the preprogrammed Recall & Dial DTMF key.
The radio switches to the preselected channel and Zone, the icon appears and the radio displays
DIALLING as it transmits the DTMF call. If Channel Announce is active, the preselected channel
number will be announced. The radio then returns to normal operation on the preselected channel.
Other manuals for Commercial CP40 Series
1
This manual suits for next models
1
Table of contents
Other GME Radio manuals
Popular Radio manuals by other brands

Sirius Satellite Radio
Sirius Satellite Radio PowerConnect XMP3I user guide

MyVQ
MyVQ Retro Mini quick start guide

Telefunken
Telefunken TF-1590 instruction manual

Midland Radio Corporation
Midland Radio Corporation 70-101BD Service manual

Goodmans
Goodmans GMR1990DABT user manual

Retekess
Retekess TR401 user guide