GMP PROTOPIC-540 QUATRO SLIT User manual

2015. 06
USER MANUAL FOR PROTOPIC-540 QUATRO SLIT
Before operating the unit, please read this manual thoroughly and retain it for future reference.
The design / specification of the machine could be changed for improvement without any prior notice.

INDEX
◐ SAFETY ◐ How to Laminate 28 ~ 33 page
Important Safety Instruction 3 ~ 5 page
Safety Device 6page ◐ MAINTENANCE 34 page
Warning Stickers 7 ~ 8 page
◐ TROUBLESHOOTING 35 ~ 38 page
◐ INSTALLATION
Packing Contents 9page ◐ SPECIFICATION 39 page
Main Devices 10 page
Move & Installation 11 ~ 13 page ◐ DIGITAL SLEEKING SOLUTION
Introduction of DIGITAL SLEEKING 40 page
◐ HOW TO USE CONTROL PANEL GLOSS & MATT SLEEKING 41 ~ 44 page
Details for Display 14 ~ 16 page HOLOGRAM SLEEKING 45 ~ 48 page
Control Panel 17 ~ 18 page METALLIZE PRINTING 49 ~ 50 page
Messages 19 ~ 20 page SLEEKING FILM SPECIFICATION 51 page
◐ HOW TO USE MAIN DEVICES
Lamination Area 21 ~ 24 page
Cutting Area 25 ~ 26 page
Other Devices 27 page

Important Safety Instruction
"Important Safety Instruction " is for the purpose of user's safety
and prevention of Property loss. Read thoroughly and Use rightly according to the manual
Warning : If you ignore this symbol, you could suffer serious injury or death
Caution: If you ignore this symbol, you could receive a serious injury or loss of property
This symbol means a prohibited action. If you ignore a prohibited action,
you could suffer a personal injury and damage the machine
This symbol means a required action. If you don't follow this action, your safety is not guaranteed.
Required action will be included in this symbol.
Reference:The sign above refers the contents for user's safety and prevention of Property loss.
☞ POWER
Do not connect or disconnect with wet hands, as this will cause an electric shock
Do not overload a power supply,as this will cause a fire and an electric shock.
Do not use a damaged plug or lead, as this could cause a fire or an electric shock
Do not use other voltage and power supply other than specified, as this will cause a fire and an electric shock.
Warning
3/51

Important Safety Instruction
☞ POWER
Make sure plug is in the socket, as it could cause fire or an electric shock
For your safety, grounding the power
Do not pull the plug or bend improperly
Danger, Malfunction, loss of electricity could cause an electric shock
☞ Installation
Do not use materials near a naked flame
Do not use the machine in the sealed place.
Only use the specified power and voltage. It can be a reason of fireflame or an electricity fireflame.
Do not dissemble, make repairs or convert the machine. Contact your dealer for repairs
Ensure all hair, neckties, necklaces, are kept free of the feeding table to avoid injury
Do not convert the safety device and safety switch.
Do not spill any liquids on the laminator as this will cause damage and a possible electric shock
Do not use the flammable spray or flammable materials inside or outside the machine. As this could cause a fire.
Do not allow childern use of this equipment
Warning
Grouning
4/51

Important Safety Instruction
☞ POWER
When moving the product, turn off the power switch, disconnect the power plug from the socket
When lamintor is not in use, you must turn off the power switch, disconnect the power plug from the socket.
☞ Installation
anger - laminating blades are sharp and can cause injury.
More than 2 people are needed to carry this equipment to avoid personal injury or damage to the machine.
Keep gears and chains free of all materials
Do not touch the roller with your hand as you could be burnt.
Please avoid installing near the following places;
Gas stove, Ventilator or Air conditioner due the higher temperature or higher humidity
Do not place any materials on the laminator as they could catch a fire
Avoid the direct sunlight for the installing the machine
Avoid the dark and slope place for installation
Do not place any materials on the laminator as they could catch a fire
Do not touch the film and laminating machine just after lamination finishes as you could be burnt.
Use the machine with laminating purpose only.
Tidy up the place near the laminating machine.
Warning
5/51
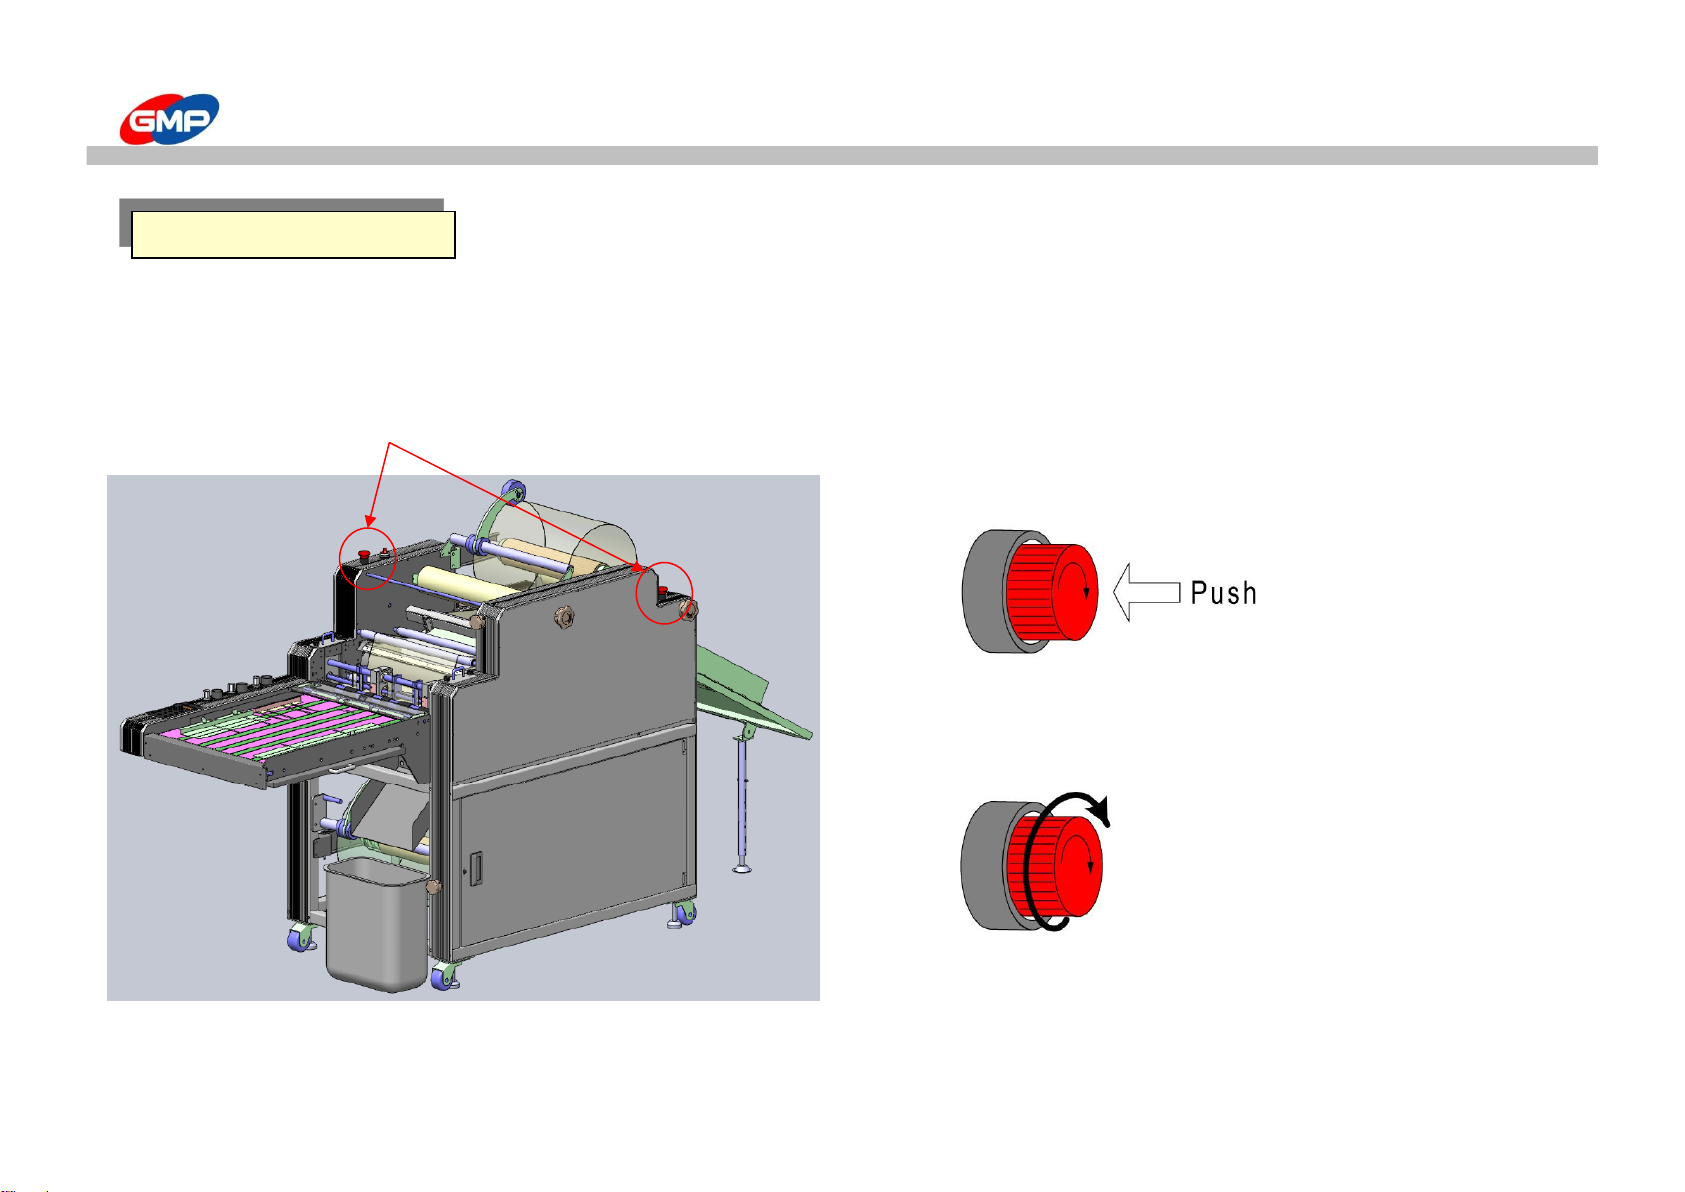
Safety Device
☞ Emergency Stop Switch
When emergency situation happened, it stops the running motor(rollers) rotation and system operation.
In case of emergency, use this switch.
☞ How to use
Press the Red button to operate the Emgency Stop Switch.
All system is stopped when this is pressed.
Turn the switch to the right to release from Emergency Status.
Emergency Stop Switch
E-Stop S/W
6/51
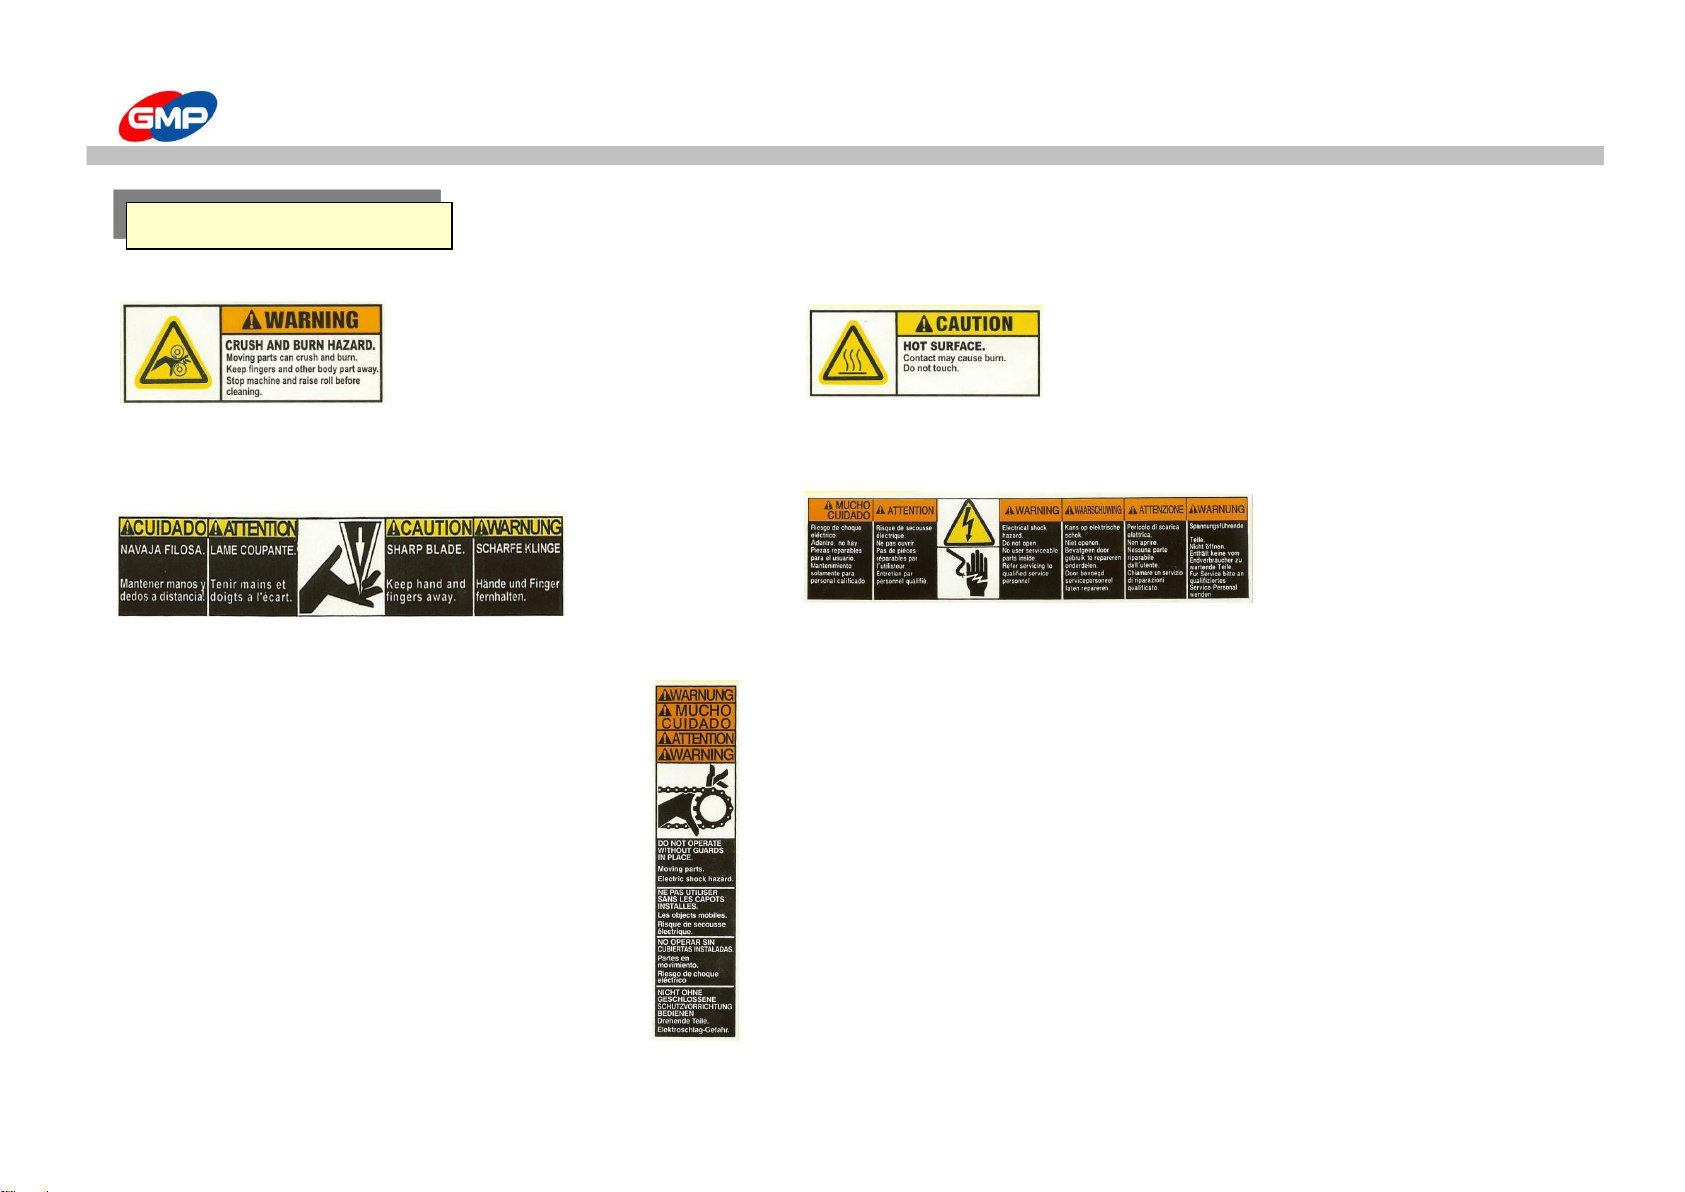
WARNING STICKERS
For the user safety, in the outer design, the below sticker is attached. Be cautious not to injured during operation.
☞ Roller caution ☞ Higher Temperature
Do not touch the roller and heating plate with your hand as you could be burnt.
Do not touch on the heating part
Roller's higher temperature and press can damage your body
☞ Electricity Caution
☞ Cutting Caution Inside the machine, high voltage flows,
Do not touch your body on the trimming device Do not open the outer case
You can suffer an injury You can suffer injury or sudden death with electricity shock
☞ Chain Caution
Do not your body wound into a chain.
You can suffer an injury
WARNING STICKERS
7/51

WARNING STICKERS
WARNING STICKERS
8/51

PACKING CONTENTS
Items Q'ty(EA)
LAMINATOR 1
FEEDING TABLE 1
PAPER GUIDE
2
AIR COMPRESSOR 1
AIR HOSE 1
GLASS TUBE FUSE (20mm) 250V/12.5A
4
GLASS TUBE FUSE (20mm) 250V/15A 2
WRENCH SET
1
LAMI TABLE
1
MANUAL
1
SEPARATOR IDLE ROLLER
1
LEADING PAPER 1
WASTE GUIDE
2
WASTE BASKET 1
`
CONTENTS
PROTOPIC-540 QUATRO SLIT
9/51

MAIN DEVICES
Main Devices
Decurling Adjustment Knob
Laminating Roller
Pressure Adjustment
Knob
Control Panel
Feeder
Pull Roller Pressure Adjustmen Kob
Feeding Table
Lower Roller Pressure Adjustmen Kobe
Application Table
Side Slitter
Film Shaft Support
Perforator
Feeding Gate
E-Stop S/W
SLIT Module Safety Cover
Film Rewinder
Waste Guide
Waste Basket
10/51

UNPACK & MOVE
☞ Unpacking
1. Product is packed with vacuum aluminum packing materials to avoid corrosion and external packing is wooden crate.
2. Wooden crate can be disassembled by 11mm box spanner.
Disassemble the 5 panels on the left picture and remove vacuum packing materials. Then,
move it to the installation place.
☞ Move the product
◑ In the following cases, it requires to move it by forklift.
1. If the ground is not level.
2. If it is required to be moved it to more than 10m distance.
3. After unpacking and move it to an installation area.
◑ If it requires to move it by caster wheel.
1. If a distance to move the laminator is less than 10m distance in the same area
2. Move the laminator gently with more than 4 persons at least. During it is moved,
grap each corner of the machine.
◑ After the machine is moved
1. Lock the caster wheel and fix the machine with height adjustment legs.
2. Plug the power cord and connect the air hose.
3. Check the machine as the test operation.
WARNING : Machine weight is very heavy, then be careful to move it to avoid damage / injury.
Before it is moved, power cord / air hose have to be unplugged / disconnected.
☞ Caster Wheel
Leveling foot is to fix / to level the machine. After the machine is moved on the installation place, fix the machine with spanner.
UNPACK & MOVE
Caster Wheel
11/51
UNPACK & MOVE
☞Circumstance
1. Be installed in the flat place.
2. If inflammable or combustible substance is around, it might be a reason for a fire.
3. Sufficient ventilation is required to omit the heat from the laminator while laminating.
4. Outlet should be near the machine, and easy to approach the outlet.
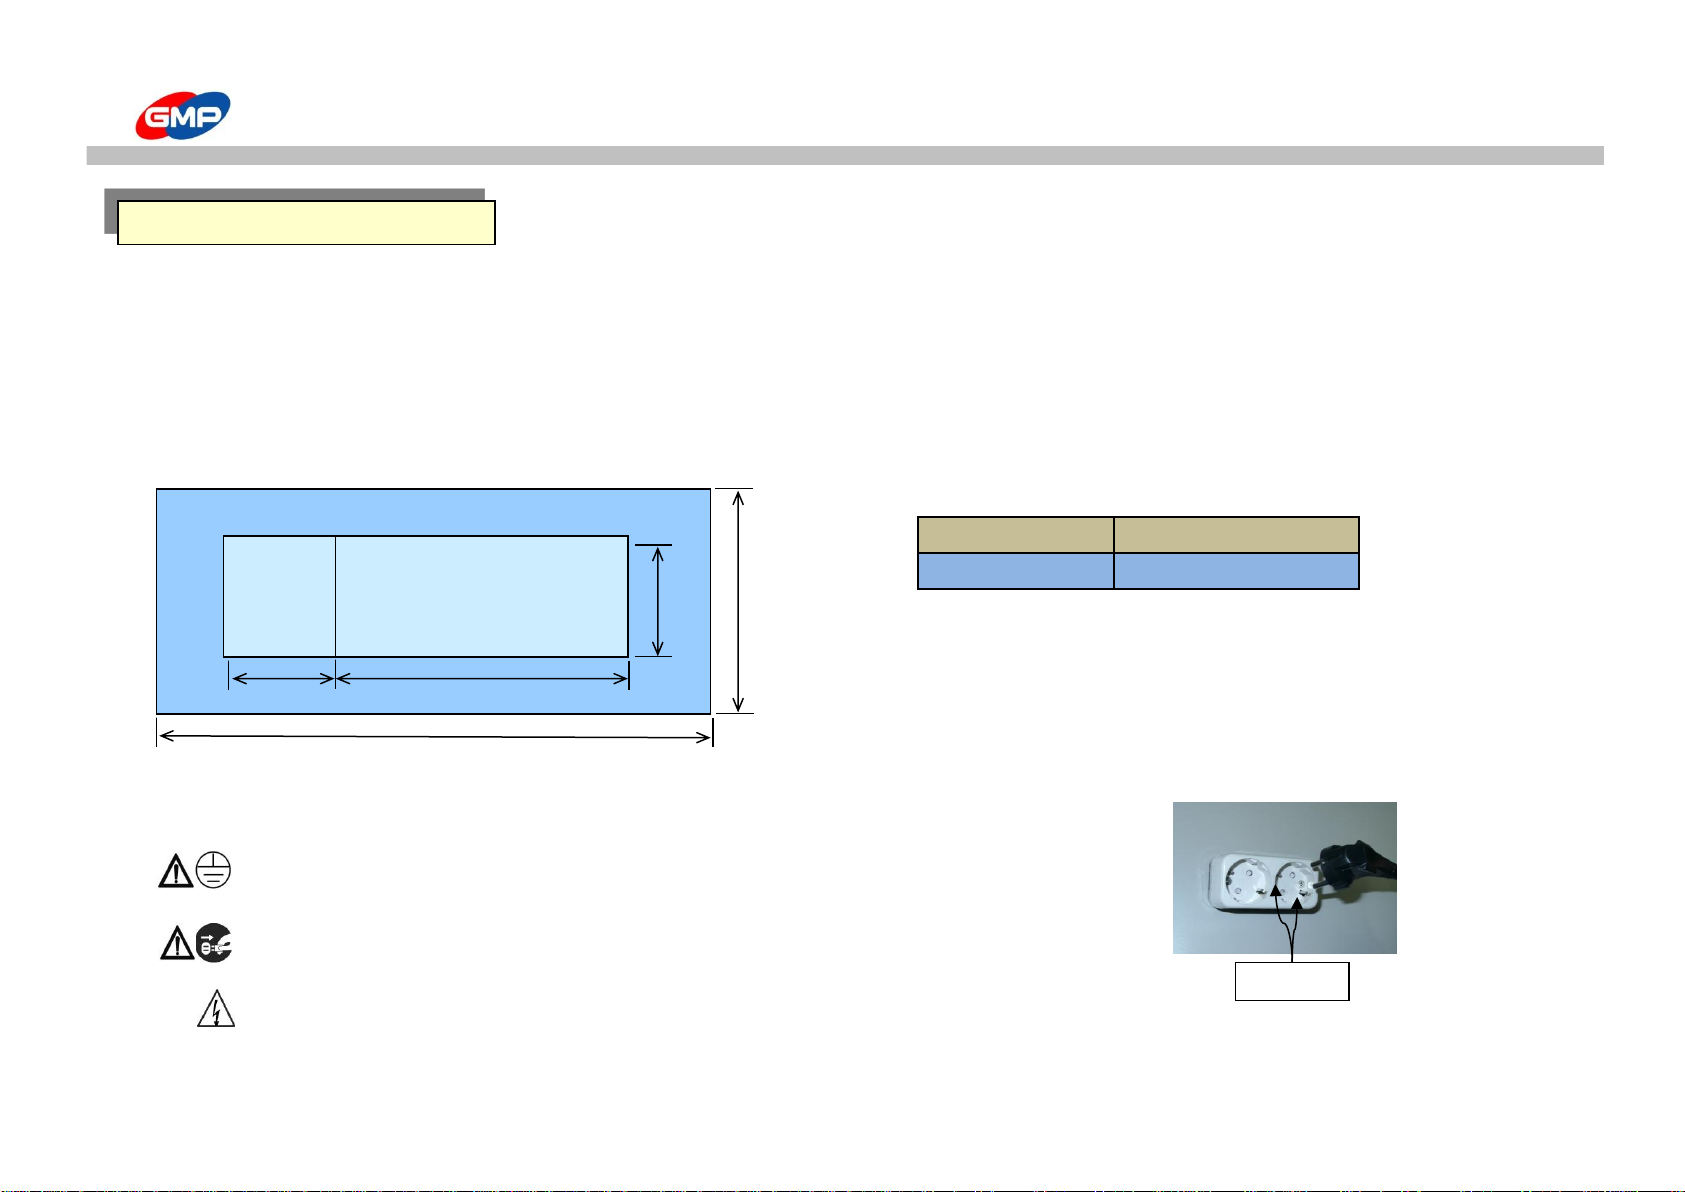
☞ Installation Space
* PROTOPIC - 540 QUTRO SLIT
Product(WxLxH)
800*2000*1320
Dimension(WxL)
1800*3670
※ The place for installation could be different
depends on the job circumstance
☞ Power Connection
AC 220~240V/15A / Independent Power System.
WARNING : It must be grounded for safety.
Otherwise, this could be a cause of trouble and electric shock.
WARNING :Do not plug-in the laminator at a Outlet with the other devices,
this could be a cause of fire by overheating at outlet.
WARNING : Plug-in the laminator only at Outlet that is listed in the manual.
Otherwise, this could be a cause of fire / electric shock.
WARNING :Insert the plug into the outlet exactly. Otherwise, this could be a cause of trouble of fire by overheating a outlet.
LAMINATOR
800
2000
3670
1800
FEEDER
670
Grounding
Installation
12/51

UNPACK & MOVE
☞ How to connect
Compressed air needs to be supplied into the laminator to activate the bursting roller and pressure on the laminating roller.
WARNING : Plug in at Independent Power System (AC 220~240V).
Note : It is recommended to place the air compressor at outside of the laminator.
if you place inside of Lamitable, the high temperature could cause malfunction or trouble
☞ Maintenance of Compressor
A large amount of moisture is made during the air compressor is operated.
Then, the dry filter at output of compressor must be demoisturised once a day.
How to connect Air Compressor
Insert air hose in to the air
compressor
After Power On, pull the cap
upward.
Push the button as the arrow direction.
Laminater
Compressor
Example of Power
connection
Laminater
Compressor
13/51
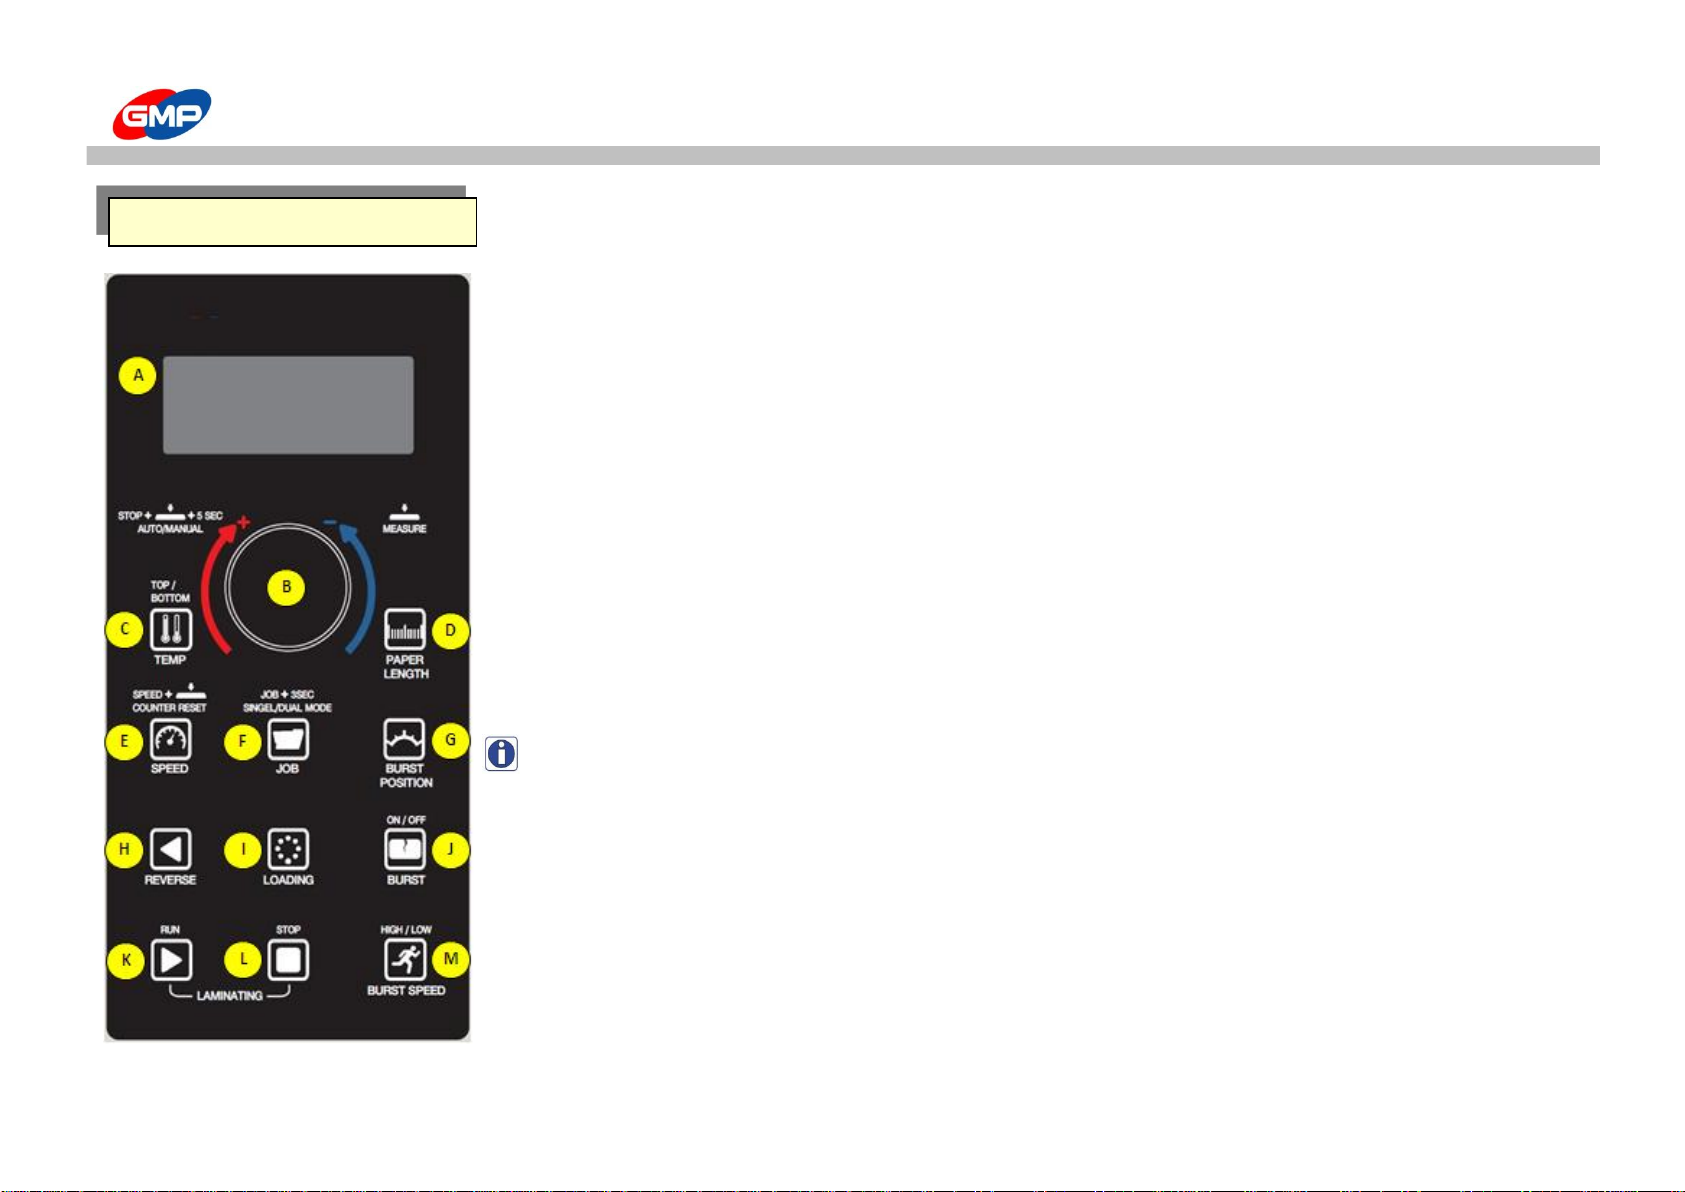
CONTROL PANEL
A. "LCD"(Display)
To display the setting values in the laminator.
When the Power is ON, LCD is lighted on.
Refer to the "Explanation of Display" for each displays.
B. "MASTER DIAL"
Dial to adjust values of Roller Temp.(C), Paper Length(D), Laminating Speed(E), Job Mode(F), Bursting Point(G), etc.
☞ How to use of MASTER DIAL
1. Press a button to adjust a required value.
2. Turn "MASTER DIAL" to left / right to set up for required setting value.
Turn "MASTER DIAL" to right to increase the value and turn it to left to decrease the value.
☞ Other Functions of MASTER DIAL
1. While the "MASTER DIAL" is pressed, the current temp. is displayed.
2. Press SPEED button and MASTER DIAL at the same time, it makes COUNTER RESET.
3. Press STOP button and MASTER DIAL at the same time for 5 secs. to change the mode to AUTO or to MANUAL.
NOTE : AUTO MODE is to integrated with GMP Automatic Feeder of PROFEEDR-5478. (Contact GMP to purchase it.)
C. "TEMP"(Button to set up the Roller Temp.) :
To set up the Roller Temp. Temp. Setting Range is "0 ~ 150"℃ .
☞ How to set up the MIRROR Roller Temp. :
Press "TEMP" button to "ON" and set up a required temp. with "MASTER DIAL".
☞ How to set up the Embossing Roller Temp. :
In normal status (SINGLE MODE), no power is supplied to the Embossing Roller Heater.
To heat up the Embossing Roller, change the mode to DUAL MODE.
1. Press "JOB" button for more than 3 secs. to change it to "DUAL" mode.
2. Press "TEMP" button to "OFF" and set up a required temp with "MASTER DIAL".
The set up value is saved automatically after 5 secs.
CONTROL PANEL
14/51

CONTROL PANEL
D. "PAPER LENGTH"(Button to set up Paper Length) :
To set up the length of substrate.
Length set up range for MANUAL MODE is "203 ~ 1,219"mm and for ATUO MODE is "254 ~ 813"mm.
☞ How to set up Substrate Length : Press "PAPER LENGTH" button and set up a required length with MASTER DIAL. Setting value is saved
after 5 secs. automatically.
NOTE : This product has "UNDERLAP" cutting system. Then, setting value has to be smaller than real size by 3~5mm for underlapped area.
E. "SPEED"(Speed Setting Button) :
To set up the laminating speed. Speed setting range is "1 ~ 15".
☞ How to set up Speed : Press "SPEED" button and adjust speed with MASTER DIAL.
F. "JOB"(Job Mode Selection Button) :
Save regularly used job conditions at the memory to avoid reset the conditions in future.
Job mode is composed of 13 kinds (Poly-L~User3).
☞ Select a Job Mode : In stop status, press "JOB" button and select a required job mode for films with "MASTER DIAL".
Temp., Substrate length can be saved by operator and this value is saved automatically after 5 secs.
☞ Other functions of "JOB" button : Press JOB button for 3 secs., mode can be changed to SINGLE or to DUAL mode.
"DUAL" mode is required in PROTOPIC III-540DUAL to heat up the Embossing Roller.
NOTE : Factory Setting Progress
In "Poly-L" Mode, press "TEMP" button and "STOP" button at the same time, message of "Factory Setting Progress Waiting" is blinking and displaying
for around 15 secs. After on, the setting value in JOB mode is changed to Factory Setting Values.
G. "BURST POSITION"(Set up button for the Bursting Point) :
To set up operation point of Bursting Roller. Bursting Point range is "960 ~ 1060"mm
☞ How to set up Bursting Point : Press "BURST POSITION" button and set up its position with MASTER DIAL. The set value is saved automatically after 5 secs.
NOTE : Characteristics of materials / thickness, height of decurling bar, laminating speed make bursting point change, then, adjust it for its cutting status.
Basically, the range is "960 ~ 1060"mm
15/51

CONTROL PANEL
H. "REV"(Button to Reverse Rotation of Roller) :
To rotate the roller reversely. While the "REV" button is pressed, the roller is rotated reversely in roller engaged status.
Then, the button is not pressed, reverse rotation is stopped and rollers are disengaged.
NOTE : During the machine operation, the function is not activated.
I. "LOADING"(Button for Film Loading & Setting) :
To set the machine initially and to load a film roll.
While "LOADING" button is pressed, roller is rotated and feeder is opened for feeding.
NOTE : During the machine operation, the function is not activated.
J. "BURST"(Button to operate Upper Bursting Roller) :
To move Bursting Roller to up/downwards.
Press "BURST" button to light on. Then, the Bursting Roller starts to move. Press the button again and lamp is OFF,
the Bursting Roller is stopped to move.
NOTE : Only in RUN status, the button is activated. In STOP status, the button is not activated.
K. "RUN"(Operation Button) :
To operate the machine.
Press "RUN" button to operate roller with engagement.
NOTE : If the roller rotates fast from stop status, this could be a cause of error in job.
L. "STOP"(Stop Button) :
Stop the machine operation.
Press "STOP" button to stop roller and the rollers are disengaged.
M. "BURST SPEED"(Button to operate Lower Bursting Roller in high speed) :
To make the lower bursting roller in high speed during lamination for NYLONEX(NYLON) & PERFEX(PET) films to increase its cutting quality.
Press "BURST SPEED" button and its lamp is ON, the lower bursting roller is rotated in high speed. Then, press the button and the lamp is OFF,
the roller is rotated in normal speed.
16/51

HOW TO USE CONTROL PANEL
1. Job Mode Display Screen 6. Bursting Paper Timming Display
2. Temperature Display on Upper Roller 7. Counting Paper/ Roller Heating Mode Display
3. Temperature Display on Bottom Roller 8. Feeding Paper Display
4. Paper Length Display 9. Error Message Display
5. Roller Speed Display
① "Poly-L" - Job Mode Display Window
According to the kind of film, this is the save function to save the temperature, speed, paper length.
There are 13 kinds of job modes as below.
JOB Mode
- Poly-L : Polynex Film Low Temp. Job Mode (Set Temp. 100℃) - MICRO : Micronex Film Job Mode (Set Temp. 120℃)
- Poly-H : Polynex Film High Temp. Job Mode (Set Temp. 120℃) - FOIL-L : Foil Film Low Temp. Job Mode (Set Temp. 115℃)
- Nylon : Nylonex Film Job Mode (Set Temp. 130℃) - FOIL-H : Foil Film High Temp. Job Mode (Set Temp. 125℃)
- PET-L : Perfex Film Low Temp. Job Mode (Set Temp. 90℃) - User-1 : Use Setting Job Mode 1
- PET_H : Perfex Film High Temp. Job Mode (Set Temp. 110℃) - User-2 : : Use Setting Job Mode 2
- FUS-L : Fusing Film Low Temp. Job Mode (Set Temp. 125℃) - User-3 : Use Setting Job Mode 3
- FUS_H : Fusing Film High Temp. Job Mode (Set Temp. 135℃)
NOTE : Refer to the 'JOB' for each functionality to check the setting value and save method.
② "T:100℃R - Upper Roller Temperature & Condition Display Window
Display Upper Roller Set Temp. and Current Temp. Refer to "TEMP" on Display for setting temperature.
☞ How to check current temp. : Display current temp while pressing "MASTER DIAL".
Description on Display
17/51

HOW TO USE CONTROL PANEL
③ "B:100℃W - Bottom Roller Temperature & Condition Display Window
It displays Bottom Roller Set Temp. and Current Temp.
NOTE : "W"(WAIT) or "R"(READY) means "Working Wait" or "Working Ready".
- "W"(WAIT) : Current condition is not suitable for lamination. (Temp high or low)
- "R"(READY) : : Current condition is suitable for lamination. Start operation.
④ "L:0315" - Paper Length Display Window
It is to show the paper length. Refer to 'PAPER LENGTH' in each function for paper length setting.
⑤ "SPD:03" - ller Speed Display Window
It is to show the rotating speed of laminating roller. Refer to 'SPEED' in each function for speed setting .
NOTE : Start the lamination at the low speed for initial job.
⑥ "B:1000" - Bursting Paper Timming Display Window
It shows starting time of Bursting Roller. Refer to "BURST POSITION" on display for burst position setting.
⑦ "C:00010" - . Counting Paper/ Roller Heating Mode Display
It shows the laminating number for some period of time. The initial reset is possible when necessary.
☞ Counter Reset : Push "SPEED" and "MASTER DIAL", Or turn off and on power.
Then, counter will be reset, but previous data will not be saved.
☞ Roller Heating Mode Display
Theres are "SINGLE" Mode and "DUAL" Mode. Under "SINGLE" Mode, bottom roller will not be heated, even though you set the temperature.
NOTE : Refer to "TEMP" on display for changing Mode and detailed operation.
⑧ "MAN" - Feeding Paper Display Window
It shows how to feed paper. Theres are two modes, "MAN"(Manual) and "AUTO"(Automatic) Mode.
Refer to "MASTER DIAL" on display for changing method of feeding paper.
⑨ Error Message Display :
When error will be happened, it shows if you run motor. At this time, the laminator will not run.
NOTE : Refer to "ERROR MESSAGE' to be displayed.
18/51

ERROR MESSAGE
☞ "EMS&COVER OPEN!!"
This is displayed when Roller Safety Cover is opened or when E-STOP Switch is pressed.
In emergency case, the switch makes Roller operation and System stop.
Roller Safety Cover is to avoid burn from contact to high temp. roller
Then, keep this in close status except film loading.
After the cover is closed and make the switch release to back to normal.
NOTE : This message is shown for 3 secs. as the RUN is pressed.
☞ "S-opn"
Temp. Sensor is short or Contact between Slip Ring & Brush
is not good, the message is displayed.
As this message is displayed, check the mentioned parts.
WARNING : Power has to be "OFF" to check the mentioned parts.
☞ "Ovr-H"
This message is displayed when the Laminating Roller temp. is higher than 170℃.
This is caused by trouble in Heater Controller.
Contact to a supplier.
Release E-STOP S/W
Error Messages
Brush
Slip Ring
M:Poly-L SPD:03
T:100℃R B:1000
B:100℃W C:00010
EMS&COVER OPEN!!
M:Poly-L SPD:03
T:S-opn B:1000
B:100℃W C:00010
L:0315 MAN
M:Poly-L SPD:03
T:Ovr-H B:1000
B:100℃W C:00010
L:0315 MAN
Emergency Switch
Roller Cover
19/51

ERROR MESSAGE
☞ "H-Err"
If laminating roller temp. is fluctuated by 25℃ in 0.5 sec., the message is displayed.
This is caused by trouble in temp. sensor.
Contact to a supplier.
☞ "L-TEMP"
This message appears if a certain amount of actual temperature of the roller is lower than
setting temperature when laminating or when you increase the laminating speed.
This message disappears when the temperature of the roller is compensated.
Please continue your work when this message disappears.
☞ "STAND BY STATUS!!" & POWER OFF!!"
This function is to shut off the power of the heater when it is not used
for a certain period for safety purpose and to save electricity
The machine enters to Stanby mode when 2-hour-time is passed when the machien is in stop mode
In STAND BY STATUS, the temperature of the roller will not exceed 80℃. After an hour after STAND BY STATUS,
the machine enters to POWER OFF mode which makes the Heat roller temperature to 0℃.
These modes can be disabled by pressing RUN BUTTON, all settings will be back to before STANDBY Status.
POWER SAVE Status Message
M:Poly-L SPD:03
T:H-Err B:1000
B:100℃W C:00010
L:0315 MAN
M:Poly-L SPD:03
T:100℃R B:1000
B:100℃W C:00010
STAND BY STATUS!!
M:Poly-L SPD:03
T:100℃R B:1000
B:100℃W C:00010
POWER OFF!!
M:Poly-L SPD:03
T:100℃R B:1000
B:100℃W C:00010
L:0315 L-TEMP
20/51
Table of contents
Other GMP Laminator manuals

GMP
GMP PROTOPIC AUTO-540 HS User manual

GMP
GMP ELECTRO ULTRA LAMITRIM-1800 User manual

GMP
GMP EXCELAM-1100SWING User manual

GMP
GMP QTOPIC-380 User manual

GMP
GMP PROTOPIC AUTO-540 HS User manual

GMP
GMP RTR-380COMBI User manual

GMP
GMP SURELAM-PRO540HR User manual

GMP
GMP PROTOPIC III-540 User manual

GMP
GMP SURELAM-PRO540HR User manual

GMP
GMP EXCELMASTER-1600 User manual


