GMV GreenLift 3010 2CH A3 User manual

GMV SPA
APPARECCHIATURE FLUIDODINAMICHE
E COMPONENTI PER ASCENSORI
Azienda Certificata
UNI EN ISO 9001
0.02
ENG
* 1 0 9 9 1 8 3 8 EN *
SELL
TECH
WORK
CUST
USER
English
O
RIGINAL INSTRUCTIONS
MIUM 3010
M
ANUAL
I
NSTALLATION
,
U
SE AND
M
AINTENANCE
D
ISTRIBUTOR
3
010
2CH
A3
A
VAILABLE WITH TANKS
:
GL
GL
D
RY
GLC
OMPACT
F1
F1
D
RY
T2
MRL
H
MRL
T
S
YSTEM NR
.
I
NSTALLER

ENG
D
ISTRIBUTOR
3010
I
NSTALLATION
,
U
SE AND
M
AINTENANCE
2 / 28
10991838 EN - 0.02 - 04.02.2021
WARNING - IMPORTANT
GMV Spa will not assume any responsibility if the instructions included in this manual are not observed.
Particularly, may cause safety problems to the system and to the passengers, if you do not respect the
instructions of this manual, about:
- motor/pump power on and power off
ATTENTION
The automatic return to the landing in event of lack of voltage should be made moving the car to the
lowest floor. To return to a landing floor that is not the lowest floor, may cause safety problems to the
system and to the passengers
RESPONSIBILITY AND VALIDITY OF THE WARRANTY
GMV Spa declines any responsibility for damages caused by the use of this product in an improper or
different way than the one for which it is intended.
In order to preserve the safety and validity of the product warranty:
- Do not use parts or spare parts that are not original and in any case not approved by GMV Spa
- Do not make modifications or repairs to the product that are not authorized by GMV Spa
- Do not carry out installation and / or maintenance operations with unqualified or unauthorized
personnel.
R
EV
15.01.2020 0.02 Beta Release
DT
MC
DT
01.02.2021 1.00 First Issue
MC
AT
MC

D
ISTRIBUTOR
3010
I
NSTALLATION
,
U
SE AND
M
AINTENANCE
ENG
3 / 28
10991838 EN - 0.02 - 04.02.2021
IND
EX
0 GENERAL INFORMATIONS 5
0.1
I
NTRODUCTORY INFORMATION
5
0.1.1
D
EFINITIONS
5
0.1.2
M
AIN STANDARDS OF REFERENCE
5
0.1.3
D
OCUMENTATION FOR INSTALLATION
5
0.1.4
T
ERMS AND SYMBOLS USED
6
0.2
S
AFETY DURING INSTALLATION
6
0.2.1
T
OOLING
6
0.3
G
ENERAL PROVISIONS
6
1 FEATURES AND REQUIREMENTS 7
1.1
T
HE
3010
2CH
A3
DISTRIBUTOR
7
1.2
T
HE FLUID
7
1.3
H
OW THE
3100
2CH
A3
SYSTEM WORKS
7
1.4
M
AIN FEATURES
7
2 INSTALLATION OPERATIONS 8
2.1
H
YDRAULIC CONNECTIONS
8
2.1.1
O
VERALL DIMENSIONS
8
2.1.1.1
D
ISTRIBUTOR
1”¼ 8
2.1.2
I
NPUT AND OUTPUT
-
POWER UNIT SIDE
8
2.1.2.1
D
ISTRIBUTOR
1”
¼
E
1”
½ 8
2.2
H
YDRAULIC CIRCUITS
9
2.2.1
D
ISTRIBUTOR
3010
2CH
A3 9
2.2.1.1
U
PWARD AND
D
OWNWARD GRAPH
9
2.2.1.2
H
YDRAULIC SCHEME
9
2.2.2
D
ISTRIBUTOR
3010
2CH
A3
/
S 10
2.2.2.1
U
PWARD AND
D
OWNWARD GRAPH
10
2.2.2.2
H
YDRAULIC SCHEME
10
2.3
P
RELIMINARY OPERATIONS TO CONNECTION
11
2.4
E
LECTRICAL CONNECTIONS
11
2.4.1
C
ONTROL PANEL REQUIREMENTS
11
2.4.2
HOW THE
SE1
AND
SE2
CONTACTS WORK
11
2.4.2.1
T
HE STATUS OF THE
SE1
AND
SE2
CONTACTS
(2CH) 11
2.4.2.2
T
HE STATUS OF THE
SE1
AND
SE2
CONTACTS
(2CH
/S) 12
2.4.3
C
ONNECTION
M
OTOR
/
PUMP AND ACCESSORIES
12
2.4.4
S
LOWDOWN DISTANCES AND MAGNETS
12
2.5
C
ONNECTION OF HYDRAULIC PIPES
13
2.5.1
C
ONNECTION WITH HOSE
13
2.5.2
C
ONNECTION WITH A RIGID PIPE
13
3 ADJUSTMENTS, CHECKS AND TESTS 14
3.1
J
ACKS ADJUSTMENTS
14
3.1.1
R
UPTURE
V
ALVE
14
3.2
D
ISTRIBUTOR ADJUSTMENTS
14
3.2.1
A
DJUSTMENT OF THE MAXIMUM PRESSURE VALVE
(VS) 14
3.2.2
A
DJUSTMENT OF THE ACCELERATION
14
3.2.3
A
DJUSTMENT OF THE LEVELLING SPEED
(
LOW SPEED
) 15
3.2.4
A
DJUSTMENT OF THE UPWARD SPEED
(
HIGH SPEED
) 15
3.2.5
A
DJUSTMENT OF THE DOWNWARD SPEED
(
HIGH SPEED
) 15
3.2.6
A
DJUSTMENT OF THE UPWARD AND DOWNWARD DECELERATION
16
3.2.7
A
DJUSTMENT OF THE PRESSURE ON THE RAM ON
VSMA 16
3.2.8
A
DJUSTMENT OF THE MAXIMUM PRESSURE VALVE
ON
THE
PAM
(VS
10) 17
3.2.9
R
EMOTE HAND PUMP FILLING
17
3.3
E
XAMINATIONS AND TESTS BEFORE PUTTING INTO SERVICE
17
3.3.1
R
UPTURE
V
ALVE
(VC)
[EN81-20
§6.3.8] 17
3.3.2
R
ESTRICTOR
/
ONE
-
WAY RESTRICTOR
(VC)
[EN81-20
§6.3.9] 18
3.3.3
P
RESSURE
T
EST
[EN81-20
§6.3.10] 18
3.3.4
P
ROTECTION AGAINST UNINTENDED MOUVEMENT
[EN81-20
§6.3.13] 18
3.3.4.1
P
RELIMINARY
R
EQUIREMENTS
18
3.3.5
E
NERGY STATUS ZERO
18
4 MAINTENANCE 19
4.1
P
ROGRAMMED MAINTENANCE
19
4.2
P
ERIODICAL MAINTENANCE AND CHECKS TABLE
19
4.3
M
AINTENANCE OPERATIONS
20
4.3.1
S
TANDARD TIGHTENING TORQUES
21
4.4
D
ISPOSAL OF MATERIALS
21

ENG
D
ISTRIBUTOR
3010
I
NSTALLATION
,
U
SE AND
M
AINTENANCE
4 / 28
10991838 EN - 0.02 - 04.02.2021
5 FAULTS 22
5.1
T
ROUBLESHOOTING
22
6 APPENDIX 25
6.1
M
AIN INITIALS AND ABBREVIATONS
25
ENG
All rights reserved.
Any kind of reproduction, even partial, of this document is forbidden without written permission from GMV Spa
GMV Spa reserves the right to alter the product or this document, partially or entirely without any prior notice in the event of any
technical, construction or production improvements.
The drawings, descriptions and technical characteristics given in this document are purely for indication purposes.
For any data that is not given in this document, reference should be made to the documentation attached to each component.
To guarantee the constant safety of the product, only original parts or spares should be used, unless they are approved by GMV
Spa
beforehand.
GMV Spa
accepts no responsibility in the event the instructions given herein are not adhere
d to.
Information and support:
FLUID
DYNAMICS
EQUIPMENTS
AND
COMPONENTS
FOR
LIFTS
UNI
EN
ISO
9001
C
ERTIFIED
C
OMPANY
GMV SPA
V
IA
D
ON
G
NOCCHI
,
10
-
20016
PERO
-
M
ILANO
(I
TALY
)
-
TEL.
+39
02
33930.1
-
FAX
+39
02
3390379
-
E
-
MAIL
:
INFO
@
GMV
.
IT
V
IA
P
ER
B
IANDRATE
,
110/112
–
28100
NOVARA
(I
TALY
)
–
TEL.
+39
0321
677
611
–
FAX
+39
0321
677690
-
E
-
MAIL
:
INFO
@
GMV
.
IT
Please visit www.gmv.it to check for
updates of this document or further information about GMV products

D
ISTRIBUTOR
3010
I
NSTALLATION
,
U
SE AND
M
AINTENANCE
ENG
5 / 28
10991838 EN - 0.02 - 04.02.2021
0GENERAL INFORMATIONS
0.1 INTRODU TORY INFORMATION
0.1.1 DEFINITIONS
The definitions are used in this manual as indicated in the following standards and regulations
EN81-20 e EN81-50
Safety regulations for the construction and installation of lifts
UNI EN ISO 14798
Lifts (elevators), escalators and mobile walkways
– Risks assessment and reduction methodology
UNI EN ISO 7010
Graphic symbols: Safety signs and colours
EN12016 e EN12015
Electromagnetic compatibility
CEI EN 61439-1
Low voltage switchgear and control gear assemblies (LV control panels)
0.1.2 MAIN STANDARDS OF REFEREN E
For anything that is not expressly given in this manual, reference should be made to the local standards and
regulations in force, observing in particular:
Directive 2006/42/CE
Machine Directive – in relation to machines, and amending Directive 95/16/CE (recast)
Directive 2014/33/UE
Lifts Directive - on the harmonisation of the laws of the Member States relating to lifts and safety
components for lifts
Directive 2014/35/CE
Low Voltage Directive – on the harmonisation of the laws of the Member States relating to the
making available on the market of electrical equipment designed for use within certain voltage limits
Directive 2004/108/CE
Electromagnetic Compatibility Directive (EMC) – approximation of laws in member States
regarding electromagnetic compatibility, and repealing Directive 89/336/CEE
Rules EN-81 complete series
Safety regulations for the construction and installation of lifts
Refer to the complete series and, in particular to:
EN 81-20
Safety rules for the construction and installation of lifts – Lift for the transport of persons and
goods - Part 20: Passengers and goods passenger lifts
EN 81-50
Safety rules for the construction and installation of lifts – Examinations and tests - Part 50: Design
rules, calculations, examinations and tests of lift components
EN 12015
Electromagnetic compatibility – Product family standard for lifts, escalators and moving walkways
– Emission
EN 12016
Electromagnetic compatibility – Product family standard for lifts, escalators and moving walkways
– Immunity
UNI EN 13015
Maintenance for lifts and escalators: Rules for maintenance instructions
UNI EN ISO 7010
Graphic symbols – Safety signs and colours – Registered safety signs
UNI EN ISO 13857
Machine safety – Safety distance to avoid access to dangerous areas with arms or legs
UNI EN ISO 14121-1
Machine safety – Risks assessment – Part 1: Principles
UNI EN ISO 12100
Safety of machinery - General principles for design - Risk assessment and risk reduction
UNI EN ISO 14798
Lifts (elevators), escalators and mobile walkways
– Risks assessment and reduction methodology
0.1.3 DO UMENTATION FOR INSTALLATION
The documents to use for installation are those required by the applicable standards in force, in particular:
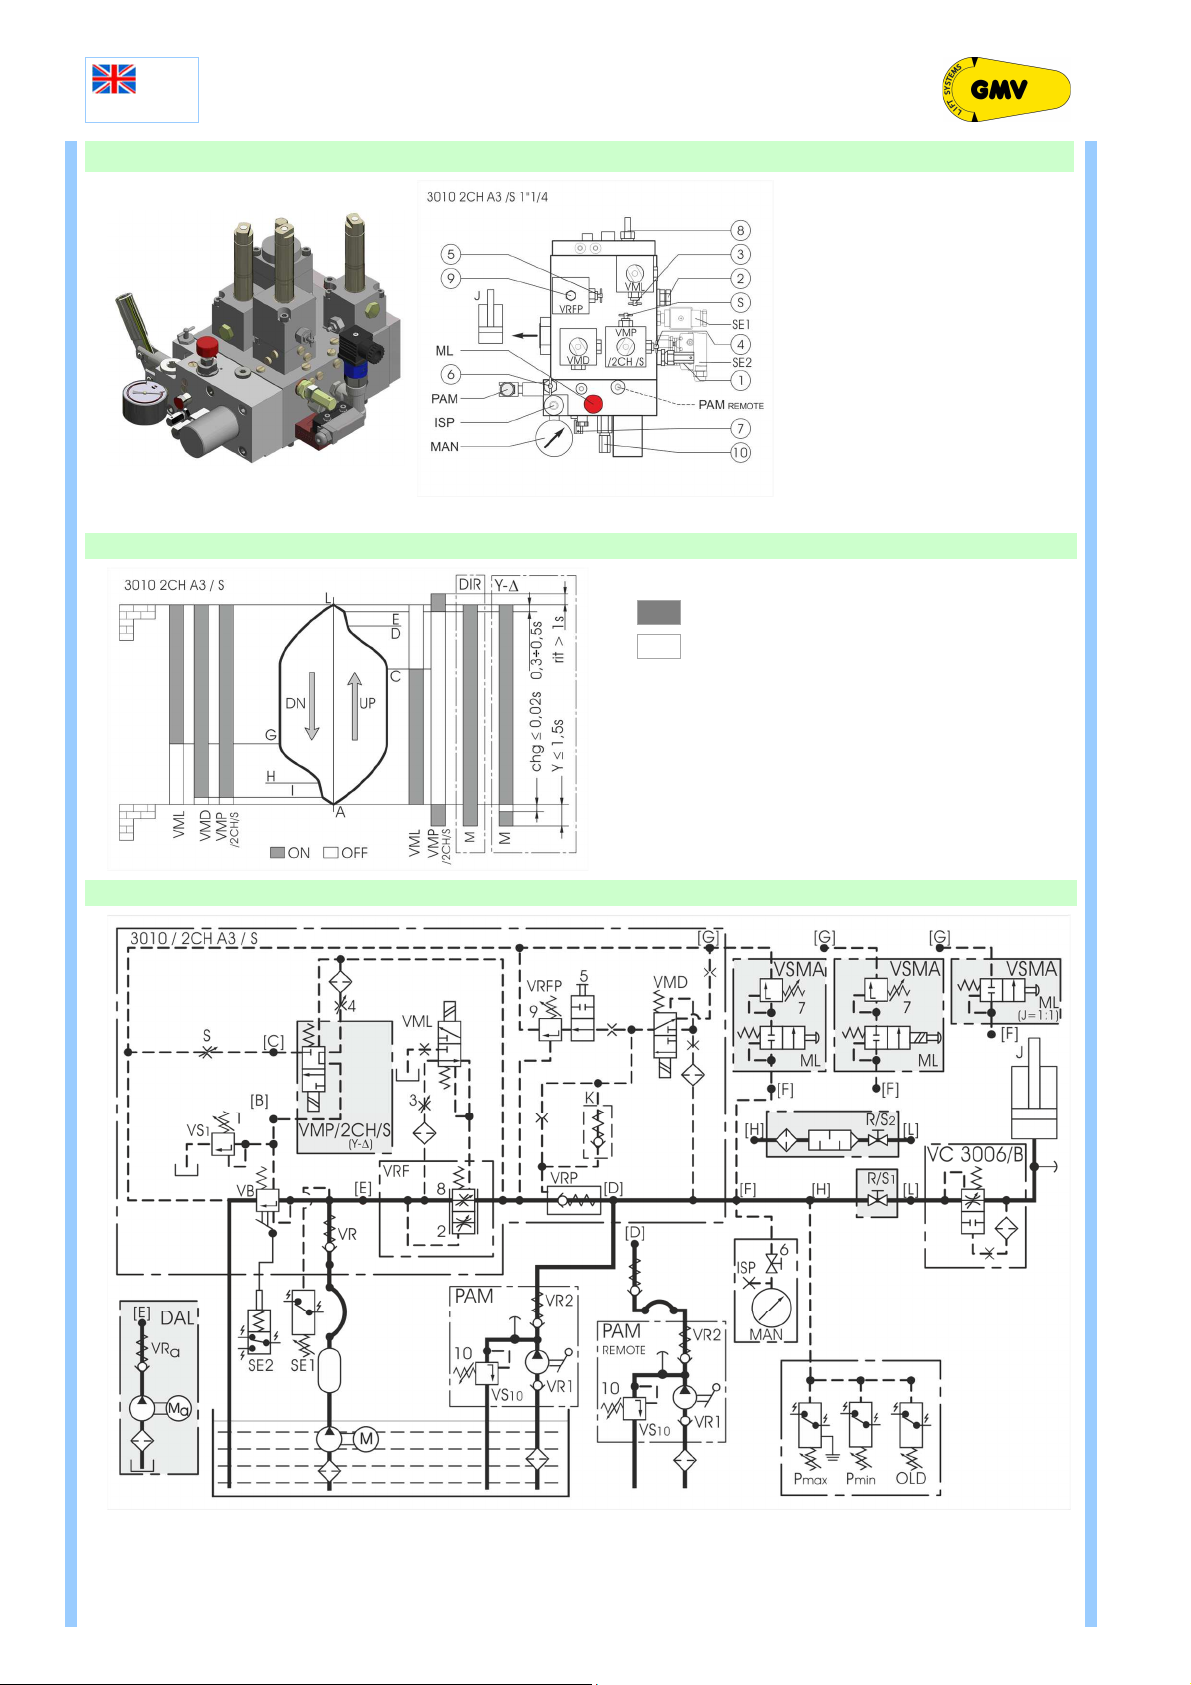
HYDRAULIC DIAGRAMS AND
INSTRUCTIONS OF THE
HYDRAULIC PART AND
RUPTURE VALVE
W
IRING DIAGRAMS AND
I
NSTRUCTIONS OF THE
ELECTRICAL PART AND
CONTROL PANEL
.
T
HIS MANUAL
All the documentation for a correct and safe installation, must be stored by the installation responsible.
Please remember that this documentation is considered part of the plant and must be complete, well stored
and unabridged in every part.
In order to maintain the readability, the documentation shouldn’t be damaged and shouldn’t have missing
parts. Moreover, do not tear or deteriorate sheets during consulting, if printed, the sheets must not be torn
or deteriorated during the consultation.

ENG
D
ISTRIBUTOR
3010
I
NSTALLATION
,
U
SE AND
M
AINTENANCE
6 / 28
10991838 EN - 0.02 - 04.02.2021
0.1.4 TERMS AND SYMBOLS USED
NOTE
Gives information of particular importance.
ATTENTION
A warning that the described operation could cause damage to the system or physical injury, even
serious, if the safety rules are not observed.
0.2 SAFETY DURING INSTALLATION
During installation and maintenance, it is compulsory to observe the applicable national safety standards for
the workplaces.
WARNING - Before starting any kind of installation operation.
ALWAYS check that all the safety devices, mechanical or electrical, are active and working properly.
0.2.1 TOOLING
No special tools are required unless expressly provided by component manufacturers supplied by third parties.
In this case, the related features and operating instructions are indicated in the manuals supplied with them.
0.3 GENERAL PROVISIONS
This manual is intended for a competent installation and / or maintenance worker, that is, a person in charge,
adequately trained (see EN ISO 9000 series), qualified with knowledge and practical experience, provided
with the necessary instructions and supported in the organization maintenance to allow the required
installation and / or maintenance operations to be carried out safely.
The valves must be kept in good operating condition in accordance with the regulations.
To obtain this result, regular maintenance must be carried out which guarantees, in particular, the safety of
the installation.
It is recommended to thoroughly clean all hydraulic components, as well as the pipes and fittings, before
mounting them, especially if disassembled for inspection or repair as impurities and dirt inside them cause
malfunctions and wear.
Any fluid leaking from the circuit during repair operations must not be dispersed in the environment, but must
be promptly collected.
System safety must consider its capacity to undergo maintenance work without causing personal damage or
injury.
Regular maintenance must be conducted to guarantee the overall system reliability.
Access and surrounding areas must be kept in good working order.
The competence of the person in charge of maintenance must be continuously updated.
NOTE
The system owner must ensure that the maintenance team qualification complies with the applicable
regulations in the country where the system is installed. Should there be no specific regulations,
qualification may be guaranteed by a certified quality system according to EN IS0 9001 standards,
integrated, if required, to consider the specific features of the system in question.

D
ISTRIBUTOR
3010
I
NSTALLATION
,
U
SE AND
M
AINTENANCE
ENG
7 / 28
10991838 EN - 0.02 - 04.02.2021
1FEATURES AND REQUIREMENTS
1.1 THE 3010 2 H A3 DISTRIBUTOR
The 3010 2CH A3 Distributor is a two-speed electro-mechanical valve with:
- the Fluitronic technology.
- the possibility to use ecological fluid or traditional mineral oil
- The use for slowing and stopping in normal operation of two valves operating in series, redundant and
electrically monitored
Guarantees:
- System reliability
- Constant downward speed regardless of the load
- The protection against unintended movement of the car (A3)
integrated.
- Compliance with various regulatory and environmental requirements
(Ex. compliance with the Directive 2006/118/EC on the environment)
Offers:
- Speed up to 0,8 m/s
- Downward speed greater than the upward (up to + 20%)
- Soft Stop function (optional)
1.2 THE FLUID
GMV uses and recommends a hydraulic fluid ISO VG 46 that:
- Thanks to classification as category HEES, as rule ISO-UNI 6743-4 and its
biodegradability index > 70%, according to standard OECD-301-B, is
acceptable from an environmental point of view
- Thanks to the synthetic base (ISO VG 46) and its viscosity index (>140),
higher than the traditional mineral oil, allowing greater stability, ensuring better
performance against wear and aging on systems as lifts for persons and
goods, in accordance with the environmental directive 2006/118/CE.
- Thanks to its flash point above 300°C compared to the 140°C of the traditional
mineral oil it is safer and reduces the risk of fire.
1.3 HOW THE 3100 2 H A3 SYSTEM WORKS
For the normal operation of the system in upward:
The VMP 2CH or 2CH / S solenoid valve must be initially energized for about 1s and remain de-energized
until the next call.
For the normal operation of the system in downward:
The VMP 2CH or 2CH / S valve is energized and de-energized simultaneously with the main downward valve
(VMD); it follows that the two valves are considered hydraulic valves operating in series and require the
monitoring that requires the type examination certification (EN81-20 § 5.6.7.3).
This monitoring must be carried out from the control panel or from a device that interfaces with it, checking
automatically and continuously, 2s after each stop of the car at floor, the closed state of VB and VRP through
contacts SE1 and SE2 which must both be closed to authorize the next call.
A3 Intervention
In the well there must be a system capable to detect the unintended movement of the car with open doors
both upward and downward and stop the car within the limits required by EN81-20 §5.6.7.5.
1.4 MAIN FEATURES
Distributor type
3010 2CH A3 e 3010 2CH /S A3
Minimum operating pressure
12 bar
Maximum operating pressure
45 bar
Maximum speed
0,8 m/s
Temperature limits
5°C - 70°C
Fluid flow rate
43 - 216 l/min

ENG
D
ISTRIBUTOR
3010
I
NSTALLATION
,
U
SE AND
M
AINTENANCE
8 / 28
10991838 EN - 0.02 - 04.02.2021
2INSTALLATION OPERATIONS
ATTENZIONE
During the installation never exclude the safety devices and never connect the motor/pump directly
to the power supply
2.1 HYDRAULI ONNE TIONS
2.1.1 OVERALL DIMENSIONS
2.1.1.1 DISTRIBUTOR 1”¼
2.1.2 INPUT AND OUTPUT - POWER UNIT SIDE
2.1.2.1 DISTRIBUTOR 1” ¼ E 1” ½
PAM
IN 1”G
OUT ½”G
OUT M8

D
ISTRIBUTOR
3010
I
NSTALLATION
,
U
SE AND
M
AINTENANCE
ENG
9 / 28
10991838 EN - 0.02 - 04.02.2021
2.2 HYDRAULI IR UITS
2.2.1 DISTRIBUTOR 3010 2 H A3
Legend: See appendix
1”
¼
2.2.1.1 UPWARD AND DOWNWARD GRAPH
On / Powered
Off / Not powered
M
Motor / pump
VMD
Downward solenoid valve
VML
Levelling
solenoid valve
VMP
2CH
Up/Down solenoid valve
2.2.1.2 HYDRAULI S HEME

ENG
D
ISTRIBUTOR
3010
I
NSTALLATION
,
U
SE AND
M
AINTENANCE
10 / 28
10991838 EN - 0.02 - 04.02.2021
2.2.2 DISTRIBUTOR 3010 2 H A3 / S
Legend: See appendix
1”
¼
2.2.2.1 UPWARD AND DOWNWARD GRAPH
On / Powered
Off / Not powered
M
Motor / pump
VMD
Downward solenoid valve
VML
Levelling
solenoid valve
VMP
2CH
Up/Down solenoid valve
2.2.2.2 HYDRAULI S HEME

D
ISTRIBUTOR
3010
I
NSTALLATION
,
U
SE AND
M
AINTENANCE
ENG
11 / 28
10991838 EN - 0.02 - 04.02.2021
2.3 PRELIMINARY OPERATIONS TO ONNE TION
0 - OFF
0 - OFF
+
2.4 ELE TRI AL ONNE TIONS
2.4.1 ONTROL PANEL REQUIREMENTS
The control panel must to receive and to understand correctly at least the following signals:
Mark
Signal/command
Characteristics
SE1
Sensor to control VRP close Electric switch NC
SE2
Sensor to control VB close Pressure switch NC
ATTENTION
To identify the unintended movements of the car, a device complying with point 5.6.7 of the EN 81-
20 standard and verified in accordance with point 5.8.3 of the EN 81-50 standard must be used.
This circuit, if detects movement of the car with the doors not closed, outside the unlocking area, it
must prevent the control panel from sending any command to the solenoid valves and / or to the
motor / pump unit. The system must be reset only by authorized and properly trained personnel.
2.4.2 HOW THE SE1 AND SE2 ONTA TS WORK
The 3010 2CH A3 distributor is equipped with two contacts (SE1 and
SE2) to control the closing of the shutters:
- VRP, piloted by the VMD solenoid valve (SE1) and
- VB, piloted by the solenoid valve VMP 2CH or 2CH / S (SE2)
The closing and the opening of the contacts SE1 and SE2 is related to
the position of the VRP and VB cursors and to the excitation or non-
excitation of the VMD and VMP solenoid valves.
Their condition must comply with what is shown in the following
diagrams.
2.4.2.1 THE STATUS OF THE SE1 AND SE2 ONTA TS (2 H)
The status of contacts SE1 and SE2 must be checked 2 seconds after the car has stopped on the floor
and the call must be authorized by the control panel only if both contacts are closed.
SE1 SE2 S
YSTEM STATUS
Close
(
ON
)
Close
(
ON
)
In
service
Close
(
ON
)
Open
(
OFF
)
Out of
order
Open
(
OFF
)
Close
(
ON
)
Out of
order

ENG
D
ISTRIBUTOR
3010
I
NSTALLATION
,
U
SE AND
M
AINTENANCE
12 / 28
10991838 EN - 0.02 - 04.02.2021
2.4.2.2 THE STATUS OF THE SE1 AND SE2 ONTA TS (2 H /S)
SE1 SE2 S
YSTEM STATUS
Close
(
ON
)
Close
(
ON
)
In
service
Close
(
ON
)
Open
(
OFF
)
Out of
order
Open
(
OFF
)
Close
(
ON
)
Out of
order
2.4.3 ONNE TION MOTOR/PUMP AND A ESSORIES
Connect the motor and the installed accessories (eg: fluid heater, fluid thermostat, motor thermistors, etc.),
following the instructions of the power unit / tank manual in accordance with the electrical characteristics
of the system.
2.4.4 SLOWDOWN DISTAN ES AND MAGNETS
Rated speed (V
N
)[m/s] <0,30 <0,40 <0,50 <0,60 <0,70 <0,80 <0,90 <1,00
Upward (C-E - D
RAL,S
) [m] 0,25 0,35 0,45 0,60 0,80 1,00 - -
Downward (G-I - D
RAL,D
)
[m] 0,35 0,45 0,55 0,70 0,90 1,10 1,30 1,50
The distance of the deceleration sensor (D
RAL
) must be adjusted according to the table above.

D
ISTRIBUTOR
3010
I
NSTALLATION
,
U
SE AND
M
AINTENANCE
ENG
13 / 28
10991838 EN - 0.02 - 04.02.2021
2.5 ONNE TION OF HYDRAULI PIPES
25 ÷ 100
1”1/4 1” - - 1” x M36 1” - 1” x M36 1”
100 ÷ 150 1” x M45 1”1/4 35 1” x M45 1”1/4
180 ÷ 216 - 1”1/4 (1”1/4) 1”1/4 x M45 1”1/4 x M45
2.5.1 ONNE TION WITH HOSE
- Remove the gear and the cutting ring
from the terminal connection of the
silencer.
- Ensure that the terminal connection is
well fixed on the silencer.
- Clean and oil the threading and their
seats.
- Fix the hose verifying it is thoroughly
tightened.
ATTENTION
Ensure that there is no dirty inside the tube. These impurities could damage the sealing of the piston
and of the distributor and inhibit the correct operation of the system.
2.5.2 ONNE TION WITH A RIGID PIPE
- Cut at 90° the head of the tube with a saw (do not use a tube-cutter)
- Do not let metal residuals fall into the tube and eliminate the burrs internally and externally.
- Remove the gear and the cutting ring of the terminal connection and insert it on the pipe.
- Ensure that the cutting ring is inserted as indicated in image
- Ensure that the terminal connection is well fixed on the silencer.
- Clean and lubricate the threading and the connection seat with a
slight oil veil.
- Insert the pipe into the cone at 24° up to lay it on the stop limit of the
cone itself.
- Screw thoroughly the gear by hand until it is felt that the cutting gear
lays perfectly to the nut.
- Then screw the nut using a wrench until the cutting edge of the ring
is in contact with the tube and prevents it from rotating.
- Keep the tube against its stop to avoid it rotates, screw the fixing nut
by 3/4 clampdown. In doing so the ring engraves with the necessary
depth the external part of the tube and rises a border in front of its
cutting edge.
- Loose the nut and check that the tube has all around a well risen
border. The border must cover 70% of the front part of the cutting
ring.
- Fix the tube, close the nut with a wrench until a certain resistance is
felt; from this moment on screw for a further 1/4 turn, contrasting
wrench against wrench.
ATTENTION
Ensure that there is no dirty inside the tube. These impurities could damage the sealing of the piston
and of the distributor and inhibit the correct operation of the system.

ENG
D
ISTRIBUTOR
3010
I
NSTALLATION
,
U
SE AND
M
AINTENANCE
14 / 28
10991838 EN - 0.02 - 04.02.2021
3ADJUSTMENTS, HE KS AND TESTS
Before making adjustments, read the entire chapter carefully.
ATTENTION
All the operations described must be carried out strictly by a competent person with the qualification
of installation worker, in charge, adequately trained, with the necessary instructions.
3.1 JA KS ADJUSTMENTS
3.1.1 RUPTURE VALVE
Before performing these distributors adjustments, make sure that the rupture valve is correctly calibrated
according to the its manual
3.2 DISTRIBUTOR ADJUSTMENTS
Distributor adjustments must be made after the system installation is complete.
3.2.1 ADJUSTMENT OF THE MAXIMUM PRESSURE VALVE (VS)
To adjust the maximum pressure valve:
1. Refer to the hydraulic circuit diagram of the distributor;
2. Close the shut-off valve (R/S). [the lever must be at 90 ° with respect to the pipe directed to the piston]
3. Open the pressure gauge tap (6)
4. Start the motor/pump
5. Check the pressure value on the pressure gauge (MAN)
If the value matches the one required by the documentation
supplied with the system (140% of the maximum static
pressure - EN81-20 §5.9.3.5.3.2) go to point 11
If the value does not match the one required:
6. -Loose and remove the protection cap of the adjustment
screw on the safety valve (1).
7. -Loose the counter nut of the screw (1).
- Tighten the screw (1 CW) to increase intervention
pressure
- Loose the screw (1 CCW) to decrease intervention
pressure
8. Reach the required pressure value by checking on the
pressure gauge (MAN)
1. Tighten the counter nut of the screw (1)
2. Mount and tighten the screw protection cap (1)
3. Stop the Motor/Pump
4. Reduce the pressure on the pressure gauge (MAN) by pressing the VMD
or the push-button (ML).
5. Close the pressure gauge tap (6). Open the shut-off valve (R/S)
3.2.2 ADJUSTMENT OF THE A ELERATION
For a correct and safe adjustment of the acceleration, refer
to the following procedure:
1. Loose the counter nut of the upward acceleration
adjustment screw (4).
2. Tighten the screw (4 CW) until the neck is closed .
3. Referring to the operating manual, call the car upward;
it will be seen that the car does not move.
4. Loose the screw (4 CCW) to obtain the desired
acceleration .
5. Tighten the counter nut of the screw (4).

D
ISTRIBUTOR
3010
I
NSTALLATION
,
U
SE AND
M
AINTENANCE
ENG
15 / 28
10991838 EN - 0.02 - 04.02.2021
3.2.3 ADJUSTMENT OF THE LEVELLING SPEED (LOW SPEED)
For a correct and safe adjustment of the levelling speed (low
speed), refer to the following procedure:
1. Loose the counter nut of the levelling speed adjustment
screw (2).
2. Tighten the screw (2 CW) to reduce the levelling speed
(D-E upward, H-I downward), loose to increase it
(CCW).
3. Adjusted the speed, tighten the counter nut of the screw
(2)
4. The levelling speed (low speed) adjustment is done.
NOTE
The levelling speed must be 1/6 - 1/8 of the upward
speed (high speed) and in any case the car must
complete the travel at low speed without oscillating
or tearing
NOTE
At the end of the levelling speed adjustment (low
speed) proceed immediately with the upward speed
adjustment (high speed).
3.2.4 ADJUSTMENT OF THE UPWARD SPEED (HIGH SPEED)
For a correct and safe adjustment of the upward speed (high
speed) refer to the following procedure:
1. Move the lift to the upper floor
2. Loose and remove the protection cap of the high speed
adjustment screw (8).
3. Loose the counter-nut of the screw (8). Tighten the
screw (8 CW) until you heard that the fluid drains into
the tank.
4. When the noise of the fluid is heard, loose the screw (8)
by 1 turn to stop the fluid discharge into the tank.
5. Tighten the counter-nut of the screw (8).
6. Put back and screw the protection cap of the screw (8).
7. The upward speed (high speed) adjustment is done.
3.2.5 ADJUSTMENT OF THE DOWNWARD SPEED (HIGH SPEED)
NOTE
The downward speed can be increased in comparison to the upward speed (up to max 20% more).
For a correct and safe adjustment of the downward speed
(high speed) refer to the following procedure:
1. Loose and remove the protection cap of the downward
speed adjustment screw (9 CW).
2. Loose the counter-nut of the screw (9 CCW).
3. Tighten the screw (9) to increase the downward speed.
Loose it to reduce.
4. Adjusted the speed, tighten the counter nut of the screw
(9).
5. Put back and screw the protection cap of the screw (9).
6. The downward speed (high speed) adjustment is done.

ENG
D
ISTRIBUTOR
3010
I
NSTALLATION
,
U
SE AND
M
AINTENANCE
16 / 28
10991838 EN - 0.02 - 04.02.2021
3.2.6 ADJUSTMENT OF THE UPWARD AND DOWNWARD DE ELERATION
For a correct and safe adjustment of the upward and
downward deceleration time please refer to the following
procedure:
1. Loose the counter-nut of the screw (3).
2. Tighten the screw (3 CW) to increase the deceleration
time (C-D upward, G-H downward). Loose (CCW) the
screw to reduce it.
3. Adjusted the time, tighten the counter-nut of the screw
(3).
4. The up- and downward deceleration time adjustment is
done.
NOTE
The maximum deceleration is obtained when the
deceleration adjustment screw (3) is completely
open.
3.2.7 ADJUSTMENT OF THE PRESSURE ON THE RAM ON VSMA
NOTE
Applicable only if 2:1 system
To adjust the pressure on the ram on VSMA:
1. Open the pressure gauge tap (6)
2. Close the shut-off valve (R/S). [the lever must be at 90 °
with respect to the pipe directed to the piston]
3. Press the manual lowering push button (ML) until the
pressure decrease stops.
4. Verify on the pressure gauge (MAN) that the pressure is
about 5 bar.
If the pressure is 5 bar go to point 6, if it is lower than 5
bar or the ram do not move down, go to point 5.
5. Adjustment
- Open the shut-off valve (R/S).
- Loose and remove the protection cap of the adjusting ram pressure screw (7)
- Loose the locknut of the screw (7). Screw by 1 turn the screw (7). Tighten the locknut of the screw (7).
- Close the shut-off valve (R/S).
- Press the manual lowering push button (ML) until the pressure decrease stops.
- Repeat this procedure until pressure obtained on the pressure gauge (MAN) is about 5 bar.
- Mount and tighten the protection cap of the adjusting ram pressure screw (7) and go to point 6.
6. Reduce the pressure on the pressure gauge (MAN) by pressing the VMD or the push-button (ML).
7. Close the pressure gauge tap (6).
8. Open the shut-off valve (R/S).

D
ISTRIBUTOR
3010
I
NSTALLATION
,
U
SE AND
M
AINTENANCE
ENG
17 / 28
10991838 EN - 0.02 - 04.02.2021
3.2.8 ADJUSTMENT OF THE MAXIMUM PRESSURE VALVE ON THE PAM (VS 10)
To adjust the maximum pressure valve on the handpump (PAM):
1. Refer to the hydraulic circuit diagram of the distributor;
2. Close the shut-off valve (R/S). [the lever must be at 90 ° with
respect to the pipe directed to the piston]
3. Open the pressure gauge tap (6)
4. Use the hand pump (PAM) to increase the pressure.
5. Verify on the pressure gauge (MAN)
If the value matches the one required by the documentation supplied
with the system (2.3 times the maximum static pressure - EN81-
20 §5.9.3.9.2.3) go to point 11
If the value does not match the one required:
6. Loose and remove the protection cap of the safety valve adjustment screw (10)
7. Loose the locknut of the screw (10).
- Tighten in the screw (10 CW) to increase the intervention pressure
- Loose the screw (10 CCW) to decrease the intervention pressure
8. Using the hand pump (PAM), reach the required pressure value by verifying the value on the pressure
gauge (MAN).
9. Tighten the locknut of the screw (10).
10. Mount and tighten the protection cap of the safety valve adjustment screw (10)
11. Reduce the pressure on the pressure gauge (MAN) by pressing the VMD or the push-button (ML).
12. Close the pressure gauge tap (6). Open the shut-off valve (R/S).
Example: If the static pressure at full load is 35 bar, the maximum pressure value is obtained as
follows: 35 x 2.3 = 80.5. For this example, the pressure gauge should indicate 80.5 bar.
3.2.9 REMOTE HAND PUMP FILLING
For correct and safe working of the remote hand pump please refer
to the following procedure:
1. Verify that:
- the end of the suction pipe, on the power unit side (nylon), is
under the oil level;
- the suction pipe fitting and the locknut are properly connected
and tightened.
2. Loose the air bleeder screw (S).
3. Use the hand pump until the oil start to get out the air bleeder (S
CCW).
4. Tighten the air bleeder screw (S CW).
3.3 EXAMINATIONS AND TESTS BEFORE PUTTING INTO SERVI E
3.3.1 RUPTURE VALVE (V ) [EN81-20 §6.3.8]
ATTENTION
Before performing this test for the first time, make sure that the rupture valve on the
cylinder is already calibrated or make its adjustment.
(see technical report of the system and instructions of the rupture valve)
VC 3006
/B /G
To perform the rupture valve test, follow the procedure below:
1. Move the car with nominal load evenly distributed to the higher floor and
wait for the car stop and the doors close;
2. When the car has stopped, loosen the lock nut on the screw/tap (5) and
close the screw/tap (5 CW) until mechanical stop.
3. Move (Call) the car at the lower floor. The rupture valve, during
downward, when the system reaches the intervention speed, must stop
the car and maintaining it stationary.
ATTENTION
If the car does not stop, it is necessary to check / change the adjustment of the rupture valve
following the instructions contained in its manual.
4. Checked that the rupture valve engages, completely loose the screw/tap (5) and tighten the lock nut;
5. Use the hand pump to unlock the rupture valve

ENG
D
ISTRIBUTOR
3010
I
NSTALLATION
,
U
SE AND
M
AINTENANCE
18 / 28
10991838 EN - 0.02 - 04.02.2021
3.3.2 RESTRI TOR/ONE-WAY RESTRI TOR (V ) [EN81-20 §6.3.9]
ATTENTION
If a restrictor is installed on the cylinder, before performing this test for the first time, make
sure that it is already calibrated or make its adjustment.
(see technical report of the system and instructions of the restrictor)
VC 3006
/D /R
The test procedure is the same as for the rupture valve.
An exception is point 3 in which, during the downward, the restrictor must not block the system but
limit its descent speed to the defined value.
3.3.3 PRESSURE TEST [EN81-20 §6.3.10]
This optional test assures you about the integrity of parts under pressure, including those which
cannot be visually checked.
To perform the test, follow the procedure below:
5. Open the shut-off valve (R/S) (position A).
6. Move the empty car to the highest floor and using the hand pump (PAM)
send the piston to the up stroke.
7. Open the pressure gauge tap (6)
8. Looking at the manometer (MAN), use the hand pump (PAM) until a pressure
equal to 200% of the maximum static pressure is reached.
9. Once the pressure is reached, observe the system for 5 minutes to verify if
there are pressure drop and leakage
(leakages up to 10 bar are considered acceptable).
10. At the end of the test, press the button above the VMD to return the piston to
normal stroke conditions and to reduce the system pressure.
11. Close the pressure gauge tap (6).
3.3.4 PROTE TION AGAINST UNINTENDED MOUVEMENT [EN81-20 §6.3.13]
ATTENTION
The 3010 distributor is able to control the unintended movement of the car. Perform these tests only
after carrying out the previous ones.
To check the correct behaviour of the devices against unintended movement, it is necessary to check that the
control panel and the system work in compliance with EN81-20 §5.6.7.
3.3.4.1 PRELIMINARY REQUIREMENTS
As required by the EN 81-20 standard, the following must be respected:
- The system must be equipped with at least one switch device capable of detecting the unintended
movement of the car.
- The control panel must not send commands to the distributor and to the motor/pump unit when the
system is located, with doors not closed, outside the door unlocking zone.
NOTE
Before proceeding, check on the manual of the electrical part the operations to be performed,
necessary to carrying out the test.
3.3.5 ENERGY STATUS ZERO
NOTE
Before any cleaning or maintenance intervention it is necessary to set the hydraulic power
unit at energy status zero, referring to the following procedure.
1. Move the car to the lower floor.
2. Turn the main switch to the 0 - OFF position
3. Press the red button for manual descent manoeuvre (ML), so as to
move the car to the lower extra-travel point (car resting on the shock
absorbers/buffers)
4. Close the shut-off valve (R/S) by moving the lever to the OFF position;
for safety and to avoid accidental opening, remove or lock the lever
5. Completely release the residual pressure by pressing the central part of
the VMD.
6. In addition, comply with all the safety requirements required by the laws
and regulations in force in the country where the power unit is installed.

D
ISTRIBUTOR
3010
I
NSTALLATION
,
U
SE AND
M
AINTENANCE
ENG
19 / 28
10991838 EN - 0.02 - 04.02.2021
4MAINTENAN E
4.1 PROGRAMMED MAINTENAN E
For a correct and safe lift use, it is necessary to make a preventive programmed maintenance, following a
fixed plan.
To define the periodical maintenance frequency, you should consider more events, particularly:
- Number of travels per year
- Travelling and stopping periods
- Age and condition of the lift
- Site and type of the building in which the lift travel
- Passengers and goods demand
- Inside and outside working condition (climate, vandalism, etc.)
In the next table, parts are shared in groups and for each group is shown the type of check and its longest
frequency recommended. Checks operative instructions are detailed in the maintenance schedules on
chapter.
Please, note that all checks are applicable only if the part is really installed.
4.2 PERIODI AL MAINTENAN E AND HE KS TABLE
NOTE
The numbering of the chapters is not in sequence because it refers to the complete list of control
operations as listed in the
GREEN LIFT SYSTEM MAINTENANCE MANUAL
Legend:
Verify by visual examination that the component has characteristics that meet the required requirements
Verify by testing / checking that the component performs the required function
Verify by using measuring instruments that the component meets the required requirements / limits
O
PERATION CHECKS
C
ONTROL
TYPE
R
ECOMMENDED
M
AXIMAL
F
REQUENCY
MONTHS
YEARS
I. G
ENERAL
I.a All components: cleaning, deterioration and wear
6
I.b Signs, labels, signals and diagrams
12
V. M
ACHINES
ROOM
V.e Devices to detect the unintended movements UCM (A3) - -
VI. M
ACHINES
-
HYDRAULIC
VI.c Shut-off valve
6
VI.d Pressure gauge tap
6
VI.e Working pressures
12
VI.f Valves on power unit
6
VI.g Pressure relief valve
6
VI.h Manual lowering valve
3
VI.i Filters
5
VI.j Hand pump
6
NOTE
Carry out periodic tests in accordance with the regulations in force in the country of installation, the
instructions given in Appendix C of the EN81-20 standard and the procedures in this manual.

ENG
D
ISTRIBUTOR
3010
I
NSTALLATION
,
U
SE AND
M
AINTENANCE
20 / 28
10991838 EN - 0.02 - 04.02.2021
4.3 MAINTENAN E OPERATIONS
ATTENTION
Change or restore all components damaged, wear or that don’t work properly.
Tighten all the bolts in accordance with the tightening torques and using a torque wrench.
I. G
ENERAL
I.a All components: cleaning, deterioration and wear
Check, visually, the condition of the components and clean, using a rag, water and neutral
soap.
I.b Signs, labels, signals and diagrams
Check, visually, that all labels, signs, diagrams, and documents are in the correct position,
clearly visible and undamaged. If necessary clean using a rag, water and neutral soap.
V. M
ACHINE ROOM
V.e Devices to detect the unintended movements UCM (A3)
Verify that the unintended car movement detection devices (UCM) work properly by performing
the necessary tests, controls and measurements.
- See § Protection against unintended car movement [EN81-20 §6.3.13]
(Also refer to what is indicated in the control panel manual).
VI. M
ACHINES
:
H
YDRAULIC
VI.c Shut-off valve
Check the seal of the shut-off valve as follow:
- Close the shut-off valve (R/S) and open the pressure gauge tap (6)
- Fully discharge the pressure by pressing the push-button on the valve (VMD)
- Check that the pressure level on the manometer (MAN) is zero
- Close the pressure gauge tap (6) and open the shut-off valve (R/S)
VI.d Pressure gauge tap
Check the seal of the EN81 pressure gauge shut-off as follow:
- Close the shut-off valve (R/S) and open the pressure gauge tap (6)
- Fully discharge the pressure by pressing the push-button on the valve (VMD)
- Close the pressure gauge tap (6) and open the shut-off valve (R/S)
- Check that the pressure level on the manometer (MAN) is zero
VI.e Working pressures
Check that static and dynamic pressure values correspond to those declared and found at start
up as follows:
- Open the pressure gauge tap (6)
- Check the maximum static pressure value with lift stopped and car with nominal load.
- Check the dynamic pressure value by moving upward the system.
- After the measurements exclude the pressure gauge (MAN), closing the pressure gauge shut-
off (6)
VI.f Valves on power unit
Check the seal of the valve seals as follow:
- With the fluid at room temperature, close the shut-off valve (R/S)
- Open the pressure gauge shut-off (6)
- Check that the pressure on the pressure gauge (MAN) does not drop more than 4 bar in 5
minutes
The execution of the test at point VI.f, ensures that all the valve organs subjected to
pressure, including those not visually controllable, are intact.
This test is specific of the maintenance and is not the "Pressure test" [EN81-20 §6.3.10]
which must be carried out before putting into service the system.
Table of contents
Other GMV Control Unit manuals