Goldmedal Sno-King 1888 User manual

Part No.12666
Sno-King
Instruction Manual
Model No. 1888, 1888EX
Cincinnati, OH 45241-4807 USA

Sno-King Model No. 1888, 1888EX
http://www.gmpopcorn.com Page 2
SAFETY PRECAUTIONS

Sno-King Model No. 1888, 1888EX
http://www.gmpopcorn.com Page 3
INSTALLATION INSTRUCTIONS
Inspection Of Shipment
Unpack all cartons and check thoroughly for any damage that may have occurred during transit.
Damage claims should be filed immediately with the transportation company.
Setup
Your new Sno-King is completely assembled and tested at the factory. Remove all packing material and
tape before starting operation.
Electrical Requirements
The following power supply must be provided:
1888: 120VAC, 60Hz, 972W
1888EX: 230V, 50Hz, 972W
Your electrician must furnish sufficient power for proper machine operation. We recommend
this shaver be on a dedicated and protected circuit. Failure to wire properly will void the
warranty and may result in damage to the machine.
It is Gold Medal® Products Company’s recommendation that this machine be plugged directly
into a wall outlet. The use of extension cords is not recommended due to safety concerns, and
may cause sacrificed and/or reduced performance.
Before You Plug In the Machine
1. Make sure the wall outlet can accept the grounded plugs (where applicable) on the power
supply cord.
2. The wall outlet must have the proper polarity. If in doubt, have a competent electrician
inspect the outlet and correct if necessary.
3. DO NOT use a grounded to un-grounded receptacle adapter.

Sno-King Model No. 1888, 1888EX
http://www.gmpopcorn.com Page 4
GENERAL INSTRUCTIONS
To Operate the Sno-King
1. Load hopper with Ice.
2. Close pusher cap, and apply gentle downward pressure.
3. Turn on the power switch.
4. Press and hold in the momentary switch. Release the button once all of the ice has been shaved.
5. Do not lift the pusher cap until the motor is off and the shaver head has stopped.
NOTE: Never allow any foreign or metallic objects around the shaver area of the Sno-King. Ice
picks, scoops, and debris that may be in the ice often damage blades.
Ice Requirements
The Sno-King can take ice cubes or block ice, if you break the block into pieces approximately 2 to
3 inches in size.
NOTE: The ice will not enter the shaving chute if the pieces are too large.
Daily: Cleaning the Ice Shaver
1. Wipe the outside parts with a clean cloth.
DO NOT use oven cleaners, as they will damage parts of the machine.
2. Ammonia cleaners will damage the Lexan Windows. Use only non-ammonia cleaners, such as
Gold Medal® Watchdog Glass Cleaner (item number 2588).

Sno-King Model No. 1888, 1888EX
http://www.gmpopcorn.com Page 5
INSTALLING NEW SHAVER BLADES
MAKE SURE TO UNPLUG THE MACHINE FIRST. After having unplugged the machine, inspect your
equipment before replacing the blades. Use a flashlight to examine the blades in the shaver body. If
the blades appear to be nicked or bent, then the blades should be replaced.
Follow This Procedure
1. Unplug the main power supply cord from the electrical outlet.
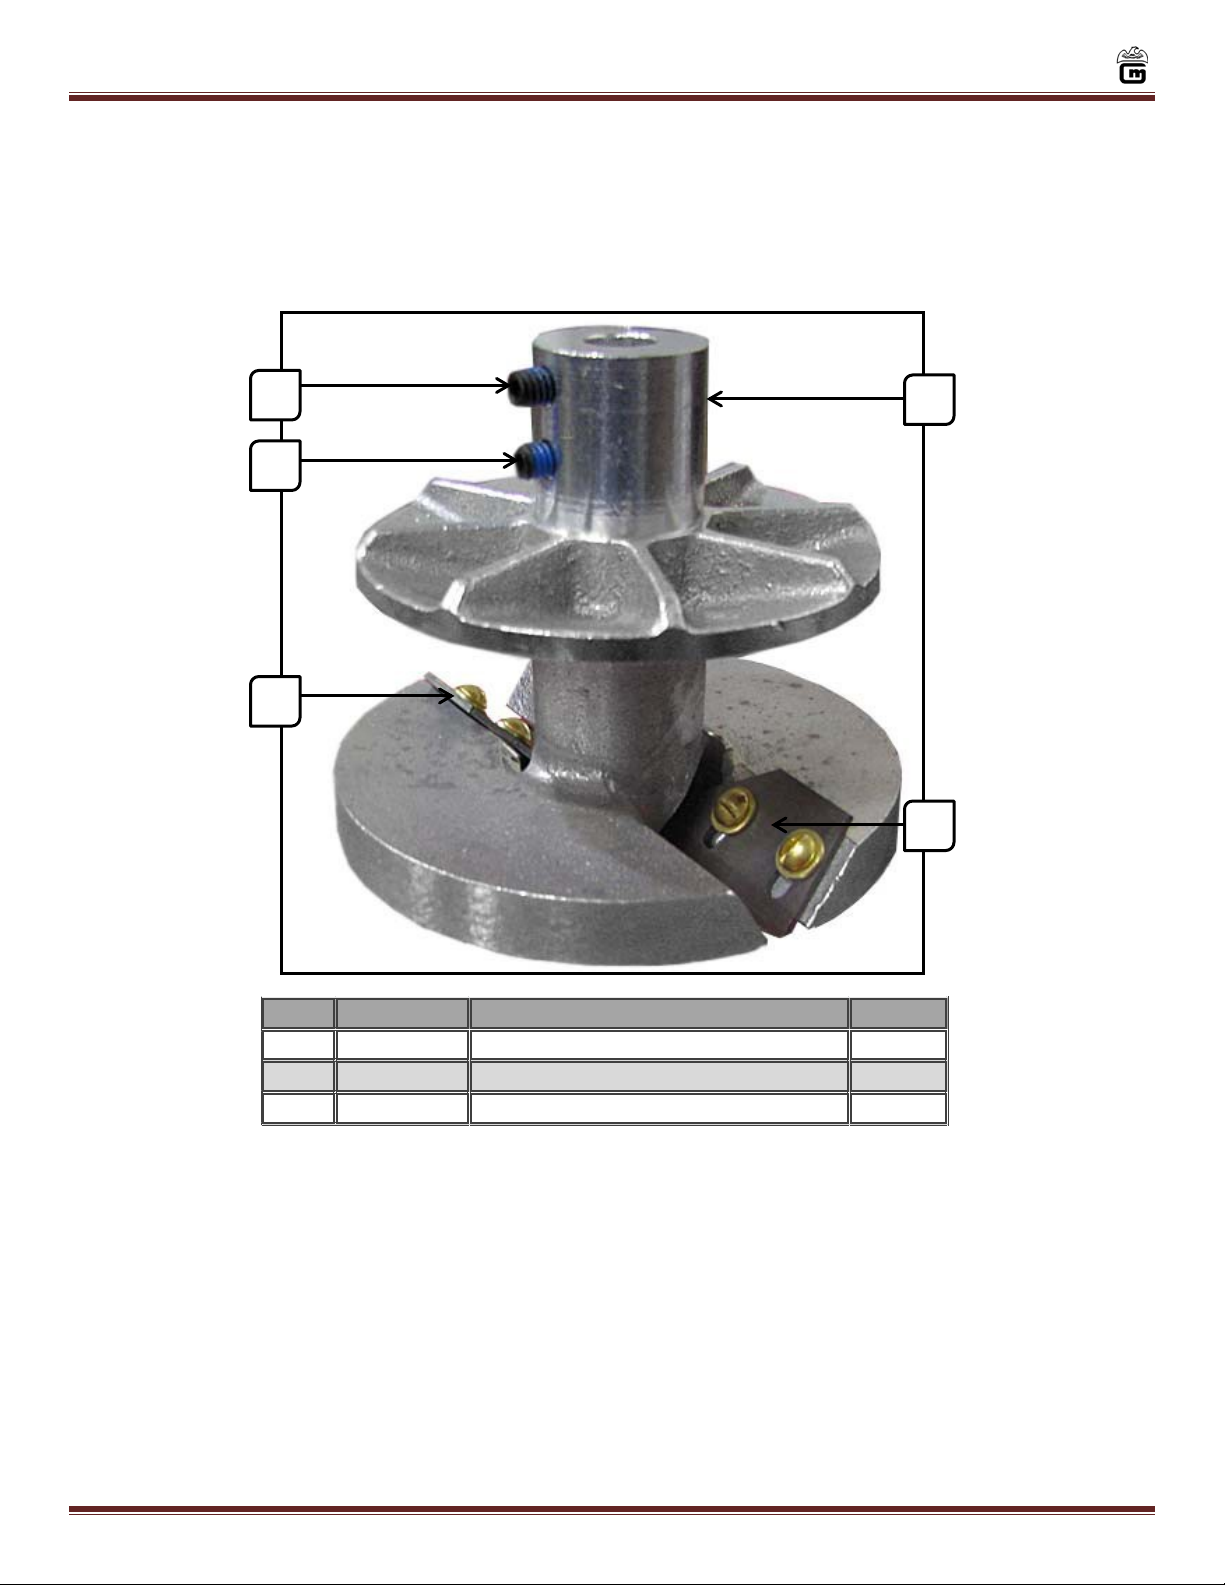
2. Remove the shaver head from the motor shaft by loosening the Allen head set screws. (Access to
the set screws may be between the hopper and motor or from the underside opening of the hopper
inside the cabinet).
3. Remove the shaver head. Pull the shaver head off of the motor shaft and through the hopper. If
the shaver head is frozen onto the shaft, remove the hold down bolts on the motor. Pull the
motor back, trapping the shaver head against the inside of the hopper, until the shaver head
disengages.
4. After removing the shaver head, check the motor shaft for burrs and corrosion. Use a fine tooth
file to remove the burrs and corrosion.
5. Remove the blades from the shaver head. These blades may be re-sharpened, but it is far better
to replace the old blades with a new set.
6. Position the new blades and insert screws until they are finger tight.
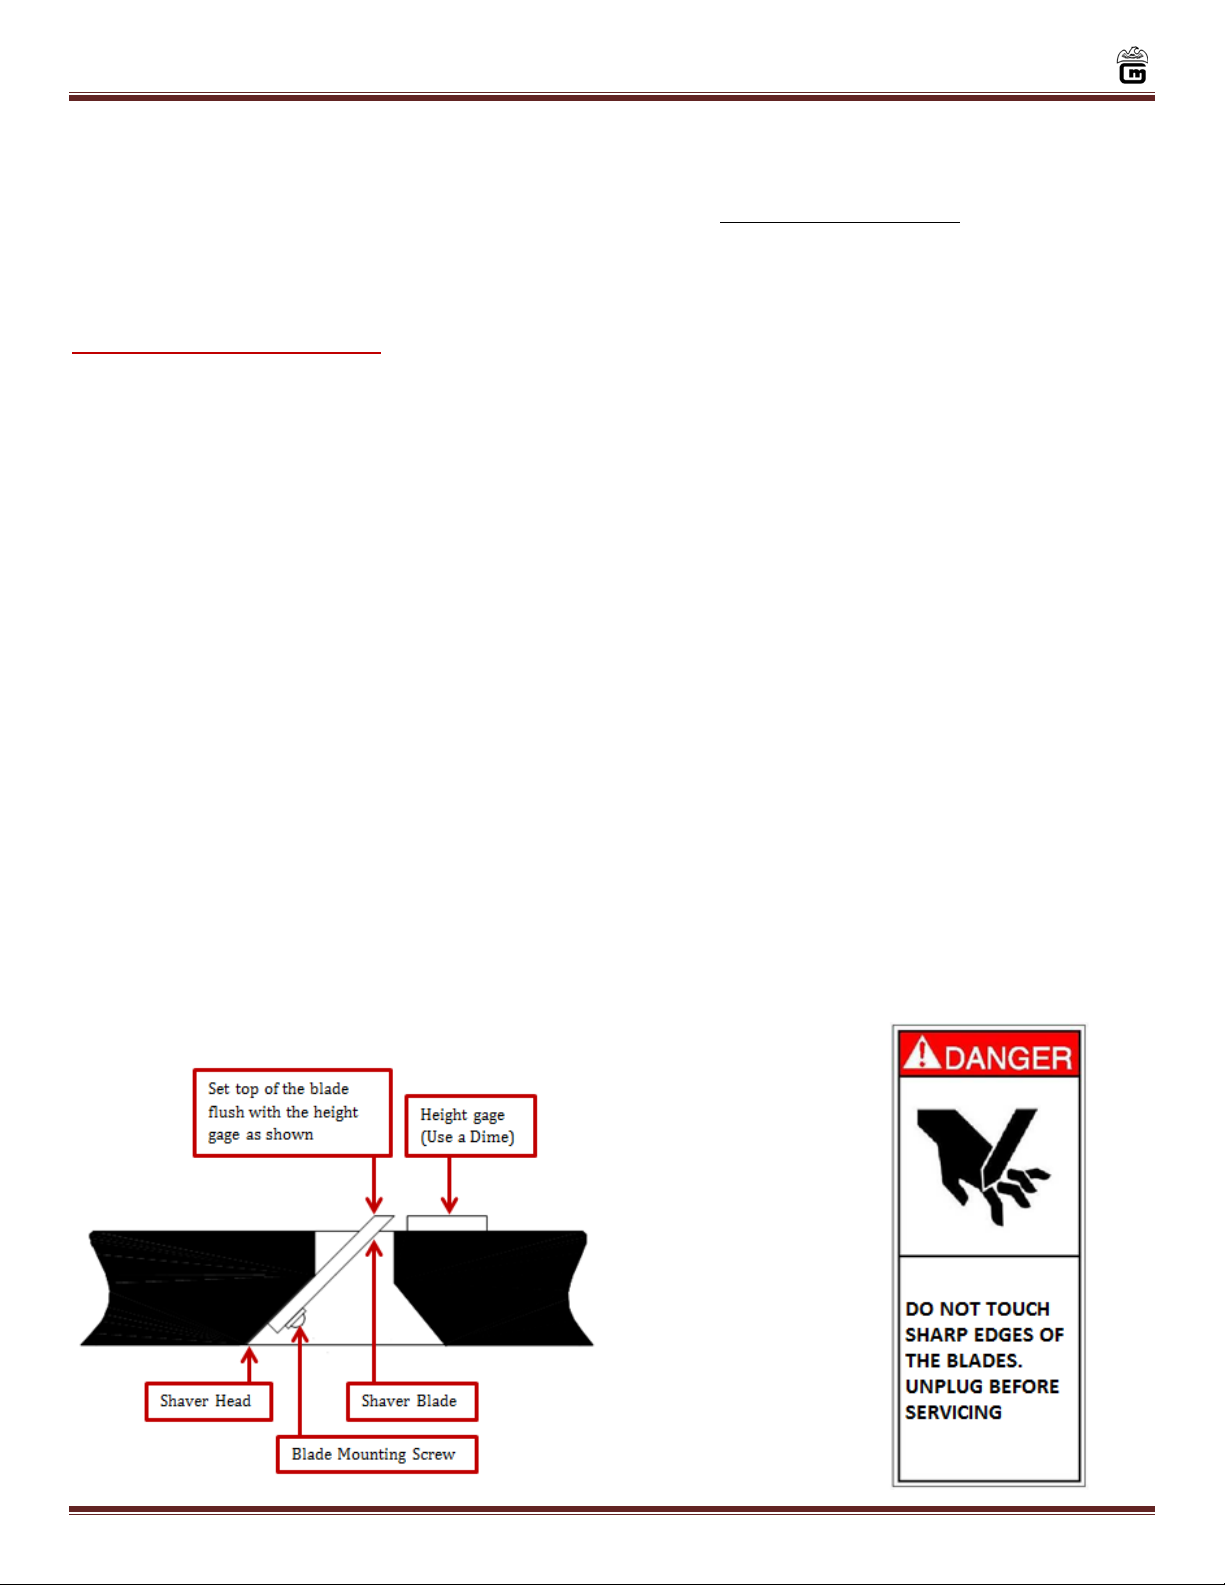
7. Set the blade thickness equal to a dime. (See illustration below.) Make sure that the height is
even across the shaver head.
8. Tighten the blade screws completely. Check the blades again with a dime to ensure the blades did
not move while tightening the screws.
9. Replace the motor and shaver head. Mount the motor using the hold down bolts. Insert the shaver
head through the hopper and onto the motor shaft. Press the shaver head onto the motor shaft with
the pusher handle, and then move the shaver head in another 1/8". Check that the shaver head is
not rubbing against the back of the hopper and the blades are not touching the pusher handle or
sides of the hopper.
10. Tighten the set screws in the shaver head.
NOTE: Replace the shims that were between the motor base and the mounting surface.

Sno-King Model No. 1888, 1888EX
http://www.gmpopcorn.com Page 6
MAINTENANCE INSTRUCTIONS

Sno-King Model No. 1888, 1888EX
http://www.gmpopcorn.com Page 7
ORDERING SPARE PARTS
1. Identify the worn or broken part by checking it with the illustrations and parts list.
2. When ordering parts, include part number, part name, and quantity required.
3. Include your model name and machine serial number (found on nameplate) with your order.
4. Address orders to:
Parts Department
Gold Medal®Products Co.
10700 Medallion Drive
Cincinnati, Ohio 45241-4807
Or place orders at:
(800) 543-0862
(513) 769-7676
Fax: (513) 769-8500
E-mail: [email protected]
www.gmpopcorn.com

Sno-King Model No. 1888, 1888EX
http://www.gmpopcorn.com Page 8
ITEM PART NO. MODEL(S) PART NAME QTY.
112660 ALL Shaver Body 1
268049 ALL 1 3/8" Glide 4
338383 ALL 10-24 x 7/8 Screw 4
22038 1888 Lead In Cord 1
42369 1888EX Export Power Supply Cord 1
522709 ALL Cover Plate 1
642798 ALL Switch Lighted Rocker 1
738971 ALL Momentary Switch 1
812670 ALL Pivot Rod 1
912001 ALL 5-16 x 18 Hex Nut 6
10 12648B ALL Side Panel 2
11 12668 ALL Drain Fitting 1
12 52236 ALL Push In Fastener 12
13 12698B ALL Front Panel 1
14 22704 ALL Elec Box Universal 1
15 12661 ALL Motor Cover 1
16 12662 ALL Plunger 1
17 49123 ALL Crutch Tip 4
4
PARTS BREAKDOWN
(Pg. 8-9)
1
2-3-17
4
5-14
6
7
8-9
10
10
11
13
12
15
16

Sno-King Model No. 1888, 1888EX
http://www.gmpopcorn.com Page 9
ITEM PART NO. MODEL(S) PART NAME QTY.
22038 1888 Lead In Cord 15A Plug 1
42369 1888EX Export Power Supply Cord
276026 ALL Strain Relief 2
374746 ALL 3" Fan Grate 1
412673 ALL Power Cord Plate 1
55448 1888 1/4 HP Motor 1
39022EX 1888EX 1/3 60/50Hz HP Motor 1
612685 ALL Motor Washer Plate 1
722015 ALL SK Shaver Head 1
81088 ALL Plastic Snow Dipper 1
922034 ALL 3/8 ID 1/16 W Drain Hose 3'
10 41163 ALL Hose Clamp With Screw 1
11 22704 ALL Universal Control Box
12 12689 ALL 0.090 Thick Shim 1
13 12690 ALL 0.032 Thick Shim 1
14 22233 ALL Hopper Support Glide 1
15 12819 ALL Hopper Support 1
16 12691 ALL Cord Assembly 1
1
5
PARTS BREAKDOWN
(Continued)
1
2
3
4
5
6
7
8
10
9
11
15
16
12-13
14

Sno-King Model No. 1888, 1888EX
http://www.gmpopcorn.com Page 10
ITEM PART NO. PART NAME QTY.
122015 Shaver Head 1
274127 1/4-20 x 3/8 Set Screw 2
322017 2 Hole Blade Replacement With Screws 2
SHAVER HEAD
Part No. 22015
1
2
2
3
3

Sno-King Model No. 1888, 1888EX
http://www.gmpopcorn.com Page 11
WIRING DIAGRAM
Model No. 1888

Sno-King Model No. 1888, 1888EX
http://www.gmpopcorn.com Page 12
WIRING DIAGRAM
Model No. 1888EX

Sno-King Model No. 1888, 1888EX
http://www.gmpopcorn.com Page 13
WARRANTY
WE WARRANT to the original purchaser the Gold Medal equipment sold by us to
be free from defects in material or workmanship under normal use and service. Our
obligation under this warranty shall be limited to the repair or replacement of any
defective part for a period of six (6) months from the date of sale to the Original
Purchaser with regard to labor and two (2) years with regard to parts and does not
cover damage to the equipment caused by accident, alteration, improper use, voltage,
abuse, or failure to follow instructions.
THIS WARRANTY IS IN LIEU OF ALL OTHER WARRANTIES EXPRESSED
OR IMPLIED, AND OF ALL OTHER OBLIGATIONS OR LIABILITIES ON OUR
PART, INCLUDING THE IMPLIED WARRANTY OF MERCHANTIBILITY.
THERE ARE NO WARRANTIES WHICH EXTEND BEYOND THE DESCRIPTION
ON THE FACE HEREOF. We neither assume, nor authorize any other person
to assume for us, any other obligation or liability in connection with the sale of said
GOLD MEDAL equipment or any part thereof.
The term “Original Purchaser” as used in this warranty shall be deemed to mean that
person, firm, association, or corporation who was billed by the GOLD MEDAL
PRODUCTS COMPANY, or their authorized distributor for the equipment.
THIS WARRANTY HAS NO EFFECT AND IS VOID UNLESS THE ORIGINAL
PURCHASER FIRST CALLS GOLD MEDAL PRODUCTS COMPANY AT 1-800-
543-0862 TO DISCUSS WITH OUR SERVICE REPRESENTATIVE THE EQUIPMENT
PROBLEM, AND, IF NECESSARY, FOR INSTRUCTIONS CONCERNING
THE REPAIR OR REPLACEMENT OF PARTS.
NOTE: This equipment is manufactured and sold for commercial use only.
GOLD MEDAL PRODUCTS COMPANY
10700 Medallion Drive
Cincinnati, Ohio 45241-4807 USA
This manual suits for next models
1
Table of contents
Other Goldmedal Ice Maker manuals

Goldmedal
Goldmedal Polar Pete 1890 User manual

Goldmedal
Goldmedal Sno–Konette 1002S User manual

Goldmedal
Goldmedal Midori Sno-King 1888W User manual

Goldmedal
Goldmedal 1027HDX User manual

Goldmedal
Goldmedal Sno-Konette 1002S User manual

Goldmedal
Goldmedal Shavatron 1020 User manual

Goldmedal
Goldmedal ShaveMaster II 1005 User manual

Goldmedal
Goldmedal 1027EX User manual

Goldmedal
Goldmedal Sno-Pro 1800 User manual

Goldmedal
Goldmedal Hawaii's Finest 1047 User manual