GOVECS FLEX 2.0 User manual

USER MANUAL
2.0

3
TABLE OF CONTENTS
Basic information
Introduction.............................................................................4
Safety ......................................................................................5
Safe riding...............................................................................6
VIN ..........................................................................................7
Vehicle overview
Main components ...................................................................8
Control and steering components..........................................9
Controls
Left hand controls.................................................................10
Right hand controls ..............................................................11
Display elements ..................................................................12
App & Downloads..................................................................13
Ignition ..................................................................................14
External components
Side stand .............................................................................15
Mirrors ..................................................................................16
Automatic steering lock & alarm ........................................17
Battery
Battery swap .........................................................................18
Charging the battery.............................................................19
Safety equipment
Lights ...................................................................................21
Tires ......................................................................................22
Brakes...................................................................................23
Brake fluid level....................................................................24
User instructions
Taking care of the vehicle.....................................................25
Technical data
Maintenance schedule .........................................................26
Technical data.......................................................................28
Technical inspection
Technical inspection & VIN number .....................................57
Technical inspection & Service booklet................................58
EN

45
INTRODUCTION SAFETY
Dear User of the GOVECS scooter,
We are excited that you have made the decision to purchase the
GOVECS scooter and to welcome you among the great number of
GOVECS scooter drivers.
This manual includes instructions concerning proper use,
maintenance, and care of your GOVECS FLEX 2.0. For your own
safety and optimal comfort of usage we advise you to carefully
read this manual before the first use.
Proper maintenance of the vehicle, observing all usage
instructions included in this manual and visiting GOVECS
service stations for regular inspections will ensure faultless
operation of your scooter.
Have a comfortable and safe journey!
FOR YOUR OWN SAFETY GET FAMILIAR WITH THE FOLLOWING INSTRUCTIONS
Whenever this symbol appears in the manual, it indicates a situation where not following the instructions may result in
damage to the scooter or injury to the user.
The batteries installed in GOVECS scooters, are subject to recycling according to the Directive 2006/66/EC of the
European Parliament and of the Council of 6 September 2006 on batteries and accumulators and waste batteries and
accumulators and repealing Directive 91/157/EEC. Damaged, spent and malfunctioning batteries need tobereturned to
the GOVECS service station or collection point authorised by the manufacturer.
• The vehicle is permitted to be driven on public roads in the European Union. Local regulations must be followed regarding age
restrictions, driver’s licence, etc.
• The scooter is designed to be used on hardened roads. It should not be used as an off-road vehicle.
• The battery can be charged in an ambient temperature above 0 degrees Celsius.
• Disassembly of the batteries is not permitted.
• Any repairs to the scooter should only be done by authorised service centers.
GOVECS does not take responsibility for inappropriate use of the vehicle.
• We recommend the user to read this manual carefully in order to use the vehicle in a proper and safe manner.
EN

67
SAFE RIDING VEHICLE IDENTIFICATION NUMBER (VIN)
BEFORE FIRST USE
Before first use of the scooter charge the battery
to 100%!
PRERIDE ACTIVITIES
Before riding the scooter make sure that:
• The battery is unplugged from the charger and plugged
into the scooter's system.
• The battery is sufficiently charged.
• The lights, turn signals and horn function properly.
• The mirrors are adjusted for your (driver's) convenience.
• The tires have correct air pressure and proper tread depth.
• The brakes work properly.
• The brake fluid level is correct.
• The brake pads and discs are not worn out.
• The handlebar turns fully left and right without resistance.
CLOTHING
• Always wear a homologated motorcycle helmet.
• Wear safe, tight-fitting and comfortable clothing
(optional: kidney belt).
• Wear proper boots (no high heels, flip-flops, or similar open
footgear).
RIDING TECHNIQUE
• Always follow traffic regulations.
• Hold the handlebar with both hands.
• Take special caution when riding on wet surfaces, dirt,
cobblestone, ice or snow.
• Do not use cell phones or other devices that may cause
distraction while riding.
CARGO AND PASSENGERS
• Maximum scooter weight must not exceed 275 kg
(with driver &cargo).
• The scooter is allowed to carry 1 person (1 seat version)
or 2 people (2 seat version).
AFTER RIDING
• Check if the battery needs charging.
• Leave the scooter in a place where it is safe from theft
orvandalism and where it doesn’t block the traffic.
• Park the scooter under a roof or in a garage, where it is
safe from rain and humidity.
The Vehicle Identification Number is located on
the right side at the back of the frame.
EN

89
MAIN COMPONENTS CONTROL AND STEERING COMPONENTS
1. Headlight
2. Steering
3. Driver's seat
4. Topcase
5. Rear light
6. Number plate holder
7. Rear wheel, brake,
in-hub motor
8. Central stand
9. Crash bumper
10. Side stand
11. Front wheel
and front brake
12. Battery (inside)
1
2
3
5
6
7
8
910
11
12
4
1. Mirrors
2. Turn indicators
3. High/low beam
4. MODE switch (front side)
5. Rear brake lever
6. Horn
7. Turn indicators switch
8. Display
9. Throttle
10. Front brake lever
11. Light sensor
12. NFC sensor
1
3
2
5
67
8
9
10
1
4
11 2
12
EN

10 11
LEFT HAND CONTROLS RIGHT HAND CONTROLS
HIGH/LOW BEAM
• Press the button to switch between low and high beam for the front lights.
• Use the high beam according to traffic regulations.
• Be aware that the high beam can blind other drivers.
MODE BUTTON
• Press and hold for 3 seconds to reset the Trip meter.
• Press and hold for 5 seconds to change the units from metric to imperial.
TURN SIGNALS
• Push left or right to activate.
• Push back to deactivate.
HORN
• Use the horn according to traffic regulations.
• Be aware that continuous use will damage the horn.
REAR BRAKE LEVER
• Left hand brake lever is responsible for braking with the rear wheel.
• Avoid blocking the rear wheel when braking to prevent excessive tire wear.
THROTTLE
• Twist backwards to accelerate.
• Release to decelerate.
• Always obey traffic regulations and speed limit.
• If possible, avoid turning the throttle too rapidly.
• Avoid braking simultaneously when turning the
throttle from zero speed, since it can temporarily
activate the safety mode (error 18). If this happens,
restart the scooter without using any brake lever.
FRONT BRAKE LEVER
• Right hand brake lever is responsible for braking with
the front wheel.
• The front brake is responsible for most of the
scooter's braking power.
• Use the front brake with caution, as it can cause
flipping over the handlebar during emergency
braking and wheel skid, leading to a possible
accident.
EN

12 13
DISPLAY ELEMENTS APP & DOWNLOADS
Trip meter
Light sensor
Sidestand &
Error signal Clock
High beam light
Right indicatorLeft indicator
We are working on it right now and soon you can download
the GOVECS FLEX 2.0 App for Android and iOS.
GPS signal
Coverage
Speedometer
Speedometer units
Odometer
NFC card receiver
Low beam light
Current battery level
Current range
Ready-to-go signal
Download the digital user manual here: www.govecs.com/downloads
Or scan the QR-Code:
Information field
EN

14 15
IGNITION SIDE STAND
Turning the scooter ON
• Get near the scooter and press the Start/Stop button.
• The Start/Stop button is in red colour displayed.
• Hold the NFC card close to the NFC card receiver on the
bottom of the cockpit.
• The Start/Stop button is in blue colour displayed.
• Make sure the side stand is folded so that the "sidestand
out" warning signal is not active.
• The scooter is then ready to drive.
Turning the scooter OFF
• Drive your scooter to a safe parking position.
• Press the Start/Stop button firmly to put the scooter
system to sleep mode.
• Hold the handlebar firmly and get off the scooter.
• Unfold the side stand (or the central stand).
• Turn the handlebar all the way to the left (the scooter is
equipped with an automatic steering lock that protects
the scooter from theft).
• The Start/Stop button goes out.
USING THE NFC CARD POSITIONING THE SCOOTER ON THE SIDE/
CENTRAL STAND
• Place the scooter on an even ground and fully unfold the side
stand/ unfold the center stand by holding and pushing the
scooter rearwards.
• The scooter leans slightly to the side when resting on the stand/The
scooter rests totally vertical on the center stand.
GETTING THE SCOOTER OFF THE STAND
• Hold the handlebar firmly and fold the stand with your leg.
SIDE STAND SENSOR
• The GOVECS FLEX 2.0 is fitted with a sensor that prevents riding
the scooter when the side stand is unfolded.
Start/Stop button
Sidestand & Error Signal
EN

16 17
MIRRORS AUTOMATIC STEERING LOCK & ALARM
This scooter is originally equipped with two mirrors in order to guarantee
full rear visibility to the driver. However, they must be adjusted to the
driver’s rewuirements before each ride.
ADJUSTING THE MIRRORS
• Loosen the nut at the base of the mirror using a wrench
• Rotate the mirror until you can clearly see the area behind the
scooter
• Make sure you have a clear view of your surroundings
• Secure the mirror nuts tightly using a wrench
CARRYING LARGE LOADS
• Should you carry a large load or a big delivery box on the rear
rack, please ensure both mirrors allow you to see the area
behind you
• If needed, replace the original mirrors with longer/wider ones,
so that the load does not obstruct the rear-view
Adjust both mirrors before each ride.
Do not ride a scooter with damaged or inproperly
adjusted mirrors!
IMPORTANT NOTICE
This scooter is fitted with an automatic steering lock and an alarm that prevents
the scooter from an unauthorised use.
The scooter will automatically lock the steering in its leftmost turning position after switching off.
Do not move the scooter if it has been deactivated (see “Ignition” chapter in this manual),
because it can activate the anti-theft alarm.
NEVER use the scooter if it has not been properly activated
(see “Ignition” chapter in this user manual).
If you need to move the scooter un-propelled (for parking, handling, storing, etc.), disconnect the
battery power connector before switching OFF the system. Only doing so will prevent the automatic
steering lock to automatically lock the steering when turning left fully.
EN

18 19
BATTERY SWAP CHARGING THE BATTERY
Charge the battery to 100% before the first
use of the scooter!
Remember, that in order to protect the battery from damage, the
system will start power-derating
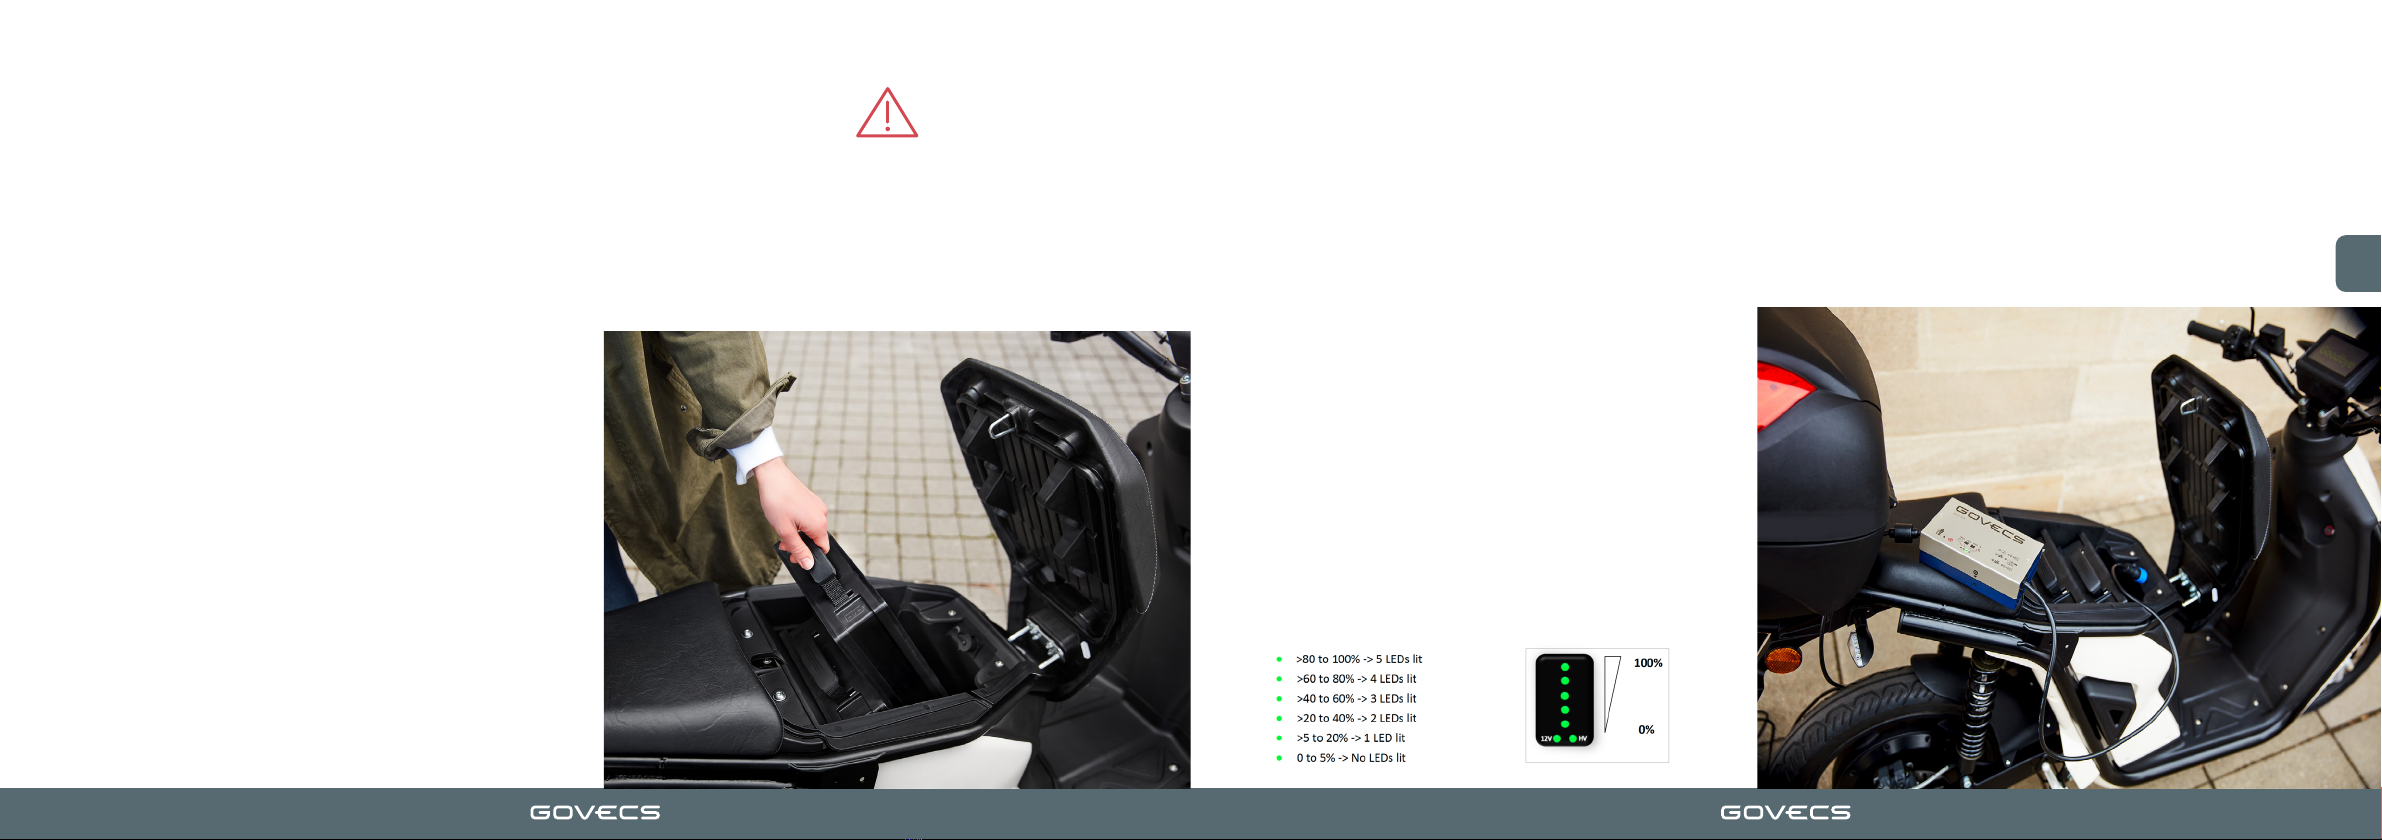
REMOVING THE BATTERY
You can remove the battery for storage or off-board charging.
• Switch off the scooter (press the start/stop button to
switch it off).
• Place the scooter on an even ground and unfold the side
stand or central stand. Release the seat lock and open it.
You can use the saddle keys, the remote control central
button, or the app to do so.
• Open the saddle.
• Remove the battery using the hand strap.
INSTALLING THE BATTERY
• Put the scooter on the central stand.
• Open the saddle.
• Check that there are no objects in the connector that obstruct
the connection with the battery, and that the connectors are
free of dirt.
• Notice that the sides of the battery are different, so that it can
only be inserted in one position.
• Carefully insert the battery with its correct orientation and
press it lightly.
• Close the saddle.
GENERAL INSTRUCTIONS
• The charger is designed for indoor use only.
• Battery charging is only possible in temperatures
above 0ºC in dry conditions.
• To charge the battery, open the saddle and install the
charger by pressing down and turning clockwise, until
a "click" sound is heard. To remove it, turn anti-clock
wise and pull.
• Always charge the battery according to GOVECS in
structions (see page 24).
CHARGING STATE
The battery displays the capacity information when
pressing down the button or during charging. The LED
pattern information is shown below. In case of a fault
detection, all LEDs will blink.
• Short press (t<=1s): Wakes up the battery and show
state of charge.
• Long press (t>=5s): Deactivates the battery (puts it in
deep sleep mode), only if this is done with the battery
outside the scooter.
CHARGING TIME
Charging the batteries can take up to 9 hours, depending on the number
of batteries being charged (one or two), the state of charge of the
batteries as well as the specifications of the charger used.
EN

20 21
LIGHTS
The energy saving LED diodes do not need
regular maintenance.
In case of damaged LED lights, contact an authorised
service station for repairs.
The scooter is equipped with the following lights:
FRONT
• Daylight running light
• Headlight (high/low beam)
• Left/right turn signals
REAR
• LED Brake light
• LED Position light
• LED Turning lights
• Registration plate light
CHARGING THE BATTERY
CHARGING REMARKS
• The cable of the charger can be passed through the groove in
the top plastic, so that the seat can be closed while charging
(see bottom pictures).
• The charger can be positioned in the space between the
frontal battery and the charging connector for transportation
purposes (see right picture). EN

22 23
TIRES
TIRE PRESSURE
• Front tire: 2,2 bar (220 kPa)
• Rear tire: 2,5 bar (250 kPa)
Air pressure above or below these limits may cause excessive
tire wear and tear. It will have a negative impact on road grip,
vehicle range and safety.
TIRE MAINTENANCE
Before riding, check both tires for damage and eventual air
inflation pressure losses.
Tire inflation pressure should be checked weekly and after
long periods of inactivity.
Regularly check the tread depth. Replace tires when reaching
1mm or lower tread depth.
Tires must never be repaired. In the event of tire wear, tear,
chunk or any other sort of structural or tread damage, replace
them immediately with GOVECS approved tires.
This GOVECS scooter is equipped with tubeless tires:
• Front tire: MITAS C02 2 ¾ -16 44P
• Rear tire: MITAS C09 90/90-16 48P
Never use tires with different ETRTO dimensions, lower load
index or lower speed symbol that those quoted above. Never
swap tires from front to rear and vice versa. NEVER ride
the scooter with tire pressure below 2.0 bar. It can cause
unstable manoeuvrability, lower road grip or even an accident.
BRAKES
BRAKE OPERATION
• Gently and gradually press both brake levers in order to slow down
• Braking too rapidly may cause accidents
• When the road is wet, use preferably the rear brake to avoid front wheel skid
BRAKE INSPECTION
Brake systems must be inspected on regular basis in order to ensure its safe
operation:
• Check the brake fluid level on both brake pump reservoirs (see next page)
• Inspect the brake hoses for leaks
• Check if brake pad thickness is above 2.4 mm
• Check if brake discs thickness is above 2 mm
• Check free operation of brake levers. Adjust and lubricate when required.
The braking system is critical for the safety of the vehicle and the driver. For
personal safety, one should take good care of brake system condition. This
vehicle is fitted with two independent hydraulic disc brake systems for front
and rear wheel.
EN

24 25
BRAKES FLUID LEVEL
CHECKING THE BRAKE FLUID LEVEL
Brake fluid level must be checked before each ride. In order to do so:
• Position the scooter in an upright position on even ground.
• Check the fluid level through the glass eye at the brake reservoir.
The brake fluid must always reach above the minimum level line.
• If the brake fluid level is below the minimum line, it indicates
wear or damage to the brake system. If so, please check the break
fluid pipes for damage.
If you notice ANY damage to the brake system,
DO NOT USE THE SCOOTER
and immediately contact the closest
authorized workshop for repairs.
TAKING CARE OF THE VEHICLE
CLEANING
Before cleaning, make sure if the scooter is turned off and discon-
nected from the charger.
• Clean the vehicle with a sponge and warm clear water
• Do not use hard sponges or brushes that may scratch the
panels, display and other delicate components.
• Clean varnished elements with dedicated cleansers only.
• Clean plastic panels with dedicated cleansers only.
• DO NOT use anti-corrosive cleansers on the brake system,
varnished parts or plastic panels.
• Avoid cleaning the scooter with any high-pressure washer,
since it may damage electrical components.
• DO NOT use any liquid product to clean the inside of the
battery storage.
• Remove the detergent with cold water and dry all surfaces.
GOVECS is not responsible for any damage resulting from the use
of pressurizing water for cleaning the vehicle.
MAINTENANCE
• Follow the recommended pre-ride check up (page 6).
• Mind the recommended maintenance schedule (page 25).
• Contact the authorised service station for maintenance.
• Do not make unauthorised modifications to the vehicle.
BATTERY LIFE
The Li-Ion battery is a crucial part of this scooter.
Li-Ion batteries have no memory effect. They can be charged as
often as desired and whatever its SOC (State Of Charge) is.Follow
these instructions for proper maintenance and long lasting per-
formance:
• Use only the designated charger supplied by GOVECS.
• To charge the battery, connect the charger first to the
vehicle, then to the power supply.
• After charging, always disconnect first the charger from the
power supply, then from the vehicle.
• Place the charger in a well ventilated area while charging to
avoid overheating.
• Avoid using the scooter when the battery is too low.
STORAGE
• Store the vehicle indoors where it is safe from harsh weather
conditions such as rain, snow, pollution and high humidity.
• Do not park the vehicle outdoors, in rain or in wet condi-
tions.
• IMPORTANT: For prolonged storage periods (i.e. overwinter)
we recommend leaving the battery with a state of charge of
70% and unplugging it.
• Check the state of charge every 3 months and charge the
battery to 70% if necessary. Letting the battery discharge
completely during this period may lead to irreparable
damage to the battery.
EN

26 27
MAINTENANCE SCHEDULE PRIVATE VEHICLES
The vehicle must undergo a regular inspection every 5000 km or every 12 months (whichever comes first). The vehicle must also be
inspected after driving the first 500 km.
Contact an authorised service centre for inspection.
Do not attempt to repair the scooter on your own.
Not following the maintenance schedule will void warranty.
Every inspection needs to be documented.
MAINTENANCE SCHEDULE COMPANY VEHICLES
Contact an authorised service centre for inspection.
Do not attempt to repair the scooter on your own.
Not following the maintenance schedule will void warranty.
Every inspection needs to be documented.
EN

28 29
TECHNICAL DATA
Model GOVECS FLEX 2.0
Vehicle class L1e-B
Top speed 45 km/h
Motor type GOVECS BLDC in-hub 3 phase motor 2.3 kW
Range 1 battery: up to 57 km
Battery type GOVECS lithium-ion battery 33.5 Ah, swappable and self-release, 9.4 kg
System voltage 50.4 V
Battery charger Slide-in-charger 8 A
Full charging cycle ~4.5 hours
Display 5“ TFT-Display: Full color, high resolution, bonding screen, shock protected
Lights Full LED
Tire size & type Front: 2¾ R16 , Rear: 90/90 R16 | 16“ Tubeless from Mitas
Braking system Hydraulic disc brakes
Max. slope 15°
Passengers 1+1
Max. payload 154 kg (including driver)
Vehicle weight 95 kg (without batteries)
Dimensions 1928 x 680 x 1300 mm (L x W x H) I Seat height: 795 mm I Ground clearance 140 mm
Suspension Front: fork hydraulic and spring 80mm, Rear: suspension hydraulic and spring 75mm
Connectivity Full connectivity: Integrated IOT, GPS
Anti-theft Steering wheel lock, alarm protection and theft notification
EN EN

30 31
INHALTSVERZEICHNIS
Grundinformation
Einführung ........................................................................... 32
Sicherheit............................................................................. 33
Sicher fahren ....................................................................... 34
Fahrgestellnummer ............................................................ 35
Überblick über das Fahrzeug
Hauptkomponenten ............................................................. 36
Lenkungskomponenten....................................................... 37
Bedienelemente
Linke Steuerelemente ......................................................... 38
Rechte Steuerelemente....................................................... 39
Display – Elemente.............................................................. 40
App & Downloads ................................................................ 41
Zündung ............................................................................... 42
Außenteile
Seitenständer....................................................................... 43
Spiegel ................................................................................. 44
Automatisches Lenkradschloss & Alarm ........................... 45
Batterie
Batterie wechseln................................................................ 46
Batterie aufladen................................................................. 47
Sicherheitsausrüstung
Beleuchtung ........................................................................ 49
Reifen ................................................................................... 50
Bremsen............................................................................... 51
Bremsflüssigkeitsstand....................................................... 52
Bedienungsanleitung
Fahrzeugpflege.................................................................... 53
Technische Daten
Wartungszeitplan ................................................................ 54
Technische Daten................................................................. 56
Technische Inspektion
Technische Inspektion & VIN Nummer ................................57
Technische Inspeltionen & Wartungsbuch...........................58
DE

32 33
EINFÜHRUNG
Lieber Nutzer eines GOVECS-Rollers,
wir freuen uns sehr, dass du dich für einen Roller von GOVECS
entschieden hast, und begrüßen dich herzlich im großen Kreis der
GOVECS-Fahrer.
Dieses Handbuch enthält wichtige Hinweise zur richtigen Handhabung,
Pflege und Wartung deines GOVECS FLEX 2.0. Zu deiner Sicherheit und
zur Gewährleistung eines komfortablen Fahrerlebnisses empfehlen
wir dir, dieses Handbuch vor der ersten Fahrt sorgfältig durchzulesen.
Eine ordnungsgemäße Wartung des Rollers, die Beachtung aller
in diesem Handbuch enthaltenen Anweisungen und das Aufsuchen
von GOVECS-Servicestationen für regelmäßige Inspektionen werden
deinen Roller immer einwandfrei in Schuss halten.
Wir wünschen dir eine gute und
unfallfreie Fahrt!
SICHERHEIT
MACHE DICH ZU DEINER EIGENEN SICHERHEIT BITTE MIT FOLGENDEN
ANWEISUNGEN VERTRAUT:
Wann immer dieses Symbol in der Bedienungsanleitung erscheint, weist es auf eine Situation hin, in der die Nichtbeach-
tung der Anweisungen zu Schäden am Roller oder zu Verletzungen führen kann.
Die in GOVECS-Rollern eingebauten Batterien unterliegen dem Recycling gemäß der Richtlinie 2006/66/EG des Euro-
päischen Parlaments und des Europäischen Rates vom 6. September 2006 über Batterien und Akkumulatoren sowie
Altbatterien und Altakkumulatoren, welche die vorherige Richtlinie 91/157/EWG ersetzt. Beschädigte, verbrauchte und
defekte Batterien müssen direkt an eine GOVECS Servicestation oder eine von GOVECS autorisierte Sammelstation
zurückgeschickt werden.
• Dieses Fahrzeug darf in der Europäischen Gemeinschaft auf öffentlichen Straßen gefahren werden. Die örtlichen Vorschriften
bezüglich Altersbeschränkungen, Führerschein usw.. sind zu beachten.
• Der Roller ist für den Einsatz auf befestigten Straßen konzipiert. Er sollte nicht im Gelände verwendet werden.
• Die Batterie kann bei einer Umgebungstemperatur von über 0 Grad Celsius geladen werden.
• Eine Demontage der Batterien ist nicht zulässig.
• Alle Reparaturen am Roller sollten von einem autorisierten Servicezentrum durchgeführt werden.
GOVECS übernimmt keine Verantwortung für unsachgemäßen Gebrauch des Rollers.
• Wir empfehlen jedem Benutzer, diese Anleitung sorgfältig zu lesen, um das Fahrzeug ordnungsgemäß und sicher benutzen zu
können.
DE

34 35
SICHER FAHREN
VOR DEM ERSTEN GEBRAUCH
Lade die Batterie vor der ersten Benutzung des
Rollers auf 100 % auf!
VOR FAHRBEGINN
Vor Fahrtbeginn vergewissere dich bitte immer von Folgendem:
• Die Batterie ist vom Ladegerät getrennt und in das System des
Rollers eingesteckt.
• Die Batterie ist ausreichend geladen.
• Beleuchtung, Blinker und Hupe funktionieren korrekt.
• Beide Spiegel sind richtig auf dich (Fahrer) eingestellt.
• Der Reifendruck ist korrekt und das Reifenprofil ist
ausreichend.
• Die Bremsen funktionieren einwandfrei.
• Der Bremsflüssigkeitsstand stimmt.
• Die Bremsbacken und -scheiben sind nicht abgenutzt.
• Der Lenker lässt sich widerstandslos ganz nach links und
rechts bewegen.
KLEIDUNG
• Trage immer einen zugelassenen Motorradhelm.
• Trage sichere, eng anliegende und bequeme Kleidung (optional:
Nierengurt).
• Immer geeignetes Schuhwerk tragen (keine Absatzschuhe,
Sandalen, offenen Schuhe usw.).
FAHRTECHNIK
• Befolge immer die Verkehrsregeln.
• Halte den Lenker mit beiden Händen.
• Sei besonders vorsichtig, wenn du auf nassen Oberflächen,
Schmutz, Kopfsteinpflaster, Eis oder Schnee fährst.
• Verwende keine Mobiltelefone oder anderen Geräte, die
während der Fahrt ablenken.
BELADUNG UND PASSAGIERE
• Das maximale Rollergewicht darf 275 kg nicht überschreiten
(mit Fahrer und Ladung).
• Der Roller darf 1 Person (1-Sitz-Version) oder 2 Personen
(2-Sitz-Version) befördern.
NACH DER FAHRT
• Prüfe, ob die Batterie aufgeladen werden muss.
• Stelle den Roller an einem Ort ab, an dem er vor Diebstahl und
Vandalismus geschützt ist und den Verkehr nicht behindert.
• Parke den Roller unter einem Dach oder in einer Garage, wo er
vor Regen und Feuchtigkeit geschützt ist.
FAHRGESTELLNUMMER
Die Fahrgestellnummer befindet sich auf
der rechten Seite des Rahmens neben dem
Rücklicht.
DE

36 37
HAUPTKOMPONENTEN
1. Scheinwerfer
2. Lenker
3. Fahrersitz
4. Topcase
5. Rücklicht
6. Kennzeichenhalterung
7. Hinterrad, Bremse,
Nabenmotor
8. Zentraler Ständer
9. Stoßfänger
10. Seitenständer
11. Vorderrad, Bremse
12. Batterie (innen)
1
2
3
5
6
7
8
910
11
12
4
STEUERUNGS UND LENKUNGSKOMPONENTEN
1. Spiegel
2. Blinker
3. Auf- und Abblendlicht
4. Modus-Schalter (Vorderseite)
5. Bremshebel für hinten
6. Hupe
7. Blinkerschalter
8. Display
9. Gasgriff
10. Bremshebel für vorne
11. Licht Sensor
12. NFC Sensor
1
3
2
5
67
8
9
1
4
11 2
12
10
DE

38 39
LINKE STEUERELEMENTE
AUF UND ABBLENDLICHT
• Drücke den Schalter zum Umschalten zwischen Abblend- und
Fernlicht für die Frontscheinwerfer.
• Verwende das Fernlicht nur gemäß der Straßenverkehrsordnung.
• Beachte, dass das Fernlicht andere Fahrer blenden kann.
MODE KNOPF
• Druck und halte den Mode Knopf für 3 Sekunden, um den
Tripmeter zurückzusetzen.
• Druck und halte den Mode Knopf für 5 Sekunden, um die
Einheiten zwischen das metrische und das
imperiale System zu wechseln.
BLINKER
• Zum Aktivieren nach links oder rechts drücken.
• Zum Deaktivieren eindrücken.
HUPE
• Verwende die Hupe nur gemäß der Straßenverkehrsordnung.
• Bei längerem Gebrauch wird die Hupe beschädigt.
BREMSHEBEL FÜR HINTEN
• Der linke Bremshebel dient dem Bremsen mit dem Hinterrad.
• Vermeide das Blockieren des Hinterrads beim Bremsen, um
übermäßigen Reifenverschleiß zu vermeiden.
RECHTE STEUERELEMENTE
GASGRIFF
• Zum Beschleunigen nach hinten drehe.
• Lösen zum Abbremsen.
• Beachte immer die Verkehrsregeln und Geschwindig-
keitsbegrenzungen.
• Wenn möglich, vermeide es, den Gasgriff zu schnell zu
drehen.
• Vermeide es, gleichzeitig zu bremsen und den
Gasgriff aus der Nullgeschwindigkeit zu drehen, da so
vorübergehend der Sicherheitsmodus aktiviert werden
kann (Fehler 18). Wenn dies geschieht, starte den
Roller neu, ohne einen Bremshebel zu benutzen.
BREMSHEBEL FÜR VORNE
• Der rechte Bremshebel dient dem Bremsen mit dem
Vorderrad.
• Die Vorderbremse ist für den größten Teil der Bremsk-
raft des Rollers verantwortlich.
• Verwende die Vorderbremse mit Vorsicht, da dies bei
einer Notbremsung zum Umkippen des Lenkers, zum
Wegrutschen der Räder und zu einem Unfall führen.
DE
Other manuals for FLEX 2.0
2
Table of contents
Languages:
Other GOVECS Scooter manuals

GOVECS
GOVECS ELM OTO KICK User manual

GOVECS
GOVECS GO! S 1.2 User manual

GOVECS
GOVECS PRO CARGO User manual

GOVECS
GOVECS FLEX 2.0 User manual

GOVECS
GOVECS FLEX User manual

GOVECS
GOVECS FLEX 2.0 User manual

GOVECS
GOVECS E-Schwalbe 2023 User manual

GOVECS
GOVECS GO! S2.4 User manual

GOVECS
GOVECS Schwalbe User manual
Popular Scooter manuals by other brands

Zero Motorcycles
Zero Motorcycles S 2010 owner's manual

Lance Power Sports
Lance Power Sports Interceptor 150 owner's manual

Yamaha
Yamaha XP500 2001 Service manual

UFREE SCOOTER
UFREE SCOOTER FS-E11 quick guide

Malaguti
Malaguti PHANTHOM F12R Sevice manual

HNF-NICOLAI
HNF-NICOLAI CD1 Cargo operating instructions