manuals.online logo
Brands
  1. Home
  2. •
  3. Brands
  4. •
  5. GOVECS
  6. •
  7. Scooter
  8. •
  9. GOVECS FLEX 2.0 User manual

GOVECS FLEX 2.0 User manual

USER MANUAL
2.0
3
TABLE OF CONTENTS
Basic information
Introduction.............................................................................4
Safety ......................................................................................5
Product and parts ...................................................................6
Safe riding...............................................................................7
VIN ..........................................................................................8
Vehicle overview
Main components ...................................................................9
Control and steering components........................................10
Controls
Left hand controls.................................................................11
Right hand controls ..............................................................12
Display elements ..................................................................13
Ignition ..................................................................................14
Settings menu.......................................................................15
External components
Kickstand ..............................................................................17
Mirrors ..................................................................................18
Battery
Battery swap .........................................................................19
Charging the battery.............................................................20
Safety equipment
Lights ...................................................................................24
Tires ......................................................................................25
Brakes ...................................................................................26
Brakes fluid level ..................................................................27
User instructions
Taking care of the vehicle .....................................................28
Technical data
Maintenance schedule..........................................................30
Technical data.......................................................................32
Reporting safety defects.......................................................34
Technical inspection
Technical inspection & VIN number .....................................35
Technical inspection & Service booklet................................36
EN
4 5
INTRODUCTION SAFETY
Dear User of the GOVECS scooter,
We are excited that you decided to purchase the GOVECS scooter and
to welcome you among the great number of GOVECS scooter drivers.
This manual includes instructions concerning the proper use,
maintenance, and care of your GOVECS FLEX 2.0. For your own
safety and optimal comfort of usage we advise you to carefully
read this manual before the first use.
Proper maintenance of the vehicle, observing all usage
instructions included in this manual and visiting GOVECS
service stations for regular inspections will ensure faultless
operation of your scooter.
Have a comfortable and safe journey!
FOR YOUR OWN SAFETY GET FAMILIAR WITH THE FOLLOWING INSTRUCTIONS
Whenever this symbol appears in the manual, it indicates a situation where not following the instructions may result in
damage to the scooter or injury to the user.
• Local regulations must be followed regarding driving age restrictions, driver’s licence, etc.
• The scooter is designed to be used on hardened roads. It should not be used as an off-road vehicle.
• The battery should be charged in an ambient temperature between 32 and 113 degrees Fahrenheit and a dry environment.
• The scooter should be driven between -4 and 140 degrees Fahrenheit.
• Disassembly of the batteries is not permitted.
• Any repairs to the scooter should only be done by authorised service centers.
 GOVECS does not take responsibility for inappropriate use of the vehicle.
• We recommend the user to read this manual carefully in order to use the vehicle in a proper and safe manner.
The batteries installed in GOVECS scooters, are subject to recycling according to the Directive 2006/66/EC of the
European Parliament and of the Council of 6 September 2006 on batteries and accumulators and waste batteries and
accumulators and repealing Directive 91/157/EEC. Damaged, spent and malfunctioning batteries need tobereturned to
the GOVECS service station or collection point authorised by the manufacturer.
EN
6 7
SAFE RIDING
BEFORE FIRST USE
Before first use of the scooter charge the battery
to 100%!
PRERIDE ACTIVITIES
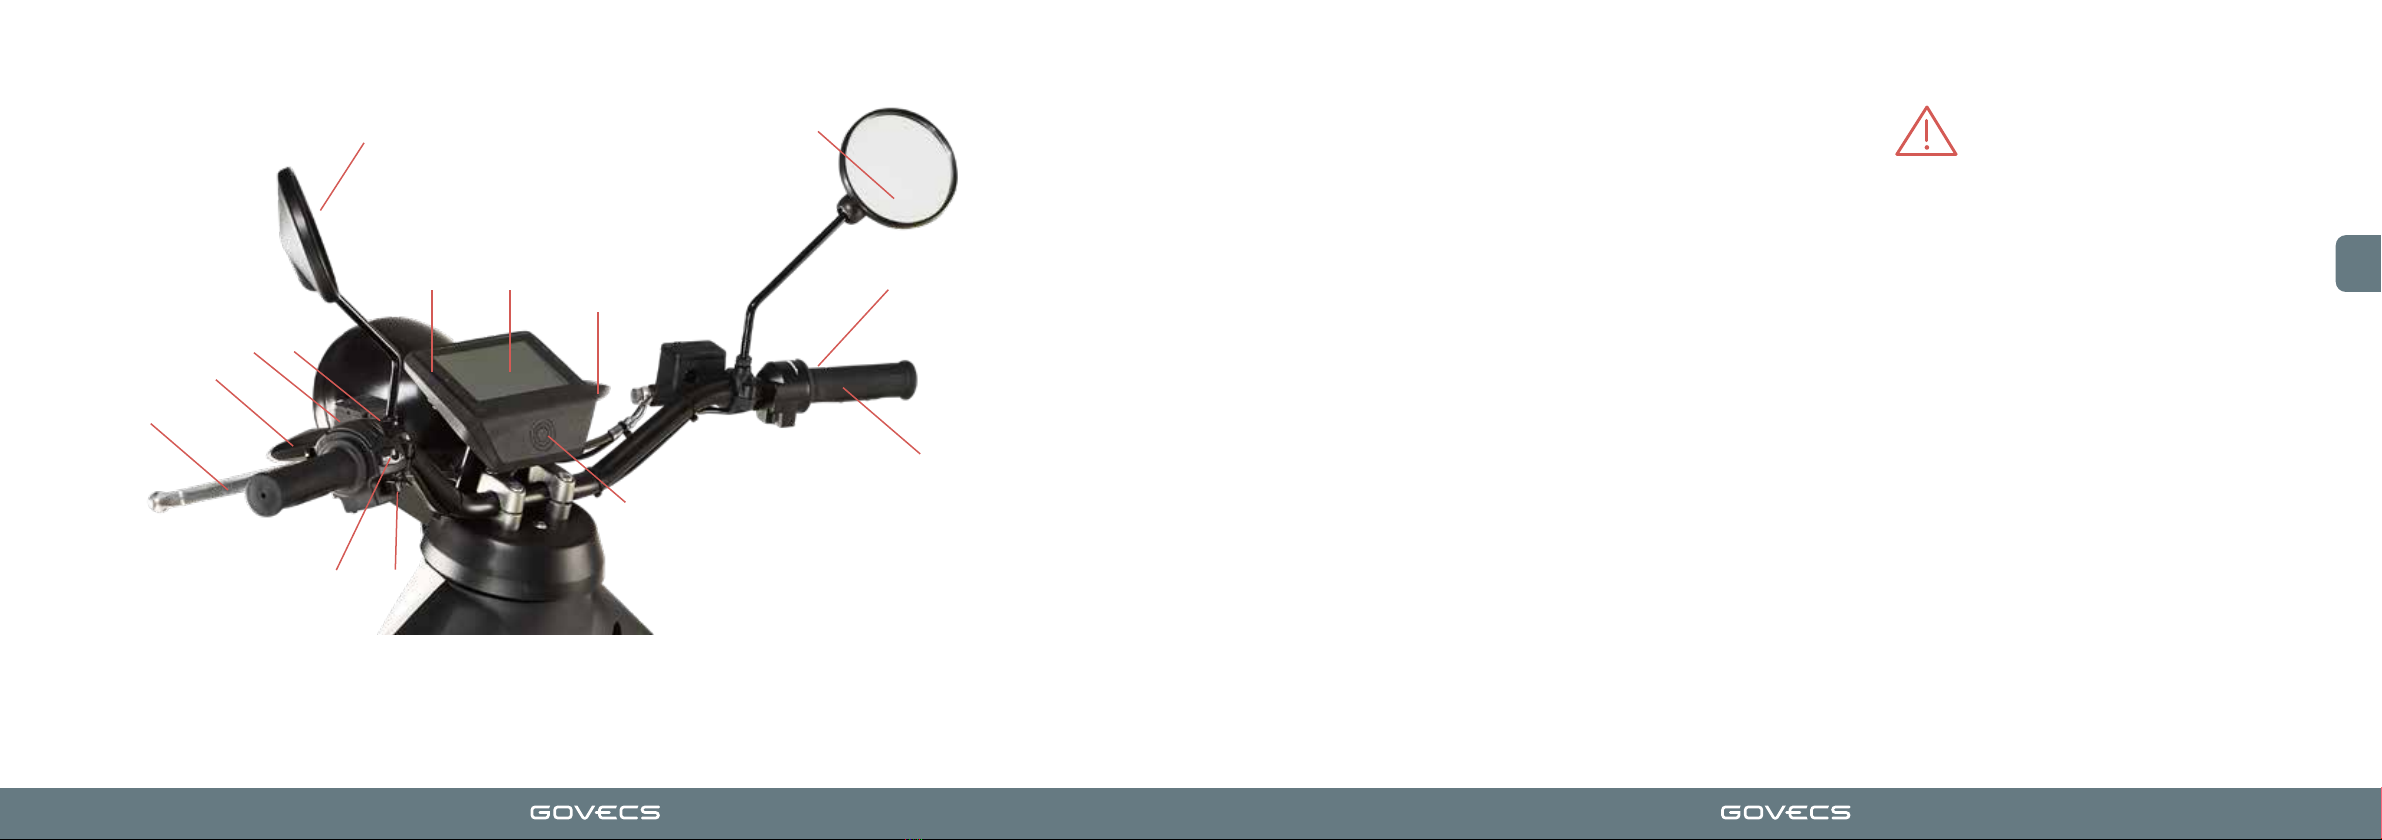
Before riding the scooter make sure that:
• The battery is sufficiently charged.
• The lights, turn signals and horn function properly.
• The mirrors are adjusted for your (driver's) convenience.
• The tires have correct air pressure and proper tread depth.
• The brakes work properly.
• The brake fluid level is correct.
• The brake pads and discs are not worn out.
• The handlebar turns fully left and right without resistance.
CLOTHING
• Always wear a homologated motorcycle helmet.
• Wear safe, tight-fitting and comfortable clothing (optional:
kidney belt).
• Wear proper boots (no high heels, flip-flops, or similar open
footgear).
RIDING TECHNIQUE
• Always follow traffic regulations.
• Hold the handlebar with both hands.
• Take special caution when riding on wet surfaces, dirt,
cobblestone, ice or snow.
• Do not use cell phones or other devices that may cause a
distraction while riding.
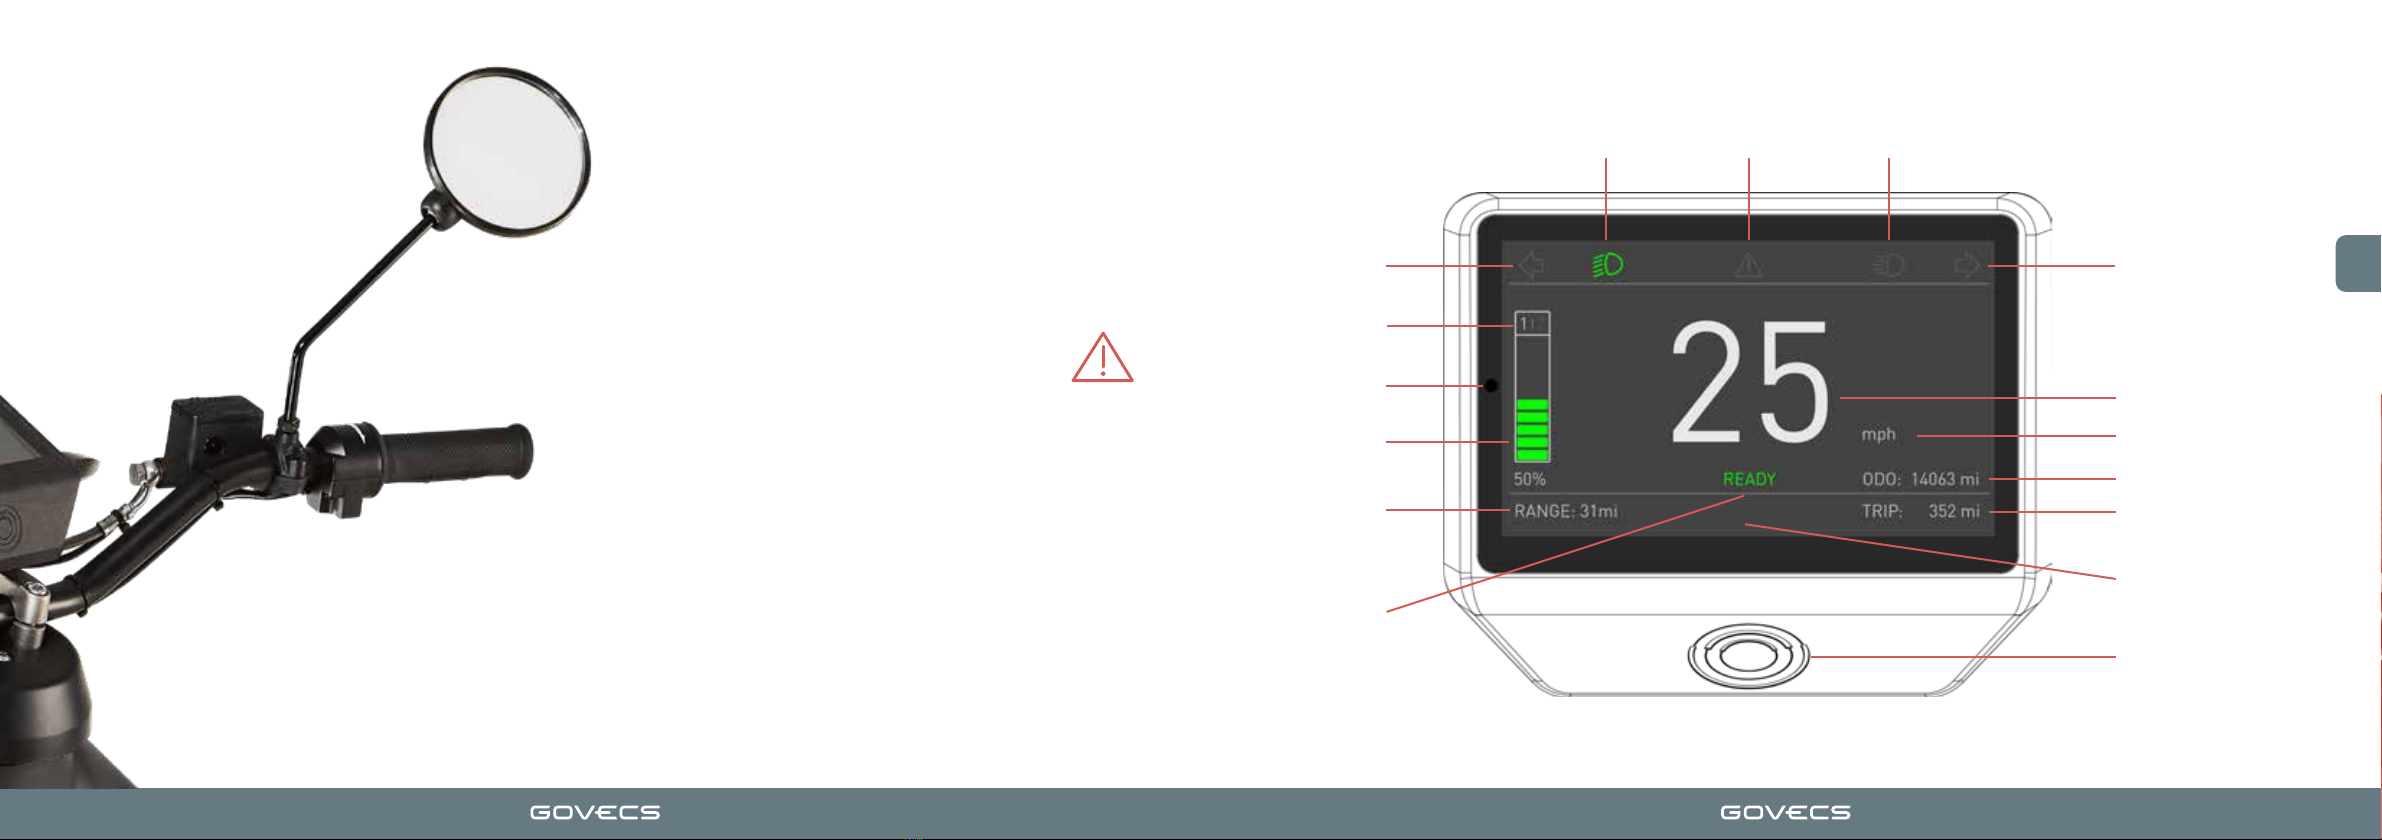
• When the motor, motor controller or battery/-ies get overheated,
a warning message will appear on the screen, while the power
of the scooter will be temporarily reduced until the temperature
returns to a normal value.
CARGO AND PASSENGERS
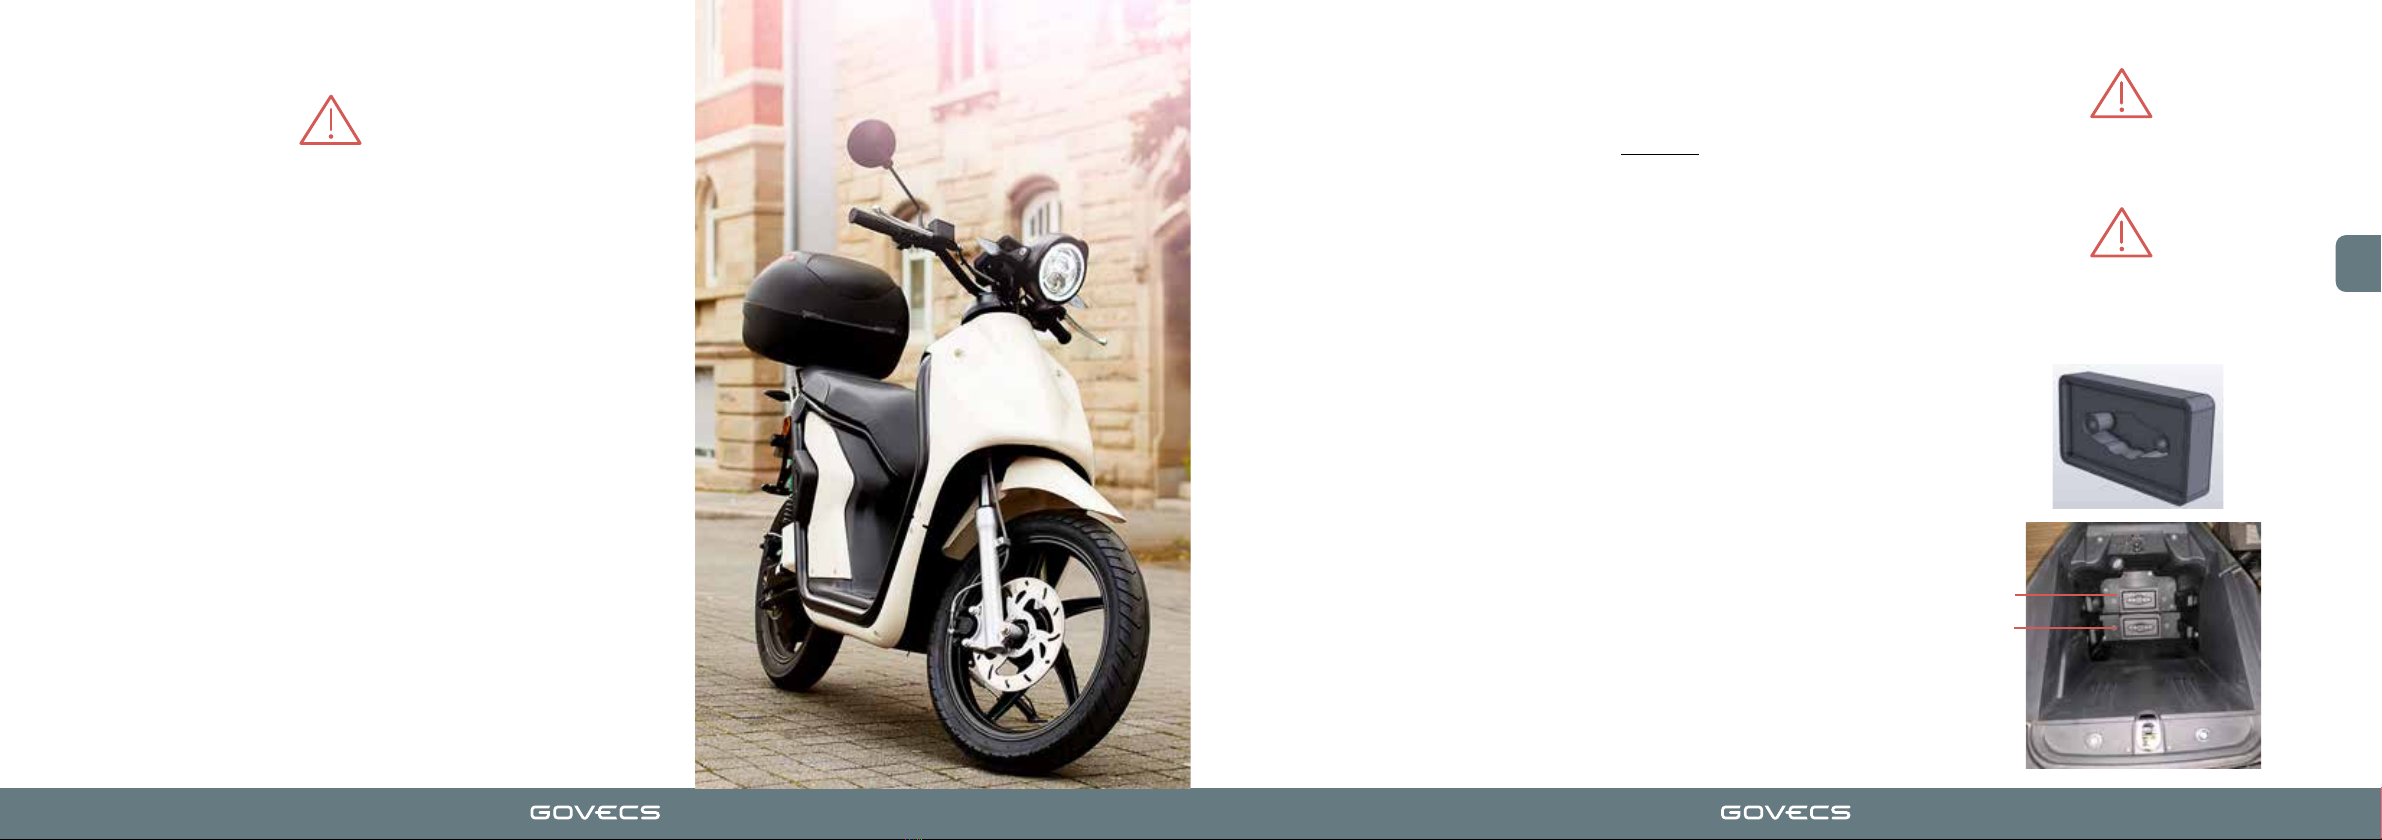
• Maximum scooter weight must not exceed 275 kg (That means
a maximum of 2 batteries, a driver of 75 kg & cargo of 87 kg are
allowed on the scooter).
• The scooter is allowed to carry 1 person (1 seat version) or 2
people (2 seat version).
AFTER RIDING
• Check if the battery needs charging.
• Leave the scooter in a place where it is safe from theft
orvandalism and where it doesn’t block the traffic.
• Park the scooter where it is safe from rain and humidity.
PRODUCT AND PARTS
Standard equipment
GOVECS Flex 2.0:
Scooter GOVECS Flex 2.0 (x1)
User Manual GOVECS Flex 2.0 (x1)
Battery (x1)
Charger (x1)
Master NFC Card (x1)
Key NFC Card (x2)
Seat keys (x2)
Optional equipment GOVECS Flex 2.0
(includes mounting hardware):
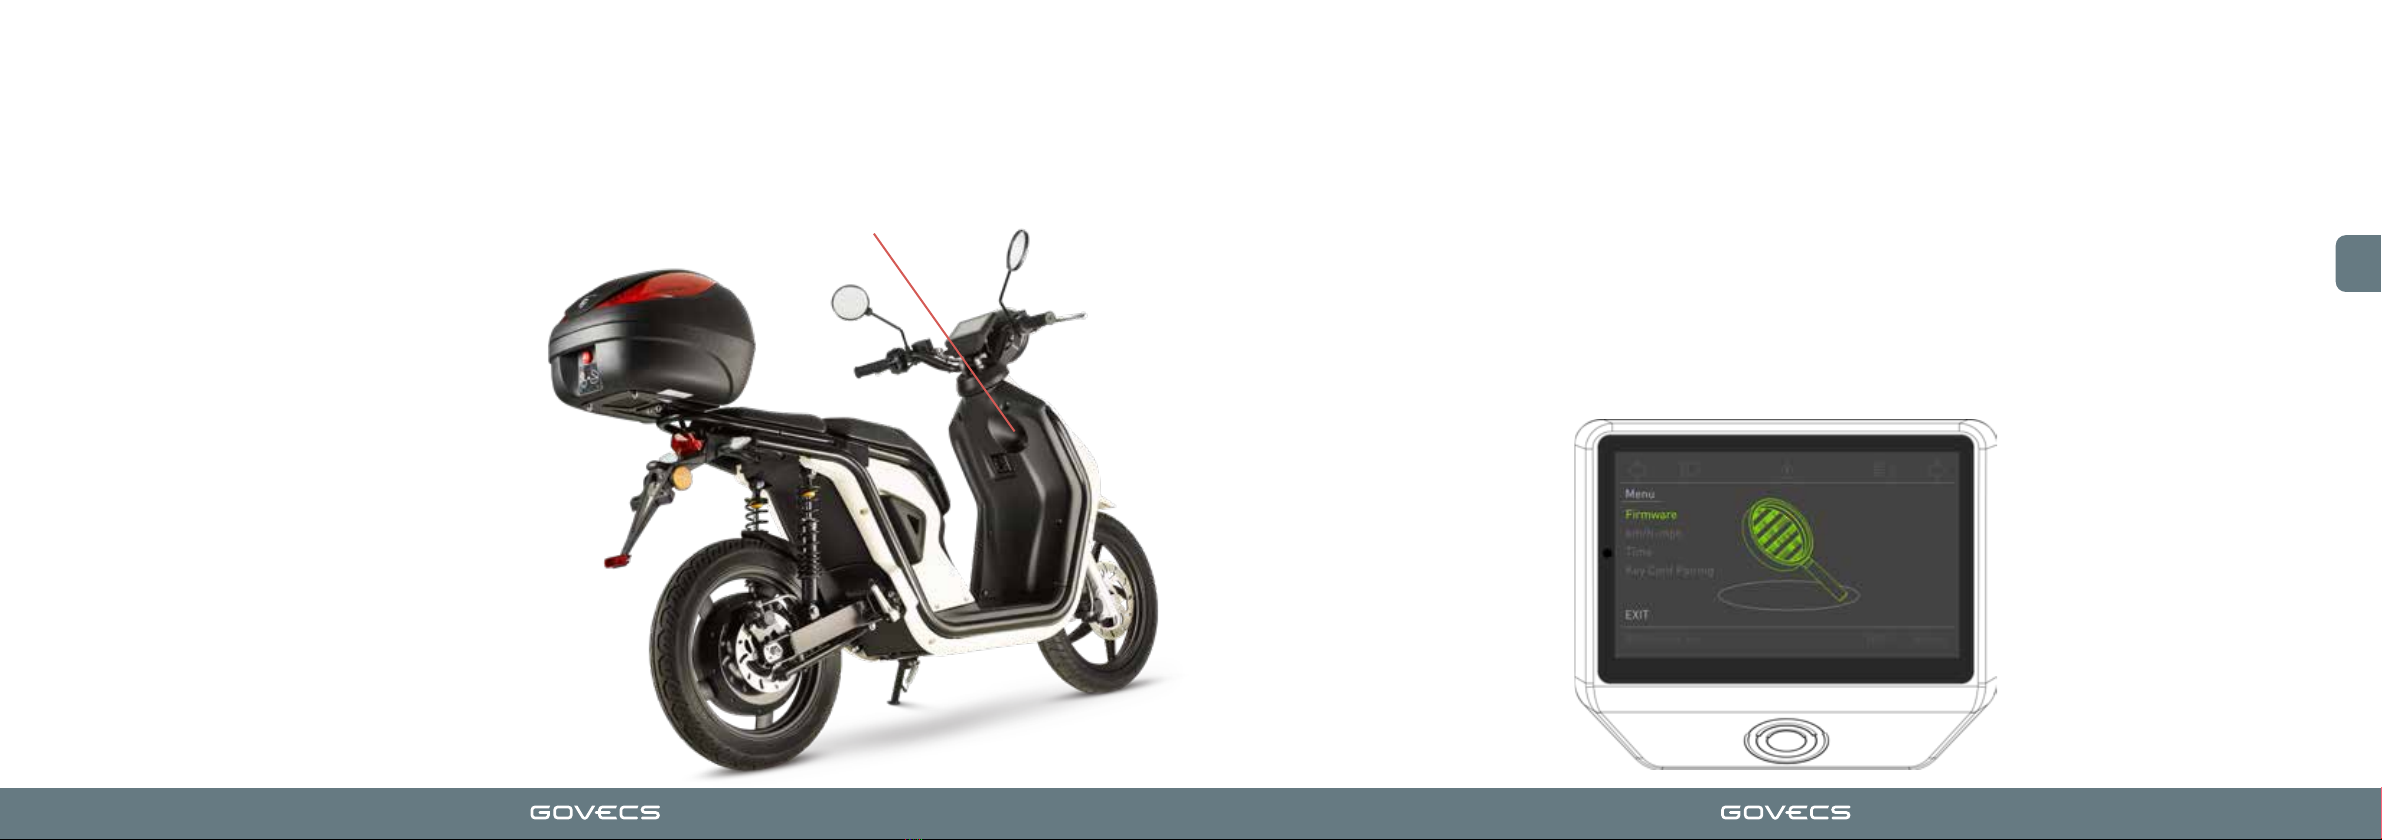
Top case (x1)
Passenger footrest (x2)
Passenger seat (x1)
Please check the contents of the package carefully and make sure that all parts are complete and undamaged. If a part is
missing or damaged, please contact us via our serviceplatform: support.govecs.com.
Please also check whether the chassis number on the data confirmation sheet matches the chassis number on your vehicle.
EN
8 9
VEHICLE IDENTIFICATION NUMBER (VIN)
The Vehicle Identification Number is located on
the right side at the back of the frame.
MAIN COMPONENTS
1
2
3
5
6
7
8
910
11
12
4
1. Headlight
2. Steering
3. Driver's seat
4. Topcase
5. Rear light
6. Number plate holder
7. Rear wheel, brake, in-hub motor
8. Central stand
9. Crash bumper
10. Kickstand
11. Front wheel and front brake
12. Battery (inside)
EN
10 11
CONTROL AND STEERING COMPONENTS
1. Mirrors
2. Turn indicators
3. High/low beam
4. MODE switch (front side)
5. Rear brake lever
6. Horn
7. Turn indicators switch
8. Display
9. Throttle
10. Front brake lever
11. Light sensor
12. NFC sensor
1
3
2
5
67
8
9
10
1
4
11 2
12
LEFT HAND CONTROLS
HIGH/LOW BEAM
• Press the button to switch between low and high beam for the front lights.
• Use the high beam according to traffic regulations.
• Be aware that the high beam can blind other drivers.
MODE BUTTON
• Press and hold for 3 seconds to reset the Trip meter.
• Press and hold for 6 seconds to access the settings menu.
TURN SIGNALS
• Push the button to the left or right to activate.
• Push the button to deactivate.
HORN
• Use the horn according to traffic regulations.
• Be aware that continuous use will damage the horn.
REAR BRAKE LEVER
• Left hand brake lever is responsible for braking with the rear wheel.
• Avoid blocking the rear wheel when braking to prevent excessive tire wear.
EN
12 13
RIGHT HAND CONTROLS
FRONT BRAKE LEVER
• Right hand brake lever is responsible for braking with the
front wheel.
• The front brake is responsible for most of the scooter's
braking power.
• Use the front brake with caution, as it can cause flipping
over the handlebar during emergency braking and wheel
skid, leading to a possible accident.
THROTTLE
• Twist backwards to accelerate.
• Release to decelerate.
• Always obey traffic regulations and speed limit.
• If possible, avoid turning the throttle too rapidly.
• Avoid braking simultaneously when turning the throttle
from zero speed, since it can temporarily activate the
safety mode. If this happens, restart the scooter without
using any brake lever.
AUTOMATIC STEERING LOCK
The scooter is fitted with an automatic steering lock. To
activate it, switch off the scooter and move the handlebar to
the leftmost position. To deactivate the steering lock, press
the Start/Stop button and use the NFC card or the app to
turn on the scooter.
DISPLAY ELEMENTS
Trip meter
Light sensor
Warning sign High beam light
Right indicator
Left indicator
Speedometer
Speedometer units
Odometer
NFC card receiver
Low beam light
Current battery level
Current range
Ready-to-go signal
Description of the warning
Battery count
EN
14 15
IGNITION
Turning the scooter ON
1. Get near the scooter and press the Start/Stop button.
2. The Start/Stop button is in red colour displayed.
3. Hold the NFC card close to the NFC card receiver on the
bottom of the cockpit.
4. The Start/Stop button is now in blue colour displayed.
5. Make sure the kickstand is folded so that the "Kickstand
out" warning signal is not active.
6. The scooter is then ready to drive.
Turning the scooter OFF
1. Drive your scooter to a safe parking position.
2. Press the Start/Stop button firmly to put the scooter
system to sleep mode.
3. Hold the handlebar firmly and get off the scooter.
4. Unfold the kickstand (or the central stand).
5. Turn the handlebar all the way to the left to lock it.
6. The Start/Stop button light goes out.
USING THE NFC CARD
Start/Stop button
SETTINGS MENU
GENERAL OVERVIEW
To access the settings menu press the "Mode" button on the handlebar of the scooter continuously, until the screen changes. To
make use of it, the "Mode" button is used to navigate through the menus and the "Horn" button to enter a sub-menu and confirm a
selection.
The settings menu has 4 sub-menus, listed below:
1. Firmware: Provides information about the firmware versions.
2. Speed units: Switches between km/h and mph.
3. Time: Switches between summer time and winter time.
4. Key Card Pairing: Lets the user control the paired NFC keys with the scooter.
In the following picture the overview of the menu in the cockpit is shown:
EN
16 17
A brand new Flex 2.0 scooter comes with one master key card (in dark petrol colour) and two key cards (in light petrol colour). An example
of the Key Card Pairing menu can be seen at the bottom of the page. To pair the key cards to the scooter please follow the next steps:
1. Start the scooter by pressing the Start/Stop button.
2. When on the screen appears the message "Start with Keycard", put the master key card above the NFC card receiver area until you
unlock the scooter and can see the main screen.
3. Press and hold the "Mode" button until the settings menu appears.
4. Navigate through the menu using the push button "MODE" on the handlebar to "Key Card Pairing". Press the "Horn" button to enter.
5. Navigate to "pair new Key Card" and press the horn button to enter.
6. Position the master key card in front of the NFC card receiver area, until the message "Master Key Card is identified" appears on the
screen.
7. Position the new key card in front of the NFC sign, until the message "new Key Card Paired" appears on the screen. Now this key card is
paired to the scooter.
8. Exit the settings menu by navigating to "EXIT" and pressing the horn button, until the main screen of the cockpit is seen.
NOTES:
• The sub-menu "identify Key Card" shows the serial number of the key card when
put above the NFC card receiver area.
• The sub-menu "show paired Key Cards" presents a list of the paired cards to this
scooter. To erase a paired key card, move to the desired card in the list, click the
Horn button to enter and confirm the deletion by entering the "Yes" option. Up to
nine key cards can be paired to one scooter.
SETTINGS MENU
KEY CARD PAIRING
The master key card should be used only to pair other key cards and not
for the everyday use. In case of loss of the master key card please contact
the nearest Govecs shop or hotline (see the last page of this manual).
KICKSTAND
POSITIONING THE SCOOTER ON THE SIDE/
CENTRAL STAND
• Place the scooter on even ground and fully unfold the kickstand/
unfold the center stand by holding and pushing the scooter rearwards.
• The scooter leans slightly to the side when resting on the stand/The
scooter rests vertical on the center stand.
GETTING THE SCOOTER OFF THE STAND
• Hold the handlebar firmly and fold the stand with your leg.
KICKSTAND SENSOR
• The GOVECS FLEX 2.0 is fitted with a sensor that prevents riding the
scooter when the kickstand is unfolded.
• When the kickstand is folded out, the message "Kickstand out"
appears on the display and the warning sign lights up.
Warning sign
EN
18 19
MIRRORS
This scooter is originally equipped with two mirrors in order to guarantee
full rear visibility to the driver. However, they must be adjusted to the
driver’s requirements before each ride.
ADJUSTING THE MIRRORS
• Loosen the nut at the base of the mirror using a wrench.
• Rotate the mirror until you can clearly see the area behind the scooter.
• Make sure you have a clear view of your surroundings.
• Secure the mirror nut tightly using a wrench.
CARRYING LARGE LOADS
• Should you carry a large load or a big delivery box on the rear rack,
please ensure both mirrors allow you to see the area behind you.
• If needed, replace the original mirrors with longer/wider ones, so that
the load does not obstruct the rear-view.
Adjust both mirrors before each ride. Do not ride a scooter
with damaged or improperly adjusted mirrors!
BATTERY SWAP
Charge the battery to 100% before the first
use of the scooter!
REMOVING THE BATTERY
To remove the batteries please follow the next steps. It is important that
before removing the batteries, the scooter is turned off.
1. Switch off the scooter (press the start/stop button to switch it off).
2. Place the scooter on even ground and unfold the kickstand or the
central stand. Release the seat lock using the saddle keys or the app
and open the seat.
3. Remove the battery using the hand strap.
INSTALLING THE BATTERY
To install the batteries in the scooter, please follow the next steps. The
scooter has to be turned off before installing a new battery (in case there
is already one).
1. Put the scooter on the central stand.
2. Open the saddle.
3. Check that there are no objects in the connector that obstruct the con-
nection with the battery, and that the connectors are free of dirt.
4. Notice that the sides of the battery are different, so that it can only be
inserted in one position.
5. Carefully insert the battery with its correct orientation and press it
lightly.
6. Close the saddle.
When using a single battery, it is recom-
mended to place it in Slot 1 and secure
Slot 2 with the connector cover.
Slot 1
Slot 2
EN
20 21
CHARGING THE BATTERY
GENERAL INSTRUCTIONS
• Please read the manual of the charger before using it.
• Battery charging is only possible in temperatures above
32°F and below 113°F and in dry conditions.
• The charger is designed for indoor use only.
• Always charge the battery according to GOVECS in-
structions.
CHARGING TIME
Charging the batteries can take up to around 8 hours,
depending on the number of batteries being charged (one
or two), the state of charge of the batteries as well as the
specifications of the charger used.
ONBOARD CHARGING
To charge the battery (-ies), first make sure the scooter is turned off.
Then open the seat and install the Chogori charger to the charging
socket of the battery case (blue end of the charger), by aligning the
arrows in both parts (See images below) and pushing them. Turn
clockwise until a "click" sound is heard. Afterwards plug the charger
socket to the wall socket.
BATTERY INFORMATION
The battery displays the state-of-charge information
when pressing down the button or during charging. The
LED pattern information is shown below. In case of a
fault, all LEDs will blink.
• Short press (t<=1s): Wakes up the
battery and shows the state of
charge. Each of the 5 LEDs indicate
a 20% of charge of the battery.
• Long press (t>=5s): Deactivates the
battery, only if this is done with the
battery outside the scooter. By this
procedure a reset to the battery is
performed.
During charging the batteries inside the scooter, the status of it can be
seen on the cockpit screen (Picture below left). If the charger is only
connected to the scooter, but not to the electrical socket, a message will
appear in the cockpit showing the message "Check connection" (Picture
below right).
CHARGING THE BATTERY
The following points have to be followed when charging:
• The cable of the charger can be passed through the groove in
the top plastic (see bottom pictures). It is a must that the seat
is closed during charging, and the charger has to be placed
outside the scooter during the whole charging process.
• The charger can be positioned in the space between the
frontal battery and the charging connector only for transpor-
tation purposes (see right picture).
• When the charging is completed, first disconnect the plug
from the wall socket and afterwards disconnect the Chogori
connector from the scooter.
EN
22 23
CHARGING THE BATTERY
OFFBOARD CHARGING
The docking station provides the possibility of charging one battery outside the scooter.
Following are the instructions to use it:
1. Identify the docking station and the charger and put them next to each other.
2. Approach the blue Chogori connector of the charger to the side of the docking station and
align the two white arrows, then push it. The blue ring will rotate to the left, keep pushing
until it snaps in, makes a click sound and flips back. When correctly done, the blue ring will
be locked and in an upright position (See pictures below).
3. Put a battery in the docking station matching the wide side of the battery with the wide side
of the docking station, and the same for the narrow side (See pictures to the right; Narrow
side upper picture and wider side lower picture).
4. Plug in the charger to an electrical socket. The charging process will start.
Once the charging process is finished you can take the battery from the docking station. Please
avoid disconnecting the blue Chogori connector when the charger is still in the electrical
socket and the battery is on the docking station.
ATTENTION: The docking station is not waterproof. Use it indoors only.
CHARGING THE BATTERY
In the following table, the charging logic of the LEDs is explained.
LEDs
SOC (%) 1 2 3 4 5
0-10 Blink
10-20 Blink
20-30 ON
30-40 ON Blink
40-50 ON ON
50-60 ON ON Blink
60-70 ON ON ON
70-80 ON ON ON Blink
80-90 ON ON ON ON
90-97 ON ON ON ON Blink
97-100 ON ON ON ON ON
CHARGER INFORMATION
• To do a reset to the charger, press the button on the back side of it, marked in red in the picture
to the right.
• The charger has 4 LEDs; its meaning is explained in the following lines:
• 1st and 2nd LED: light up in orange and indicate an SOC of the batteries of <80%
and >80% respectively.
• 3rd LED: lights up in green and indicates an SOC of 100%.
• 4th LED: lights up in red and indicates missing batteries or finished charging
process.
EN
24 25
LIGHTS
The energy-saving LEDs do not need
regular maintenance.
In case of damaged LED lights, contact an authorised
service station for repairs.
The scooter is equipped with the following lights:
FRONT
• Daylight running light
• Headlight (high/low beam)
• Left/right turn signals
REAR
• LED Brake light
• LED Position light
• LED Turning lights
• Registration plate light
TIRES
TIRE PRESSURE
• Front tire: 2,2 bar (220 kPa)
• Rear tire: 2,5 bar (250 kPa)
Air pressure above or below these limits may cause excessive
tire wear and tear. It will have a negative impact on road grip,
vehicle range and safety.
TIRE MAINTENANCE
Before riding, check both tires for damage and eventual air
inflation pressure losses.
Tire inflation pressure should be checked weekly and after
long periods of inactivity.
Regularly check the tread depth. Replace tires when reaching
1mm or lower tread depth.
Tires must never be repaired. In the event of tire wear, tear,
chunk or any other sort of structural or tread damage, replace
them immediately with GOVECS approved tires.
The GOVECS FLEX 2.0 scooter is equipped with tubeless tires:
• Front tire: MITAS C02 2 ¾ -16 44P
• Rear tire: MITAS C09 90/90-16 48P
Never use tires with different ETRTO dimensions, lower load index or
lower speed symbol than those quoted above. Never swap tires from
front to rear and vice versa.
Check your tire pressures every month to make sure they are up to
specification, or more often when carrying extra loads. For accuracy,
check the inflation pressure with a tire gauge when tires are cold (or
after the vehicle has been stopped for at least 3 hours). NEVER ride
the scooter with tire pressure 0.2 bar beyond (below or above) the
recommended tire pressures, since it can cause unstable maneu-
verability, excessive wear, lower road grip or even an accident.
EN
26 27
BRAKES
BRAKES OPERATION
• Gently and gradually press both brake levers to slow down.
• Braking too rapidly may cause accidents.
• When the road is wet, use preferably the rear brake to avoid front wheel skid.
BRAKES INSPECTION
The braking system must be inspected regularly in order to ensure its safe operation:
• Check the brake fluid level on both brake pump reservoirs (see next page).
• Inspect the brake hoses for leaks.
• Check if brake pad thickness is above 2.4 mm.
• Check if brake discs thickness is above 2 mm.
• Check free operation of brake levers. Adjust and lubricate when required.
RECUPERATION
When using the rear brake, the recuperation is active, charging the battery/-ies in the
process. When the recuperation is active, additional bars appear coming from above in the
"current level battery" area. The process is shown below, from left to right.
The braking system is critical for the safety of the vehicle and the driver. For personal
safety, one should take good care of the braking system state. This vehicle is fitted with two
independent hydraulic disc brake systems for front and rear wheel.
BRAKES FLUID LEVEL
CHECKING THE BRAKES FLUID LEVEL
The brake fluid level must be checked before each ride. To do so,
please follow the next steps:
• Position the scooter in an upright position on even ground.
• Check the fluid level through the glass eye at the brake reservoir.
The brake fluid must always reach above the minimum level line.
• If the brake fluid level is below the minimum line, it indicates wear
or damage to the brake system. If so, please check the brake fluid
pipes for damage.
If you notice ANY damage to the brake system,
DO NOT USE THE SCOOTER
and immediately contact the closest
authorized workshop for repairs. EN
28 29
TAKING CARE OF THE VEHICLE
CLEANING
Before cleaning, make sure that the scooter is turned off and dis-
connected from the charger.
• Clean the vehicle with a sponge and warm clear water.
• Do not use hard sponges or brushes that may scratch the
panels, display and other delicate components.
• Clean varnished elements with dedicated cleansers only.
• Clean plastic panels with dedicated cleansers only.
• DO NOT use anti-corrosive cleansers on the brake system,
varnished parts or plastic panels.
• Avoid cleaning the scooter with any high-pressure washer, since
it may damage electrical components.
• DO NOT use any liquid product to clean the inside of the battery
storage.
• Remove the detergent with cold water and dry all surfaces.
GOVECS is not responsible for any damage resulting from the use
of pressurized water for cleaning the vehicle.
MAINTENANCE
• Follow the recommended pre-ride checkup (page 7).
• Mind the recommended maintenance schedule (pages 30-31).
• Contact the authorised service station for maintenance.
• Do not make unauthorised modifications to the vehicle.
BATTERY LIFE
Follow these instructions for proper maintenance and long
lasting performance:
• Use only the designated charger supplied by GOVECS.
• To charge the battery, connect the charger first to the vehicle,
then to the power supply. After charging, always disconnect
first the charger from the power supply, then from the vehicle.
• Place the charger in a well-ventilated area while charging to
avoid overheating.
• Avoid charging the battery immediately after a long ride. Avoid
using the scooter when the battery is too low.
STORAGE
• Store the vehicle indoors where it is safe from harsh weather
conditions such as rain, snow, pollution and high humidity.
• Do not park the vehicle outdoors under direct sunlight, rain or
wet conditions for long periods of time.
• IMPORTANT: For prolonged storage periods (i.e. overwinter)
we recommend leaving the battery with a state of charge
between 30% and 70% and outside the scooter.
• Check the state of charge every 3 months and charge the
battery to 70% if necessary. Letting the battery discharge com-
pletely during this period may lead to irreparable damage to
the battery.
TAKING CARE OF THE VEHICLE
DO'S AND DONT'S FOR BATTERY/IES AND CHARGER
Following are additional points and reminders for charging the scooter:
• The scooter must be turned off before starting the charging process.
• The charger supplied with the scooter should be used only for the purpose of charging the scooter,
and not for any other purpose.
• The battery charger supplied can only be used indoors. Avoid exposure to direct sunlight, excessive
dust or liquids.
• Do not try to open the charger.
• Keep the charger and battery/-ies out of reach of children and pets.
• Do not use the charger if you see damaged components in the power cord, charger case, plug, etc.;
it can cause electric shock, short circuit or fire. If you see a damaged component, please contact the
nearest Govecs store or send an email to [email protected]om.
• Once the battery is fully charged, unplug the charger from the wall socket and remove the charger
from the scooter.
• Ensure that the charger is plugged on both sides and not loose and there are no sparks coming from
the mains socket.
• When charging the battery/-ies outside the scooter make sure that the charger and the battery/-ies
are out of range of inflammable material.
• The batteries are sealed, do not try to open them. Otherwise the warranty will be void.
EN
30 31
MAINTENANCE SCHEDULE  PRIVATE VEHICLES
The vehicle must undergo a regular inspection every 3100 miles or every 12 months (whichever comes first). The vehicle must also be
inspected after driving the first 310 miles.
Contact an authorised service centre for inspection.
Do not attempt to repair the scooter on your own.
Not following the maintenance schedule will void the warranty.
Every inspection needs to be documented.
0,31 3,1 6,2 9,3 12,4 15,5 18,6 21,7 24,8 27,9 31,0 34,1 37,2
1
Lights front/rear I I IIIIIIIIII ICheck functionality
2
Light mounting I I IIIIIIIIII ICheck stability
3
Horn I I IIIIIIIIII I
Check functionality
4
Indicators left/right I I IIIIIIIIII ICheck functionality
5
Suspension (front) I I IIIIIIIIII ICheck for leaks
6
Front fork bearings I I I I R I I I R I I I R
Replace bearings if damaged or every 12.000 mi
7
Brake cables I I IIIIIIIIII I
Check for leaks
8
Front fork
Check for cracks using the procedure from the Service
Manual
9
Firmware version check I I IIIIIIIIII I
Check that the scooter has up-to-date firmware using
the Service tool software
10
Front/rear brake pads Replace if damaged
11
Front/rear brake discs Replace if damaged
12
Brake fluid I I IIIIIIIIII IReplace once a year
13
Tire thread front & rear Replace if damaged
14
Tire pressure I I IIIIIIIIII IFront: 2.2 bar; Rear: 2.5 bar
15
Spokes and wheel I I IIIIIIIIII ICheck wheel centering, inspect for damage
16
Fenders I I IIIIIIIIII ICheck stability
17
Side stand I I IIIIIIIIII IFull pivot, sensor working
18
Swingarm I I IIIIIIIIII ICheck stability
19
Bolts & screws I I IIIIIIIIII ICheck if all are secured, check for damage
20
Motor contoller screws I I IIIIIIIIII ITorque confirmation
21
Charger I I IIIIIIIIII ICheck functionality
22
Battery mounting I I IIIIIIIIII ICheck stability
23
Seat lock I I IIIIIIIIII ICheck functionality
24
Test ride I I IIIIIIIIII ICheck performance & functionality
NOTE:
Inspect every 3100 mi
Replace if the pads thickness is less than 1.8 mm
Replace if the pads thickness is less than 2.4 mm
Inspect every 3100 mi
Inspect only the first 3
maintenances
Check during the first 3 maintenance checks and during the front fork bearings exchange
Inspect every 3100 mi
Inspect & lubricate
every 3100 mi
Inspect every 3100 mi
GOVECS FLEX RECOMMENDED MAINTENANCE SCHEDULE FOR B2C SCOOTERS
Comments
Mileage x 1000 mi
Items
Frequency
Inspect every 3100 mi
Replace if tire thread depth is less than 1 mm
R- replace
Inspect every 3100 mi
Perform every 3100 mi
Inspect every 3100 mi
I- inspect (clean, adjust, lubricate if necessary)
Inspect every 3100 mi
MAINTENANCE SCHEDULE  B2B COMPANY VEHICLES
Contact an authorised service centre for inspection.
Do not attempt to repair the scooter on your own.
Not following the maintenance schedule will void the warranty.
Every inspection needs to be documented.
The vehicle must undergo a regular inspection every 2100 miles or every 12 months (whichever comes first). The vehicle must also be
inspected after driving the first 310 miles.
0,31 2,1 4,2 6,3 8,4 10,5 12,6 14,7 16,8 18,9 21,0 23,1 25,2 27,3
1
Lights front/rear IIIIIIIIIIIIIICheck functionality
2
Light mounting I I I I I I I I I I I I I I Check stability
3
Horn IIIIIIIIIIIIII
Check functionality
4
Indicators left/right I I I I I I I I I I I I I I Check functionality
5
Suspension (front) IIIIIIIIIIIIIICheck for leaks
6
Front fork bearings IIIIIRIIIIRIII
Replace bearings if damaged or every 11.000 mi
7
Brake cables I I I I I I I I I I I I I I
Check for leaks
8
Front fork
Check for cracks using the procedure from the Service
Manual
9
Firmware version check IIIIIIIIIIIIII
Check that the scooter has up-to-date firmware using
the Service tool software
10
Front/rear brake pads Replace if damaged
11
Front/rear brake discs Replace if damaged
12
Brake fluid I I I I I I I I I I I I I I Replace once a year
13
Tire thread front & rear Replace if damaged
14
Tire pressure IIIIIIIIIIIIIIFront: 2.2 bar; Rear: 2.5 bar
15
Spokes and wheel IIIIIIIIIIIIIICheck wheel centering, inspect for damage
16
Fenders I I I I I I I I I I I I I I Check stability
17
Side stand IIIIIIIIIIIIIIFull pivot, sensor working
18
Swingarm IIIIIIIIIIIIIICheck stability
19
Bolts & screws IIIIIIIIIIIIIICheck if all are secured, check for damage
20
Motor contoller screws I I I I I I I I I I I I I I Torque confirmation
21
Charger IIIIIIIIIIIIIICheck functionality
22
Battery mounting IIIIIIIIIIIIIICheck stability
23
Seat lock IIIIIIIIIIIIIICheck functionality
24
Test ride IIIIIIIIIIIIIICheck performance & functionality
NOTE:
Inspect & lubricate
every 2100 mi
GOVECS FLEX RECOMMENDED MAINTENANCE SCHEDULE FOR B2B SCOOTERS
Items
Frequency
Mileage x 1000 mi
Comments
Inspect every 2100 mi
Replace if the pads thickness is less than 2.4 mm
Inspect every 2100 mi
Replace if the pads thickness is less than 1.8 mm
Inspect every 2100 mi
Perform every 2100 mi
I- inspect (clean, adjust, lubricate if necessary)
Inspect every 2100 mi
R- replace
Inspect only the first 3
maintenances
Inspect every 2100 mi
Check during the first 3 maintenance checks and during the front fork bearings exchange
Inspect every 2100 mi
Replace if tire thread depth is less than 1 mm
Inspect every 2100 mi
EN
32 33
TECHNICAL DATA
1086mm
830mm
1355mm
220mm
300mm
1204mm
500mm
885mm
1220mm
Basic version (1 seat) 2 seat version Delivery version (with box)
1942mm
1204mm
1204mm
1960mm
1460mm
1942mm
TECHNICAL DATA
Model GOVECS FLEX 2.0
Vehicle class L1e-B
Top speed 28 mph
Motor type GOVECS BLDC in-hub 3 phase motor 2.3 kW
Range 1 battery: 35 mi / 2 batteries: 57 mi
Battery type GOVECS lithium-ion battery 33.5 Ah, swappable and self-release, 9.4 kg
System voltage 50.4 V
Battery charger Slide-in-charger 7 A
Full charging cycle ca. 5 hours / 1 battery // ca. 8.5 hours / 2 batteries
Display 5“ TFT-Display: Full color, high resolution, bonding screen, shock protected
Lights Full LED
Tire size & type Front: K66 80/80-16 46J | Rear: 100/80-16 56P | tubeless tires by Heidenau
Braking system Hydraulic disc brakes
Max. slope 15°
Passengers 1+1
Max. payload 163,5 kg (With 2 batteries) / 172,5 kg (With 1 battery)
Vehicle weight 95 kg (without batteries)
Dimensions 1942 x 830 x 1204 mm (L x W x H) I Seat height: 885 mm
Suspension Front: Hydraulic fork and spring, 80 mm stroke; Rear: Hydraulic suspension and spring, 75 mm stroke
Connectivity Full connectivity: Integrated IOT device with GPS
Anti-theft Steering wheel lock, alarm protection and theft notification
ENEN
TECHNICAL INSPECTION / TECHNISCHE INSPEKTION / CONTRÔLE TECHNIQUE / TECHNISCHE INSPECTIES
35
34
CONSUMER INFORMATION
SAMPLE PART 575.6, CONSUMER INFORMATION
GOVECS AG
Brunnstrasse 1, 80331 München, Germany
Reporting Safety Defects
If you believe that your vehicle has a defect which could cause a crash or could cause injury or death, you should
immediately inform the National Highway Traffic Safety Administration (NHTSA) in addition to notifying GOVECS AG.
If NHTSA receives similar complaints, it may open an investigation, and if it finds that a safety defect exists in a
group of vehicles, it may order a recall and remedy campaign.
However, NHTSA cannot become involved in any individual problems between you, your dealer, or GOVECS AG.
To contact NHTSA you may either call the Auto Safety Hotline toll-free at 1-800-424-9393 (366-0123 in Washington,
DC area) or write to:
NHTSA
U.S. DEPARTMENT of TRANSPORTATION
400 7 Street SW, (NSA-11)
Washington, DC 20590
You can also obtain other information about motor vehicle safety from the Hotline.
EN
The inspections shall be carried out within a period of 60 mi before or 60 mi after the due date, but at least once a year.
VIN :________________________________________________
TECHNICAL INSPECTION
33
TECHNICAL INSPECTION / TECHNISCHE INSPEKTION / CONTRÔLE TECHNIQUE / TECHNISCHE INSPECTIES TECHNICAL INSPECTION / TECHNISCHE INSPEKTION / CONTRÔLE TECHNIQUE / TECHNISCHE INSPECTIES
36 37
* There are different service intervals for private customers (every 3.100 mi) and business customers (every 2.100 mi).
Business customers are e.g. sharing companies, delivery services, etc.
Inspection *Mileage Date Next Inspection Signature Stamp
TECHNICAL INSPECTION
Inspection *Mileage Date Next Inspection Signature Stamp
TECHNICAL INSPECTION
TECHNICAL INSPECTION / TECHNISCHE INSPEKTION / CONTRÔLE TECHNIQUE / TECHNISCHE INSPECTIES TECHNICAL INSPECTION / TECHNISCHE INSPEKTION / CONTRÔLE TECHNIQUE / TECHNISCHE INSPECTIES
38 39
Inspection *Mileage Date Next Inspection Signature Stamp
TECHNICAL INSPECTION
Inspection *Mileage Date Next Inspection Signature Stamp
TECHNICAL INSPECTION

Other manuals for FLEX 2.0

2

Other GOVECS Scooter manuals

GOVECS PRO CARGO User manual

GOVECS

GOVECS PRO CARGO User manual

GOVECS FLEX 2.0 User manual

GOVECS

GOVECS FLEX 2.0 User manual

GOVECS FLEX User manual

GOVECS

GOVECS FLEX User manual

GOVECS GO! S 1.2 User manual

GOVECS

GOVECS GO! S 1.2 User manual

GOVECS E-Schwalbe 2023 User manual

GOVECS

GOVECS E-Schwalbe 2023 User manual

GOVECS ELM OTO KICK User manual

GOVECS

GOVECS ELM OTO KICK User manual

GOVECS GO! S2.4 User manual

GOVECS

GOVECS GO! S2.4 User manual

GOVECS Schwalbe User manual

GOVECS

GOVECS Schwalbe User manual

GOVECS FLEX 2.0 User manual

GOVECS

GOVECS FLEX 2.0 User manual

Popular Scooter manuals by other brands

Motus PRO 11 Original user manual

Motus

Motus PRO 11 Original user manual

URBANGLIDE RIDE 100 MAX manual

URBANGLIDE

URBANGLIDE RIDE 100 MAX manual

Ninebot KickScooter MAX product manual

Ninebot

Ninebot KickScooter MAX product manual

GOLDEN LITERIDER GL109 owner's manual

GOLDEN LITERIDER

GOLDEN LITERIDER GL109 owner's manual

SWAGTRON T6 user manual

SWAGTRON

SWAGTRON T6 user manual

Benelli CAFFENERO owner's manual

Benelli

Benelli CAFFENERO owner's manual

Bugatti BYTECH BG-ES-09-702 Series manual

Bugatti

Bugatti BYTECH BG-ES-09-702 Series manual

niu Kick Scooter KQi3 Service manual

niu

niu Kick Scooter KQi3 Service manual

Olsson and Brothers Fresh Wildred USER'S MANUAL AND GARANTEE

Olsson and Brothers

Olsson and Brothers Fresh Wildred USER'S MANUAL AND GARANTEE

Messingschlager FREESTYLE 100 manual

Messingschlager

Messingschlager FREESTYLE 100 manual

TVS JUPITER GRANDE EDITION owner's manual

TVS

TVS JUPITER GRANDE EDITION owner's manual

SmartGyro ziro pro user manual

SmartGyro

SmartGyro ziro pro user manual

EMG Velociptor es 82w SKILL 2 user guide

EMG

EMG Velociptor es 82w SKILL 2 user guide

Puky R 1 user manual

Puky

Puky R 1 user manual

SKIKE V7 FIX manual

SKIKE

SKIKE V7 FIX manual

HOMCOM 371-014 manual

HOMCOM

HOMCOM 371-014 manual

INOKIM QUICK4 user guide

INOKIM

INOKIM QUICK4 user guide

VOLTION EVO500 user manual

VOLTION

VOLTION EVO500 user manual

manuals.online logo
manuals.online logoBrands
  • About & Mission
  • Contact us
  • Privacy Policy
  • Terms and Conditions

Copyright 2025 Manuals.Online. All Rights Reserved.