Graef ES 90 User manual

DE Espressoautomat
Bedienungsanleitung
EN Espresso Machine
Instruction Manual
CZ Espresso automat
Návodkpoužití
SK Espresso automat
Návod na obsluhu
Espressoautomat ES 90 / ES 91

Vorbereitung / Preparation / Příprava / Príprava
1a 2a 1b 2b
3 4 5 6
7

Espressozubereitung / Making the espresso/ Příprava expressa / Príprava expressa
1 2 3 4
5 6 7 8a
98b 8c 10

4
DE
Auspacken
Zum Auspacken des Gerätes gehen Sie
wie folgt vor:
∙Entnehmen Sie das Gerät aus dem Kar-
ton.
∙Entfernen Sie alle Verpackungsteile.
∙Entfernen Sie eventuelle Aufkleber am
Gerät (nicht das Typenschild).
Anforderungen an den Aufstellort
Für einen sicheren und fehlerfreien Be-
trieb des Gerätes muss der Aufstellort
folgende Voraussetzungen erfüllen:
∙Das Gerät muss auf einer festen, a-
chen, waagerechten, rutschfesten und
hitzebeständigen Unterlage mit einer
ausreichenden Tragkraft aufgestellt
werden.
∙Wählen Sie den Aufstellort so, dass
Kinder nicht an heiße Oberächen des
Gerätes gelangen können.
∙Das Gerät ist nicht für den Einbau in
einer Wand oder einem Einbauschrank
vorgesehen.
∙Stellen Sie das Gerät nicht in einer hei-
ßen, nassen oder feuchten Umgebung
auf.
∙Die Steckdose muss leicht zugänglich
sein, so dass das Stromkabel notfalls
leicht abgezogen werden kann.
Vor dem Erstgebrauch
Vor dem Erstgebrauch oder längerem
Nichtbenutzen sollten Sie das Gerät
einmal entlüften. Drehen Sie dazu beide
Regler auf und nach kurzer Zeit drehen
Sie diese wieder zu. Nun lassen Sie ein
paar Tassen Wasser (ohne Kaffeemehl)
durchlaufen. Verfahren Sie dabei wie
unter „Vorbereitungen“ beschrieben.
Es kann sein, dass die Pumpzeit bis zu
8 Minuten dauert.
Bei der Erstinbetriebnahme kann es zu
einem Geruch nach „heißem Kunst-
stoff“ kommen. Dies ist normal und
lässt nach kurzer Zeit nach.
Filtereinsätze
Dieses Gerät wird mit 4 Filtereinsätzen
geliefert. 2 einwandige Filtereinsätze (1
und 2 Tassen) und 2 doppelwandige Fil-
tereinsätze (1 und 2 Tassen).
Die einwandigen Filtereinsätze ent-
sprechen den Filtereinsätzen gewerbli-
cher Espressoautomaten. Diese haben
einen einfachen Boden und wenn Sie
diese gegen das Licht halten, können
Sie viele kleine Löcher sehen. Diese
Filter sind für den frischen, selbstge-
mahlenen Kaffee gedacht. Zum selbst
Mahlen empfehlen wir Ihnen die Graef
Kaffeemühle CM 80 / CM 81 / CM 90.
Bei der Verwendung von gekauftem,
bereits vorgemahlenem Kaffeemehl
sollten Sie darauf achten, dass dieses
für Espressoautomaten geeignet und
entsprechend fein gemahlen ist.
Die doppelwandigen Filtereinsätze sind
für den typischen vorgemahlenen Kaf-
fee aus dem Supermarkt gedacht.
Manometer
Unterdruck: Kaffeemehl wurde nicht
fest genug gepresst / zu wenig Kaffee-
mehl / falscher Mahlgrad
Optimaler Druck: Kaffeemehl wurde
optimal gepresst / optimale Kaffee-
mehlmenge, korrekter Mahlgrad
Überdruck: Kaffeemehl wurde zu stark
gepresst / zuviel Kaffeemehl / falscher
Mahlgrad
Benutzen des Bedienfeldes
POWER
Mit der „POWER“-Taste schalten Sie
das Gerät ein und aus.
Am Anfang blinkt die „POWER“-Taste
grün auf, d.h. Gerät heizt auf.
Wird die Lampe rot und die restlichen
Bedientasten sind auch hinterleuchtet,
ist das Gerät betriebsbereit.
Bevor Sie mit der Espressozubereitung
beginnen, vergewissern Sie sich, dass
der Drehregler für die Dampf- bzw.
Heißwasserzubereitung geschlossen ist
und Wasser im Wassertank ist.
Hinweis
∙Dieses Gerät ist mit zwei Rollfüßen
ausgestattet. So können Sie das Gerät
problemlos nach vorne ziehen und den
Wassertank im hinteren Bereich zum
Wasserbefüllen entnehmen.
∙Während des Aufheizens entweicht
einmalig ein kurzer Dampfstoß aus der
Tropfschale. Dies ist völlig unbedenk-
lich und kein Defekt am Gerät. Hiermit
wird der Thermoblock zu Beginn von
Restwasser entleert und mit frischem
Wasser aufgefüllt.
MANUAL
Mit der „MANUAL“- Funktion können
Sie selbst bestimmen wieviel Kaffee Sie
haben möchten.
Wenn das Gerät eingeschaltet ist und
aufgeheizt hat, wird die „POWER“
- Taste rot und die restlichen Tasten
leuchten grün auf.
Füllen Sie Kaffeemehl in den Siebträger
und setzen diesen ein.
Stellen Sie eine Tasse unter den Siebträ-
ger.
Drücken Sie die „MANUAL“- Taste.
Der Kaffee ießt nun in die Tasse.
Wenn Sie die gewünschte Menge er-
reicht haben, drücken Sie zum Stoppen
wieder die „MANUAL“ - Taste.
In dem Augenblick wo sie die „MANU-
AL“- Taste drücken, bereitet der Espres-
soautomat durch eine Pre-Infusion mit
drei kurzen Pumpstößen das Kaffeepul-
ver auf die bessere Aufnahme des hei-
ßen Wassers vor.
Dieses gilt auch für und
Hnweis
Bei längerer Nichtbenutzung des Ge-
rätes, kann es sein, dass die Pumpzeit
bis zu 8 Minuten dauert. Dies ist kein
Defekt am Gerät.
Dieses gilt auch für und
Einfacher Espresso
Die „einfache Espresso“ Funk-
tion ist so programmiert, dass
30 ml Espresso in die Tasse ießen.
Wir empfehlen Ihnen den Filtereinsatz
für 1 Tasse zu nutzen.
Wenn das Gerät eingeschaltet ist und
aufgeheizt hat, wird die „POWER“

5
DE
- Taste rot und die restlichen Tasten
leuchten grün auf.
Füllen Sie Kaffeemehl in den Siebträger
und setzen diesen ein.
Stellen Sie eine Tasse unter den Siebträ-
ger.
Drücken Sie die „ “ Taste.
30 ml Espresso ießen nun in Ihre Tasse.
Wenn Sie allerdings weniger als 30 ml
haben möchten, können Sie den Vor-
gang jederzeit durch Drücken der „
“ Taste unterbrechen.
Doppelter Espresso
Die „doppelte Espresso“ Funktion ist so
programmiert, dass 60 ml Espresso in
die Tasse ießen.
Wir empfehlen Ihnen den Filtereinsatz
für 2 Tassen zu nutzen.
Wenn das Gerät eingeschaltet ist und
aufgeheizt hat, wird die „POWER“
- Taste rot und die restlichen Tasten
leuchten grün auf.
Füllen Sie Kaffeemehl in den Siebträger
und setzen diesen ein.
Stellen Sie eine Tasse unter den Siebträ-
ger.
Drücken Sie die „ “ Taste.
60 ml Espresso ießen nun in Ihre Tasse.
Wenn Sie allerdings weniger als 60 ml
haben möchten, können Sie den Vor-
gang jederzeit durch Drücken der „
“ Taste unterbrechen.
PROGRAM
Mit der „PROGRAM“ - Funktion kön-
nen Sie Ihre eigene Espressomenge für
„“und „ “ programmieren.
Mehr dazu erfahren Sie unter „PRO-
GRAMMIEREN“.
Milchaufschäumen.
Verwenden Sie zum Milchaufschäu-
men nur den beigefügten Behälter
oder einen anderen größeren Behälter.
Verwenden Sie keine Tasse. Durch über-
schäumende Milch kann es zu Verbren-
nungen kommen.
Milchaufschäumen mit Pannarello
∙Füllen Sie nun den beigefügten Behäl-
ter zu 1/3 mit kalter Milch.
∙Vor der Benutzung der Milchschaum-
düse sollte das sich darin gesammelte
Kondenswasser abgelassen werden.
Dies geschieht, indem Sie diese auf
den Ablaufrost richten und den Dampf
kurz aufdrehen.
∙Warten Sie bis kein Wasser, sondern
Dampf austritt und drehen Sie den
Regler wieder zu.
∙Tauchen Sie nun die Milchschaumdüse
mit Pannarello in die Milch, ca. 1 cm
unter die Oberäche.
∙Nun drehen Sie den Dampfhahn bis
zum Anschlag auf.
∙Halten Sie dabei den Milchbehälter
leicht schräg.
∙Senken Sie die Milchkanne, sobald der
Milchpegel steigt.
∙BITTE BEACHTEN Sie, dass die Milch
dabei nicht über 70°C erhitzt werden
sollte, sonst fällt der Schaum sehr
schnell wieder zusammen und das Ge-
tränk schmeckt später zu süß oder gar
nach verbrannter Milch!
∙Ein guter Hinweis für die korrekte Tem-
peratur ist, wenn Sie den Behälter nicht
länger als 3 Sek. anfassen können.
∙Drehen Sie nun den Drehregler wieder
zu.
∙Durch das Zudrehen des Ventils ent-
steht durch das Abkühlen des Damp-
fes in der Milchschaumdüse ein Un-
terdruck, so dass noch etwas Milch
angesogen wird.
∙Warten Sie daher einen kurzen Mo-
ment, bevor Sie die Milchschaumdüse
aus der Milch ziehen.
∙Nach dem Schäumen schlagen Sie die
Milchkanne kurz auf die Tischplatte,
um die letzten groben Luftbläschen zu
beseitigen.
∙Schwenken hilft auch, um den Schaum
gleichmäßig zu verteilen.
∙Reinigen Sie die Milchschaumdüse di-
rekt nach Beendigung des Vorganges
mit einem feuchten Tuch. Lassen Sie
allerdings das Rohr einen kleinen Mo-
ment abkühlen, da dieses sehr heiß
wird.
∙Reinigen Sie die Milchschaumdüse
auch mit einem kurzen Dampfstoß
damit die Milchreste aus der Milch-
schaumdüse gepustet werden.
Milchaufschäumen mit Zusatzdüse
∙Entfernen Sie den Pannarello und
schrauben Sie die Düse ab.
∙Schrauben Sie nun die Zusatzdüse auf.
∙Füllen Sie nun den beigefügten Behäl-
ter zu 1/3 mit kalter Milch.
∙Vor der Benutzung der Milchschaum-
düse sollte das sich darin gesammelte
Kondenswasser abgelassen werden.
Dies geschieht, indem Sie diese auf
den Ablaufrost richten und den Dampf
kurz aufdrehen.
∙Warten Sie bis kein Wasser, sondern
Dampf austritt und drehen Sie den
Regler wieder zu.
∙Setzen Sie die Milchschaumdüse leicht
versetzt in den Milchbehälter.
∙Dies ist wichtig, damit die Milch in eine
Wirbelbewegung versetzt wird.
∙Nutzen Sie die Auslauftülle als Führung
für die Milchschaumdüse.
∙Drehen Sie den Drehregler für die
Milchschaumdüse auf.
Nun beginnen die Phasen „Ziehen“
und „Rollen“
∙Als erstes die „Ziehphase“: um die Luft
unterzuheben, setzen Sie die Milch-
schaumdüse ganz knapp unter die
Oberäche der Milch.
∙Die richtige Position haben Sie erreicht,
wenn Sie ein „Schlürfgeräusch“ hören.
∙Dieses kann kurzzeitig aussetzen, da
die Oberäche der Milch in Bewegung
ist.
∙Nun kommt die „Rollphase“.
∙Sobald das Volumen der Milch zu-
nimmt, schieben Sie die Milchschaum-
düse zurück in die Milch.
∙Sobald die Kanne heiß wird, drehen Sie
den Drehregler zu.
∙Nach dem Schäumen schlagen Sie die
Milchkanne kurz auf die Tischplatte,
um die letzten groben Luftbläschen zu
beseitigen.
∙Schwenken hilft auch um den Schaum
gleichmäßig zu verteilen.
∙Reinigen Sie die Milchschaumdüse di-
rekt nach Beendigung des Vorganges
mit einem feuchten Tuch. Lassen Sie
allerdings das Rohr einen kleinen Mo-
ment abkühlen, da dieses sehr heiß

6
DE
wird.
∙Reinigen Sie die Milchschaumdüse
auch mit einem kurzen Dampfstoß
damit die Milchreste aus der Milch-
schaumdüse gepustet werden.
Zum Üben des Milchaufschäumens
können Sie folgende Methode verwen-
den:
∙Geben Sie kaltes Wasser in das Milch-
kännchen.
∙Fügen Sie einen Tropfen Spülmittel
hinzu.
∙Schäumen Sie dieses wie oben be-
schrieben auf.
∙Wenn man richtig schäumt, sieht das
Gemisch wie richtiger Milchschaum
aus.
∙Bitte dieses Gemisch nicht trinken!!
Heißwasserzubereitung
∙Platzieren Sie ein Gefäß unter der
Heißwasserdüse.
∙Drehen Sie den Drehregler auf.
∙Heißes Wasser strömt nun aus der
Düse in das Gefäß.
∙Nach Beendigung des Vorganges dre-
hen Sie den Dreh-regler wieder zu.
Programmierung
Dieses Gerät wird mit folgenden
Werkseinstellungen geliefert:
Einfacher Espresso – 30 ml
Doppelter Espresso – 60 ml
Sie können dieses aber in dem folgen-
den Abschnitt verändern und so einstel-
len, wie Sie es gerne haben möchten:
Programmierung „Einfacher Espres-
so“
∙Setzen Sie den einwandigen Filterein-
satz für 1 Tasse in den Siebträger und
befüllen Sie diesen mit Kaffeemehl.
∙Drücken Sie das Kaffeemehl fest und
setzen Sie den Siebträger ein.
∙Stellen Sie eine Tasse unter den Sieb-
träger.
∙Drücken Sie die „PROGRAM“ - Taste.
∙Dann drücken Sie die „ “ Taste.
∙Drücken Sie diese Taste wieder, wenn
Sie die gewünschte Menge an Espresso
erreicht haben.
∙2 Pieptöne signalisieren Ihnen, dass
die neue Einstellung für „einfachen Es-
presso“ programmiert und gespeichert
wurde.
Programmierung „Doppelter Es-
presso“
∙Setzen Sie den einwandigen Filterein-
satz für 2 Tassen in den Siebträger und
befüllen Sie diesen mit Kaffeemehl.
∙Drücken Sie das Kaffeemehl fest und
setzen Sie den Siebträger ein.
∙Stellen Sie eine Tasse unter den Sieb-
träger.
∙Drücken Sie die „PROGRAM“ - Taste.
∙Dann drücken Sie die „ “ Taste.
∙Drücken Sie diese Taste wieder, wenn
Sie die gewünschte Menge an Espresso
erreicht haben.
∙2 Pieptöne signalisieren Ihnen, dass die
neue Einstellung für „doppelten Es-
presso“ programmiert und gespeichert
wurde.
Werkseinstellung
Um zur Werkseinstellung zurückzukeh-
ren, achten Sie darauf, dass das Gerät
ausgeschaltet ist und gehen Sie wie
folgt vor:
∙Halten Sie die „MANUAL“- Taste ge-
drückt und drücken Sie gleichzeitig die
„POWER“- Taste.
∙Lassen Sie nun die „MANUAL“- Taste
los.
∙Wenn Sie 4 Signaltöne hören und
die „POWER“- Taste leuchtet, ist die
Werkseinstellung wieder eingestellt.
Einfacher Espresso: 30 ml
Doppelter Espresso: 60 ml
Weitere Programmiermöglichkeiten
Espresso Thermoblock Temperatur
Die Wassertemperatur dieses Gerätes ist
auf ca. 92°C am Brühkopf abgestimmt.
Die Temperatur des Wassers lässt sich
im Schnitt von je 2°C um maximal +/-
4°C verändern.
Gehen Sie dabei wie folgt vor:
Stecken Sie den Stecker in die Steckdo-
se.
Bitte beachten Sie: Obwohl das Gerät
am Stromnetz angeschlossen ist, muss
das Gerät „aus“ geschaltet sein. Des-
halb werden noch keine Kontrolllam-
pen an dem Gerät leuchten.
Drücken Sie die „ “ Taste und hal-
ten Sie diese gedrückt.
Während Sie die „ “Taste drücken,
drücken Sie die „POWER“- Taste und
lassen Sie die „POWER“- Taste wieder
los.
Dies aktiviert die Programmierbarkeit
des Gerätes.
Lassen Sie nun die „ “ Taste los.
Innerhalb von 5 Sekunden drücken Sie
eine der aufgeführten Tasten um die
Temperatur zu senken oder zu erhöhen:
+ 2°C = Drücken Sie die „ “ Taste
+ 4°C = Drücken Sie die „PROGRAM“-
Taste
- 2°C = Drücken Sie die „MANUAL“-
Taste
- 4°C = Drücken Sie die POWER“- Taste
Wenn Sie nicht innerhalb von 5 Sekun-
den eine neue Temperatur gewählt ha-
ben, schaltet das Gerät automatisch in
die Werkseinstellung, heizt sich auf und
ist dann betriebsbereit.
Dampf Thermoblock Temperatur
Die Dampftemperatur des Gerätes ist
so eingestellt, dass beim Aufschäumen
von Milch ein leistungsstarker und tro-
ckener Dampf entsteht. Die Temperatur
des Dampfes lässt sich im Schnitt von
je 5°C um maximal +/- 10°C verändern.
Gehen Sie dabei wie folgt vor:
Stecken Sie den Stecker in die Steckdo-
se.
Bitte beachten Sie: Obwohl das Gerät
am Stromnetz angeschlossen ist, muss
das Gerät „aus“ geschaltet sein. Des-
halb werden noch keine Kontrolllam-
pen an dem Gerät leuchten.
Drücken Sie die „ “ Taste und hal-
ten Sie diese gedrückt.
Während Sie die „ “ Taste drücken,
drücken Sie die „POWER“- Taste und
lassen Sie die „POWER“- Taste wieder
los.
Lassen Sie nun die „ “ Taste los.
Dies aktiviert die Programmierbarkeit
des Gerätes.
Innerhalb von 5 Sekunden drücken Sie
eine der aufgeführten Tasten um die
Temperatur zu senken oder zu erhöhen:
+ 5°C = Drücken Sie die „ “ Taste

7
DE
+ 10°C = Drücken Sie die „PROGRAM“-
Taste
- 5°C = Drücken Sie die „MANUAL“-
Taste
- 10°C = Drücken Sie die „POWER“-
Taste
Dampffeuchtigkeit und Pumpleis-
tung
Die Dampfpumpenfrequenz dieses Ge-
rätes wurde voreingestellt; 0,3 Sekun-
den „an“ und 0,5 Sekunden „aus“. Es
besteht die Möglichkeit, diese Vorein-
stellung zu verändern. Eine Verände-
rung der Frequenz macht den Dampf
nasser oder trockener bis hin zu einem
starken trockenen Dampf, ideal zum
Herstellen von stabilem Milchschaum.
Die Pumpfrequenz (“aus”-Zeit) kann
um 0,1 Sekunden hoch oder runter ge-
stellt werden, so wie es Ihren Bedürfnis-
sen entspricht.
Gehen Sie dabei wie folgt vor:
Stecken Sie den Stecker in die Steckdo-
se.
Bitte beachten Sie: Obwohl das Gerät
am Stromnetz angeschlossen ist, muss
das Gerät „aus“ geschaltet sein. Des-
halb werden noch keine Kontrolllam-
pen an dem Gerät leuchten.
Drücken Sie die „PROGRAM“- Taste
und halten Sie diese gedrückt.
Während Sie die „PROGRAM“- Taste
gedrückt halten, drücken Sie die „PO-
WER“- Taste und lassen Sie die „POW-
ER“- Taste wieder los.
Lassen Sie nun die „PROGRAM“-Taste
los.
Bitte beachten Sie: Dieser Vorgang ak-
tiviert die Programmierbarkeit des Ge-
rätes, welches die „ “-Taste durch
Aueuchten signalisiert.
Bitte beachten Sie: Das Lämpchen
über der „ “-Taste leuchtet so
lange, bis die Pumpfrequenz nach Ih-
ren Bedürfnissen eingestellt ist. Soll-
ten keine Änderungen an der Pump-
frequenz innerhalb von 5 Sekunden
vorgenommen werden, stellt sich au-
tomatisch die voreingestellte Pumpfre-
quenz ein und das Gerät beginnt dann
das Wasser aufzuheizen.
Um zur gewünschten Dampffeuch-
tigkeit bzw. Dampfpump-frequenz zu
gelangen, gehen Sie also wie folgt vor:
Drücken Sie innerhalb von 5 Sekunden
eine der aufgeführten Tasten und lassen
diese wieder los, wenn das Lämpchen
leuchtet, welches die gewünschte Ein-
stellung anzeigt.
nass = -0,1 Sek. > Drücken Sie hierfür
die „ “-Taste
nasser = -0,2 Sek. > = Drücken Sie hier-
für die „PROGRAM“-Taste
trocken = +0,1 Sek. > Drücken Sie hier-
für die „MANUAL“-Taste
trockener = +0,2 Sek. > Drücken Sie
hierfür die „POWER“-Taste
Bitte beachten Sie: Wenn Sie eine an-
dere Pumpfrequenz gewählt und einge-
stellt haben, dann leuchtet das Lämp-
chen über der gedrückten Taste. Um
zu signalisieren, dass die vorgenom-
mene Änderung richtig ist, leuchtet
das Lämpchen auf und zwei Signaltöne
werden ertönen.
Bitte beachten Sie: Das Gerät wird nun-
mehr automatisch das Wasser erhitzen.
Bitte denken Sie dran: Wenn Sie nicht
innerhalb von 5 Sekunden eine neue
Dampfpumpfrequenz wählen, wird
das Gerät automatisch die werksseitig
voreingestellte Dampfpump-frequenz
wählen und beginnen, das Wasser zu
erhitzen.
Werkseinstellung
Um alle Änderungen wieder in die vom
Werk eingestellte Einstellung zurück
zusetzen, schalten Sie das Gerät aus.
Drücken Sie die „MANUAL“- Taste und
gleichzeitig die „POWER“- Taste. Lassen
Sie die „POWER“- Taste los während
sich noch die „MANUAL“- Taste ge-
drückt halten. Lassen Sie nun die „MA-
NUAL“- Taste los. Die „POWER“- Tastet
leuchtet auf und es ertönen 4 Pieptöne.
Alle von Ihnen eingestellten Program-
mierungen sind nun auf Werkseinstel-
lung zurückgesetzt worden.
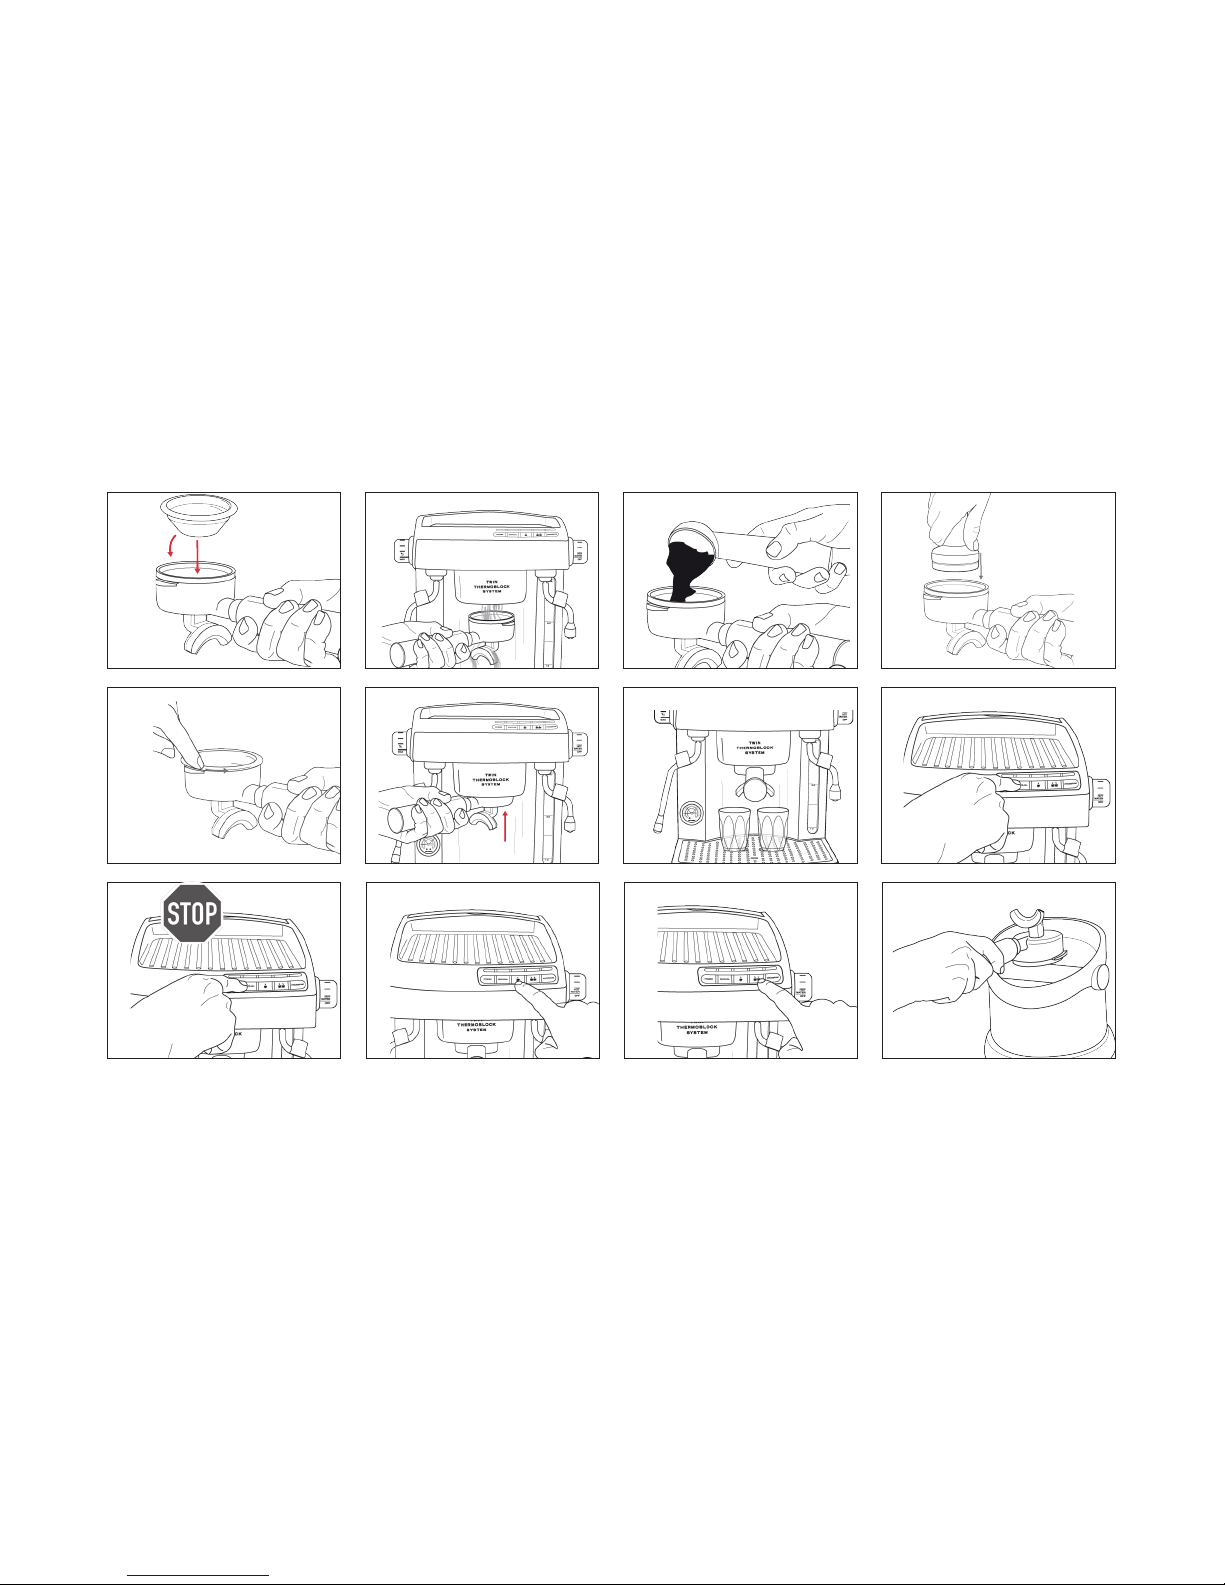
Reinigung
∙Reinigen Sie die Außenächen des Ge-
rätes mit einem weichen, angefeuch-
teten Tuch. Bei starker Verschmutzung
kann ein mildes Reinigungsmittel ver-
wendet werden.
∙Ziehen Sie die Abtropfschale raus.
∙Entnehmen Sie das Abtropfrost.
∙Entleeren Sie die Abtropfschale.
∙Reinigen Sie Abtropfschale sowie das
Rost und den Siebträger unter ießen-
dem Wasser.
∙Setzen Sie anschließend die Abtropf-
schale samt Rost wieder ein.
∙Reinigen Sie die Düsen mit dem Reini-
gungspinn.
Reinigungszyklus mit Reinigungs-
scheibe
∙Entnehmen Sie den Wassertank und
entsorgen Sie das alte Wasser.
∙Füllen Sie neues, frisches Wasser ein.
∙Entnehmen Sie das Reinigungsset.
∙Dieses nden Sie an der Innenseite der
Hintertür.
∙Setzen Sie den Filtereinsatz für 2 Tas-
sen in den Siebträger.
∙Legen Sie die Reinigungsscheibe (mit
der glatten Seite nach unten) in den
Filtereinsatz.
∙Eventuell legen Sie auch noch eine
Reinigungstablette in den Filtereinsatz.
Hier empfehlen wir die Graef Reini-
gungstabletten Artikel-Nr. 145614
∙Setzen Sie nun den Siebträger ein.
∙Stellen Sie einen großen Behälter unter
den Siebträger.
∙Stecken Sie den Stecker in die Steck-
dose.
∙Vergewissern Sie sich, dass das Gerät
ausgeschaltet ist.
∙Drücken Sie gleichzeitig die
„ “ Taste und die „ “ Taste.
∙Während Sie diese beiden Tasten ge-
drückt halten, drücken Sie die „POW-
ER“- Taste.
∙Wenn die Tastenlichter anfangen von
links nach rechts zu blinken, lassen Sie
die Tasten „ “ „ “ los.
∙Die Tastenlichter blinken abwechselnd,
solange bis der Reinigungsvorgang be-
endet ist. Dieses kann ca. 10 Minuten
dauern.
∙Nach dem Reinigungsvorgang hören
die Lichter auf zu blinken und es ertö-

8
DE
nen 4 Signaltöne.
∙Entfernen Sie den Behälter.
∙Entnehmen Sie den Siebträger.
∙Entnehmen Sie die Reinigungsscheibe
und setzen Sie diese wieder auf der In-
nenseite der Hintertür ein.
∙Entnehmen Sie den Filtereinsatz und
reinigen Sie diesen in warmem Seifen-
wasser.
∙Anschließend trocknen Sie diesen gut
ab.
∙Ihr Gerät ist nun wieder betriebsbereit.
Entkalken
Wie jedes Gerät, welches mit Wasser
betrieben wird, muss auch dieses Gerät
regelmäßig entkalkt werden. Aufgrund
der unterschiedlichen Wasserhärten
und Benutzungen können wir hier kei-
ne Vorgaben machen, wann das Gerät
entkalkt werden muss.
Zum Entkalken empfehlen wir die
Graef Entkalkungstabletten Artikel-Nr.
145618
Gehen Sie dabei wie folgt vor:
∙Den Wassertank entfernen und kom-
plett leeren.
∙Füllen Sie den Wassertank erneut mit
Wasser und vermischen Sie das Wasser
- gemäß den Angaben des Herstellers -
mit dem Entkalker.
∙Positionieren Sie den Wassertank wie-
der in dem Gerät.
∙Benutzen Sie eine kleine Bürste zum
Reinigen des Brühkopfes, entfernen
Sie alle Kaffeereste.
∙Setzen Sie nun einen großen Behälter
unter den Brühkopf.
∙Schalten Sie das Gerät ein.
∙Sobald das Gerät bereit ist, drücken Sie
auf die „MANUAL“- Taste.
∙Sobald der Behälter voll ist, entleeren
Sie diesen und wiederholen diese Pro-
zedur mehrmals.
∙Nach mehrmaligem Wiederholen
schalten Sie das Gerät für ca. 10-15
min aus, damit der Entkalker seine Wir-
kung erzielen kann.
∙Danach schalten Sie das Gerät wieder
ein.
∙Lassen Sie die restliche Entkalkerlösung
durchlaufen, indem Sie die „MANU-
AL“- Taste betätigen.
∙Danach entnehmen Sie den Wasser-
tank und spülen diesen gut aus.
∙Befüllen Sie den Wassertank wieder
mit frischem Wasser.
∙Stellen Sie wieder einen Behälter unter
den Brühkopf.
∙Lassen Sie nun mehrmals frisches Was-
ser durchlaufen.
∙Befüllen Sie nun den Wassertank mit
frischem Wasser.
Entkalken der Dampfdüse
∙Um die Dampfdüse zu entkalken, ge-
hen Sie wie folgt vor:
∙Schalten Sie das Gerät aus.
∙Füllen Sie den Wasserbehälter mit fri-
schem Wasser.
∙Legen Sie eine Graef Entkalkungstab-
lette in den Wasserbehälter.
∙Stellen Sie je ein großes Gefäß unter
die Düsen.
∙Drücken Sie folgende Tastenkombina-
tion: „MANUAL“ und „ “.
∙Halten Sie die beiden Tasten gedrückt
und drücken Sie nun die POWER-Taste.
Die Temperatur des Wassers wird ge-
senkt.
∙Öffnen Sie die Heißwasser- und
Dampfdüsen in dem Sie die Drehregler
auf Max. stellen.
∙Wasser ießt nun in die Gefäße! Dieses
Gemisch nicht trinken!
∙Sobald die Gefäße voll sind, drehen Sie
die Regler der Düsen wieder zu und
drücken Sie die POWER Taste.
∙Entleeren Sie die Gefäße
∙Stellen Sie nun die leeren Gefäße wie-
der unter die Düsen.
∙Drücken Sie wieder die Tastenkom-
bination „MANUAL“ und „ “ und
anschließend POWER.
∙Drehen Sie die Drehregler der Düsen
wieder auf.
∙Wiederholen Sie diese Prozedur meh-
rere Male.
∙Anschließend wechseln Sie das Wasser
des Wasserbehälters und befüllen die-
sen mit frischem Wasser.
∙Drücken Sie wieder die Tastenkom-
bination „MANUAL“ und „ “ und
anschließend POWER.
∙Stellen Sie wieder ein Gefäß unter die
Düse.
∙Drehen Sie die Drehregler der Düsen
wieder auf und lassen frisches Wasser
durch die Düsen laufen.
∙Nach Beendigung des Vorganges dre-
hen Sie die Drehregler wieder zu und
drücken die POWER-Taste.
∙Das Gerät ist nun ausgeschaltet.
∙Wenn Sie nun das Gerät wieder
einschaltet, ist dieses wieder in der
Werkseinstellung und Sie können mit
der Zubereitung von Kaffee, Milchauf-
schäumen etc. wie gewohnt fortfah-
ren.
Kundendienst
Sollte es vorkommen, dass Ihr Graef-
Gerät einen Schaden hat, wenden Sie
sich bitte an Ihren Fachhändler oder an
den Graef-Kundendienst.
Sicherheit
Dieses Gerät entspricht den vorge-
schriebenen Sicherheitsbestimmungen.
Ein unsachgemäßer Gebrauch kann
jedoch zu Personen- und Sachschäden
führen.
Beachten Sie für einen sicheren Um-
gang mit dem Gerät die folgenden Si-
cherheitshinweise:
∙Kontrollieren Sie das Gerät vor der Ver-
wendung auf äußere sichtbare Schä-
den am Gehäuse, dem Anschlusskabel
und -stecker. Nehmen Sie ein beschä-
digtes Gerät nicht in Betrieb.
∙Reparaturen am Gerät z. B. eine be-
schädigte Zuleitung auszutauschen,
dürfen nur von einem Fachmann oder
vom Graef-Kundendienst ausgeführt
werden. Durch unsachgemäße Repa-
raturen können erhebliche Gefahren
für den Benutzer entstehen. Zudem
erlischt der Garantieanspruch.
∙Defekte Bauteile dürfen nur gegen
Original-Ersatzteile ausgetauscht wer-
den. Nur bei diesen Teilen ist gewähr-
leistet, dass sie die Sicherheitsanforde-
rungen erfüllen werden.
∙Dieses Gerät kann von Kindern ab 8
Jahren und darüber benutzt werden
sowie von Personen mit reduzierten

9
DE
physischen, sensorischen oder men-
talen Fähigkeiten oder Mangel an
Erfahrung und/oder Wissen benutzt
werden, wenn sie beaufsichtigt oder
bezüglich des sicheren Gebrauchs des
Gerätes unterwiesen wurden und die
daraus resultierenden Gefahren ver-
standen haben. Reinigung und Benut-
zer-Wartung dürfen nicht von Kindern
durchgeführt werden, es sei denn Sie
sind 8 Jahre oder älter und werden be-
aufsichtigt.
∙Das Gerät und seine Anschlussleitung
sind von Kindern jünger als 8 Jahren
fernzuhalten.
∙Kinder sollten beaufsichtigt werden,
um sicherzustellen, dass sie nicht mit
dem Gerät spielen.
∙Das Gerät ist nicht dazu bestimmt mit
einer externen Zeitschaltuhr oder einer
separaten Fernsteuerung verwendet zu
werden.
∙Dieses Gerät ist dazu bestimmt, im
Haushalt und ähnlichen Anwendun-
gen verwendet zu werden, wie bei-
spielsweise: in Mitarbeiterküchen für
Läden und Büros; in landwirtschaftlichen
Anwesen; von Gästen in Hotels, Motels
und anderen Wohneinrichtungen; in
Frühstückspensionen
∙Die Zuleitung immer am Anschlussste-
cker aus der Steckdose ziehen, nicht
am Anschlusskabel.
∙Vergleichen Sie vor dem Anschließen
des Gerätes die Anschlussdaten (Span-
nung und Frequenz) auf dem Typen-
schild mit denen Ihres Elektronetzes.
Diese Daten müssen übereinstimmen,
damit keine Schäden am Gerät auftre-
ten.
∙Benutzen Sie das Gerät nicht, wenn
das Stromkabel oder der Stecker be-
schädigt ist.
∙Lassen Sie vor der Weiterbenutzung
des Gerätes eine neue Anschlusslei-
tung durch den Graef-Kundendienst
oder einer autorisierten Fachkraft ins-
tallieren.
∙Öffnen Sie auf keinen Fall das Gehäu-
se des Gerätes. Werden spannungs-
führende Anschlüsse berührt und der
elektrische und mechanische Aufbau
verändert, besteht Stromschlaggefahr.
∙Niemals unter Spannung stehende Tei-
le berühren. Diese können einen elekt-
rischen Schlag verursachen oder sogar
zum Tode führen.
∙Tragen Sie das Gerät nicht am An-
schlusskabel.
∙Niemals das Gerät während des Betrie-
bes transportieren.
∙Fassen Sie den Stecker nicht mit feuch-
ten Händen an.
∙Verpackungsmaterialien dürfen nicht
zum Spielen verwendet werden. Es be-
steht Erstickungsgefahr.
∙Beachten Sie die Hinweise zu den An-
forderungen an den Aufstellort sowie
zum elektrischen Anschluss des Gerä-
tes um Personen- und Sachschäden zu
vermeiden.
∙Entfernen Sie niemals den mit Kaf-
feemehl gefüllten Siebträger während
des Durchlaufs, da dieser unter Druck
steht.
∙Benutzen Sie das Gerät nur, wenn das
Abtropfgitter und die Auffangschale in
Position sind.
∙Stellen Sie vor der Kaffeezubereitung
fest, ob der Siebträger gut festgezo-
gen ist.!
∙Schalten Sie das Gerät vor dem Reini-
gen aus indem Sie den Netzstecker aus
der Steckdose ziehen.
∙Lassen Sie das Gerät vor jeder Reini-
gung abkühlen.
∙Benutzen Sie keine aggressiven oder
scheuernden Reinigungsmittel und
keine Lösungsmittel.
∙Kratzen Sie hartnäckige Verschmut-
zungen nicht mit harten Gegenstän-
den ab.
∙Geben Sie das Gerät nicht in die Spül-
maschine und halten Sie dieses auch
nicht unter ießendes Wasser.
∙Tauchen Sie das Gerät niemals in Was-
ser ein.
∙Verwenden Sie zum Milchaufschäu-
men nur den beigefügten Behälter
oder einen anderen größeren Behäl-
ter. Verwenden Sie keine Tasse. Durch
überschäumende Milch kann es zu
Verbrennungen kommen.
∙Richten Sie die Milchschaumdüse nie
auf sich selber oder auf andere Perso-
nen. VERBRENNUNGSGEFAHR!
∙Benutzen Sie zum Bewegen der Milch-
schaumdüse stets den Griff. Fassen Sie
die Milchschaumdüse nach dem Ge-
brauch nicht am Rohr an. Dieses wird
sehr heiß!
Unpacking
To unpack the unit, proceed as below:
∙Take the unit out of the carton.
∙Remove all pieces of the packing.
∙Remove all labels from the unit. (but
not the rating plate)!
Requirements for the installation
location
For safe and awless operation of the
unit, the place of location must meet
these prerequisites:
∙The unit must be set up on a rm, at,
level, non-slip and heat resistant base
that has sufcient load bearing capac-
ity.
∙Select the place of location so that chil-
dren cannot reach the hot surfaces of
the unit.
∙The unit is not intended for installation
in a wall or a built-in cupboard.
∙Do not set up the unit in a hot, wet or
moist environment.
∙The electric socket must be readily ac-
cessible so that the power cord can be
easily unplugged.
Filter baskets
This unit is supplied with 4 lter inserts:
2 standard lter baskets (1 and 2 cups)
and 2 double-walled lter baskets.
The standard lter baskets have the
same prerequisites as the lter baskets
used in the commercial espresso ma-
chines. They have a single base: you can
see many small holes when held against
the light. The standard lter baskets are
designed for fresh, self-ground coffee.
To grind the coffee yourself, we recom-
mend using the GRAEF CM 80 coffee

10
EN
grinder. The grind setting is perfectly
matched to the espresso machines. If
you do not have a coffee grinder, when
purchasing the ground coffee please
make sure the coffee grind is very ne,
just like that used in the commercial
machines.
The double-walled lter baskets are de-
signed for use with typical, pre-ground
coffee from the supermarket.
Espresso gauge
Using the control panel
POWER
Use the “POWER” button to switch the
unit on and off.
At rst, the “POWER” button ashes
green. That means the unit is heating
up.
If the lamp changes to red and the rest
of the buttons are backlit, the unit is
ready for use.
Before you start making espresso, make
sure the control knob for steam and hot
water preparation is closed.
MANUAL
Use the “MANUAL” function to de-
termine how much coffee you want.
When the unit is switched on and has
heated up, the “POWER” button is red
and the other buttons are illuminated
green.
Put a cup under the group handle.
Press the “MANUAL” button.
The coffee ows into the cup.
As soon as you have the desired
amount, press the “MANUAL” button
again to stop.
Single espresso
The single espresso function is pro-
grammed so that 30 ml espresso ow
into the cup.
When the unit is switched on and has
heated up, the “POWER” button is red
and the other buttons are illuminated
green.
Put a cup under the group handle.
Press the “ ” button.
30 ml espresso now ow into your cup.
But, if you want less than 30 ml, you
can interrupt the process at any time by
pressing any button (except the POWER
button).
Double espresso
The double espresso function is pro-
grammed so that 60 ml espresso ow
into the cup.
When the unit is switched on and has
heated up, the “POWER” button is red
and the other buttons are illuminated
green.
Put a cup under the group handle.
Press the “ ” button.
60 ml espresso now ow into your cup.
But, if you want less than 60 ml, you
can interrupt the process at any time by
pressing any button (except the POWER
button).
PROGRAM
You can program your own amount of
espresso for “ ” and “ ” with
the PROGRAM function. Please go to
“PROGRAMMING” for more informa-
tion.
Milk frothing with Pannarello
∙Fill the enclosed container to 1/3 with
cold milk.
∙Before using the milk frother nozzle,
the condensate that has collected there
should be drained off. To do that, aim
it at the drain grate and briey turn on
the steam.
∙Wait until only steam and no water es-
capes and close the control again.
∙Now immerse the milk frother nozzle
with the Pannarello into the milk to ap-
prox. 1 cm under the surface.
∙Open the steam cock to the limit.
∙Hold the milk container at a slight an-
gle while doing so.
∙Lower the milk can as soon as the milk
level rises.
∙PLEASE MAKE SURE that the milk
should not be heated to more than
70°C during this process; otherwise,
the froth will collapse and the bever-
age will taste too sweet or possibly
even like burned milk!
∙A good tip for the correct temperature
is when the you cannot hold the con-
tainer for more than 3 seconds.
∙Turn open the control knob again.
∙By closing the valve and due to the
steam cooling off a vacuum arises in
the milk frother nozzle which then
draws some more milk.
∙For that reason, please wait a moment
before you pull the milk frother nozzle
out of the milk.
∙After frothing, briey knock the milk
can on the table top to remove the last
of the large air bubbles.
∙Swirling also helps uniformly distribute
the froth.
∙Clean the milk frother nozzle immedi-
ately after nishing the process using
a moist cloth. However, let the pipe
cool down for a few moments as it be-
comes very hot.
∙Also clean the milk frother nozzle with
a short blast of steam so that the milk
remnants are blown out of the milk
frother nozzle.
Milk frothing with the extra nozzle
Remove the Pannarello and unscrew
the nozzle.
Screw on the extra nozzle.
Fill the enclosed container to 1/3 with
cold milk.
∙Before using the milk frother nozzle,
the condensate that has collected there
should be drained off. To do that, aim
it at the drain grate and briey turn on
the steam.
∙Wait until only steam and no water es-
capes and close the control again.
∙Put the milk frother nozzle into the
milk container slightly offset.
∙That is important so that the milk is put
into a whirling motion.
∙Use the outlet sleeve as a guide for the
milk frother nozzle.
∙Open the control knob for the milk
frother nozzle.
Now start the “pulling” and “roll-
ing” phases
∙First the “pull phase”: to slightly stir

11
EN
the air, place the milk frother nozzle
just under the milk surface.
∙You have reached the correct position
when you hear a “slurping” sound.
∙That might stop for a moment as the
surface of the milk is moving.
∙Now the “roll phase”.
∙As soon as the volume of the milk in-
creases, push the milk frother nozzle
back into the milk.
∙As soon as the can becomes hot, close
the control knob.
∙After frothing, briey knock the milk
can on the table top to remove the last
of the large air bubbles.
∙Swirling also helps uniformly distribute
the froth.
∙Clean the milk frother nozzle immedi-
ately after nishing the process using
a moist cloth. However, let the pipe
cool down for a few moments as it be-
comes very hot.
∙Also clean the milk frother nozzle with
a short blast of steam so that the milk
remnants are blown out of the milk
frother nozzle.
You can use the method below to prac-
tice frothing milk:
∙Put cold water into the milk can.
∙Add a drop of detergent.
∙Froth it as described above.
∙If you froth correctly, the mixture looks
like real milk froth.
∙Please do not drink this mixture!!
Making hot water
∙Set a container under the hot water
nozzle.
∙Turn the control knob open.
∙Hot water now ows from the nozzle
into the container.
∙After completing the process, close the
rotary control again.
Programming
This unit comes with the following fac-
tory settings:
Single espresso – 30 ml
Double espresso – 60 ml
In the following section you can also
change them and set them however
you like:
Programming “Single Espresso”
∙Put the single-ply lter insert for 1 cup
into the group handle and ll it with
coffee grounds.
∙Press down the coffee grounds rmly
and insert the group handle.
∙Put a cup underneath the group han-
dle.
∙Press the “PROGRAM” button.
∙Then press the “ ” button.
∙Press the button again when you have
the desired amount of espresso.
∙2 beeps inform you that the new
setting for “single espresso” is pro-
grammed and saved.
Programming “Double Espresso”
∙Put the single-ply lter insert for 2 cups
into the group handle and ll it with
coffee grounds.
∙Press down the coffee grounds rmly
and insert the group handle.
∙Put a cup underneath the group han-
dle.
∙Press the “PROGRAM” button.
∙Then press the “ ” button.
∙Press the button again when you have
the desired amount of espresso.
∙2 beeps inform you that the new
setting for “double espresso” is pro-
grammed and saved.
Factory settings
To revert back to the factory settings,
make sure the unit is switched off and
proceed as follows:
∙Keep the “MANUAL” button pressed
and press the “POWER” button at the
same time.
∙Release the “MANUAL” button.
∙When you hear 4 acoustic signals and
the “POWER” button is illuminated the
factory settings are restored.
Single espresso 30 ml
Double espresso: 60 ml
Other programming facilities
Espresso thermoblock temperature
The water temperature of this unit is set
to approx. 92°C on the brewing head.
The temperature of the water can be
changed by a maximum of +/- 4°C in
2°C steps.
To do so, proceed as follows:
Plug the plug into the electric socket.
Please note: Even though the unit is
connected to the mains, the unit must
be switched “off”. That is why no con-
trol lamps on the unit are lit.
Press the “ ” button and keep it
pressed.
While pressing the “ ” button,
press the “POWER” button and then
release the “POWER” button.
That enables unit programming. Now
let go of the “ ” button.
Within 5 seconds, pres one of the but-
tons listed to raise or lower the tem-
perature:
+ 2°C = Press the “ ” button
+ 4°C = Press the “PROGRAM” button
- 2°C = Press the “MANUAL” button
- 4°C = Press the “POWER” button
After you have selected a new tempera-
ture, the respective button lights up and
2 beeps sound.
Steam thermoblock temperature
The unit’s steam temperature is set so
that powerful, dry steam is generated
when frothing the milk. The tempera-
ture of the steam can be changed by a
maximum of +/- 5°C in 10°C steps.
To do so, proceed as follows:
Plug the plug into the electric socket.
Please note: Even though the unit is
connected to the mains, the unit must
be switched “off”. That is why no con-
trol lamps on the unit are lit.
Press the “ ” button and keep it
pressed.
While pressing the “ ” button,
press the “POWER” button and then
release the “POWER” button.
Now let go of the “ ” button.
That enables unit programming. With-
in 5 seconds, pres one of the buttons
listed to raise or lower the temperature:
+ 5°C = Press the “ ” button
+ 10°C = Press the “PROGRAM” button
- 5°C = Press the “MANUAL” button
- 10°C = Press the “POWER” button
∙After you have selected a new tem-
perature, the respective button lights
up and 2 beeps sound.

12
EN
∙If you do not select a new temperature
within 5 seconds, the unit automatical-
ly switches back to the factory settings,
heats up and is then ready for use.
Steam moisture and pumping pow-
er
The steam pumping frequency in this
unit was preset; 0.3 seconds “on” and
0.5 seconds “off”. You can change this
default. Changing the frequency makes
the steam wetter or drier up to a pow-
erful, dry steam which is ideal for mak-
ing stable milk froth. The pumping fre-
quency (“off” time) can be increased or
decreased by 0.1 seconds as you please.
To do so, proceed as follows:
Plug the plug into the electric socket.
Please note: Even though the unit is
connected to the mains, the unit must
be switched “off”. That is why no con-
trol lamps on the unit are lit.
cress the “PROGRAM” button and keep
it pressed.
While pressing the “PROGRAM” but-
ton, press the “POWER” button and
then release the “POWER” button.
Now release the “PROGRAM” button.
Please note: This process allows pro-
gramming the unit, which is indicated
in that the “ ” button illuminates.
Please note: The lamps over the “
” button stay lit until the pumping fre-
quency is set to match your needs. If
no changes are made to the pumping
frequency within 5 seconds, the default
pumping frequency is automatically set
and the unit starts heating up the wa-
ter.
To reach the desired damp moisture and
steam pumping frequency, proceed as
follows:
Within 5 seconds, press one of the list-
ed buttons and let it go again as soon
as the lamp indicating the desired set-
ting illuminates.
wet = -0.1 sec. > Press the “ ” but-
ton
wetter = -0.2 sec. > Press the “PRO-
GRAM” button
dry = +0.1 sec. > Press the “MANUAL”
button
drier = +0.2 sec. > Press the “POWER”
button
Please note: After you have selected
and set a different pumping frequency,
the lamp over the pressed button illumi-
nates. To indicate that the change you
have made is correct, the lamp illumi-
nates and two acoustic signals sound.
Please note: The unit will now automat-
ically heat up the water.
Please remember: If you do not select a
new steam pumping frequency within 5
seconds, the unit automatically selects
the factory set steam pumping frequen-
cy and starts heating up the water.
Factory settings
Switch the unit off to reset all changes
back to the settings made in the factory.
Simultaneously press the “MANUAL”
button and the “POWER” button. Re-
lease the “POWER” button while keep-
ing the “MANUAL” button is pressed.
Release the “MANUAL” button. The
“POWER” button illuminates and 4
acoustic signals sound.
All the changes you made to the pro-
gramming are restored to the factory
settings.
Cleaning
∙Clean the exterior of the unit with a
soft, moist cloth. If heavily soiled, a
mild detergent can be used.
∙Pull out the drip dish.
∙Remove the drip grate.
∙Empty the drip dish.
∙Clean the drip tray and the grate and
the group handle under running water.
∙Then replace the drip dish together
with the grate.
∙Clean the nozzles with the cleaning
pin.
Cleaning cycle with cleaning disc
∙Remove the water tank and dispose of
the old water.
∙Fill with fresh, cold water.
∙Take out the cleaning set.
∙It is located in the inside of the rear
door.
∙Put the lter insert for 2 cups into the
group handle.
∙Place the cleaning disk (with the
smooth side facing down) into the l-
ter insert.
∙Possibly also put a cleaning tab into the
lter insert.
∙Now insert the group handle.
∙Put a large container underneath the
group handle.
∙Plug the plug into the electric socket.
∙Make sure the unit is switched off.
∙Simultaneously press the “
” button and the
„ “ button.
∙While keeping both these buttons
pressed, press the “POWER” button.
∙When the button lights start ashing
from left to right, let go of the “ ” “
” buttons.
∙The button lights keep ash alternately
until the cleaning process is complete.
This can take approx. 10 minutes.
∙After the cleaning processes the lights
stop ashing and 4 acoustic signals
sound.
∙Remove the tank.
∙Remove the group handle.
∙Remove the cleaning disc and put it
back into the inside of the rear door.
∙Take out the lter insert and clean it
with warm, soapy water.
∙Dry well.
∙Your unit is now ready for use again.
Descaling
Just as with any unit that is operated
with water, the unit also requires peri-
odic descaling.
You can use a commercially available
descaler for descaling your coffee ma-
chine.
To do so, proceed as follows:
∙Remove the water tank and completely
empty it.
∙Fill the water tank with water again
and mix the water as stated in the
descaler manufacturer’s instructions.
∙Put the water tank back into the unit.
∙Use a small brush to clean the brewing
head. Remove the coffee remnants.
∙Now place a large container under the
brewing head.
∙Switch on the unit.

13
EN
∙As soon as it is ready, press the “MAN-
UAL” button.
∙As soon as the container is full, empty
it and repeat the process several times.
∙After multiple repetitions, switch off
the unit for 10 - 15 minutes so that the
descaler can achieve its full effect.
∙After that, switch the unit back on.
∙Let the rest of the descaling solution
run through by pressing the “MANU-
AL” button.
∙Remove the water tank and rinse thor-
oughly.
∙Fill the water tank again with fresh
water.
∙Place a container under the brewing
head again.
∙Let fresh water run through several
times.
∙Now ll the water tank with fresh wa-
ter.
Customer service
If your Graef unit becomes damaged,
please contact your dealer or the Graef
customer service department.
Safety instructions
This unit complies with the statutory
safety regulations. Improper use can,
however, lead to personal injury and
property damage.
To handle the unit safely, follow the ins-
tructions below:
∙Check the unit for external, visible
damage to the housing, the supply
cord and the plug before using it. Do
not put a damaged unit into operation.
∙Repairs are only allowed to be per-
formed by a specialist or by the Graef
customer service department. Improp-
er repairs can lead to extreme hazards
for the user. Furthermore, the warranty
claim expires.
∙Only Graef customer service is author-
ised to repair the unit during the war-
ranty period, otherwise the warranty
expires for additional damages.
∙Defective components must be re-
placed solely with genuine spare parts.
Fullment of the safety regulations
is only guaranteed if these parts are
used.
∙This appliance can be used by children
aged from 8 years and above and per-
sons with reduced physical, sensory
or mental capabilities or lack of ex-
perience and knowledge if they have
been given supervision or instruction
concerning use of the appliance in a
safe way and understand the hazards
involved. Children shall not play with
the appliance. Cleaning and user main-
tenance shall not be made by children
unless they are older than 8 and super-
vised.
∙Keep the appliance and its cord out of
the reach of children less than 8 years.
∙The unit is not intended to be used
with an external timer or a separate
telecontrol system.
∙This unit is intended to be used in
household and similar applications
such as: staff kitchen areas in shops, of-
ces and other working environments;
farm houses; by clients in hotels, motels
and other residental type environments;
bed and breakfast type environments.
∙If the supply cord is damaged, it must
be replaced by the manufacturer, its
service or similarly qualied persons in
order to avoid a hazard.
∙Always pull the supply cord from the
electric socket using the connector
plug, not the supply cord.
∙Do not carry the unit by the supply
cord.
∙Never transport the unit during opera-
tion.
∙Do not touch the plug with moist
hands.
∙Do not use the packing material as a
toy. Danger of suffocation.
∙Follow the instructions regarding the
requirements for the place of installa-
tion and on the unit’s electrical con-
nection to prevent personal harm and
property damage.
∙Never aim the milk frother nozzle to-
wards yourself or any other person.
DANGER OF BURNS!
∙Always use the handle to move the
milk frother nozzle. Never touch the
milk frother nozzle on the pipe after
using. It becomes very hot!
∙Never remove the group handle when
it is lled with coffee grounds; it is
pressurised.
∙Use the unit only when the drip grid
and drip tray are properly positioned.
∙Before making coffee, make sure the
group handle is tightened rmly.
∙Switch the unit off before cleaning and
pull the power cord from the electric
socket.
∙Let the unit cool off before cleaning.
∙Do not use any aggressive or abrasive
cleaning agents and do not use any
solvents.
∙Do not scratch off stubborn soiling
with hard objects.
∙Do not put the unit in the dishwasher
and do not hold it under owing wa-
ter.
∙The appliance must not be immersed
in water.

14
CZ
Použitíovládacíhopanelu
POWER
Použijte tlačítko „POWER“ k zapnutí a
vypnutí spotřebiče.
Nejdříve bliká tlačítko „POWER“ zele-
nou barvou. Znamená to, že se spotře-
bič zahřívá.
Pokud se kontrolka změní na červenou
a další tlačítka svítí, spotřebič je připra-
vený pro použití.
Před přípravou espressa se ujistěte, zda
je ovladač páry a horké vody zavřený.
MANUAL
Použijte funkci „MANUAL“ k volbě po-
žadovaného množství kávy. Když je spo-
třebič zapnutý a zahřátý, tlačítko „PO-
WER“ svítí červenou barvou a ostatní
tlačítka svítí zelenou barvou.
Postavte šálek pod madlo s držákem.
Stiskněte tlačítko „MANUAL“.
Káva vytéká do šálku.
Po dosažení požadovaného množství
stiskněte opět tlačítko „MANUAL“ k
zastavení vypouštění.
Jedno espresso
Funkce jedno expresso je naprogramo-
vaná na vypuštění 30 ml espressa do
šálku.
Pokud je spotřebič zapnutý a zahřátý,
tlačítko „POWER“ svítí červenou barvou
a zbývající tlačítka svítí zelenou barvou.
Postavte šálek pod madlo s držákem.
Stiskněte tlačítko „ “.
30 ml espressa nyní vyteče do šálku.
Pokud chcete méně než 30 ml, můžete
přerušit proces vypouštění stisknutím
jakéhokoliv tlačítka (kromě tlačítka PO-
WER).
Dvojité espresso
Funkce dvojitého espressa je naprogra-
movaná na vypuštění 60 ml espressa do
šálku.
Když je spotřebič zapnutý a zahřátý, tla-
čítko „POWER“ svítí červenou barvou a
zbývající tlačítka zelenou.
Vložte šálek pod madlo s držákem.
Stiskněte tlačítko „ “.
60 ml espressa nyní vyteče do šálku.
Pokud chcete méně než 60 ml, může-
te proces kdykoliv přerušit stisknutím
kteréhokoliv tlačítka (kromě tlačítka
POWER).
PROGRAM
Můžete naprogramovat vlastní množ-
ství espressa pro „ ” a “ ”
pomocí funkce PROGRAM. Přejděte
na kapitolu „PROGRAMOVÁNÍ“ pro
podrobnější informace.
ZpěněnímlékasPannarello
∙Naplňte dodanou nádobu do 1/3 stu-
deným mlékem.
∙Před použitím zpěňovací trysky vypusť-
te nahromaděný kondenzát. K tomu
nasměrujte trysku na odkapávací řošt
a krátce vypusťte páru.
∙Počkejte, dokud nebude vycházet pou-
ze čistá pára bez vody a zavřete ovla-
dač.
∙Nyní ponořte zpěňovací trysku s Pan-
narello do mléka přibližně 1 cm pod
hladinu.
∙Otevřete ovladač páry na maximum.
∙Držte nádobu s mlékem v mírném
úhlu.
∙Jak pěna roste, snižujte nádobu dolů.
∙UJISTĚTE SE, abyste mléko během
tohoto procesu neohřáli na více než
70°C; v opačném případě se pěna zne-
hodnotí a nápoj bude mít příliš sladkou
nebo spálenou chuť!
∙Vhodným tipem pro zjištění správné
teploty je, když nemůžete udržet ná-
dobu déle než 3 sekundy.
∙Opět otevřete ovladač.
∙Zavřením ventilu a z důvodu ochlazo-
vání páry vzniká vakuum v trysce, což
může nasát trochu mléka.
∙Z tohoto důvodu počkejte chvíli před
vytažením trysky z mléka.
∙Po zpěnění krátce poklepte nádobou
s mlékem o stůl k odstranění velkých
vzduchových bublin.
∙Zatočení také pomůže narovnat pěnu.
∙Vyčistěte zpěňovací trysku ihned po
procesu pomocí vlhké utěrky. Nechte
ji předtím chvíli vychladnout, neboť je
velmi horká.
∙Také vyčistěte zpěňovací trysku krát-
kým vypuštěním páry.
Zpěněnímlékasextratryskou
Sejměte Pannarello a odšroubujte
trysku.
Našroubujte extra trysku.
Naplňte dodanou nádobu do 1/3 stude-
ným mlékem.
∙Před použitím zpěňovací trysky vy-
pusťte kondenzát. K tomu nasměrujte
trysku na odkapávací rošt a krátce vy-
pusťte páru.
∙Počkejte, dokud nevychází pouze čistá
pára bez vody a poté ovladač zavřete.
∙Dejte zpěňovací trysku do nádoby s
mlékem mírně stranou.
∙Je důležité, abyste mléko roztočili.
∙Použijte vnější stranu jako vodítko pro
zpěňovací trysku.
∙Otevřete ovladač zpěňovací trysky.
Nyní začněte fázi „tahání” a „rolo-
vání“.
∙Nejdříve fáze „tahání“: k jemnému mí-
chání ponořte trysku těsně pod hladinu
mléka.
∙Správná pozice je, když uslyšíte „srká-
ní”.
∙Můžete na chvíli zastavit, když se po-
vrch mléka pohybuje.
∙Nyní fáze „rolování“.
∙Když se objem mléka zvětšuje, vtlačte
zpěňovací trysku zpět do mléka.
∙Když je nádoba horká, zavřete ovladač.
∙Po zpěnění krátce poklepte nádobou
s mlékem o stůl k odstranění velkých
vzduchových bublin.
∙Zatočení také pomůže narovnat pěnu.
∙Vyčistěte zpěňovací trysku ihned po
procesu pomocí vlhké utěrky. Nechte
ji předtím chvíli vychladnout, neboť je
velmi horká.
∙Také vyčistěte zpěňovací trysku krát-
kým vypuštěním páry.
Můžete použít následující postup k na-
cvičení zpěnění mléka:
∙Nalijte studenou vodu do nádoby na
mléko.
∙Přidejte kapku saponátu.
∙Postupujte podle výše popsaných kro-

15
CZ
ků.
∙Pokud postupujete správně, směs by
měla vypadat jako skutečné mléko.
∙Nepijte tuto směs!!
Přípravahorkévody
∙Postavte nádobu pod trysku horké
vody.
∙Otevřete ovladač.
∙Horká voda nyní vytéká z trysky do ná-
doby.
∙Po dokončení procesu zavřete otočný
ovladač.
Programování
Tento spotřebič je dodávaný s následují-
cími výrobními nastaveními:
Jedno espresso – 30 ml
Dvojité espresso – 60 ml
V následující kapitole můžete tyto hod-
noty změnit a nastavit požadované:
Programování„Jednohoespressa”
∙Dejte jednoduchý ltr pro 1 šálek do
držáku s madlem a naplňte kávu.
∙Utlačte kávu a držák nasaďte na místo.
∙Postavte šálek pod madlo s držákem.
∙Stiskněte tlačítko „PROGRAM“.
∙Poté stiskněte tlačítko „ “.
∙Po dosažení požadovaného množství
espressa opět stiskněte tlačítko.
∙2 akustické signály informují, že je na-
programované a uložené nové nasta-
vení pro „jedno espresso“.
Programování„Dvojitéhoespressa”
∙Vložte jednoduchý ltr pro 2 šálky do
držáku s madlem a naplňte kávu.
∙Utlačte kávu a držák nasaďte na místo.
∙Postavte šálek pod madlo s držákem.
∙Stiskněte tlačítko „PROGRAM“.
∙Poté stiskněte tlačítko „ “.
∙Po dosažení požadovaného množství
espressa opět stiskněte tlačítko.
∙2 akustické signály informují, že je na-
programované a uložené nové nasta-
vení pro „jedno espresso“.
Výrobnínastavení
K obnovení výrobních nastavení se ujis-
těte, zda je spotřebič vypnutý a postu-
pujte následovně:
∙Stiskněte a držte tlačítko „MANUAL” a
stiskněte tlačítko „POWER“.
∙Uvolněte tlačítko „MANUAL“.
∙Po zaznění 4 akustických signálů a roz-
svícení tlačítka „POWER“ jsou výrobní
nastavení obnovena.
Jedno espresso 30 ml
Dvojité espresso: 60 ml
Dalšímožnostiprogramování
Teplota Espressa
Teplota vody tohoto spotřebiče je na-
stavená na přibližně 92°C na výstupu.
Teplotu vody můžete změnit v rozsahu
maximálně +/- 4°C v 2°C krocích.
K tomu postupujte následovně:
Připojte zástrčku k síťové zásuvce.
Poznámka: I když je spotřebič připojený
k síťové zásuvce, spotřebič musí být vy-
pnutý. Znamená to, že žádné kontrolky
na spotřebiči nesvítí.
Stiskněte tlačítko „ ” a držte jej
stisknuté.
Během držení tlačítka „ “, stiskně-
te tlačítko „POWER“ a poté uvolněte
tlačítko „POWER“.
To umožňuje programování. Nyní uvol-
něte tlačítko „ “.
Do 5 sekund stiskněte jedno z níže po-
psaných tlačítek k zvýšení nebo snížení
teploty:
+ 2°C = Stiskněte „ “
+ 4°C = Stiskněte „PROGRAM“
- 2°C = Stiskněte „MANUAL“
- 4°C = Stiskněte „POWER“
Po volbě nové teploty se rozsvítí odpoví-
dající tlačítko a zazní 2 akustické signály.
Nastaveníteplotypáry
Teplota páry spotřebiče je nastavená na
vytváření výkonné, suché páry při zpě-
nění mléka. teplotu páry lze změnit ma-
ximálně o +/- 10°C v 5°C krocích.
K tomu postupujte následovně:
Připojte spotřebič k síťové zásuvce.
Poznámka: I když je spotřebič připojený
k síťové zásuvce, spotřebič musí být vy-
pnutý. Znamená to, že žádné kontrolky
na spotřebiči nesvítí.
Stiskněte a držte stisknuté tlačítko
„ “.
Během držení tlačítka „ ” „ stisk-
něte tlačítko „POWER“ a poté jej uvol-
něte.
Nyní uvolněte tlačítko „ “.
Umožňuje vám to programování spo-
třebiče. Do 5 sekund stiskněte jedno z
níže popsaných tlačítek k snížení nebo
zvýšení teploty:
+ 5°C = Stiskněte „ “
+ 10°C = Stiskněte „PROGRAM“
- 5°C = Stiskněte „MANUAL“
- 10°C = Stiskněte „POWER“
∙Po volbě nové teploty se rozsvítí od-
povídající tlačítko a zazní 2 akustické
signály.
∙Pokud nezvolíte novou teplotu do 5
sekund, spotřebič se automaticky pře-
pne na výrobní nastavení, zahřeje se a
je připravený k použití.
Vlhkostpáryavýkončerpadla
Frekvence čerpadla páry tohoto spo-
třebiče je předvolená; 0.3 sekundy
„zapnutá“ a 0.5 sekundy „vypnutá“.
Můžete tuto hodnotu změnit. Změnou
frekvence páru zvlhčíte nebo vysušíte,
suchá pára je ideální pro přípravu stabil-
ní mléčné pěny. Frekvence čerpadla (čas
„vypnutí“) lze zvýšit nebo snížit o 0.1
podle potřeby.
K tomu postupujte následovně:
Připojte spotřebič k síťové zásuvce.
Poznámka: I když je spotřebič připojený
k síťové zásuvce, spotřebič musí být vy-
pnutý. Znamená to, že žádné kontrolky
na spotřebiči nesvítí.
Stiskněte tlačítko „PROGRAM“ a držte
jej stisknuté.
Během držení tlačítka „PROGRAM“
stiskněte tlačítko „POWER“ a poté jej
uvolněte.
Nyní uvolněte tlačítko „PROGRAM“.
Poznámka: Tento proces umožňuje pro-
gramování spotřebiče, což je indikované
rozsvícením tlačítka „ “.
Poznámka: Kontrolka nad tlačítkem „
” svítí během nastavování frek-
vence čerpadla. Pokud neuskutečníte
žádnou změnu frekvence čerpadla do
5 sekund, nastaví se automaticky počá-
teční frekvence a spotřebič začne ohří-
vat vodu.
K dosažení požadované vlhkosti a frek-
vence čerpadla postupujte následovně:
Do 5 sekund stiskněte některé z popsa-
ných tlačítek a nechte je svítit pro indi-

16
CZ
kaci požadovaného nastavení.
mokrá = -0.1 sek. > Stiskněte „ ”
vlhčí = -0.2 sek. > Stiskněte tlačítko
„PROGRAM”
suchá = +0.1 sek. > Stiskněte tlačítko
„MANUAL“
sušší = +0.2 sek. > Stiskněte tlačítko
„POWER“
Poznámka: Po volbě a nastavení jiné
frekvence čerpadla se rozsvítí kontrolka
nad stisknutým tlačítkem. Pro indikaci,
že nastavená změna je správná, kont-
rolka svítí a zazní dva akustické signály.
Poznámka: Spotřebič začne nyní auto-
maticky ohřívat vodu.
Pamatujte: Pokud nezvolíte novou frek-
venci čerpadla do 5 sekund, spotřebič
se automaticky nastaví na výrobní hod-
noty a začne ohřívat vodu.
Výrobnínastavení
Vypněte spotřebič k resetování všech
změn na výrobní hodnoty. Současně
stiskněte tlačítko „MANUAL“ a tlačítko
„POWER“. Uvolněte tlačítko „POWER“
během držení tlačítka „MANUAL“.
Uvolněte tlačítko „MANUAL“. Tlačítko
„POWER“ svítí a zazní 4 akustické sig-
nály.
Všechny provedené změny v režimu
programování se obnoví na výrobní
hodnoty.
Čištění
∙Vyčistěte vnějšek spotřebiče měkkou
vlhkou utěrkou. V případě silnějšího
znečištění můžete použít jemný sapo-
nát.
∙Vytáhněte odkapávací zásobník.
∙Vyjměte odkapávací rošt.
∙Vyprázdněte odkapávací zásobník.
∙Vyčistěte zásobník a rošt a držák s ma-
dlem pod tekoucí vodou.
∙Vraťte na místo odkapávací zásobník s
roštem.
∙Vyčistěte trysky čisticím kolíčkem.
Čisticícyklussčisticímdiskem
∙Vyjměte zásobník vody a vylijte starou
vodu.
∙Naplňte čerstvou, studenou vodou.
∙Vyndejte čisticí sadu.
∙Nachází se za zadními dvířky.
∙Nasaďte ltr pro 2 šálky do držáku s
madlem.
∙Vložte čisticí disk (hladkou stranou
dolů) do ltru.
∙Vložte také čisticí tabletu do vložky l-
tru.
∙Nasaďte držák s madlem na místo.
∙Postavte velkou nádobu pod držák s
madlem.
∙Připojte zástrčku k síťové zásuvce.
∙Ujistěte se, zda je spotřebič vypnutý.
∙Současně stiskněte tlačítko „ ” a tla-
čítko „ “.
∙Během držení obou tlačítek stiskněte
tlačítko „POWER“.
∙Když začne blikat kontrolka tlačítka
zleva doprava, uvolněte tlačítka „
“ „ “.
∙Kontrolky tlačítek střídavě blikají až do
ukončení procesu čištění. To může tr-
vat přibližně 10 minut.
∙Po skončení procesu čištění kontrolky
přestanou blikat a zazní 4 akustické
signály.
∙Vyjměte nádobu.
∙Sejměte držák s madlem.
∙Vyjměte čisticí disk a vložte jej zpět do
prostoru za zadní dvířka.
∙Vyjměte vložku ltru a vyčistěte ji tep-
lou vodou se saponátem.
∙Důkladně vysušte.
∙Spotřebič je nyní připravený k opětov-
nému použití.
Odvápnění
Jako všechny spotřebiče používající
vodu, vyžaduje také tento spotřebič
pravidelné odvápnění.
Můžete použít komerčně dostupné od-
vápňovací prostředky k odvápnění spo-
třebiče.
Postupujte následovně:
∙Vyjměte zásobník vody a vyprázdněte
jej.
∙Naplňte zásobník vodou a smíchejte
vodu podle pokynů výrobce odvápňo-
vacího prostředku.
∙Vložte zásobník vody do spotřebiče.
∙Použijte malý kartáč k vyčištění vypouš-
těcí hlavy. Odstraňte zbytky kávy.
∙Nyní postavte velkou nádobu pod vy-
pouštěcí hlavu.
∙Zapněte spotřebič.
∙Když je připravený, stiskněte tlačítko
„MANUAL“.
∙Když je nádoba plná, vylijte ji a opakuj-
te proces několikrát.
∙Po několika procesech vypněte spotře-
bič na 10 - 15 minut, aby mohl odvá-
pňovací prostředek dosáhnout plného
účinku.
∙Poté opět zapněte spotřebič.
∙Nechte vytéct zbytek odvápňovacího
roztoku stisknutím tlačítka „MANU-
AL“.
∙Vyjměte zásobník vody a důkladně jej
vypláchněte.
∙Naplňte zásobník čistou vodou.
∙Vložte nádobu pod vypouštěcí hlavu.
∙Nechte čistou vodu vytéct několikrát
do připravené nádoby.
∙Nyní naplňte zásobník vody čistou čer-
stvou vodou.
Servisnístředisko
Pokud se váš spotřebič Graef porouchá,
kontaktujte prodejce nebo Graef servis-
ní středisko.
Bezpečnostnípokyny
Tento spotřebič vyhovuje platným bez-
pečnostním předpisům. Nesprávné
použití může však vést k zranění nebo
poškození majetku.
K bezpečnému použití spotřebiče dodr-
žujte níže uvedené pokyny:
∙Zkontrolujte spotřebič z hlediska vněj-
ších viditelných poškození krytu, pří-
vodního kabelu a zástrčky před použi-
tím. Nepoužívejte poškozený spotřebič.
∙Opravy smí provádět pouze kvaliko-
vaný servisní technik nebo Graef servis-
ní středisko. Nesprávné opravy mohou
vést k ohrožení zdraví nebo poškození
majetku. Ztrácíte také právo na záruku.
∙Pouze Graef servisní středisko je opráv-
něné k opravě spotřebiče během záru-
ky, v opačném případě se nebude záru-
ka vztahovat na další poškození.
∙Poškozené komponenty se musí vymě-
nit za originální náhradní díly. Pouze
tak je zaručená bezpečnost spotřebiče.
∙Tento spotřebič smí používat děti od 8
let a osoby se sníženými fyzickými, sen-
zorickými nebo mentálními schopnost-

17
CZ
mi, nebo bez dostatečných zkušeností
a znalostí, pokud jsou pod dohledem
nebo byly poučené o použití osobou
odpovědnou za jejich bezpečnost. Ne-
dovolte dětem hrát si se spotřebičem.
Čistění a údržbu spotřebiče nesmí pro-
vádět děti do 8 let.
∙Držte spotřebič a přívodní kabel mimo
dosah dětí do 8 let.
∙Spotřebič není určený pro použití s ex-
terním časovačem nebo samostatným
dálkovým systémem.
∙Tento přístroj je určený pro použití v do-
mácnosti a podobných místech: zaměst-
nanecké kuchyně v obchodech, kance-
lářích a jiném podobném prostředí; na
farmách; klienty v hotelech, motelech a
podobných ubytovacích zařízeních; ve
stravovacích místech.
∙Pokud je poškozený přívodní kabel,
musí jej vyměnit výrobce, servisní tech-
nik nebo podobně kvalikovaná osoba
pro zabránění nebezpečí.
∙Při odpojování spotřebiče tahejte za zá-
strčku, nikdy za přívodní kabel.
∙Nepřenášejte přístroj za přívodní kabel.
∙Nikdy nepřenášejte přístroj během pro-
vozu.
∙Nedotýkejte se zástrčky mokrýma ru-
kama.
∙Nepoužívejte obalové materiály jako
hračku. Riziko udušení.
∙Dodržujte pokyny týkající se instala-ce
přístroje a elektrického připojení, abys-
te zabránili úrazu a poškození majetku.
∙Nikdy nesměrujte trysku zpěňovače na
osoby. RIZIKO POPÁLENÍ!
∙Vždy používejte madlo k přesunutí
trysky zpěňovače. Nikdy se nedotýkejte
trysky zpěňovače po použití. Může být
velmi horká!
∙Nikdy nesundávejte držák s madlem,
pokud je naplněný kávou; je pod tla-
kem.
∙Spotřebič používejte pouze, pokud je
správně nasazený odkapávací zásobník
a rošt.
∙Před přípravou kávy se ujistěte, zda je
pevně utažený držák s madlem.
∙Vypněte a odpojte spotřebič od sítě
před čištěním.
∙Před čištěním nechte spotřebič vy-
chladnout.
∙Nepoužívejte agresivní čističe a nepou-
žívejte rozpouštědla.
∙Neodstraňujte odolné nečistoty tvrdý-
mi předměty.
∙Nemyjte spotřebič v myčce nádobí a
nedržte jej pod tekoucí vodou.
∙Spotřebič neponořujte do vody.
Použitieovládaciehopanela
POWER
Použije tlačidlo „POWER“ pre zapnutie
a vypnutie spotrebiča.
Najskôr bliká tlačidlo „POWER“ zelenou
farbou. Znamená to, že sa spotrebič za-
hrieva.
Ak sa kontrolka zmení na červenú a ďal-
šie tlačidlá svietia, spotrebič je priprave-
ný na použitie.
Pred prípravou espressa sa uistite, či je
ovládač pary a horúcej vody zatvorený.
MANUAL
Použite funkciu „MANUAL“ pre voľbu
požadovaného množstva kávy. Keď je
spotrebič zapnutý a zahriaty, tlačidlo
„POWER“ svieti červenou farbou a os-
tatné tlačidlá svietia zelenou farbou.
Postavte šálku pod rukoväť s držiakom.
Stlačte tlačidlo „MANUAL“.
Káva vyteká do šálky.
Po dosiahnutí požadovaného množstva
stlačte opäť tlačidlo „MANUAL“ pre za-
stavenie vypúšťania.
Jedno espresso
Funkcie jedno expresso je naprogramo-
vaná na vypustenie 30 ml espressa do
šálky.
Ak je spotrebič zapnutý a zahriaty, tla-
čidlo „POWER“ svieti červenou farbou
a zostávajúce tlačidlá svietia zelenou
farbou.
Postavte šálku pod rukoväť s držiakom.
Stlačte tlačidlo „ “.
30 ml espressa teraz vytečie do šálky.
Ak chcete menej ako 30 ml, môžete
prerušiť proces vypúšťania stlačením
akéhokoľvek tlačidla (okrem tlačidla
POWER).
Dvojité espresso
Funkcia dvojitého espressa je naprogra-
movaná na vypúšťanie 60 ml espressa
do šálky.
Keď je spotrebič zapnutý a zahriaty, tla-
čidlo „POWER“ svieti červenou farbou a
zostávajúce tlačidlá zelenou.
Vložte šálku pod rukoväť s držiakom.
Stlačte tlačidlo „ “.
60 ml espressa teraz vytečie do šálky.
Ak chcete menej ako 60 ml, môžete
proces kedykoľvek prerušiť stlačením
ktoréhokoľvek tlačidla (okrem tlačidla
POWER).
PROGRAM
Môžete naprogramovať vlastné množ-
stvo espressa pre „ ” a “ “
pomocou funkcie PROGRAM. Prejdite
na kapitolu „PROGRAMOVANIE“ pre
podrobnejšie informácie.
Spenenie mlieka s Pannarello
∙Naplňte dodanú nádobu do 1/3 stude-
ným mliekom.
∙Pred použitím speňovacej trysky vy-
pustite nahromadený kondenzát. Na

EN
18
SK
to nasmerujte trysku na odkvapkávací
rošt a krátko vypustite paru.
∙Počkajte, kým nebude vychádzať len
čistá para bez vody a zatvorte ovládač.
∙teraz ponorte speňovaciu trysku s Pan-
narello do mlieka približne 1 cm pod
hladinu.
∙Otvorte ovladač pary na maximum.
∙Držte nádobu s mliekom v miernom
uhle.
∙Ako pena rastie, znižujte nádobu dolu.
∙UISTITE SA, aby ste mlieko počas
tohto procesu neohriali na viac ako
70°C; v opačnom prípade sa pena zne-
hodnotí a nápoj bude mať veľmi sladkú
alebo spálenú chuť!
∙Vhodným tipom pre zistenie správnej
teploty je, keď nemôžete udržať nádo-
bu dlhšie ako 3 sekundy.
∙Opäť otvorte ovládač.
∙Zatvorením ventila a z dôvodu ochla-
dzovania pary vzniká vákuum v tryske,
čo môže nasať trochu mlieka.
∙Z tohto dôvodu počkajte chvíľu pred
vytiahnutím trysky z mlieka.
∙Po spenení krátko poklepte nádobou s
mliekom o stôl pre odstránenie veľkých
vzduchových bublín.
∙Zatočenie taktiež pomôže narovnať
penu.
∙Vyčistite speňovaciu trysku ihneď po
procese pomocou vlhkej utierky. Ne-
chajte ju predtým chvíľu vychladnúť,
pretože je veľmi horúca.
∙Taktiež vyčistite speňovaciu trysku krát-
kym vypustením pary.
Spenenie mlieka s extra tryskou
Zložte Pannarello a oskrutkujte trysku.
Naskrutkujte extra trysku.
Naplňte dodanú nádobu do 1/3 stude-
ným mliekom.
∙Pred použitím speňovacej trysky vy-
pustite kondenzát. Na to nasmerujte
trysku na odkvapkávací rošt a krátko
vypustite paru.
∙Počkajte, kým nvychádza len čistá para
len vody a potom ovládač zatvorte.
∙Dajte speňovaciu trysku do nádoby s
mliekom mierne na bok.
∙Je dôležité, aby ste mlieko roztočili.
∙Použite vonkajšiu stranu ako vodítko
pre speňovaciu trysku.
∙Otvorte ovládač speňovacej trysky.
Teraz začnite fázu „ťahania” a „ro-
lovania“.
∙Najskôr fáza „ťahania“: pre jemné
miešanie ponorte trysku tesne pod hla-
dinu mlieka.
∙Správna pozícia je, keď budete počuť
„sŕkanie”.
∙Môžete na chvíľu zastaviť, keď sa po-
vrch mlieka pohybuje.
∙Teraz fáza „rolovania“.
∙Keď sa objem mlieka zväčšuje, vtlačte
speňovaciu trysku späť do mlieka.
∙Keď je nádoba horúca, zatvorte ovlá-
dač.
∙Po spenení krátko poklepte nádobou s
mliekom o stôl pre odstránenie veľkých
vzduchových bublín.
∙Zatočenie taktiež pomôže narovnať
penu.
∙Vyčistite speňovaciu trysku ihneď po
procese pomocou vlhkej utierky. Ne-
chajte ju predtým chvíľu vychladnúť,
pretože je veľmi horúca.
∙Taktiež vyčistite speňovaciu trysku krát-
kym vypustením pary.
Môžete použiť nasledujúci postup pre
nacvičenie spenenia mlieka:
∙Nalejte studenú vodu do nádoby na
mlieko.
∙Pridajte kvapku saponátu.
∙Postupujte podľa vyššie popísaných
krokov.
∙Ak postupujete správne, zmes by mala
vypadať ako skutočné mlieko.
∙Nepite túto zmes!!
Prípravahorúcejvody
∙Postavte nádobu pod trysku horúcej
vody.
∙Otvorte ovládač.
∙Horúca voda teraz vyteká z trysky do
nádoby.
∙Po dokončení procesu zatvorte otočný
ovládač.
Programovanie
Tento spotrebič je dodávaný s nasledu-
júcimi výrobnými nastaveniami:
Jedno espresso – 30 ml
Dvojité espresso – 60 ml
V nasledujúcej kapitole môžete tieto
hodnoty zmeniť a nastaviť požadované:
Programovanie „Jedného espressa”
∙Dajte jednoduchý lter pre 1 šálku do
držiaka s rukoväťou a naplňte kávu.
∙Utlačte kávu a držiak nasaďte na
miesto.
∙Postavte šálku pod rukoväť s držiakom.
∙Stlačte tlačidlo „PROGRAM“.
∙Potom stlačte tlačidlo „ “.
∙Po dosiahnutí požadovaného množ-
stva espressa opäť stlačte tlačidlo.
∙2 akustické signály informujú, že je na-
programované a uložené nové nasta-
venie pre „jedno espresso“.
Programovanie „Dvojitého espres-
sa”
∙Vložte jednoduchý lter pre 2 šálky do
držiaku s rukoväťou a naplňte kávu.
∙Utlačte kávu a držiak nasaďte na
miesto.
∙Postavte šálku pod rukoväť s držiakom.
∙Stlačte tlačidlo „PROGRAM“.
∙Potom stlačte tlačidlo „ “.
∙Po dosiahnutí požadovaného množ-
stva espressa opäť stlačte tlačidlo.
∙2 akustické signály informujú, že je na-
programované a uložené nové nasta-
venie pre „jedno espresso“.
Výrobné nastavenia
Pre obnovenie obnovení výrobných na-
stavení sa uistite, či je spotrebič vypnutý
a postupujte nasledovne:
∙Stlačte a držte tlačidlo „MANUAL” a
stlačte tlačidlo „POWER“.
∙Uvoľnite tlačidlo „MANUAL“.
∙Po zaznení 4 akustických signálov a
rozsvietení tlačidla „POWER“ sú výrob-
né nastavenia obnovené.
Jedno espresso 30 ml
Dvojité espresso: 60 ml
Ďalšiemožnostiprogramovania
Teplota Espressa
Teplota vody tohto spotrebiča je na-
stavená na približne 92°C na výstupe.
Teplotu vody môžete zmeniť v rozsahu
maximálne +/- 4°C v 2°C krokoch.
Postupujte nasledovne:
Pripojte zástrčku k sieťovej zásuvke.

EN
19
SK
Poznámka: Aj keď je spotrebič pripo-
jený k sieťovej zásuvke, spotrebič musí
byť vypnutý. Znamená to, že žiadne
kontrolky na spotrebiči nesvietia.
Stlačte tlačidlo „ ” a držte ho stla-
čené.
Počas držania tlačidla „ “, stlačte
tlačidlo „POWER“ a potom uvoľnite tla-
čidlo „POWER“.
To umožňuje programovanie. Teraz
uvoľnite tlačidlo „ “.
Do 5 sekúnd stlačte jedno z nižšie popí-
saných tlačidiel pre zvýšenie alebo zní-
ženie teploty:
+ 2°C = Stlačte „ “
+ 4°C = Stlačte „PROGRAM“
- 2°C = Stlačte „MANUAL“
- 4°C = Stlačte „POWER“
Po voľbe novej teploty sa rozsvieti zod-
povedajúce tlačidlo a zaznejú 2 akustic-
ké signály.
Nastavenie teploty pary
Teplota pary spotrebiča je nastavená na
vytváranie výkonnej, suchej pary pri spe-
není mlieka. Teplotu páry môžete meniť
maximálne o +/- 10°C v 5°C krokoch.
Na to postupujte nasledovne:
Pripojte spotrebič k sieťovej zásuvke.
Poznámka: Aj keď je spotrebič pripo-
jený k sieťovej zásuvke, spotrebič musí
byť vypnutý. Znamená to, že žiadne
kontrolky na spotrebiči nesvietia.
Stlačte a držte stlačené tlačidlo „ “.
Počas držania tlačidla „ ” „ stlačte
tlačidlo „POWER“ a potom ho uvoľnite.
Teraz uvoľnite tlačidlo „ “.
Umožňuje vám to programovanie spot-
rebiča. Do 5 sekúnd stlačte jedno z
nižšie popísaných tlačidiel pre zníženie
alebo zvýšenie teploty:
+ 5°C = Stlačte „ “
+ 10°C = Stlačte „PROGRAM“
- 5°C = Stlačte „MANUAL“
- 10°C = Stlačte „POWER“
∙Po voľbe novej teploty sa rozsvieti prí-
slušné tlačidlo a zaznejú 2 akustické
signály.
∙Ak nezvolíte novú teplotu do 5 sekúnd,
spotrebič sa automaticky prepne na vý-
robné nastavenia, zahreje sa a je pri-
pravený na použitie.
Vlhkosťparyavýkončerpadla
Frekvencia čerpadla páry tohto spotrebi-
ča je predvolená; 0.3 sekundy „zapnu-
tá“ a 0.5 sekundy „vypnutá“. Môžete
túto hodnotu zmeniť. Zmenou frekven-
cie paru zvlhčíte alebo vysušíte, suchá
para je ideálna pre prípravu stabilnej
mliečnej peny. Frekvenciu čerpadla (čas
„vypnutia“) je možné zvýšiť alebo znížiť
o 0.1 podľa potreby.
Na to postupujte nasledovne:
Pripojte spotrebič k sieťovej zásuvke.
Poznámka: Aj keď je spotrebič pripo-
jený k sieťovej zásuvke, spotrebič musí
byť vypnutý. Znamená to, že žiadne
kontrolky na spotrebiči nesvítia.
Stlačte tlačidlo „PROGRAM“ a držte ho
stlačené.
Počas držania tlačidla „PROGRAM“
stlačte tlačidlo „POWER“ a potom ho
uvoľnite.
Teraz uvoľnite tlačidlo „PROGRAM“.
Poznámka: Tento proces umožňuje
programovanie spotrebiča, čo je indiko-
vané rozsvietením tlačidla „ “.
Poznámka: Kontrolka nad tlačidlom „
” svieti počas nastavovania frek-
vencie čerpadla. Ak neuskutočníte
žiadnu zmenu frekvencie čerpadla do
5 sekúnd, nastaví sa automaticky po-
čiatočná frekvencia a spotrebič začne
ohrievať vodu.
Pre dosiahnutie požadovanej vlhkosti a
frekvencie čerpadla postupujte nasle-
dovne:
Do 5 sekúnd stlačte niektoré z popísa-
ných tlačidiel a nechajte ho svietiť pre
indikáciu požadovaného nastavenia.
mokrá = -0.1 sek. > Stlačte „ ”
vlhčí = -0.2 sek. > Stlačte tlačidlo
„PROGRAM”
suchá = +0.1 sek. > Stlačte tlačidlo
„MANUAL“
suchšia = +0.2 sek. > Stlačte tlačidlo
„POWER“
Poznámka: Po voľbe a nastavení inej
frekvencie čerpadla sa rozsvieti kontrol-
ka nad stlačeným tlačidlom. Pre indi-
káciu, že nastavená zmena je správna,
kontrolka svieti a zaznejú dva akustické
signály.
Poznámka: Spotrebič začne teraz auto-
maticky ohrievať vodu.
Pamätajte: Ak nezvolíte novú frekvenciu
čerpadla do 5 sekúnd, spotrebič sa au-
tomaticky nastaví na výrobné hodnoty a
začne ohrievať vodu.
Výrobné nastavenia
Vypnite spotrebič pre resetovanie všet-
kých zmien na výrobné hodnoty. Súčas-
ne stlačte tlačidlo „MANUAL“ a tlačidlo
„POWER“. Uvoľnite tlačidlo „POWER“
počas držania tlačidla „MANUAL“.
Uvoľnite tlačidlo „MANUAL“. Tlačidlo
„POWER“ svieti a zaznejú 4 akustické
signály.
Všetky vykonané zmeny v režime
programovania sa obnovia na výrobné
hodnoty.
Čistenie
∙Vyčistite vonkajšok spotrebiča mäkkou
vlhkou utierkou. V prípade silnejšieho
znečistenia môžete použiť jemný sa-
ponát.
∙Vytiahnite odkvapkávací zásobník.
∙Vyberte odkvapkávací rošt.
∙Vyprázdnite odkvapkávací zásobník.
∙Vyčistite zásobník a rošt a držiak s ru-
koväťou pod tečúcou vodou.
∙Vráťte na miesto odkvapkávací zásob-
ník s roštom.
∙Vyčistite trysky čistiacim kolíčkom.
Čistiacicyklussčistiacimdiskom
∙Vyberte zásobník vody a vylejte starú
vodu.
∙Naplňte čerstvú, studenú vodu.
∙Vyberte čistiacu sadu.
∙Nachádza sa za zadnými dvierkami.
∙Nasaďte lter pre 2 šálky do držiaka s
rukoväťou.
∙Vložte čistiaci disk (hladkou stranou
dolu) do ltra.
∙Vložte taktiež čistiacu tabletu do vložky
ltra.
∙Nasaďte držiak s rukoväťou na miesto.
∙Postavte veľkú nádobu pod držiak s
rukoväťou.
∙Pripojte zástrčku k sieťovej zásuvke.

EN
20
SK
∙Uistite sa, či je spotrebič vypnutý.
∙Súčasne stlačte tlačidlo „ ” a tla-
čidlo „ “.
∙Počas držania oboch tlačidiel stlačte
tlačidlo „POWER“.
∙Keď začne blikať kontrolka tlačidla zľa-
va doprava, uvoľnite tlačidlá „ “
„ “.
∙Kontrolky tlačidiel striedavo blikajú
až do ukončenia procesu čistenia. To
môže trvať približne 10 minút.
∙Po skončení procesu čistenia kontrolky
prestanú blikať a zaznejú 4 akustické
signály.
∙Vyberte nádobu.
∙Zložte držiak s rukoväťou.
∙Vyberte čistiaci disk a vložte ho späť do
priestoru za zadné dvierka.
∙Vyberte vložku ltra a vyčistite ju tep-
lou vodou so saponátom.
∙Dôkladne vysušte.
∙Spotrebič je teraz pripravený na opä-
tovné použitie.
Odvápnenie
Ako všetky spotrebiče používajúce
vodu, vyžaduje taktiež tento spotrebič
pravidelné odvápnenie.
Môžete použiť komerčne dostupné od-
vápňovacie prostriedky na odvápnenie
spotrebiča.
Postupujte nasledovne:
∙Vyberte zásobník vody a vyprázdnite
ho.
∙Naplňte zásobník vodou a zmiešajte
vodu podľa pokynov výrobcu odváp-
ňovacieho prostriedku.
∙Vložte zásobník vody do spotrebiča.
∙Použite malú kefu na vyčistenie vypúš-
ťacej hlavy. Odstráňte zvyšky kávy.
∙Teraz postavte veľkú nádobu pod vy-
púšťaciu hlavu.
∙Zapnite spotrebič.
∙Keď je pripravený, stlačte tlačidlo „MA-
NUAL“.
∙Keď je nádoba plná, vylejte ju a opa-
kujte proces niekoľkokrát.
∙Po niekoľkých procesoch vypnite spot-
rebič na 10 - 15 minút, aby mohol od-
vápňovací prostriedok dosiahnuť plný
účinok.
∙Potom opäť zapnite spotrebič.
∙Nechajte vytiecť zvyšok odvápňovacie-
ho roztoku stlačením tlačidla „MANU-
AL“.
∙Vyberte zásobník vody a dôkladne ho
vypláchnite.
∙Naplňte zásobník čistou vodou.
∙Vložte nádobu pod vypúšťaciu hlavu.
∙Nechajte čistú vodu vytiecť niekoľko-
krát do pripravenej nádoby.
∙Teraz naplňte zásobník vody čistou čer-
stvou vodou.
Servisné stredisko
Ak sa váš spotrebič Graef pokazí, kon-
taktujte predajcu alebo Graef servisné
stredisko.
Bezpečnostnépokyny
Tento spotrebič vyhovuje platným bez-
pečnostným predpisom. Nesprávne
použitie môže viesť k zraneniu alebo
poškodeniu majetku.
Pre bezpečné použitie prístroja postu-
pujte podľa nižšie uvedených pokynov:
∙Pred použitím skontrolujte prístroj z
hľadiska vonkajšieho viditeľného po-
škodenia, poškodenia napájacieho
kábla a zástrčky. Nepripájajte poškode-
ný spotrebič.
∙Opravy môžu vykonávať len kvali-
kovaní servisní technici alebo servisné
stredisko GRAEF. Nesprávne opravy
môžu viesť k nebezpečenstvu pre pou-
žívateľa. Strácate tým taktiež právo na
záruku.
∙Len zákaznícky servis GRAEF je opráv-
nený na opravu prístroja počas zá-
ručnej lehoty, v opačnom prípade sa
záruka nebude vzťahovať na ďalšie
poškodenia.
∙Poškodené komponenty sa musia vy-
meniť za originálne náhradné diely.
Dodržanie bezpečnostných predpisov
je zaručené len v prípade použitia tých-
to dielov.
∙Tento spotrebič môžu používať deti
staršie ako 8 rokov a viac a osoby so
zníženými fyzickými, senzorickými
alebo mentálnymi schopnosťami, ak
sú pod dozorom alebo boli poučené
o použití spotrebiča osobou zodpo-
vednou za ich bezpečnosť. Nedovoľte
deťom hrať sa so spotrebičom. Čistenie
a údržbu spotrebiča nesmú vykonávať
deti do 8 rokov.
∙Držte spotrebič a napájací kábel mimo
dosahu detí do 8 rokov.
∙Spotrebič nie je určený pre použitie s
externým časovačom alebo samostat-
ným diaľkovým systémom.
∙Tento prístroj je určený pre použitie v
domácnosti a podobných miestach:
zamestnanecké kuchyne v obchodoch,
kanceláriách a inom podobnom pro-
stredí; na farmách; klientmi v hoteli,
moteloch a podobných ubytovacích
zariadeniach; na miestach pre stravo-
vanie.
∙Ak je poškodený napájací kábel, musí
ho vymeniť výrobca, servisný technik
alebo podobne kvalikovaná osoba,
pre zabránenie nebezpečenstva.
∙Pri odpájaní spotrebiča ťahajte za zá-
strčku, nikdy za napájací kábel.
∙Neprenášajte prístroj za napájací kábel.
∙Nikdy neprenášajte prístroj pčoas pre-
vádzky.
∙Nedotýkajte sa zástrčky mokrými ru-
kami.
∙Nepoužívajte obalové materiály ako
hračku. Riziko udusenia.
∙Dodržiavajte pokyny týkajúce sa inšta-
lácie prístroja a elektrického pripojenia,
aby ste zabránili úrazu a poškodeniu
majetku.
∙Nikdy nesmerujte trysku speňovača na
osoby. RIZIKO POPÁLENIA!
∙Vždy používajte rukoväť na presunutie
trysky speňovača. Nikdy sa nedotýkajte
trysky speňovača po použití. Môže byť
veľmi horúca!
∙Nikdy neskladajte držiak s rukoväťou
ak je naplnený kávou; je pod tlakom.
∙Spotrebič používajte len ak je správne
nasadený odkvapkávací zásobník a
rošt.
∙Pred prípravou kávy sa uistite, či je pev-
ne utiahnutý držiak s rukoväťou.
∙Vypnite a odpojte spotrebič od siete
pred čistením.
∙Pred čistením nechajte spotrebič vy-
chladnúť.
Other manuals for ES 90
1
This manual suits for next models
1
Table of contents
Languages:
Other Graef Coffee Maker manuals