manuals.online logo
Brands
  1. Home
  2. •
  3. Brands
  4. •
  5. Graff
  6. •
  7. Plumbing Product
  8. •
  9. Graff 6765 User manual

Graff 6765 User manual

For care, use soft towel with soap and water only! Under no circum-
stances should you use any chemicals. Please be extra careful not to
ATTENTION!
Para el cuidado, utilice solamente una toalla suave con jabón y aqua!
Bajo ninguna circunstancia no use productos químicos. Hay que tener
un cuidado especial para no dañar, arañar o destruir el acabado durante
su instalación o limpieza!
ATENCIÓN!
-
gically advanced products which directly result from our many years
Muchas gracias por elegir nuestro producto. Estamos seguros que
podemos atisfacer completamente sus expectativas ofreciéndole
una amplia variedad de productos tecnológicamente avanzados
que resultan directamente de muchos años de experiencia en grifos
y su producción apropiada.
Dear Customer Estimado Cliente
Installation Instructions •Instrucciones de Instalación
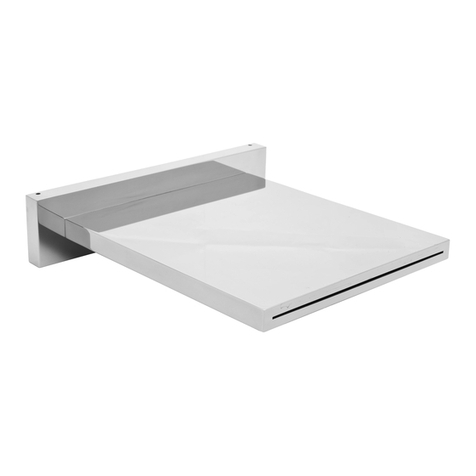
TUB SPOUT
TUBO DE SALIDA DE LA BAÑERA
1IOG 2872.10
6765
Model
Modelo
Tools and Materials
 adjustable wrench,
 strap wrench,


connections,

Herramientas y materiales
 llave ajustable,
 llave de correa,
 destornillador plano,


ESPAÑOLENGLISH
1
6
81
7
5
1SPOUT CAÑO
2
3AERATOR’S INSERT CARTUCHO DEL ATOMIZADOR
4AERATOR’S BODY CUERPO DEL ATOMIZADOR
5COUNTERSUNK SCREW WITH HEX SOCKET TORNILLO CON ASIENTO HEXAGONAL CÓNICO
6ROSETTE ROSETA
7O-RING 11,3x2,4 (2 PCS.) O-RING 11,3x2,4 (2 UNID.)
8SPOUT CONNECTOR CONECTOR DEL CAÑO
AWALL OUTLET SALIDA EN LA PARED
ESPAÑOLENGLISH
8-1/8” (206mm)
Ø2-11/16”
(69mm)
Ø1-1/8”
(29mm)
7-1/2” (191mm)
1/2-14 NPT
11/16”
(18mm)
1/2-14 NPT
2
3
4
O-RING 27x2 O-RING 27x2
1/8” (2,5mm), 3/8” (10mm) Allen keys.
1/8” (2,5mm), 3/8” (10mm).
Rev. 2 January 2016
B
BSPECIAL KEY FOR THE AERATOR LLAVE ESPECIAL PARA EL AEREADOR
Installation Instructions •Instrucciones de Instalación
TUB SPOUT
TUBO DE SALIDA DE LA BAÑERA
2
1. Prepare the wall outlet with 1/2”female thread (A) to connect
the spout (1).
2. Slide the decorative escutcheon (6).
3.
(8) threaded section. Screw the connector (8) into the wall
outlet (A); use a 3/8" (10mm) Allen key.
4. Slide the spout (1) onto the connector (8) and position it
properly. Secure the spout against moving by means of
screw (5) – tighten them against stop by means of a 1/8"
(2,5mm) Allen key supplied.
NOTE: Piping between valve body and tub spout must be
a minimum of 1/2”(13mm) copper pipe or 1/2” (13mm) iron pipe
in a straight drop no less than 8” (203mm) but no more than
18” (457mm) long with only one iron pipe or copper 90 degree
elbow to the tub spout connector.
1. Prepare la salida en la pared con la rosca interior 1/2“ (A) para
conectar el caño (1).
2. Meta la roseta decorativa (6).
3.
parte roscada del conector (8). Enrosque el conector (8) en la
salida en la pared (A), use la llave allén 3/8" (10mm).
4. Meta el caño (1) en el conector (8) y colóquelo en la posición
adecuada. Asegure el caño contra desplazamientos mediante
dos tornillos (5), aprentándolos hasta el momento de sentir la
resistencia, con la llave allén 1/8" (2,5mm) anexa al juego.
NOTA: La tubería entre el cuerpo de la válvula y el tubo de salida
de la bañera debe ser de tubo de cobre de un mínimo de 1/2”
(13mm) o tubo de hierro de 1/2”(13mm) en caída recta no menos
de 8”(302mm) pero no más de 18”(457mm) de largo con sólo un
codo de 900, de hierro o cobre, a la pieza de empalme de salida
de agua.
ESPAÑOLENGLISH
INSTALLATION INSTRUCTION •INSTRUCCIÓN DE MONTAJE
It is recommended to unscrew the aerator from the spout once
per 3–6 months (depending on water quality) to remove any
impurities.
Una vez a 3-6 meses (en función de la calidad de agua) se reco-
mienda desenroscar el atomizator del caño para eliminar todas
las impurezas.
ESPAÑOLENGLISH
OPERATION •MANEJO
1/2" - 14NPT
A
1/2" - 14NPT
3/8" (10mm)
1/8" (2,5mm)
1.5mm
A
88
1
11
6
K
5
5
2
3
4
8
2.1 2.2
Finished wall
Acabado de la pared
Finished wall
Acabado de la pared
A
1
3
3
Finished wall
Acabado de la pared
Rev. 2 January 2016IOG 2872.10
To do this, remove the aerator’s insert (3) from the body (4) and
insert into the body.
Para ello, del cuerpo (4) saque el cartucho del atomizador (3) y
el cartucho del atomizador en el cuerpo.
4
B
2
Installation Instructions • Instrucciones de Instalación
TUB SPOUT
TUBO DE SALIDA DE LA BAÑERA
3
Your Gra is designed and engineered in accordance with the
highest quality and performance standards. Be sure not to
damage the nish during installation. Care should be given to
the cleaning of this product. Although its nish is extremely
durable, it can be damaged by harsh abrasives or polish. Never
use abrasive cleaners, acids, solvents, etc. to clean any Gra
product. To clean, simply wipe gently with a damp cloth and
blot dry with a soft towel.
Su producto de la Gra esta diseñado yse regido de acuerdocon
los estándares de funcionamiento ycalidad más altos. Estesegu-
ro no dañar las terminaciones del grifo durante la instalación.
Cuide el producto manteniendolo siempre limpio. Aunque sua-
cabado es extremadamente durable, puede ser dañado por lo-
sabrasivos opulientes ásperos. Nunca utilice limpiadores abra-
sivos, ácidos, solventes, el etc. para limpiar cualquierproducto
de la Gra. Para limpiar, simplemente use un paño húmedo
yseque con una toalla suave.
ESPAÑOLENGLISH
CARE AND MAINTENANCE •CUIDADO Y MANTENIMIENTO
Gra products, Gra 3701 W. Burnham Street, Unit B Milwakuee,
WI 53215 warrants to the purchaser that the materials and
workmanship of the product will be free from defects for the
term of ownership for the original purchaser.
The Gra ceramic cartridge, is warranted for the lifetime of the
product. If at any time a valve mechanism should fail, Gra will
provide a replacement part free of charge.
A limited lifetime warranty for the nish is provided to the
original purchaser of the Gra unit.
This warranty does not apply to product that has been subject
to abrasives, chemicals, scratches, dents, accidents, misuse,
improper installation, alteration, or that has not received
reasonable care. Purchaser should return any defective or non-
conforming product to the factory, freight prepaid, at the above
address.
This warranty is limited to replacement parts only and does not
include or cover labor charges or damage incurred in installation,
replacement or repair or any consequential or incidental
damages whatsoever, nor does it cover or include damages for
property, personal injury or economic loss.
Any damage to this Gra faucet as a result of improper
installation, neglect, accident, misuse or any use that violates the
original instructions provided by us, WILL VOID THE WARRANTY.
This warranty is valid to the original consumer purchaser and
excludes commercial, industrial or business use of this Gra
faucet.
Los productos de la Gra, Gra 3701 W. Burnham Street, Unit B
Milwaukee, WI 53215 garantizan al comprador que los materiales
y la ejecución de los productos están libres de defectos durante
el periodo en que estén en posesión del comprador original.
El cartucho cerámico de la Gra tiene una garantía vitalicia. Si
en cualquier momento el mecanismo de la válvula resulte defec-
tuoso, la Gra suministrará gratuitamente la pieza de recambio
adecuada.
El comprador original obtiene una garantía vitalicia para el aca-
bado de los productos de la Gra.
La presente garantía no será aplicada a los productos que ha-
yan sido sometidos ala acción de productos abrasivos o quími-
cos, los arańados, abollados, dańados en efecto de accidentes,
explotación abusiva, instalación incorrecta, cambios o falta de
conservación adecuada. El comprador deberá devolver todos los
productos defectuosos o disconformes a la dirección de la fabrica
antes indicada, enviándolos por correo pagado por adelantado.
La presente garantía está limitada únicamente alas piezas de
recambio yno comprende ni cubre los gastos de mano de obra
o dańos surgidos durante la instalación, recambio o reparación,
ni cualesquiera dańos indirectos oincidentales; tampoco cubre
las pérdidas en propiedad, dańos personales opérdidas econó-
micas.
Cualquier dańo al mezclador de la Gra que resulte de su insta-
lación inadecuada, negligencia, accidente, explotación abusiva
otodo uso disconforme a las instrucciones suministradas por no-
sotros, INVALIDAN LA GARANTIA. La presente garantía será válida
para el comprador / consumidor original y excluye el uso comer-
cial, industrial o de negocios de los mezcladores de la Gra.
ESPAÑOLENGLISH
WARRANTY •GARANTÍA
HOTLINE FOR HELP
NUMERO DE EMERGENCIA
For toll-free information and answers to your questions, call:
Llame sin costo para obteiner informacion y respestas
a sus preguntas:
1 - 800 - 954 - GRAF (4723)
www.gracollection.com
All dimensions and drawings are for reference only. For details, please refer to actual products.
Todas las dimensiones y dibujos sirven únicamente de referencia. Para consultar detalles, ver los productos.
IOG 2872.10 Rev. 2 January 2016


Other Graff Plumbing Product manuals

Graff CANTERBURY 2386000 Operator's manual

Graff

Graff CANTERBURY 2386000 Operator's manual

Graff 9960 User manual

Graff

Graff 9960 User manual

Graff 8550 User manual

Graff

Graff 8550 User manual

Graff G-8232 User manual

Graff

Graff G-8232 User manual

Graff UNI-BOX 3/4 Operator's manual

Graff

Graff UNI-BOX 3/4 Operator's manual

Graff BALI 2100-LM20 User manual

Graff

Graff BALI 2100-LM20 User manual

Graff G-11420 Series User manual

Graff

Graff G-11420 Series User manual

Graff G-11520 L1 Series User manual

Graff

Graff G-11520 L1 Series User manual

Graff G-6950-LM48B User manual

Graff

Graff G-6950-LM48B User manual

Graff MOD+ G-11530 Series User manual

Graff

Graff MOD+ G-11530 Series User manual

Graff 7090 User manual

Graff

Graff 7090 User manual

Graff SADE G-1810-T Series User manual

Graff

Graff SADE G-1810-T Series User manual

Graff G-8078-T Series User manual

Graff

Graff G-8078-T Series User manual

Graff AMETIS G-6440-LM43-T User manual

Graff

Graff AMETIS G-6440-LM43-T User manual

Graff G-8031 T Series User manual

Graff

Graff G-8031 T Series User manual

Graff G-6855-LM47B User manual

Graff

Graff G-6855-LM47B User manual

Graff PERFEQUE 5230 User manual

Graff

Graff PERFEQUE 5230 User manual

Graff Immersion 2357-LM31N-T User manual

Graff

Graff Immersion 2357-LM31N-T User manual

Graff QUBIC 6201-LM38M User manual

Graff

Graff QUBIC 6201-LM38M User manual

Graff IMMERSION 2301-LM31 User manual

Graff

Graff IMMERSION 2301-LM31 User manual

Graff 7030 User manual

Graff

Graff 7030 User manual

Graff TOPAZ THREE-HOLE BIDETMIXER Operator's manual

Graff

Graff TOPAZ THREE-HOLE BIDETMIXER Operator's manual

Graff G-8232 User manual

Graff

Graff G-8232 User manual

Graff Oscar GN-4853 User manual

Graff

Graff Oscar GN-4853 User manual

Popular Plumbing Product manuals by other brands

newform 67611E instructions

newform

newform 67611E instructions

American Standard 8340.243 Series parts list

American Standard

American Standard 8340.243 Series parts list

Helvex 5424 installation guide

Helvex

Helvex 5424 installation guide

Kohler Wave 12791T-4 installation instructions

Kohler

Kohler Wave 12791T-4 installation instructions

Price Pfister Parisa H34-1N manual

Price Pfister

Price Pfister Parisa H34-1N manual

Masco Brizo Virage 65330LF installation instructions

Masco

Masco Brizo Virage 65330LF installation instructions

Brizo VUELO 64055LF manual

Brizo

Brizo VUELO 64055LF manual

BSP SF390 Installation, Maintenance & Operation Instructions

BSP

BSP SF390 Installation, Maintenance & Operation Instructions

Kohler K-11660 Installation and care guide

Kohler

Kohler K-11660 Installation and care guide

Hans Grohe ShowerSelect 15738 Series Instructions for use/assembly instructions

Hans Grohe

Hans Grohe ShowerSelect 15738 Series Instructions for use/assembly instructions

Sanela INT01P Instructions for use

Sanela

Sanela INT01P Instructions for use

Westover Artos PS114 installation guide

Westover

Westover Artos PS114 installation guide

Stylish LODI K-142 quick start guide

Stylish

Stylish LODI K-142 quick start guide

Hans Grohe 15720 Series quick start guide

Hans Grohe

Hans Grohe 15720 Series quick start guide

Sanela SLP 18RS Instructions for use

Sanela

Sanela SLP 18RS Instructions for use

American Standard Colony Soft 3875-403 installation instructions

American Standard

American Standard Colony Soft 3875-403 installation instructions

Hans Grohe Talis C 04217 0 Series Installation/User Instructions/Warranty

Hans Grohe

Hans Grohe Talis C 04217 0 Series Installation/User Instructions/Warranty

Hans Grohe Raindance Showerpipe 27165-1 Series Installation/User Instructions/Warranty

Hans Grohe

Hans Grohe Raindance Showerpipe 27165-1 Series Installation/User Instructions/Warranty

manuals.online logo
manuals.online logoBrands
  • About & Mission
  • Contact us
  • Privacy Policy
  • Terms and Conditions

Copyright 2025 Manuals.Online. All Rights Reserved.