Grant HPMONOPP210G User guide

Grant Monowave System
Standard and Pre-plumbed Cylinders
Installation and Servicing Instructions
IRL| DOC 0014| REV 0.0 | MARCH 2021
DO NOT FIT ON A WELL OR PRIVATE WATER SUPPLY

GRANT ENGINEERING (IRELAND) ULC
Crinkle, Birr, Co Offaly
R42 D788, Ireland
www.grantengineering.ie
Tel:+353 (0)57 91 20089 Fax: +353 (0)57 91 21060
This manual is accurate at the date of printing but will be superseded and should be disregarded if specifications and/or appearances are changed in the interests of continued product improvement.
However, no responsibility of any kind for any injury, death, loss, damage or delay however caused resulting from the use of this manual can be accepted by Grant Engineering (Ireland) ULC, the author or others involved in its
publication.
All good sold are subject to our official Conditions of Sale, a copy of which may be obtained on application.
© Grant Engineering (Ireland) ULC No part of this manual may be reproduced by any means without prior written consent.

IMPORTANT NOTE FOR INSTALLERS
These instructions are intended to guide Installers on the installation,
commissioning and servicing of the Grant MonoWave HP (high performance)
Standard and Pre-Plumbed cylinder. After installing the cylinder, leave these
instructions with the user.
SPECIAL TEXT FORMATS
The following special text formats are used in these instructions for the purposes
listed below:
PRODUCT CODES AND SERIAL NUMBERS
COVERED
These instructions cover the following product codes and serial numbers:
HPMONOPP210G
HP210GAWERP
HPMONO210
HPMONO300
HPDUO210G
HPDUO300G
ROI3C300ERP (KINGSPAN CODE)
SERVICING
The cylinder should be serviced at least every twelve months and the details
entered in the Service Log .
WARNING
CAUTION
NOTE
Warning of possible human injury as a
consequence of not following the instructions in the
warning.
Caution concerning likely damage to equipment
or tools as a consequence of not following the
instructions in the caution.
Used for emphasis or information not directly
concerned with the surrounding text but of
importance to the reader.

Page 4
1 INTRODUCTION
1.1 Installation requirements 6
1.2 Water supply requirements 6
1.3 Location 6
1.4 Storage and handling 6
1.5 About your cylinder 6
1.6 Open vented hot water systems 6
1.7 Primary circuit pipework
connections 6
1.8 Cylinder by-pass 6
1.9 Secondary circuit pipework
connections 7
1.10 Taps and fittings 7
1.11 Insulation 7
1.12 Health and Safety 7
2 TECHNICAL DATA
2.1 Cylinder technical data 8
2.2 Product contents 8
2.3 Dimensions 9
3 PRIMARY CIRCUIT INSTALLATION
3.1 Grant Monowave HP cylinders 12
3.2 Primary connections:
pre-plumbed cylinders 12
3.3 Hard water areas 12
4 SECONDARY CIRCUIT
INSTALLATION
4.1 General 16
4.2 Cold water inlet manifold 16
4.3 Installation 16
4.4 Expansion vessel 17
4.5 Temperature and pressure relief
valve 17
4.6 Hot water supply 17
4.7 Prevention of scaling 17
4.8 Secondary return 17
4.9 Tundish 18
4.10 Discharge pipe 18
4.11 Discharge pipe arrangement 18
4.12 Discharge pipe sizing 19
4.13 Worked example 19
5 ELECTRICAL
5.1 Immersion heater 20
5.2 Immersion heater wiring instructions 20
5.3 Immersion heater safety cut-out 21
5.4 Dual thermostat 21
5.5 2-port valves 21
5.6 Pre-plumbed cylinder wiring 21
5.7 Standard cylinder wiring 21
5.8 Setting the timeswitch 20
5.9 First Fix WIring 22
5.10 Second Fix Wiring 24
5.11 Mechanical Drawing 26
6 COMMISSIONING, DRAINING
DOWN AND SAFETY
6.1 Filling the cylinder 28
6.2 Draining down 28
6.3 Immersion heater safety cut-out 28
6.4 Cold water discharge from tundish 29
6.5 Hot water discharge from tundish 29
6.6 Expansion vessel 29
6.7 Setting the cylinder bypass 29
6.8 Customer handover 29
7 MAINTENANCE
7.1 Servicing and maintenance 30
7.2 Inlet manifold assembly 30
7.3 Pressure reducing valve 30
7.4 Expansion relief valve cartridge 30
7.5 Expansion vessel 30
8 FAULT FINDING
8.1 Intermittent water discharge 31
8.2 Constant water discharge 31
8.3 No flow from hot water taps 32
8.4 Cold water flow from hot water taps 32
9 SPARE PARTS 33
10 PRODUCT FICHE 34
11 END OF LIFE INFORMATION 34
12 USER INSTRUCTIONS 35
13 GUARANTEE 36
CONTENTS
Page 4
DRAFT

Page 5Page 5

Page 6 Introduction
1.1 INSTALLATION REQUIREMENTS
Thank you for purchasing a Grant unvented hot water storage cylinder from
our Wave range.
These Installation and User instructions must be read carefully before you
begin installing the cylinder.
The cylinder must be installed by a competent person in compliance with
all current legislation, codes of practice and local by-laws covering the
installation of an unvented hot water cylinder.
Please also make sure that the installation complies with the information
contained in these Installation and User Instructions.
To prevent damage to the coil, cylinder and cylinder connections, make any
soldered joints before connecting pipework to the cylinder.
1.2 WATER SUPPLY REQUIREMENTS
We recommend that your Grant unvented cylinder is installed with an
uninterrupted water supply.
Where possible, the unit should be fed via a Ø22 mm supply pipe. It
requires a supply pressure of 1.5 bar with a flow rate of at least 20 litres per
minute as a minimum for it to function.
Even with this pressure and flow rate, the flow from the outlets will be
disappointing if several outlets are used simultanteously. Generally
speaking, the higher the supply pressure, the better the system will function.
The cylinder control equipment is factory set to limit the incoming system
operating pressure to 3 bar. The maximum supply pressure into the pressure
reducing valve (PRV) is 12 bar.
1.3 LOCATION
The unit is designed to be floor standing, vertically mounted, internally in a
frost-free environment. When choosing a suitable location for the cylinder,
consideration should be given to the routing of the discharge pipe to a
convenient point and also the availability of an adequate power supply for
connecting the immersion heaters.
The cylinder may stand on any flat and level surface without any special
foundation requirements, provided that it is sufficiently robust to support the
full weight of the cylinder (refer to Section 2.1).
The position of the cylinder should be such that easy access is provided for
servicing the controls and replacing the immersion heater should the need
arise.
Generally, pipe runs should be made as short as possible and lagged to
prevent heat loss.
1.4 STORAGE AND HANDLING
If the cylinder is not being installed immediately, it should remain in its
packaging to prevent damage. We recommend that the cylinder be
transported to its installation position on a sack truck or similar whilst still
within the packaging.
1.5 ABOUT YOUR CYLINDER
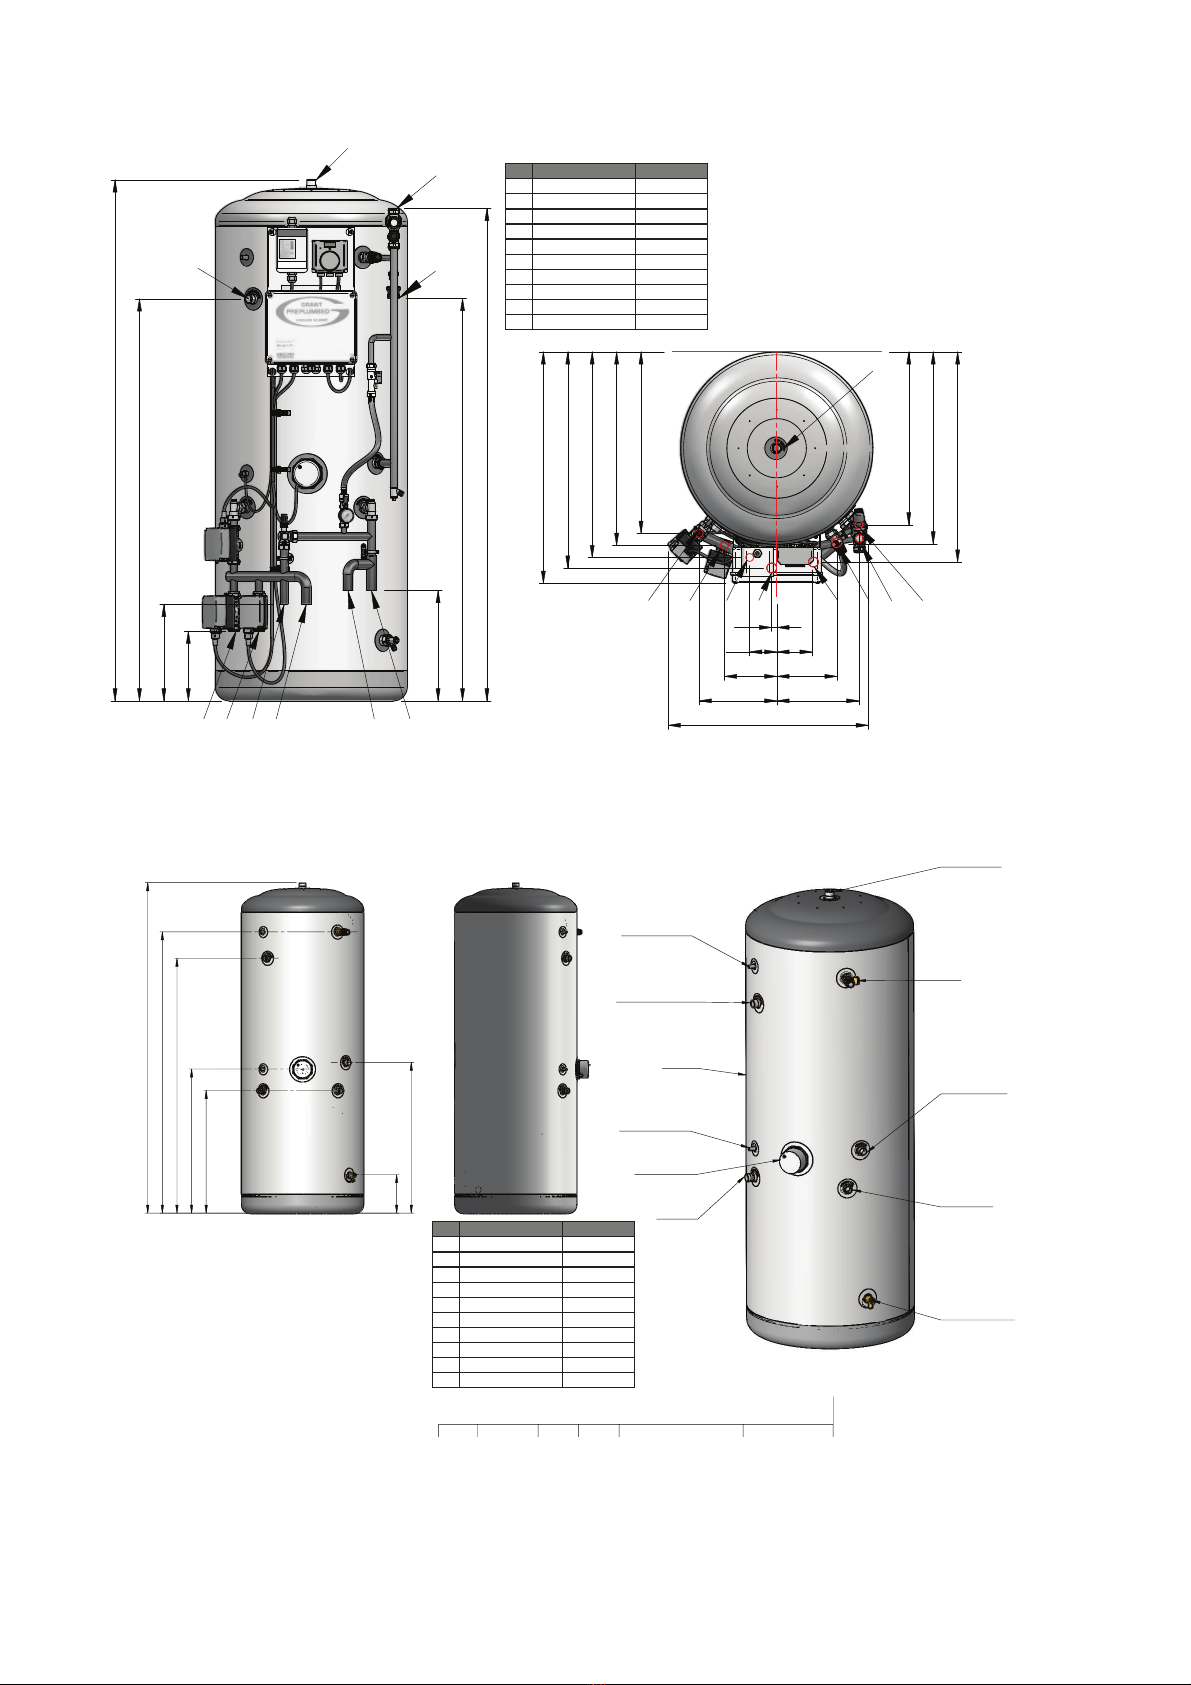
The pre-plumbed cylinders are factory fitted with the following:
Primary circuit pipework
• 1 x 2-port zone valve for hot water
• 2 x 2-port zone valves for heating (for two separate heating zones)
• 1 x Digital dual stat (cylinder thermostat and high limit thermostat)
• 1 x 22 mm bypass valve
Cold water inlet pipework
• 1 x Temperature and pressure relief valve
• 1 x Cold water inlet manifold
• 1 x Tundish
Electrical
• 1 x Wiring centre (pre-wired to the zone valves and dual thermostat)
• 1 x 3kW electric immersion elements
Both pre-plumbed and standard versions have a single coil designed for
connection to an air source heat pump, such as the Grant Aerona³ range.
If another make of heat pump is to be connected, please refer to the
manufacturer’s installation instructions for more information.
The coil must be connected using a 2-port motorised valve (factory fitted on
the pre-plumbed versions) to shut off the flow from the primary source and
electronically interlocked with the heat source via the cylinder control and
high limit thermostat. This valve is factory fitted on the pre-plumbed versions
and supplied loose with the standard cylinder versions.
Failure to fit this 2-port valve will invalidate all guarantees and will be
in breach of the Building Regulations Approved Document G3 (2010)
(U.K) More information on electrical wiring is given in Section 5 of these
instructions.
1.6 OPEN VENTED HOT WATER
SYSTEMS
If required, your MonoWave HP cylinder can be used as part of an open
vented hot water system, i.e. fed from a cold water storage cistern and fitted
with an open vent pipe, provided the maximum head does not exceed 30
metres.
When used in this way, it will not be necessary to install the expansion
vessel and cold inlet manifold supplied with the cylinder.
1.7 PRIMARY CIRCUIT PIPEWORK
CONNECTIONS
All primary circuit pipework connections to the cylinder MUST be made
in accordance with Figures 3-1 to 3-6 as appropriate. Refer to Section 3
(Primary Circuit Installation).
1.8 CYLINDER BYPASS
The pre-plumbed version of the cylinder is supplied with a factory fitted coil
bypass, fitted between the primary flow and return pipes. This by-pass must
be set during commissioning. Refer to Section 6.7 of these Installation and
User Instructions.
1 INTRODUCTION
With pre-plumbed cylinders, do not use the
pipework as a carrying handle when lifting,
moving and positioning the cylinder.
CAUTION
CAUTION
Do not use the Temperature and Pressure
relief valve (T&P relief valve) as a handle
when moving and positioning the cylinder.

Page 7Introduction
1.9 SECONDARY CIRCUIT PIPEWORK
CONNECTIONS
All secondary circuit primary pipework connections to the cylinder MUST
be made in accordance with Figures 2-3 or 2-4 as appropriate. Refer to
Section 4 – Secondary Circuit Installation.
1.10 TAPS AND FITTINGS
All taps and fittings incorporated in the unvented hot water system should
have a rated operating pressure of 7 bar or above.
NOTE
The temperature and pressure relief (T&P)
valve must be left connected to the cylinder (as
supplied).
1.11 INSULATION
All Grant Cylinders are insulated with 50mm thick CFC/HFC free, fire
retardant, polyurethane foam injected between the stainless steel cylinder
and the outer casing. This polyurethane foam has a Global Warming
Potential (GWP) of less than 3.1 and an Ozone Depletion Potential (ODP)
of 0.
1.12 HEALTH AND SAFETY
The information supplied will help you assess the safest way to manoeuvre
your cylinder into position. Please use the table to find the empty weight
of your cylinder and then consider how you can safely move it into its final
position.
Please leave these Installation and User Instructions with the householder
after installation.

Technical DataPage 8
Cylinder Type Weight kg Performance Coil T&P Valve Immer-
sion
Accesso-
ries
Name Volume
size
Empty Full Packed 24 hr
Standing
Loss
Reheat time
based on
EN12897
Coil 80°C.
Cylinder
temp 15°C
to 60°C
Coil Type
use
kW Area m/sq 1/2" inlet
15mm
outlet
(fitted)
spec Heating
Expansion
Tank
Exp. Tank
charge
Potable
Expansion
Tank
Tundish Dual stat Motorised
valve
Brass joiner
411 x 1"
x 28mm
compres-
sion
Monowave 210 ltr
heatpump cylinder Pre-
plumbed
210L 59 296 1.79kW for
24hrs 75W/hr
23.5 HP type 32kW @80°C 2.35m² 7 Bar, 90°C (1 off) 3
Kw 240V
1&3/4"
n/a n/a 18 litre c/w
bracket
15-22mm* Cylinder
thermostat
ZCYS1072
(1200mm)
3 off 2 way
22mm*
'3 off
Grant Awave Intergrat-
ed 210 Unit
210L 1.79kW for
24hrs 75W/hr
23.5 HP type 32kW @80°C 2.35m² 7 Bar, 90°C (1 off) 3
Kw 240V
1&3/4"
18 litre* 1.0 bar 19 Litre* 15-22mm* Cylinder
thermostat
ZCYS1072
(1200mm)
3 off 2 way
22mm*
Monowave 210 ltr
heatpump cylinder
210L 54 264 1.79kW for
24hrs 75W/hr
23.5 HP type 32kW @80°C 2.35m² 7 Bar, 90°C (1 off) 3
Kw 240V
1&3/4"
n/a 18 litre c/w
bracket
15-22mm* Cylinder
thermostat
ZCYS1058
1 off -Supplied
by Grant to
Kingspan for
adding to kit
n/a
Monowave 300 ltr
heatpump cylinder
300L 68 368 2.24kW for
24hrs 93W/hr
34.0 HP type 31.8kW
@80°C
2.35m² 7 Bar, 90°C (1 off) 3
Kw 240V
1&3/4"
n/a n/a 18 litre c/w
bracket
15-22mm* Cylinder
thermostat
ZCYS1058
1 off -Supplied
by Grant to
Kingspan for
adding to kit
n/a
GRANT DUOWAVE
210
210L 59 269 1.79kW for
24hrs 75W/hr
23.5 HP & solar 32kW @80°C 2.35m² 7 Bar, 90°C (1 off) 3
Kw 240V
1&3/4"
n/a n/a 19 litre c/w
bracket
15-22mm* Cylinder
thermostat
ZCYS1058
1 off -Supplied
by Grant to
Kingspan for
adding to kit
n/a
GRANT DUOWAVE
300
300L 77 377 2.24kW for
24hrs 93W/hr
34.0 HP & solar 31.8kW
@80°C
2.35m² 7 Bar, 90°C (1 off) 3
Kw 240V
1&3/4"
n/a n/a 24Llitre c/w
bracket
15-22mm* Cylinder
thermostat
ZCYS1058
1 off -Supplied
by Grant to
Kingspan for
adding to kit
n/a
GRANT TRIPLEWAVE
300
300L 72 372 2.32kW for 24hrs
97W/hr
52.0 Solar, Boiler
and solid
fuel
0.9m2 7 Bar, 90°C (2 off) 3
Kw 240V
1&3/4"
n/a n/a 24Llitre c/w
bracket
15-22mm* Cylinder
thermostat
ZCYS1058
1 off -Supplied
by Grant to
Kingspan for
adding to kit
n/a
TECHNICAL DATA
*Insulation-Nominal cylinder thickness is 50mm with a GWP of 1.
*Expansion tank charge = 3bar
Inlet group setting =3.0 bar
Expansion releif value =6.0 bar
*Working pressure = 6 bar
Test pressure = 15 bar

Technical Data Page 9

Page 10
2.1 MONOWAVE 210 LTR HEATPUMP CYLINDER PREPLUMBED
316
1152
1410
519
554
588
619
495
550
601
15
78
150
222
101
173
235
200
662
573
A
AB
BC
C
D
D
E
E
F
F
H
H
276
1150
1491
J
I
I
G
G
/Ey KEEd/KE KEEd/KEdzW
,d/E'&>KtKEϭ ϮϮDDKDWZ^^/KE
,d/E'&>KtKEϮ ϮϮDDKDWZ^^/KE
,d/E'&>KtKEϯ;KWd/KE>Ϳ ϮϮDDKWWZd/>
&>Kt&ZKDWW>/E ϮϴDDKWWZd/>
,d/E'ZdhZE&ZKD^z^dD ϮϴDDKWWZd/>
& ZdhZEdKWW>/E ϮϴDDKWWZd/>
' K>t dZ/E >d ϮϮDDKDWZ^ ^/ KE
, dhE/^,/^,Z' ϮϮDDKDWZ^^/KE
/ ,KdtdZZtK&& ϮϮDDKDWZ^^/KE
: ^KEZz,KdtdZZdhZE ϮϮDDKDWZ^^/KE
PREPLUMBED CYLCINDER -CONNECTION DETAILS
Index Connnection Connnection Type
A Heating Flow Zone 1 22mm Compression
B Heating Flow Zone 2 22mm Compression
C Heating Flow Zone 3 (Optional) 22mm Copper Tail
D Flow From Appliance 28mm Copper Tail
E Heating Return Fom System 28mm Copper Tail
F Return to Appliance 28mm Copper Tail
G Cold Water Inlet 22mm Compression
H Tundish Discharge 22mm Compression
I Hot Water Draw off 22mm Compression
J Secondary Hot Water Return 22mm Compression
2.1 GRANT AWAVE INTERGRATED 210 UNIT
+(,*+7
%
$
*5(<723
*5(<%27720
:+,7(
&$6(
'5$,19$/9(
&2,/287
&2,/,1
&2/',1/(7
,00(56,21
67$732&.(7
PP
73
6(&5(7
,1&/8',1*
%/$1.,1*187
+27'5$:
67$732&.(7
PP
,1&/8'(187$1'
2/,9(21$//23(1%266(6
'5*1R:$67
6,=(
+(,*+7
$
%
.,1*63$15() *5$175()
/
+3*$:(53
+3,17*
/
+3*$:(53
+3,17*
72/(5$1&(
'5$:1%<
&86720(5
7(&+1,&$/
'$7(
5(9
7$'0$1675((7:$.(),(/':)48
&23<5,*+7
123$572)7+,6'5$:,1*&$1%(5(352'8&('25
',675,%87(':,7+287.,1*63$16:5,77(1&216(17
$0(1'0(176'(6&5,37,21
48$/,7<
352'8&7,21
81/(6667$7('
'5$:,1*180%(5
672&.&2'(
),567,668(
/6,=($''('
18762/,9(6%/$1.,1*187$1':$//(7$''('
'21276&$/(5(029($//6+$53('*(6$//',0(16,216,10,//,0(75(6,),1'28%7$6.
'$7(
'$7(
'$7(
$9$6,87,1
'$7(
'$7(
3/($6(&+(&.7+(&217(1762)7+('5$:,1*$1'
3529,'($6,*1$785()25$33529$/
0$7(5,$/
(&1
$9
'7
$9
'(6&5,37,21
6&$/(
66
7
176
*(1(5$/$66(0%/<
*5$17$:$9(+($73803
5(9,6,210$5.
),567$1*/(
352-(&7,21
'7
6KHHWRI
04-02-2021
Index Connnection Connnection Type
A Heating Flow Zone 1 22mm Compression
B Heating Flow Zone 2 22mm Compression
C Heating Flow Zone 3 (Optional) 22mm Copper Tail
D Flow From Appliance 28mm Copper Tail
E Heating Return Fom System 28mm Copper Tail
F Return to Appliance 28mm Copper Tail
G Cold Water Inlet 22mm Compression
H Tundish Discharge 22mm Compression
I Hot Water Draw off 22mm Compression
J Secondary Hot Water Return 22mm Compression
Technical DataPage 10

Page 11
365
540
620
640
1045
1105
1154
1245
1305
1567
255
A
C
D
B1
B2
E 1
E 2
D
F
G
I
B2
H1
H2
B3
F
137
220
137
192
236
Index
A
Hot water draw
B 1 Dry stat pocket (high limit)
B 2 Dr
y
stat pocket
(
boiler
)
B 3 Dry stat pocket (solar)
C T&P boss
D Immersion
E1 28mm Coil In
(
flow
)
E 2 28mm Coil Out
(
return
)
F Solar Coil In/Out (flow/return)
G Cold Inlet
H 1 22mm Coil In (flow)
H 2 22mm Coil Out
(
return
)
I Secondar
y
Return
O
622
DRAWN BY
CHECKED BY
APPROVED BY
NAME DATE
jpcleary
DRAWING TITLE
SIZE
A3
ONGWD
SCALE WEIGHT
FIRST ANGLE PROJECTION
ALL UNITS IN MM
QUANTITY
GENERAL TOLERANCE
MATERIAL GRADE
MATERIAL THICKNESS
XXX
u0.5 MM
JOB TITLE
T31016 SOLA
R
05/03/21
FOR FULL PART DIMENSIONS
REFER TO DXF FILE
368
423
465
978
1052
1150
1267
1491
HEIGHT
X
Y
A
B
C
D
E
F
G3
G3
G2
D
G1
F
H
127
193
207
211
Index
A
Hot water draw
B T&P
C Immersion
D 28mm Coil In/Out (flow/return)
ECold Inlet
F Solar Coil In/Out
(
flow/return
)
G 1 Dry stat pocket (solar)
G 2 Dr
y
stat pocket
(
boiler
)
G 3 Dry stat pocket (high limit)
H Secondar
y
Return
Grant Ref. Name LN CODE SIZE HEIGHT X
Y
HPDUO210G 210L 1490 1267 1150
HPDUO300G 300L 2054 1831 1601
O
550
2.3 GRANT TRIPLEWAVE 300LTR
2.4 GRANT AWAVE INTERGRATED 210 UNIT
Technical Data Page 11

Page 12
REV
DRAWN BY
NA
M
jp
clear
y
1150
680
553
1269
650
1493
HEIGHT
X
Y
A
B
D
E
F
C
E
G2
H
G1
170,5206,5
210198
O
550
Grant Ref. Name LN CODE SIZE HEIGHT X
Y
HPMONO210G 210L 1491 1269 1150
HPMONO300G 300L 2054 1832 1600
Index
A
Hot water draw
B T&P
C Immersion
D Cold Inlet
E 28mm Coil In/Out
(
flow/return
)
FDrain Valve
G 1 10mm Stat Pocket
G 2 10mm Stat Pocket
H Secondary Return
2.5 NON PREPLUMBED 210LTR & 300 LTR
8
1821
1855
62
127
192
257
337
417
457
490
527
47
52
102
594
633
A
BCEFGH
I
A
B
C
D
H
I
G
F
E
Spacers ifrequired(+100mm)
2.6 CABINET CYLINDER DIMENSIONS
Pipes
A Heating Return 28mm Ø
B Heat pump Return 28mm Ø
C Heat pump flow 28mm Ø
D Heating flow (Blanked spare) 22mm Ø
E Heating Flow 22mm Ø
F Heating Flow 22mm Ø
G Hot outlet 22mm Ø
H Cold mains outlet 22mm Ø
I Cold mains inlet 22mm Ø
Page 13 Technical Data

Page 13
1
Heat Pump
2
Flexible Hose
3
Isolation Valve
4
Magnetic Filter c/w 1” BSP valves
5
Radiators
6
Underground heating manifold
7
A Wave, Grant Integrated 210l Cylinder
Pipework type
Size
A
Hot Water
22mm
B
Cold Mains Supply
22mm
C
Balance Cold Supply
22mm
The system diagram is only a concept drawing, not a detailed
engineering drawing, and is not intended to describe complete
systems, nor any particular system. It is the responsibility of the
system designer, not Grant IRL, to determine the necessary
components for and configuration of the particular system being
designed including any additional equipment and safety devices to
ensure compliance with building and safety code requirements.
1
2
4
3
5
6
7
A
B
C
A
B
C
DG
F
E
Index
A Potable and heaƟŶg expansion tanks located
inside the unit
B Digital stat, pressure gauge, heat pump
controller and Ɵme boost kit all easily
accessible behind the top door
C Labelled wiring center to show issues
D Flush and Įůů valve
E Filling loop
F Label for idenƟfying pipes on panel.
G Inlet group designed to control the pressure on
the mains supply
2.8 CABINET CYLINDER EXPLODED VIEW
2.7 ??????
Technical Data Page 14

Technical DataPage 15
REVISION HISTORY
REV DESCRIPTION DATE APPRO
V
100
416
R275
422
2.9 OPTIONAL PLINT DIMENSIONS
Note: Volumiser should be fitted in the return pipe to the Heat Pump (see schematic diagram on reverse).
Connections
Dimensions
Return from heating and hot
water system
Return to heat pump
Volumiser
Height 360
Diameter (mm) 475
Weight
(kg)
Empty 8
Full 41.5
Capacity (actual) (L) 33.5
Connections (BSP) 1" (2 off)
Max system operating
pressure (bar)
3
Materials
Shell Stainless stell (duplex 2034)
Outer casing Steel (arcylic coated)
Top/Bottom Caps ABS (acrylic capped)
Insulation Polyurethane foam (40mm thick nominal)
GWP <3 ODP=3
2.10 VOLUMISER DIMENSIONS AND CONNECTIONS

Technical Data Page 16
y
Key Description
1 Expansion vessel
2 Pressure gauge
3 Pressure relief valve
4 Tundish
5 Removable filling loop
6 Double check valve
7 Automatic air vent
8 Thermostatic radiator valve
9 Automatic bypass
10 Flexible hose
11 Isolation valve
12 Volumiser
13 Motorised 2-port valves(CH)
14 Motorised 2-port valves (DHW)
15 Optional additional circulating pump
(refer to Section 8.3.7)
16 Drain point
17 Mag One magnetic filter
17
12
12
2.11 GRANT VOLUMISER TECHNICAL SPECIFICATIONS

3.1 GRANT CYLINDERS
Grant cylinders are specifically designed for connection to most fully
pumped Air Source Heat Pump systems (such as the Grant Aerona³ Heat
Pump range) - either open vented or sealed systems having a maximum
working pressure of 3 bar and a maximum working temperature of 90ºC.
If you are in any doubt over the suitability of an Air Source Heat Pump
(other than a Grant Aerona³ heat pump) for use with the cylinder, consult
the heat pump manufacturer.
3.2 PRIMARY CONNECTIONS:
PREPLUMBED CYLINDERS
Primary Circuit InstallationPage 17
3 PRIMARY CIRCUIT INSTALLATION
3.3 HARD WATER AREAS
If the cylinder is to be used with a boiler, in a hard water area, we
reccomend that the primary flow temperature be limited to 75°C. This will
help reduce the migration of suspended solids in the water and help prevent
the build up of lime scale
WARNING
Solid fuel or wood burning boilers and
gravity circulation systems must not be used
on the primary circuit of an unvented hot
water system.
WARNING
1. The primary flow and return connections from the heat pump should be
made to the flow and return connections of the cylinder. Refer to Figures ???
to ??? as appropriate.
1.The motorised valve (supplied) must be fitted into the primary flow. For all
Grant MonoWave Cylinders except the 'A rated' cylinder:
• The primary flow and return fittings are 22mm compression.
• The valve has 22mm compression connections.For the 'A rated' cylinder:
• The primary flow and return fittings are 28mm compression.
• The valve has 22mm compression connections.
2. Locate the dual thermostat in the stainless steel pocket
(refer to Figures 2-6 to 2-10, as appropriate, for location) and
secure using the retaining screws on the thermostat housing.
3. Any automatic or manual air vent fitted to vent air from the
upper coil should be installed on the primary flow pipe to the
coil.
Cylinder not suitable for installation on a well
or private water supply

Primary Circuit Installation Page 18

Secondary Circuit InstallationPage 19
4.1 GENERAL
Grant MonoWave indirect HP cylinders are supplied with the safety devices
and components loose in a kit, with the exception of the Temperature &
Pressure (T&P) relief valve which is factoryfitted. These safety devices and
components MUST be fitted to the cylinder as detailed in the following
Sections 4.2 to 4.13. For a list of these safety devices and components refer
to either Table 2-3 or 2-4, as appropriate.
For commissioning and maintenance purposes, it is essential to
fit a service valve (not supplied) in the cold water supply pipe,
immediately before the inlet manifold.
The ½" drain cock (supplied in the kit) must be fitted in the cold
feed to the cylinder to provide a means of draining the unit. Refer
to Figures 2-6 to 2-10 (as appropriate) for a suitable drain cock
position that will enable most of the cylinder to be drained off
when required.
4.2 COLD WATER INLET MANIFOLD
This manifold contains a pressure reducing valve (with integral strainer),
double check valve, expansion relief valve with a stainless steel seat.
The pressure reducing valve is factory set to 3 bar. The set pressure is shown
on top of the valve. The maximum inlet pressure to this valve is 12 bar.
A balanced cold water connection is provided on the inlet manifold. Refer
to Figure 4-1. This should only be used to provide balanced cold supplies
to shower valves and mixer taps. If the balanced cold water outlet is not
required, blank off this port.
4.3 INSTALLATION
1. Cold water supply pipe to be 22mm nominal size.
2. Flush supply pipework before connection to remove all flux and debris
prior to fitting the inlet controls.
Failure to do this may result in irreparable damage to the controls and
will invalidate the warranty.
3. Once the pipework is flushed connect the cold supply to the Inlet
manifold.
The manifold can be installed in any position as long as it is installed in
the correct flow direction. Refer to the arrows on the side of the body.
Make sure that the head of the expansion relief valve is offset from the
cylinder for ease of access.
4. The expansion relief valve should be either horizontal or upright - if
fitted inverted, debris may be deposited on the seat and cause fouling
of the seat when the valve operates. Check direction of flow arrows.
5. The smaller black plastic plug in the inlet manifold body is a pressure
gauge connection to enable pressure monitoring to be carried out,
should the system develop a fault. It is recommended that this be
accessible.
6. The larger black plastic plug in the inlet valve manifold body is an
expansion vessel connection.
7. The expansion relief drain pipework must be connected to a safe
visible discharge point via the tundish (supplied in the unvented hot
water safety kit) and the pipework must have a continuous fall.
8. Connect the expansion relief valve outlet into the discharge pipe from
the temperature and pressure Relief valve using a 15mm copper pipe
and tee piece (not supplied). Fit the tundish below this tee piece using
a short length of copper pipe. Refer to Sections 4.7, 4.8 and 4.9 for
further information on Tundish and Discharge pipe.
9. The pressure reducing valve has two outlets, the second one is for a
balanced cold water supply, to a shower or a bidet (over rim type
only, ascending spray type requires type AA, AB or AD air gap).
Major shower manufacturers advise fitting a mini expansion
If the dwelling has a shower mixing valve (manual or thermostatic) or
a Bidet (over rim type) use the cold water supply from the balanced
cold water connection on the inlet manifold for these outlets.
Do not use the balanced cold connection to supply bath taps as this
can reduce the flow of water available to the cylinder.
If the balanced cold water outlet is not required, blank off the
connection.
10. The Benchmark book enclosed with the cylinder should be completed
after commissioning of the system.
11. The cylinder must be registered with Grant Engineering (IRL) ULC
within thirty days of installation and it is serviced at twelve monthly
intervals. See main Terms and Conditions.
4 SECONDARY CIRCUIT INSTALLATION
Figure 4-1: Cold water inlet manifold

Secondary Circuit Installation Page 20
4.4 EXPANSION VESSEL
A suitable expansion vessel with a pre-charge pressure of 3bar is supplied
for fitting to all cylinders.
This expansion vessel must be connected into the cold water supply,
between the expansion relief valve (in the inlet manifold) and the cylinder.
The vessel is supplied with a 22 mm compression connection and should be
connected to the 22 mm connection on the cold water pipe just below the
inlet manifold body.
Mount the expansion vessel in a suitable position on an adjacent wall to the
cylinder using the wall brackets on the vessel. The expansion vessel must be
positioned with the connection point at the bottom.
No valve should be fitted between the expansion vessel and cylinder.
The air charge pressure in the expansion vessel must be regularly checked
(e.g. at every service) and topped up as necessary. The correct air charge
pressure is 3.0bar. Refer to Sections 7.1 and 7.5 for further details.
4.5 TEMPERTURE AND PRESSURE
RELIEF VALVE
The temperature and pressure relief valve (T&P Valve) is supplied factory
fitted to the cylinder. The T&P valve must not be removed from the cylinder or
tampered with in any way. The valve is pre-set to lift at 7bar or 90°C and
any attempt to adjust it will invalidate the guarantee.
4.6 HOT WATER SUPPLY
Connect the hot water supply pipe to the top outlet of the cylinder.
4.7 PREVENTION OF SCALDING
Building Regulations Approved Document G (Part G3)(U.K), requires
that the hot water temperature supplied to a bath should be limited to a
maximum of 48°C by using an in-line blending valve (not supplied with the
cylinder) with a maximum temperature stop.
The length of the supply pipe between the blending valve and the bath hot
water outlet should be kept to a minimum to prevent the colonisation of
waterborne pathogens (e.g. legionella). Refer to Approved Document G for
further details.
4.8 SECONDARY RETURN
All MonoWave HP cylinders are fitted with a secondary return connection.
If a secondary return circuit is required it should be connected to the
MonoWave HP cylinder as shown in Figure 4-2
Balanced cold supply for showers
or bidet only (see Section 4.2)
Secondary
return line Circulation
pump
Non return
valve
Cold inlet
Balanced cold
supply outlet
.
Figure 4-2: Secondary return circuit
secondary
return line Circulation
pump
Non- return
valve Balanced cold
supply outlet
Cold Outlet
Balanced cold supply for showers
or bidet only (see Section 4.2)

4.9 TUNDISH
A suitable tundish is supplied with the cylinder for fitting in the common
discharge pipe from the T&P and Expansion relief valves. On the pre-
plumbed cylinders this is factory-fitted on the secondary circuit pipework.
On the standard cylinders this is supplied loose and must be fitted by the
installer.
A discharge pipe must be fitted to the outlet of the tundish. This must conform
to the requirements as given in Section 4.9 of these Installation and User
Instructions.
4.10 DISCHARGE PIPE
1. The discharge pipe from the tundish should terminate in a safe place
where there is no risk to persons in the vicinity of the discharge, be of
metal and:
a) Be at least one pipe size larger than the normal outlet size of
the safety device unless its total equipment hydraulic resistance
exceeds that of a straight pipe 9m long, i.e. discharge pipes
between 9m and 18m equivalent resistance length should be
at least larger than the normal outlet size of the safety device,
between 18m and 27m at least three sizes larger and so on.
Bends must be taken in to account in calculating the flow
resistance. Refer to sections 4.10, 4.11 and 4.12.
b) Have a vertical section of pipe at least 300 mm long, below the
tundish before any elbows or bends in the pipe work.
c) Be installed with a continuous fall of 1:40 (2.5°).
d) Have discharges visible at both the tundish and the final point
of discharge but where this is not possible or practically difficult
there should be clear visibility at one or other of these locations.
2. Examples of acceptance discharge arrangements are:
a) ideally below a fixed grating and above the water seal in a
trapped gully.
b) downward discharges at a low level; i.e. up to 100mm above
external surfaces such as car parks, hard standings, grassed
areas etc. are acceptable providing that where children may
play or otherwise come in to contact with discharges, a wire
cage or similar guard is positioned to prevent contact, whilst
maintaining visibility.
c) discharges at high level; e.g. in to metal hopper and metal
down pipe with the end of the discharge pipe clearly visible
(tundish visible or not) or onto a roof capable of withstanding
high temperature discharges of water and 3m from any plastics
guttering systems that would collect such discharges (tundish
visible).
3. Where a single pipe serves a number of discharges, such as in blocks
of flats, the number served should be limited to not more than 6
systems so that any installation can be traced reasonably easily.
The single common discharge pipe should be at least one pipe size
larger than the largest individual discharge pipe to be connected.
If unvented hot water storage systems are installed where discharges
from safety devices may not be apparent i.e. in dwellings occupied
by blind, infirm or disabled people, consideration should be given to
the installation of an electronically operated device to warm when
discharge takes place.
4.11 DISCHARGE PIPE ARRANGEMENT
Secondary Circuit InstallationPage 21
WARNING
The tundish must NOT be positioned above
or in close proximity of any electrical current
carrying devices or wiring.
NOTE
Safety device (e.g.
temperature relief valve)
Metal
discharge
pipe from
safety device
Metal discharge pipe from tundish
with continuous fall. See table and
worked example on next page
Discharged below
fixed grating
Fixed grating
Trapped gully
Tundish
600mm max
300mm min
Figure 4-3: Typical discharge pipe arrangement
The discharge will consist of scalding water
and steam. Asphalt, roofing felt and non-
metallic rainwater goods may be damaged
by such discharges.
This manual suits for next models
6
Table of contents
Other Grant Laboratory Equipment manuals

Grant
Grant R Series User manual

Grant
Grant GLS Aqua Plus User manual

Grant
Grant JB Academy Series User manual

Grant
Grant UVT-B-AR User manual

Grant
Grant SAP Series User manual

Grant
Grant XUBA Series User manual

Grant
Grant QBA Series User manual

Grant
Grant CRFT User manual

Grant
Grant SUB User manual

Grant
Grant SUB Aqua Plus User manual