GRE AR119 Manual

FILTERS MONOBLOCK
FILTRO MONOBLOC
FILTER MONOBLOC
MONOBLOCK-FILTER
FILTRO MONOBLOCCO
MONOBLOC-FILTER
FILTRO MONOBLOCO
INSTALLATION AND MAINTENANCE MANUAL
MANUAL DE INSTALACIÓN Y MANTENIMIENTO
MANUEL D’INSTALLATION ET D’ENTRETIEN
EINBAU-UND BETRIEBSANLEITUNG
MANUALE DI INSTALLAZIONE E MANUTENZIONE
GEBRUIKSAANWIJZINGEN MONOBLOC FILTER
MANUAL DE INSTRUÇÕES E MANUTENÇÃO 15666R9914A-03
AR119

2
INSTRUCTIONS FOR MONOBLOC FILTER ENGLISH
Read this manual thoroughly before installing the filter and carefully follow the instructions during installation and use.
Keep this manual for future reference regarding the operation of this apparatus.
SAFETY INSTRUCTIONS. READ CAREFULLY
•All electrical installations should comply with the following standard;
NF C15-100
NF EN 60-335-2-41
that refers “to the construction of electrical installations, both in indoor and outdoor swimming pools”, or the equivalent
standard in force in each region or country.
•All filtering should follow the C 15-
100 installation standard that stipulates that all electrical apparatus located at less
than 3.5 m. from the pool and freely accessible, should be supplied by a very low voltage of 12 V. All apparatus
supplied with 220 V should be located at least 3.5 m. from the swimming pool edge. Ask the manufacturer for
permission to make any modifications in one or more elements of the filtering system.
•The electrical installation should be performed by professional staff qualified in electrical installations.
•The height of the sand should not exceed 2/3 of the height of the tank.
•The apparatus must not be on while the pool is being used.
•Do not operate the apparatus unless it is properly primed.
•NEVER touch the filter when it is operating if you are wet or have wet hands.
•When handling the filter or valve, DISCONNECT the power supply.
•Make sure that the ground is dry before touching the electrical equipment.
•Do not install the filter where it could become wet, as it may cause electrocution.
•Do not allow children or adults to lean against or sit on the apparatus.
•If the supply flex of the apparatus is damaged, it should be replaced. Read the instructions carefully to replace it.
If in doubt, contact the technical service.
1PACKAGING COMPONENTS
The monobloc which you have just purchased is a device which is especially planned and designed to be used in
elevated pools. As a result of its innovative design and excellent functionality, it provides you with the different
components required to filter water: a single unit which includes filter and pump.
The main components of this monobloc are as follows:
Pos. Fig. Amt. Name
161Hose ø25 mm, 4.5 m length (feedback).
261Feedback valve, coupling and nut with ø25 mm connection
361Hose ø32 mm, 4.5 m. length (suction).
461Suction valve, coupling and nut with ø32 mm connection
561Hose ø25 mm, 1 m. length (discharge).
661Filter unit (pump, carboy, 10 kg. dry load, cable, upper connection and nut).
766Hosesecuringclamps.
871Hose adapter (Sand backwash)
94-54Drag rings.
10 4-54Sealing gaskets.
Check that your monobloc unit includes all of the components.
1.1 REQUIREMENTS FOR CORRECT INSTALLATION
This apparatus is easy to install and can be assembled by one adult in about 2 HOURS, taking care to correctly follow
the instructions detailed in this manual.
Only the following tools are required to correctly handle the filter components and to install it.
Task Tool Alternative tool
Tighten the hose flanges 7mm Stecker screwdriver Philips screwdriver
Cut the liner Cutter Knife
Protection of collector pipe Piece of plastic Piece of fabric

3
2INSTALLATION
Place the filter on a flat, solid surface at a minimum distance of 3.5 metres from the pool (in accordance with standard
NF C15-100 or the equivalent standard of the region or country) and at the same level as the bottom of the pool to
prevent air from entering the cleansing circuit and the filter from becoming unprimed (Fig. 1). The filter should be
protected from sun and rain, and kept it in an area with sufficient ventilation during operation. Never cover it during
operation.
Do not turn over the carboy, since it contains the dry load of silica sand which is required (10 kg).
2.1 HYDRAULIC CONNECTION
After the monobloc has been set into place, proceed as follows:
Loosen the upper nut on the filter. Remove the cover and take out the protective plastic disc. (Fig.2)
Place the rubber coupling against the threaded tank opening. Then, insert the cover and the closing nut, and use the
appropriate clamps to connect the ø25 mm, 1 m. length (discharge) hose between the pump outlet and the filter cover.
(Fig.3)
Use the appropriate clamps to connect the ø32 mm, 4.5 m. length (suction) hose between the suction valve and the
pump inlet (Fig.4). Install the rubber bushing (Fig.4 position C) with the Teflon supplied.
Use the appropriate clamps to connect the ø25 mm, 4.5m. length (feedback) hose between the discharge valve and
the filter outlet.(Fig.5)
Fill the pool with water.
2.2 ELECTRIC CONNECTION
All electrical installations should comply with the following standard:
NF C15-100
NF EN 60-335-2-41
that refers “to the construction of electrical installations, both in indoor and outdoor swimming pools”, or the
equivalent standard in force in each region or country.
The pump must be connected to a 220/230 v. alternating current 50 Hz power outlet with earth connection. A
omnipolar switch must be used to ensure there is no power feed to the filter when it is not in use. A differential of 30
mA for protection from electrical breakdowns must also be used. (Not supplied. These items can be purchased at
electricity shops).
2.3 START-UP
BEFORE BEGINNING THE FIRST FILTRATION CYCLE, PERFORM AN BACKWASH OF THE SILICA SAND IN THE
FILTER. (SEE AUTOMATIC BACKWASH).
3DRAINING THE FILTER
For proper operation of the filter, it should be drained when it is started up after changing the hoses or the initial
connection. In order to do so, while the pump is operating, unscrew the upper nut slightly in order to allow all of the air
which has accumulated in the carboy to be released, until water overflows without bubbles. Then, close the filter.
4OPERATION
The operation of this filter is based on the retention capacity of the silica sand placed inside. To maintain the pool
water in good condition, the chemical products (chlorine, alga protection, etc. DO NOT USE FLOCCULANT)
recommended by the manufacturer should also be used. (See the pool manual). Depending on the periods of use, the
environment, pollen, trees and the frequency of bathing, factors which influence the dirtiness of the pool water, the
automatic backwash must be performed on the filter with greater or less frequency (See automatic backwash section).
5FILTRATION (Fig.6)
The assembly described in the hydraulic connection section will prepare the unit for filtration.
All of the pool water should be recirculated once a day.
The service life of the filter will be extended if the periods of continuous operation are not longer than 2h. Its filtration
needs are determined by the relation between the volume of m3of water in your pool and the 2m3/h flow rate of the
filter. Leave the motor idle at least 2h between operating intervals.
Volume of the pool in m3
Filter flow in m3= hours required
Example: 8 m3
2m3/h = 4 hours 2 cycles of 2 hours with an intermediary
cycle of 2 hours rest
6SAND BACKWASH (Fig.7)
An automatic sand backwash cycle should be performed every week.
To perform automatic sand backwash of the filter, proceed as follows:
•First of all, a garden hose which is connected to a tap is needed.
•Unplug the filter from the power point and close the suction and discharge valves.

4
•Disconnect the ø25 mm. 4.5 m. length hose from the feedback valve and use the adapter to connect the garden
hose to the filter on the end opposite the tap.
•Disconnect the ø25 mm. 1 m. length hose from the pump discharge and put this end in a drainpipe.
•Open the tap of the garden hose (the water pressure should not be too high, so that the silica sand will not be
ejected) and let the water circulate until you can see that the water which enters the drainpipe is clean. This operation
may take approximately 1 minute, and during this process the connections may leak. This does not mean there is
damage.
•Return the hoses to their original connections and leave the filter idle for a few minutes to prevent the silica sand
from being released into the pool. The filter is ready to begin a new filtration cycle.
7CLEANING THE BOTTOM AND SURFACE
This pump can not be used with suction bottom cleaners. It must only be used with Ventury bottom cleaners. This filter
is not equipped with a skimmer. Use a leaf collector to clean the surface and a floating chlorine feeder for the chemical
product. See the pool manual for the accessories mentioned.
8CABLE REPLACEMENT
•Disconnect the unit from the power point.
•Close the suction and discharge valves.
•Disconnect the filter suction hose. Lift the terminal quickly and place it in the pool.
•Disconnect the filter discharge hose. Lift the terminal quickly and place it in the pool.
•Disconnect the ø25 mm. 1 m. length hose from the pump discharge.
•Carefully tilt the monobloc unit and release the pump and its base support (unscrew the four screws with a
screwdriver).
•Disconnect the motor terminals, taking note of their position.
•Remove the cable, replace it, and reassemble the unit by performing the actions described in reverse order.
9WINTER SEASON -MAINTENANCE WHILE NOT IN USE
During the winter, the water should be drained from the filter and the entire unit (pump, hoses, etc.) For this reason,
after performing a final automatic backwash to clean the silica sand, close the suction valves and discharge valves in
the pool, disconnect the hoses from their filter connections (pump suction, pump discharge, filter cover), and drain the
water which may have remained inside. Wait until all of the water has drained, and make sure that the water pump is
completely dry. Then, store it in a dry place. This operation should also be performed whenever you do not plan to use
the filter for extended periods of time. It is recommendable to take advantage of this opportunity to visually check the
condition of the cable and replace it if necessary. For cable replacement, follow the instructions in the cable
replacement section.
The silica sand need not be removed from the carboy. After the winter season, we will reinstall the filter as though it
were new.
PROBLEM CAUSE SOLUTION
No power in the electric line. Check that there is power in the electric line.
The motor will not start up. Loose terminals on the motor. Turn on the motor and check the terminals.
After connection, there is no flow to the
discharge valve. The suction valve is closed. Open the valve.
The flow rate of the filter is limited. The silica sand is dirty. Automatic backwash.
The filter leaks through the hose terminals. The hoses are loose or are not properly
inserted in the terminals. Insert the terminals until they reach the bottom
of the hoses and tighten the clamps.
Water comes out through the upper filter
opening. There is dirt in the coupling on the upper filter
opening. Remove the silica sand from the opening. Insert
the coupling correctly and retighten.
If this problem can not be solved, contact the pool manufacturer at the telephone and hours indicated in the instructions.
HOSE D.25 / D.32

5
INSTRUCCIONES FILTRO MONOBLOC ESPAÑOL
Lea atentamente este manual antes de instalar el filtro y siga meticulosamente las indicaciones durante la
instalacion del mismo y durante su uso.
Conserve este manual para futuras consultas acerca del funcionamiento de este aparato.
INDICACIONES DE SEGURIDAD, LEALAS ATENTAMENTE
•En todo lo referente a la instalación eléctrica debe seguirse la normativa:
NF C15-100
NF EN 60-335-2-41
que hace referéncia “a la construcción de instalaciones eléctricas, tanto en piscinas cubiertas como en piscinas al
aire libre”, o la normativa análoga vigente en cada zona o pais.
•”Todas las filtraciones siguen la norma de instalación C 15-100 que especifica que todo aparato eléctrico ubicado
a menos de 3,5 m de la piscina y accesible libremente debe estar alimentado con muy baja tensión 12 V. Todo
aparato alimentado en 220 V debe estar ubicado por lo menos a 3,5 m del borde de la piscina. Pedir permiso del
fabricante para toda modificación de uno o varios elementos del sistema de filtración”
•La instalación eléctrica debe ser hecha por personal profesional cualificado en instalaciones eléctricas.
•La altura de la arena no debe sobrepasar los 2/3 de la altura del depósito.
•No tenga el aparato en marcha mientras utiliza la piscina.
•No haga funcionar el aparato sin estar correctamente cebado.
•No toque NUNCA el filtro en marcha con el cuerpo húmedo o las manos húmedas.
•Siempre que deba manipular el filtro o la válvula, DESCONÉCTELO de la tóma de corriente.
•Asegúrese de que el suelo está seco antes de tocar el equipo eléctrico.
•No coloque el filtro donde pueda mojarse, puede causar electrocución.
•No permita ni a niños ni a adultos apoyarse o sentarse sobre el aparato.
•Si el cable flexible de alimentación de este aparato está dañado, debe ser sustituido. Lea detenidamente las
instrucciones para su sustitución. Ante la duda consulte con un servicio técnico.
1COMPONENTES EMBALAJE
El monobloc que acaba usted de comprar es un aparato especialmente concebido y diseñado para ser utilizado en
piscinas elevadas. Con un innovador diseño y una gran funcionalidad, usted dispone de los diferentes elementos
necesarios para filtrar el agua, Filtro y bomba en un mismo aparato.
Los principales componentes de este monobloc son:
Pos. Fig. Cant. Denominación
161Manguera de ø25 mm de 4,5 m. De largo, (retorno).
261Válvula de retorno, junta y tuerca con conexión de ø25 mm.
361Manguera de ø32 mm de 4,5 m. De largo, (aspiración).
461Válvula de aspiración, junta y tuerca, con conexión de ø32 mm.
561Manguera de ø25 mm de 1 m. De largo, (impulsión).
661Conjunto filtro (bomba, bombona, carga de arena 10 Kg, cable, conexión superior y tuerca).
766Abrazaderasfijaciónmangueras.
871Adaptador manguera (Lavado de la arena)
94-54Anillos de fricción
10 4-54Juntas de estanqueidad
Compruebe que su equipo monobloc incluye todos los componentes.
1.1 NECESIDADES PARA UNA CORRECTA INSTALACION
Por su facilidad de instalación este equipo puede ser montado por una sola persona adulta y en un periodo de tiempo
de alrededor de 2 HORAS, con la precaución en todo momento de hacer un correcto seguimiento de las instrucciones
detalladas en este manual.
Para una manipulación correcta de los componentes del filtro y su correcta instalación solo son necesarias las
siguientes herramientas:

6
Función Herramienta Herramienta alternativa
Apretar las bridas de las mangueras Destornillador stecker 7mm Destornillador boca philips
Recortar el liner Cutter Cuchilla
Protección del tubo del colector Trozo de plástico Trozo de tela
2INSTALACIÓN
Colocar el filtro sobre una superficie plana y sólida, a una distancia no inferior a 3,5 metros de la piscina (según
norma NF C15-100 o análoga vigente en cada zona o pais.) y al mismo nivel del fondo de la piscina para evitar que
en el circuito de depuración entre aire y el filtro se descebe (fig. 1). Es conveniente resguardar el filtro del sol y la
lluvia, y mantenerlo con una ventilación suficiente durante su funcionamiento, nunca taparlo durante el
funcionamiento.
No volcar la bombona, puesto que ya contiene la carga de arena de sílex necesaria (10 Kg).
2.1 CONEXIÓN HIDRÁULICA
Una vez situado el monobloc, proceder como sigue:
Aflojar la tuerca superior del filtro, quitar la tapa y retirar el disco protector de plástico. (Fig.2)
Colocar la junta de goma contra la boca roscada de la cuba, luego la tapa y la tuerca de cierre, y conectar la
manguera de ø25 mm y de 1m. de largo (impulsión) con las abrazaderas correspondientes, entre la salida de la
bomba y la tapa del filtro.(Fig.3)
Conectar la manguera de ø32 mm y 4,5m. de largo (aspiración), entre la válvula de aspiración y la entrada de la
bomba. (Fig.4) con las abrazaderas correspondientes. Colocar el casquillo roscado (Fig.4 posición C) con el teflón
suministrado.
Conectar la manguera de ø25 mm y 4,5m. de largo (retorno) con las abrazaderas correspondientes, entre la válvula
de impulsión y la salida del filtro.(Fig.5)
Llenar la piscina de agua.
2.2 CONEXIÓN ELÉCTRICA
En todo lo referente a la instalación eléctrica debe seguirse la normativa:
NF C15-100
NF EN 60-335-2-41
que hace referéncia “a la construcción de instalaciones eléctricas, tanto en piscinas cubiertas como en
piscinas al aire libre”, o la normativa análoga en cada zona o pais.
La bomba se debe conectar a una toma de corriente de 220/230 V. de corriente alterna y 50 Hz, con conexión a tierra.
Es imprescindible utilizar un interruptor omnipolar para dejar sin tensión el filtro cuando no lo esté utilizado y un
diferencial de 30 mA. para protección de descargas. (No suministrados. Pueden adquirirse en establecimientos de
electricidad).
2.3 PUESTA EN MARCHA
ANTES DE INICIAR EL PRIMER CICLO DE FILTRACIÓN, EFECTUAR UN LAVADO DE LA ARENA DE SÍLEX DEL
FILTRO. ( VER AUTOLAVADO)
3PURGADO DEL FILTRO
Para el correcto funcionamiento del filtro, lo debemos purgar al ponerlo en marcha tras el cambio de mangueras o
conexión inicial. Para ello con la bomba en marcha, desenroscar ligeramente la tuerca superior permitiendo la salida
de todo el aire acumulado en la bombona, hasta que rebose agua sin burbujas, cerrándola seguidamente.
4FUNCIONAMIENTO
El funcionamiento de este filtro se basa en la capacidad de retención de la arena de sílex que hay en su interior. Para
mantener en buen estado el agua de la piscina deberá además utilizar los productos químicos (cloro, antialgas, etc.
NO USAR FLOCULANTE ) aconsejados por el fabricante (Ver el manual de la piscina). Dependiendo de los periodos
de utilización, el ambiente, polen, arboles y frecuencia de baños, factores que determinan la suciedad del agua de la
piscina, este filtro necesita ser autolavado con mayor o menor frecuencia (ver apartado autolavado).
5FILTRACIÓN (Fig.6)
El montaje descrito en el apartado conexión hidráulica deja el equipo preparado para filtración.
Se deberá recircular una vez al día todo el agua de la piscina.
La vida útil del filtro se alarga con periodos de funcionamiento continuado no superiores a 2h. Sus necesidades de
filtración vienen dadas por en volumen de m3de agua de su piscina en relación con los 2m3/h de caudal de este filtro.
Deje al menos 2h de reposo al motor entre intervalos de funcionamiento.
Volumen piscina en m3
Caudal filtro en m3= horas necesarias
Ejemplo: 8 m3
2 m3/h =4 horas 2 ciclos de 2 horas con un ciclo intermedio
de 2 horas de descanso

7
6LAVADO DE LA ARENA (Fig.7)
Se recomienda efectuar un ciclo de lavado de la arena cada semana.
Para efectuar un lavado de la arena del filtro, proceder como sigue:
•En primer lugar necesitaremos una manguera de jardín conectada a un grifo,
•Desenchufar el filtro de la toma de corriente y cerrar las válvulas de aspiración e impulsión.
•Desconectar la manguera de ø25 mm. y de 4,5 m. de largo de la válvula de retorno y conectar a ella, mediante el
adaptador, la manguera de jardín por el extremo opuesto al grifo.
•Desconectar la manguera de ø25 mm. y de 1 m. de largo, de la impulsión de la bomba y llevar este extremo a un
desagüe.
•Abrir el grifo de la manguera de jardín (la presión del agua no debe ser elevada, para evitar expulsar la arena de
sílex) y dejar circular el agua hasta que se observe que el agua que enviamos al desagüe sale limpia. Esta operación
puede durar aproximadamente 1 minuto, en esta operación las conexiones pueden gotear, ello no indica avería.
•Volver las mangueras a su conexión original y dejar reposar el filtro durante unos minutos para evitar que salga
arena de sílex hacia la piscina, el filtro está listo para comenzar un nuevo ciclo de filtración.
7LIMPIEZA DE FONDO Y SUPERFICIE
Esta bomba no permite utilizar limpiafondos de aspiración. Utilizar únicamente limpiafondos de tipo ventury.
Este filtro no incorpora skimmer. Utilice un recogedor de hojas para la limpieza de la superficie y un dosificador de
cloro flotante para el producto químico.
Ver manual de la piscina para accesorios señalados.
8SUSTITUCIÓN DEL CABLE
•Desconectar el aparato de la toma de corriente.
•Cerrar las válvulas de aspiración e impulsión.
•Desconectar la manguera de aspiración del filtro, levantar el terminal rápidamente e introducirlo en la piscina.
•Desconectar la manguera de impulsión del filtro, levantar el terminal rápidamente e introducirlo en la piscina.
•Desconectar la manguera de ø25 mm. y de 1 m. de largo de la impulsión de la bomba.
•Con precaución ladear el monobloc y desprender la bomba junto con su base de su ubicación (destornillar los cuatro
tornillos con un destornillador).
•Desconectar los terminales del motor atendiendo a su posición.
•Extraer el cable, sustituirlo, y proceder de modo inverso al descrito para volver a montar el equipo.
9PERIODO DE INVIERNO -MANTENIMIENTO FUERA DE USO
Durante el periodo de invierno, deberá de vaciarse el agua del filtro y de todo el circuito (bomba, mangueras, etc.) por
este motivo y tras haber hecho un autolavado final para dejar limpia la arena de sílex procederemos a cerrar las
válvulas de aspiración e impulsión en la piscina, desconectaremos las mangueras de sus conexiones con el filtro
(aspiración bomba, impulsión bomba, tapa filtro), procediendo a escurrir el agua que pueda quedar en su interior,
dejaremos también que el agua del filtro se escurra totalmente, prestaremos especial atención a dejar bien seca la
bomba de agua, y procederemos a guardarlo en un lugar seco, esta operación también deberemos llevarla a cabo
siempre que consideremos que no usaremos el filtro durante periodos largos de tiempo. Es aconsejable aprovechar
esta ocasión para verificar visualmente el estado del cable y proceder a su sustitución si fuese necesario, para ello
proceder como se describe en el apartado sustitución del cable.
No es necesario sacar el sílex de la bombona, tras un periodo de invernaje procederemos a la instalación del filtro
como si fuese nuevo.
PROBLEMA CAUSA SOLUCIÓN
Falta corriente en la línea eléctrica. Verificar que hay corriente en la línea eléctrica,
No arranca el motor. Terminales flojos en el motor. Abrir el motor y revisar los terminales.
Una vez conectado no da caudal en la válvula
de impulsión. La válvula de aspiración está cerrada. Abrir la válvula.
El filtro da poco caudal. La arena de sílex está sucia, Efectuar un autolavado.
EL filtro gotea por los terminales de las
mangueras. Las mangueras están flojas o mal introducidas
en los terminales. Introduzca los terminales hasta el fondo de las
mangueras y apretar las abrazaderas.
Sale agua por la boca superior del filtro. Hay suciedad en la junta de la boca superior
del filtro. Limpie de arena la boca, coloque
correctamente la junta y vuelva a apretar.
De no poder solucionar su problema contacte con el fabricante de la piscina en el teléfono y horario indicado en sus instrucciones.
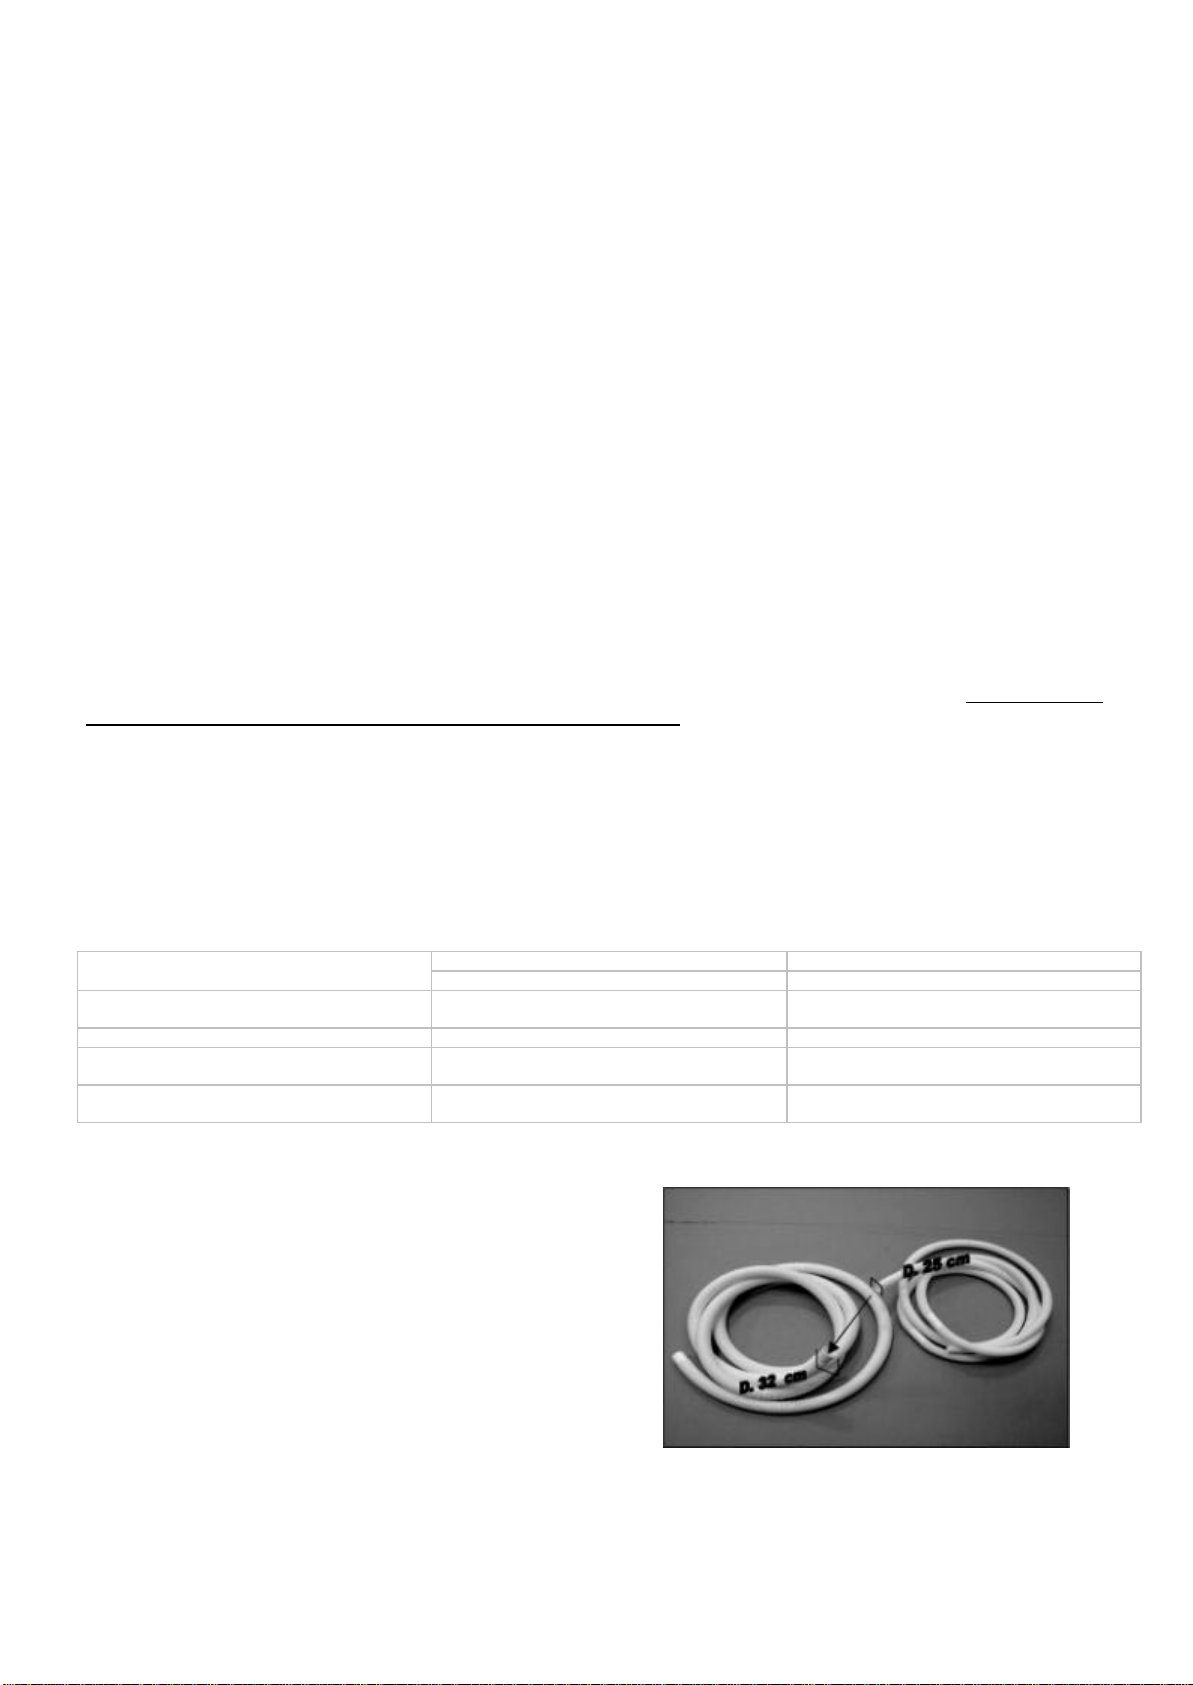
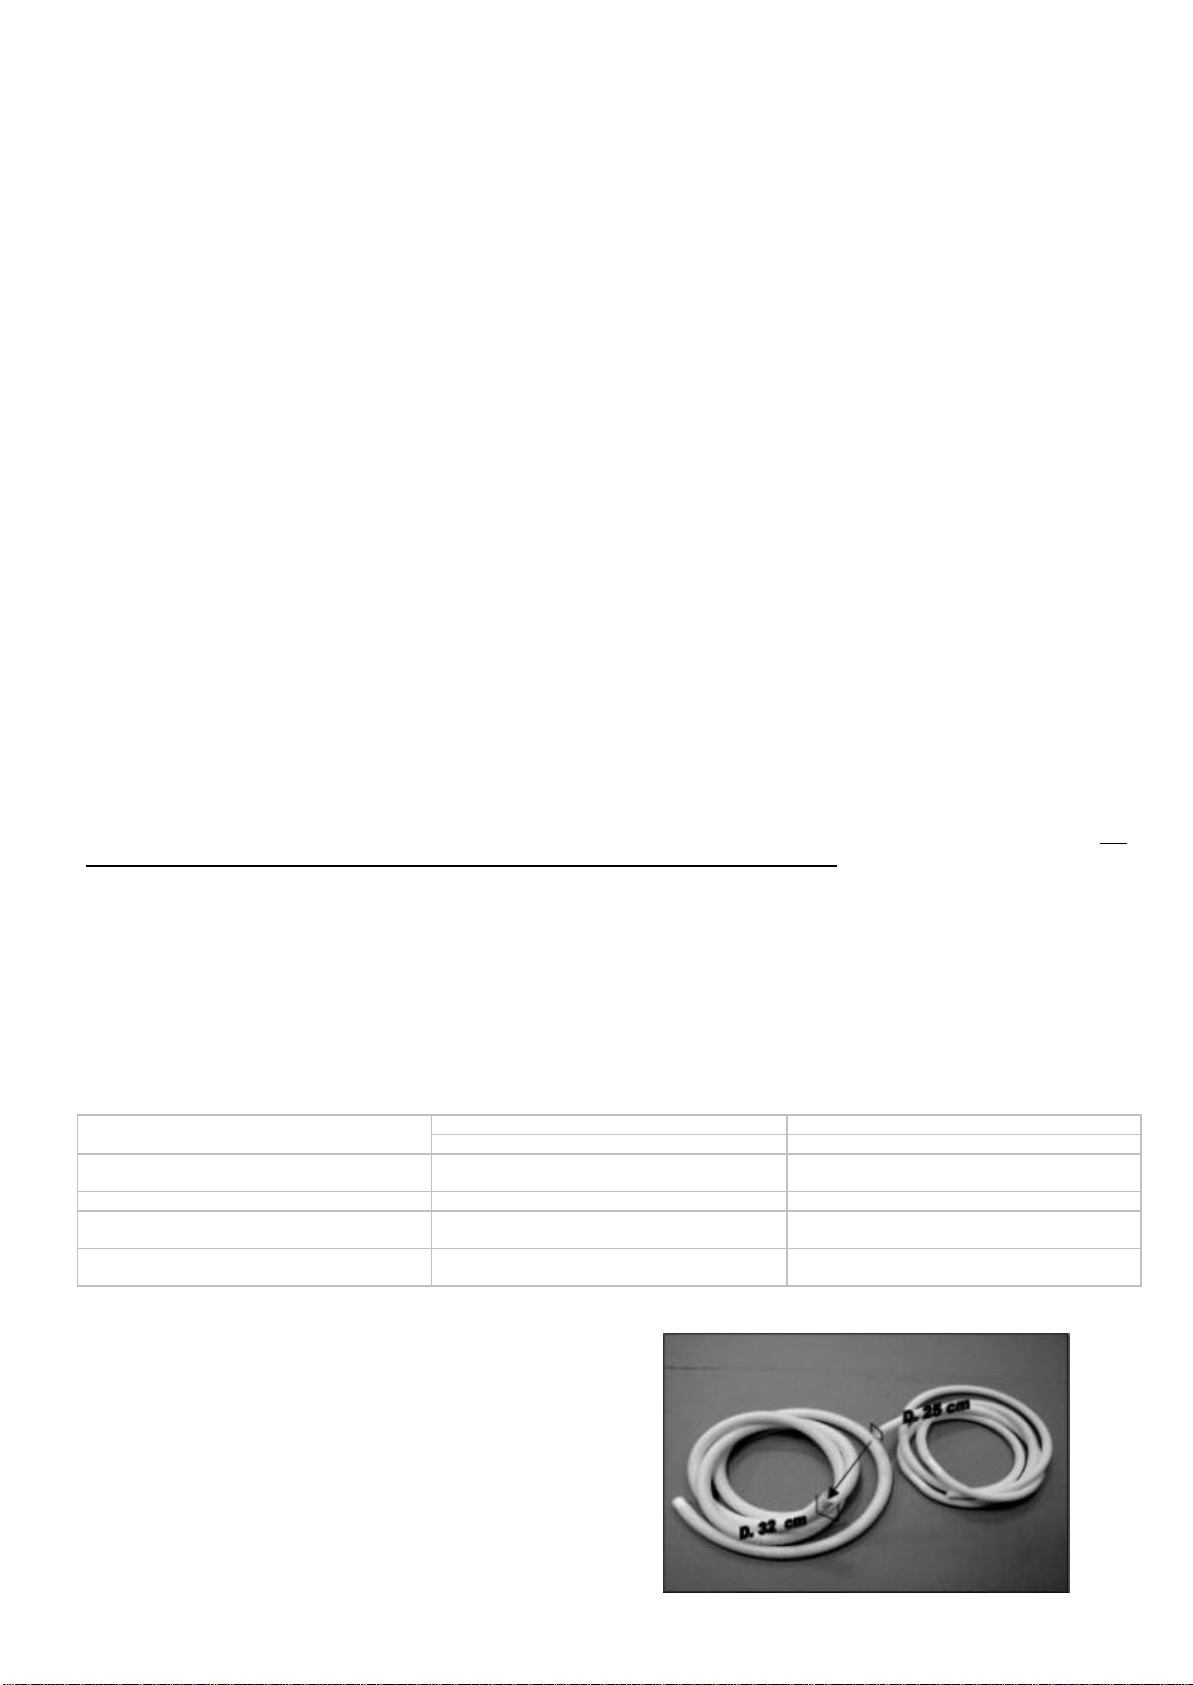
MANGUERA D.25 / D.32

8
INSTRUCTIONS FILTRE MONOBLOC FRANÇAIS
Lisez attentivement ce manuel avant d’installer le filtre et suivez méticuleusement les indications pendant l’installation
de celui-ci et pendant son utilisation.
Conservez ce manuel en vue de futures consultations sur le fonctionnement de cet appareil.
INDICATIONS DE SÉCURITÉ, LISEZ-LES ATTENTIVEMENT
•Pour tout ce qui concerne l’installation électrique, il faut suivre les normes :
NF C15-100
NF EN 60-335-2-41
qui ont trait “à la construction d’installations électriques, aussi bien dans des piscines couvertes que dans des
piscines en plein air”, ou les normes analogues en vigueur dans chaque région ou pays.
•” Toutes les filtrations suivent la norme d'installation NF C 15-100 stipulant que tout appareil électrique situé à
moins de 3,50 m du bassin et librement accessible doit être alimenté en très basse tension 12 V. Tout appareil
électrique alimenté en 220 V doit être situé au moins à 3,50 m du bord du bassin. Demander l'avis du fabricant pour
toute modification d'un ou plusieurs éléments du système de filtration.”.
•L’installation électrique doit être faite par des professionnels qualifiés en installations électriques.
•La hauteur du sable ne doit pas dépasser les 2/3 de la hauteur du réservoir.
•Veillez à ce que l’appareil ne soit pas en marche pendant que vous utilisez la piscine.
•Ne faites pas fonctionner l’appareil s’il n’est pas amorcé correctement.
•Ne touchez JAMAIS le filtre en marche si vous avez le corps ou les mains humides.
•Chaque fois que vous devez manipuler le filtre ou la vanne, DÉBRANCHEZ-LES de la prise de courant.
•Vérifiez que le sol est bien sec avant de toucher l’équipement électrique.
•Ne placez pas le filtre dans un endroit où il pourrait être mouillé, cela pourrait causer une électrocution.
•Interdisez aux enfants et aux adultes de s’appuyer ou de s’asseoir sur l’appareil.
•Il faut remplacer le câble flexible d’alimentation de cet appareil, s’il est abîmé. Lisez attentivement les instructions
•Pour son installation.Si vous avez un doute quelconque, veuillez consulter un service technique.
1L’EMBALLAGE CONTIENT :
Le monobloc dont vous venez de faire l’achat est un appareil spécialement conçu et dessiné pour être utilisé dans des
piscines surélevées. Vous avez maintenant à votre disposition un équipement d’une conception innovatrice et d’une grande
fonctionnalité, comprenant, en un seul appareil, l’ensemble des éléments nécessaires au filtrage de l’eau, c’est-à-dire le filtre
et la pompe.
Les principaux éléments de ce monobloc sont:
Pos. Fig. Cant. Désignation
161Tuyau de 25 mm de et 4,5 m de long (retour)
261Vanne de retour, joint et écrou avec raccord de ø25 mm.
361Tuyau de ø32 mm de 4,5 m. de long, (aspiration).
461Vanne d’aspiration, joint et écrou avec raccord de ø32 mm.
561Tuyau de ø25 mm de 1 m. de long, (impulsion).
661Ensemble filtere (pompe, bombone, charge de sable 10 Kg, câble,raccors supérieur et
écrou)
766Brides de fixation des tuyaux.
871Adaptateur tuyau (Lavage du sable)
94-54Anneaux de friction
10 4-54Joints d’étanchéité
Vérifiez qu’il ne manque aucun élément à votre équipement monobloc.
1.1CONSEILS POUR UNE CORRECTE INSTALLATION
Étant facile à monter, cet appareil peut être monté par une seule personne adulte et dans un temps d’environ 2 HEURES,
les instructions détaillées dans ce manuel devant, à tout instant, être suivies correctement.
Pour une manipulation correcte des composants du filtre et pour leur correcte installation, vous n’aurez besoin que des outils
suivants :

9
Fonction Outil Outil alternatif
Serrer les colliers des tuyaux Tournevis stecker 7mm Tournevis bouche philips
Couper le liner Cutter Lame
Protection du tube du collecteur Morceau de plastique Morceau de tissu
2INSTALLATION
Placer le filtre sur une surface plane et solide, à une distance d’au moins 3,5 mètres de la piscine(selon la norme NF C15-
100 ou analogue en vigueur dans chaque région ou pays) et au même niveau que le fond de la piscine pour éviter que l’air
pénètre dans le circuit d’épuration (fig. 1). Il est recommandé de protéger le filtre du soleil et de la pluie et de toujours avoir
suffisamment de ventilation pendant le fonctionnement de l’appareil ; ne jamais le recouvrir pendant le fonctionnement.
Faire bien attention à ne pas renverser la bombone, parce celle-ci contient le sable de silex nécessaire à l’appareil (10 Kg).
2.1 RACCORDEMENT HYDRAULIQUE
Une fois le monobloc mis en place, procéder comme suit :
Dévisser légérement l’écrou supérieur du filtre, retirer le couvercle ainsi que le disque protecteur de plastique (Fig. 2).
Placer le joint de caoutchouc contre l’ouverture filetée de la cuve, puis le couvercle et l’écrou de fermeture et raccorder le
tuyau de ∅25 mm et 1 m de long (impulsion) avec les brides correspondantes, entre la sortie de la pompe et le couvercle du
filtre (Fig. 3).
Raccorder le tuyau de ø32 mm et 4,5m. de long (aspiration), entre la vanne d’aspiration et l’entrée de la pompe (Fig.4) avec
les brides correspondantes. Mettre en place la douille de caoutchouc (Fig.4 position C) avec le Téflon qui vous été remis.
Raccorder le tuyau de ø25 mm et 4,5m. de long (retour) avec les brides correspondantes, entre la vanne d’impulsion et la
sortie du filtre.(Fig.5)
Remplir la piscine d’eau.
2.2 BRANCHEMENT ÉLECTRIQUE
Pour tout ce qui a trait à l’installation électrique, il faut suivre les normes :
NF C15-100
NF EN 60-335-2-41
qui se réfèrent “à la construction des installations électriques, aussi bien dans les piscines couvertes que dans les
piscines en plein air”, ou les normes analogues en vigueur dans chaque région ou pays.
La pompe doit étre branchée sur une prise de courant de 220 -230 V alterné et 50 Hz, avec prise de terre. Pour plus de
sûreté, il est recommandé d’installer un interrupteur à un seul pôle pour que le filtre ne soit pas sous tension quand il n’est
pas utilisé et un différentiel de 30 mA (non fourni, qui peut être acheté dans les établissements spécialisés en matériel
électrique) qui sert de protection contre les décharges d’électricité.
2.3 MISE EN MARCHE
AVANT DE COMMENCER LE PREMIER CYCLE DE FILTRAGE, EFFECTUER UN AUTO-LAVAGE DU SABLE DE SILEX
DU FILTRE (VOIR AUTO-LAVAGE).
3PURGE DU FILTRE
Pour que le filtre fonctionne correctement, il faut le purger lors de la mise en marche après qu’on ait changé les tuyaux ou
lors du premier raccordement. Pour ce faire, mettre la pompe en marche, dévisser légèrement l’écrou supérieur pour que
tout l’air accumulé dans la bombone puisse sortir, jusqu'à ce qu’il n’y ait plus une seule bulle d’air dans l’eau de sortie, et
fermer.
4FONCTIONNEMENT
Le fonctionnement de ce filtre se base sur la capacité de retention du sable de silex qu’il contient. Pour garder en bon état
l’eau de la piscine, il faudra également utiliser les produits chimiques (chlore, anti-algues, etc. N’UTILISEZ PAS DE
FLOCULANT ) recommandés par le fabricant (consulter le manuel d’entretien de la piscine). Selon les périodes d’utilisation
de la piscine, l’ambiance, le pollen, la présence d’arbres tout près et la fréquence des bains, facteurs déterminant le degré
d’impureté de l’eau, ce filtre devra être auto-nettoyé avec une fréquence plus ou moins grande (voir le paragraphe auto-
lavage)
5FILTRAGE (Fig.6)
Le montage décrit au paragraphe Raccordement hydraulique laisse l’équipement prêt à l’usage. Il faut remettre en
circulation une fois par jour toute l’eau de la piscine. Pour augmenter la vie utile du filtre, il est recommandϑde réaliser le
filtrage en périodes de 2 heures maximum. Le besoin de filtrer dépend du volume en mètres cube d’eau de la piscine en
fonction des 2 mètres cube/heure de débit de ce filtre, Il faut laisser des cycles de repos intermédiaire de 2 heures au moins.
Volume piscine en m3
Débit filtre en m3= heures nécessaires
Exemple : 8 m3
2 m3/h =4 heures 2 cycles de 2 heures avec un cycle
intermédiaire de 2 heures de repos

10
6LAVAGE DU SABLE (Fig.7)
Il est recommandé d’effectuer un cycle de lavage du sable une fois par semaine.
Pour ce faire, procéder comme suit :
•en premier lieu, il faut disposer d’un tuyau de jardin branché à un robinet,
•débrancher le filtre de la prise de courant et fermer les vannes d’aspiration et d’impulsion.
•débrancher le tuyau de 25 mm de ø et de 4,5 m de long de la vanne de retour et y raccorder, à l’aide de l’adaptateur, le
tuyau de jardin qui, à l’autre extrémité, sera raccordé au robinet.
•débrancher le tuyau de ø25 mm.et de 1 m. de long, de l’impulsion de la pompe et amener l’autre extrémité jusqu'à un trop-
plein.
•ouvrir le robinet du tuyau de jardin (la pression de l’eau ne doit pas être trop élevée pour éviter que le sable de silex soit
expulsé) et laisser circuler l’eau jusqu'à ce que l’eau sortant vers le trop-plein soit propre. Cette opération peut durer environ
une minute, et si pendant ce temps, on voit goutter les branchements, cela n’indique en aucune façon une fuite.
•remettre en place les tuyaux et laisser reposer le filtre pendant quelques minutes pour éviter que le sable de silex aille vers
la piscine. Le filtre est maintenant prêt pour un nouveau cycle de filtration.
7NETTOYAGE DU FOND ET DE LA SUPERFICIE
Cette pompe ne permet pas l’utilisation d’aspirateurs de fond. N’utiliser que des nettoyeurs de fond de type ventury. Ce
filtre ne contient pas de skimmer incorporé. Utiliser un ramasse-feuilles pour nettoyer la surface de l’eau et un doseur de
chlore flottant pour le produit chimique.
Pour ces accessoires, consulter le manuel d’instructions de la piscine.
8REMPLACEMENT DU CÂBLE
•Débrancher l’appareil de la prise de courant.
•Fermer les vannes d’aspiration et d’impulsion.
•Débrancher le tuyau d’aspiration du filtre, enlever rapidement le raccord de câble et l’introduire dans la piscine.
•Débrancher le tuyau d’impulsion du filtre, enlever rapidement le raccord de câble et l’introduire dans la piscine.
•Débrancher le tuyau de 25 mm de ∅et 1 m de long de la sortie de la pompe.
•Incliner avec précaution le monobloc et retirer la pompe et sa base de son logement (en retirant les 4 vis avec un
tournevis).
•Débrancher les bornes du moteur en faisant bien attention à leur position respective.
•Retirer le câble et le remplacer, puis procéder à remettre tout en place en suivant les instructions en ordre inverse.
9HIVERNAGE -ENTRETIEN EN PÉRIODE DE NON UTILISATION
Pendant la période d’hiver, il faut vider l’eau du filtre et vidanger tout le circuit (pompe, tuyaux, etc.). C’est pour cette raison
qu’après avoir effectué un dernier auto-lavage pour laisser le sable de silex bien propre, il faudra fermer les vannes
d’aspiration et d’impulsion dans la piscine, et déconnecter les tuyaux de leurs raccordements au filtre (aspiration pompe,
impulsion pompe, couvercle filtre) en expulsant bien tout reste d’eau de leur intérieur. Faire de même avec le filtre, faire en
sorte que la pompe soit bien séche et garder l’ensemble dans un endroit sec. Toutes ces opérations doivent également être
menées à bien chaque fois que l’on doit garder le filtre pour une longue période sans utilisation. Il est conseillé de profiter de
cette occasion pour vérifier l’état du câble et le remplacer si besoin est. En ce cas, suivre les instructions données au
paragraphe Remplacement du câble. Il n’est pas nécessaire de retirer le silex de la pompe. Pour la remise en marche aprés
l’hivernage, procéder comme si le filtre était neuf.
PROBLÈMES CAUSES SOLUTIONS
Pas de courant. Vérifdier qu’il y a du courant,
Le moteur ne démarre pas. Bornes mal fixés sur le moteur. Ouvrir le moteur et vérifier les bornes.
Une fois branché, il n’y a pas de débit
dans la vanne d’impulsion. La vanne d’aspiration est fermée. Ouvrir la vanne.
Le débit du filte est faible. Le sable de silex est sale, Effectuer un auto-lavage.
Le filtre goutte par les extrémités des
tuyaux. Les tuyaux sont mal introduits dans les
extrémités ou trop lâches. Faire entrer les extrémités dans les
tuyaux jusqu’au fond et serrer les
brides.
L’eau déborde du filtre. Il y a des impuretés dans l’orifice
supérieur du filtre. Nettoyer l’orifice de sable, remettre en
place le joint et serrer.
Si vous ne pouvez pas résoudre le problème vous-même, mettez-vous en contact avec le fabricant de la piscine en suivant les indications
de votre manuel d’instructions.
TUYAU D.25 / D.32

11
ANWEISUNGEN MONOBLOCK-FILTER DEUTSCH
Lesen Sie sich dieses Handbuch aufmerksam durch, bevor Sie das Filter installieren, und befolgen Sie die Anweisungen bei
der Installation und dem Gebrauch des Filters genau.
Bewahren Sie dieses Handbuch auf, falls Sie zu einem späteren Zeitpunkt Informationen über die Funktion dieses Apparates
nachschlagenmöchten.
SICHERHEITSHINWEISE, BITTE AUFMERKSAM LESEN
•Bei der gesamten Installation elektrischer Komponenten muss folgende Norm befolgt werden:
NF C15-100
NF EN 60-335-2-41
Diese Norm bezieht sich auf “den Aufbau von elektrischen Installationen in Hallenbädern und Freibädern”. Ebenso müssen
die Normen befolgt werden, die in jeder Region oder jedem Land anwendbar sind.
•“Alle Filtereinrichtungen entsprechen der Norm für die Installation C 15-100, die angibt, dass alle elektrischen Apparate, die
sich in weniger als 3,5 m Entfernung vom Schwimmbad befinden und frei zugänglich sind, mit einer Niedrigspannung von 12
V gespeist werden müssen. Alle Apparate, die mit 220 V gespeist werden, müssen sich mindestens 3,5 m vom Rand des
Schwimmbeckens entfernt befinden. Wenn ein oder mehrere Elemente des Filtersystems geändert werden sollen, muss der
Hersteller die entsprechende Genehmigung erteilen”
•Die elektrische Installation muss von Fachleuten für elektrische Installationen durchgeführt werden.
•Die Höhe des Sandes darf nicht mehr als 2/3 der Höhe des Tanks betragen.
•Lassen Sie den Apparat nicht angeschaltet, wenn Sie das Schwimmbecken benutzen.
•Lassen Sie den Apparat nielaufen, ohne ihn vorher korrekt gefüllt zu haben.
•Berühren Sie NIE den angeschalteten Filter, wenn Ihr Körper oder Ihre Hände naß sind.
•Immer, wenn Sie am Filter oder dem Ventil arbeiten müssen, UNTERBRECHEN Sie die Stromverbindung.
•Vergewissern Sie sich, daß der Boden trocken ist, bevor Sie die elektrische Ausrüstung berühren.
•Setzen Sie den Filter nie dort ein, wo er naß werden kann. Das kann zu einem tödlichen Stromschlag führen.
•Erlauben Sie nicht, daß sich Kinder oder Erwachsene an den Apparat anlehnen oder auf ihn setzen.
•Wenn das flexible Kabel für den Stromanschluß beschädigt ist, muß es ausgetauscht werden. Lesen Sie aufmerksam die
Anweisungen für den Austausch. Im Zweifelsfalle ist der Kundendienst zu befragen.
1TEILELISTE
Bei dem soeben von Ihnen erstandenen Monoblock handelt es sich um einen Apparat, der speziell für die Verwendung bei
erhöhten Schwimmbecken erdacht und hergestellt wurde. Dank seines innovativen Designs und der großen Funktionsfähigkeit
vereint er in ein und demselben Apparat die unterschiedlichen, für das Filtrieren des Wassers erforderlichen Elemente, den Filter
und die Pumpe.
Die wichtigsten Teile dieses Monoblocks sind:
Pos. Zeichng. Anzahl Bezeichnung
1614,5 m langer Schlauch Ø 25 mm (Rücklauf)
261Rücklaufventil, Dichtung und Anschlußschraube für Ø 25 mm
3614,5 m langer Schlauch Ø 32 mm (Ansaugung)
461Ansaugventil, Dichtung und Anschlußventil für Ø 32 mm
5611 m langer Schlauch Ø 25 mm (Ausstoß)
661Filtersatz (Pumpe, Flasche, 10 kg Füllung Silikagel, Kabel, oberer Anschluß und Schraube)
766Klemmen für die Befestigung der Schläuche
871Anpassungsteil für den Schlauch (Waschen mit Sand)
94-54Reibungsringe
10 4-54Dichtungen
Vergewissern Sie sich, daß Ihre Monoblock-Ausrüstung vollständig ist.
1.1 VORRAUSSETZUNGEN FÜR DIE KORREKTE INSTALLATION
Die Installation dieser Anlage ist sehr einfach, deshalb kann ein Erwachsener sie in ungefähr 2 STUNDEN fertigstellen. Dabei
müssen die Anleitungen in diesem Handbuch genau befolgt werden.
Folgende Werkzeuge sind für den korrekten Umgang und Einbau der Filterkomponenten notwendig:
Funktion Werkzeug Alternatives Werkzeug
Anziehen der Klemmen der Schläuche Schraubendreher7mm Schraubendreher Typ Philips
Ausschneiden des Liner Cutter Messer
Schutzabdeckung des Rohrs des Auffangs Ein Stück Kunststoff Ein Stück Stoff

12
2INSTALLATION
Das Filter auf einer flachen und festen Unterfläche anbringen, und zwar in einem Abstand unter 3,5 m vom Schwimmbecken
entfernt (laut Norm NF C15-100 oder analoger in der jeweiligen Region oder im jeweiligen Land gültigen Norm) oder auf dem
Boden des Schwimmbeckens, um zu vermeiden, dass in den Reinigungskreislauf Luft eindringt und sich das Filter löst. (Zeichng.
1). Es ist ratsam, den Filter vor Sonne und Regen zuschützen und für ausreichende Belüftung zu sorgen, wenn er arbeitet.
Die Flasche darf nicht gekippt werden, denn sie enthält die erforderliche Füllung Silikagel (10 kg).
2.1 HYDRAULISCHER ANSCHLUSS
Wenn sich der Monoblock an seinem vorgesehenen Aufstellort befindet, muß wie folgt vorgegangen werden:
Die obere Schraube des Filters muß gelockert, der Deckel abgehoben und die Schutzscheibe aus Plastik entfernt werden
(Zeichnung 2).
Die Gummidichtung wird auf die Schrauböffnung des Behälters gelegt, darauf folgt der Deckel und die Schraube zum Verschließen.
Dann wird der 1 m lange Schlauch ∅25 mm (Ausstoß) mit den entsprechenden Klemmen zwischen dem der Pumpenaustritt und
dem Filterdeckel angebracht (Zeichnung 3).
Der 4,5 m lange Schlauch ∅32 mm (Ansaugung) wird mittels der entsprechenden Klemmen zwischen dem Ansaugventil und dem
Pumpeneinttritt angeschlossen (Zeichnung 4). Die Muffe aus schwarzem (Zeichnung 4, Position C) mit der Hilfe des mitgelieferten
Teflon montieren. Der 4,5 mm lange Schlauch ∅25 mm (Rücklauf) wird mit den entsprechenden Klemmen zwischen dem
Ausstoßventil und dem Filteraustritt (Zeichnung 5) angeschlossen
Das Schwimmbecken kann nun mit Wasser gefüllt werden.
2.2 ELEKTROANSCHLUSS
Bei der gesamten Installation elektrischer Komponenten muss folgende Norm befolgt werden:
NF C15-100
NF EN 60-335-2-41
Diese Norm bezieht sich auf “den Aufbau von elektrischen Installationen in Hallenbädern und Freibädern”. Ebenso müssen
die Normen befolgt werden, die in jeder Region oder jedem Land anwendbar sind.
Die Pumpe muß an einen 220/230 V 50 Hz Wechselstromanschluß mit Erdung angeschlossen werden. Es muß unbedingt ein
Allpolschalter verwendet werden, damit der Filter bei Nichtbenutzung von der Spannung abgeschaltet, sowie auch ein 30 mA
Diferential gegen Elektroschläge verwendet werden kann. (Gehört nicht zum Lieferumfang und kann im Elektrohandel erworben
werden.)
2.3 INBETRIEBNAHME
VOR DEM ERSTEN FILTRIERZYKLUS MUß EIN REINIGUNGSVORGANG MIT DEM SILIKAGEL DES FILTERS
VORGENOMMEN WERDEN (SIEHE AUTOMATISCHER REINIGUNGSVORGANG).
3LUFTAUSLASS FILTER
Für das korrekte Arbeiten des Filters muß nach einem Auswechseln der Schläuche oder für den ersten Anschluß die Luft aus dem
Filter ausgelassen werden. Hierfür lockert man bei laufender Pumpe leicht die obere Schraube und läßt die gesamte angesammelte
Luft aus der Flasche entweichen, bis Wasser ohne Luftblasen austritt. Danach muß die Schraube sofort wieder angezogen werden.
4BETRIEB
Die Arbeit dieses Filters basiert auf der Rückhaltkapazität des Silikagels, das sich in ihm befindet. Damit das Wasser im
Schwimmbecken in gutem Zustand bleibt, müssen außerdem die vom Hersteller vorgeschlagenen chemischen Produkte verwendet
werden (Chlor, Algenschutzmittel, u.s.w. KEINE AUSFLOCKUNGSMITTEL BENUTZEN). (Siehe hierzu die Betriebsanleitung für
das Schwimmbecken). Je nach den Faktoren, die einen Einfluß auf die Verschmutzung des Wassers haben, wie
Benutzungszeiträume, Umfeld, Blütenstaub, Bäume und Badefrequenz, muß bei diesem Filter mehr oder weniger oft eine
automatische Reinigung durchgeführt werden ((Siehe hierzu den Abschnitt Automatischer Reinigungsvorgang.)
5FILTRIERUNG (Zeichnung 6)
Nach der im Abschnitt Hydraulischer Anschluß beschriebenen Montage ist die Ausrüstung für das Filtrieren vorbereitet.
Ein Mal pro Tag muß das gesamte Wasser des Schwimmbeckens durch den Apparat gelaufen sein.
Die Lebensdauer des Filters kann verlängert werden, wenn der Apparat nicht länger als 2 Stunden hintereinander arbeitet. Die
erforderliche Filtrierung ergibt sich aus der Kubikmeteranzahl Wasser in Ihrem Schwimmbecken in bezug auf die 2m3/h
Durchflußmenge dieses Filters. Lassen Sie den Motor zwischen dem Arbeitszyklus mindestens 2 h ruhen.
Volumen im Schimmbad in m3
Filterdurchflussmenge m3= notwendige Stunden
Beispiel: 8 m3
2 m3/h 4 Stunden2 Zyklen pro Stunde mit einem
Zwischenzyklus von 2 Stunden Pause
6WASCHEN MIT SAND (Zeichnung 7)
Es empfiehlt sich, einen waschen mit Sand einmal pro Woche vorzunehmen.
Für den automatischen Reinigungsvorgang des Filters muß wie folgt vorgegangen werden:
•Vor allen Dingen benötigt man einen Gartenschlauch, der an einem Wasserhahn angeschlossen ist.
•Der Strom zum Filter wird unterbrochen und sowohl das Ansaug-als auch das Ausstoßventil werden geschlossen.
•Der 4,5 m lange Schlauch∅25 mm des Rücklaufventils wird abmontiert und mittels Adapter das freie Ende des am Wasserhahn
angeschlossenen Gartenschlauchs angeschlossen.
•Der 1 m lange Schlauch∅25 mm für den Pumpenausstoß wird abmontiert und sein Ende zu einem Wasserabfluß geleitet.
•Der Wasserhahn, an den der Gartenschlauch angeschlossen ist, wird geöffnet (Der Wasserdruck darf nicht sehr hoch sein, um zu
vermeiden, daß Silikagel ausgestoßen wird.). Man läßt das Wasser auslaufen, bis beobachtet wird, daß das auslaufende Wasser

13
sauber ist. Dieser Vorgang kann ungefähr eine Minute anhalten. Wenn bei diesem Vorgang die Anschlüsse tropfen, bedeutet das
nicht, daß sie schadhaft sind.
•Die Schläuche werden erneut mit ihren normalen Anschlüssen verbunden und der Filter muß nun einige Minuten ruhen, um zu
vermeiden, das Silikagel in das Schwimmbecken gelangt. Danach ist der Filter wieder für einen neuen Filtrierzyklus vorbereitet.
7REINIGUNG DES BODENS UND DER OBERFLÄCHE
Mit der Pumpe kann kein Sauger für die Reinigung des Bodens verwendet werden. Es dürfen nur Bodenreinigungsapparate des
Typs Ventura benutzt werden.
Dieser Filter hat keinen Skimmer. Verwenden Sie für die Reinigung der Oberfläche einen Blätteraufnehmer und bei der
Verwendung von chemischen Produkten einen Schwimmdosierer für das Chlor.
Siehe auch die in der Bedienungsanleitung des Schwimmbeckens angegebenen Zusatzgeräte.
8AUSWECHSELN DES KABELS
•Die Stromverbindung zum Apparat muß unterbrochen werden.
•Das Ausaug-und Ausstoßventil sind zu schließen.
•Der Ansaugschlauch des Filters muß abmontiert und sein freies Ende schnellstens zum Schwimmbecken geführt werden.
•Der Ausstoßschlauch des Filters muß abmontiert und sein freies Ende schnellstens zum Schwimmbecken geführt werden.
•Der 1 m lange Schlauch∅25 mm für den Pumpenaustritt muß abmontiert werden.
•Vorsichtig wird der Monoblock gekippt und die Pumpe zusammen dem Pumpenbett herausgenommen (mit einem
Schraubenzieher die vier Schrauben entfernen).
•Die Kabelschuhe des Motors werden entfernt und ihre Lage notiert.
•Das Kabel wird herausgenommen, ersetzt und danach wird für die Montage der Ausrüstung in umgekehrter Weise vorgegangen.
9ÜBERWINTERUNG -WARTUNG AUSSERHALB DER BENUTZUNGSZEITEN
Vor der Überwinterung muß der Wasserfilter und der gesamte Kreislauf entleert werden (Pumpe, Schläuche, u.s.w.). Zu diesem
Zweck und nach Durchführung eines abschließenden automatischen Reinigungsvorgangs, damit das Silikagel sauber bleibt,
schließen wir das Ansaug -und das Austrittventil im Schwimmbecken und unterbrechen die Verbindungen der Schläuche mit dem
Filter (Ansaugung Pumpe, Ausstoß Pumpe, Filterdeckel), wobei wir das sich vielleicht im Inneren befindende Wasser ablaufen
lassen. Ebenfalls muß das gesamte Wasser im Filter ablaufen, wobei besonders darauf zu achten ist, daß die Wasserpumpe
vollkommen trocken ist. Danach wird der Filter an einem trockenen Ort aufbewahrt. Dieser Vorgang wiederholt sich jedesmal,
wenn wir den Filter über einen längeren Zeitraum nicht benutzen werden. Es ist ratsam, bei dieser Gelegenheit eine Sichtprüfung
des Kabelzustandes durchzuführen und es, falls erforderlich, auszutauschen. Hierbei ist wie im Abschnitt Auswechseln des kabels
vorzugehen.
Das Silikagel kann in der Flasche bleiben. Nach der Überwinterung schließen wir den Filter wieder wie bei einem Neuanschluß an.
PROBLEM URSACHE LÖSUNG
Kein Strom in der Leitung. Überprüfen ob Strom in der Leitung ist.
Der Motor springt nicht an. Die Kabelschuhe des Motors sind locker. Den Motor öffnen und die Kabelschuhe
überprüfen.
Nach Anschluß tritt aus dem Ventil kein
Wasser aus. Das Ansaugventil ist nicht frei. Ventil freimachen
Es fließt wenig Wasser durch den Filter. Der Silikagel ist schmutzig. Eine automatische Reinigung vornehmen.
Der Filter tropft an den Schlauchenden. Die Schläuche sind nicht fest angezogen
oder ihre Enden schlecht eingeführt. Die Enden ganz in die Schläuche
einführen und die Klemmen fest anziehen.
Aus der oberen Filter-öffnung tritt Wasser
aus. Es befindet sich Schmutz in der oberen
Öffnung des Filters.
Die Öffnung vom Sand befreien. Legen
Sie die Dichtung korrekt auf und ziehen
Sie erneut an.
Sollte das Problem nicht behoben werden können, rufen Sie den Hersteller Ihres Schwimmbeckens unter der angegebenen Nummer und zu den
angegebenen Zeiten an.
SCHLAUCH D.25 / D.32

14
ISTRUZIONI FILTRO MONOBLOCCO ITALIANO
Legga attentamente questo manuale prima di installare il filtro e segua meticolosamente le indicazioni durante
l’installazione dello stesso e durante l’uso.
Conservi questo manuale per future consultazioni in merito al funzionamento di questo apparecchio.
INDICAZIONI DI SICUREZZA, LEGGERE ATTENTAMENTE
•Per quanto riguarda l’installazione elettrica, si renderà necessario adempiere alla seguente normativa:
NF C15-100
NF EN 60-335-2-41
che si riferisce “alla costruzione di installazioni elettriche, sia per piscine coperte sia per piscine all’aria aperta”, o
la normativa analoga in vigore in ciascuna zona o paese.
•”Tutti i filtraggi adempiono alla norma di installazione C 15-100 che specifica che ogni apparecchio elettrico
ubicato a meno di 3,5 m dalla piscina e liberamente accessibile deve essere alimentato con una tensione molto
bassa da 12 V. Ogni apparecchio alimentato a 220 V deve essere ubicato a un minimo di 3,5 m dal bordo della
piscina. Si renderà necessario richiedere l’autorizzazione del fabbricante per qualsiasi modifica di uno o più
elementi del sistema di filtraggio”
•L’installazione elettrica deve essere realizzata da personale professionale qualificato per installazioni elettriche.
•L’altezza della sabbia non deve oltrepassare i 2/3 dell’altezza del serbatoio.
•No mantenere l’apparecchio in marcia mentre si utilizza la piscina.
•Noh far funzionare l’apparecchio se questo non è stato allacciato in forma corretta.
•Non toccare MAI il filtro in marcia con il corpo umido o con le mani umide.
•Ogni vola che si debba manipolare il filtro o la valvola, si renderà necessario DISINSERIRLO dalla presa di
corrente.
•Si assicuri che il suolo sia asciutto prima di toccare l’apparecchio elettrico.
•Non collochi il filtro dove possa bagnarsi, giacché potrebbe causare scosse elettriche.
•Non consenta né a bambini né a adulti di appoggiarsi o sedersi sull’apparecchio.
•Se il cavo flessibile dell’alimentazione di questo apparecchio è danneggiato, si dovrà procedere alla sua
sostituzione. Legga attentamente le istruzioni per la sostituzione. In caso di dubbi, si rivolga al servizio tecnico.
1COMPONENTI IMBALLAGGIO
Il monoblocco che ha appena acquistato é un apparato concepito in modo speciale e progettato per essere utilizzato in piscine
elevate. Con un progetto innovativo e una grande funzionalità, lei dispone di diversi elementi necessari per il filtraggio dell’acqua,
Filtro e pompa in uno stesso apparato.
I principali componenti di questo monoblocco sono:
Pos. Fig. Quant. Denominazione
161Tubo flessibile da ø25 mm e di 4,5 m. Di lunghezza, (ritorno).
261Valvola di ritorno, giunta e dado con collegamento da ø25 mm.
361Tubo flessibile da ø32 mm e di 4,5 m. Di lunghezza, (aspirazione).
461Valvola di aspirazione, giunta e dado, con collegamento da ø32 mm.
561Tubo flessibile da ø25 mm e di 1 m. Di lunghezza (impulsione).
661Gruppo filtro (pompa, bombola, carico di sabbia 10 Kg, cavo, collegamento superiore e dado).
766Ghiere fissaggio tubi flessibili.
871Adattatore tubi flessibili (Lavaggio della sabbia)
94-54Anelli di frizione
10 4-54Giunte a tenuta stagna
Controllare che il suo apparato monoblocco includa tutti i componenti.
1.1 NECESSITÀ PER UNA CORRETTA INSTALLAZIONE
Per lasua facilità di installazione, questo apparecchio può essere montato da una sola persona adulta e in un periodo di tempo di
circa 2 ORE, con la precauzione in ogni momento di seguire attentamente le istruzioni riportate in questo manuale.
Per una correttamanipolazione dei componenti del filtro e la loro corretta installazione, saranno necessari solo i seguenti utensili:
Funzione Utentile Utensile alternativo
Stringere le flangie dei manicotti Cacciavite stecker 7mm Cacciavite bocca philips
Tagliare il liner Cutter Coltello
Protezione del tubo del collettore Pezzo di plastico Pezzo di tela

15
2INSTALLAZIONE
Collochi il filtro su una superficie piatta e solida ad una distanza non inferiore a 3,5 metri dalla piscina (ai sensi della norma NF C15-
100 o analoga in vigore in ogni zona o paese.) ed allo stesso livello del fondo della stessa per evitare che nel circuito di
depurazione entri aria e di conseguenza il filtro si disinneschi (fig. 1). É conveniente proteggere il filtro dal sole e dalla pioggia, che
abbia una ventilazione sufficiente durante il suo funzionamento e che non venga tappato durante il funzionamento.
Non ribaltare la bombola, dato che contiene il carico di sabbia di silex necessario (10 Kg).
2.1 COLLEGAMENTO IDRAULICO
Quando si é posizionato il monoblocco, procedere come segue:
Allentare il dado superiore del filtro, togliere il coperchio ed estrarre il disco protettore di plastica. (Fig.2)
Collocare la giunta di gomma contro la bocchetta filettata della vasca, togliere quindi il coperchio e il dado di chiusura, e collegare il
tubo flessibile da ø25 mm e di 1m. di lunghezza (impulsione), con le ghiere corrispondenti, tra l’uscita della pompa ed il coperchio
del filtro.(Fig.3)
Collegare il tubo flessibile da ø32 mm e di 4,5m. di lunghezza (aspirazione), tra la valvola di aspirazione e l’entrata della pompa
(Fig.4) con le ghiere corrispondenti. Collocare la boccola roscata (Fig.4 posizione C) con il teflon fornito.
Collegare il tubo flessibile da ø25 mm e di 4,5m. di lunghezza (ritorno) con le ghiere corrispondenti, tra la valvola di impulsione e
l’uscita del filtro.(Fig.5)
Riempire la piscina d’acqua.
2.2 COLLEGAMENTO ELETTRICO
Per quanto riguarda l’installazione elettrica, si renderà necessario adempiere alla seguente normativa:
NF C15-100
NF EN 60-335-2-41
che si riferisce “alla costruzione di installazioni elettriche, sia per piscine coperte sia per piscine all’aria aperta”, o la normativa
analoga in vigore in ciascuna zona o paese.
La pompa si deve collegare ad una presa di tensione di 220/230 V. acorrente alternata e 50 Hz, con messa a terra.
É obbligatorio usare un interruttore onnipolare in modo da lasciare senza tensione il filtro quando non si sta utilizzando ed un
differenziale da 30 mA. per protezione dalle scariche. (Non forniti. Si possonoacquistare in tutti i negozi d’elettricità).
2.3 MESSA IN MOTO
PRIMA DI INIZIARE IL PRIMO CICLO DI FILTRAGGIO, EFFETTUARE UN LAVAGGIO DELLA SABBIA DI SILEX DEL FILTRO.
(VEDERE AUTOLAVAGGIO)
3SPURGAMENTO DEL FILTRO
Per un corretto funzionamento del filtro, dobbiamo spurgarlo quando lo mettiamo in moto dopo la sostituzione dei tubi flessibili o
dopo il collegamento iniziale. Per fare ciò, con la pompa in moto, svitare leggermente il dado superiore per permettere l’uscita di
tutta l’aria accumulata nella bombolafino a quando non tracimi acqua priva di bolle, successivamente chiuderlo.
4FUNZIONAMENTO
Il funzionamento di questo filtro si basa sulla capacità di ritenzione della sabbia di silex che si trova al suo interno. Per mantenere in
buono stato l’acqua dellapiscina si dovranno inoltre utilizzare dei prodotti chimici (cloro, antivegetativi, ecc. NON BISOGNA
UTILIZZARE FLOCCULANTE) consigliati dal fabbricante (Vedere il manuale della piscina). Dipendendo dai periodi d’utilizzazione
della piscina, dall’ambiente,dal polline, dagli alberi e dalla frequenza dei bagni, fattori che determinano la sporcizia dell’acqua della
piscina, il filtro ha bisogno di essere autolavato con maggiore o minor frequenza (vedere paragrafo autolavaggio).
5FILTRAGGIO (Fig.6)
Il montaggio descritto nel paragrafocollegamento idraulico lascia l’apparato preparato per il filtraggio.
Una volta al giorno si dovrà fare ricircolare tutta l’acqua della piscina.
La vita utile del filtro si allunga con periodi di funzionamento continuato non superiori alle 2h. Le sue necessità di filtraggio vengono
date da un volume di m3d’acqua della piscina in relazione con i 2m3/h di portata di questo filtro. Lasci trascorrere almeno due ore
di riposo tra un funzionamento e l’altro.
Volume piscina in m3
Portata filtro in m3=ore necessarie
Esempio: 8 m3
2 m3/h =2 ore 2 cicli di 2 ore con un ciclo intermedio di 2 ore
di riposo
6LAVAGGIO DELLA SABBIA (Fig.7)
Si raccomanda di realizzare un ciclo di lavaggio della sabbia ogni settimana.
Per effettuare un lavaggio della sabbia del filtro, procedere come segue:
•Per prima cosa abbiamo bisogno di una canna per l’acqua collegata ad un rubinetto,
•Staccare il filtro dalla presa di corrente e chiudere le valvole di aspirazione ed impulsione.
•Scollegare iltubo flessibile, da ø25 mm. e di 4,5 m. di lunghezza, della valvola di ritorno e collegarla, per mezzo dell’adattatore,
alla canna per l’acqua con l’estremità opposta a quella attaccata al rubinetto.
•Scollegare il tubo flessibile, da ø25 mm. e di 1 m. di lunghezza, d’impulsione della pompa e portare questa estremità ad uno
scarico.
•Aprire il rubinetto collegato alla canna dell’acqua (la pressione dell’acqua non deve essere elevata, per evitare l’espulsione della
sabbia di silex) e lasciare circolare l’acqua fino a quando non vediamo che l’acqua diretta allo scarico non é pulita. Questa
operazione può durare circa 1 minuto, durante questa operazione gli allacciamenti possono gocciolare, ciò non indica un guasto.

16
•Rimettere i tubi flessibili nelle loro posizioni originali e lasciare riposare il filtro per alcuni minuti per evitare che la sabbia di silex si
riversi nella piscina, il filtro é pronto per cominciare un nuovo ciclo di filtraggio.
7PULIZIA DEL FONDO E DELLA SUPERFICIE
Questa pompa non permette di utilizzare puliscifondo ad aspirazione. Utilizzare solamente puliscifondo del tipo ventury.
Questo filtro non incorpora skimmer. Utilizzi un raccoglitore di foglie per la pulizia della superficie ed un dosificatore di cloro
galleggiante per il prodotto chimico.
Vedere il manuale della piscina per gli accessori segnalati.
8SOSTITUZIONE DEL CAVO
•Disinserire l’apparato dalla presa di corrente.
•Chiudere le valvole di aspirazione e di impulsione.
•Disinserire il tubo flessibile d’aspirazione del filtro, alzare rapidamente il terminale e introdurlo nella piscina.
•Disinserire il tubo flessibile d’impulsione del filtro, alzare rapidamente il terminale ed introdurlo nella piscina.
•Disinserire il tubo flessibile, da ø25 mm. e di 1 m. di lunghezza, d’impulsione della pompa.
•Con precauzione inclinare il monoblocco e staccare la pompa insieme alla sua base, dalla sua ubicazione (svitare le quattro viti
con un cacciavite).
•Scollegare i terminali del motore facendo attenzione alla loro posizione.
•Estrarre il cavo, sostituirlo, e procedere in modo inverso a quello descritto per montare nuovamente l’apparato.
9PERIODO INVERNALE -MANUTENZIONE FUORI USO
Durante il periodo invernale, si dovrà svuotare l’acqua dal filtro e da tutto il circuito (pompa, tubi flessibili, ecc.) per questo motivo e
dopo aver effettuato un autolavaggio finale per lasciare pulita la sabbia di silexprocederemo a chiudere le valvole di aspirazione ed
impulsione nella piscina, disinserendo i tubi flessibili dai loro allacciamenti con il filtro (aspirazione pompa, impulsione pompa,
coperchio filtro), faremo scorrere via l’acqua che può rimanere al suo interno così come quella all’interno del filtro, faremo
particolare attenzione a lasciare ben asciutta la pompa dell’acqua e procederemo a custodirlo in un luogo asciutto. Bisognerà fare
sempre questa operazione quando riterremo che non useremo il filtro per un lungo periodo di tempo. É consigliabile approfittare di
quest’occasione per controllare visivamente lo stato del cavo e procedere alla sua sostituzione se risulta necessario, per fare ciò
procedere come descritto nel paragrafosostituzione del cavo.
Non é necessario togliere il silex dalla bombola, dopo il periodo di svernamento procederemo all’installazione del filtro come se
fosse nuovo.
PROBLEMA CAUSA SOLUZIONE
Manca corrente nella linea elettrica. Controllare che ci sia corrente nella linea
elettrica,
Non parte il motore. Terminali allentati nel motore. Aprire il motore e revisionare i terminali.
Una volta collegato non c’é portata nella
valvola d’impulsione. La valvola d’aspirazione é chiusa. Aprire la valvola.
Il filtro da poca portata. La sabbia di silex é sporca, Effettuare un autolavaggio.
Il filtro sgocciola dai terminali dei tubi
flessibili. I tubi flessibili sono allentati o inseriti male
nei terminali. Introduca i terminali fino in fondo al tubo
flessibile e stringa le ghiere.
Esce acqua dalla bocchetta superiore del
filtro. C’é sporcizia nella bocchetta superiore del
filtro. Pulisca la bocchetta dalla sabbia, collochi
correttamente la giunta e prema
nuovamente.
Nel caso non riesca a soluzionare il problema si metta in contatto con il fabbricante della piscina al telefono e nell’orario indicati nelle sue
istruzioni.
TUBO FLESSIBILE D.25 / D.32

17
GEBRUIKSAANWIJZING MONOBLOC-FILTER NEDERLANDS
Alvorens het filter te installeren eerst deze handleiding lezen en tijdens het installeren en het gebruik ervan nauwkeurig de
aanwijzigingen volgen.
Deze handleiding bewaren voor eventuele vragen omtrent de werking van dit apparaat.
DE VEILIGHEIDSAANWIJZINGEN AANDACHTIG DOORNEMEN
Voor alles wat de elektrische installatie betreft moet de norm
EN C15-100
NF EN 60-335-2-41
gevolgd worden die betrekking heeft op “de aanleg van elektrische installaties, zowel voor overdekte zwembaden als voor
openlucht zwembaden”, of de desbetreffende norm van ieder land of regio afzonderlijk.
•Voor alle filters moet de installatienorm C15-100 gevolgd worden die duidelijk specificeert dat ieder willekeurig elektrisch
apparaat dat zich op minder dan 3.5 m afstand van het zwembad bevindt en waar het publiek vrij toegang toe heeft, op
een laag voltage van 12V werkt. Elk apparaat dat werkt op een voltage van 220V moet op zijn minst op een afstand van
3,5 m van de rand van het zwembad geplaatst worden. Voor het veranderen van een of meerdere elementen van he
filtreersysteem moet toestemming aan de fabrikant gevraagd worden
•De elektrische installatie moet aangelegd worden door vakmensen, gespecialiseerd in elektrische installaties.
•Het zand mag niet hoger reiken dan 2/3 van de hoogte van het deposito.
•Het apparaat mag niet in werking zijn wanneer het zwembad in gebruik is.
•Het apparaat niet laten werken als het niet op correcte wijze aan de gang gebracht is.
•NOOIT met een nat lichaam of natte handen het werkende filter aanraken.
•Bij het manipuleren van het filter of de klep altijd van de stroomtoevoer AFSLUITEN
•Alvorens enig elektrisch toestel aan te raken eerst controleren of de grond droog is.
•Het filter nooit plaatsen waar het nat kan worden, dit kan electrocutie veroorzaken.
•Verbied kinderen en volwassenen om op het apparaat te gaan zitten of er tegen aan te leunen.
•Als het buigbare snoer van dit apparaat beschadigd is, moet het vervangen worden. Lees hiertoe aandachting de
instructies ter vervanging van het snoer. Bij eventuele twijfel de technische dienst raadplegen.
1ONDERDELEN VERPAKKING
Het monobloc dat u zojuist aangeschaft heeft is een apparaat dat speciaal ontworpen is voor gebruik bij staande
zwembaden. Een toestel met een vernieuwend ontwerp en grote functionaliteit waarmee u over de benodigde elementen
beschikt om het water te zuiveren. Filter en pomp in één apparaat.
De belangrijkste onderdelen van dit monobloc zijn:
Pos. Afb. Aantal Omschrijving
161Slang ø25 mm., lengte 4,5 m. (retour).
261Terugslagklep, pakking en moer met verbinding van ø25 mm.
361Slang ø32 mm., lengte 4,5 m. (aanzuig).
461Zuigklep, pakking en moer met verbinding van ø32 mm.
561Slang ø25 mm., lengte 1 m. (aandrijving).
661Filtereenheid (pomp, reservoir, zandvulling 10 kg, snoer, bovenverbinding en moer).
766Slangklemmen.
871Slangverbindingsstuk (Reinigen van het zand)
94-54Frictieringen
10 4-54Afdichtingen
Controleer of alle onderdelen van het monobloc meegeleverd zijn.
1.1NOODZAKELIJK VOOR EEN CORRECTE INSTALLERING :
Dank zij de eenvoudige installering kan dit toestel door een volwassene in ongeveer 2 UUR tijds gemonteerd worden,
alhoewel er voortdurend strikt de hand moet worden gehouden aan de instructies in de voorliggende handleiding.
Voor de correcte behandeling van de onderdelen van het filter en voor de correcte aansluiting ervan, is het onderstaande
gereedschap nodig :
Funktie Gereedschap Alternatief gereedschap
De schroeven van de klembanden de
slangen aandraaien Schroevedraaier stecker 7mm
Schroevedraaier met
philipsmond
Liner afsnijden Cutter Scheermesje
Bescherming van de buis van het
verzamelvat Een stuk plastic Een stuk stof

18
2INSTALLEREN
Plaats het filter op een vlakke en solide ondergrond op minimaal 3,5 m. van het zwembad (in overeenstemming met de
Norm NF C-15-100 of overeenkomstige norm al naar gelang regio of land), en op gelijke hoogte met de bodem van het
zwembad om te voorkomen dat er lucht in het zuiveringscircuit en in het filter komt (Afb. 1). Aangeraden wordt het filter zo te
plaatsen dat het tegen zon en regen beschut is en er voldoende ventilatie tijdens het bedrijf van het filter is. Het filter nooit
bedekken wanneer het in bedrijf is.
Het reservoir niet kantelen aangezien dit reeds de benodigde hoeveelheid zand (10 kg.) bevat.
2.1HYDRAULISCHE AANSLUITING
Nadat het monobloc geplaatst is als volgt te werk gaan:
Draai de bovenste moer van het filter los, verwijder het deksel en neem de plastic beschermschijf eruit (Afb. 2).
Plaats de rubber pakking op de opening met schroefdraad van het vat, breng het deksel en de sluitmoer aan en sluit de
slang van ∅25 mm. en 1 m. lengte (aandrijving) met de bijbehorende slangklemmen tussen de uitlaat van de pomp en het
filterdeksel (Afb. 3) aan.
Sluit de slang van ∅32 mm. en 4,5 m. lengte (aanzuig) met de bijbehorende slangklemmen aan tussen de aanzuigklep en
de inlaat van de pomp (Afb.4). Breng het beschermkapje aan met bijgesloten tape(Afb.4 positie C).
Sluit de slang van ∅25 mm. en 4,5 m. lengte (retour) met de bijbehorende slangklemmen tussen de aandrijfklep en de
uitlaat van het filter (Afb. 5) aan.
Laat het zwembad met water vollopen.
2.2ELEKTRISCHE AANSLUITING
Voor alles wat de elektrische installatie betreft moet de norm
NF C15-100
NF EN 60-335-2-41
gevolgd worden die betrekking heeft op “de aanleg van elektrische installaties, zowel voor overdekte zwembaden als voor
openlucht zwembaden”, of de desbetreffende norm van ieder land of regio afzonderlijk.
De pomp dient op een geaard stopcontact van 220/230 V wisselspanning en 50 Hz aangesloten te worden. Het is beslist
noodzakelijk een omni-polaire schakelaar te gebruiken zodat er geen spanning op het filter staat als dit niet gebruikt wordt
en een differentiaalschakelaar van 30 mA. Ter bescherming tegen ontladingen. (Beide schakelaar zijn niet bijgeleverd en
kunnen bij de speciaalzaken gekocht worden).
2.3INBEDRIJFSTELLING
ALVORENS DE EERSTE FILTERCYCLUS TE STARTEN, DIENT MEN HET SILEX VAN HET FILTER TE REINIGEN (ZIE
AUTOMATISCHE REINIGING).
3ONTLUCHTEN VAN HET FILTER
Voor een correcte werking van het filter dient het bij de inbedrijfstelling na het vervangen van de slangen of de
oorspronkelijke verbinding ontlucht te worden. Hiertoe dient men met werkende pomp de bovenste moer iets los te draaien,
zodat de lucht die in het reservoir zit, eruit kan stromen. Zet de moer weer vast zodra er water zonder luchtbelletjes
uitstroomt.
4WERKING
De werking van het filter berust op het vasthoudend vermogen van het silex dat zich in het filter bevindt. Om het water in het
zwembad in goed staat te houden dienen er tevens chemische producten (chloor, algengroei remmend middel, enz. GEEN
ANTIVLOKMIDDELLEN GEBRUIKEN) gebruikt te worden die door de fabrikant aanbevolen worden (Zie handleiding van het
zwembad). Afhankelijk van de periode waarin het zwembad gebruikt wordt, zijn de omgeving, stuifmeel, bomen en
gebruiksfrequentie de factoren die de vuilgraad van het water in het zwembad bepalen en dient het filter al dan niet vaker
automatisch gereinigd te worden ( zie paragraaf automatische reiniging).
5ZUIVEREN (Afb. 6)
Door de montage zoals beschreven in de paragraaf hydraulische aansluiting is het toestel voor het zuiveren gereed.
Het water in het zwembad dient een maal per dag gehercirculeerd te worden.
De levensduur van het filter is optimaal als dit met perioden van continu bedrijf uitgevoerd wordt die niet langer dan 2 uur
duren. De noodzaak van het filteren wordt bepaald door het watervolume (m3) van het zwembad in verhouding tot het debiet
van 2m3/u van het filter.
Laat de motor minstens 2 uur tussen de bedrijfsintervallen uit staan.
Volume zwembad in m3
Debiet filter in m3 =nodige uren
VOORBEELD : 8 m3
2 m3/u = 4 uur 2 maal 1 cyclus van 2 uur met een
tussenliggende cyclus van 2 uur rust.
6REINIGEN VAN HET ZAND (Afb. 7)
Aanbevolen wordt het filter eenmaal per week automatisch te reinigen.
Voor het reinigen van het zand dient u als volgt te werk te gaan:
•Allereerst heeft u een tuinslang nodig die op een kraan aangesloten is.

19
•Neem het snoer van het filter uit het stopcontact en sluit de aanzuig-en aandrijfklep.
•Maak de slang van ∅25 mm. en 4,5 m. lengte van de terugslagklep los en verbindt deze m.b.v. het verbindingsstuk aan
de tuinslang bij het uiteinde dat niet op de kraan aangesloten is.
•Maak de slang van ∅25 mm. en 1 m. lengte van de pompaandrijving los en plaats deze in de afvoer.
•Draai de kraan van de tuinslang open (de druk van het water mag niet te hoog zijn, omdat anders het silex naar buiten
gespoten wordt) en laat het water circuleren totdat het water dat via de afvoer wegstroomt er schoon uitziet. •Deze
handeling kan ongeveer 1 minuut in beslag nemen; hierbij is het mogelijk dat de verbindingen iets lekken, maar dit betekent
niet dat er een defect is.
•Sluit de slangen weer op de oorspronkelijke wijze aan en laat het filter een paar minuten rusten om te voorkomen dat er
silex in het zwembad stroomt. Het filter is nu gereed om opnieuw gebruikt te worden.
7REINIGEN VAN DE BODEM EN HET WATEROPPERVLAK
Bij deze pomp kan geen gebruik gemaakt worden van bodemzuigers. Gebruik uitsluitend bodemzuigers van het type
ventury.
Het filter is niet met een skimmer uitgerust. Gebruik een bladhark voor het reinigen van het wateroppervlak en een drijvende
chloordoseerder voor het chemische product.
Zie voor de genoemde toebehoren de handleiding van het zwembad.
8VERVANGEN VAN HET SNOER
Sluit het toestel van de netspanning af.
Sluit de aanzuig-en aandrijfkleppen.
Maak de aanzuigslang van het filter los, til het uiteinde van de slang snel op en leg deze in het zwembad.
Maak de aandrijfslang van het filter los, til het uiteinde van de slang snel op en leg deze in het zwembad.
Maak de slang van ∅25 mm. en 1 m. lengte van de pompaandrijving los
Kantel voorzichtig het monobloc en verwijder de pomp samen met de voet van zijn plaats (draai de vier schroeven met een
schroevendraaier los).
Maak de aansluitklemmen van de motor los en let erop dat deze op zijn plaats blijft.
Verwijder het snoer, vervang het en ga voor het monteren van het toestel in omgekeerde volgorde te werk.
9WINTER –ONDERHOUD BUITEN GEBRUIK
Tijdens de winter mag er geen water in het filter noch in het circuit (pomp, slangen, enz.) zitten en daarom dient, nadat het
filter voor de laatste keer automatisch gereinigd is, de aanzuig-en aandrijfklep in het zwembad gesloten te worden. Maak de
slangen en de slangverbindingen met het filter los (aanzuiging pomp, aandrijving pomp, filterdeksel) en laat het water dat er
in zit weglopen. Dit geldt ook voor het water in het filter. Let erop dat de waterpomp goed droog is en bewaar deze op een
droge plaats. Deze handelingen dienen ook uitgevoerd te worden als het filter langere tijd niet gebruikt zal worden.
Aangeraden wordt hierbij het snoer visueel te controleren en, indien nodig, te vervangen. Hiertoe te werk gaan zoals
beschreven in paragraaf Vervangen van het snoer.
Het silex hoeft niet uit het reservoir verwijderd te worden en na de winter kan het filter weer geïnstalleerd worden alsof het
nieuw is.
PROBLEEM OORZAAK OPLOSSING
Er staat geen stroom op de elektrische leiding. Controleer of er stroom op de leiding staat,
De motor werkt niet. Losse aansluitklemmen bij de motor. Maak de motor open en kijk de
aansluitklemmen na.
Na het inschakelen komt er geen water bij de
aandrijfklep. De zuigklep staat dicht. Maak de klep open.
Het filter geeft een lage doorstroom. Het silex is vuil. Laat het filter automatisch reinigen.
Het filter lekt bij de aansluitpunten van de
slangen. De slangen zitten los of zitten slecht op de
aansluitpunten. Steek de aansluitpunten geheel in de slangen
en zet de slangklemmen vast.
Er komt water uit het bovenste mondstuk van
het filter. Er zit vuil in de pakking van het bovenste
mondstuk van het filter. Maak het mondstuk met zand schoon, plaats de
pakking op de juiste wijze en zet opnieuw vast.
Als de problemen aanhouden, neem dan contact op met de fabrikant van het zwembad op het in de handleiding aangegeven
telefoonnummer en tijden.
SLANG D.25 / D.32

20
INSTRUÇÕES FILTRO MONOBLOCO PORTUGUÊS
Leia com atenção este manual antes de instalar o filtro e siga rigorosamente as indicações durante a instalação e
respectivo uso.
Guarde este manual para futuras consultas sobre o funcionamento deste aparelho
INDICAÇÕES DE SEGURANÇA, LEIA COM ATENÇÃO
•No que se refere à instalação eléctrica dever-se-á seguir a norma:
NF C15-100
NF EN 60-335-20-41
relativa “à construção de instalações eléctricas, tanto em piscinas cobertas como em piscinas ao ar livre”, ou a norma
análoga vigente em cada região ou país.
•”Todas as filtrações seguem a norma de instalação C 15-100 que especifica que qualquer aparelho eléctrico situado
a menos de 3,5 m da piscina e com livre acesso deve estar alimentado com muito baixa tensão 12 V. Todo aparelho
alimentado com 220 V deve estar situado a, no mínimo, 3,5 m do bordo da piscina. Para qualquer modificação de um
ou de vários elementos do sistema de filtração”, deve-se pedir a autorização do fabricante.
•A instalação eléctrica deve ser realizada por profissionais qualificados em instalações eléctricas.
•A altura da areia não deve ultrapassar 2/3 da altura do depósito.
•Não deixe o aparelho ligado quando estiver a utilizar a piscina.
•Não faça o aparelho funcionar sem estar correctamente purgado.
•Não toque NUNCA no filtro em funcionamento com o corpo ou com as mãos húmidas.
•Quando tiver de manipular o filtro ou a válvula, DESLIGUE-O da tomada.
•Assegure-se de que o chão esteja seco, antes de tocar no equipamento eléctrico.
•Não coloque o filtro onde ele possa se molhar, pode causar electrocussão.
•Não permita que crianças ou adultos se apoiem ou sentem no aparelho.
•Se o cabo de alimentação flexível estiver danificado, deverá ser substituído. Leia com atenção as instruções para a
substituição do cabo. Em caso de dúvida consulte ou serviço técnico.
1COMPONENTES EMBALAGEM
O monobloco que você acaba de comprar é um aparelho que foi concebido e desenhado especialmente para ser
utilizado em piscinas elevadas. Com um desenho inovador e uma grande funcionalidade, dispõe dos elementos
necessários para filtrar a água, filtro e bomba num só aparelho.
Os principais componentes deste monobloco são:
Pos. Fig. Quant. Denominação
161Mangueira de ø25 mm e 4,5 m. de comprimento, (retorno).
261Válvula de retorno, junta e porca com união de ø25 mm.
361Mangueira de ø32 mm e 4,5 m. de comprimento, (aspiração).
461Válvula de aspiração, junta e porca, com união de ø32 mm.
561Mangueira de ø25 mm e 1 m. de comprimento, (impulsão).
661Conjunto filtro (bomba, botija, carga de areia 10 kg, cabo, união superior e porca).
766Braçadeiras fixação mangueiras.
871Adaptador mangueira (Lavagem de areia)
94-54Anéis de fricção
10 4-54Juntas de estanqueidade
Verifique se o seu aparelho monobloco integra todos os componentes
1.1 PARA INSTALAR O APARELHO CORRECTAMENTE
Devido à facilidade de instalação, este aparelho pode ser montado por uma única pessoa adulta durante
aproximadamente 2 HORAS, com a devida precaução de seguir rigorosamente as instruções descritas neste manual.
Para a manipulação correcta dos componentes do filtro e a sua correcta instalação, são necessárias as seguintes
ferramentas:
Função Ferramenta Ferramenta alternativa
Apertar os flanges das mangueiras Chave de parafuso stecker 7mm Chave de parafuso philips
Recortar o liner X-acto Lâmina gilete
Protecção do tubo do colector Pedaço de plástico Pedaço de tecido
Table of contents
Languages:
Other GRE Water Filtration System manuals
Popular Water Filtration System manuals by other brands

Novy
Novy novy 7941400 Installation and operating instructions

Marineland
Marineland Emperor owner's manual

Mocom
Mocom Milldrop user manual

Deltec
Deltec MCE 300 Operating instructions and spare parts list

DEKA Controls
DEKA Controls TOH Series installation manual

Pentair
Pentair SHURFLO WB6-M3-22-003-SS manual

Gardena
Gardena PF 10000 S operating instructions

enphase
enphase ELF-020-1P Quick install guide

Evince
Evince INSIGHT EV-IN-BW-948-1.0 owner's manual

Viqua
Viqua Trojanuvmax IHS12-D4 owner's manual

Grunbeck
Grunbeck desaliQ:MA Operation manual

SE Electronics
SE Electronics REFLEXION FILTER PRO Assembly & use instructions