GreenWorks GRV-5011 User manual

www.greenworkstools.comGRV-5011
ASPIRATEUR ROBOTIQUE
ROBOT ASPIRADOR


1 Safety Instructions............................ 4
1.1 Instructions for use............................................ 4
1.2 Safety precautions..............................................4
1.3 About child safety..............................................5
1.4 About the batteries.............................................6
1.5 Scope of use of the product............................... 6
1.6 Disclaimers........................................................ 6
1.7 FCC STATEMENT............................................6
2 Product overview...............................8
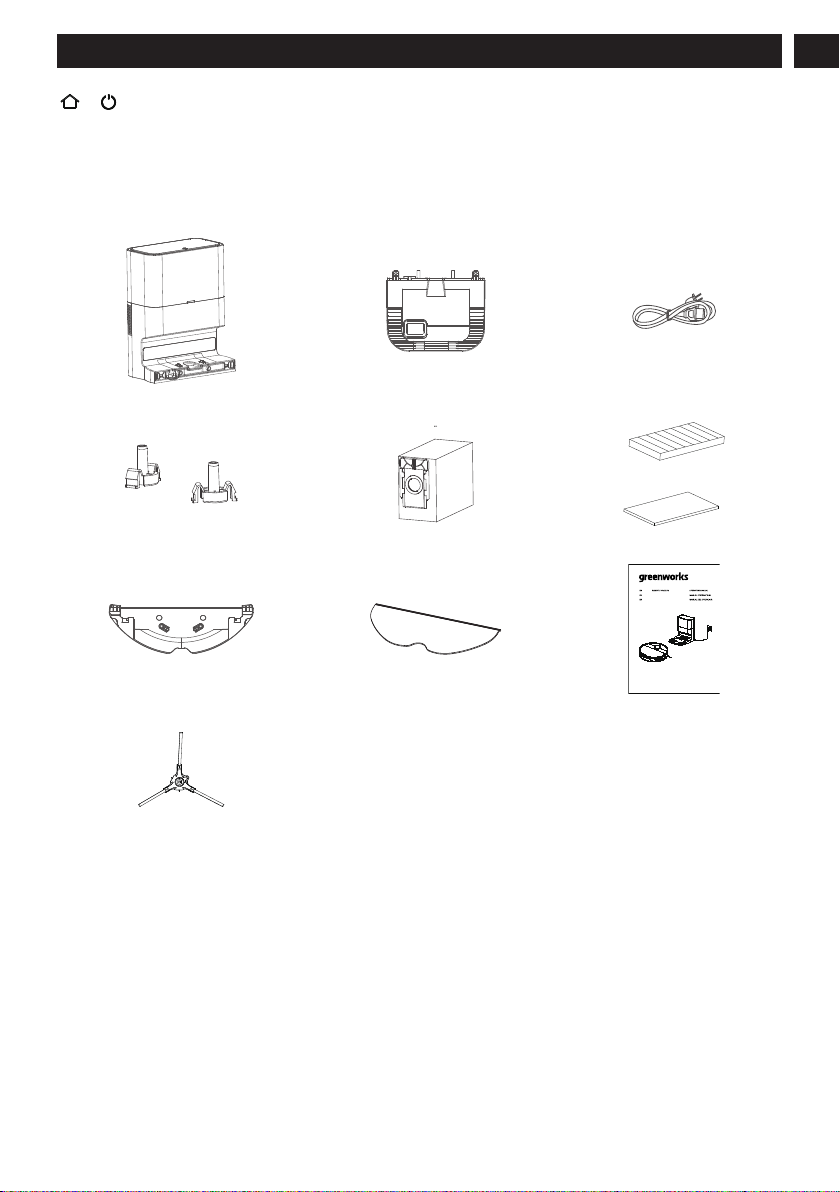
2.1 Machine and its accessories...............................8
2.2 Machine and dust box......................................10
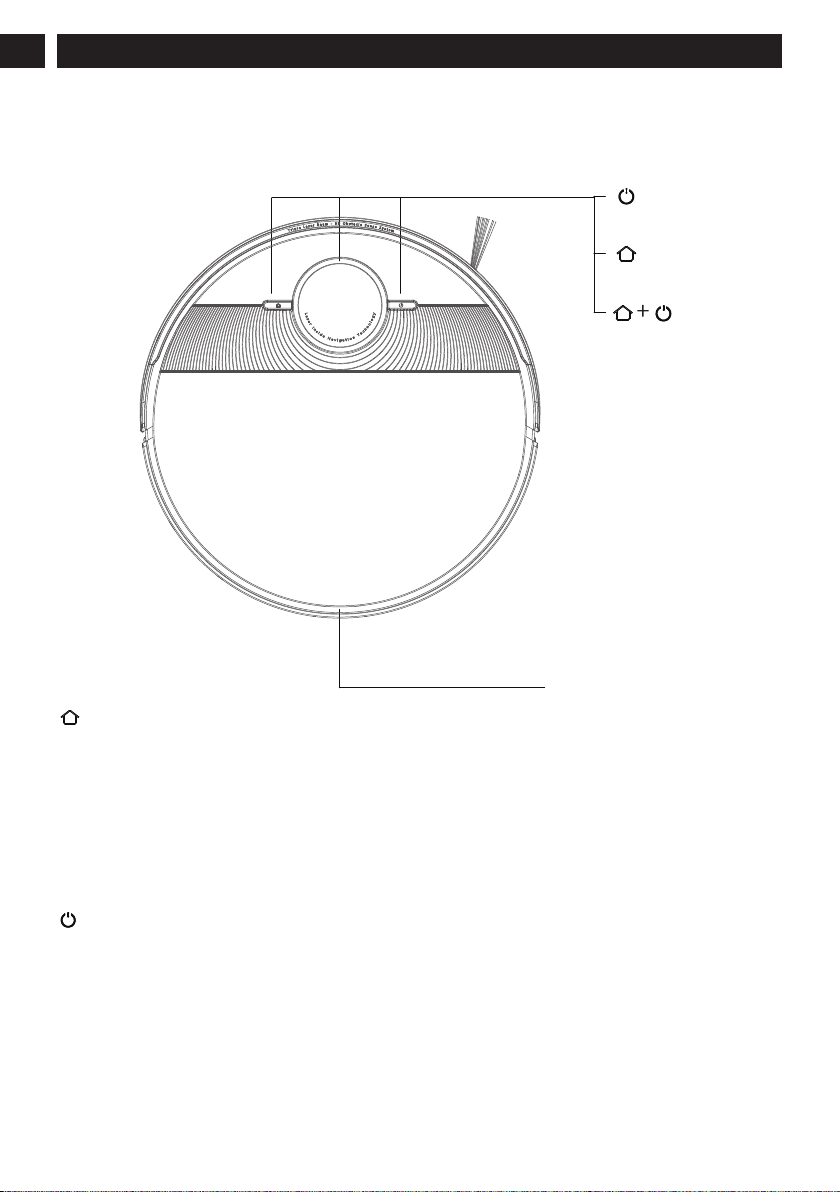
2.3 Machine and its sensors................................... 11
2.4 Mop module.....................................................12
2.5 Dust collecting and charging dock.................. 12
3 Installation....................................... 14
3.1 Assemble the dust collecting and charging
dock ................................................................ 14
3.2 Installation of Dust collecting and
charging dock ..................................................15
4 Operating Instructions....................16
4.1 Use of the machine.......................................... 16
4.2 Sweep modes................................................... 17
4.3 Select suction intensity (only in-app
operation supported)........................................ 18
4.4 Use of mop module..........................................18
4.5 Map management............................................ 20
4.6 System reset.....................................................20
5 Maintenance.....................................21
5.1 Clean dust box and water tank.........................21
5.2 Clean the main brush....................................... 22
5.3 Clean its side brushes...................................... 22
5.4 Clean caster......................................................22
5.5 Clean sensors and charging electrodes............ 22
5.6 Clean the mop module.....................................23
6 Common Faults............................... 23
6.1 Voice prompts.................................................. 23
6.2 Troubleshooting...............................................25
6.3 Faults in Wi-Fi connection.............................. 26
7 Technical Parameters......................27
8 IC warning....................................... 28
9 Warranty Card................................ 29
3
English EN

1 SAFETY INSTRUCTIONS
1.1 INSTRUCTIONS FOR USE
Please review the following basic safety precautions before using the product:
• Read the user manual carefully and follow the instructions in the user manual when using the product.
• Keep the user manual for future reference.
• If you need to transfer the product to a third party, include the user manual with the product.
• Any operation not in conformity to the instructions in the user manual may result in serious personal injury or damage to the
product itself.
• This appliance is to only be used with the power supply provided.
1.2 SAFETY PRECAUTIONS
Warning
This product can only be used with the adapter, batteries and charging dock
provided with this product. Failure to do so may result in damage to the product,
electrical shock, or fire caused by high voltage.
Do not use this product if the appliance and/or accessories are found to be
damaged. Contact our service department. Except for the service technicians
designated or authorized by our company, no one may disassemble, repair or
modify this product.
Unplug the product before maintenance.
Do not touch the power plug or the product when your hands are wet, as this
may result in electrical shock.
If the power cord is damaged, it must be replaced by the manufacturer, its
service department or a similar professional.
To prevent the product from falling accidentally, do not use in a suspended
place without a protective fence, which may result in personal injury.
User should not attempt to replace the batteries. Contact the manufacturer for
battery replacement.
Prevent clothing or any part of your body (hair, fingers, etc.) from getting
caught in the brush or wheel of the vacuum cleaner. Failure to do so may result
in personal injury.
Do not place the product near fire or flammable, explosive or corrosive
materials.
If the user manual is missing, contact your local dealer or call the manufactur-
er’s service department to obtain an electronic user manual.
4
English
EN

Caution
This product should only be
used indoors.
Prevent the suction of water,
oil or other liquids, which
may damage the vacuum
cleaner.
Remove scattered wires from
floor before use to avoid af-
fecting the normal operation
of the vacuum cleaner.
Remove fragile objects before
use.
The charging dock should be
placed on a flat floor by a wall
to ensure proper product func-
tionality.
Unplug charging dock when
unused for an extended period
of time.
When the product is working,
removal of the charging dock
will affect the normal recharg-
ing of the machine.
Do not use product to vacuum
sharp objects (e.g., shattered
glass, nails, etc.) to avoid dam-
age to the product.
Do not use product in a wet,
flammable, explosive or corro-
sive environment.
Do not use the mopping func-
tion on a carpet.
1.3 ABOUT CHILD SAFETY
• Keep away from children! This appliance should only be used by children aged
eight (8) and above and/or persons with reduced physical, sensory or mental capa-
bilities or lack of experience and knowledge if they have been provided supervision
and/or instructions concerning safe use of the appliance, and fully understand the
hazards involved.
• This is not a toy. Children should not play with the appliance.
• Children should not clean or do maintenance without supervision.
5
English EN
High voltage danger! Be careful
of electric shock. Please dry
your hands before operation!

1.4 ABOUT THE BATTERIES
1. Only the batteries provided by the manufacturer are applicable to the product.
2. Before discarding the product, please remove the battery as follows:
• Use a screwdriver to loosen the screws of the side brush and the base decoration plate;
• Remove the base plate.;
• Take out the battery and unplug the connection cable between the battery and the vacuum.
3. Make sure that the product is powered off before removing the battery. Battery should be disposed of
properly.
4. Contact manufacturer’s service department for battery replacement.
5. Use of incorrect batteries may cause injury or accident.
6. If the batteries leak, prevent the contact of the liquid with the skin or clothing. Immediately wipe it with a
dry cloth and send it to the recycling station or designated maintenance point. Do not discard battery.
7. The batteries contain hazardous substances harmful to the environment. Battery should be disposed of
properly. Please follow the local environmental regulations and send them to the designated recycling site.
1.5 SCOPE OF USE OF THE PRODUCT
Scope of application The product is suitable for the following floors:
Wooden floor Ceramic tile Short-staple carpet
1.6 DISCLAIMERS
Manufacturer’s warranty will be null and void under any of the following circumstances:
• Damage due to the user’s failure to operate the product in strict accordance with our user manual, or due to improper
storage;
• The machine or parts have exceeded the free warranty period;
• Damage due to disassembly by those other than the manufacturer or maintenance personnel authorized by manufacturer.
• A valid purchase voucher number cannot be provided;
• The product model on the warranty card does not match the product to be repaired, or is altered in any way;
• Damage caused by uncontrollable factors such as natural disasters;
• Product failure or damage caused by unexpected factors or man-made causes (including operational errors, liquid ingress,
improper plugging/unplugging, scratching, handling, bumping, input of inappropriate voltage, etc.)
NOTE
Manufacturer provides a warranty for the product in accordance with the “National New Regulations on Warranty”. For details,
please check the warranty card provided with the product.
1.7 FCC STATEMENT
1. This device complies with Part 15 of the FCC Rules. Operation is subject to the following two conditions:
6
English
EN

(1) This device may not cause harmful interference,and
(2) This device must accept any interference received, including interference that may cause undesired operation.
2. Any changes or modifications not expressly approved by the party responsible for compliance could void the user's authority
to operate the equipment.
NOTE: This equipment has been tested and found to comply with the limits for a Class B digital device, pursuant to Part 15 of
the FCC Rules. These limits are designed to provide reasonable protection against harmful interference in a residential installation.
This equipment generates uses and can radiate radio frequency energy and, if not installed and used in accordance with the
instructions, may cause harmful interference to radio communications. However, there is no guarantee that interference will not
occur in a particular installation. If this equipment does cause harmful interference to radio or television reception, which can be
determined by turning the equipment off and on, the user is encouraged to try to correct the interference by one or more of the
following measures:
• Reorient or relocate the receiving antenna.
• Increase the separation between the equipment and receiver.
• Connect the equipment into an outlet on a circuit different from that to which the receiver is connected.
• Consult the dealer or an experienced radio/TV technician for help.
FCC Radiation Exposure Statement
This equipment complies with FCC radiation exposure limits set forth for an uncontrolled environment. This equipment should
be installed and operated with minimum distance 20cm between the radiator & your body.
7
English EN

2 PRODUCT OVERVIEW
2.1 MACHINE AND ITS ACCESSORIES
TABLE 1: MACHINE
Flip port
Home Button
• Press to return to dock for charging. Press again to pause
• Press and hold for 3 seconds to start fixed-point cleaning
• In the charging state, press once to start dust collection
LED Status Indicator
• White: working state light. Battery level ≥20%
• Yellow: low battery state light. Battery level < 20%
• Red: Fault
Cleaning On/Off button
• Press and hold for 3 seconds to turn on or off (only when vacuum is not being charged).
• Press to start cleaning.
• Press to pause the task.
8
English
EN

+
Home button + on/off button
• Press and hold both buttons simultaneously for 3 seconds to reset Wi-Fi connection.
• Flashing: charging or starting in progress
• Fast flashing in red: fault state
TABLE 2: ACCESSORIES
Dust collecting and charging dock ×1 Bottom tray ×1 Power cord ×1
Tray Fastener ×2 Disposable dust bag ×1 Filter combination ×2
www.greenworkstools.comGRV-5011
ASPIRATEURROBOTIQUE
ROBOT ASPIRADOR
Mop holder ×1 Common mop ×1 User manual ×1
Side brush ×2
Note: A filter combination and battery have been installed in the vacuum cleaner; a disposable dust bag has been installed in the
dust collection charging stand ; the illustrations in this manual are for reference only, and the actual appearance is subject to the
actual product.
9
English EN

2.2 MACHINE AND DUST BOX
System reset button
Dust box
Button for taking out dust box
Button for taking out water tank
Button for removal of the mop holder
Wi-Fi indicator:
• Blinking slowly in white:
Wait for connection
• Blinking fast in white:
Being connected to Wi-Fi
• Normally on in white:
Wi-Fi connected
Dust box
Air outlet
Cleaning brush
Suction inlet
Filter
Foam filter
High-performance filter
Dust outlet at the bottom
of the dust box
10
English
EN

2.3 MACHINE AND ITS SENSORS
Collision buffer
Along-the-wall side sensor
Built-in TOF lidar
Front bumper laser sensor
for obstacle avoidance
Anti-drop sensor
Side brush
Charging electrode
Caster
Rolling brush
Rolling brush cover
Dust outlet at the bottom
Caster
Water outlet
11
English EN

2.4 MOP MODULE
Water outlet
Removal button
BuckleBuckle
Washable
mopping cloth Stick a mopping
cloth here
Slot
2.5 DUST COLLECTING AND CHARGING DOCK
Charging dock indicator
• Normally on in white: The charging dock has been connected to a power supply (when the machine is not connected to the
charging dock);
• White light off: The machine is correctly connected with the charging dock;
• White light flashing 3 times: When a relevant instruction is received;
• Red light normally on: The dust bag or the dust collecting and charging dock cover is not installed in place;
• Red light flashing 3 times: When a dust collection error or wrong operation occurs.
Charging
electrode
Infrared lens
State indicator
12
English
EN

Filter (non-removable)
Flip cover closure sensor
Inner chamber for dust bag
Dust outlet
Dust bag slot
Air pressure sensor
(assisted detection of full
dust or blocked pipe)
Cable winding pile
Power outlet
Outlet slot
Air outlet
Dust collection port
Bottom tray
Flip cover
State indicator
Infrared lens
Charging pole pieces
13
English EN

Bottom tray
(removable)
Non-slip
foot pad
Bottom tray
fixing buckle
Dust
collection
pipe
3 INSTALLATION
3.1 ASSEMBLE THE DUST
COLLECTING AND CHARGING
DOCK
1. Locate the dust collecting and charging dock, bottom tray,
and bottom tray fasteners;
2. Connect the dust collecting and charging dock with the
bottom tray, and ensure proper connection;
3. Insert the fasteners into the bottom tray and press until
they click to complete the assembly of the dust collecting
and charging dock;
4. Take out the dust bag and check whether the dust bag is
in good condition, open the cover, insert the dust bag into
the dust bag slot to the bottom, close the cover, and it can
be used after power on.
14
English
EN

NOTE
• If the dust bag is not installed or is not installed
properly, the red light of the dust collecting and
charging dock indicator is normally on, and the dust
collection operation cannot be started.
• Before using the dust bag, please be sure to check
whether the dust bag is damaged. If it is damaged, it
will cause damage to the fan of the dust collecting and
charging dock.
3.2 INSTALLATION OF DUST
COLLECTING AND CHARGING
DOCK
1. Connect the charging dock with the adapter. Prevent the
adapter wire from winding the machine during sweep.
Connect the adapter to the wall socket and keep the
power on.
2. Place the charging dock on a flat hard ground
perpendicular to a wall and keep it clear of obstacles
within 1.5 meters in front of it and within 0.5 meters on
its left and right.
19.7 in.
(0.5M)19.7 in.
(0.5M)
59.1 in.
(1.5M)
NOTE
• Install the charging dock at a location easily
accessible by the machine. It is recommended to
place the charging dock on a hard ground, instead
of a carpet, against a wall.
• Keep the charging dock powered, or the machine
will not automatically return.
• To ensure normal charging, do not move the
charging dock frequently. Once the machine
location is changed, the machine may regenerate
a map due to repositioning failure (for details, see
Operating Instructions > Map Management).
3. Startup and charging
Press and hold on the machine for 3 seconds to turn
it on. Before use for the first time, the machine shall
be fully charged (about 4.5 hours) to ensure normal
operation.
• Place the machine on the charging dock and align it
with the charging port. When the white indicator on
the charging dock goes off, charging will begin.
LED indicator
The power indicator color indicates the battery level:
• White ≥20%
• Yellow red < 20%
15
English EN

NOTE
• You may not be able to start the machine when the
battery is low. Please fully charge it and try again.
• To ensure the service life of the battery, please
charge and discharge at least once every six months.
• To enter the low power standby mode when the
machine is being charged, press and hold and
for 20 seconds until the power status indicator
goes off. Wi-Fi will be disabled when this mode
is active. Press to exit the low power standby
mode.
4. Install the app
① Download
Scan the QR code and download and install the mobile
application.
NOTE
If the mobile phone cannot be connected to the robot,
please refer to – “Reset Wi-Fi”.
② Reset Wi-Fi
A. Open the machine top cover to expose the Wi-Fi
indicator.
B. Press and hold and simultaneously till the voice
prompts "reset Wi-Fi". Wait till the Wi-Fi indicator starts
blinking slowly in white, indicating that the robot vacuum
has entered the network configuration mode.
Wi-Fi indicator:
Wi-Fi indicator:
• Blinking slowly in white: Wait for connection
• Blinking fast in white: Being connected to Wi-Fi
• Normally on in white: Wi-Fi connected
③ Add devices
Open the app and create a new account, click the
"+" icon in the upper right corner of the page.
Perform network configuration operations according to
the internal instructions of the APP.
NOTE
• Only the 2.4GHz band, but not the 5GHz one, is
supported in the Wi-Fi connection.Please switch
to the 2.4GHz band if your Wi-Fi network is dual-
band and try again.
• If the connection between your phone and robot
vacuum fails, you can reset Wi-Fi again and add
it again after entering the network configuration
mode.
• As version upgrade and update may be made,
please follow internal guidelines in the app for
operation.
5. Start sweep by operating it from the app or pressing
manually.
The machine automatically returns to the charging dock
for charging under the following conditions:
A. The machine has completed sweep;
B. Sweep has not been completed yet but the battery
power level is insufficient; Once the battery is charged to
80%, the machine will resume to complete the remaining
sweep work.
NOTE
Do not move the charging dock during sweep, and
make sure the charging dock is powered on, or the
machine may not be able to return for charging. If
automatic recharge fails, you shall manually connect it
to the charging dock.
4 OPERATING INSTRUCTIONS
4.1 USE OF THE MACHINE
A. Startup/shutdown
• When the machine is connected to the charging dock, it
will start automatically.
• If the machine is not connected to its charging dock, press
and hold for 3 seconds to start it up. Wait until the
power status indicator turns white and is kept ON.
• If the machine is not connected to its charging dock, press
and hold for 3 seconds to shut it down.
16
English
EN

B. Start sweep
•Press to start the auto sweep mode. Once it is
started, the machine will leave the charging dock, scan
automatically to generate a map, intelligently determine
its sweep route, and divide the space into multiple areas.
The sweep route route will be planned along the wall to
sweep in straight lines back and forth to thoroughly clean
on area at a time.
NOTE
• If the battery level is too low to start sweep, please
charge it first.
• Before sweeping all wires on the ground should be
well organized or damage to articles may occur.
• In the auto sweep mode, by default the machine will
do sweeping twice if the sweep duration is shorter
than 10 minutes.
C. Pause
• When the robot vacuum is operating, press to pause.
Press again to resume sweep. During sweep, press once
to stop the current sweep and press twice to return to the
charging dock automatically.
D. Hibernation
•When the robot vacuum is operating, press to pause.
Press again to resume sweep. During sweep, press
once to stop the current sweep and press twice to
return to the charging dock automatically.
E. Charging
• Auto recharge: After sweep, the white light of the
recharge button will keep blinking and the machine
will automatically return to the charging dock for
charging.
• Manual recharge:
a. If it is paused, press to recharge it automatically;
b. When the machine is stuck or cannot find the charging
dock, please manually return it to the charging dock for
charging.
F. Fault
• Please refer to the "Common Faults” section herein or
guidelines in the app for repair when any abnormality
occurs to your robot vacuum in operation and the power
indicator is blinking in red with voice prompts.
NOTE
• If it cannot be repaired after the above operations,
please contact our Service Department for consultation
or repair. Do not disassemble the machine by yourself.
G. Reset Wi-Fi
•Press and simultaneously for 3 seconds to reset
your Wi-Fi connection when your router has changed,
you've forgotten the password or your phone is unable to
connect to the machine normally for other reasons. The
Wi-Fi status indicator will be blinking slowly in white.
After the Wi-Fi connection is reset, there will be a voice
prompt. After that, you can reset the Wi-Fi connection as
instructed in this app.
4.2 SWEEP MODES
A. Auto Sweep
•Auto Sweep is the default mode after startup. Press
to start it. The machine will start off the charging dock,
automatically scan and plan the sweep map and path,
and sweep your rooms. After the task is complete, the
machine will return automatically for recharge. It is fast
and convenient.
B. Sweep at Fixed Point
• After the mode is enabled, the machine will sweep a
rectangular area of 1.5m X 1.5m centered on itself. This
mode is very useful if you have any area with much
dust or debris to clean. After such specific area has
been swept, the machine will automatically return to the
charging dock.
a. Manual startup: Move the machine to the area to be
cleaned, press and hold for 3 seconds to start it up.
b. Startup using app: Open the app, select Pin n Go, and
follow the instructions.
17
English EN

C. Area-specific Sweep (only in-app operation supported)
• Select Zone in the app and set a sweep area. The machine
will sweep this area only and return to the charging dock
after sweep.
;
NOTE
Area-specific Sweep can only be started after a map is
created.
D. Zone cleaning mode (It is only supported with the
mobile App)
• Use the mobile APP to set the zone cleaning, and the
robotic vacuum cleaner will clean one or more rooms
checked on the APP zoning map.
ĸ$&ĸ%'
NOTE
• After starting to clean, the vacuum cleaner may
enter the zone outside the selected zone, clear
floor obstacles around the selected zone. The zone
selection cannot ensure safe isolation;
• Zone cleaning can be started only after the vacuum
cleaner successfully creates a map.
E. Remotely Controlled Sweep (only in-app operation
supported)
• Manual Remotely-Controlled Sweep is available in the
app to make the machine go to the area to be cleaned.
4.3 SELECT SUCTION INTENSITY
(ONLY IN-APP OPERATION
SUPPORTED)
Select an sweep intensity in this app as required:
• Floor mopping only
• Quiet
• Standard
• Power
• Max
4.4 USE OF MOP MODULE
① Take out the water tank and add water.
18
English
EN

NOTE
If you want to use floor disinfectant or cleaning solution,
first fill the water tank with clean water, then pour in
an appropriate amount of disinfectant or cleaning solution
according to the dilution ratio, and shake evenly for dilution
before use, otherwise long-term use of high-concentration
cleaning solution will cause pipe blockage or corrosion of
the machine.
② Wet your mopping cloth before mopping, install the
mopping cloth on its holder, and then install the holder to
the machine bottom. (In order to ensure mopping results,
the machine's obstacle-crossing performance will be reduced
after the mopping cloth is put in.)
③ Select a sweep mode to start sweep, and select the amount
of mopping water (3 levels) in the app as necessary. (To
prevent the machine from wetting any of your carpets when
mopping your floor, it is recommended to place virtual wall
(for no mopping) around carpet areas using the app to protect
your carpets)
Dry mopping
LOW
④ When the machine returns to the charging dock after
completing its work, hold buckles on both sides by hand and
drag backward to remove the mop module.
19
English EN

⑤ Empty the remaining water in the water tank. Wash the
mopping cloth to avoid mildew and odor.
NOTE
• Please do not use the mopping mode on any carpet.
• It is recommended to wash the mopping cloth after each
mopping.
• When the machine is being charged or idle, please
remove the mop module.
• In order to achieve better mopping results, it is
recommended to sweep your floor three times with the
machine before installing the mop module.
• To avoid damaging your wood floor, please make sure
to take out the mop module immediately after floor
mopping is complete. Or install the charging dock onto
the waterproof pad (optional).
• When mopping is paused or finished, the machine will
automatically cut off water. However, the mopping
cloth remains wet and should not be left in place for
too long but removed in time.
4.5 MAP MANAGEMENT
A. Map your rooms in real time
• Real-time mapping helps you easily understand the sweep
route and environment. After sweep, a floor plan of your
rooms will be generated. Maps will be updated in real
time during each sweep to ensure normal navigation.
Generate a complete floor plan of your rooms:
a. Open room doors so that the machine generates a map
of each room;
b. Remove any object that may block or jam the machine;
c. After generating maps, please do not disassemble or
move the charging dock;
B. Repositioning and map regeneration
• If the location of the machine/charging dock is adjusted
or the surrounding environment changes significantly, the
machine will try repositioning and may regenerate a map
to adapt to the surrounding environment. Details are as
follows:
a. If repositioning is successful, the machine will resume
sweep;
b. If repositioning fails, the machine will regenerate a
map to ensure normal navigation for new sweep;
c. If repositioning fails and virtual boundary information
(restricted area) is available in the original map, the
machine will not start a new sweep to avoid crossing any
restricted area.
NOTE
• Make sure that the machine always starts sweep from
the charging dock.
• Do not move the equipment frequently during sweep.
Otherwise, put the machineback to its home position.
4.6 SYSTEM RESET
• If the machine does not respond after pressing any button
thereon, it is an option to reset the system.
a. Ensure that the machine is not on the charging dock;
b. Press the reset button with a paper clip and the machine
will shut down automatically.
c. Connect the machine to the charging dock or press and
hold the key for 3 seconds to turn it ON and system
reset will be completed.
20
English
EN
Table of contents
Other GreenWorks Vacuum Cleaner manuals

GreenWorks
GreenWorks VUF401 User manual

GreenWorks
GreenWorks 4700007AU User manual

GreenWorks
GreenWorks VUG402 User manual

GreenWorks
GreenWorks VUG403 User manual

GreenWorks
GreenWorks VUG403 User manual

GreenWorks
GreenWorks VUF301 User manual

GreenWorks
GreenWorks BVU24211 User manual

GreenWorks
GreenWorks WDV40B00 User manual

GreenWorks
GreenWorks GRV-3011 User manual

GreenWorks
GreenWorks WDV24B00 User manual