SCHLOSSKÄSTEN (STUDIO) FÜR GLASTÜREN / LOCK CASE (STUDIO) FOR GLASS DOORS
1/2 Technische Änderungen vorbehalten / subjecttoalterations 12/2020 cqGRIFFWERK GmbH - Lindenstraße 90 - D-89134 Blaustein
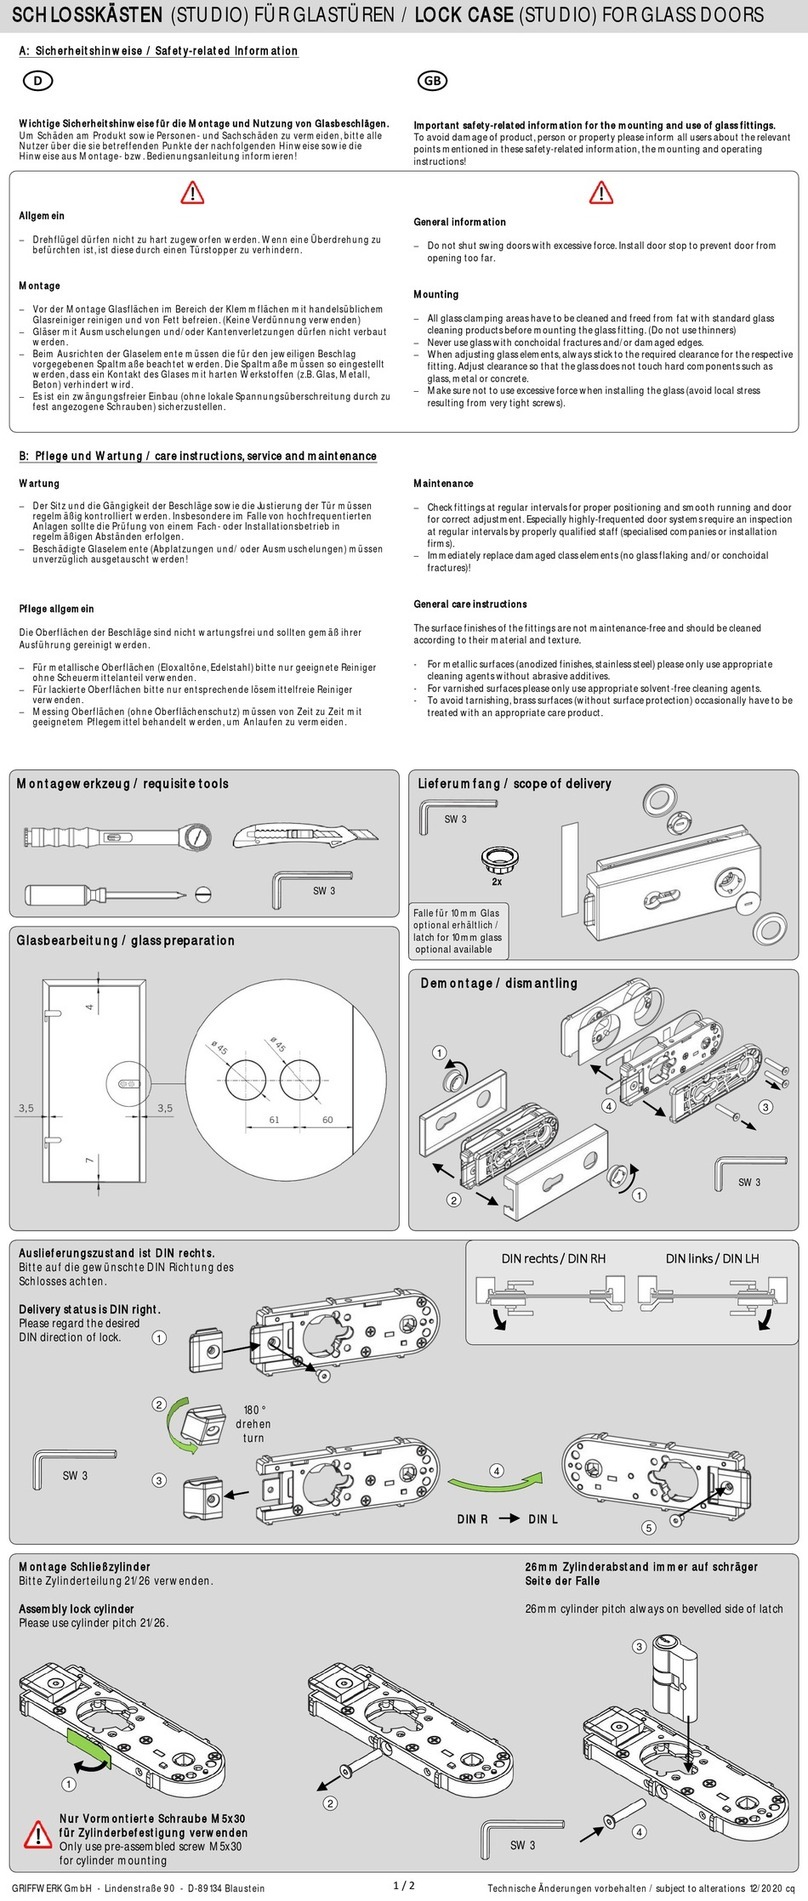
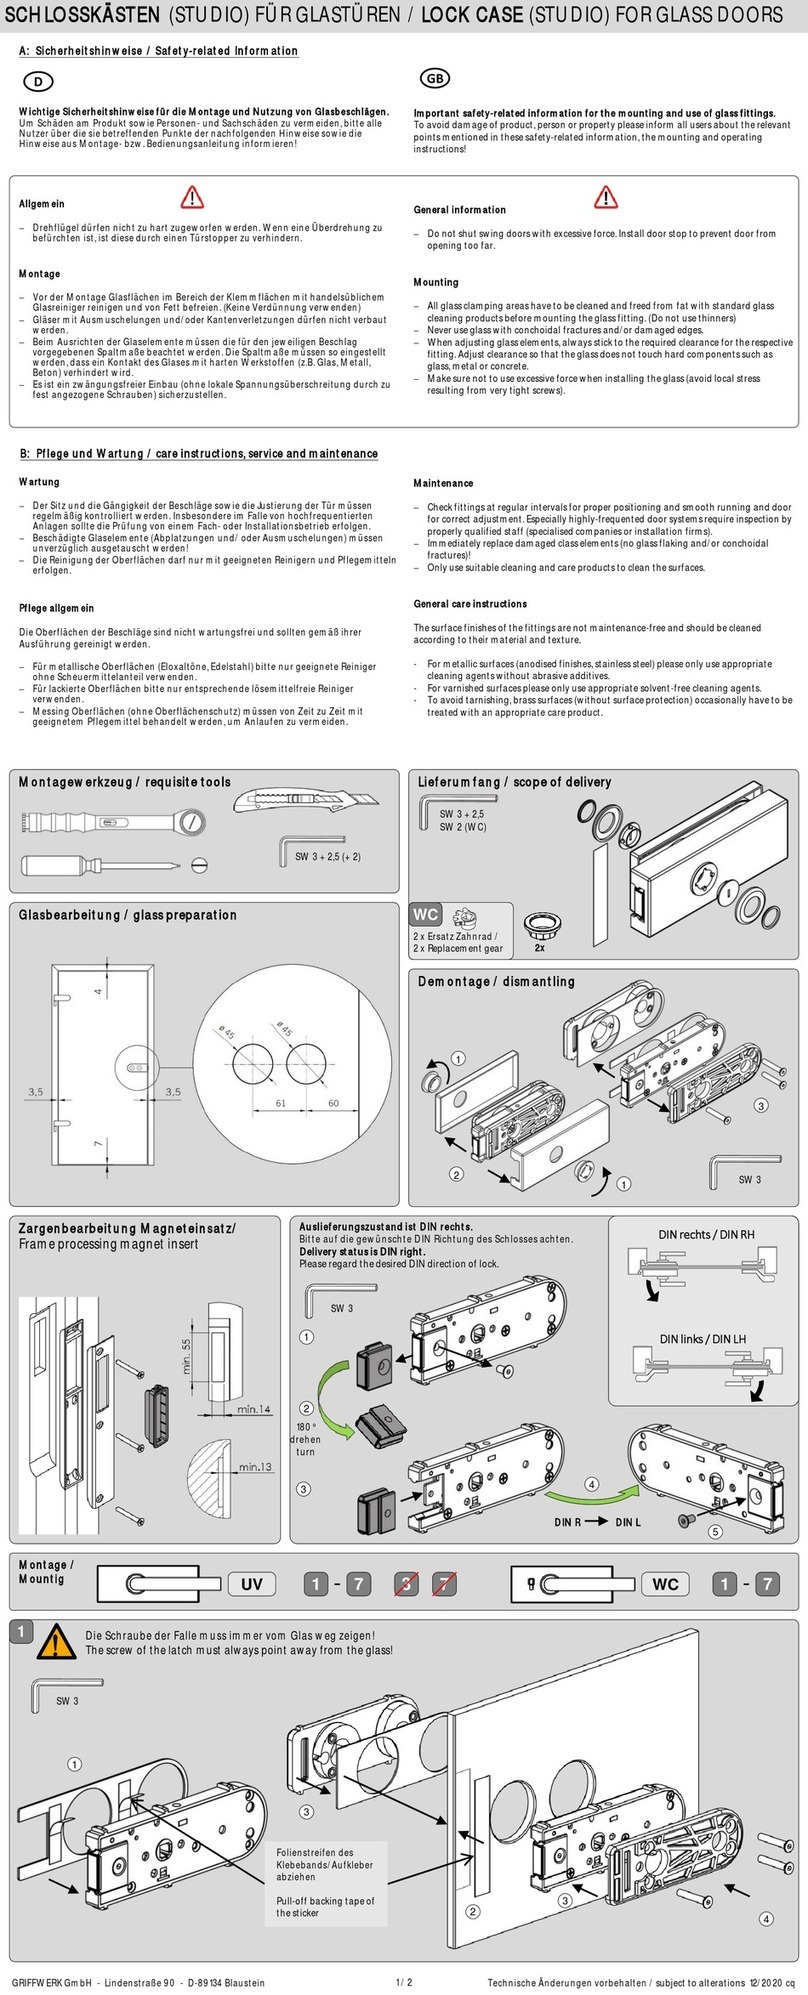
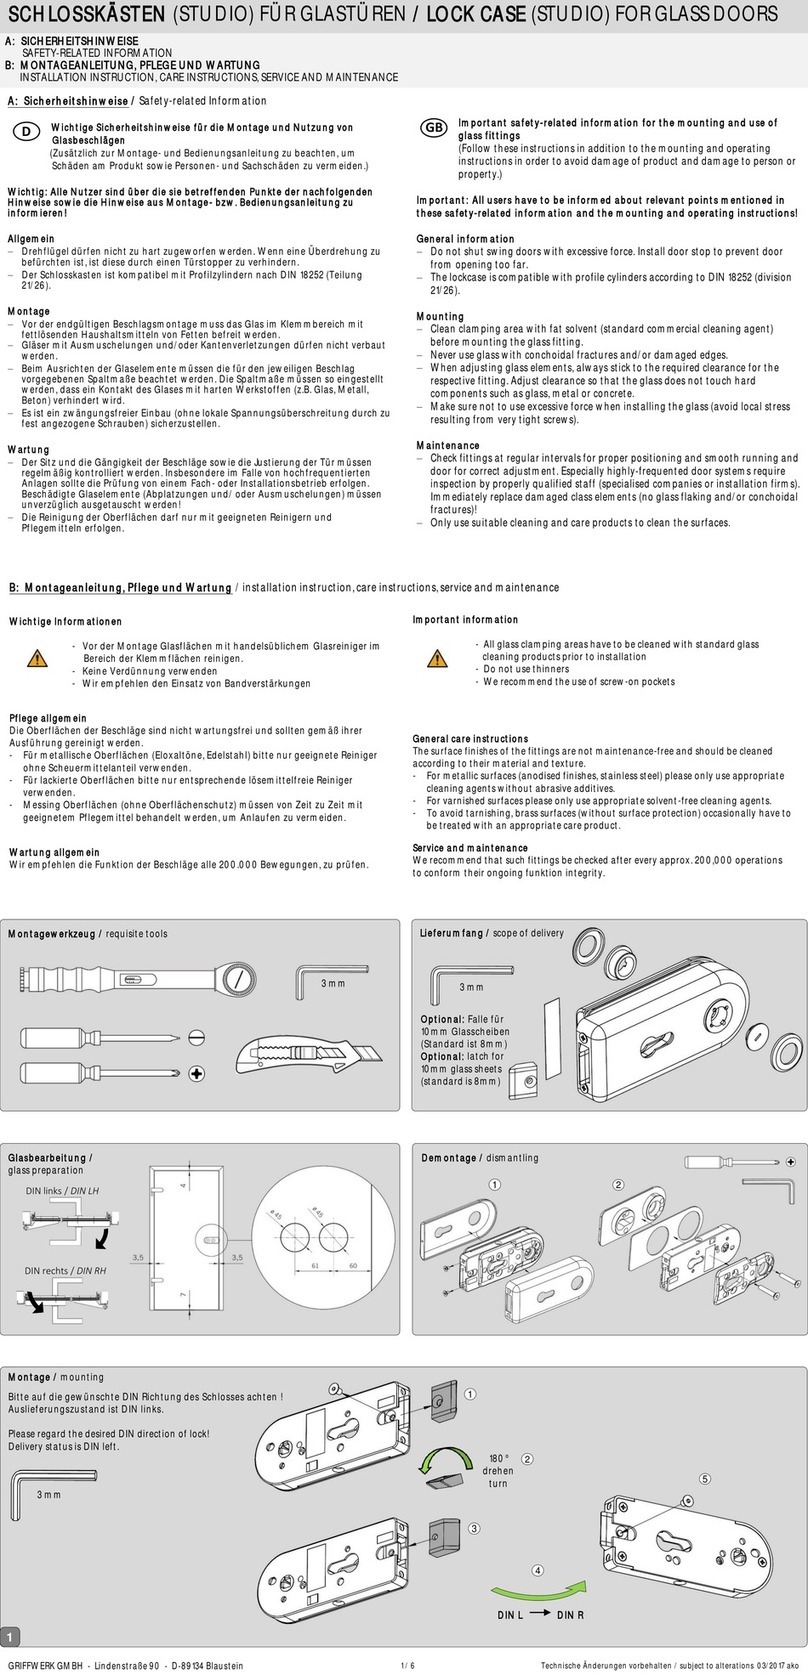
Montagewerkzeug / requisite tools Lieferumfang / scope of delivery
SW 3 + 2,5 (+ 2)
Glasbearbeitung / glass preparation
180°
drehen
turn
Auslieferungszustand ist
DIN rechts.
Bitte auf die gewünschte DIN
Richtung des Schlosses
achten.
Delivery status is DIN right.
Please regard the desired DIN
direction of lock.
DIN R DIN L
Important safety-related information for the mounting and use of glass fittings.
To avoid damage ofproduct, person or property pleaseinform all users about the relevant
points mentionedin thesesafety-related information, themounting and operating
instructions!
General information
−Do not shutswing doors with excessiveforce. Install door stop to prevent door from
opening too far.
Mounting
−All glass clamping areas haveto be cleanedand freed from fat with standard glass
cleaning products before mounting theglass fitting. (Do not use thinners)
−Never useglass with conchoidal fractures and/or damaged edges.
−When adjusting glass elements, always stickto the required clearance for the respective
fitting. Adjust clearance so that theglass does not touchhard componentssuch as
glass, metalor concrete.
−Make surenot to use excessive forcewhen installing theglass (avoid local stress
resulting from very tight screws).
A: Sicherheitshinweise / Safety-related Information
Wichtige Sicherheitshinweise für die Montage und Nutzung von Glasbeschlägen.
Um Schäden am Produkt sowie Personen- und Sachschäden zu vermeiden, bitte alle
Nutzerüber die sie betreffenden Punkte dernachfolgenden Hinweisesowie die
Hinweise aus Montage- bzw. Bedienungsanleitung informieren!
Allgemein
−Drehflügel dürfen nicht zu hart zugeworfen werden. Wenn eine Überdrehung zu
befürchten ist, ist diese durch einenTürstopper zu verhindern.
Montage
−Vor der Montage Glasflächen im Bereichder Klemmflächen mit handelsüblichem
Glasreinigerreinigenund von Fett befreien. (Keine Verdünnung verwenden)
−Gläser mit Ausmuschelungen und/oder Kantenverletzungen dürfen nicht verbaut
werden.
−Beim Ausrichten der Glaselemente müssen die für den jeweiligen Beschlag
vorgegebenen Spaltmaße beachtet werden. Die Spaltmaße müssen so eingestellt
werden, dass ein Kontakt des Glases mit harten Werkstoffen (z.B. Glas, Metall,
Beton) verhindert wird.
−Es ist ein zwängungsfreier Einbau (ohne lokaleSpannungsüberschreitung durch zu
fest angezogene Schrauben) sicherzustellen.
DGB
Wartung
−Der Sitz und die Gängigkeit der Beschläge sowie die Justierung der Tür müssen
regelmäßigkontrolliert werden. Insbesondere im Fallevon hochfrequentierten
Anlagen sollte diePrüfung von einem Fach- oder Installationsbetrieb erfolgen.
−Beschädigte Glaselemente (Abplatzungen und/ oder Ausmuschelungen) müssen
unverzüglich ausgetauscht werden!
−Die Reinigung der Oberflächen darf nur mit geeigneten Reinigern und Pflegemitteln
erfolgen.
Pflege allgemein
Die Oberflächen der Beschläge sind nicht wartungsfrei und sollten gemäß ihrer
Ausführung gereinigt werden.
−Für metallische Oberflächen (Eloxaltöne, Edelstahl) bitte nur geeignete Reiniger
ohne Scheuermittelanteil verwenden.
−Für lackierte Oberflächen bitte nur entsprechende lösemittelfreie Reiniger
verwenden.
−Messing Oberflächen (ohne Oberflächenschutz) müssen von Zeit zu Zeit mit
geeignetem Pflegemittel behandelt werden, um Anlaufen zu vermeiden.
Maintenance
−Check fittings at regular intervals for proper positioning and smooth running and door
for correct adjustment.Especially highly-frequented door systems require inspection by
properly qualified staff (specialised companies or installation firms).
−Immediately replacedamaged classelements (no glass flaking and/or conchoidal
fractures)!
−Only use suitable cleaning and care products to clean thesurfaces.
General care instructions
The surface finishesof the fittings are notmaintenance-free and should be cleaned
according to theirmaterial and texture.
-For metallic surfaces (anodised finishes,stainless steel) pleaseonly use appropriate
cleaning agents without abrasive additives.
-For varnished surfacesplease only useappropriate solvent-free cleaning agents.
-To avoid tarnishing, brass surfaces (without surfaceprotection) occasionally have to be
treated withan appropriate care product.
B: Pflege und Wartung / care instructions, service and maintenance
17
-
Montage /
Mountig 3
WC
1 7
-
UV
DIN rechts / DIN RH DIN links / DIN LH
SW 3
SW 3
1
2
3
4
5
1
3
21
1Die Schräge der Falle muss immer zum Glas zeigen!
Bevelled side of latch must always pointto the glass!
SW 3
Folienstreifen des
Klebebands/Aufkleber
abziehen
Pull-off backing tape of
thesticker
1
3
3
2
4
7
Falle für 10mm Glas
optionalerhältlich /
latch for 10mm glass
optional available
SW 3 + 2,5
SW 2 (WC)
2 x ErsatzZahnrad /
2x Replacementgear
WC
2x
Demontage / dismantling
!
