manuals.online logo
Brands
  1. Home
  2. •
  3. Brands
  4. •
  5. Griffwerk
  6. •
  7. Door Lock
  8. •
  9. Griffwerk STUDIO Operation manual

Griffwerk STUDIO Operation manual

Important safety-related information for the mounting and use of
glass fittings
(Follow these instructions in addition to the mounting and operating
instructions in order to avoid damage of product and damage to person or
property.)
Important: All users have to be informed about relevant points mentioned in
these safety-related information and the mounting and operating instructions!
General information
−Do not shut swingdoors with excessive force. Install door stop to prevent door
from opening too far.
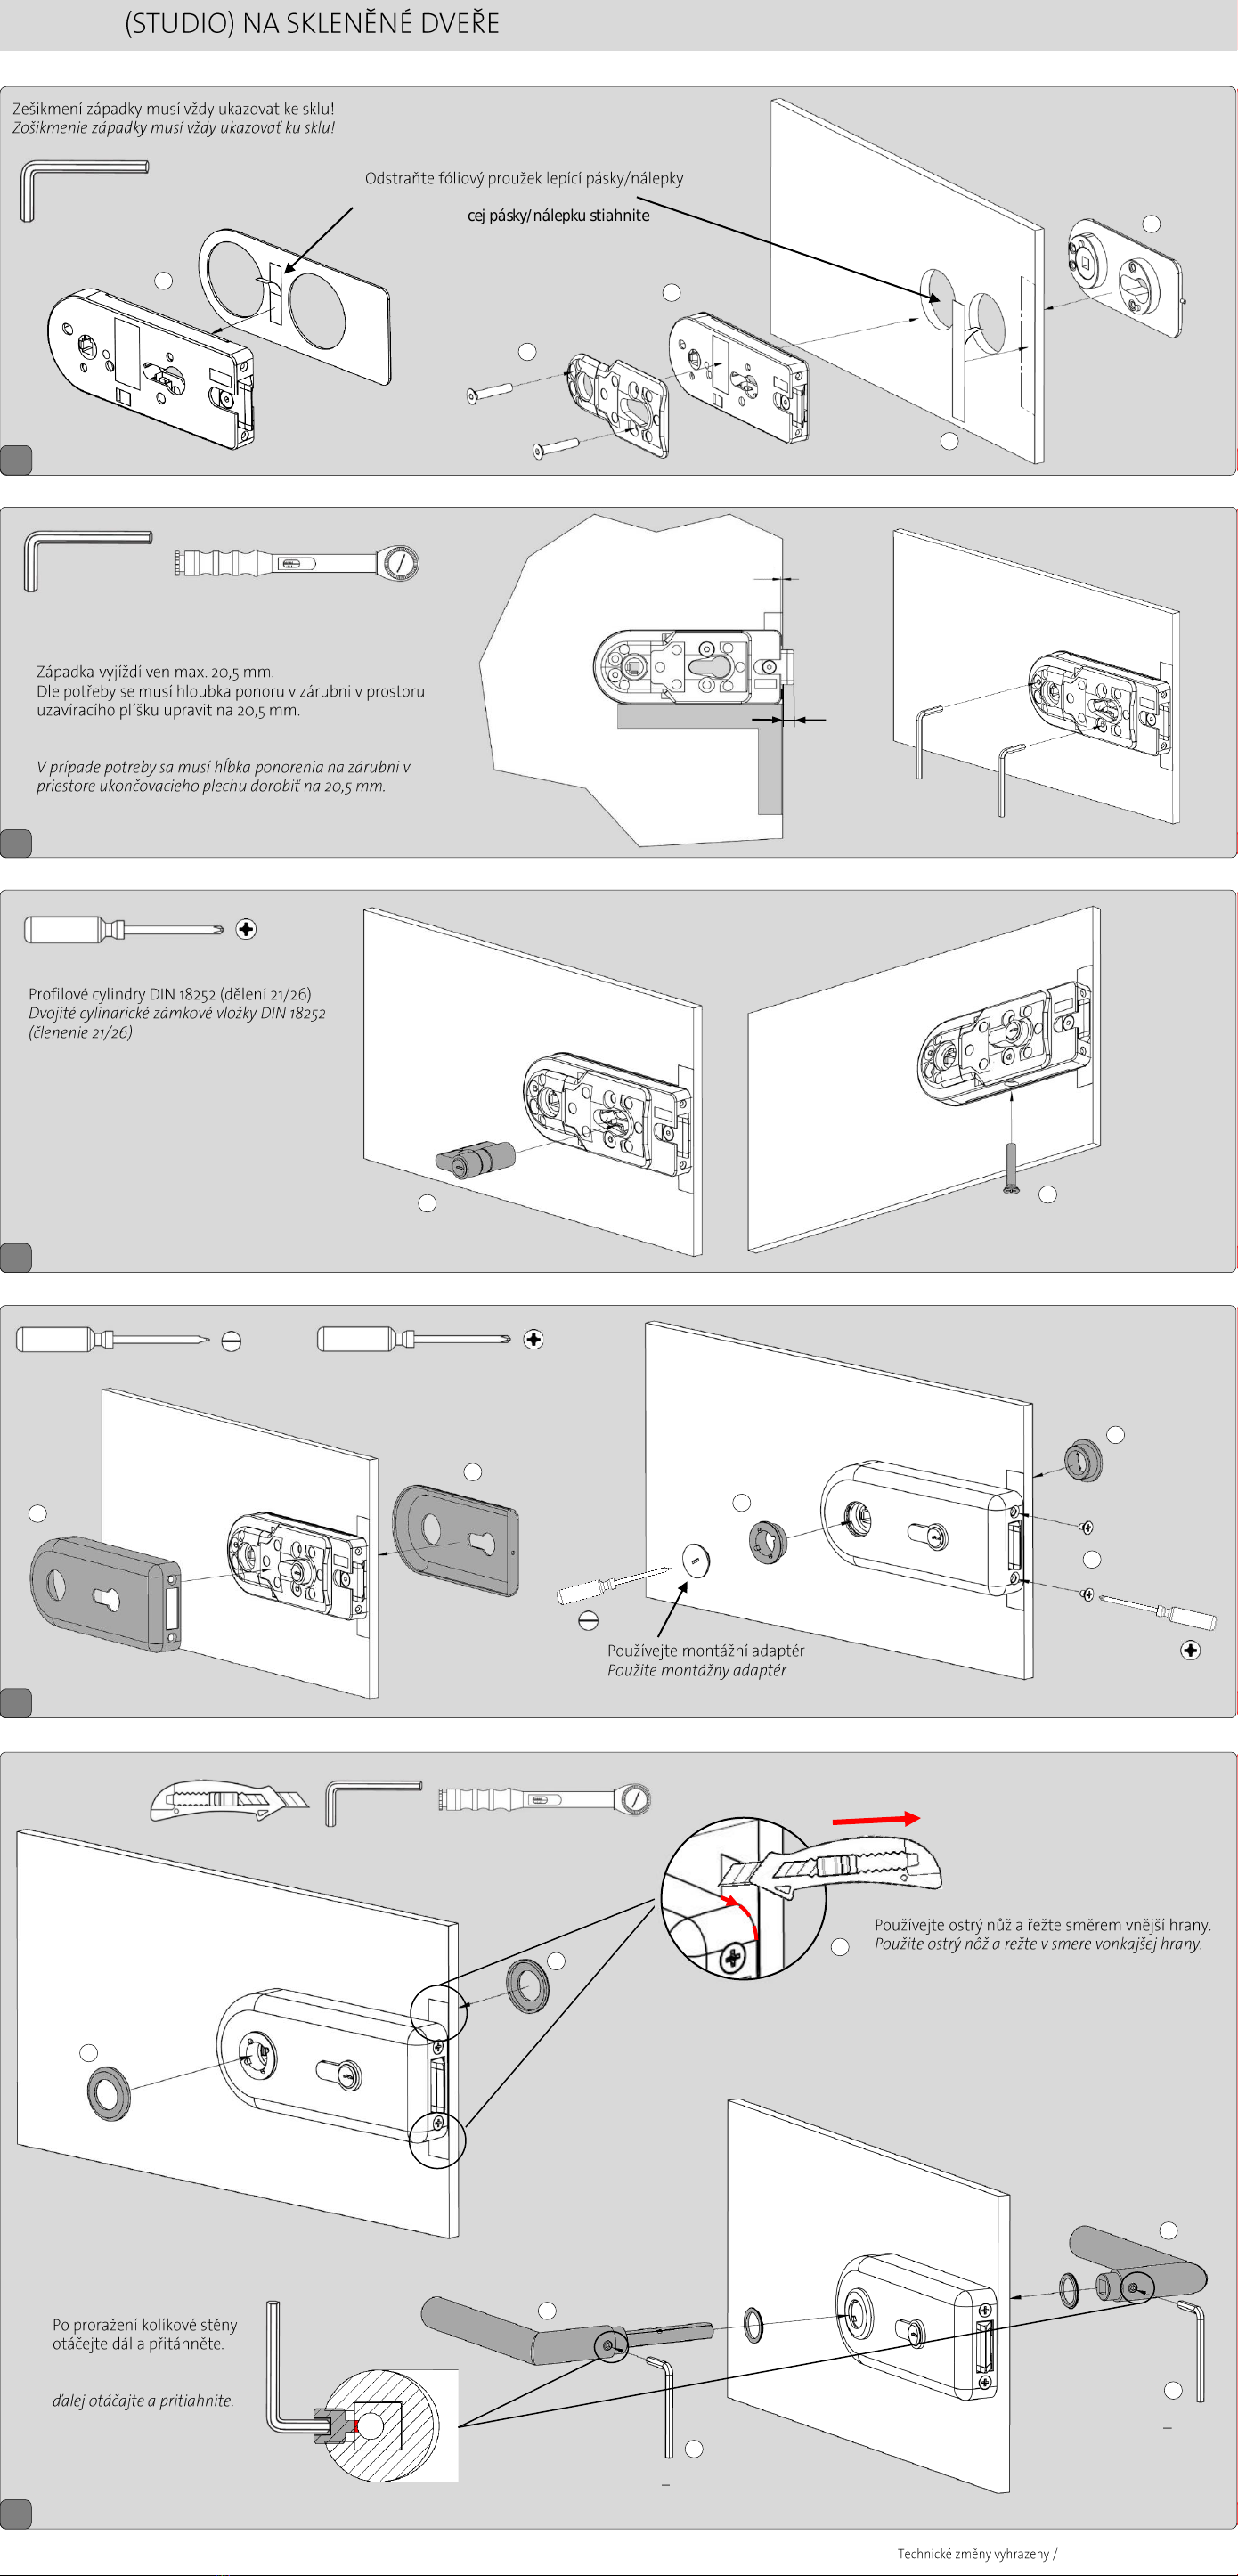
−The lockcase is compatible with profile cylinders according to DIN 18252 (division
21/26).
Mounting
−Clean clamping area with fat solvent (standard commercial cleaning agent)
before mounting the glass fitting.
−Never use glass with conchoidal fractures and/or damaged edges.
−When adjusting glass elements, always stick to the required clearance for the
respective fitting. Adjust clearance so that the glass does not touch hard
components such as glass, metal or concrete.
−Make sure not to use excessive force when installing the glass (avoid local stress
resulting from very tight screws).
Maintenance
−Check fittings at regular intervals for proper positioning and smooth runningand
door for correct adjustment. Especially highly-frequented door systems require
inspection by properly qualified staff (specialised companies or installation firms).
Immediately replace damaged class elements (no glass flaking and/or conchoidal
fractures)!
−Only use suitable cleaning and care products to clean the surfaces.
SCHLOSSKÄSTEN (STUDIO) FÜR GLASTÜREN/LOCK CASE (STUDIO) FOR GLASS DOORS
A: SICHERHEITSHINWEISE
SAFETY-RELATEDINFORMATION
B: MONTAGEANLEITUNG, PFLEGE UND WARTUNG
INSTALLATION INSTRUCTION, CARE INSTRUCTIONS,SERVICE AND MAINTENANCE
A: Sicherheitshinweise / Safety-relatedInformation
Wichtige Sicherheitshinweise für die Montage und Nutzung von
Glasbeschlägen
(Zusätzlich zur Montage- und Bedienungsanleitung zu beachten, um
Schäden am Produkt sowie Personen- und Sachschäden zu vermeiden.)
Wichtig: Alle Nutzer sind über die sie betreffenden Punkte der nachfolgenden
Hinweise sowie die Hinweise aus Montage- bzw. Bedienungsanleitung zu
informieren!
Allgemein
−Drehflügel dürfen nicht zu hart zugeworfen werden. Wenn eine Überdrehung zu
befürchten ist, ist diese durch einen Türstopper zu verhindern.
−Der Schlosskasten ist kompatibel mit Profilzylindern nach DIN 18252 (Teilung
21/26).
Montage
−Vor der endgültigen Beschlagsmontage muss das Glas im Klemmbereich mit
fettlösenden Haushaltsmitteln von Fetten befreit werden.
−Gläser mit Ausmuschelungen und/oder Kantenverletzungen dürfen nicht verbaut
werden.
−Beim Ausrichten der Glaselemente müssen die für den jeweiligen Beschlag
vorgegebenen Spaltmaße beachtet werden. Die Spaltmaße müssen soeingestellt
werden, dass ein Kontakt des Glases mit harten Werkstoffen (z.B. Glas, Metall,
Beton) verhindert wird.
−Es ist ein zwängungsfreier Einbau (ohne lokale Spannungsüberschreitung durch zu
fest angezogene Schrauben) sicherzustellen.
Wartung
−Der Sitz und die Gängigkeit der Beschläge sowie die Justierung der Tür müssen
regelmäßig kontrolliert werden. Insbesondere im Falle von hochfrequentierten
Anlagen sollte die Prüfung von einem Fach- oder Installationsbetrieb erfolgen.
Beschädigte Glaselemente (Abplatzungen und/ oder Ausmuschelungen)müssen
unverzüglich ausgetauscht werden!
−Die Reinigung der Oberflächen darf nur mit geeigneten Reinigern und
Pflegemitteln erfolgen.
DGB
Wichtige Informationen
- Vor derMontage Glasflächen mit handelsüblichem Glasreiniger im
Bereich der Klemmflächen reinigen.
- Keine Verdünnung verwenden
- Wir empfehlen den Einsatz von Bandverstärkungen
Pflege allgemein
Die Oberflächen der Beschläge sind nicht wartungsfrei und sollten gemäß ihrer
Ausführung gereinigt werden.
- Für metallische Oberflächen (Eloxaltöne,Edelstahl) bitte nur geeignete Reiniger
ohne Scheuermittelanteil verwenden.
- Für lackierte Oberflächen bitte nur entsprechende lösemittelfreie Reiniger
verwenden.
- Messing Oberflächen (ohne Oberflächenschutz) müssen von Zeit zuZeit mit
geeignetem Pflegemittel behandelt werden, um Anlaufen zu vermeiden.
Wartung allgemein
Wir empfehlen die Funktion der Beschläge alle 200.000 Bewegungen, zu prüfen.
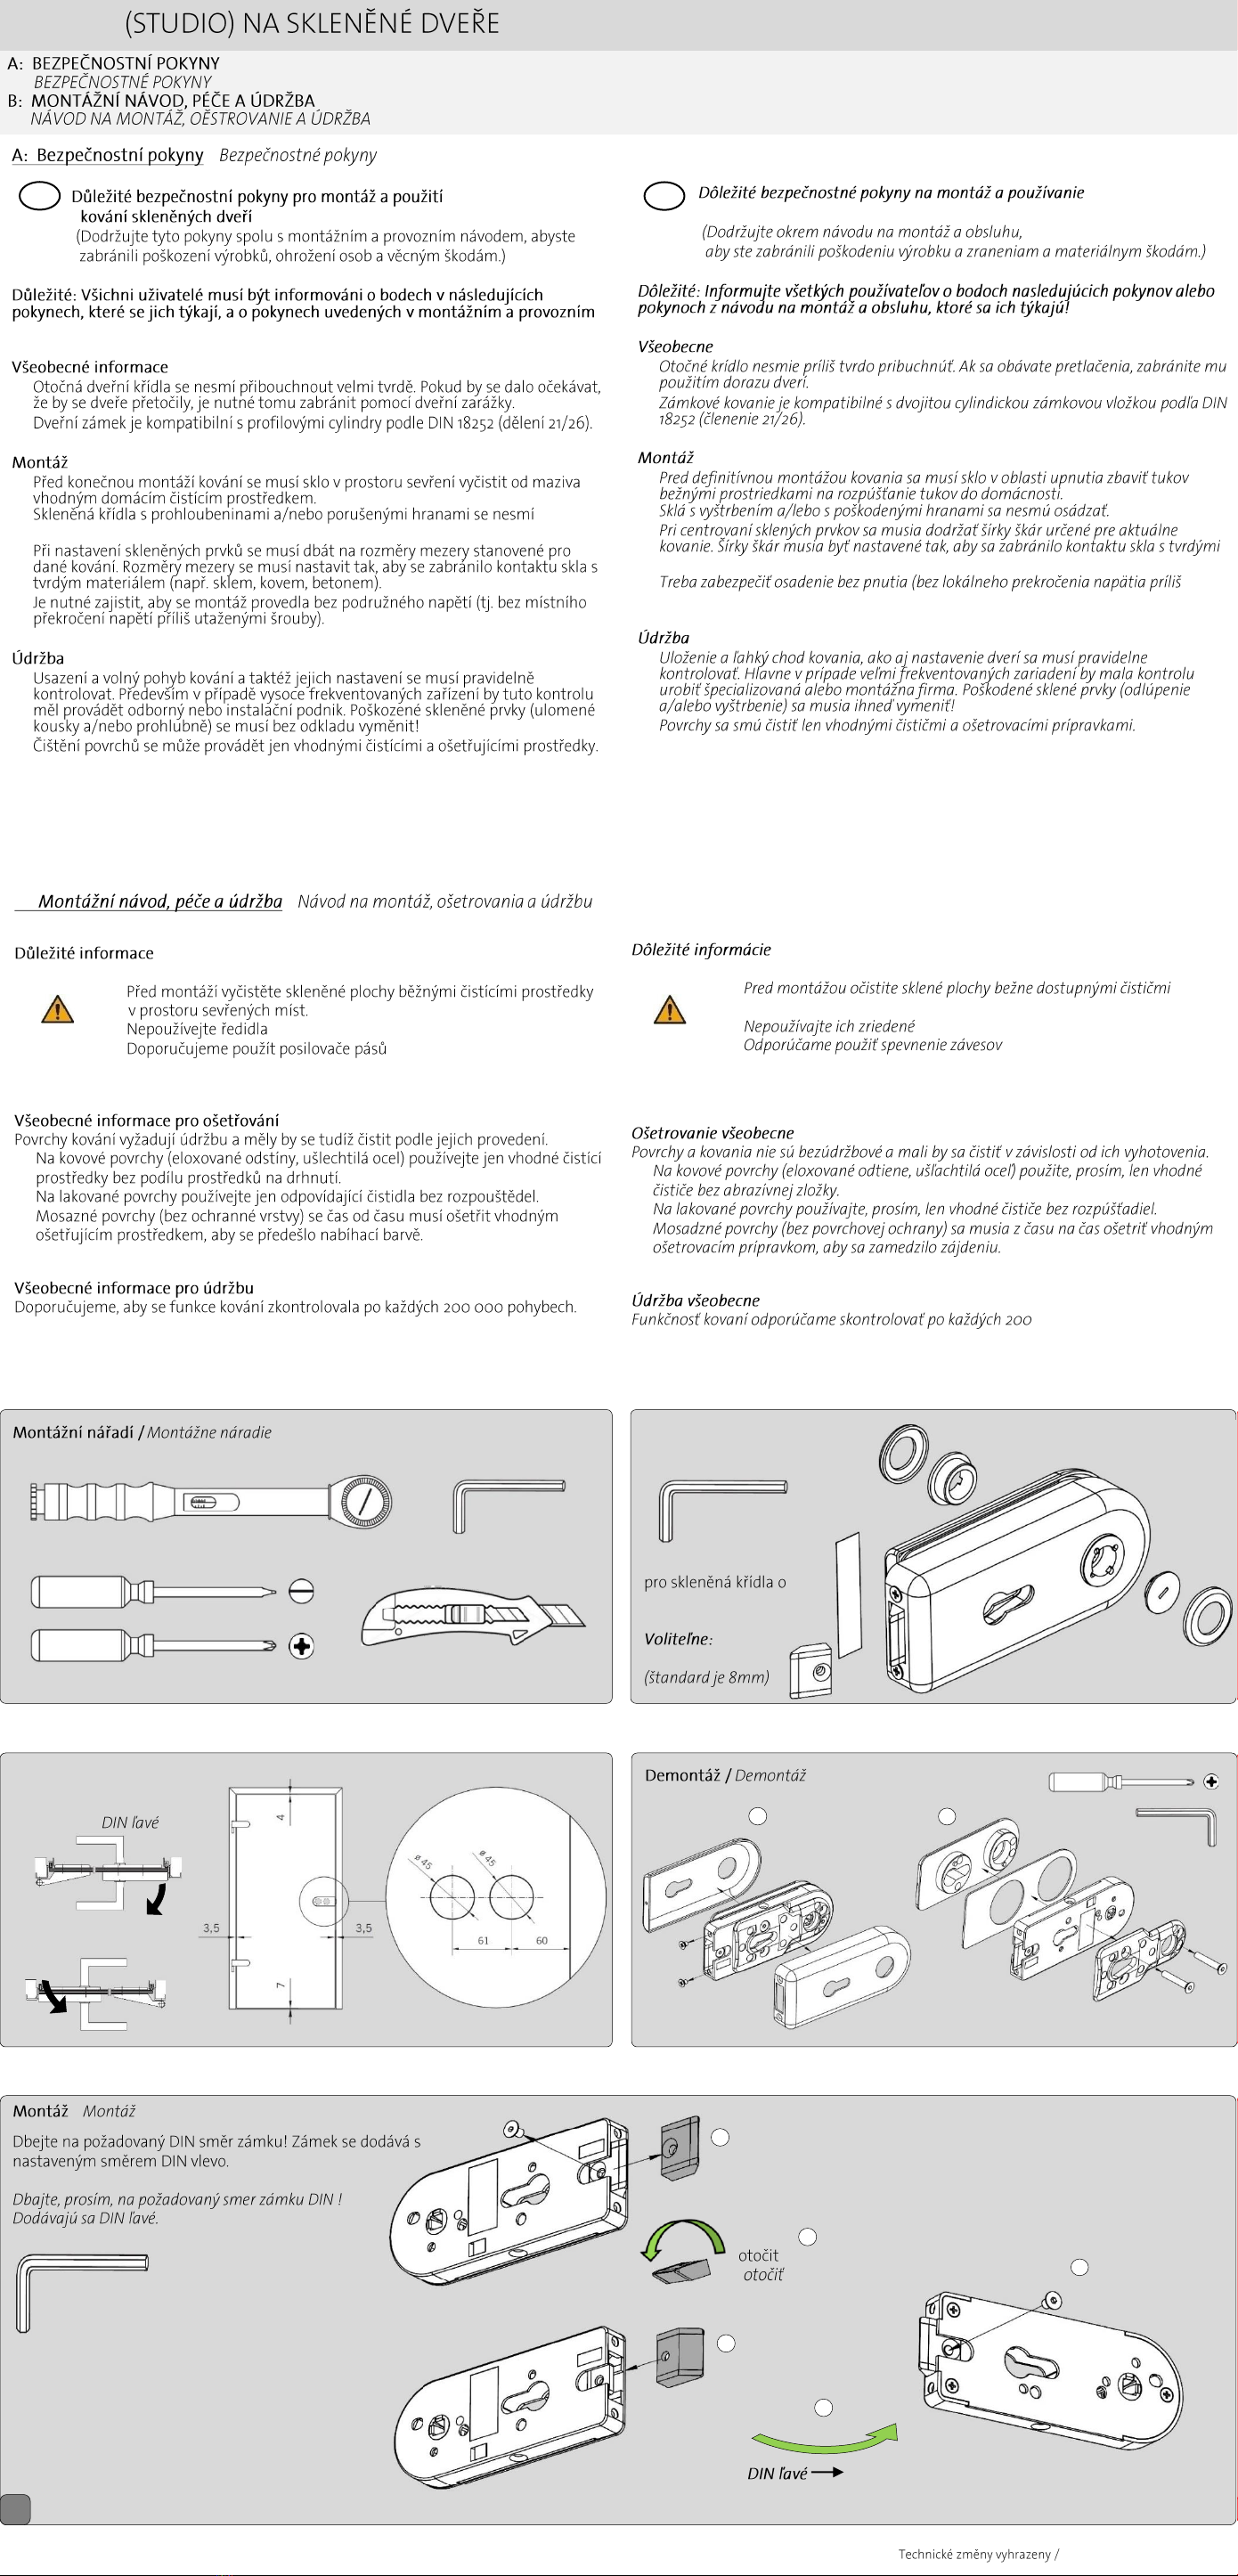
Montagewerkzeug / requisite tools
3 mm 3 mm
Optional: Falle für
10mm Glasscheiben
(Standard ist 8mm)
Optional: latch for
10mm glass sheets
(standard is 8mm)
Demontage / dismantling
12
Montage / mounting
1
180°
drehen
turn
Bitte auf diegewünschte DIN Richtungdes Schlosses achten !
Auslieferungszustand ist DIN links.
Please regard the desired DIN direction of lock!
Delivery status is DIN left.
DIN L DIN R
1
2
3
4
5
3 mm
DIN rechts / DIN RH
Technische Änderungen vorbehalten / subject to alterations 03/2017 ako1 / 6
Important information
- All glass clamping areas haveto be cleaned with standardglass
cleaning products prior to installation
- Do not use thinners
- We recommend the use of screw-on pockets
General care instructions
The surface finishes of the fittings are not maintenance-freeand should be cleaned
according to their material and texture.
-For metallic surfaces (anodised finishes, stainless steel) please only use appropriate
cleaning agents without abrasive additives.
-For varnished surfaces please only use appropriatesolvent-free cleaning agents.
-To avoid tarnishing, brass surfaces (without surface protection) occasionally have to
be treated with an appropriate care product.
Service and maintenance
We recommend that such fittings be checked after every approx. 200,000 operations
to conform their ongoing funktion integrity.
B: Montageanleitung, Pflege und Wartung /installationinstruction,care instructions,service and maintenance
GRIFFWERKGMBH - Lindenstraße90 - D-89134 Blaustein
Lieferumfang / scope of delivery
Glasbearbeitung /
glass preparation
DIN links / DIN LH
2
Die Schräge der Falle muss immer zum Glas zeigen!
Bevelled side of latch must always point to the glass!
3
Folienstreifen des Klebebands/Aufkleber abziehen
Pull-off backing tape of the sticker
90°20,5
Falle fährt max. 20,5 mm aus.
Bei Bedarf muss die Eintauchtiefe an der Zarge im
Bereich des Schließblech auf 20,5 mm nachgearbeitet
werden.
The latch moves max. 20,5 mm.
If necessary, the immersion depth of the frame in the area
of the strike plate must be reworked to 20.5 mm.
1
3
3
4
2
1,5
3 –4 Nm
4
12
1
1
2
2
3
Montageadapter verwenden
Use mounting adapter
5
Profilzylindern DIN 18252 (Teilung 21/26)
Profile cylinders DIN 18252 (division 21/26)
6
Scharfes Messer verwenden und in Richtung
Außenkante schneiden.
Use a sharp knife and cut toward the outer edge.
3 mm
3
3
4
4
1
2
1
4 5Nm
4 5Nm
Technische Änderungen vorbehalten / subject to alterations 03/2017 ako
2 / 6
Nach durchbrechen der
Stiftwandung weiter drehen
und anziehen.
After breakthroughthe pin
wall continue turning and
tighten.
SCHLOSSKÄSTEN (STUDIO) FÜR GLASTÜREN /LOCK CASE (STUDIO) FOR GLASS DOORS
Kovania na sklo
−
−
−
−
−
materiálmi (napr.sklom, kovom, betónom).
−utiahnutými skrutkami).
−
−
ZÁMKY / ZÁMKOVÉ KOVANIA (STUDIO) NA SKLENÉ DVERE
/
návodu!
−
−
−
−namontovat.
−
−
−
−
SK
-
-
-
-
-
-
Rozsah dodávky /
Rozsah dodávky
3 mm 3 mm
Opracování skla /
Úprava skla 12
/
1
180° /
DIN vlevo / DIN vpravo / DIN pravé
1
2
3
4
5
3 mm
DIN vpravo / DIN pravé
DIN vlevo /
Technické zmeny vyhradené3 / 6
- skla v
v priestore upínacích plôch.
-
-
-
-
-
000 pohybov.
B: /
GRIFFWERKGMBH - Lindenstraße90 - D-89134 Blaustein
CZ
Volitelné: Západka
síle 10 mm (standard
je 8 mm) Západka na
10mm sklené tabule
2
3
Pásik fólie lepiacej pásky/nálepku stiahnite
90°20,5
Západka sa vysúva max. 20,5 mm.
1
3
3
4
2
1,5
3 –4 Nm
4
12
1
1
2
2
3
5
6
3 mm
3
3
4
4
1
2
1
4 5 Nm
4 5 Nm
Technické zmeny vyhradené
4 / 6
Po preniknutí ostením kolíka
ZÁMKY / ZÁMKOVÉ KOVANIA (STUDIO) NA SKLENÉ DVERE
okovja za steklena vrata
na uporabnike!
−
−
−
−
−
stekla, kovine, betona).
−Poskrbite, da pri vgradnji ne pride do prenapetosti (nesme priti do lokalnih
−Redno je treba preverjati prileganje in tek okovja ter nastavitev vrat. Predvsem pri
sistemih s pogosto uporabo naj preverjanjeopravi strokovno usposobljeno osebjeali
udarjeni) je treba takoj zamenjati!
−
KUTIJEZABRAVE(STUDIO)ZASTAKLENAVRATA/(STUDIO)ZASTEKLENAVRATA
A: SIGURNOSNE NAPOMENE
VARNOSTNA NAVODILA
A: Sigurnosne napomene / Varnostnanavodila
okova za staklo
−
−Kutija za brave je kompatibilna s profilnimcilindrima uskladu s DIN 18252 (omjer
duljine cilindra 21/26)
−
−
−
−
−
−
SL
-
-
-
-
-
-
Dobavljeni elementi
3mm 3 mm
Opcijski:
kvake za staklene
mm
(standardno je 8 mm)
Opcijsko:
steklo debeline 10 mm
(standardno 8 mm)
Obrada stakla /
Priprava stekla 12
1
180°
okrenuti /
obrnite
lijevo.
dobavi je stanje DIN levo.
DIN lijevo / DIN levo DIN desno / DIN desno
1
2
3
4
5
3 mm
DIN desno / DIN desno
DIN lijevo / DIN levo
5 / 6
Pomembne informacije
-
-
-
-
-
-
/
GRIFFWERKGMBH - Lindenstraße90 - D-89134 Blaustein
HR
2
3
Skinite foliju s ljepljive trake / naljepnice
Odstranite folijo z lepilnega traku/nalepke
90°20,5
mm.
Ako je potrebno, dubinu uranjanja na dovratniku u mm.
mm.
potrebi naknadno obdelati na 20,5 mm.
1
3
3
4
2
1,5
3 –4 Nm
4
12
1
1
2
2
3
5
Profilni cilindri DIN 18252 (omjer duljine
cilindra 21/26)
Profilni cilindri po DIN 18252 (delitev 21/26)
6
vanjskog brida.
zunanjegaroba.
3 mm
3
3
4
4
1
2
1
4 5 Nm
4 5 Nm
6 / 6
Nakon probijanja stijenke
pritegnite.
naprej vrtite in zategnite.
KUTIJEZABRAVE(STUDIO)ZASTAKLENAVRATA/(STUDIO)ZASTEKLENAVRATA

Other Griffwerk Door Lock manuals

Griffwerk PURISTO S 100691177 User manual

Griffwerk

Griffwerk PURISTO S 100691177 User manual

Griffwerk smart2lock User manual

Griffwerk

Griffwerk smart2lock User manual

Griffwerk FRAME 1.0 User guide

Griffwerk

Griffwerk FRAME 1.0 User guide

Griffwerk PURISTO S User manual

Griffwerk

Griffwerk PURISTO S User manual

Griffwerk SMART2LOCK 2.0 User manual

Griffwerk

Griffwerk SMART2LOCK 2.0 User manual

Griffwerk SMART2LOCK 2.0 User manual

Griffwerk

Griffwerk SMART2LOCK 2.0 User manual

Griffwerk PURISTO S 100691177 User manual

Griffwerk

Griffwerk PURISTO S 100691177 User manual

Griffwerk SMART2LOCK PIATTA S User manual

Griffwerk

Griffwerk SMART2LOCK PIATTA S User manual

Popular Door Lock manuals by other brands

Schlage Encode quick start guide

Schlage

Schlage Encode quick start guide

Lamp ET-48 installation manual

Lamp

Lamp ET-48 installation manual

Yale 5400 Series installation instructions

Yale

Yale 5400 Series installation instructions

MDD LOK04 manual

MDD

MDD LOK04 manual

Lockly Vision installation guide

Lockly

Lockly Vision installation guide

Milocks BLEF installation guide

Milocks

Milocks BLEF installation guide

Pamex Cambridge FL3 Use and care guide

Pamex

Pamex Cambridge FL3 Use and care guide

Gate House G2X2D01 installation guide

Gate House

Gate House G2X2D01 installation guide

Iseo Thesis 2.0 Standard Installation

Iseo

Iseo Thesis 2.0 Standard Installation

Wattle TOUCH manual

Wattle

Wattle TOUCH manual

Assa Abloy Yale Real Living Assure Lock YRD216 Installation and programming instructions

Assa Abloy

Assa Abloy Yale Real Living Assure Lock YRD216 Installation and programming instructions

Assa Abloy Yale Doorman installation guide

Assa Abloy

Assa Abloy Yale Doorman installation guide

Kaba Solitaire 710-II Series installation guide

Kaba

Kaba Solitaire 710-II Series installation guide

SDC 1511S Nstallation instructions

SDC

SDC 1511S Nstallation instructions

Assa Abloy Corbin Russwin FE6600 Series installation instructions

Assa Abloy

Assa Abloy Corbin Russwin FE6600 Series installation instructions

BRINKS BC4051 installation instructions

BRINKS

BRINKS BC4051 installation instructions

Dormakaba Saffire LX installation guide

Dormakaba

Dormakaba Saffire LX installation guide

GEZE Boxer installation instructions

GEZE

GEZE Boxer installation instructions

manuals.online logo
manuals.online logoBrands
  • About & Mission
  • Contact us
  • Privacy Policy
  • Terms and Conditions

Copyright 2025 Manuals.Online. All Rights Reserved.