GrillChef 12049 User instructions

12049
Version: 12049gb
reVision: #090-2012
edition: 09/11er
"Patio heaters"
Assembly and operating manual
Please read before use!
Failure to observe these instructions can aect or damage the device and other objects and lead to personal injury.
We therefore recommend that you read the relevant chapter of these instructions prior to assembly and be-
fore each use. Follow the steps in the order they are specied and please observe the safety warnings.
These instructions form part of the product.They should therefore always be
stored with the product and passed on to each subsequent user.

2GRILLCHEF
Table of contents
Specications..............................................................................................................................................3
Delivery specications.................................................................................................................................4
Components................................................................................................................................................5
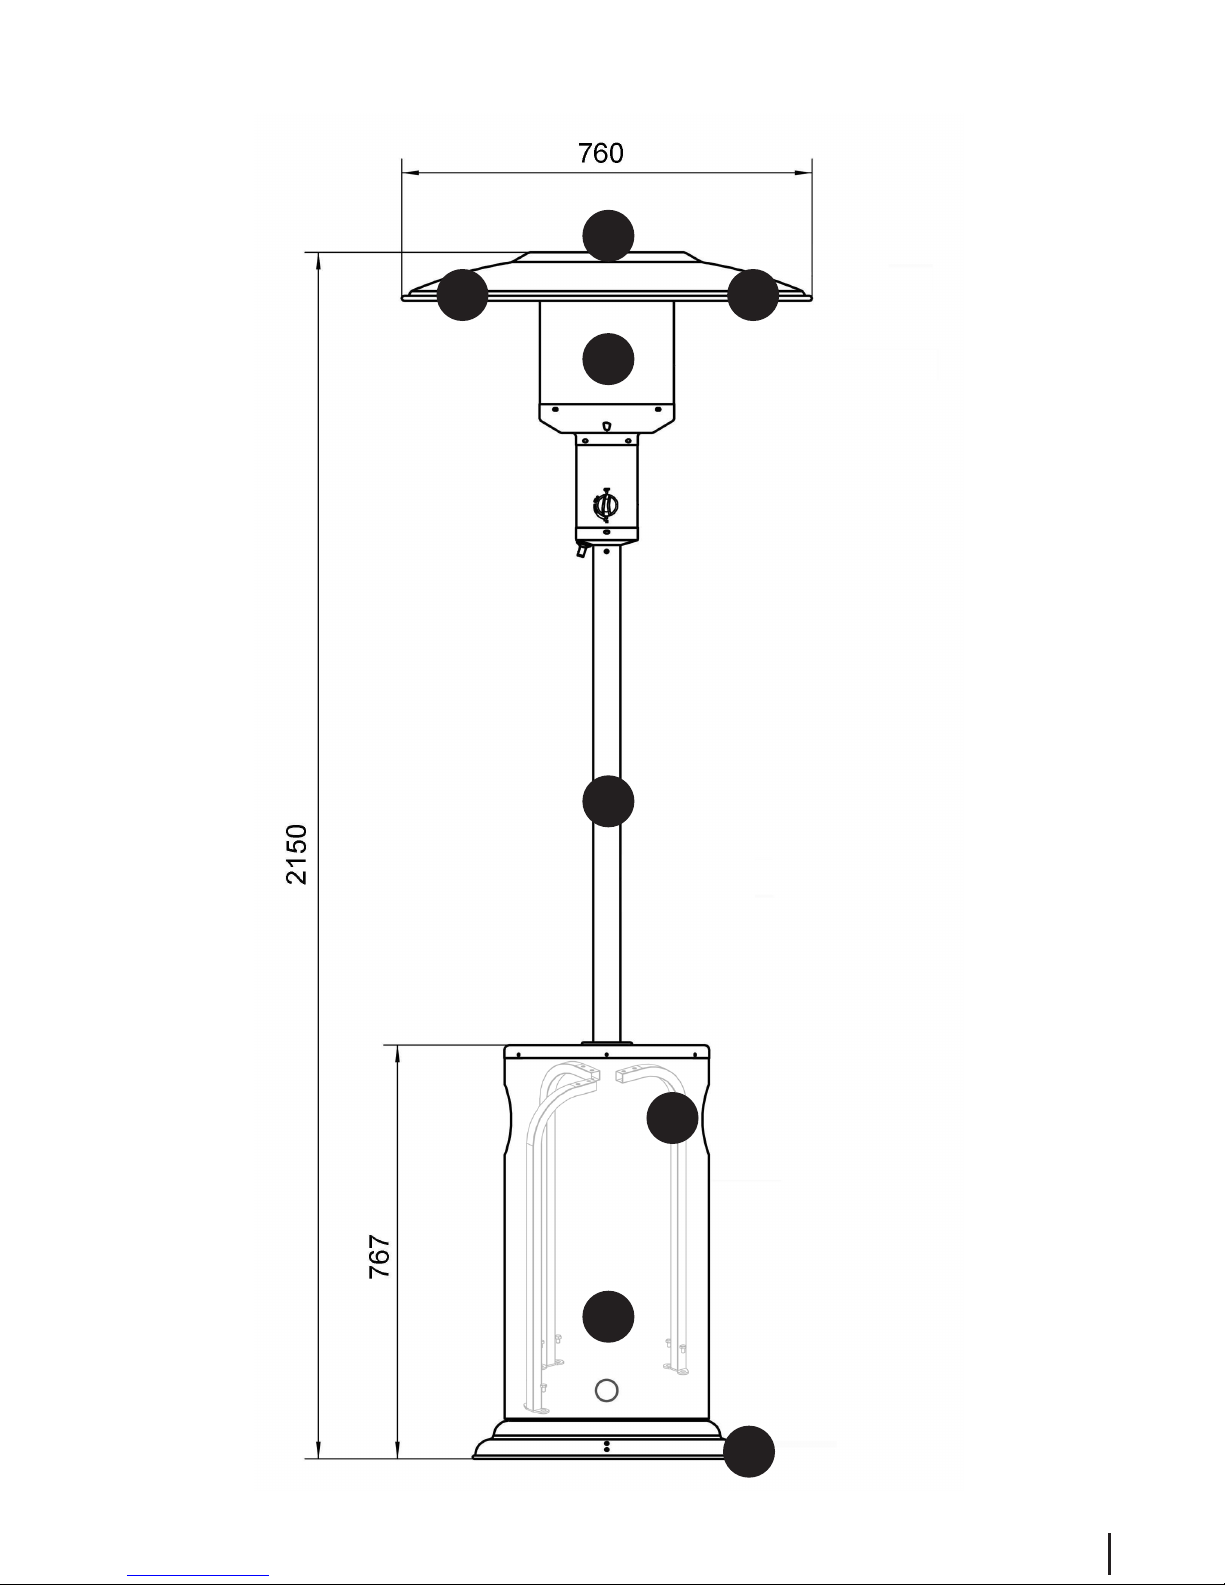
Drawing......................................................................................................................................................5
Operational Elements..................................................................................................................................6
Function......................................................................................................................................................6
Usage..........................................................................................................................................................7
Warranty and disclaimer.............................................................................................................................7
Safety instructions ......................................................................................................................................8
Denition of instructions used..............................................................................................................8
Danger "Hot surfaces and parts" ..........................................................................................................9
Danger "Gas is highly ammable"......................................................................................................10
Danger "Gas displaces oxygen" ..........................................................................................................11
Assembly ..................................................................................................................................................12
Assembly procedure..................................................................................................................................12
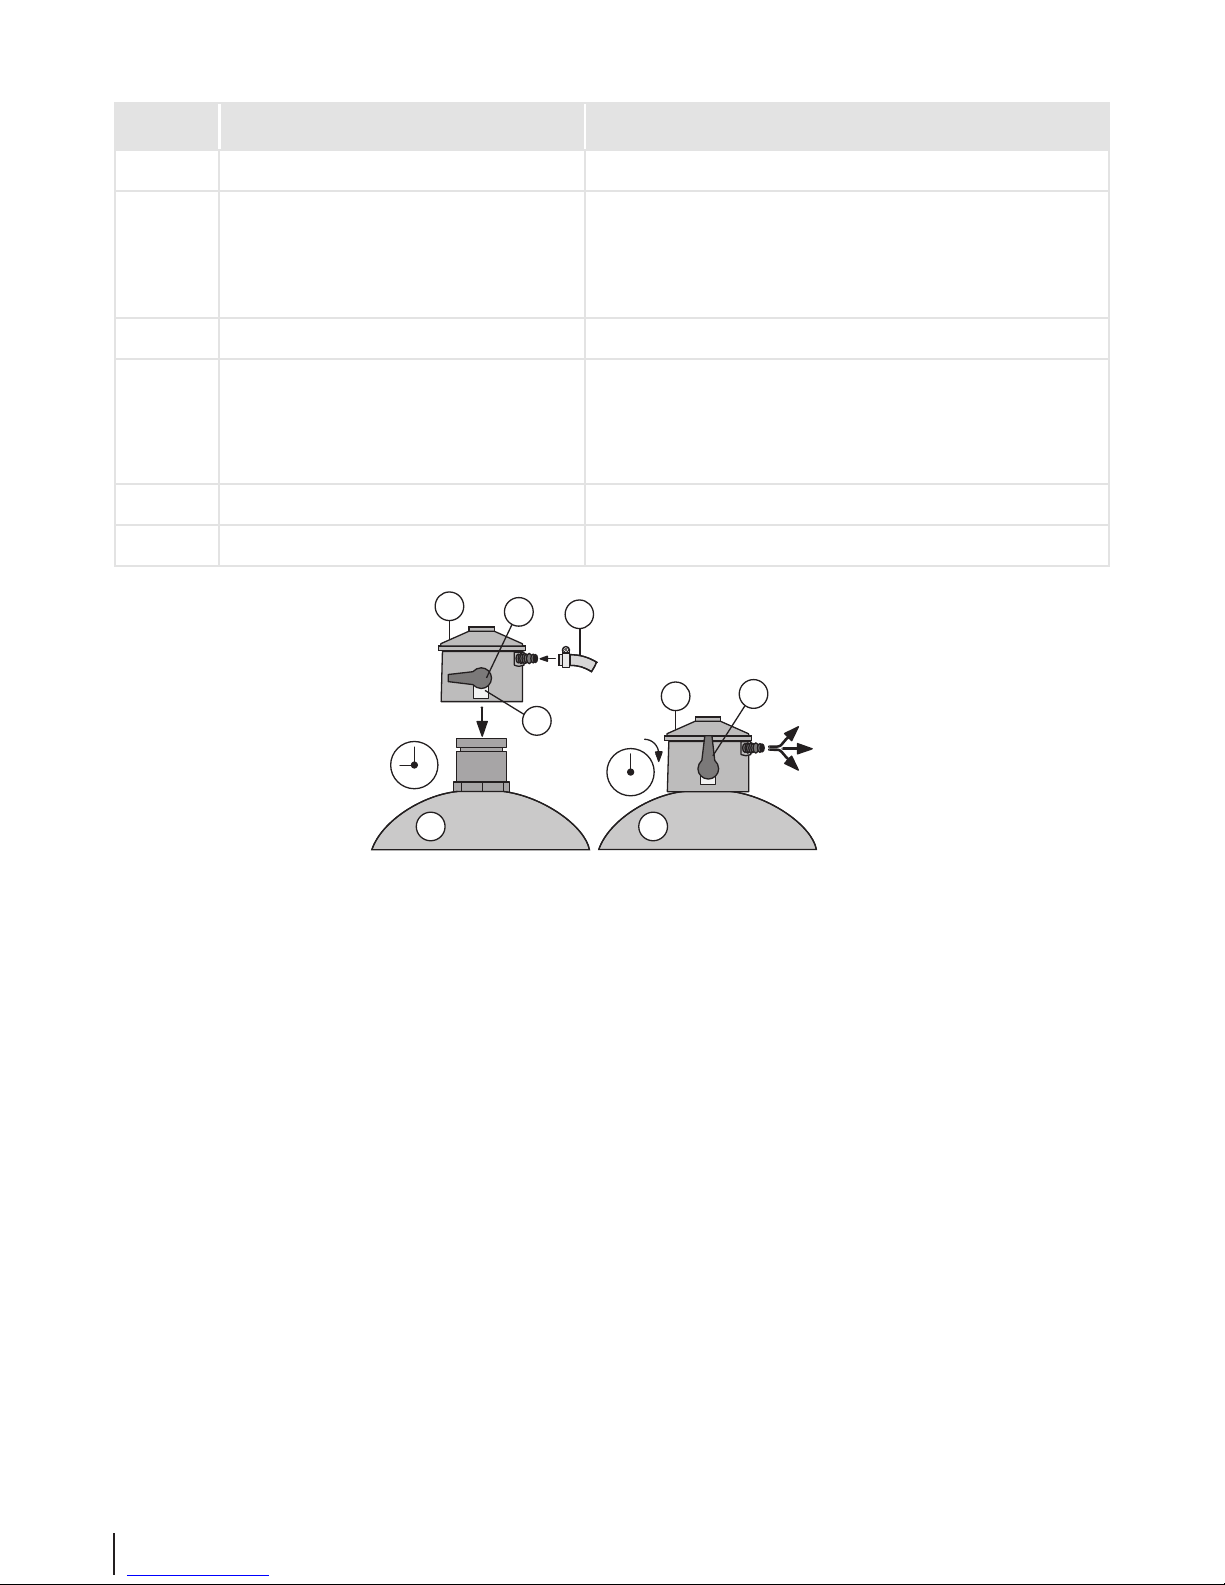
Connecting and disconnecting the gas cylinder........................................................................................16
Connecting the gas cylinder ...............................................................................................................16
Disconnecting the gas cylinder...........................................................................................................17
Operation..................................................................................................................................................18
Starting up the heater........................................................................................................................18
Switching o the heater.....................................................................................................................19
Cleaning....................................................................................................................................................19
Heater ................................................................................................................................................19
Maintenance.............................................................................................................................................19
Environmental information and disposal measures ..................................................................................20
Troubleshooting and remedies..................................................................................................................20
Declaration of conformity .........................................................................................................................21

3
GRILLCHEF
Specications
Approvals
Intertek Test number - 0359, Pin/No. 359CL1108
Barbecue
Appliance category I3B/P according to DIN EN 498
Total weight approx. 14.5 kg
Dimensions (L x H x W) approx. 760 x 2150 x 760 mm
Gas system
Heat output 9.9 kW
Flow rate (mass ow rate) 720 g/h
Gas type Liquid gas (propane/butane)
Gas cylinder Standard gas cylinder with a ll weight of 3, 5 or 11 kg
Gas pressure 37mbar
Gas hose -approved hose (max 1.5 m)
Ignition Piezo ignition
Flame regulation innitely adjustable 0 - max.
Nozzle diameter 1.40 mm

4GRILLCHEF
Delivery specications
Pos. Qty. Designation Pos. Qty. Designation
1a 1 Caster a 6 M6x12
1 1 Base b 6 M6x30
2 3 Cylinder chamber support c 12 M6
3 1 Tripod d 3 Threaded rod
4 1 Cylinder chamber e 4 3/16
5 1 Burner unit f 2 M8x16
6 1 Connecting ring for reector g 2 M8
7 3 Reector, 3-piece h 9 M6x8
i 6 Ø20x6.5x1.0
j 3 Wing nut

5
GRILLCHEF
Drawing
1
4
5
3
6
77
2

6GRILLCHEF
Controls
Pos. Designation Function
A Piezo igniter Ignite gas on burner (press).
B Flame regulator Fill burner with gas to ignite (keep depressed and turn to "lar-
ge ame" setting).
After ignition adjust the heat input for the left burner (turn).
G1 Pressure reducer Reduce gas pressure.
G2 control button with safety catch Cut-o safety device with 2 settings:
9 o'clock setting: gas o / shut o gas cylinder
12 o'clock setting: Gas is on.
G3 gas cylinder with bottle valve Fuel container
G4 Gas hose with hose clip Directs gas to burner.
G5
12
G1
G3
9
G2
G1
G2
G4 G4

7
GRILLCHEF
Utilisation
Proper use
This heater is a gas-powered heater for use outdoors or in well-ventilated areas. It is designed to be used exclusively for
heating purposes outdoors or in well-ventilated areas and in accordance with all of the details in this instruction manual.
Only for private use!
Improper use
Any other use or application extending beyond the intended purpose is not permitted. This applies to the following types
of misuse in particular:
• Donotoperatetheheaterwithanyfuelotherthanliquidgas(propane/butane).
Warranty and disclaimer
The heater has been manufactured according to the general engineering rules - valid at the time manufacturing was started
- and the requirements of the - sign. It is recognised and approved by the GermanTechnical and Scientic Association for
Gas and Water (Deutsche Verein des Gas- und Wasserfaches - DVGW) (test number -0359). The heater left the factory in
perfect condition regarding its function and safety.
The patio heater is subject to our warranty for a term of two years from the date of purchase. The warranty covers defective
workmanship and parts; it is restricted to the replacement of these parts. Costs for shipping, assembly, replacement of worn
parts and others are not covered by this warranty.
The warranty shall expire and any responsibility shall pass over to the executor:
• if the heater is not used properly.
• if the heater is used despite visible damage or incomplete assembly.
• if technical alterations are made to the heater
• if accessories are used that are not expressly authorised for this heater (if in doubt please ask our customer service
department).
• if original spare parts from LANDMANN GmbH & Co. Handels-KG are not used.

8GRILLCHEF
Safety instructions
Denition of terms used
The following pictograms and signal words are used in these instructions to point out hazards and important information.
Safety instructions
Pictogram and signal word Note on ...
Danger
... a possible danger that can result in severe personal injury or damage
to property if the stated measures are not observed.
Caution
... a possible danger that can result in damage to property if the speci-
ed measures are not observed.
Operating notes
Pictogram Note on ...
... a useful function or tip.

9
GRILLCHEF
Danger "Hot surfaces and parts"
During operation some parts of the heater can become very hot, particularly those that are
close to the burner.
Possible consequences:
• Severe burns if parts near the burner are touched.
• Fire or smouldering re if ammable materials or substances are located in close proxim-
ity to the heater.
Safety measures before use:
• When setting up the barbecue, make sure that
• the heater cannot tip over during strong wind.
– there are not, and will not be, any ammable materials or substances in close prox-
imity to the heater. Minimum distance to ammable materials or substances: 2 m
above and 1 m to the side. Distance to less ammable materials or substances, e.g.
walls: min. 0.25 m.
– the heater is operated outdoors or in a well-ventilated area.
– in well-ventilated areas at least 25% of the enclosure surface must be open.
– the enclosure surface is the sum of all wall surfaces.
– the heater is positioned rmly on a suciently large surface area. It must not be
moved during operation.
Safety measures during operation:
• Never leave the heater unattended. Take particular care to ensure that children and pets
are kept at a safe distance from the heater.

10 GRILLCHEF
Danger„Gas is highly ammable“
Liquid gas is highly ammable and explosive.
Possible consequences:
• Serious personal injury or damage to property if escaping gas ignites in an environment
in which it is not controlled.
Safety measures:
• Only use the barbecue outdoors and ensure that the area is well-ventilated.
• Protect the gas cylinder and the gas hose from direct sunlight and other sources of heat
(max. 50°C). Take particular care to ensure that the gas hose does not touch any part of
the hot barbecue.
• Do not place the gas cylinder on the lower shelf, as it is too near the burner.
• Do not lean over the barbecue when igniting the gas ame.
• Close the valve on the gas cylinder immediately after each use (turn the valve clockwise).
• Never leave the barbecue unattended. If the ame extinguishes, relight it immediately
or cut o the supply from the gas cylinder.
• When connecting the gas cylinder make sure that there are no sources of ignition within
a 5 m radius.
• Take special care not to light any naked ames, do not smoke or switch on electric appli-
ances (devices, lights, door bells), etc. (spark-over possible).
• Before each use, make sure that all gas connections are sealed and intact.
• If necessary, replace the hose in order to comply with the corresponding national re-
quirements.
The barbecue must not be used if the connections for the gas supply are porous or faulty.
This also applies, for example, to hoses or ttings blocked by insects, as this can produce
a dangerous ashback.

11
GRILLCHEF
Danger "Gas displaces oxygen"
Liquid gas is heavier than oxygen.Therefore it settles on the ground and displaces the oxygen
at that level.
Possible consequences:
• Suocation resulting from a lack of oxygen if the concentration of gas is allowed to rise
suciently.
Safety measures:
• Only use the barbecue outdoors in a well ventilated area and above ground (i.e. not in
areas that are below ground level).
• Close the valve on the gas cylinder after each use.
• Never leave the barbecue unattended. If the ame extinguishes, relight it immediately
or cut o the supply from the gas cylinder.
• Before each use, make sure that all gas connections are sealed and intact.
• If necessary, replace the hose in order to comply with the corresponding national re-
quirements.
The barbecue must not be used if the connections for the gas supply are porous or faulty.
If the barbecue is not being used for a prolonged period, cut o the supply from the gas
cylinder and store properly:
– Fit the gas cylinder valve with a cap nut and safety cap.
– Do not store the gas cylinder in rooms below ground level, in or near stairways,
hallways or passages and thoroughfares between buildings.
– Always store gas cylinders upright, even if they are empty!

12 GRILLCHEF
Assembly
Before starting
Here are a few tips to help you assemble your barbecue quickly and successfully:
• Check that no parts are missing by placing all of the individual parts on an empty surface (we reserve the right to make
minor technical alterations, such as the content of the small parts bag).
• If, despite careful factory checks, a component should be missing, please contact our customer service department (see
last page). We will immediately attend to your request.
Sort out the small parts, as some of the screws and bolts, for example, are very similar and can be easily confused.
• For assembly you will need a medium size screwdriver and a suitable spanner (at spanner or box spanner).
• You will need a at spanner (AF17) to connect the gas cylinder.
Only use tools that are intact and suitable for the job at hand.Worn or unsuitable tools will not allow you to tighten the
bolts suciently, but will damage them to the extent that they can no longer be turned.
• Always t all connecting elements (screws, bolts, nuts, etc.) as shown in the following illustrations. If you misplace
a connecting element, replace it with an appropriate part. Only by doing this can you ensure that the construction is
strong and safe.
• Be sure to follow the instructions in the specied order!
• Read the text for each step before carrying it out, as useful information is sometimes only provided at the end of the
section.
•
Even if you are not experienced at DIY, assembly does not generally take longer than one hour.
Assembly procedure
1. Attach the castors (1a) using M8x16 screws (f) and M8 nuts (g) to the
base (1). 1
1a

13
GRILLCHEF
2. Assemble the cylinder chamger supports (2) using M6x12 (a) bolts (1).
3. Screw the stand (3) using M6x30 (b) screws and M6 nuts (c) to the cyl-
inder chamber supports (2) .
4. Slide the cylinder chamber (4) from the top over the stand (3).
2
1
2
3
3
4

14 GRILLCHEF
5. Passthegashosefromthe burner (5) fromthe topthroughthe stand (3).
Turn the three threaded rods (d) into the upper side of the burner (5).
Fix the burner (5) using the four 3/16 screws (e) to the stand (3).
6. Screw the three reector parts (7) to the outer end using M6x8 screws
(h) and M6 nuts (c).
Place the connector ring (6) into the middle opening on the reector
(7). Screw the connector ring (6) using M6x8 screws (h) and M6 nuts (c).
3
5
d
6
7

15
GRILLCHEF
7. Place a washer (i) on each of the threaded rods (d), then place the pre-
mounted reector (6+7) on the threaded rods (d) and attach them us-
ing the washers (i) and the wing nuts (j).
8. In order to connect a gas cylinder, slide the cylinder chamber
(4) up. Now connect the gas cylinder and place it between
the cylinder chamber supports (2). Then lower the cylin-
der chamber (4) over the gas cylinder to the base (1).
4
1
2
d
6+7

16 GRILLCHEF
Connecting and disconnecting the gas cylinder
Parts and tools needed
• 17 mm spanner (open-ended spanner WAF 17)
• Gas cylinder
Standard camping gas cylinder with 5 or 11 kg liquid gas (e.g. grey camping propane gas cylinder). These are available
at DIY shops or from liquid gas suppliers.
Leak detector
• You can locate any leaks in the gas system using a leak detector.This can be purchased at DIY shops or liquid gas suppli-
ers. Please follow the operating instructions of the leak detector.
The following parts are included in delivery. They comply with the standards applicable in the country to which they have
been supplied by LANDMANN.
Pressure regulator
Preset and -approved pressure regulator, max. 1.5 kg/h, operating pressure 50 mbar, suitable for the gas cylinder
used.
Gas hose
-approved hose of sucient length, allowing installation without any kinks.
Connecting the Gas Cylinder
Danger "Ignition of escaping gas"
Liquid gas is highly ammable and explosive.
Possible consequences:
• Serious personal injury or damage to property if escaping gas ignites in an environment
in which it is not controlled.
Safety precautions:
• When connecting the gas cylinder ensure that there are no sources of ignition within a
5 m radius.
• Take special care not to light any naked ames, do not smoke or switch on electric appli-
ances (devices, lights, door bells), etc. (sparkover possible).
• If necessary, replace the hose in order to comply with the corresponding national requi-
rements.
1. Select a suitable place to set up the cooker. Make sure that ...
– no ammable materials or substances are in close proximity to the cooker. Minimum distance to ammable mate-
rials or substances: 2m above and 1m to the side; distance to ame resistant materials or substances - min 0.25 m.
– the heater has positioned rmly on a at, suciently large surface area. It must not be moved during operation.

17
GRILLCHEF
G5
G1
G3
9
G2
G4
2. Position the gas cylinder next to the heater.
– Never lay the gas cylinder on its side or place it
on the base shelf.
– The gas hose must not be bent or under ten-
sion.
3. Check that the gas cylinder (G3) and the pressure
reducer (G1) are in good working order.
4. Turn the control button (G2) to the 9 o'clock setting
and t the pressure reducer (G1) onto the gas cylin-
der valve.
5. Turn the control button (G2) to the 9 o'clock setting. Check to ensure that the pressure reducer (G1) is securely on the gas
cylinder (G3).
6. Check the connection between the pressure reducer (G1) and the gas hose (G4) and the gas hose (G4) to the setting
device (19) to ensure they are secure.
7. Open the cylinder vale by pulling the red safety catch on the control button (G2) forwards a little and by turning the
control button to the 12 o'clock setting. Use a standard leak detector to ensure that all connections are tight.
Please observe the instructions for the leak detection agent!
– Never check for leaks using a naked ame. Listening for leaks is not a reliable method of detection either.
– If the connection is not sealed immediately close the bottle valve (turn control button (G2) to 9 o'clock setting) and
tighten the connection or replace the leaking part. Repeat the leak test.
8. If you do not wish to use the heater immediately, close the cylinder valve: turn control button (G2) to the 9 o'clock
setting.
Shut o Gas Cylinder
G1
G3
9
G2
G4
1. Close the cylinder valve: turn control button (G2) to a
9 o'clock position).
2. Pull the red safety leverl on the control button (G2)
forwards a little, turn the control button t(G2) to a
9 o'clock setting and pull the pressure reducer (G1)
from the gas cylinder valve.
3. Store the pressure reducer (G1) with the gas hose (G4) underneath the heatrer. Make sure that the gas hose is not kinked
or twisted in any way.
4. Storing the gas cylinder correctly:
– Fit the gas cylinder valve with a cap nut and safety cap.
– Do not store the gas cylinder in rooms below ground level, or in or near stairways, hallways or passages and tho-
roughfares between buildings.
– Always store gas cylinders upright, even if they are empty!

18 GRILLCHEF
Operation
Starting up the heater
1. Check to ensure that ....
– the heater cannot tip over during strong wind.
– there are not, and will not be, any ammable materials or substances in close proximity to the heater. The mi-
nimum distance to materials or substances is 2m above and 1m to the side. The distance to highly ammable
materials or substances, e.g. house walls is min. 0.25 m.
– the heater is operated outdoors or in a well-ventilated area.
– in well-ventilated areas at least 25% of the enclosure surface must be open.
– the enclosure surface is the sum of all wall surfaces.
– the heater is positioned rmly on a suciently large surface area. It must not be moved during operation.
2. Check to ensure that ....
– the heater is fully assembled and has no visible defects.
12
G2
G1
G4
3. Turn the operating lever (G2) to the 12 o‘clock positi-
on.
4. Check to ensure that the gas system is sealed; if not,
Turn the operating lever (G2) immediately to the 3
o‘clock position.
Caution: Leave a suitable distance between yourself and the burner during steps 7 and 8.
6. Press the ame regulator (B) to the setting with the small ame symbol and simultaneously actuate the Piezo igniter
(A) repeatedly.
7. After the ame has ignited keep the ame regulator (B) depressed for approximately 10 seconds in order to activate the
gas igniter.
8. Iftheamegoesout,turntheameregulator(B)withthesmallamesymbolto"•"(off)),waitfor
3 minutes and then repeat step 6.
9. When the heater has warmed up suciently, turn the ame regulator (B) slowly to the desired setting (size of ame).
Turning the regulator quickly can result in the ame going out.

19
GRILLCHEF
Cleaning
Heater
To ensure that your heater serves you well for many years to come, it should be cleaned after each use with washing-up
liquid, a brush and a cloth - ensure that all parts have cooled down rst.
Gas system
All other parts through which gas is supplied may only be cleaned by an expert.
Never dismantle the adjusting element!
Maintenance
The heater is maintenance free. Nevertheless, you should check it at regular intervals.The intervals will depend on how often
the heater is used and the environment to which it is exposed.
Heater
• Check to ensure that all parts of the heater are present and assembled (conduct a visual check).
• Check to ensure that all connections are present and securely fastened. Tighten if necessary.
Gas system
The gas system needs to be checked every time a gas cylinder is connected (see chapter "Connecting and disconnecting the
gas cylinder").
If necessary, replace the hose in order to comply with the corresponding national requirements.
Switching o the heater
1. Close the cylinder valve on the gas cylinder (turn G1 clockwise).
2. Turntheameregulator(B)withthesmallamesymbolto"•"(o).
3. Wait until all of the parts have cooled down and then clean any soiled components.
4. If the heater is not going to be used for a prolonged period:
– Disconnect the gas cylinder (see chapter "Disconnecting the gas cylinder").
– Store the heater in a dry place.

20 GRILLCHEF
Troubleshooting
If there is a fault despite due care, this chapter may help you to resolve the malfunction.
Malfunction Cause Remedy
There is a smell of gas Leak in the gas system 1. Close the cylinder valve immediately
(turn G1 clockwise)
2. Prevent any ames or sparks (do not
switch on electric devices)
3. Tighten all connections of the gas sys-
tem
4. Check all components of the gas system
for external damage; replace defective
parts with original spare parts
5. Check for leaks using a leak detector
Burner does not light Gas cylinder is empty Replace the gas cylinder
Cylinder valve is closed Turn the cylinder valve (G1) anti-clockwise
Distance between the spark plug
and gas outlets on the burner (2) is
incorrect
Visual inspection; correct if necessary
The temperature of the heater is
too low
Pre-heating time too short Set ame regulator to max.
Gas outlets on the burner are
blocked
Remove blockage from burner
Popping or bubbling noise Flashback caused by blockages in
the burner.
1. Close the cylinder valve immediately
(turn G1 clockwise)
2. Wait for three minutes and start up the
heater again.
3. If the problem recurs, remove burner
and clean
Environmental information and disposal measures
To dispose of the heater, disassemble it. Recycle the metal and plastic components.
Table of contents
Popular Patio Heater manuals by other brands

leziter
leziter CALIENTA WALL instruction manual

Heat Controller
Heat Controller IRPH15SS Installation & operation manual

Bartscher
Bartscher 825131 instruction manual

Outsunny
Outsunny 842-031 Assembly and operation instructions

Frontgate
Frontgate GWU9850F/3554A owner's manual

Heat Outdoors
Heat Outdoors 902114 Safety instructions and operation manual