Grillo CLIMBER 9.18 User manual

02450-14
CLIMBER 9.18
OPERATOR'S MANUAL
MANUALE DELL'OPERATORE
MANUAL DE INSTRUCCIONES

SUMMARY
Safety rules
Instructions :
Warnings 5
Identification and servicing 6
Technical specifications 7
Putting the machine into service 8
Instructions for use 8
Maintenance and lu rication 10
Illustrations 38
EC Declaration of conformity - Noise and vi rations levels 45
INDICE
Norme antinfortunistiche
Istruzioni :
Avvertenze 16
Identificazione e assistenza 17
Caratteristiche tecniche 18
Messa in opera della macchina 19
Istruzioni d’uso 19
Manutenzione e lu rificazione 21
Figure 38
Certificato di conformità CE - Rumorosità e livelli di vi razione 45
ÍNDICE
Normas de seguridad
Instrucciones:
Advertencias 27
Identificación y asistencia 29
Características técnicas 29
Puesta en servicio de la máquina 30
Instrucciones de uso 30
Mantenimiento y lu ricación 32
Ìndice de ilustraciones 38
Certificado de conformidad CE - Niveles de ruido y vi ración 45
- i -

SAFETY SYMBOLS - SIMBOLOGIA PER LA SICUREZZA - SYMBOLOGIE POUR LA SECURITE –
SICHERHEITSSYMBOLE- SIMBOLOGÍA DE SEGURIDAD
OPEN MANUAL- means that ou must read the operator's manual ver carefull .
MANUALE APERTO - significa che dovete leggere attentamente il manuale di uso e manutenzione.
MANUEL OUVERT – signifie qu'il faut lire avec attention le présent manuel.
OFFENES HANDBUCH – bedeutet, dass Sie die Gebrauchs- und Wartungsanleitung aufmerksam durchlesen müssen.
MANUAL ABIERTO – es decir que ha que leer mu atentamente el manual del operador.
CAUTION! - means that ou have to pa particular attention to the operation ou have to carr out, in particular if there is the
indication “DANGER”.
ATTENZIONE! - significa che dovete porre particolare attenzione all’operazione che dovete effettuare, in particolare se vi è anche
l’indicazione di “Pericolo”.
ATTENTION! - signifie qu'il faut faire particulière attention dans l'opération que vous allez faire, en particulier s'il a aussi
l'indication “DANGER”.
VORSICHT! - bedeutet, dass Sie besondere Aufmerksamkeit beim Durchführen des Vorgangs haben müssen, insbesondere wenn
auch der Hinweis “GEFAHR” aufgeführt ist.
ATENCIÓN! - es decir que ha que poner ma or atención en la operación a ejecutar si, en particular cuando ha también la
indicación “Peligro”.
INTERDICTION, YOU MUST NOT DO THAT! - means that it is absolutel forbidden to carr out the operations reported under this
s mbol because the could lead to mortal danger.
DIVIETO, NON FARE! - significa che non dovete assolutamente fare le operazioni riportate sotto questo simbolo, potrebbe
comportare un pericolo mortale.
INTERDICTION, NE PAS FAIRE! - signifie qu'il est absolument interdit d' effectuer les opérations reportées sous cette indication,
car elles pourraient conduire au danger de mort.
VERBOT, strengstens untersagt! - bedeutet, dass der Vorgang unter diesem S mbol absolut nicht durchgeführt werden darf, da er
zur einer lebensgefährlichen Situation führen könnte.
PROHIBICIÓN, NO LO HAGAN! - es decir que no ha que hacer absolutamente las operaciones bajo este símbolo, podría
comportar un peligro mortal.
NOTE, ou have to pa particular attention to the note put next to this s mbol
NOTA, dovete porre particolare attenzione alla nota posta accanto a questo simbolo.
NOTE, il faut faire attention particulière à la note mise à côté de ce s mbole.
ANMERKUNG, besondere Aufmerksamkeit muss auf die Anmerkungen neben diesem S mbol gelenkt werden.
NOTA, ha que poner atención particular en la nota puesta a lado de este símbolo.
You must not repair nor lubricate the machine with moving parts or with the engine put on.
Non riparare o lubrificare la macchina con organi in movimento o motore acceso
Ne pas réparer ou lubrifier la machine avec des parties en mouvement ou à moteur en marche.
Niemals bei bewegenden Objekten oder bei laufendem Motor Reparationen oder Einschmierungen durchführen.
No reparar ni lubrificar la máquina con órganos en movimiento o motor en marcha.
You must not smoke, light matches or lift flames, trigger frames nor cause sparks.
Vietato fumare, accendere fiammiferi o fiamme, lasciare fiamme libere o creare scintille.
Il est interdit de fumer, allumer des allumettes ou du feu, laisser des flammes libres ou de causer des étincelles.
Es ist untersagt zu Rauchen, Streichhölzer oder Feuer anzuzünden, Flammen auslösen oder Funken verursachen.
Prohibido fumar, encender cerillas o fuego, dejar llamas o crear chispas.
Use personal protective equipement
Utilizzare mezzi di protezione individuali
Utilisez l'équipement de protection individuelle
Individuelle Schutzausrüstung benutzen
Utilizar dispositivo de proteccion individual

GENERAL SECURITY RULES
NORME DI CARATTERE GENERALE SULLA SICUREZZA
SICHERHEITSHINWEISE
RÈGLES GÉNÉRALES DE SÉCURITÉ
NORMAS DE CARÁCTER GENERAL SOBRE LA SEGURIDAD
NORMAS DE CARÁCTER GENERAL ACERCA DA SEGURANÇA
Pay attention to symbol DANGER! It points out all most dangerous operations according to the situation. All safety rules are important and therefore must be strictly
observed. Always keep this handbook within the reach, read it carefully and learn how to use the equipment in a safe way. Let nobody, not provided with necessary
information, work with the equipment.
Fare attenzione al simbolo PERICOLO! Esso indica la presenza delle principali situazioni di pericolo. Tutte le norme antinfortunistiche contente sono importanti e
vanno rispettate. Tenere sempre questo manuale a portata di mano, leggerlo attentamente ed imparare ad usare l’attrezzatura in modo sicuro. Non permettere che
qualcuno operi con questa attrezzatura senza aver ricevuto istruzioni esaurienti.
Attention au symbole DANGER! Il indique la présence des principales situations de danger. outes les normes contenues pour la prévention des accidents sont
importantes et doivent être respectées scrupuleusement. Garder toujours ce manuel à la portée de la main, le lire attentivement et apprendre à utiliser ce matériel
en toute sécurité. Ne pas permettre que d’autres personnes utilisent ce matériel sans avoir reçus des instructions exhaustives.
Achtung - die mit dem ymbol GEFAHR! gekennzeichneten Hinweise weisen auf potentielle Gefahrensituationen hin. Alle sicherheitsrelevanten Hinweise in diesem
Handbuch sind sehr wichtig und müssen unbedingt befolgt werden. Bewahren ie dieses Handbuch stets griffbereit auf, lesen ie es aufmerksam durch, und lernen
ie, die Maschine und die gesamte Ausrüstung sicher zu benutzen. Die Maschine darf nur von Personen benutzt werden, die vorher entsprechend unterwiesen
wurden.
Preste atención al símbolo ¡PELIGRO! Indica la presencia de situaciones importantes de peligro. odas las normas de prevención de accidentes detalladas son
importantes y deben respetarse estrictamente. Conserve este manual al alcance de la mano, léalo atentamente y aprenda a utilizar el equipamiento de modo
seguro. No permita que otras personas operen con este equipamiento sin haber recibido instrucciones exhaustivas.
ake special care not to touch hot parts of the engine.
Prestate particolare attenzione a non entrare in contatto con parti surriscaldate
del motore.
Veiller tout particulièrement à ne pas toucher des éléments surchauffés du
moteur.
Achtung – keine heißen Motorteile berühren!
No tocar partes recalentadas del motor.
ome muito cuidado para não entrar em contacto com as partes aquecidas do
motor.
Engine exhaust fumes can cause sickness or death. If it is necessary to run an
engine in an enclosed area, use an exhaust pipe extension to remove the
fumes. Always try to work in a well ventilated area.
I gas di scarico possono causare malanni o morte. Se è necessario mettere in
moto un motore in uno spazio chiuso, usare una prolunga tubo di scarico per far
uscire il fumo. Lavorare in una zona ben ventilata.
L’exhalation des gaz d’échappement peut être cause d’intoxication ou de mort.
S’il est vraiment nécessaire d’allumer le moteur à l’intérieur, appliquer au tuyau
d’échappement un autre tuyau extensible pour permettre la sortie des gaz. Il est
toujours mieux de travailler en plein air.
Auspuffgase können Übelkeit oder od verursachen. Wenn es notwendig ist,
einen Motor in einem geschlossenen Raum laufen zu lassen, benützen Sie eine
Verlängerung, um das Auspuffgas abzuleiten. Versuchen Sie immer in einem
gut belüfteten Raum zu arbeiten.
Los gases de escape pueden provocar enfermedades o muerte. De tener que
poner en marcha un motor en un espacio cerrado, usar una prolongación del
tubo de escape para que salga el humo. rabajar en una zona bien ventilada.
Os gases de escape podem causar danos ou morte. Caso seja necessário
fazer com que o motor funcione num espaço fechado, utilize uma extensão
para o tubo de escape que os fumos sejam expulso para o exterior. rabalhe
numa área bem ventilada.
Caution! Never touch moving pulleys or belts. hey can be very dangerous.
Never do maintenance with engine running.
Attenzione! Non toccare mai pulegge o cinghie in movimento, creano gravi
danni alla persona. Non fare manutenzione col motore in moto.
Attention! Ne jamais toucher ni poulies ni courroies en mouvement, elles
peuvent provoquer des accidents aux personnes. Ne pas faire l’entretien quand
le moteur est en marche.
Vorsicht! Nie laufende Riemenscheiben oder reibriemen anfassen, da es
gefährlich ist. Nie bei laufendem Motor Instandhaltung machen.
¡Atención! No tocar jamás poleas o correas en movimiento, porque pueden
crear graves daños a la persona. No efectuar el mantenimiento con el motor en
marcha.
Atenção! Nunca toque nas polias ou correias em movimento devido ao alto
risco de ferimentos. Nunca faça a manutenção da máquina com o motor ligado.

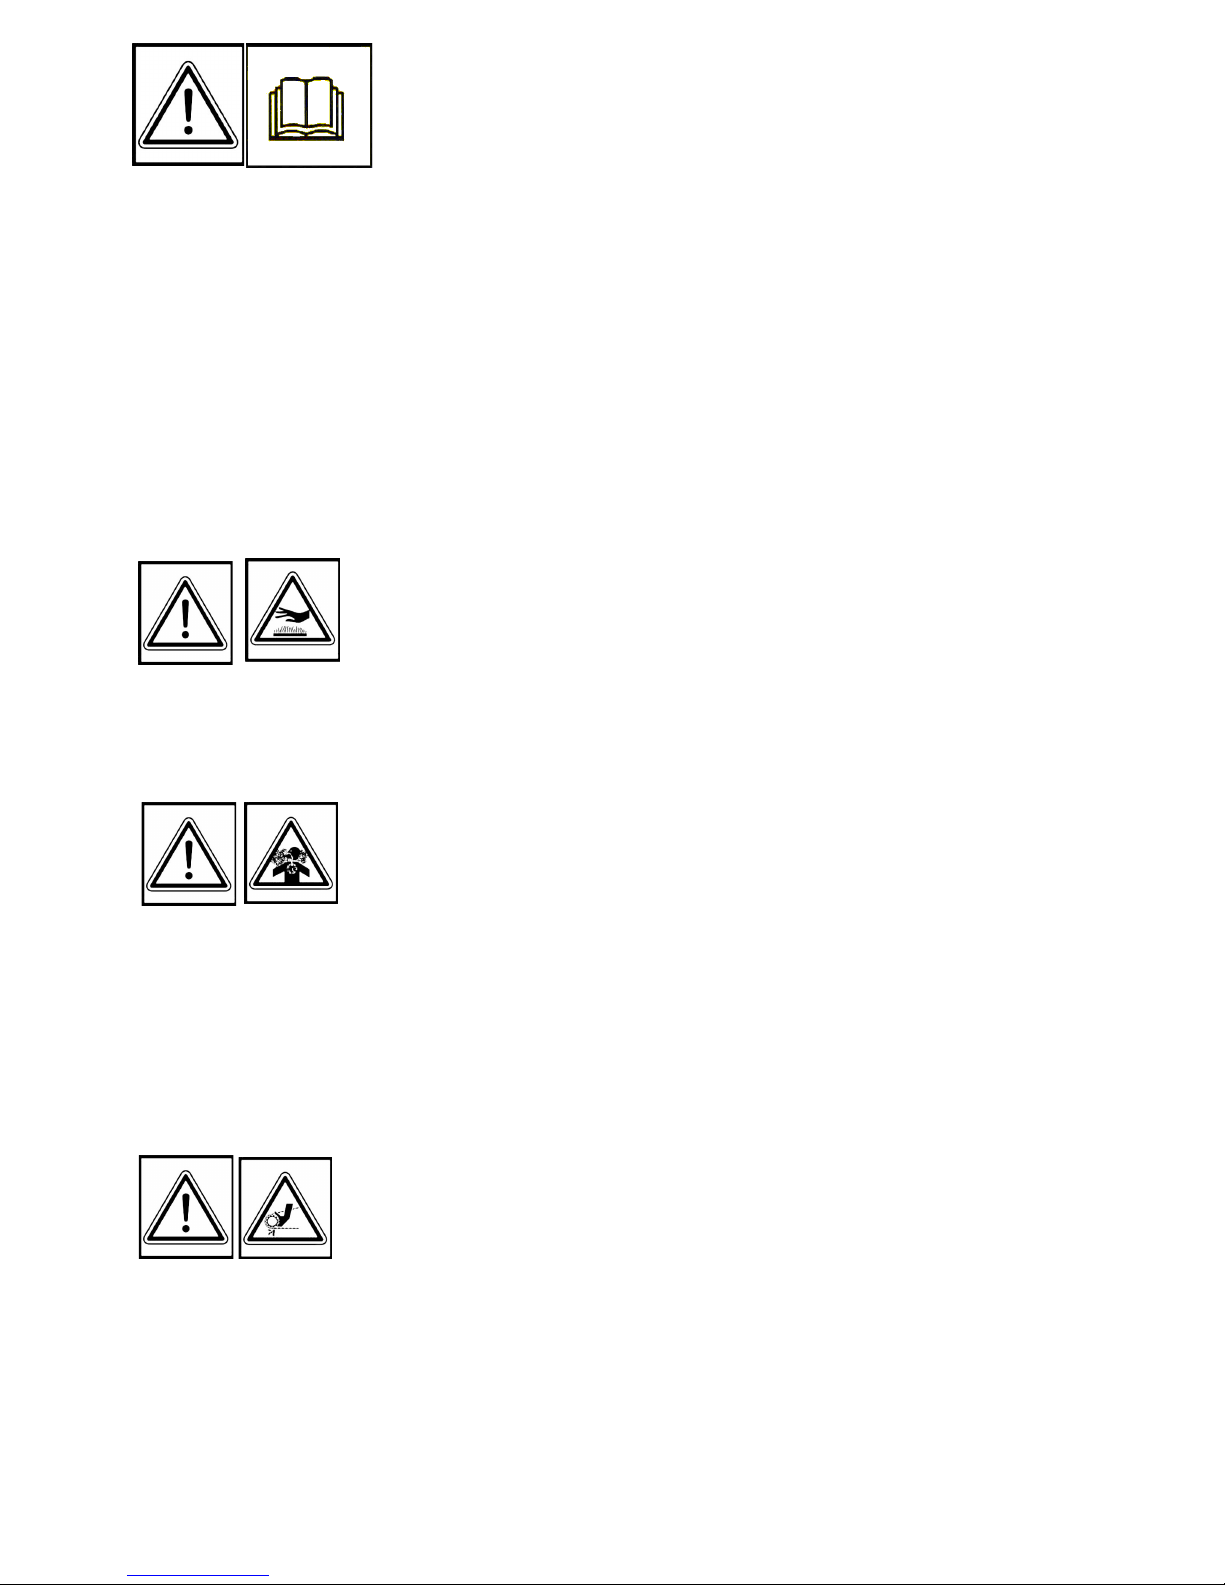
A burst which separates the tyre from the rim parts can cause serious injury or
death.
La separazione fra pneumatico e cerchione, causata dall’esplosione del
pneumatico, può provocare serie ferite o addirittura la morte.
La séparation entre le pneu et la jante, provoquée par l’explosion d’une roue
peut causer des dommages, blessures ou la mort.
Die rennung der Räder von den Felgen durch Explosion kann schwere
Verletzungen oder den od verursachen.
La separación entre el neumático y la llanta producida por la explosión del
neumático puede provocar graves herida e incluso la muerte.
A separação entre o pneumático e o aro, provocada pela explosão do
pneumático, pode causar graves ferimentos ou até mesmo a morte.
Handle fuel with care, it is highly flammable: Do not refuel machine while
smoking, when machine is near an open flame or sparks, or when the engine is
running. Stop the engine.
Maneggiare il carburante con cura, è altamente infiammabile; non fate
rifornimento mentre fumate, o vicino a fiamme o scintille, o quando il motore è
acceso.
Manier avec soin le carburant car c’est très inflammable. Ne pas remplir le
réservoir si vous êtes en train de fumer ou pendant que la machine est près du
feu ou d’étincelles ou encore pendant que la machine travaille. Arrêter le
moteur.
reibstoff vorsichtig handhaben, da er sehr entzündbar ist: beim anken nicht
rauchen. Nicht tanken, wenn die Maschine in der Nähe von Flammen oder
Funken ist oder wenn der Motor läuft. Immer den Motor abschalten.
Manejar el combustible con cuidado porque es sumamente inflamable; no
repostar mientras se fuma o cerca de llamas o chispas, o cuando el motor está
encendido.
Manuseie o carburante com cuidado, pois este è altamente inflamável; não
fume durante o abastecimento da máquina ou enquanto o motor estiver ligado,
não o aproximado de chama ou de faíscas.
Prevent battery explosions: keep sparks, lighted matches and open flames
away from the top of the battery. Battery gas can explode.
Per prevenire l’esplosione della batteria, tenete scintille, fiammiferi accesi e
fiamme lontani dalla stessa. Il gas della batteria può esplodere.
Prévenir l’explosion de la batterie: tenir les étincelles, les allumettes et le feu
loin de la batterie. Le gaz de la batterie peut exploser.
Vorbeugung der Batterie-Explosion. Entfernen Sie Funken, Zündhölzer und
Flammen von der Batterie. Das Batteriegas kann explodieren.
Para prevenir la explosión de la batería, mantener chispas, cerillas encendidas
y llamas lejos de la misma. El gas de la batería puede explotar.
Para prevenir explosão da bateria ter centelhas, fósforos acendido e chamas
longe da mesma. O gás da bateria poderia explodir.
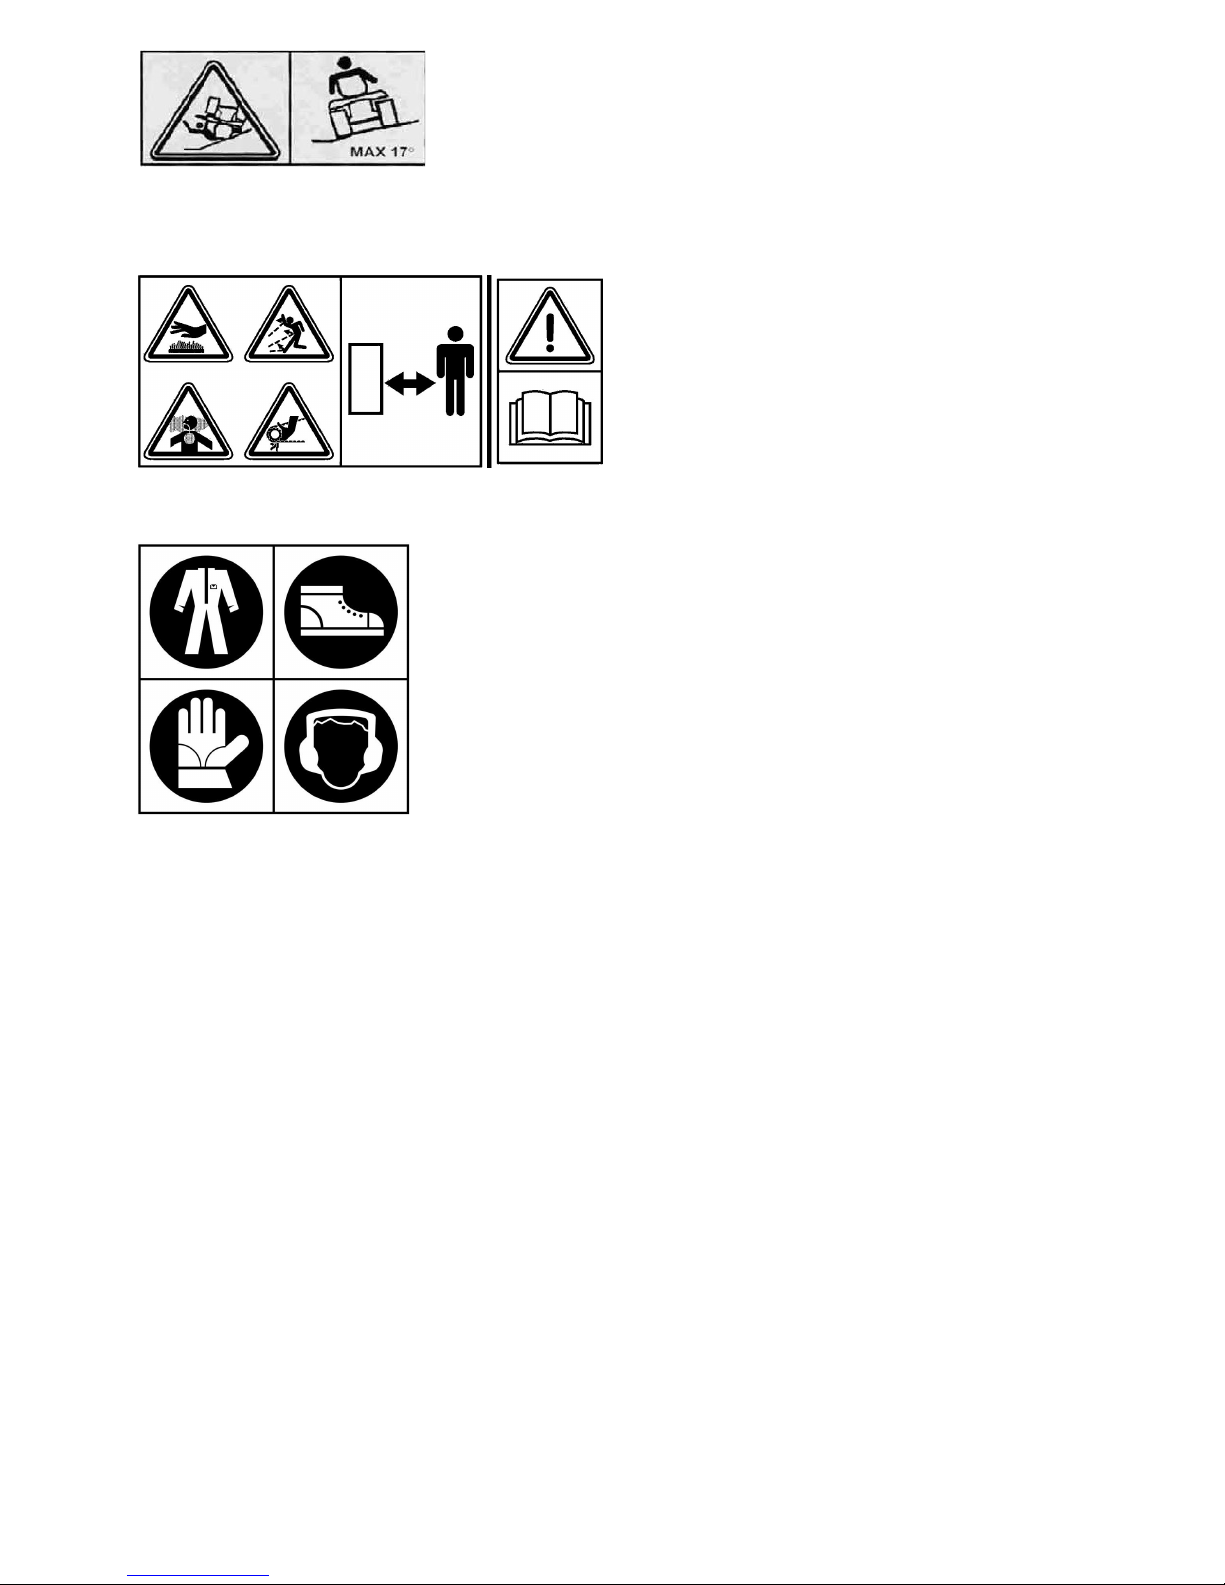
Rotating blades are dangerous. Protect children and prevent accidents.
Le lame in movimento sono pericolose. Proteggete i bambini e prevenite gli
incidenti.
Les lames en rotation sont dangereuses. Protéger les enfants et prévenir les
accidents.
Arbeitende Messer sind gefährlich, Kinder schützen und Unfälle vorbeugen.
Las cuchillas en movimiento son peligrosas, proteger a los niños y prevenir los
accidentes.
As facas em movimento são perigosas. Proteger as crianças e prevenir
acidentes.
Sulphuric acid in battery electrolyte is poisonous. It is strong enough to burn
skin, eat holes in clothing and cause blindness if it gets in contact with the eyes.
L’acido solforico della batteria è velenoso. È in grado di causare bruciature alla
pelle, bucare vestiti e causare cecità se arriva negli occhi.
L’acide sulfurique de la batterie est toxique. Il peut causer des brûlures à la
peau, endommager les vêtements et peut aussi causer cécité.
äure der Batterie ist giftig. ie kann die Haut verbrennen, Löcher in die
Kleidung machen und Blindheit verursachen.
El ácido sulfúreo de la batería es venenoso, puede provocar quemaduras en la
piel, agujar la ropa y provocar ceguera si llega a los ojos.
O acido sulfúrico e tóxico. Pode ser causa de queimadura da pele, furar roupa
e provocar cegueira, no caso chegarem em contacto com os olhos.
Avoid tipping. Do not drive where machine could slip or tip. Stay alert for holes
and other hidden objects.
Evitate le scivolate. Non guidate dove la macchina potrebbe scivolare o
inclinarsi. Attenzione a buche o ad oggetti nascosti.
Éviter les pentes. Ne pas conduire la machine où elle pourrait glisser ou se
renverser. Faire attention aux trous ou à tout autre obstacle caché.
Nicht dort fahren, wo die Maschine rutschen könnte. Vorsicht bei Löchern oder
versteckten Gegenständen.
Evitar patinazos. No conducir donde la máquina pueda patinar o inclinarse.
Cuidado con los baches o con objetos escondidos.
Evitar deslizamentos. Não dirija em lugares onde a maquina poderia deslizar.
er cuidado a buracos e objetos escondidos.

DANGER! Machine roll-over: Do not use this machine on slopes greater than
17° (30%).
PERICOLO! Ribaltamento della macchina. Non usare questa macchina su
pendii superiori ai 17° (30%).
DANGER! Renversement de la machine. Ne pas utiliser cette machine sur des
pentes supérieures à 17° (30%).
GEFAHR! Umstürzen der Maschine. Die Maschine nicht an Hängen mit einer Neigung
über 17° (30%) einsetzen.
¡PELIGRO! Volcado de la máquina. No utilizar esta máquina en pendientes
superiores a 17° (30%).
PERIGO! Revirado da máquina. Não use essa máquina em inclinações além
de 17° (30%).
DANGER! READ HE INS RUC ION MANUAL. KEEP SAFE Y DIS ANCES.
PERICOLO! LEGGERE IL MANUALE D’IS RUZIONE. ENERE LON ANO LE
PERSONE.
DANGER! LIRE LE MANUEL D’INS RUC IONS. RESPEC ER LES
DIS ANCES DE SÉCURI É
GEFAHR! DIE GEBRAUCHS ANLEI UNG DURCHLESEN. NICH IN DER
NÄHE VON ANDEREN PERSONEN MÄHEN.
PELIGRO! LEER LAS INS RUCCIONES. MAN ENER ALEJADAS LAS
PERSONAS.
PERIGO! LER O MANUAL DE INS RUÇÕES. MAN ER AS PESSOAS
AFAS ADAS.
Before using the machine, it is mandatory to put on the appropriate individual
safety devices: body protection, protection gloves, security shoes, ear
protection.
Prima di utilizzare la macchina, è obbligatorio indossare gli appositi dispositivi di
sicurezza individuali: protezione del corpo, guanti di protezione, calzature di
sicurezza, protezione dell’udito.
Avant d’utiliser la machine, il est obligatoire de mettre les dispositifs individuels
de sécurité appropriés: protection du corps, gants de protection, chaussures de
sécurité, protection de l’ouïe.
Vor dem Gebrauch der Maschine ist es vorgeschrieben, die geeignete
persönlichen Schutzkleidung anzuziehen: Körperschutz, Schutzhandschuhe,
Sicherheitsschuhe, Gehörschutz.
Antes de utilizar la máquina es obligatorio ponerse los dispositivos individuales
de seguridad apropiados: protección del cuerpo, guantes de protección,
calzado de seguridad, protección del oído.

ALTEZZA DI TAGLIO
CUTTING HEIGHT
HAUTEUR DE COUPE
SCHNITTHÖHE
ALTURA DE CORTE
STOP
STOP
ARRÊT
E
STOP
PARAD
O
MARCIA AVANTI
FORWARD GEAR
MARCHE AVANT
VORWÄRTSFAHR
T
DELANTE
LENTA
SLOW
LENT
LANGSAM
LENTAMENTE
VELOCE
FAST
RAPIDE
SCHNELL
VELOZ
LENTA
SLOW
LENT
LANGSAM
LENTAMENTE
VELOCE
FAST
RAPIDE
SCHNELL
VELOZ
RETROMARCIA
REVERSE GEAR
MARCHE ARRIÈRE
RÜCKWÄRTSFAHRT
MARCHA INVERTIDA
INSERIMENTO PTO
PTO ENGAGEMENT
CONNECTION PRISE DE FORCE
ZAPFWELLE EINSCHALTUNG
CONEXIÓN TOMA DE FUERZA
4
PERICOLO
DANGER
DANGEREUX
VORSICHT
PELIGRO
ARRESTO LAMA
BLADE DISENGAG.
ARRETE DE LAME
MESSERABSCHALTUNG
DESCONNECTION
DE CUCHILLA
INSERIMENTO LAMA
BLADE ENGAGEMENT
CONNECTION DE LA LAME
MESSERANSCHALTUNG
CONEXIÓN DE CUCHILLA
DIFFERENTIAL LOCK
BLOCC.
DIFFERENZIALE
BLOCAGE
DIFERENTIEL
DIFFERENTIALSPERR
E
BLO UEO
DIFERENCIAL
FRENO
BRAKE
FREIN
BREMSE
FRENO
CAUTION, DANGER!
ATTENZIONE, PERICOLO!
ATTENTION, DANGER!
VORSICHT, GEFAHR!
¡ATENCION, PELIGRO!
AVVIAMENTO A FREDDO
CHOKE START
DEMARRAGE A FROID
KALTSTART
ARRAN UE EN FRIO
ACCELERATORE
THROTTLE
ACCELERATEUR
AKZELERATOR
ACELERATOR
ARRESTO LAMA
BLADE DISENGAG.
ARRETE DE LAME
MESSERABSCHALTUNG
DESCONNECTION
DE CUCHILLA

Climber 9.18/ Translation of the original instructions
HYDROSTATIC GRASS CUTTER
GRILLO CLIMBER 9.18
Dear Customer,
Thank you for choosing our product. We hope that this new tractor mower will perfectly meet your
requirements. For best use and maintenance o er time, please carefully read and follow the instructions
gi en in this manual. This will enable you to get top results from your mower and will pre ent a oidable
expense. Please look after this manual which should always be kept with the machine.
GENERAL DESCRIPTION AND INTENDED USE
The Grillo machine Climber 9.18 is a ride-on grass-cutter with operator on board, designed for the cut of
grass, on slopes also.
WARNING! Be ore starting the engine, read this manual care ully. The
ollowing warnings are very important in ensuring sa ety!
WARNINGS
Caution is the best tool for accident pre ention.
You are urged to read the following instructions for use of the grass-cutter before starting work.
Incorrect use of the mower and its equipment may cause damage. To reduce this risk, follow the
precautions gi en below:
1) Read the whole of this before turning on and using the grass-cutter, before starting any work at all.
2) Pay particular attention to the warnings and safety labels set out around the grass-cutter.
3) Before allowing others to use the grass-cutter, inform them of the safety rules and carefully instruct
them on how to use the machine.
4) Be ore starting work, put on suitable working clothes, gloves, strong shoes and protective
glasses.
5) Wear special acoustic protections (ear-caps) during work.
6) Before turning on the machine, make sure there are no persons around it; especially children
(minimum distance 15 metres).
7) Before dri ing the machine in re erse, make sure there are no persons or obstacle in the way.
8) Check the condition of the ground before mowing. Make sure that there are no stones, sticks, or
other objects, which could be run o er and become a danger when projected.
9) If any impact with a foreign object occurs, disengage the blade, turn off the engine, remo e the
ignition key and examine the lawnmower. If the machine ibrates, ha e it repaired.
10) Before getting off the mower, turn off the engine, turn off the PTO, remo e the ignition key and lower
the cutting deck in the lowest position.
11) Always dri e slowly along une en paths.
12) Keep the speed down when dri ing down slopes.
13) Always turn slowly when dri ing downhill.
14) The user is always liable for any damage caused to third parties.
15) Deformed or damaged blades must always be replaced , ne er just repaired.
16) Always use original GRILLO spare parts and accessories.
17) Only work in sunlight or under effecti e artificial lighting.
18) Only store fuel in suitable containers designed for the purpose.
19) Be ery careful when working close to a road.
20) Allow the engine to cool before putting the machine away in a closed en ironment.
21) Do not operate the machine when tired or after drinking alcohol.
22) Do not allow any fuel spillage and after filling the tank wipe away any spilled fuel before starting the
engine.
23) Do not tamper with the safety de ices or disable them.
24) Do not change the engine settings, especially the maximum number of re s.
25) Do not rest hea y loads on the seat, the starter safety de ice could become disengaged.
5

Climber 9.18/ Translation of the original instructions
26) Ne er attempt any adjustments or cleaning with the engine running.
27) Ne er allow anyone to check the machine while you are seated at the controls with the engine
running.
IMPROPER USE TO BE AVOIDED
28) Do not allow passengers to ride on the machine.
29) Do not allow under-age children to operate it; use is prohibited to children under 16 years old.
30) Do not operate the grass-cutter near to ditches or erges which could collapse under the weight of
the machine, especially when the surface is loose or wet.
31) Replace worn or damaged exhausts.
FURTHER SAFETY ADVICE
The abo e mentioned warnings could not be enough to a oid any risk, if the operator does not use the
present grass-cutter correctly. Therefore, for your safety we gi e you following ad ices:
32) The mower blade is ery dangerous when rotating, never put hands or eet underneath the
mower deck.
33) Do not dri e in re erse at high speed.
34) It is dangerous to operate the steering wheel abruptly with the engine at full power.
35) Fill the tank with fuel before starting the engine. Only refuel outdoors, always turn off the engine,
keep away from sparks or naked flames, do not smoke! Always replace the cap on the fuel tank and
those on fuel containers properly.
36) If the fuel tank has to be emptied, only do so outdoors.
37) Do not operate the grass-cutter o er gra el which could become sucked up and drawn into the
blade, becoming ery dangerous.
38) If you ha e children, hide the ignition key after using the machine.
39) CAUTION: to a oid the risk of fire, keep the engine compartment, exhaust, discharge outlets,
battery, tank area and fuel pipes free from grass, lea es, dirt etc.
40) Do not store the machine inside any building where the engine fumes can reach naked flames,
sparks or bare electrical wires
Remo e the mower deck, turn off the engine and disconnect the spark plugs:
a) be ore cleaning obstructed points.
b) be ore checking or repairing the lawnmower.
c) when the machine hits a oreign body (check the mower deck to see i it is damaged).
d) i abnormal vibration occurs, stop and inspect the machine. Contact the nearest authorized
service centre i you need help.
IDENTIFICATION AND SERVICING
IDENTIFICATION
The Grillo CLIMBER 9.18 has a label under the
instrument panel indicating the machine’s serial
number.
TECHNICAL ASSISTANCE
This manual pro ides instructions for use and basic maintenance of the mower by the user. For
operations that are not described in this manual, contact your Area Dealer.
SPARE PARTS
Only use original spare parts. These are the only parts that ensure safety and interchangeability. Always
quote the machine’s serial number and the code number of the part to be replaced when ordering spare
parts. For engine parts, follow the indications gi en in the specific manual.
6

Climber 9.18/ Translation of the original instructions
WARRANTY
The guarantee is gi en in compliance with the current law. The dealer will ha e to gi e the client a copy
of the registration card of the machine, which they will print up from the Grillo website.
For the engine the guarantee of the relati e manufacturers apply.
RECOMMENDED LIST OF SPARE PARTS
2 x mowing blades
2 x blade screws
2 x blade screw nuts
1 x set of belts
1 x air filter for engine
1 x oil filter for engine
TECHNICAL SPECIFICATIONS
MOTOR: B&S INTEK 7180, 15,2 HP (@ 3300 r.p.m.) 656 cm³ OHV twin-cylinder petrol engine.
STARTER: electric with 12V battery.
FUEL TANK: 13 Litres – EMERGENCY SUPPLY: 3 litres.
GEARBOX: hydrostatic transmission with reduction gear and differential.
DIFFERENTIAL LOCK: with pedal engagement.
INTERNAL STEERING RADIUS: 380 mm (±14.9’’).
CLUTCH: electromagnetic with P.T.O and with blade brake.
SPEED: continuously ariable from 0 to 9 km/h + re erse speed from 0 to 6 km/h.
TYRES: TRACTOR ront 13×5.00-6 puncture-proof treated; rear: 17×8.00-8.
SEAT: sprung and adjustable super-comfort seat with armrests and roll-bar.
BRAKES: front ser ice brakes with pedal engagement; rear parking brake with le er engagement.
CUTTING DECK: rear/side discharge.
CUTTING SYSTEM: rotating with 1 blade.
CUTTING WIDTH: 910 mm (±36’’).
CUTTING HEIGHT: from 30 mm to 90 mm (from ±1.2’’ to ±3.5’’) with 4 different cutting positions and 1
transfer position.
HOURLY CUTTING CAPACITY: approx. 7200 m2/h (±1.7 acres per hour).
STANDARD FEATURES: tow bar.
ATTACHMENTS: turf wheels set, 110 cm (±43’’) Quick Shift cutting deck with mulching, rear discharge
and electrical cutting height adjustment, mulching kit for 91 cm (±36’’) cutting deck, 125 cm (±49’’)
orientable snow blade, snow chains for rear wheels.
WEIGHT: 293 kg
SIZE: Length: 1800 mm (±71’’) Width: 990 mm (±38.9’’) Height: 1070 mm (±42.1)
7

Climber 9.18/ Translation of the original instructions
PUTTING THE MACHINE INTO SERVICE
1) Check that the machine has not been damaged in transit.
2) Check the oil le els of the engine, hydrostatic transmission and final dri e.
3) Check the tyre pressure:
1 BAR front wheels 13×50/6
1.5 BAR rear wheels 17×8.00-8
4) Check the battery oltage; it must be at least 12,5 Volts. Charge if necessary.
IMPORTANT!!! During assembly take care not to re erse the polarity of the battery.
BATTERY – CAUTION!
The gases released by the battery are explosi e, keep it away from naked lights or sparks. Check the
liquid le el periodically and keep the terminals lubricated with Vaseline grease.
RUNNING IN – CAUTION!!
Change the engine oil and filter after the first 20 working hours. Check that there are no oil leaks or slack
screws, especially those which fix the blade, the steering and the wheels. Adjust the tension of the
hydrostatic transmission belts (fig. 16).
INSTRUCTIONS FOR USE
BEFORE STARTING UP THE ENGINE
Before starting up the engine, always check that:
– the engine oil le el is correct (fig. 4)
the oil in the hydraulic engine is at the correct le el (fig. 3)
the forward le el is in the idle position (fig. 1B, no. 2)
the engine cooling intake grilles are clean (fig. 5)
– air filter is clean (fig. 6).
– the mowing deck is clean
– the hydraulic motor fins are clean (fig. 7)
– the blades are sharp and firmly fastened in place
– the screw in the centre of the blade hub is safety tightened (fig. 1C, no.3)
Fill the fuel tank using a funnel with ery fine filter (fig. 1A, no. 4).
STARTING UP THE ENGINE
– Push the throttle half way in (fig. 1B, no.5)
– If the engine is cold, use the choke (fig. 1B, no.6). Turn the ignition key on the dashboard (fig. 1, no.
7).
Once the engine has started, turn off the choke and wait for a few minutes to allow the engine to warm
up.
To switch off the engine put the ignition key in the STOP position (fig. 1, no. 7).
N.B. When mo ing the mower from one place to another, you are ad ised to keep the cutting deck at the
maximum height setting.
STARTING WORK
– Choose the desired cutting height by means of the le er 8 (fig. 1D). Suitably accelerate the engine and
engage the PTO le er (fig. 1, no. 1). Gently operate the forward tra el le er (fig. 1B, no. 2) and start
work. To stop, return the forward le er to the stop position.
– The le er (fig. 1B, no. 2) is also used to re erse. When it is mo ed back, the machine mo es
backwards; always operate it gently.
8

Climber 9.18/ Translation of the original instructions
FRONT BRAKE
The front brake (fig. 23, no. 1) must be used only as emergency brake, sloping down to a oid the
machine sliding. (When it is used with the differential lock, it makes the machine steadier on slopes). The
forward tra el le er is normally used to decelerate and to brake.
PARKING BRAKE
To engage the parking brake, please press the le er upwards and lock it to the proper seal retainer (fig.
23, no. 2); in this position, if the forward tra el le er is engaged, an acoustic signal warns that the
parking brake is engaged. To adjust the parking brake, use the castellated nut (fig. 22).
CUTTING POSITIONS
The cutting position is adjusted using the le er (fig. 1D, no. 8).
The deck can be set in 4 different cutting positions from 30 to 90 mm and one tra el position in which the
blade disengages automatically (fig. 1D).
In case of une en ground, humps or dips, the deck should be kept in the highest cutting position to
pre ent knocks by the blade.
SLOPING GROUND
If possible, steep slopes must be mown in the up/down direction, taking great care when turning that the
wheels upstream do not strike obstacles (stones, branches, roots, etc.) which might cause the machine
to o erturn, or lead to loss of control.
Assess the conditions and take care i the ground and grass are damp since the machine might
slip. Downhill, set off at low speed and do not pass o er dry or cut grass since the wheels lose grip;
INTERVENTION OF SAFETY DEVICES
Remember that the engine will stop whene er:
– The operator gets up from the seat.
The engine will not start up if:
– The blade is engaged.
– Nobody is sitting in the dri er’s seat.
– If the cutting deck isn’t at the highest setting.
HOURMETER
The machine is equipped with the new hour meter. This hour meter has three different functions:
1) It always shows the no. of hours worked, e en when the key is not inserted.
2) It displays the no. of hours to the next engine oil change (OIL CHANGE IN...HS). The first oil change
must
be carried out after the first 20 working hours than e ery 100 working hours. The indicator “OIL
CHANGE”
flashes automatically when it is necessary to change the oil.
3) It displays the no. of hours to the next lubrication (LUBE IN...HS). Lubrication must be carried out
e ery
50 working hours. The indicator “LUBE” flashes automatically when lubrication must be carried out.
By pushing the white button you can choose the function to be displayed on the hour meter.
USEFUL RULES FOR EFFICIENT USE
1) Ne er strain the engine: when fumes are emitted from the exhaust it means that it is being strained.
Slow down.
2) Do not lea e the machine out in the rain.
3) Frequently sharpen the mower blades: the cut will be better and the engine will not be strained as
much.
4) Check the land before mowing to make sure that there are no stones, sticks or foreign bodies.
5) Keep the engine at peak r.p.m. during mowing, adjust the speed according to the height of the grass.
6) Keep the grilles above the engine and the cooling ins o the hydraulic motor ( ig. 5 - 7) clean.
99

Climber 9.18/ Translation of the original instructions
MAINTENANCE AND LUBRICATION
CAUTION!
- Disconnect the plugs be ore per orming any cleaning, maintenance or repair operation. Always
wear suitable clothing and working gloves.
- When the machine or part o it is li ted to carry out maintenance operations, always remember
to use suitable ixing tools such as holders and sa ety locks.
- When carrying out maintenance operations and/or when the machine is tilted without sa ety
locks or supports, never leave it unguarded in places where inexperienced people and children
could have easy access to it.
- Protect the environment: care ully dispose o used oils, petrol and any other pollutant product!
- E ective maintenance and correct lubrication help to keep the machine ully e icient.
ENGINE
For the lubrication inter als, follow the instructions pro ided in the engine handbook; the oil must in any
case be changed a ter the irst 20 working hours, using AGIP SAE 30 engine oil. To remo e the oil
remo e the tap and connect a rubber hose long enough to drain the oil into a container outside the
machine (fig. 20B). Change the oil filter (fig. 10).
FINAL DRIVE GEARBOX
Check the oil le el e ery 100 hours by unscrewing the cap (fig. 11, ref. A); if necessary top up with
80W90 (API GL-5) gearbox oil. To drain the oil unscrew the cap (fig. 11, ref. B). Change the oil e ery
1000 hours. Quantity 1,9 lt (fill through the tap fig. 11A).
HYDRAULIC MOTOR
Check the le el in the expansion tank when the motor is cold. It should come up to the le el notch (fig.
3). If necessary, add AGIP SAE 15W50 or 20W50m oil. Change the oil e ery 200 working hours. To drain
the oil, unscrew the cap (fig. 4); pour into the tank. Keep the fins and coil of the hydraulic motor (fig. 3A
and 7) thoroughly cleaned. Quantity 1 litre.
AIR FILTER
Check the air filter e ery 4 hours, or more frequently if working in a ery dusty en ironment (fig. 6).
Check the air intake grid for engine cooling (fig. 5). The external and internal grids must always be kept
clean to a oid blocking the air flow needed for the engine cooling.
Keep the engine compartment, the hydrostatic transmission and the intake grid clean.
CHECKING THE BLADES AND DECK
A blunt blade tears the grass, lea ing it unattracti e. The cutting edges of both blades must be
sharpened. To remo e a blade, take hold of it firmly, wearing work glo es, and unscrew the central
screw, remembering that the screw has a right-hand thread (fig. 1C, no. 3). Sharpen both cutting edges
using a medium-grain grinding wheel and check that the blade is balanced by standing it on a round bar
inserted in the central hole. Fit the two cutting blades following the diagram (fig. 13).
CAUTION!
Tighten the fixing screw (fig. 1C, no. 3) firmly. Always replace damaged or crooked blades; ne er attempt
to repair them! When fitting, always follow the diagram (fig. 10). ALWAYS USE ORIGINAL BLADES! If
they are worn they can be turned round since they ha e two cutting edges.
910 mm CUTTING DECK
ADJUSTING THE CUTTING DECK
Le elness of the cutting deck is essential in order to obtain an e enly mown lawn.
Park the mower on a flat surface and check that the tyre pressure is correct. Adjust the right and the left
adjustment de ices so that the edge of the cutting deck is at the same distance from the floor, 30 mm, on
both sides (with the operator sitting on board – fig. 14 – 14A). If you are unable to le el off the deck,
contact an Authorised After-Sales Ser ice Centre.
10

Climber 9.18/ Translation of the original instructions
ENGINE – BLADE BELT
910 mm CUTTING DECK
The engine – blade belt is self-adjusting. Therefore no adjustment is required. Simply check the spring
tension (fig. 15). If the belt becomes twisted or comes off, check the parameters below, keeping the
cutting deck in the highest position (“tra el” position):
1) 170 mm from the edge of the deck to the ground (fig. 24).
2) 170 mm from the rear edge of the deck to the ground (fig. 24).
3) Adjust the registers (fig. 14 – 14A).
4) Take care when positioning the belt guides; mo e them towards the belt, checking the cutting deck at
the arious height settings (fig. 12, ref. A). Check that during operation the belt I always in the centre of
the stretcher (fig. 15, ref. A). The stretcher has to stick about 5/8 mm out of the frame (fig. 25).
110 MP CUTTING DECK
This cutting deck with 3 blades has a cutting width of 1100 mm. It has two functions: rear discharge and
mulching. If you want to change from rear discharge function to mulching function you simply ha e to
use the le er. It is namely not necessary to change the blades (fig. 26 – 27). The cutting height can be
adjusted electrically using the button on the dashboard (fig. 36).
MAINTAINANCE 110MP CUTTING DECK
To ensure the deck belt works properly and to ha e a uniform cut, please follow these instructions:
– put the cutting deck in its lowest position.
– adjust the front arms fig. 34 in order to set the front part of the cutting deck at 35 mm from the ground
(fig. 28): you ha e to measure the point A as indicated (fig. 29).
– regulate the adjusting de ice (fig. 35) in order to set the rear part of the cutting deck at 35 mm from the
ground (fig. 30): you ha e to measure the point B as indicated (fig. 29).
To check the cutting deck belt you ha e to unscrew the knob D in fig. 31 and remo e the two protections.
If you see that the length of the belt has changed, resulting in malfunctioning, you can regulate the belt
tension using the adjusting screw (fig. 32). If you want to replace the belt, please follow the fig. 33 to re-
assemble it. The spring has to be adjusted at 86 mm and it is indicated by the red arrow (fig. 32B). The
stretcher has to be lubricated e ery 50 working hours (fig. 32/C).
ENGINE – HYDROSTATIC TRANSMISSION BELT
Whene er there is a change in belt length (causing therefore its malfunctioning), the tension can be
regulated by means of the adjustment de ice (fig. 16). Take care not to compress the spring beneath the
unit completely; belts must be neither too tight nor slack. The spring must be kept set at 44 mm and it is
indicated by the red arrow (fig. 16)
BLADE ROTATION
Rotation is started and stopped using the switch (no. 1, fig. 1). When rotation is engaged, the engine
must be running at medium r.p.m (see throttle sticker) and the machine must not be in the grass for
cutting. Ne er start the blades with the engine at maximum r.p.m. The machine is equipped with an
electromagnetic clutch which also brakes the blade during disengagement. The blades are also
disengaged automatically when the cutting height adjuster le er is mo ed to the highest position. Always
work at maximum rpm.
CHANGING THE BELTS
The mo ement is transmitted from the motor to the hydraulic transmission and to the blades by means of
two -belts. Replace the belts as soon as they show signs o wear!
Their replacement and subsequent adjustment are fairly complex procedures and must be carried out by
an Authorised After-Sales Ser ice Centre. For the cutting deck – engine belt, the belt guides of the deck
pulley ha e to be remo ed; release the belt stretcher spring (fig. 15, ref. B). For the two transmission and
hydraulic engine belts proceeds as follows:
-remo e the rear and top grids
-undo the belt stretcher nut (fig. 16).
ALWAYS USE ORIGINAL BELTS!
11

Climber 9.18/ Translation of the original instructions
TRACTION RELEASE LEVER
The traction release de ice is located behind the seat; if the machine breaks down, to allow it to be
towed or mo ed by hand, mo e the le er outward (fig. 20A). In the position shown (fig. 20B) the machine
is in working condition. Check that during working the hydraulic engine piston does not remain pressed
down; if necessary, adjust the nut (fig. 21).
DIFFERENTIAL LOCK ADJUSTMENT
The differential lock has to be acti ated when the pedal is half way of its tra el (fig. 8). To adjust the
acti ation point of the differential lock use the screw (fig. 9).
MAINTENANCE SUMMARY TABLE
PROCEDURE EVERY 8
HOURS
AFTER
20
HOURS
EVERY
50
HOURS
EVERY
100
HOURS
ONCE A YEAR
OR EVERY
200 HOURS
Engine oil check the le el ●
change ● ●
Air filter
check ●
replace ٭
Spark plug check/adjust ●
replace ●
Hydraulic
engine oil
check the le el ● ●
replace ●
Check that the engine intake grid is
clean ●
Check that the hydraulic engine
cooling fins are clean ●
Final dri e
gearbox oil
check the le el ● ●
replace ٭
Check that blades are well-sharpened
and well-fixed ●
Lubricate with grease ● ●
● recommended procedure
٭ procedure to be carried out if necessary
12

Climber 9.18/ Translation of the original instructions
LUBRICATION POINTS WITH GREASE
TROUBLESHOOTING
PROBLEM
CAUSE REMEDY
Dashboard OFF with key in “AVV.” (ON) pos.
Battery not supplying power – Check connecting cables
– Check electrolyte le el
– Recharge battery
– Change the fuse
Dashboard ON, but starter motor does not turn o er with key in “AVV” (ON) pos.
– Battery not supplying enough power – Recharge battery
– Start-up go-ahead not gi en – Tra el le er in stop position
– Disengage blades
– Sit in the dri er’s seat
Difficult starting or irregular running of engine
– Carburettor problems – Clean or change the air filter
– Adjust the carburettor (follow engine manual
instructions)
– Deposits or dirt in fuel – Empty the tank and use fresh petrol
– Check and change the petrol filter if necessary
Starter motor turns o er but engine does not start
– No petrol flow – Check that the choke has been acti ated (if
engine is cold)
– Check petrol le el in tank
13

Climber 9.18/ Translation of the original instructions
– Check wiring of carburettor opening control
– Check petrol filter (and change if necessary)
– Check that the ent on the tank cap is not
blocked
– Fault in ignition system – Check that the caps of the spark plugs are
correctly fastened
– Check that the electrodes are clean and at the
correct distance apart.
Drop in engine performance during cutting
Speed too high for cutting height – Reduce speed
When the blades are engaged the engine cuts out
- Go ahead not gi en for blade engaging - Check the blade-engaging microswitch
- Sit in the dri er's seat
Une en cutting
– Cutting deck not parallel to ground – Check tyre pressure
– Le el off the deck
– Blades fault – Check that the blades are correctly mounted
– Sharpen or change the blades
– Adjust the tension of the cutting deck
engine belt
Vibrations during operation
– Blades unbalanced – Balance blades or replace if damaged
– Fastenings are loose – Check and fasten the blade fixing screws
as well as the fixing screws of the engine
and chassis.
Incorrect P.T.O. engagement
– Check the battery oltage, it must be at least
12,5 olts
– Check the le elness of the blade brake
and the electromagnetic clutch, 0,3 mm
– When PTO button is pressed,
the blade does not engage
14

Climber 9.18/ Translation of the original instructions
ELECTRICAL SYSTEM
The electrical system is protected by a fuse which cuts out the entire electrical system if blown. A ter
inding and repairing the ault, replace the fuse with another of the same rating. Never replace the
use with one o a di erent rating. The electrical system fuses are underneath the tank (fig. 19). If the
problems persist after all the procedures described abo e ha e been carried out, contact the Authorised
After-Sales Ser ice Centre. Ne er attempt to make difficult repairs unless you ha e the necessary
equipment and technical expertise.
IMPORTANT!
– Take care not to re erse the battery polarity.
– Ne er operate the mower without the battery, since it is equipped with a charge regulator.
– Take care not to cause short-circuits.
THE MACHINE DOES NOT REMAIN IN NEUTRAL
Adjust the zero turn de ice by tightening or loosening it (fig. 17).
to adjust the forward and re erse tra el speeds, use the screws (fig. 18).
ENDING WORK
After mowing, disengage the blades and dri e back to base with the cutting deck in the highest position.
To stop, mo e the tra el le er to the STOP position (fig. 1B, no. 2), set the throttle le er on the minimum
r.p.m., switch off the engine by turning the key in the STOP position (fig. 1, no.7) and lower the deck to
the lowest position. Engage the parking brake (fig. 23, no. 2).
CLEANING
Clean the outside of the mower after each use.
STORAGE AND PROLONGED PERIODS OF DISUSE
Store the mower in a dry place, away from atmospheric agents, and preferably co er with a sheet. If the
mower is not going to be used for a long period (o er 1 month), disconnect the red battery cable and
follow the instructions gi en in the engine manual. Also lubricate all of the articulated joints. Regularly
check that the battery oltage does not drop below 12 olts. If it does, recharge the battery. If the
machine is to be out of use for more than 30 days (models with petrol engine), drain the fuel from the
engine to pre ent sticky deposits from forming in the fuel intake system or in ital parts of carburettor. To
a oid this procedure, it is possible to sa e fuel in storage up to 12 months by using an appropriate fuel
stabilizer. Add the such additi e to the fuel in the tank or in the fuel container. Run the engine for a while
to let the stabilizer get into the fuel system. Caution: if the engine is fed with petrol containing alcohol,
drain the fuel tank and run the engine until there is no fuel left.
TRANSPORTING THE MACHINE
If the machine has to be transported on a lorry or a trailer, fasten it to the ehicle using ropes or cables.
15

Climber 9.18/Original instructions- Istruzioni originali- Original-Anleitungen- Instrucciones originales
TRINCIAERBA IDROSTATICO
GRILLO CLIMBER 9.18
Gentile Cliente,
nel ringraziarla per la fiducia e la preferenza accordata al nostro Grillo CLIMBER, confidiamo che l’uso di
questa sua nuova macchina risponda pienamente alle sue esigenze Per l’impiego ottimale e per la sua
manutenzione nel tempo, la preghiamo di leggere attentamente e seguire scrupolosamente le indicazioni
di questo libretto; ciò le consentirà di ottenere i massimi risultati e salvaguardare la sua spesa La
preghiamo di conservare questo libretto, che dovrà sempre accompagnare la macchina
DESCRIZIONE GENERALE E USO PREVISTO
La macchina Grillo Climber 9 18 è un trinciaerba con operatore a bordo, progettato per il taglio dell'erba,
anche in pendenza
ATTENZIONE! Leggere attentamente rima di avviare il motore.
Le seguenti avvertenze sono im ortanti er l’incolumità dell’o eratore!
AVVERTENZE
La prudenza è l’arma principale nella prevenzione degli incidenti!
La preghiamo vivamente di leggere con attenzione le seguenti avvertenze nell’uso del trinciaerba, prima
ancora di iniziare il lavoro L’uso improprio del trinciaerba e il suo equipaggiamento possono risultare
pericolosi; per ridurre queste possibilità osservare le precauzioni necessarie di seguito riportate:
1) Leggere questo manuale interamente, prima di accendere e mettere in movimento il trinciaerba
2) Dare particolare attenzione alle ammonizioni e alle etichette di sicurezza attorno al trinciaerba
3) La rotazione della lama del trinciaerba è altamente pericolosa, non mettere mai le mani o i piedi
sotto al piatto rasaerba
4) Prima di fare lavorare con la macchina altre persone bisogna metterle al corrente delle norme di
sicurezza e di come si usa
5) Prima d'iniziare il lavoro, verificare che non ci siano persone attorno, specialmente bambini
(osservare una distanza minima di 15 metri)
6) Prima di partire con la macchina a marcia indietro controllare che non ci siano persone od ostacoli
7) Prima di iniziare il lavoro, indossare indumenti a ro riati da lavoro, guanti, scar oni,
occhiali.
8) Indossare a ro riate rotezioni acustiche (cuffie).
9) Controllare il terreno prima di procedere alla rasatura, che non vi siano sassi, bastoni o corpi
estranei, che potrebbero essere scagliati lontano, e quindi molto pericolosi
9) Se si urta un corpo estraneo, disinnestare la lama, fermare il motore, togliere la chiave di
avviamento e ispezionare il trinciaerba; se la macchina vibra, farla riparare
10) Prima di scendere dal trinciaerba, spegnere il motore, disinserire la PTO, rimuovere la chiave
d'avviamento e abbassare il piatto tosaerba nella posizione più bassa
11) Sui viali sconnessi viaggiare a bassa velocità
12) Sulle pendenze, in discesa moderare la velocità
13) In discesa, curvare sempre lentamente
14) L'utilizzatore è sempre responsabile dei danni arrecati a terzi
15) I coltelli deformati o danneggiati devono essere sempre sostituiti, mai riparati
16) Usare sempre ricambi ed accessori originali GRILLO
17) Lavorare solo con la luce del sole o con buona luce artificiale
18) Immagazzinare il carburante in contenitori specificatamente costruiti per questo scopo
19) Fare attenzione quando si lavora vicino ad una strada
20) Far raffreddare il motore prima di mettere la macchina in locali chiusi
21) Non usare la macchina quando si è affaticati e non bere alcolici
22) Evitare fuoriuscite di combustibile e dopo aver riempito il serbatoio pulire ogni fuoriuscita sulla
macchina prima di avviare il motore
23) Non manomettere o disattivare i dispositivi di sicurezza
24) Non cambiare le regolazioni del motore, in modo particolare il numero di giri max
25) Non appoggiare pesi sul sedile, si potrebbe disattivare il dispositivo di sicurezza dell'avviamento
26) Non fare nessun tipo di regolazione o pulizia col motore in moto
16

Climber 9.18/Original instructions- Istruzioni originali- Original-Anleitungen- Instrucciones originales
27) Non fare controllare la macchina da nessuno mentre siete seduti alla guida col motore in moto
USI IMPROPRI DA EVITARE
28) Non permettere passeggeri sulla macchina
29) Non fare lavorare ragazzi troppo giovani; vietato l'uso ai minori di 16 anni
30) Non operare col trinciaerba vicino a fossati o banchine che si possono rompere sotto il peso della
macchina, specialmente quando la superficie è staccata o bagnata
31) Sostituire le marmitte danneggiate o usurate
ULTERIORI ACCORGIMENTI PER LA SICUREZZA
Le avvertenze sopra riportate potrebbero non essere sufficienti ad evitare ogni rischio, nel caso in cui
l'operatore non si attenesse all'uso appropriato della presente macchina trinciaerba Pertanto, per
maggiore prudenza specifichiamo quanto segue
32) La rotazione della lama del trinciaerba è molto pericolosa, non mettere mai le mani o i piedi sotto al
piatto rasaerba
33) Non fare retromarcia col motore accelerato
34) E' pericoloso azionare il volante di guida bruscamente, col motore a massimo regime
35) Prima di avviare il motore riempire il serbatoio di carburante Fare rifornimento di combustibile solo
all'aperto, spegnere sempre il motore, stare lontano da scintille o fiamme, non fumare!
Riposizionare in modo sicuro il tappo del serbatoio e dei contenitori di carburante
36) Se dovete svuotare il serbatoio carburante, eseguire l'operazione all'aperto
37) Non lavorare col trinciaerba sopra alla ghiaia che viene aspirata e centrifugata dalla lama,
risultando molto pericolosa
38) Se avete dei bambini, quando non usate la macchina, nascondete la chiave d'avviamento
39) ATTENZIONE: per ridurre il pericolo d'incendio mantenere il vano motore, la marmitta, i collettori
di scarico, la batteria, la zona serbatoio e conduttura carburante liberi da erba, foglie, polvere ecc
40) Non immagazzinare la macchina dentro un edificio dove i vapori del carburante possono arrivare a
fiamme, scintille o fili elettrici scoperti
Disinnestare la trasmissione del piatto di taglio, spegnere il motore e disinserire le candele:
a) rima di ulire i unti ostruiti
b) rima di controllare o ri arare il trinciaerba.
c) do o aver urtato un cor o estraneo (is ezionare l'organo di taglio er verificare che non sia
danneggiato).
d) se la macchina comincia a vibrare in modo anomalo, effettuare immediatamente un controllo
generale er individuare la ragione che rovoca questa anomalia: se necessario richiedere
l'intervento di un rofessionista.
IDENTIFICAZIONE E ASSISTENZA
IDENTIFICAZIONE
Il Grillo CLIMBER 9 18 è fornito di una targhetta, posta sotto
al cruscotto, con il numero della macchina
SERVIZIO ASSISTENZA
Questo manuale fornisce le indicazioni per l’uso del trinciaerba e per una corretta manutenzione di base,
eseguibile dall’utilizzatore Per gli interventi non descritti in questo libretto, interpellare il Rivenditore di
Zona
RICAMBI
Si raccomanda di impiegare esclusivamente ricambi originali, gli unici che offrono caratteristiche di
sicurezza e intercambiabilità Ogni richiesta deve essere corredata del numero di matricola della
macchina e il numero di codice del pezzo da sostituire Per i ricambi del motore, attenersi a quanto
indicato nel libretto specifico
17
Other manuals for CLIMBER 9.18
1
Table of contents
Languages:
Other Grillo Lawn Mower manuals

Grillo
Grillo CL 75 User manual

Grillo
Grillo FD 220 R User manual

Grillo
Grillo Climber CL 7.13 User guide

Grillo
Grillo G52 User guide

Grillo
Grillo Climber CL 7.21 User guide

Grillo
Grillo MD 22 User manual

Grillo
Grillo GF1 User manual

Grillo
Grillo CL62 User manual

Grillo
Grillo FD 220 R User manual

Grillo
Grillo MD15 User manual

Grillo
Grillo fm2200 User manual

Grillo
Grillo MD22 N User manual

Grillo
Grillo FD 280 User manual

Grillo
Grillo MD13 User manual

Grillo
Grillo CL 620 User guide

Grillo
Grillo FD13.09 User manual

Grillo
Grillo FD 500 User manual

Grillo
Grillo FD 2200 4WD User manual

Grillo
Grillo MD 24 AWD User manual

Grillo
Grillo Climber 710 User manual