KW-Empfang
der
Bander
1-4
Zum
Empfang
der
KW-Bander
1
bis
4
dient
die
ausziehbare
T.leskopantenne
@.
Bitte
—
ziehen
Sie
die
Antenne
langsam
und
in
stetigem
Zug
heraus,
um
sie
nicht
zu
be-
schaédigen.
Achten
Sie
auch
darauf,
dass
Sie
die
ausgezogene
Antenne
nicht
um-
knicken.
Klangregelung
Mit
dem
kleinen
Drehkttopf
@
asst
sich
die
-Klangfarbe
stetig
verandern.
Etwa
in
der
Mitte
des
Drehberetches
befindet
-sich
eine
Raststellung,
bei
der
eine
ausgewogene
Wiedergabe
der
hohen
und
tiefen
Tone
eingestelit
wird.
Fur
Musikprcgramme
ist
dies
die
Grundeinstellung.
Kurzwellenlupe
SW1
-to
SW4-
Band
Reception
The
telescopic
antenna
®
serves
to
ame-
liorate
reception
on
the
SW-bands
1
to
4.
Please,
pull
out
the
antenna
slowly,
SO
8s
to
avoid
damage
in
the
construction.
Be
careful
not
to
crack
the
telescopic
antenna
when
drawn
out.
Tone
contre}
The
tone
level
can
be
adjusted
to
suit
your
taste
when
rotating
the
small
knob
@
to
the
left
of
the
buttons.
To
receive
musical
programs,
turn
the
knob
to
the
middle
position
where
the
button
is
locked.
Réception
OC
1—OC
4
Pour
les
ondes
courtes
OC1-OC4,
tirer
sur
le
bouton
de
!antenne
télescopique
®
et
"
sortir
celle-ci
intégralement,
en
la
laissant
&
fa
verticale.
Pour
éviter
que
l'antenne
soit
endom-
magée,
il
convient
de
la
sortir
progres-
sivement
dans
un
mouvement
continu,
et
non
par
8-coups.
Réglage
de
tonalité
La
tonalité
peut
étre
adaptée
selon
votre
goit
par
lintermédiaire
du
petit
bouton
@®
&
gauche
des
touches.
Pour
recevoir
des
programmes,
de.
musique,
tourner
ce
bouton
jusqu'a
position
au
milieu
od
il
verrouille.
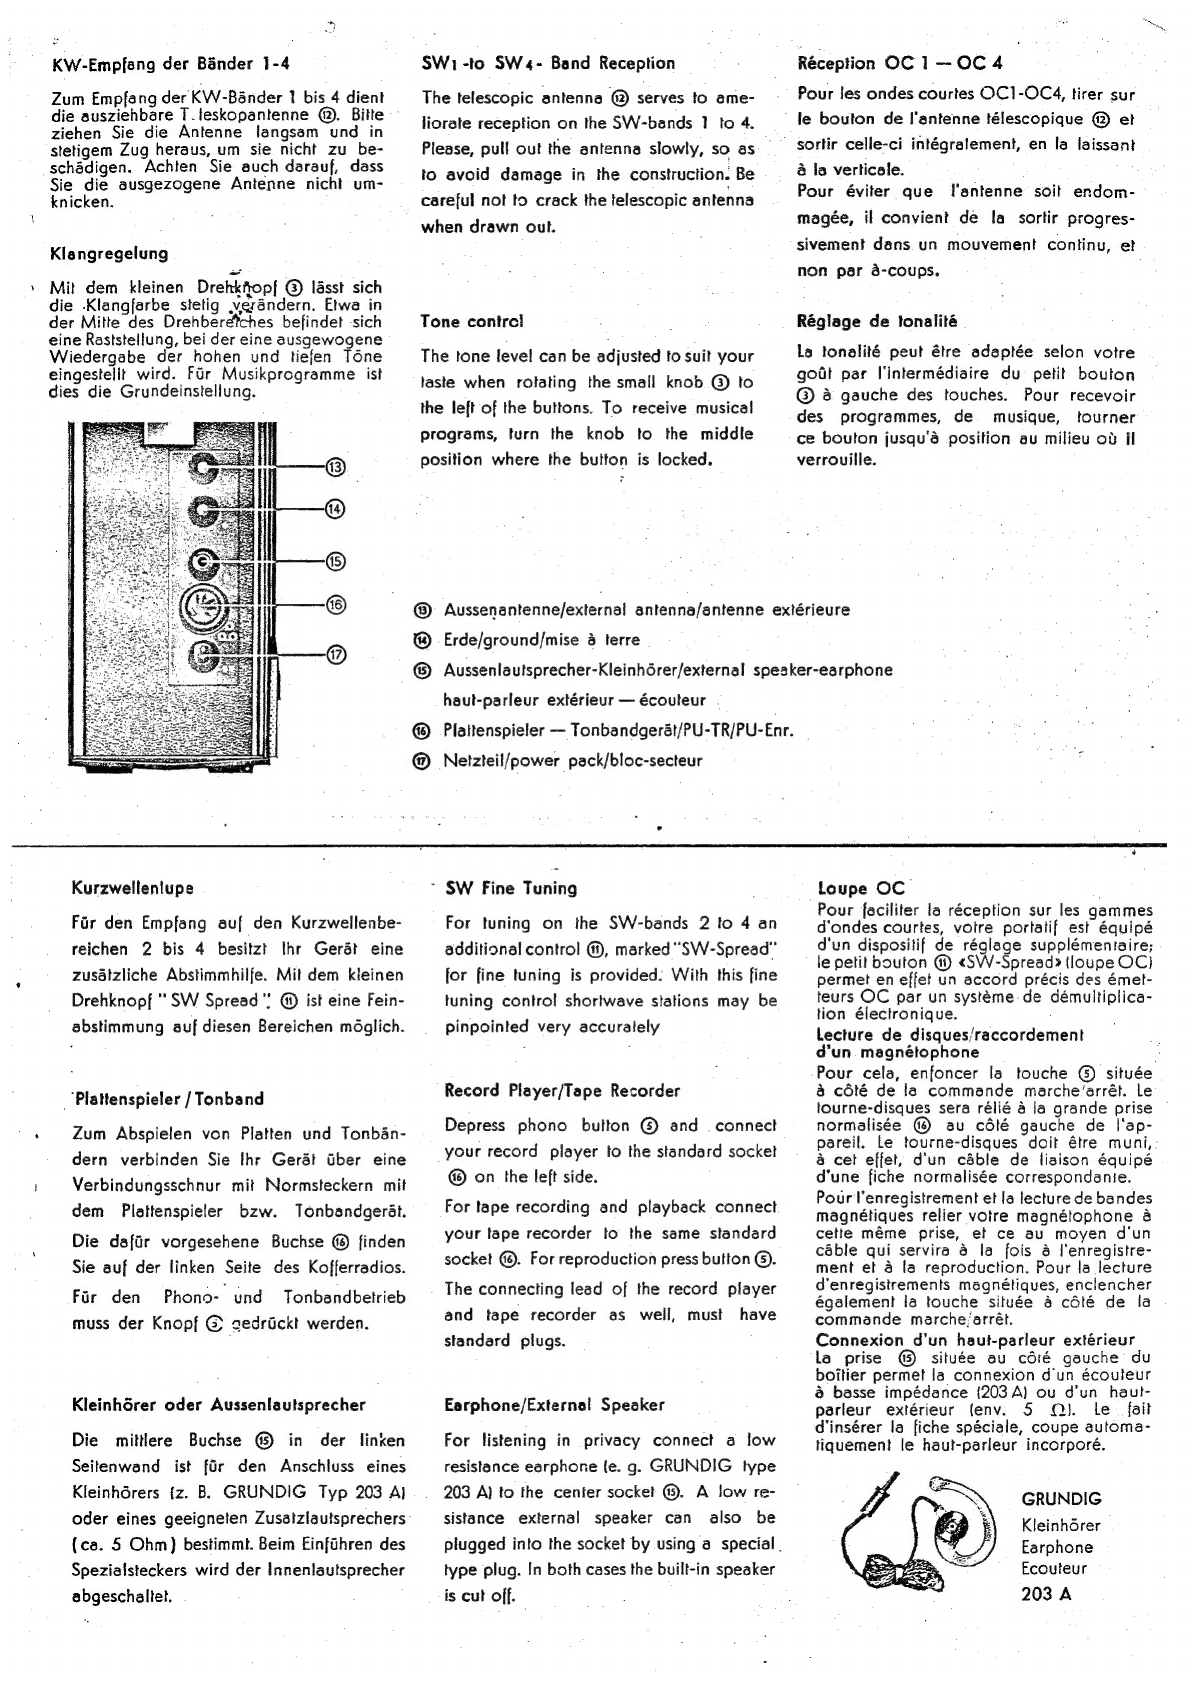
@)
Aussenantenne/external
antenna/antenne
extérieure
®
Erde/ground/mise
&
terre
@
Aussenlautsprecher-Kleinhérer/external
speaker-earphone
haut-parleur
extérieur
—
écouteur
Plaitenspieler
—
Tonbandger&t/PU-TR/PU-Enr.
@
Netzteil/power
pack/bloc-secteur
-
SW
Fine
Tuning
Far
den
Empfang
auf
den
Kurzwellenbe-
reichen
2
bis
4
besitzt
thr
Ger&t
eine
zusdtzliche
Abstimmhilfe.
Mit
dem
kleinen
Drehknopf{
"
SW
Spread"!
@)
ist
eine
Fein-
abstimmung
auf
diesen
Bereichen
mdglich.
_‘Plattenspieler
/
Tonband
Zum
Abspielen
von
Platten
und
Tonban-
dern
verbinden
Sie
thr
Geradt
Gber
eine
Verbindungsschnur
mit
Normsteckern
mit
dem
Plattenspieler
bzw.
Tonbandgerat.
Die
dafir
vorgesehene
Buchse
finden
Sie
auf
der
linken
Seite
des
Kofferradios.
Fir
den
Phono-
und
Tonbandbetrieb
muss
der
Knopf
©
gedrickt
werden.
Kleinhérer
oder
Aussenlautsprecher
Die
mittere
Buchse
@)
in
der
linken
Seitenwand
ist
fir
den
Anschluss
eines
Kleinhdrers
{z.
B.
GRUNDIG
Typ
203
Aj
oder
eines
geeigneten
Zusatzlautsprechers-
(ca.
5
Ohm}
bestimmt.
Beim
Einfahren
des
Spezialsteckers
wird
der
Innenlautsprecher
abgeschaltet.
For
tuning
on
the
SW-bands
2
to
4
an
additional
control
@),
marked
"SW-Spread”
for
fine
tuning
is
provided;
With
this
fine
tuning
control
shortwave
stations
may
be
pinpointed
very
accurately
Record
Player/Tape
Recorder
Depress
phono
bulton
©
and.
connect
your
record
player
to
the
standard
socket
on
the
left
side.
For
tape
recording
and
playback
connect
your
tape
recorder
to
the
same
standard
socket
(@.
For
reproduction
press
button
@).
The
connecting
lead
of
the
record
player
and
tape
recorder
as
well,
must
have
standard
plugs.
Earphone/External
Speaker
For
listening
in
privacy
connect
a
low
resistance
earphone
le.
g.
GRUNDIG
type
203
A}
to
the
center
socket
©.
A
low
re-
sistance
external
speaker
can
also
be
plugged
into
the
socket
by
using
a
special.
type
plug.
In
both
cases
the
built-in
speaker
is
cut
off.
Loupe
OC
.
Pour
faciliter
la
reception
sur
les
gammes
d‘ondes
courtes,
votre
portatif
est
équipé
d'un
dispositif
de
réglage
supplémentaire;
le
petit
bouton
@
«SW-Spread»
(loupe
OC}
permet
en
effet
un
accord
précis
des
émet-
teurs
OC
par
un
systéme
de
démultiplica-
tion
électronique.
Lecture
de
disques/raccordement
d’un
magnétophone
:
Pour
cela,
enfoncer
la
touche
©
située
&
cété
de
la
commande
marche’arrét.
le
tourne-disques
sera
rélié
&
la
grande
prise
normalisée
au
cété
gauche
de
I'ap-
pareil.
Le
tourne-disques
doit
étre
muni,
&
cet
effet,
d'un
cable
de
liaison
équipé
d'une
fiche
normalisée
correspondanie.
Pour
l’enregistrement
et
la
lecture
de
bandes
magnétiques
relier
votre
magnétophone
&
cette
méme
prise,
et
ce
au
moyen
d'un
cable
qui
servira
&
la
fois
&
l'enregistre-
ment
et
&
la
reproduction.
Pour
la
lecture
d'enregistrements
magnétiques,
enclencher
également
la
touche
situge
&
célé
de
la
commande
marche/arrét.
Connexion
d’un
haut-parleur
extérieur
la
prise
@)
située
au
cdié
gauche
du
boitier
permet
la
connexion
d'un
écouleur
&
basse
impédance
{203
A)
ou
d'un
haut-
parleur
extérieur
(env.
5
QQ).
le
_
fait
d'insérer
la
fiche
spéciale,
coupe
automa-
tiquement
le
haut-parleur
incorporé.
GRUNDIG
KleinhGrer
Earphone
Ecouteur
203
A