manuals.online logo
Brands
  1. Home
  2. •
  3. Brands
  4. •
  5. GSC
  6. •
  7. Science Education Product
  8. •
  9. GSC 1314 User manual

GSC 1314 User manual

Other GSC Science Education Product manuals

GSC WVDEM02 User manual

GSC

GSC WVDEM02 User manual

GSC TMRPG-1 User manual

GSC

GSC TMRPG-1 User manual

GSC 1858 User manual

GSC

GSC 1858 User manual

GSC 501 User manual

GSC

GSC 501 User manual

GSC LSOPT7 User manual

GSC

GSC LSOPT7 User manual

GSC PROLCH User manual

GSC

GSC PROLCH User manual

Popular Science Education Product manuals by other brands

Alga Science SOLAREXPLORER quick start guide

Alga Science

Alga Science SOLAREXPLORER quick start guide

PASCO ES-9080B instruction manual

PASCO

PASCO ES-9080B instruction manual

ARBOR SCIENTIFIC 93-3501 Assembly instructions

ARBOR SCIENTIFIC

ARBOR SCIENTIFIC 93-3501 Assembly instructions

HAKUBUN magnet SA manual

HAKUBUN

HAKUBUN magnet SA manual

Aurora Plasma Globe owner's guide

Aurora

Aurora Plasma Globe owner's guide

Dentsply Sirona Sim Multi Bench installation instructions

Dentsply Sirona

Dentsply Sirona Sim Multi Bench installation instructions

KOKEN LM-026M instruction manual

KOKEN

KOKEN LM-026M instruction manual

PASCO ME-7018 instruction manual

PASCO

PASCO ME-7018 instruction manual

Tektronix P6217 instruction manual

Tektronix

Tektronix P6217 instruction manual

PASCO Node Cart manual

PASCO

PASCO Node Cart manual

DEWESOFT E-Mobility DEMO user manual

DEWESOFT

DEWESOFT E-Mobility DEMO user manual

SPECTRO FES 27 Original operating instructions

SPECTRO

SPECTRO FES 27 Original operating instructions

PLASTOLIGHT LiteScout HBW Series User instructions

PLASTOLIGHT

PLASTOLIGHT LiteScout HBW Series User instructions

Gaumard Clinical Chloe S222 user guide

Gaumard

Gaumard Clinical Chloe S222 user guide

Logictech LTG-2100T manual

Logictech

Logictech LTG-2100T manual

Seakeeper 6 Operation manuals

Seakeeper

Seakeeper 6 Operation manuals

PASCO Basic Electrostatics System instruction manual

PASCO

PASCO Basic Electrostatics System instruction manual

Operative Experience RealMom manual

Operative Experience

Operative Experience RealMom manual

manuals.online logo
manuals.online logoBrands
  • About & Mission
  • Contact us
  • Privacy Policy
  • Terms and Conditions

Copyright 2025 Manuals.Online. All Rights Reserved.

1
GSC International
Phone: 417.374.7431
Fax: 417.374.7442
Toll Free: 888.756.4592
service@gosciencecrazy.com
2076 James River Court
Nixa, Missouri 65714
Introduction
The Two Potato Clock is designed to demonstrate the principle of an
electrochemical cell. The LED clock runs on 2 potatoes, oranges,
grapefruits, or lemons. The potatoes are not included.
Specifications
Potato Holder: 6 cm H x 8.5 cm D
LED Display: 20 mm x 45 mm
Dimensions: 21.5 cm x 10 cm x 6.2 cm
Weight: 6.6 oz
Theory
A potato battery is an electrochemical battery, or an electrochemical
cell in which a chemical reaction occurs in a liquid between two
different metals. When a wire is placed to connect the metals, it
carries an electric current. An electrochemical cell converts chemical
energy to electric energy.
A battery can be made of many different combinations of metals and
liquids. The potato battery uses strips of Zinc and Copper in the
acidic juice to produce electric current. Although very small, the
current is sufficient to run a digital clock.
In order to obtain enough current to power the clock, we use two
potato cells and connect them in series (head to tail). Potatoes can
be substituted with oranges, grapefruits, lemons, or tomatoes
because these fruits also contain the acid for chemical reactions.
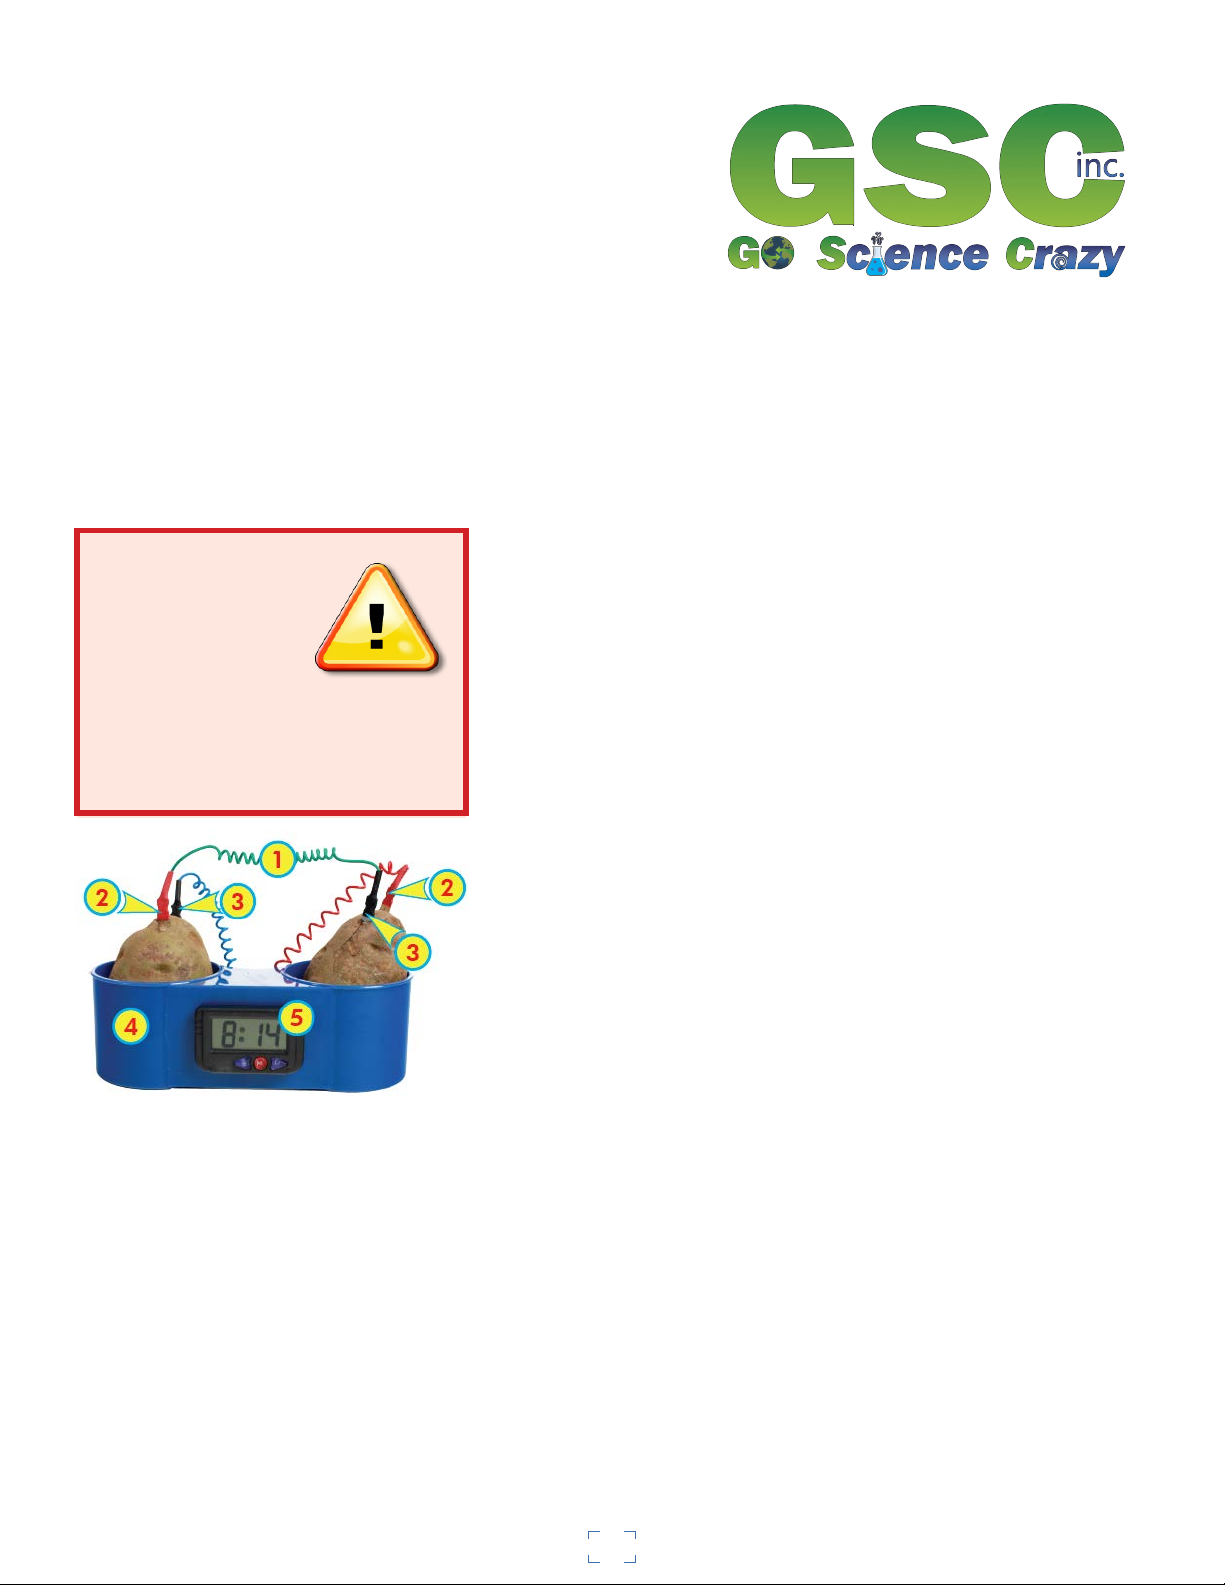
Two Potato Clock
#1314
Warning:
• Not a toy; use only
in a laboratory or
educational setting.
• California Proposition 65
Warning: This product can expose you to chemicals
including lead, which is known to the State of
California to cause cancer, birth defects, or other
reproductive harm. For more information go to
www.P65Warnings.ca.gov.
Components:
1. Loose Wire 2. Copper Strip
3. Zinc Strip 4. Potato Holder
5. Clock
2
Experiment
Powering the Clock
1. Place two potatoes in the potato holders, one on each side.
2. Insert the Zinc strip from the clock into the potato on the left.
3. Insert the Copper strip of the loose wire into the same potato, about 2 cm from the Zinc. The two strips
should not be in contact with each other. For the best result, keep the two strips parallel to each other.
4. Insert the other end of the loose wire- a Zinc strip - into the potato on the right. Insert the Copper strip from
the clock into the same potato, about 2 cm from the Zinc. Again, the two strips should not be in contact with
each other. For the best result, keep the two strips parallel to each other. The clock should be on now.
Setting the Clock
1. Press M once to activate the clock.
2. Press S twice. Month is displayed.
3. Press M repeatedly to change month. Press S once to set month.
4. Press M repeatedly to change day. Press S once to set day.
5. Press M repeatedly to change hour. Press S once to set hour.
6. Press M repeatedly to change minute. Press S once to set minute.
7. Press M to reactivate the clock.
8. To display date, press D once.
Maintenance
1. Keep the unit from heat, dust, and shock.
2. Use sand paper to remove the coating of the strips when they are oxidized.
3. After each use, remove the potatoes and clean the holder with a paper towel or clean cloth. Do not wash the
unit or put it in water.