haaga
677 / 697 / 697 plus
38
EN
WARNING
Danger of injury and accident when
handling the charger.
If the charger is handled incorrectly, a number
of di erent hazards may ensue. The following
points must be noted:
• The electrical cable must only be plugged
into an o cially approved socket.
• The plug must be disconnected from mains
supply after use of the charger.
• Fire hazard! Do not use on easily
in ammable surfaces (e.g. paper, textiles), or
in easily in ammable surroundings.
• Disconnect the plug immediately from mains
supply if the charger catches re or emits
smoke.
• Do not cover the charger to allow it to cool
without hindrance.
• Connection leads should be put away and
labelled so to avoid damage and harm to
persons - avoid trip hazards.
NOTE
If the battery, charger, and charging socket
are handled incorrectly or inappropriately, they
may cause damage to material or devices.
The following points must be noted:
• The battery must only be used for the
sweeping machine and the manufacturer’s
charger.
• Only use the geometrically suitable batteries
for charging according to the values in
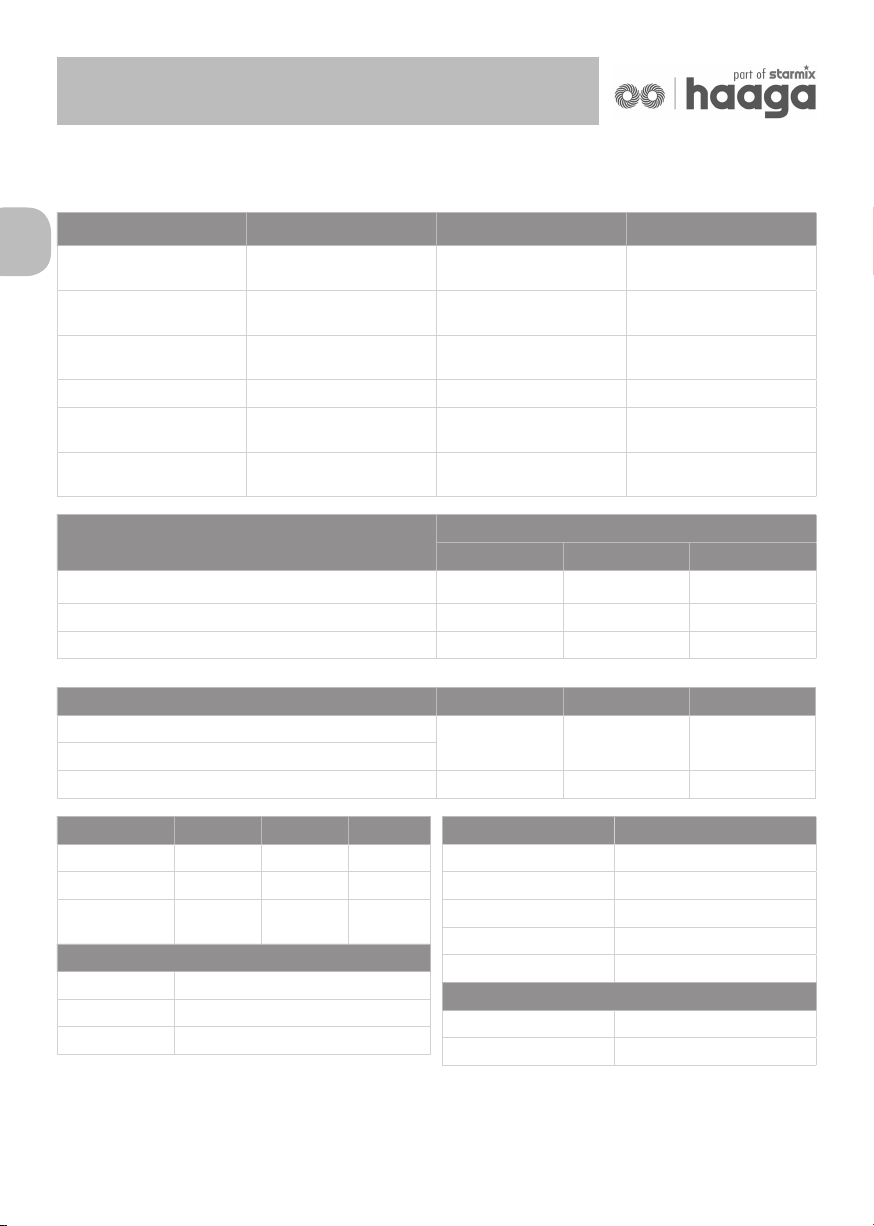
Chapter “3. Technical data”.
• Only connect the charger to the mains
frequency and mains voltage indicated on
the data plate.
• Do not remove the plug from the socket by
pulling the connection lead; always remove
by pulling the plug itself.
• Damaged connecting leads must be
disconnected by a quali ed electrician.
Danger of injury and accident when
If the charger is handled incorrectly, a number
of di erent hazards may ensue. The following
The electrical cable must only be plugged
into an o cially approved socket.
The plug must be disconnected from mains
supply after use of the charger.
Fire hazard! Do not use on easily
in ammable surfaces (e.g. paper, textiles), or
in easily in ammable surroundings.
Disconnect the plug immediately from mains
supply if the charger catches re or emits
Do not cover the charger to allow it to cool
Connection leads should be put away and
labelled so to avoid damage and harm to
persons - avoid trip hazards.
If the battery, charger, and charging socket
are handled incorrectly or inappropriately, they
may cause damage to material or devices.
The following points must be noted:
The battery must only be used for the
sweeping machine and the manufacturer’s
Only use the geometrically suitable batteries
for charging according to the values in
Chapter “3. Technical data”.
Only connect the charger to the mains
frequency and mains voltage indicated on
Do not remove the plug from the socket by
pulling the connection lead; always remove
by pulling the plug itself.
Damaged connecting leads must be
disconnected by a quali ed electrician.
NOTE
• The charger must only used in closed and
dry spaces. Protect the charger from rain
and moisture.
• Only use the charger and battery in the
temperatures speci ed in Chapter “3.
Technical data”.
• Never connect the charger contacts to
metallic objects such as nails, coins or
jewellery as this can cause a short-circuit.
The charger may be damaged by a short-
circuit.
• Never connect the battery terminals or the
contacts of the charging socket to metallic
objects such as nails, coins or jewellery as
this can cause a short-circuit. The battery or
the electronics of the sweeping machine may
be damaged by a short-circuit.
• Do not use metallic containers to transport
the battery.
• Protect the battery from rain and moisture.
• When the battery is stored for 2 months
or more without being recharged the
blue battery connection lead should be
disconnected in order to prevent the battery
from deep discharging. Information regarding
the storage and disconnection of the battery
can be found in Chapter “10.3 Storage/
Safekeeping” and Chapter “10.2 Disconnect
battery leads” of this operating manual.
• If the battery is to be stored for 6 months
or more the battery must be fully charged
in order to retain the performance of the
battery. Information on the charging of
the battery can be found in Chapter “6.3
Charging battery” of this operating manual.
The charger must only used in closed and
dry spaces. Protect the charger from rain
Only use the charger and battery in the
temperatures speci ed in Chapter “3.
Never connect the charger contacts to
metallic objects such as nails, coins or
jewellery as this can cause a short-circuit.
The charger may be damaged by a short-
Never connect the battery terminals or the
contacts of the charging socket to metallic
objects such as nails, coins or jewellery as
this can cause a short-circuit. The battery or
the electronics of the sweeping machine may
be damaged by a short-circuit.
Do not use metallic containers to transport
Protect the battery from rain and moisture.
When the battery is stored for 2 months
or more without being recharged the
blue battery connection lead should be
disconnected in order to prevent the battery
from deep discharging. Information regarding
the storage and disconnection of the battery
can be found in Chapter “10.3 Storage/
Safekeeping” and Chapter “10.2 Disconnect
battery leads” of this operating manual.
If the battery is to be stored for 6 months
or more the battery must be fully charged
in order to retain the performance of the
battery. Information on the charging of
the battery can be found in Chapter “6.3
Charging battery” of this operating manual.
Safety