D
D
DDD
D
D
D
H H H
O
O
F
F
P
P
N
N
N
N
N
N
L
L
L
L
L
L
MMMM
MMMM
x
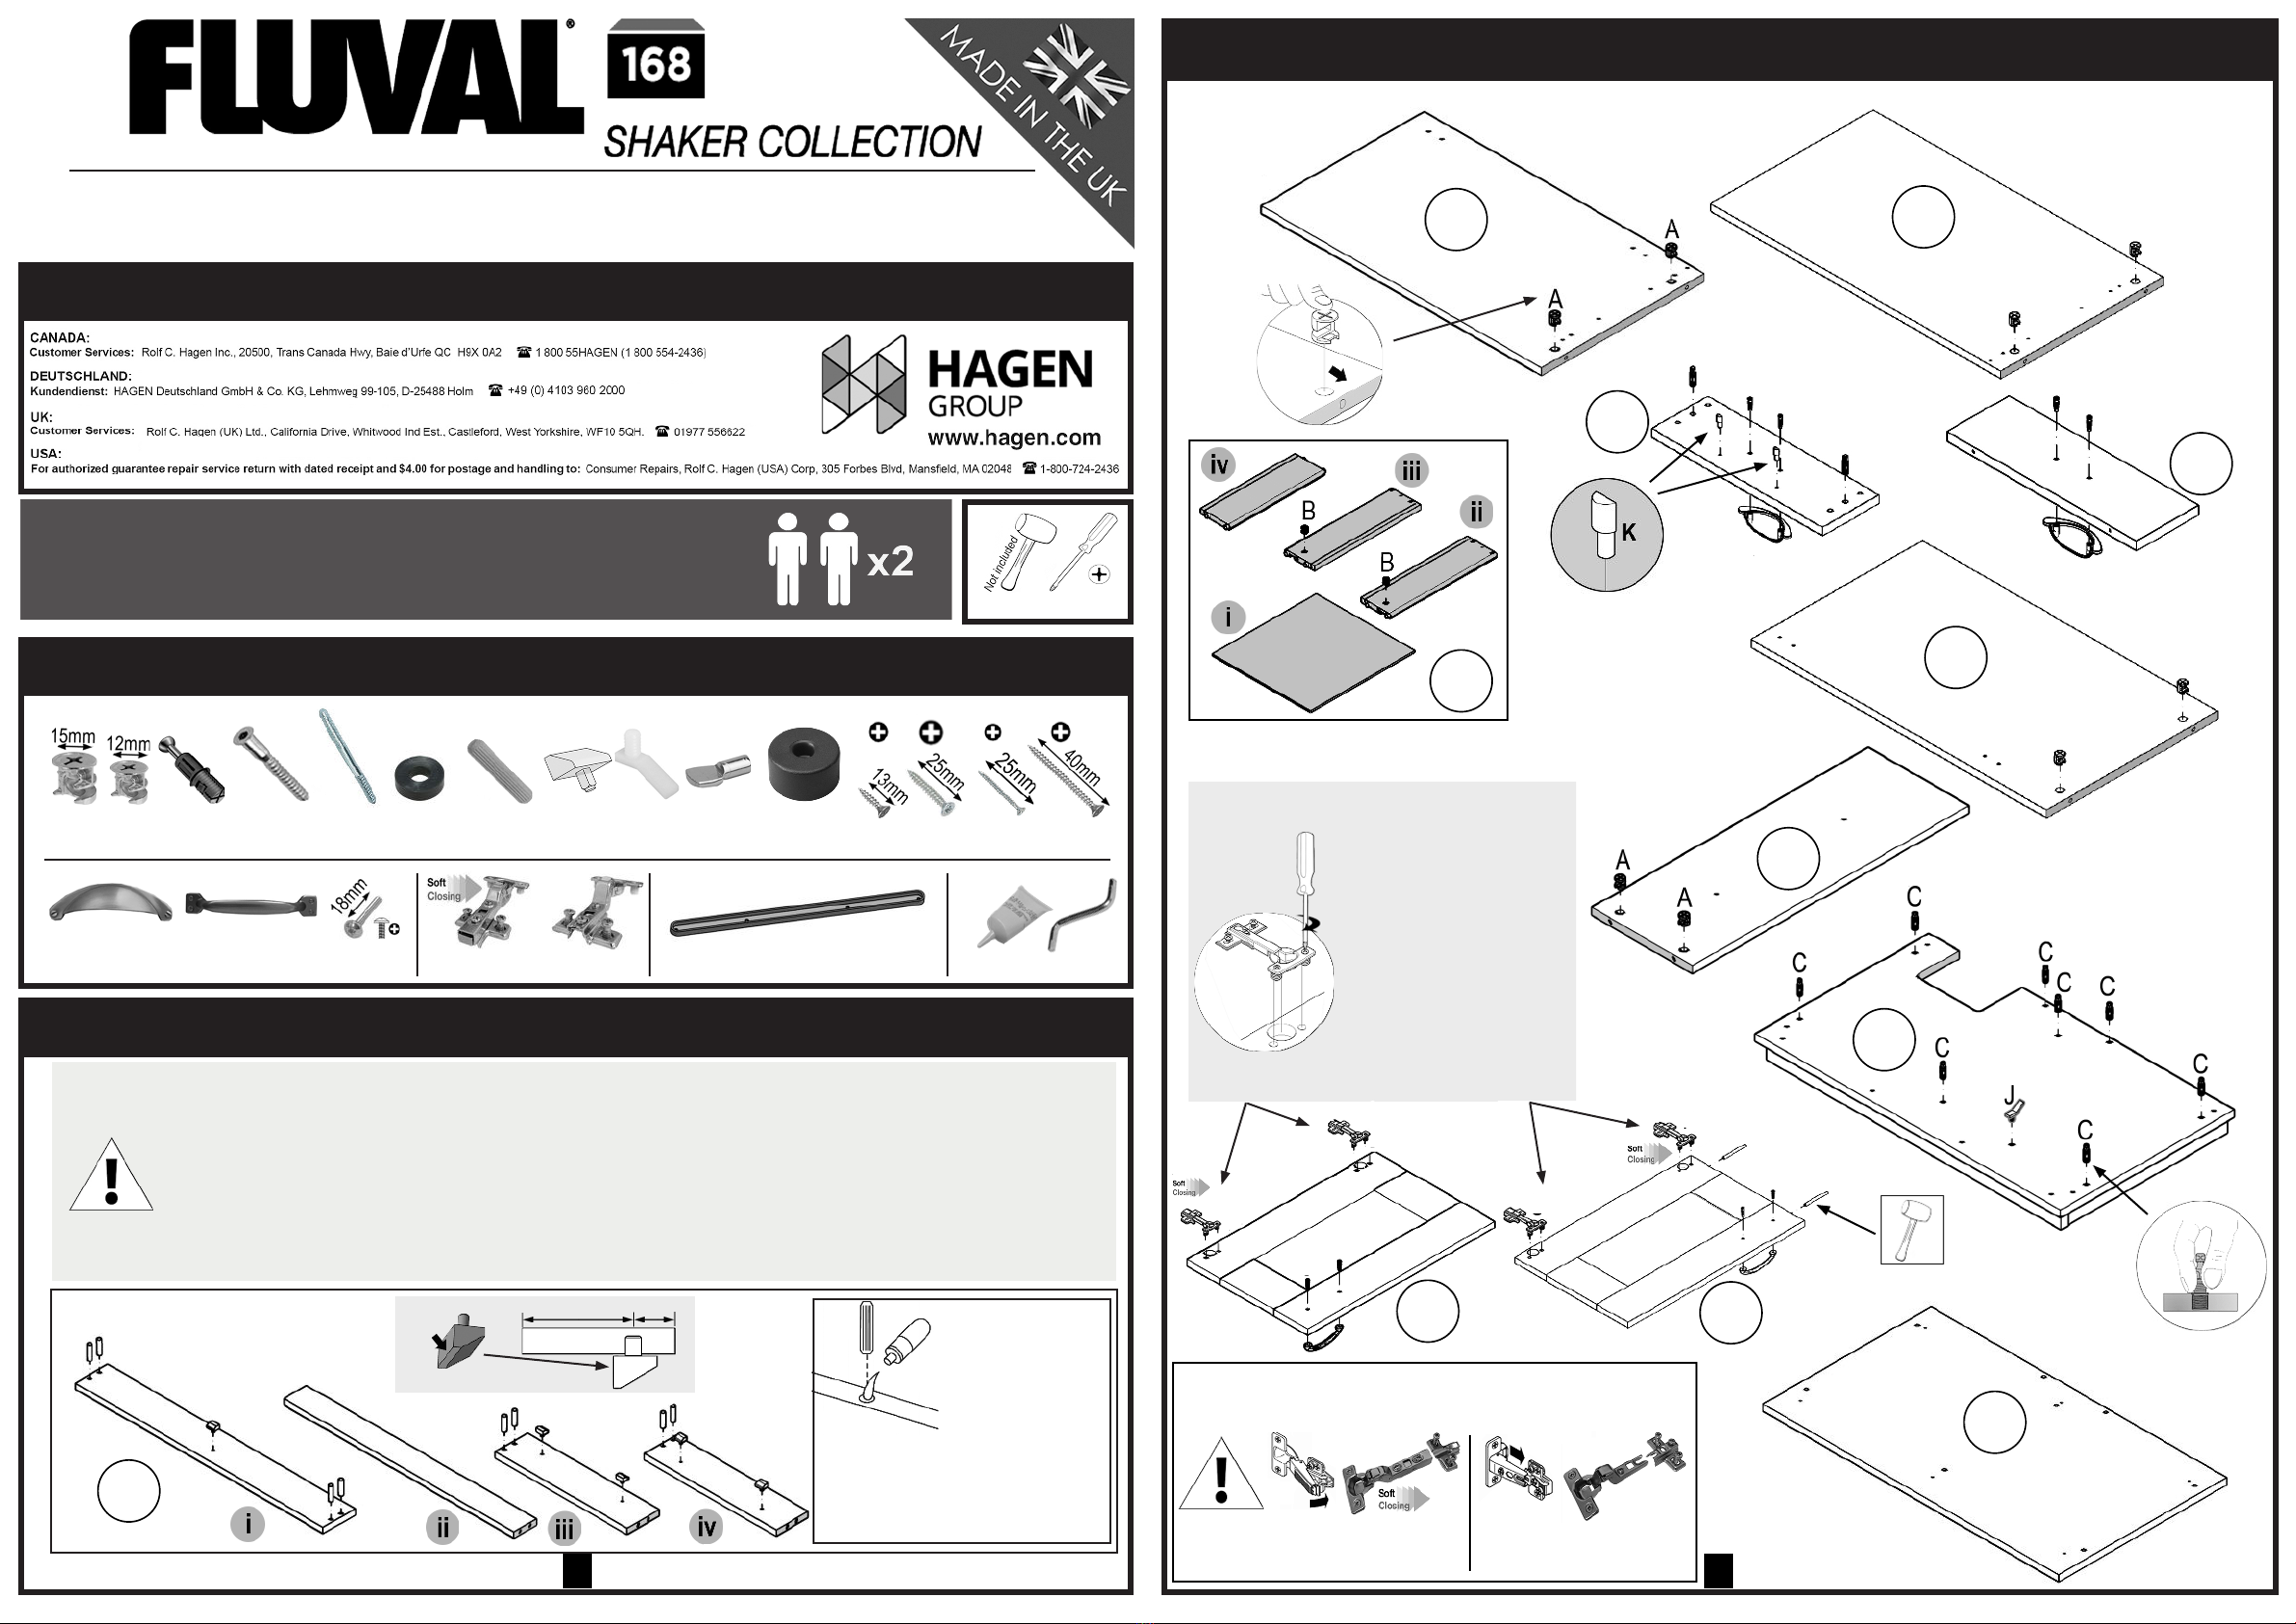
H
• Only use a mallet, DO NOT use a hammer as it could cause damage to the panels.
• Verwenden Sie ausschließlich einen Holzhammer. VERWENDEN SIE KEINEN
Metallhammer, da dieser die Platten beschädigen könnte.
• Utiliser seulement un maillet; NE PAS UTILISER un marteau, car cela pourrait
endommager les panneaux.
• Utilice únicamente un mazo. NO UTILICE un martillo ya que podría dañar los paneles.
• Attention! Washers (F)
must be used to ensure even
spacing between false drawer
and door.
• Achtung! Um einen
gleichmäßigen Abstand
zwischen Schubladenattrappe
und Tür zu gewährleisten,
müssen Unterlegscheiben (F)
verwendet werden.
• Attention! Les rondelles
(F) doivent être utilisées
pour assurer un espacement
uniforme entre le faux tiroir et
la porte.
• ¡Atención! Se deben utilizar
arandelas (F) para garantizar
un espacio uniforme entre el
falso cajón y la puerta.
• Attention! Make sure glide ‘V’ is
positioned the correct way around. The 4
x screw holes must align with the holes
drilled on the panel.
• Achtung! Achten Sie darauf, dass die
Schiene ‘V’ richtig herum positioniert
ist. Die 4 x Schraubenlöcher müssen
deckungsgleich zu den Bohrungen in der
Schrankwand ausgerichtet sein.
•Attention! S’assurer que la glissière
coulissante V soit positionnée du bon
côté; les 4 trous doivent s’aligner avec les
trous prépercés sur le panneau.
• ¡Atención! Asegúrese de que el
deslizador “V” esté colocado de manera
correcta. Los 4 oricios para tornillos
deberán alinearse con los
oricios perforados en el panel.
This product was manufactured for Rolf C. Hagen by Aquapac Ltd.
Dieses Produkt wurde von Aquapac Ltd. für Rolf C. Hagen hergestellt.
Ce meuble a été fabriqué par Aquapac Ltd. pour Rolf C. Hagen.
Este producto fue producido para Rolf C. Hagen por Aquapac Ltd.
1
• Apply a VERY SMALL drop of glue
into the end dowel holes on panels (ii),
(iii) & (iv) before assembling.
• Geben Sie vor dem Zusammenbau
einen KLEINEN TROPFEN Leim in
die Enddübellöcher der Platten (ii),
(iii) & (iv).
• Appliquer une TRÈS PETITE goutte
de colle aux extrémités des trous de
chevilles des parois (ii), (iii) et (iv)
avant l’assemblage.
• Aplique una PEQUEÑA GOTA de
pegamento en los oricios para clavi-
jas a los extremos de los paneles (ii),
(iii) y (iv) antes de montar el producto.
• Make sure panel (i) is positioned
the correct way around, with tting
(H) at the same height as those on
the side panels (iii) & (iv).
• Vergewissern Sie sich, dass die
Platte (i) richtig herum positioniert
ist, wobei sich das Anschlussstück
(H) auf der gleichen Höhe wie die
an den Seitenwänden (iii) & (iv)
benden muss.
• S’assurer que la paroi (i) est
placée du bon côté, et que le
raccord (H) est à la même hauteur
que les raccords des parois
latérales (iii) et (iv).
• Asegúrese de que el panel (i) se
encuentre en la posición correcta y
que (H) se ajuste a la misma altura
que los paneles laterales (iii) y (iv).
• Apply a VERY SMALL drop of
glue into the dowel holes on panels
(ii), (iii) & (11) before assembling.
• Geben Sie vor dem
Zusammenbau einen KLEINEN
TROPFEN Leim in die Dübellöcher
der Platten (ii), (iii) & (11).
• Appliquer une TRÈS PETITE
goutte de colle dans les trous de
chevilles des parois (ii), (iii) et (11)
avant l’assemblage.
• Aplique una PEQUEÑA GOTA
de pegamento en los oricios para
clavijas de los paneles (ii), (iii) y
(11) antes de montar el producto.
13
11
12
10
5
6
7
3
42
11
13
9
10
• STOP! After assembly, it is strongly recommended that you seal all inside joints of the top panel
trim to safeguard against water spills. Apply a very ne bead of transparent silicone and smooth
out / wipe away any excess with a wet nger to create a smooth nish.
• STOPP! Nach der Montage wird dringend empfohlen, alle inneren Verbindungsnähte der oberen
Platte zum Schutz vor
Wasserspritzern mit einem geeigneten, transparenten Silikon abzudichten. Tragen Sie eine sehr
dünne Silikonschicht auf und glätten/wischen Sie den Überschuss mit einem feuchten Finger ab,
um eine glatte Oberäche zu schaffen.
• ATTENTION! Après l’assemblage, il est fortement recommandé de sceller tous les joints internes
du rebord de la paroi supérieure pour prévenir les dégâts d’eau. Appliquer un très n boudin de
silicone transparent et le lisser / essuyer tout excès avec un doigt humide pour créer un ni lisse.
• ¡ESPERE! Después del montaje, es altamente recomendable sellar todas las uniones internas
del panel de revestimiento superior para salvaguardar contra derrames de agua. Aplique una gota
muy na de silicona transparente y alisar / limpiar cualquier exceso con un dedo húmedo para
crear un acabado liso.
1
• Attention! Ensure ttings ‘H’ are correctly tted
so the deep side of the hood rests on the tank.
•Achtung! Achten Sie darauf, dass die Stutzen
‘H’ ordnungsgemäß montiert sind, damit die
breite Seite der Abdeckung auf dem Aquarium
auiegt
• Attention! S’assurer que les raccords H sont
correctement alignés pour que la partie profonde
du couvercle s’appuie sur le bac.
• ¡Atención! Asegúrese de que los herrajes “H”
estén colocados correctamente de modo que
el lado profundo de la cubierta repose sobre el
tanque.
• 3D Hinge Adjustment - How to align the doors
• 3D Hinge Adjustment - So werden die Türen ausgerichtet
• 3D Hinge Adjustment - Alignement des portes
• 3D Hinge Adjustment - Cómo alinear las puertas
FRONT
ASSEMBLY - ZUSAMMENBAU - ASSEMBLAGE - MONTAJE
3 4