manuals.online logo
Brands
  1. Home
  2. •
  3. Brands
  4. •
  5. hager
  6. •
  7. Thermostat
  8. •
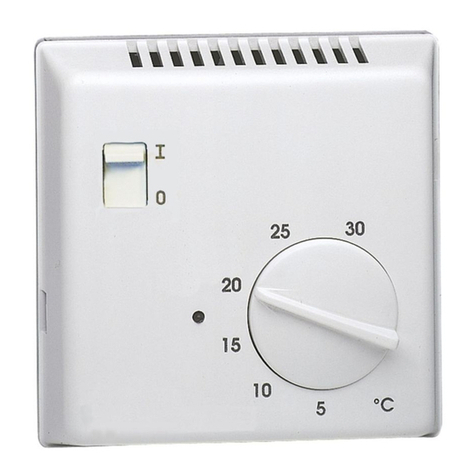
  9. hager WS310 systo User manual

hager WS310 systo User manual

Installation (a)
It has to be installed ideally at about 1,5 m from
the floor, on an inside wall, sheltered from direct
sun radiation and from all thermal disturbance,
such as lighting lamp, television, heating pipe,
draught (see installation layout “a”).
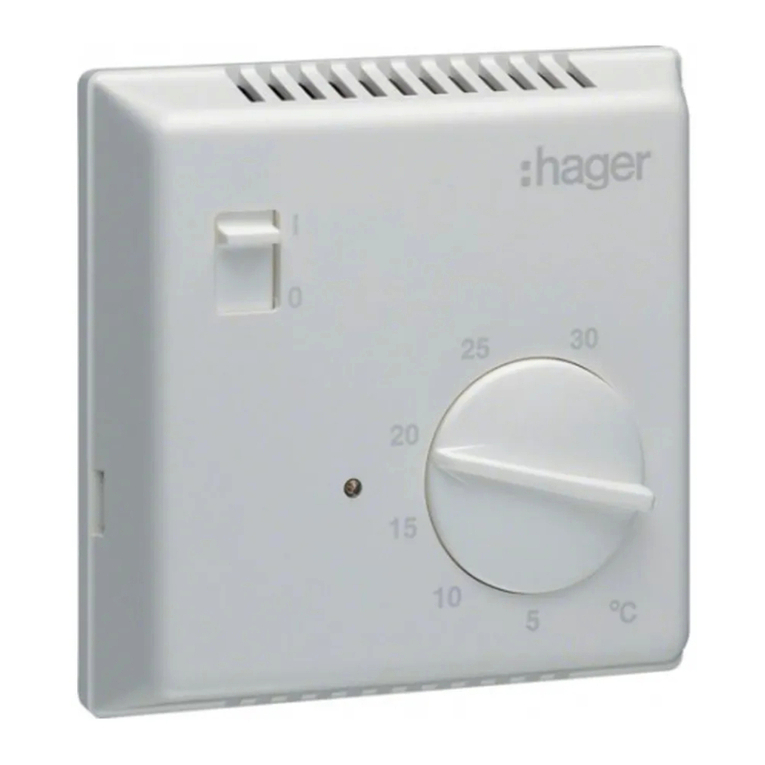
Description (b)
Temperature adjustment button
Scale limitation lug
Wheel (blue and red)
Change-over switch OFF / (reduced) / ON
Temperature pointer
The switch lights up when the heating / air
conditioning system is in operation.
Electrical connection (c)
Connect heating or air-conditioning system
between terminals 2 & 3 "NO". The control logic is
automatically reversed in air-conditioning mode !
Changing operation mode,
air-conditioning or heating (d)
The product is delivered with thermostat set to
"heating" mode.
Follow instructions below to switch to "air-
conditioning" mode (d):
For starting, switch OFF and set the
temperature to "minimum stop" position
➀Switch ON.
➁Set the temperature to "maximum stop".
➂Switch OFF.
➃Set the temperature to "minimum stop".
➄Switch ON.
At the end of the sequence, the switch blinks
3 times to signal the change of mode. If the
time between the various steps exceeds 15
sec, the sequence shall be run again starting
from step.
Checking the operation mode
Heating mode: if the room temperature is below
the temperature set, the switch indicator shall
be on (and conversely in air-conditioning mode).
Limitation of the temperature range (e)
The temperature range can be reduced as follows:
1- Remove the temperature adjustment
button
2- Lift the limitation lug
3- Adjust the red wheel to define the maxi
desired temperature
4- Adjust the blue wheel to define the mini
desired temperature
5- Put back the lug
6- Put back the button
Electrical data
- Supply voltage: 230 V, 50 Hz
- Adjustment range: +5°C up to +30°C
- Operating temperature: 0°C up to 50°C
- Storage temperature: -20°C up to +60°C
- Output relay 8 A cos φ = 1
- Temperature accuracy ± 0,5°C
- Class II
- Degree of protection: IP 21
- Connection capacity: 1 x 2,5 mm2
- The operating mode is stored indefinitely
- : Reduced = -3°C heating /
+3°C air-conditioning
Recommendations
This device shall be installed solely by a
professional installer. Use only genuine parts.
Never use the product with external protection
devices removed.
Installation (a)
Le thermostat d’ambiance doit être installé à
environ 1,5 m du sol, sur un mur intérieur, à l’abri du
rayonnement solaire direct et de toute perturbation
thermique telle que lampe d’éclairage, téléviseur,
tuyau de chauffage, courant d’air (voir schéma
d’installation “a”).
Description (b)
Bouton de réglage de température
Ergot de limitation d’échelle
Disque (bleu et rouge)
Commutateur OFF / (réduit) / ON
Pointeur de température
Le commutateur devient lumineux lorsque le
chauffage / la climatisation est en fonction.
Raccordement électrique (c)
Connecter le chauffage ou la climatisation entre
les bornes 2 & 3 "NO". La logique de commande
est automatiquement inversée en mode climatisation !
Modification du mode de fonctionnement,
climatisation ou chauffage (d)
Le thermostat est livré en mode “chauffage”.
Pour passer en mode “climatisation” suivre la
séquence décrite en (d) :
Pour débuter, placer le commutateur sur OFF
et la température en “butée minimale”.
➀Placer le commutateur sur ON.
➁Régler la température en “butée maximale”.
➂Placer le commutateur sur OFF.
➃Régler la température en “butée minimale”.
➄Placer le commutateur sur ON.
A la fin de la séquence, le commutateur clignote
3 fois pour signaler le changement de mode.
Si plus de 15 secondes s’écoulent entre les différentes
étapes il faut recommencer la séquence à l’étape
Vérification du mode de fonctionnement
Mode chauffage : si température ambiante inférieure
à température de consigne alors le voyant du
commutateur est allumé (inversement en mode
climatisation).
Limitation de la plage de température (e)
La plage de température peut être réduite de la
façon suivante :
1- Enlever le bouton de réglage de température
2- Soulever l’ergot de limitation
3- Ajuster le disque rouge afin de définir la
température maximale désirée
4- Ajuster le disque bleu afin de définir la
température minimale désirée
5- Replacer l’ergot
6- Replacer le bouton
Caractéristiques techniques
- Tension d’alimentation : 230 V, 50 Hz
- Plage de réglage : +5°C à +30°C
- Température d’utilisation : 0°C à 50°C
- Température de stockage : -20°C à +60°C
- Relais de sortie 8 A cos φ = 1
- Précision de température ± 0,5°C
- Classe II
- Indice de protection : IP 21
- Capacité de raccordement : 1 x 2,5 mm2
- Mode de fonctionnement mémorisé indéfiniment
- : Réduit = -3°C chauffage / +3°C climatisation
Recommandations
Appareil à installer uniquement par un professionnel
habilité. N’utiliser que les pièces d’origine.
Ne pas utiliser le produit sans les protections
externes.
16W 5202.d
6W 5202.d
WS310
systo
¢
£
§
¶
ß
©
Notice d’instructions
Thermostat d’ambiance
électronique
User instructions
Electronic room
thermostat
Installation (a)
Er solle in einem Abstand von ungefähr 1,5 m vom
Boden und an einer Innenwand liegend installiert
werden. Geschützt von direkter Sonneneinstrahlung
und jeglicher thermischen Störung, wie z.B. Leuchte,
Fernseher, Heizungsrohr, Luftzug, anbringen (siehe
Installationsplan “a”).
Beschreibung (b)
Temperaturregelungsknopf
Begrenzung des Einstellbereiches
Scheibe (blau und rot)
Umschalter OFF / (Absenkung) / ON
Temperatureinstellungsmarkierung
Der Umschalter leuchtet, wenn die Heizung/
Klimaanlage aktiviert ist.
Elektrischer Anschluss (c)
Heizung bzw. Klimaanlage zwischen den Klemmen
2 & 3 "NO" anschließen. Im Modus Klimaanlage
wird die Steuerungslogik automatisch umgekehrt !
Betriebsart “Heizung/Klimaanlage”
ändern (d)
Das Thermostat wird mit der Werkseinstellung
“Heizung” ausgeliefert. Zum Umschalten in den
“Klima-Modus” ist die unter (d) beschriebene
Sequenz zu beachten:
Erster Schritt: Schalter auf OFF stellen
und Temperatur auf “Min.” (Anschlag) stellen.
➀Schalter auf ON stellen.
➁Temperatur auf “Max.” (Anschlag) stellen.
➂Schalter auf OFF stellen.
➃Temperatur auf “Min.” (Anschlag) stellen.
➄Schalter auf ON stellen.
Nach Abschluß dieser Sequenz signalisiert der Schalter
durch dreimaliges Blinken, daß der Betriebsartwechsel
vollzogen ist. Sollten zwischen den unterschiedlichen
Schritten der Sequenz über 15 Sekunden verstreichen,
ist die Sequenz ab Schritt neu zu beginnen.
Betriebsart überprüfen
Heizmodus: Unterschreitet die Raumtemperatur den
Sollwert, leuchtet die Kontrollleuchte am Schalter
auf (im Klima-Modus geschieht dasselbe umgekehrt).
Begrenzung des Temperaturbereiches (e)
Der Temperaturbereich kann wie folgt eingestellt
werden:
1- Temperaturregelungsknopf entfernen
2- Stift anheben
3- Zur Festlegung der maximal gewünschten
Temperatur, rote Scheibe einstellen
4- Zur Festlegung der minimal gewünschten
Temperatur, blaue Scheibe einstellen
5- Stift wiedereinsetzen
6- Knopf wiedereinsetzen.
Elektrische Daten
- Betriebspannung: 230 V, 50Hz
- Einstellbereich: +5°C bis +30°C
- Gebrauchstemperatur: 0°C bis 50°C
- Lagerungstemperatur: -20°C bis +60°C
- Schaltleistung 8 A cos φ = 1
- Schalttemperaturdifferenz ± 0,5°C
- Schutzklasse II
- Schutzart: IP 21
- Anschlusskapazität: 1 x 2,5 mm2
- Die eingestellte Betriebsart bleibt zeitlich
unbegrenzt gespeichert
- : Absenkung = -3°C Heizung / +3°C Klimaanlage
Empfehlungen
Einbau und Montage dürfen nur durch eine
Elektrofachkraft erfolgen. Ausschließlich Original-
Ersatzteile verwenden. Gerät keinesfalls ohne die
äußere Schutzverkleidungen einsetzen.
Bedienungsanleitung
Elektronischer
Raumthermostat
ON
25
5
15
10
30
OFF
20
ON
25
5
15
10
30
20
25
5
15
10
30
OFF
20
25
5
15
10
30
20
ON
53
1
2
4
(d)
WS310
WS310
1,50 m
(a)
A
D
C
B
E
(b) (e)
N
L
123NL
NO
L
WS310
(c)
0
0
0
A
B
C
A
B
C
A
B
C
E
D
A
B
C
A
B
C
A
B
C
A
B
C
0
0
0
0
FR DE GB
A
B
C
E
D
A
B
C
E
D
Hager SAS - 132 bld d’Europe - BP 78 - 67 212 Obernai cedex (FRANCE) - Tél. +333 88 49 50 50 - www.hagergroup.net2 6W 5202.d
Hager 10.2009
6W 5202.d
ES PT GR
WS310
systo
¶
ß
©
¢
£
§
Eγκατάσταση (a)
O θερoστάτησ πρέπει να εγκαθίσταται σε ύψoσ
1,5 m περίπoυ απ τo πάτωα, πρoστατευένoσ
απ τισ ακτίνεσ τoυ ηλίoυ και απ θερικέσ
επιδράσεισ πωσ φωτιστικά, τηλεoράσεισ,
εξαερισoσ κλπ. (βλ. Σχήα “a”).
Περιγραφή (b)
∆ίσκoσ ρύθισησ τησ θερoκρασίασ
Aκίδα για τoν περιoρισ τησ κλίακασ
Tρoχσ περιστρoφήσ (πλε και κκκινoσ)
Eπιλoγέασ OFF / (νυχτερινή λειτoυργία) / ON
∆είκτησ
O επιλoγέασ φωτίζεται ταν η θέρανση ή o
κλιατισσ λειτoυργεί.
Kαλωδίωση (c)
H θέρανση ή o κλιατισσ συνδέεται ανάεσα
στoυσ ακρoδέκτεσ 2 & 3 "NO". Προσοχή: H λoγική
τησ λειτoυργίασ τoυ θερoστάτη είναι διαφoρετική
για τη θέρανση απ’ τι για τoν κλιατισ !
Λογική λειτουργίας του θερμοστάτη
Θέρανση: αν η θερoκρασία τoυ χώρoυ
πέσει κάτω απ αυτή πoυ έχετε θέσει ε τo
δίσκo, ττε ανάβει τo ενδεικτικ τoυ
επιλoγέα (στη λειτoυργία κλιατισoύ
συβαίνει τo αντίθετo).
Aλλαγή της λογικής λειτουργίας (d)
O θερμοστάτης είναι εργοστασιακά ρυθμισμένος
για εφαρμογές θέρμανσης. Για να περάσετε στη
λειτoυργία κλιατισoύ πρέπει να ακoλoυθήσετε
την παρακάτω διαδικασία (Σχήα “d”):
Θέστε τoν επιλoγέα στη θέση OFF και τo
δίσκo ρύθισησ στην ελάχιστη θερoκρασία.
➀Θέστε τoν επιλoγέα στη θέση ON.
➁Θέστε τo δίσκo στη έγιστη θερoκρασία.
➂Θέστε τoν επιλoγέα στη θέση OFF.
➃Θέστε τo δίσκo στην ελάχιστη θερoκρασία.
➄Θέστε τoν επιλoγέα στη θέση ON.
Στo τέλoσ τησ διαδικασίασ, o επιλoγέασ
αναβoσβήνει 3 φoρέσ. Aν περάσoυν πάνω
απ 15 sec ανάεσα σε δυo βήατα, θα
πρέπει να ξεκινήσετε ξανά απ τo
Περιορισμς της κλίμακας (e)
H κλίακα τησ θερoκρασίασ πoρεί να
περιoριστεί:
1. Aφαιρέστε τo δίσκo ρύθισησ
2. Σηκώστε την ακίδα
3. Για να θέσετε τη έγιστη θερoκρασία,
ρυθίστε τoν κκκινo τρoχ
4. Για να θέσετε την ελάχιστη θερoκρασία,
ρυθίστε τoν πλε τρoχ
5. Eπανατoπoθετήστε την ακίδα
6. Eπανατoπoθετήστε τo δίσκo
Xαρακτηριστικά
- Tρoφoδoσία: 230 V, 50 Hz
- Kλίακα ρύθισησ θερoκρασίασ: +5°C ωσ +30°C
- Θερoκρασία λειτoυργίασ: 0°C ωσ 50°C
- Θερoκρασία απoθήκευσησ: -20°C ωσ +60°C
- Eπαφή εξδoυ: 8 A cos φ = 1
- Aκρίβεια: ± 0,5°C
- Mνωση κλάσησ II
- ∆είκτησ πρoστασίασ: IP21
- Mέγιστη διατoή καλωδίων: 1 x 2,5 mm2
- : Nυχτερινή λειτoυργία = -3°C απ τη
θερoκρασία θέρανσησ / +3°C απ τη
θερoκρασία κλιατισoύ
Παρατηρήσεις
O θερoστάτησ θα πρέπει να τoπoθετηθεί
απ εξειδικευένo πρoσωπικ.
Xρησιoπoιείστε νo τα αυθεντικά
εξαρτήατα και ην τo αφήνετε εκτεθειένo.
Oδηγίεσ χρήσησ
Hλεκτρoνικσ
θερoστάτησ
Instalação (a)
O termóstato de ambiente deve ser instalado
a uma altura de 1,5m do chão, numa parede
interior, e ao abrigo de raios solares directos e
de qualquer perturbação térmica, tais como
lâmpadas, televisões, tubos de aquecimento,
correntes de ar (ver esquema de instalação “a”).
Descrição (b)
Botão de regulação de temperatura
Limitador de escala
Disco (azul e vermelho)
Comutador OFF / (reduzido) / ON
Indicador da regulação de temperatura
O comutador fica luminoso quando o aqueci-
mento / a climatização está em funcionamento.
Ligação eléctrica (c)
Ligar o aquecimento ou a climatização nas
saídas 2 e 3 “NA”. Em modo climatização, a
lógica de comando é invertida automaticamente.
Modificação do modo de funcionamen-
to, climatização ou aquecimento (d)
O termóstato é fornecido em modo “aqueci-
mento”. Para passar ao modo “climatização”
seguir os passos descritos en “d”:
Inicialmente, colocar o comutador em OFF
e a temperatura em “mínimo”.
➀Passar o comutador a ON.
➁Regular a temperatura para “máximo”.
➂Passar o comutador a OFF.
➃Regular a temperatura para “mínimo”.
➄Passar o comutador a ON.
No final da sequência, o comutador pisca 3 vezes
para sinalizar a mudança do modo.
Se entre alguma das etapas descritas decorrerem
mais que 15 segundos, será necessário recome-
çar da etapa .
Verificação do modo de funcionamento
Modo aquecimento: se a temperatura ambiente for
inferior à temperatura regulada, o indicador estará
ligado (em modo de climatização será o inverso).
Limitação do intervalo de regulação
da temperatura (e)
O intervalo de regulação da temperatura pode
ser limitado da seguinte forma:
1. Retirar o botão de regulação da temperatura
.
2. Levantar o limitador de escala .
3. Ajustar o disco vermelho para definir a
temperatura máxima desejada.
4. Ajustar o disco azul para definir a tempe-
ratura mínima desejada.
5. Recolocar o limitador .
6. Recolocar o botão .
Características técnicas
- Tensão de alimentação: 230 V, 50Hz
- Intervalo de regulação: +5°C a +30°C
- Temperatura de utilização: 0°C a +50°C
- Temperatura de armazenamento: -20°C a +60°C
- Relé de saída 8 A cos φ = 1
- Precisão de temperatura ± 0,5°C
- Classe II
- Grau de protecção: IP21
- Capacidade de ligação: 1 x 2,5 mm2
- Modo de funcionamento memorizado
indefinidamente
- : Reduzido = -3ºC em aquecimento / +3ºC
em climatização.
Recomendações
Este aparelho deve ser instalado apenas por um
profissional habilitado. Utilizar sempre peças de
origem. Não utilizar o produto sem as protecções
externas.
Instruções de montagem
Termóstato de
ambiente electrónico
Instalación (a)
El termostato ambiental debe ser instalado a 1,5 m
del suelo más o menos, en una pared interior, al
abrigo de los rayos solares directos y de toda
perturbación térmica, como por ejemplo lámparas,
televisión, tubo de calefacción, corriente de aire
(ver el esquema de instalación “a”).
Descripción (b)
Botón de ajuste de la temperatura
Guía de límite de escala
Disco (azul o rojo)
Conmutador OFF / (reducido) / ON
Indicador de temperatura
El conmutador se enciende cuando la calefacción /
la climatización está activa.
Conexión eléctrica (c)
Conectar la calefacción o la climatización entre los
terminales 2 & 3 "NO". La lógica de mando se
invierte automáticamente en modo climatización.
Modificación del modo de funcionamiento,
climatización o calefacción (d)
El termostato viene en modo "Calefacción". Para
pasar al modo "Climatización" ejecute la secuencia
indicada en (d):
Para comenzar, coloque el conmutador en OFF
y la temperatura en "tope mínimo".
➀Coloque el conmutador en ON.
➁Ajuste la temperatura en “tope máximo”.
➂Coloque el conmutador en OFF.
➃Ajuste la temperatura en “tope mínimo”.
➄Coloque el conmutador en ON.
Al final de la secuencia el conmutador parpadea
3 veces para confirmar el cambio de modo.
Si el paso entre las etapas toma más de 15 segundos
se deberá reanudar la secuencia en la etapa
Verificación del modo de funcionamiento
Modo calefacción: si la temperatura ambiental es
inferior a la temperatura de consigna el testigo del
conmutador se enciende (y lo contrario en el modo
climatización).
Limitación del margen de temperatura (e)
Para reducir el margen de temperatura siga las
instrucciones siguientes:
1. Retire el botón de ajuste de la temperatura
2. Alce el guía de limitación de la temperatura
3. Ajuste la temperatura máxima deseada con el
disco rojo
4. Ajuste la temperatura máxima deseada con
el disco azul
5. Baje el guía de limitación de la temperatura
6. Instale de nuevo el botón de ajuste de la
temperatura
Características
- Tensión de alimentación: 230 V, 50 Hz
- Margen de ajuste de la temperatura: +5°C a +30°C
- Temperatura de almacenamiento: -20°C a +60°C
- Temperatura de uso: 0°C a 50°C
- Relé de salida 8 A cos φ = 1
- Precisión de la temperatura ± 0,5°C
- Clase II
- Indice de protección: IP21
- Capacidad de conexión: 1 x 2,5 mm2
- El Modo de funcionamiento queda memorizado
permanentemente
- : Reducido = -3°C calefacción / +3°C climatización
Recomendaciones
Este aparato debe ser instalado por un profesional
cualificado. Utilice exclusivamente respuestos de
origen. No use el producto sin las protecciones
externas.
Instrucciones de uso
Termostato ambiental
electrónico
ON
25
5
15
10
30
OFF
20
ON
25
5
15
10
30
20
25
5
15
10
30
OFF
20
25
5
15
10
30
20
ON
53
1
2
4
(d)
A
D
C
B
E
(b) (e)
N
L
123NL
NO
L
WS310
(c)
0
A
B
C
E
D
A
B
C
E
D
A
B
C
E
D
B
A
C
B
A
C
B
A
C
B
A
C
B
A
C
B
A
C
0
0
0
0
0
0
WS310
WS310
1,50 m
(a)

Other hager Thermostat manuals

hager WH104404 User manual

hager

hager WH104404 User manual

hager 54185 User manual

hager

hager 54185 User manual

hager kallysta WK310 User manual

hager

hager kallysta WK310 User manual

hager 25113 User manual

hager

hager 25113 User manual

hager kallysto WUC70 User manual

hager

hager kallysto WUC70 User manual

hager EK 053 User manual

hager

hager EK 053 User manual

hager EK530 User manual

hager

hager EK530 User manual

hager EK570 User manual

hager

hager EK570 User manual

hager EK520 User manual

hager

hager EK520 User manual

hager tebis tx460 User manual

hager

hager tebis tx460 User manual

hager Bocchiotti 25310 User manual

hager

hager Bocchiotti 25310 User manual

hager EK005, 25505 User manual

hager

hager EK005, 25505 User manual

hager EK510 User manual

hager

hager EK510 User manual

hager EK003 Installation instructions

hager

hager EK003 Installation instructions

hager EK051 User manual

hager

hager EK051 User manual

hager 58102 User manual

hager

hager 58102 User manual

hager 54185 User manual

hager

hager 54185 User manual

hager EK052 Installation instructions

hager

hager EK052 Installation instructions

hager EK760 User manual

hager

hager EK760 User manual

hager Flash 25620 User manual

hager

hager Flash 25620 User manual

hager 25614 Installation instructions

hager

hager 25614 Installation instructions

hager EK560 User manual

hager

hager EK560 User manual

hager 25501 User manual

hager

hager 25501 User manual

hager essensya WE310 User manual

hager

hager essensya WE310 User manual

Popular Thermostat manuals by other brands

Watts Tekmar WiFi Thermostat 561 Installation & operation manual

Watts

Watts Tekmar WiFi Thermostat 561 Installation & operation manual

Nu-Heat NTG5110 Homeowner's guide

Nu-Heat

Nu-Heat NTG5110 Homeowner's guide

PW maintenance DT operating instructions

PW maintenance

PW maintenance DT operating instructions

Hunter Set & Save 44377W Installation and operation manual

Hunter

Hunter Set & Save 44377W Installation and operation manual

HAI OMNISTAT RC-122B owner's manual

HAI

HAI OMNISTAT RC-122B owner's manual

Chacon 54311 user guide

Chacon

Chacon 54311 user guide

nVent RAYCHEM ETS-05 manual

nVent RAYCHEM

nVent RAYCHEM ETS-05 manual

OJ Electronics MWD5-1999-UAC3 instructions

OJ Electronics

OJ Electronics MWD5-1999-UAC3 instructions

Airzone ACUAZONE IBPRO32 user manual

Airzone

Airzone ACUAZONE IBPRO32 user manual

Honeywell RTH6500WF Wi-Fi Series user guide

Honeywell

Honeywell RTH6500WF Wi-Fi Series user guide

Fiamma OT11 manual

Fiamma

Fiamma OT11 manual

Sampford IXL Cannon User instructions

Sampford IXL

Sampford IXL Cannon User instructions

Dwyer Instruments TS2 Series Installation and operating instructions

Dwyer Instruments

Dwyer Instruments TS2 Series Installation and operating instructions

Rogers Smart Thermostat Setup guide

Rogers

Rogers Smart Thermostat Setup guide

Honeywell T834C quick start guide

Honeywell

Honeywell T834C quick start guide

Bryant AND THERMIDISTAT CONTROL Homeowner's guide

Bryant

Bryant AND THERMIDISTAT CONTROL Homeowner's guide

Lux Products SMART TEMP CAG1500 SERIES Installation and operating instructions

Lux Products

Lux Products SMART TEMP CAG1500 SERIES Installation and operating instructions

Honeywell T8131C owner's guide

Honeywell

Honeywell T8131C owner's guide

manuals.online logo
manuals.online logoBrands
  • About & Mission
  • Contact us
  • Privacy Policy
  • Terms and Conditions

Copyright 2025 Manuals.Online. All Rights Reserved.