manuals.online logo
Brands
  1. Home
  2. •
  3. Brands
  4. •
  5. Nu-Heat
  6. •
  7. Thermostat
  8. •
  9. Nu-Heat NTG5110 Assembly instructions

Nu-Heat NTG5110 Assembly instructions

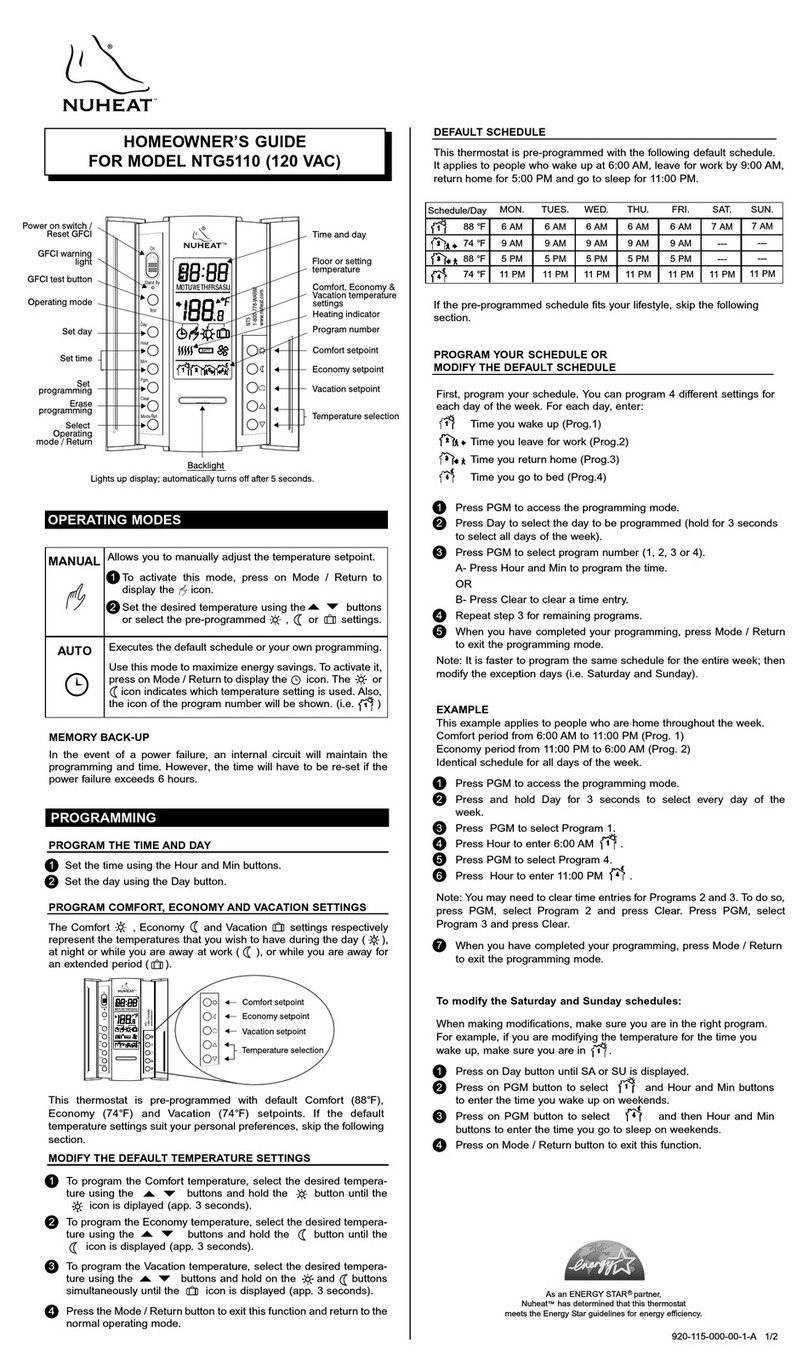
NUHEAT
HOMEOWNER'SGUIDE
MODEL
NTG51
1
0
(1
20
VAC)
Power
on
switch
/
Reset
GFCI
GFCI
warning
light
GFCI
test
button
Operating
mode
Set
day
Set
time
-
Set
programming
Erase
programming
Select
Operating
mode
/
Return
Time
andday
Floor
or
setting
temperature
Comfort,
Economy
&
Vacation
temperature
settings
Heating
indicator
Program
number
Comfort
setpoint
Economy
setpoint
Vacation
setpoint
Temperature
selection
Lights
up
display;
automatically
turns
off
after
5
seconds.
OPERATINGMODES
MANUAL
AUTO
©
Allows
youto
manuallyadjust
the
temperaturesetpoint.
J^To
activatethismode,press
on
Mode
/
Return
to
display
the
,4
icon.
^Set
the
desiredtemperature
using
the-*-
"^
buttons
or
select
the
pre-programmed
-$-
,
d
or
r£D
settings.
Executes
the
defaultschedule
or
your
own
programming.
Use
this
mode
to
maximizeenergysavings.
To
activate
it,
press
on
Mode
/
Return
to
display
theO
icon.
The
-$•
or
(J
iconindicateswhichtemperaturesetting
is
used.Also,
the
icon
ofthe
programnumberwill
be
shown,
(i.e.
fTf
)
MEMORY
BACK-UP
In
the
event
ofa
powerfailure,
an
internalcircuitwillmaintain
the
programming
and
time.However,
the
timewillhave
tobe
re-set
ifthe
power
failureexceeds
6
hours.
PROGRAMMING
PROGRAM
THE
TIME
ANDDAY
Q
Setthe
timeusing
the
Hour
andMin
buttons.
Q
Settheday
using
theDay
button.
PROGRAM
COMFORT.
ECONOMY
AND
VACATIONSETTINGS
The
Comfort
-&•
,
Economy
([
and
Vacation
O
settingsrespectively
represent
the
temperatures
that
you
wish
to
have
during
theday
(-$•),
at
night
or
while
youare
away
at
work
((J
),or
while
youare
away
for
an
extendedperiod
(o"rj).
Comfort
setpoint
Economysetpoint
Vacationsetpoint
This
thermostat
is
pre-programmedwithdefaultComfort
(88°F),
Economy
(74°F)
and
Vacation
(74°F)
setpolnts.
Ifthe
default
temperature
settingssuityourpersonal
preferences,
skip
the
following
DEFAULT
SCHEDULE
This
thermostat
is
pre-programmed
with
the
following
default
schedule.
It
applies
to
people
who
wake
upat
6:00
AM,
leave
for
work
by
9:00
AM,
return
home
for
5:00
PMandgoto
sleep
for
11:00
PM.
Schedule/Day
WON.
TUES.
WED.
THU.
FBI.
SAT.SUN.
f^
88
°F
f^*»
™
°F
fS>«j,
88
°F
ft74
°F
6AM
9AM
5PM
11
PM
6AM
9AM
5PM
11PM
6AM
9AM
5PM
11
PM
6AM
9AM
5PM
11
PM
6AM
9AM
5PM
11
PM
7AM
...
11PM
7AM
...
11
PM
If
the
pre-programmed
schedule
fitsyour
lifestyle,
skip
the
following
section.
PROGRAM
YOUR
SCHEDULE
OR
MODIFY
THE
DEFAULT
SCHEDULE
First,
programyour
schedule.
Youcan
program
4
different
settings
for
each
dayofthe
week.
For
eachday,enter:
1M
Time
you
wake
up
(Prog.1)
,~
f
l
\
.
Time
you
leave
for
work(Prog.2)
f^f«
*
Time
you
return
home
(Prog.3)
f^j
Time
yougotobed
(Prog.4)
©
Press
PGMto
access
the
programming
mode,
Press
Dayto
select
thedaytobe
programmed
(hold
for3
seconds
to
select
all
days
ofthe
week).
Press
PGMto
selectprogramnumber
(1
,
2,3 or4).
A-
PressHour
andMinto
program
the
time.
OR
B-
PressClear
to
clear
a
timeentry,
Repeatstep
3 for
remainingprograms.
When
you
have
completed
your
programming,
pressMode
/
Return
to
exit
the
programmingmode,
NOTE:
Itis
faster
to
program
the
same
schedule
forthe
entire
week;
thenmodify
the
exceptiondays(i.e.Saturday
and
Sunday),
EXAMPLE
Thisexampleapplies
to
people
whoare
homethroughout
the
week,
Comfort
periodfrom6:00
AMto
11:00
PM
(Prog.
1)
Economy
period
from
11:00
PMto
6:00
AM
(Prog.
2)
Identicalschedule
forall
days
ofthe
week.
O
Press
PGMto
access
the
programmingmode.
Q
Press
and
hold
Dayfor3
seconds
to
select
every
day
o?
the
week.
Q
Press
PGMto
selectProgram
1.
O
PressHour
to
enter6:00
AM
-'T1-
.
@
Press
PGMto
select
Program
4.
@
Press
Hour
to
enter11:00
PM
^
.
NOTE:
Youmay
need
to
clear
time
entries
tar
Programs
2 and
3.
Todo
so,
pressPGM,select
Program
2 and
press
Clear.
P-ess
PGM.
select
Program
3 and
press
dear.
O
When
you
have
completed
your
programming,
press
Mode
!
Retur
to
exit
the
programming
mode.
To
modify
the
Saturday
and
Sunday
schedules:
When
making
modifications,
make
sure
youareinthe
rigM
program.
For
example,
ifyouare
modifying
the
temperature
forthe
time
you
wake
up,
make
sure
youarein
f*^.
O
3ress
OfDay
button
until
SAorSUis
displayed.
htitton
to
select
-
''-
and
Hour
andMin
buttons
Backlight
Lights
up
display;
automatically
turns
off
after
5
seconds.
OPERATING
MODES
MANUAL
AUTO
O
Allows
youto
manuallyadjust
the
temperaturesetpoint.
O"To
activatethismode,press
on
Mode
/
Return
to
display
the
,4
icon.
@
Setthe
desiredtemperatureusing
the-A.
-w
buttons
or
select
the
pre-programmed
-$-,([
orO
settings.
Executes
the
defaultschedule
or
your
own
programming.
Use
thismode
to
maximizeenergysavings.
To
activate
it,
press
on
Mode
/
Return
to
display
theO
icon.
The
•$-
or
(J
iconindicateswhichtemperaturesetting
is
used.Also,
the
icon
ofthe
programnumberwill
be
shown,
(i.e.
fff
)
MEMORY
BACK-UP
In
the
event
ofa
powerfailure,
an
internalcircuitwillmaintain
the
programming
and
time.However,
the
timewillhave
tobe
re-set
ifthe
power
failureexceeds
6
hours.
PROGRAMMING
PROGRAM
THE
TIME
ANDDAY
Q
Setthe
timeusing
the
Hour
andMin
buttons.
Q
Settheday
using
theDay
button.
PROGRAM
COMFORT,ECONOMY
AND
VACATIONSETTINGS
Trie
Comfort
-&
,
Economy
d
and
Vacation
(0)
settingsrespectively
represent
the
temperaturesthat
you
wish
to
haveduring
theday
(-$-),
at
night
or
while
youare
away
at
work
((J
),or
while
youare
away
for
an
extendedperiod
(n°n).
Economy
setpoint
Vacation
setpoint
jre
select!
This
thermostat
is
pre-programmedwithdefaultComfort
(88°F),
Economy
(74°F)
and
Vacation
(74°F)
setpoints.
Ifthe
default
temperaturesettingssuityourpersonalpreferences,skip
the
following
section.
MODIFY
THE
DEFAULTTEMPERATURESETTINGS
Q
To
program
the
Comforttemperature,select
the
desiredtempera-
tureusing
the
A.
TT
buttons
and
hold
the
-$-
button
until
the
-&-
icon
is
diplayed
(app.
3
seconds).
@
To
program
the
Economytemperature,select
the
desiredtempera-
ture
using
the
.*.
^
buttons
and
hold
the
([
button
until
the
(J
icon
is
displayed(app.
3
seconds).
@
To
program
the
Vacationtemperature,select
the
desiredtempera-
ture
using
the
A.
w
buttons
and
hold
onthe
-&
and
<J
buttons
simultaneouslyuntil
the(CD
icon
is
displayed(app.
3
seconds).
O
Press
the
Mode
/
Returnbutton
to
exitthisfunction
and
return
tothe
normaloperatingmode.
fi|
Time
you
wake
up
(Prog.
1)
f*"?*
»
Time
you
leave
for
work(Prog.2)
f*!1*
*
Time
you
returnhome
(Prog.
3)
fJj
Time
yougotobed
(Prog.4)
O
Press
PGMto
access
the
programmingmode.
Q
Press
Dayto
select
thedaytobe
programmed(hold
for3
seconds
to
select
all
days
ofthe
week).
Q
Press
PGMto
selectprogramnumber
(1,2,3
or
4).
A-
PressHour
andMinto
program
the
time.
OR
B-
PressClear
to
clear
a
timeentry.
Q
Repeatstep
3 for
remainingprograms.
Q
When
you
havecompletedyourprogramming,pressMode
/
Return
to
exit
the
programmingmode.
NOTE:
Itis
faster
to
program
the
sameschedule
forthe
entireweek;
then
modify
the
exceptiondays(i.e.Saturday
and
Sunday).
EXAMPLE
This
example
applies
to
people
whoare
home
throughout
the
week.
Comfort
periodfrom6:00
AMto
11:00
PM
(Prog.
1)
Economy
periodfrom
11
:00
PMto
6:00
AM
(Prog.
2)
Identicalschedule
forall
days
ofthe
week.
O
Press
PGMto
access
the
programmingmode.
Q
Press
and
hold
Dayfor3
seconds
to
selectevery
dayofthe
week.
©
Press
PGMto
selectProgram
1.
O
Press
Hour
to
enter6:00
AM
fff
.
0
Press
PGM
to
selectProgram
4.
@
PressHour
to
enter
1 1
:00
PM
ftf
.
NOTE:
Youmay
need
to
cleartimeentries
for
Programs
2 and3.To
do
so,
pressPGM,selectProgram
2 and
pressClear.PressPGM,
selectProgram
3 and
pressClear.
O
When
you
havecompletedyourprogramming,pressMode
/
Return
to
exit
the
programmingmode.
To
modify
the
Saturday
and
Sundayschedules:
Whenmakingmodifications,makesure
youareinthe
right
program.
For
example,
ifyouare
modifying
the
temperature
forthe
time
you
wake
up,
make
sure
you
are
in
^.
O
Press
onDay
button
until
SAorSUis
displayed.
@
Press
onPGM
button
to
select
frj
and
Hour
andMin
buttons
to
enter
the
time
you
wake
upon
weekends.
Q
Press
onPGM
button
to
select
fi^
and
thenHour
andMin
buttons
to
enter
the
time
yougoto
sleep
on
weekends.
O
Press
on
Mode
/
Returnbutton
to
exit
this
function.
As
an
ENERGY
STAR®
partner,
Nuheat™
has
determinedthat
this
thermostat
meets
the
EnergyStarguidelines
for
energy
efficiency.
920-115-000-00-1-A
TEMPORARY
OR
PERMANENTTEMPERATURE
BYPASS
This
operationallows
youto
temporarilymodify
the
floor
temperature
while
youareinthe
Automaticmode.Simplypress
on
.A.
or
-w
but-
tons
to
select
the
desiredtemperature,
orthe
-ft
or
d
button
to
select
the
Comfort
or
Econosettings
you
haveprogrammed.
This
tempera-
ture
will
be
maintained
until
the
beginning
ofthe
next
programmed
schedule.
You
can
alsoswitch
tothe
Vacationsetting
fora
prolongedabsence
by
pressing
ontheO
button.
In
thatcase,
the
temperaturebypass
is
permanent.
To
return
tothe
normaloperatingmode,press
on
Mode
/
Return
button.
If
you
wish
to
immediatelyreturn
tothe
programmedsettings,press
on
Mode
/
Returnbuttontwice.
EARLY
STARTFUNCTION
This
thermostat
is
equipped
with
a
function
that
enables
itto
calculate
the
optimumtime
to
start
the
heatingsystem
to
achieve
the
desired
temperaturesetting
bythe
programmedtime.
It
couldstart
the
heating
system
as
early
as6
hoursprior
if
necessary.
Everyday,
the
thermostatwillautomaticallyre-evaluate
how
early
to
start
heating,
based
onthe
previousday'sperformance.
The
switch
onthe
back
ofthe
thermostat
is
factory-set
to
EarlyStart
ON.To
turn
it
off,
see
SWITCHSELECTION.
SWITCH
SELECTION
Thisthermostat
is
factory-set
tothe
followingvalues.
SW1
SW2
SW3
SW5
Function
Temperature
format
EarlyStart
Timeformat
Permanentbacklight
UP
?p
Disable
12h
Enable
DN
°c
Enable
24
h
Disable
I
Factory
pre-sets
SW5
DN
1
-^p
To
change
these
pre-sets:
9
Locate
the
screw
at
bottom
of
thermostat.Unscrew.
Q
Removethermostatfaceplate.
-
©
Locate
tne
switches
atthe
back
ofthe
faceplate.
Setthe
switches
to
yourpreferences.
OPutthe
faceplateback
onthe
thermostat.
@
Secure
the
thermostatwith
the
screw.
o
We
recommend
you
test
the
GFCI
monthly.
It
the
test
is
not
success-
ful,
cut
power
tothe
heatingsystem
and
callcustomerservice,
or
return
the
thermostat
to
yoursupplier
for
verification.
O
Adjust
the
setpointtemperature
-A.
-w
until
the
heatingindicator
(
MIM
)
appearson-screen.
Q
Press
TEST.
The
test
is
successful
ifthe
GFCI
warning
light
isON
and
power
is
cut-off.
Q
Switchpower
to
Standby,thenreset
toON.
Warninglight:
If
this
comes
on
duringnormaloperation,
cut
power
to
the
heatingsystem
and
have
an
electricianverify
the
installation.
TECHNICAL
SPECIFICATIONS
NTG5110(120VAC)
32°
f to
140°F
(0°C
to
60°C)
40°F
to
104°F(5°C
to
40°C)
88°F(31°C)
74°
F
(23°C)
50°F(10°C)
1
Model:
•
Display
range:
1
Settingrange:
1
Comfort
-ft
defaultsetting:
1
Economy
C
default
setting:
•
Vacation
O
defaultsetting:
WARRANTY
NUHEAT
INDUSTRIES
ONE
m
YEARLIMITEDWARRANTY
This
product
is
guaranteed
against
workmanship
defects
fora
one-year
periodfollowing
the
initialdate
of
purchase.Duringthisperiod,
NUHEATwillrepair
or
replace,
atour
option
and
withoutcharge,
any
defectiveproductwhich
has
beenusedundernormalconditions,
The
warrantydoes
not
coverdeliverycosts
and
does
not
apply
to
productspoorlyinstalled
or
randomlydamagedfollowing
installation.
Thiswarrantycancels
and
replaces
any
othermanufacturer's
express
or
impliedwarranty
as
well
asany
othercompanycommitment.
NUHEAT
cannot
be
heldliable
for
related
or
randomdamages
following
the
installation
of
thisproduct.
The
defectiveproduct
as
well
asthe
purchaseinvoicemust
be
returned
tothe
place
of
purchase
or
mailed,prepaid
and
insured,
tothe
followingaddress:
NUHEATINDUSTRIESLTD.
USA
880
GrantAvenue
Elaine,
WA
98230
1
(800)778-9276
www.nuheat.com
CANADA
1689
ClivedenAvenue
Delta,
BC
V3M6V5
NUHEAT™
isa
registeredtrademark
of
Nuheat
IndustriesLTD.
.

Other Nu-Heat Thermostat manuals

Nu-Heat Home User manual

Nu-Heat

Nu-Heat Home User manual

Nu-Heat NTG5110 User manual

Nu-Heat

Nu-Heat NTG5110 User manual

Nu-Heat FTGF1P User manual

Nu-Heat

Nu-Heat FTGF1P User manual

Nu-Heat Siognature User manual

Nu-Heat

Nu-Heat Siognature User manual

Nu-Heat TH111GFCI-P User manual

Nu-Heat

Nu-Heat TH111GFCI-P User manual

Nu-Heat NTG5110; NTG5220 Assembly instructions

Nu-Heat

Nu-Heat NTG5110; NTG5220 Assembly instructions

Nu-Heat ELEMENT User manual

Nu-Heat

Nu-Heat ELEMENT User manual

Nu-Heat NTG5110 Assembly instructions

Nu-Heat

Nu-Heat NTG5110 Assembly instructions

Nu-Heat Element User manual

Nu-Heat

Nu-Heat Element User manual

Nu-Heat neoAir User manual

Nu-Heat

Nu-Heat neoAir User manual

Nu-Heat FTGF2P User manual

Nu-Heat

Nu-Heat FTGF2P User manual

Nu-Heat SIGNATURE User manual

Nu-Heat

Nu-Heat SIGNATURE User manual

Nu-Heat HMY110 User manual

Nu-Heat

Nu-Heat HMY110 User manual

Nu-Heat Solo User manual

Nu-Heat

Nu-Heat Solo User manual

Nu-Heat HMYDV User manual

Nu-Heat

Nu-Heat HMYDV User manual

Nu-Heat TEMPO User manual

Nu-Heat

Nu-Heat TEMPO User manual

Nu-Heat NTG5220 Assembly instructions

Nu-Heat

Nu-Heat NTG5220 Assembly instructions

Nu-Heat SOLO User manual

Nu-Heat

Nu-Heat SOLO User manual

Popular Thermostat manuals by other brands

Honeywell Lyric T6 user guide

Honeywell

Honeywell Lyric T6 user guide

MS Electronics E8210 Product guide

MS Electronics

MS Electronics E8210 Product guide

JUMO eTron M 100 operating manual

JUMO

JUMO eTron M 100 operating manual

Vimar 02972 Installer manual

Vimar

Vimar 02972 Installer manual

Venstar T2900 owner's manual

Venstar

Venstar T2900 owner's manual

Interlogix IS-ZW-TSTAT-500 Installation & user guide

Interlogix

Interlogix IS-ZW-TSTAT-500 Installation & user guide

PW maintenance DT operating instructions

PW maintenance

PW maintenance DT operating instructions

AEG FRTD 903 TC user manual

AEG

AEG FRTD 903 TC user manual

Mi-Heat Heizsysteme E51 user manual

Mi-Heat Heizsysteme

Mi-Heat Heizsysteme E51 user manual

Daikin TSTATD2200C-2 Owner's manual and installation instructions

Daikin

Daikin TSTATD2200C-2 Owner's manual and installation instructions

Honeywell RTH2510/RTH2410 Series operating manual

Honeywell

Honeywell RTH2510/RTH2410 Series operating manual

Honeywell RTH2410B operating manual

Honeywell

Honeywell RTH2410B operating manual

Bryant II TSTAT-0-20 Installation and start-up instructions

Bryant

Bryant II TSTAT-0-20 Installation and start-up instructions

DIVERSITECH 675-TS32 instruction manual

DIVERSITECH

DIVERSITECH 675-TS32 instruction manual

ICM Controls SC 3201 Installation, operation & application guide

ICM Controls

ICM Controls SC 3201 Installation, operation & application guide

HomeMatic HM-CC-TC Installation and operating manual

HomeMatic

HomeMatic HM-CC-TC Installation and operating manual

KMC Controls FlexStat BAC-10000 Series Operation guide

KMC Controls

KMC Controls FlexStat BAC-10000 Series Operation guide

Braeburn Builder 1200NC instructions

Braeburn

Braeburn Builder 1200NC instructions

manuals.online logo
manuals.online logoBrands
  • About & Mission
  • Contact us
  • Privacy Policy
  • Terms and Conditions

Copyright 2025 Manuals.Online. All Rights Reserved.