Haier HVC15A User manual

Quality •Innovation •Style
Built In / Freestanding Wine Cellar
Construire Dans / Indépendant Vin Cave
Construido En / Bodega Aislada
HVCE15ABH
User Manual
Model # HVCE15A, HVC15A
Guide de l’Utilisateur
Modéle # HVCE15A, HVC15A
Manual del Usuario
Para Modelo de # HVCE15A, HVC15A

SAFETY PRECAUTIONS
Read all of the instructions before using this appliance. When using
this appliance, always exercise basic safety precautions, including the
following:
1) Use this appliance only for its intended purpose as described in this use and
care guide.
2) This wine cellar must be properly installed in accordance with the
installation instructions before it is used. See grounding instructions in the
installation section.
3) Never unplug your wine cellar by pulling on the power cord. Always grasp the
plug firmly and pull straight out from the outlet.
4) Repair or replace immediately, all electric service cords that have become
frayed or otherwise damaged. Do not use a cord that shows cracks or
abrasion damage along its length, the plug or the connector end.
5) Unplug your wine cellar before cleaning or before making any repairs.
Note: If for any reason this product requires service, we strongly
recommend that a certified technician performs the service.
6) If your old wine cellar is not being used, we recommend that you remove the
door and leave the shelves in place. This will reduce the possibility
of danger to children.
7) Do not operate your wine cellar in the presence of explosive fumes.
8) Do not store foods in wine cellar as interior temperature may not be cool
enough to prevent spoilage.
1
English

2
Thank you for using our Haier product. This easy-
to-use manual will guide you in getting the best
use of your wine cellar.
Remember to record the model and serial
number. They are on a label in back of the wine
cellar.
Model number
Serial number
Date of purchase
Staple your receipt to your manual. You will need it to obtain warranty service.
SAVE THESE INSTRUCTIONS
For Future Reference
DANGER
Risk of child entrapment. Before you throw away your old wine cellar,
take off the doors. Leave the shelves in place so that children may not
easily climb inside.
English

TABLE OF CONTENTS PAGE
Safety Precautions ........................................................................................................1
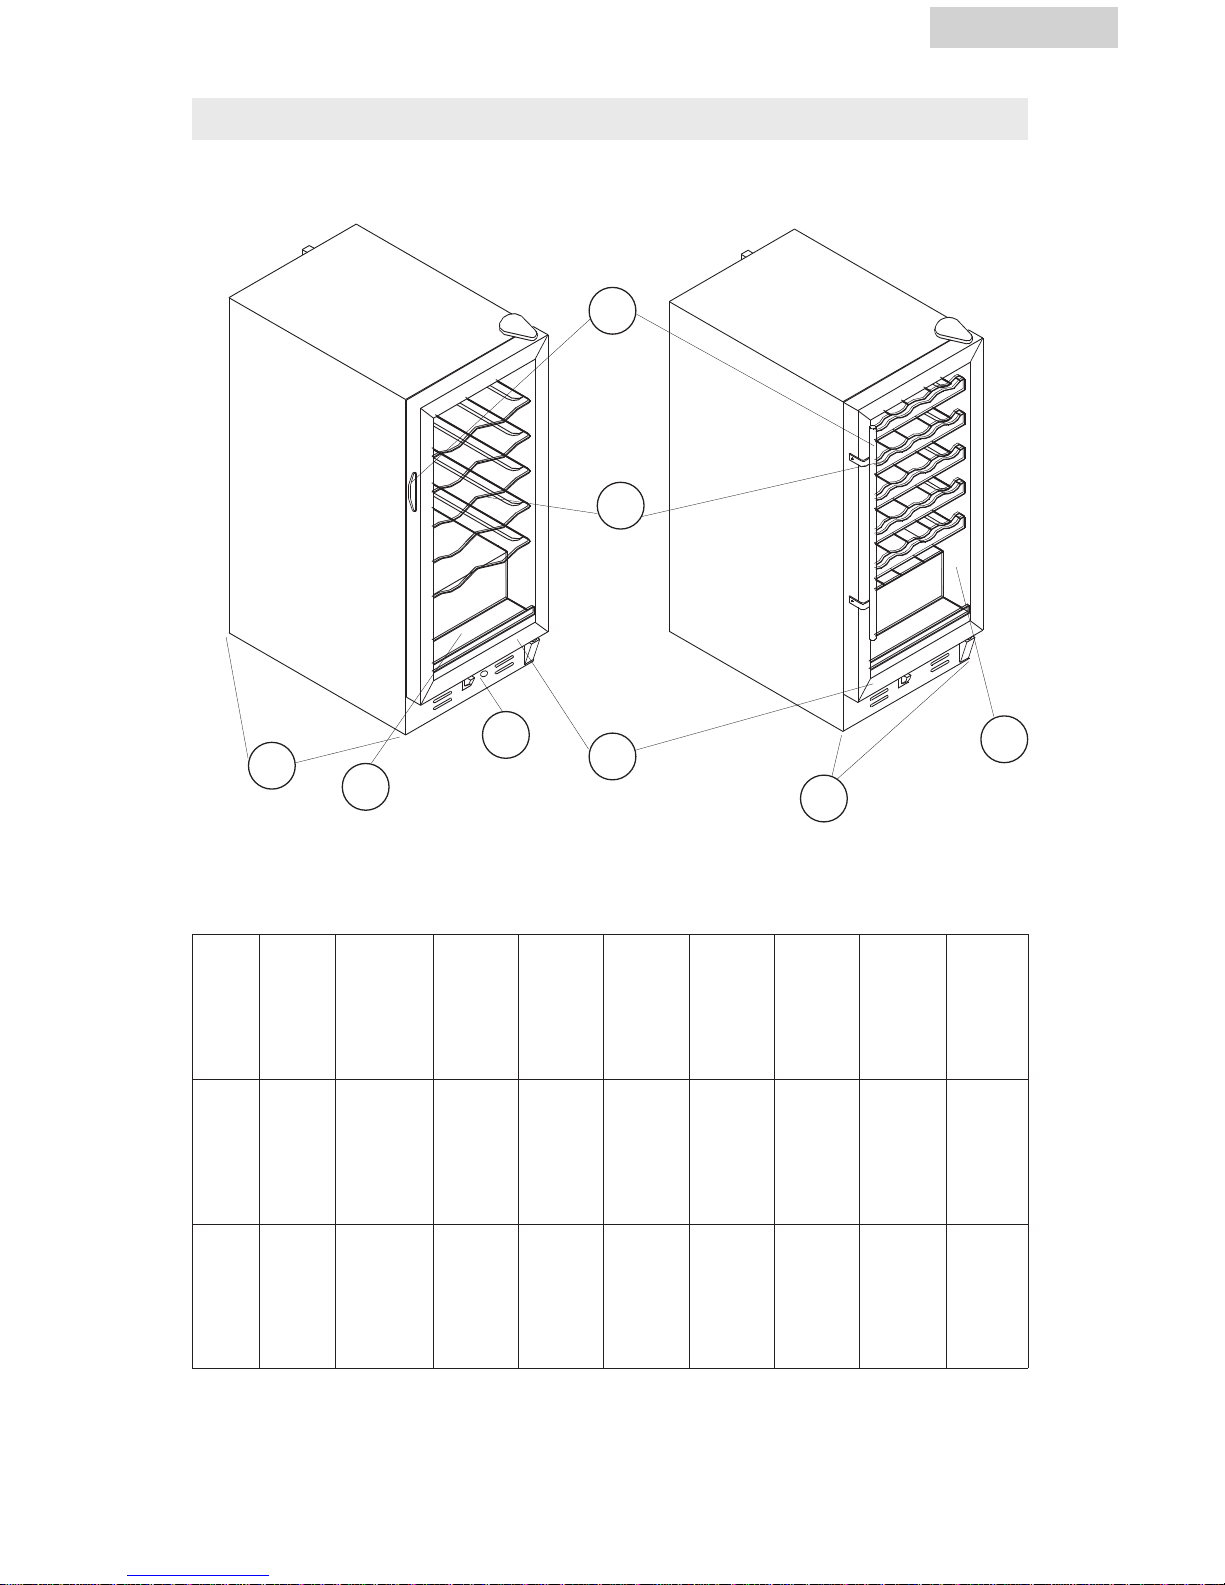
Parts And Features........................................................................................................4
Installing Your Wine Cellar ..........................................................................................5
Unpacking Your wine cellar......................................................................................................5
Leveling Your wine cellar..........................................................................................................5
Electrical Requirements ............................................................................................................5
Use of Extension Cord..............................................................................................................5
Wine Cellar Features And Use......................................................................................6
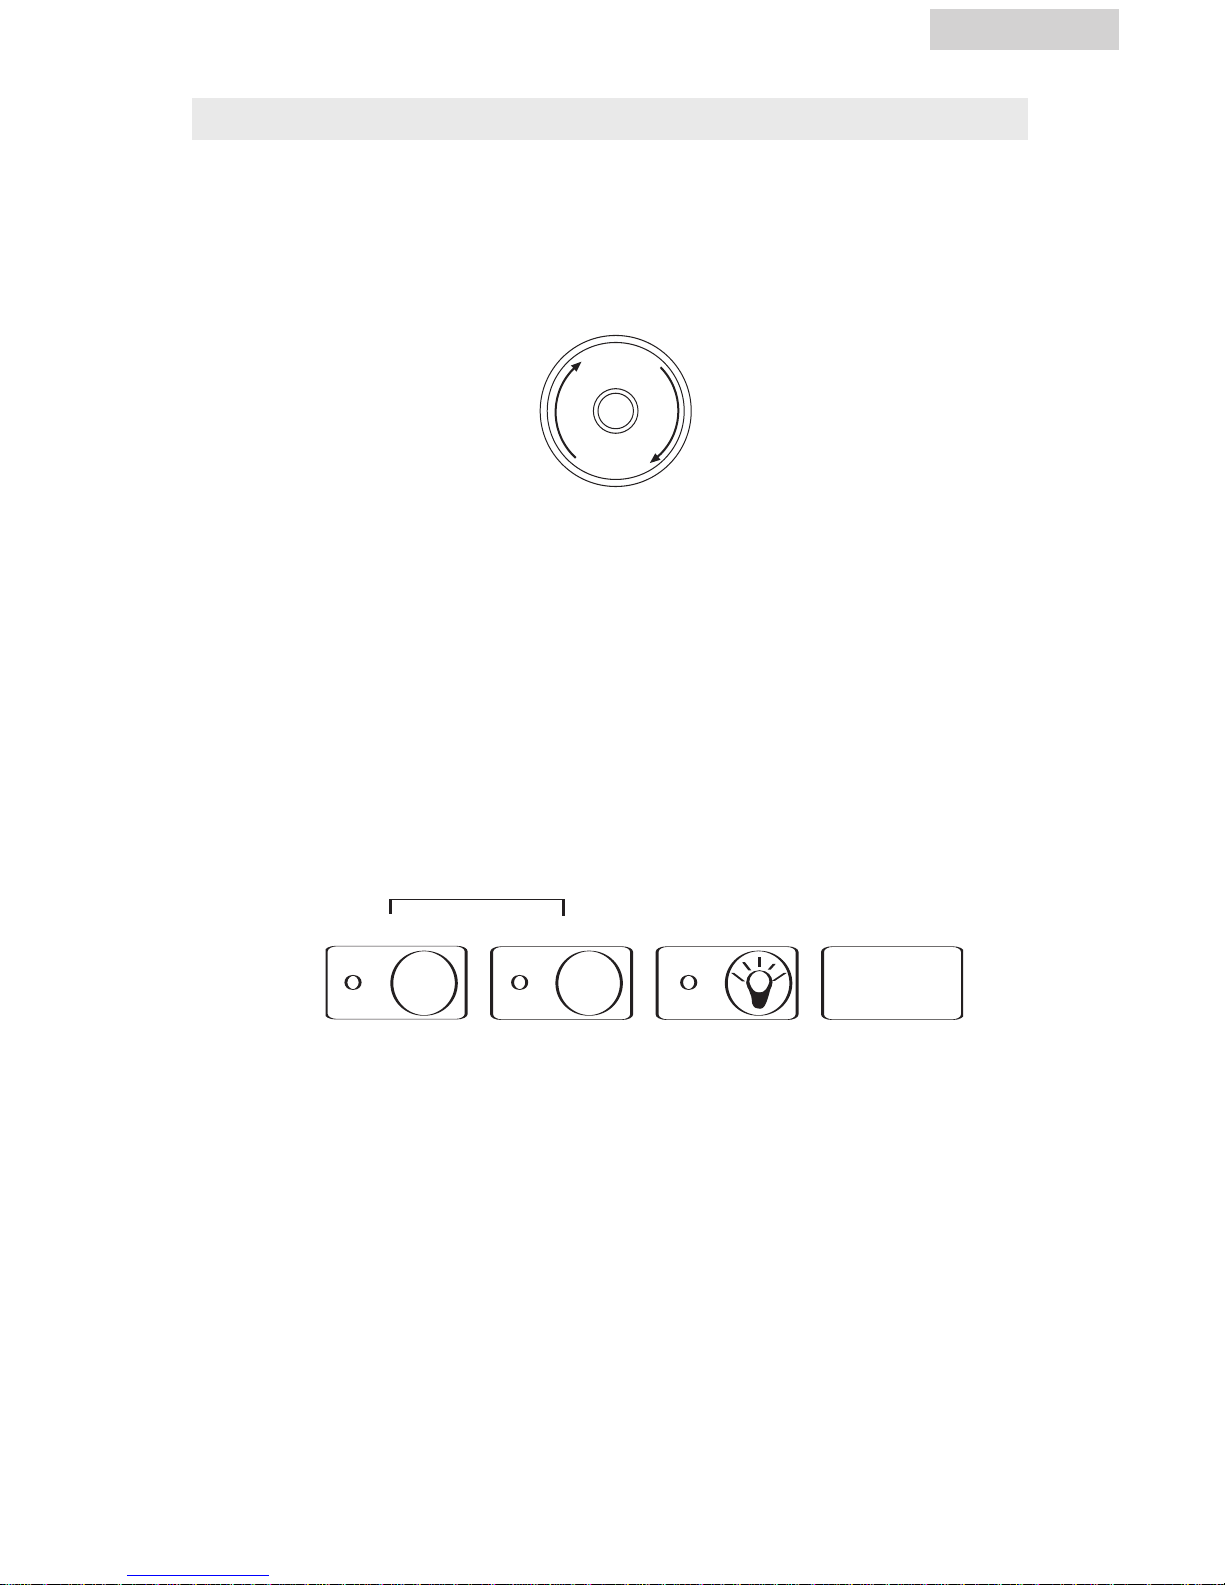
Initial Set Up............................................................................................................................6
Shelving ..................................................................................................................................7
Interior Light............................................................................................................................7
Normal Operating Sounds ......................................................................................................7
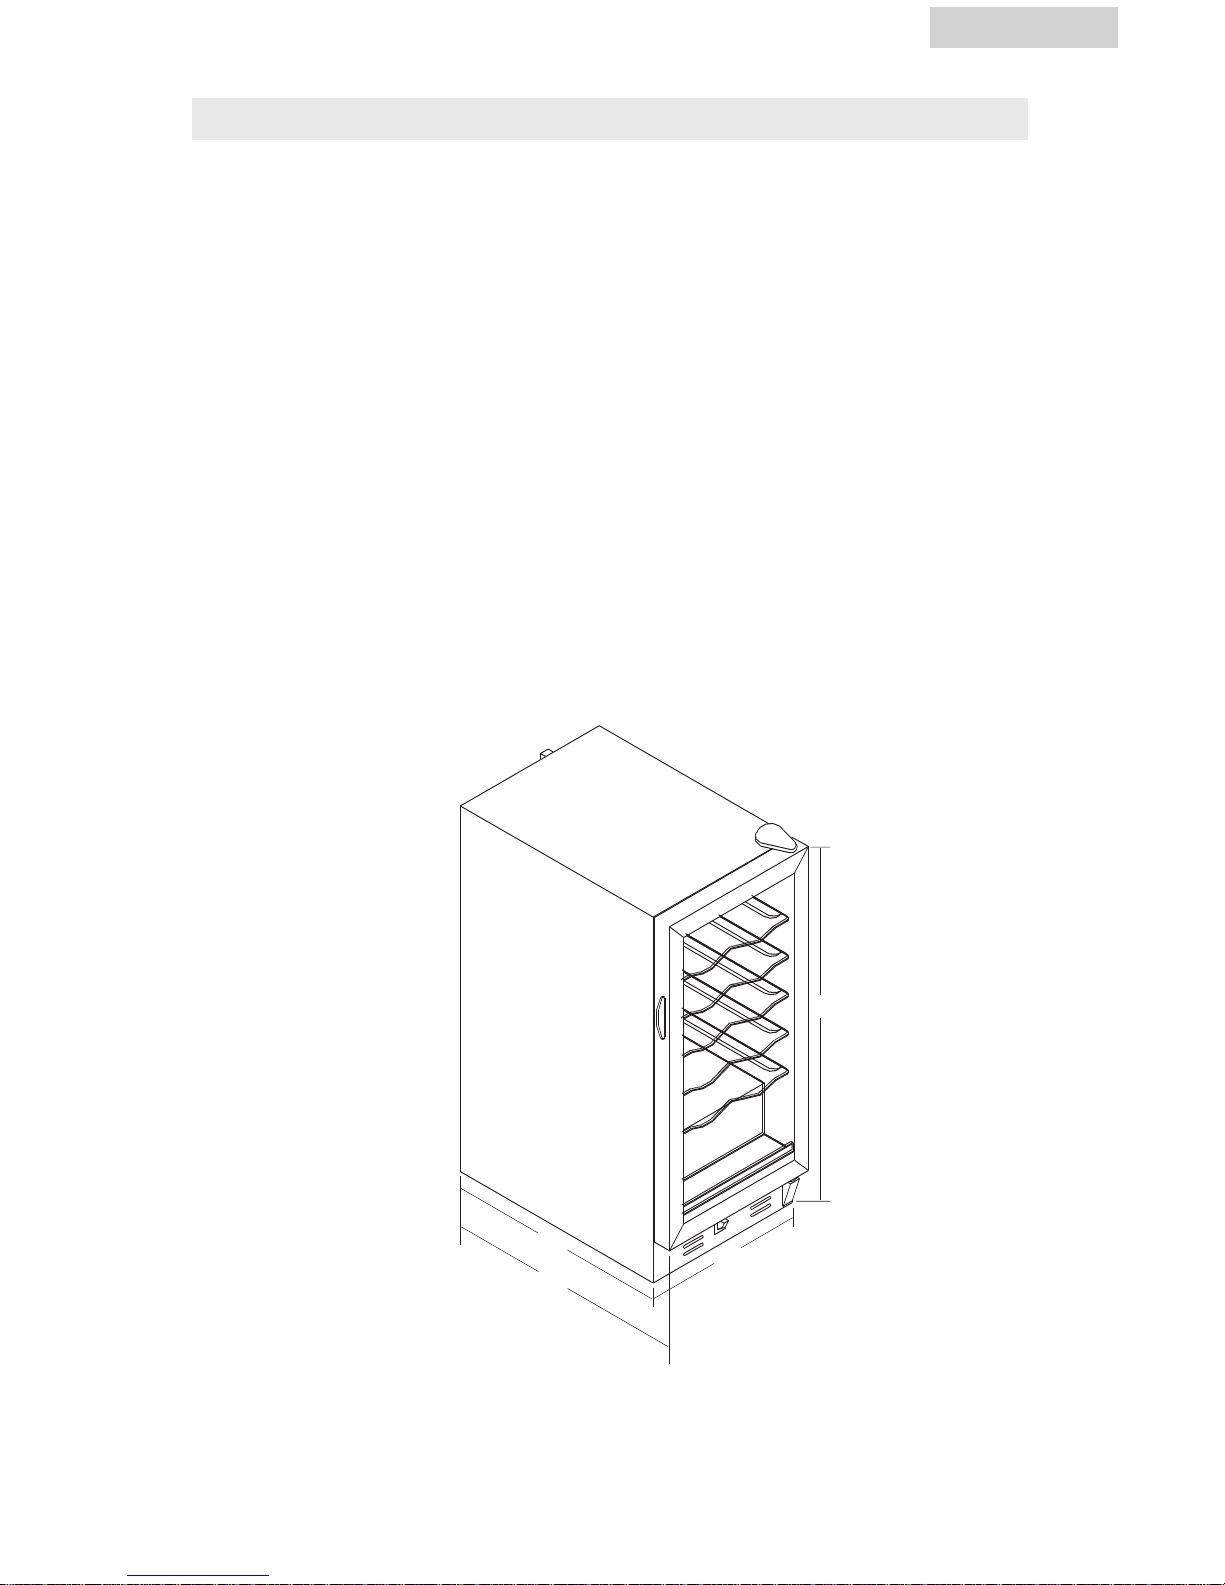
Wine Cellar Installation ................................................................................................8
Install Limitations ....................................................................................................................8
Dimensions ............................................................................................................................8
Door Reversal..........................................................................................................................9
Replace Light Bulbs..................................................................................................................9
Proper Wine Cellar Care and Cleaning......................................................................10
Cleaning and Maintenance....................................................................................................10
Power Interruptions ................................................................................................................10
Vacation and Moving Care ....................................................................................................10
Troubleshooting ..........................................................................................................11
Limited Warranty ........................................................................................................12
English
3

PARTS AND FEATURES
English
4
HVC15 HVCE15
1.
bottle
capacity
2.
adjustable
temp.
control
3.
*shelving 4.
interior
light
5.
door
handle
6.
door trim 7.
leveling
legs
8.
reversible
door
9.
tinted
glass
HVCE15 26 electronic
(not
shown)
glide out
with
woodtrim
yes
manual
(not
shown)
tube type
grip brushed
metal 4
(not
shown)
yes UV-grey
blue
HVC15 31 mechanical curved
wire yes
auto
(not
shown)
plastic
recessed black
plastic 4
(not
shown)
yes UV-grey
blue
2
3
5
6
7
79
9
*Quantity and style will vary per model purchased.

INSTALLING YOUR WINE CELLAR
Unpacking Your Wine Cellar
1.Remove all packaging material. This includes the foam base and all adhesive tape holding the wine
cellar accessories inside and outside.
2. Inspect and remove any remains of packing, tape or printed materials before powering on the wine
cellar.
Leveling Your Wine Cellar
•Your wine cellar has four leveling legs which are located in the front and rear corners of your wine cel-
lar. After properly placing your wine cellar in its final position, you can level your wine cellar.
• Leveling legs can be adjusted by turning them clockwise to raise your wine cellar or by turning them
counterclockwise to lower your wine cellar. The wine cellar door will close easier when the
leveling legs are extended.
Electrical Requirements
•Make sure there is a suitable power Outlet (115 volts, 15 amps outlet) with proper grounding to
power the wine cellar.
• Avoid the use of three plug adapters or cutting off the third grounding in order to accommodate a two
plug outlet. This is a dangerous practice since it provides no effective grounding for the wine cellar
and may result in shock hazard.
Use of Extension Cord
•Avoid the use of an extension cord because of potential safety hazards under certain conditions. If it is
necessary to use an extension cord, use only a 3-wire extension cord that has a 3-blade
grounding plug and a 3-slot outlet that will accept the plug. The marked rating of the extension cord
must be equal to or greater than the electrical rating of the appliance.
5
English

English
6
1
3
6
5
2
7
colder
Off
4
WINE CELLAR FEATURES AND USE
HVC15A
•Your wine cellar has a temperature control knob on the bottom of the unit. There are 6 settings: 1
being the warmest and 6 being the coolest. You can set the temperature of your wine cellar at any set-
ting you desire. The wine cellar will maintain a temperature range between 39˚F and 65˚ F.
HVCE15A
•Once you have plugged the unit into an electrical outlet, let the unit run for at least 30 minutes to
acclimate itself before making any adjustments. During this time the Red Wine light will stay on.
Temperature inside the cooler, if not adjusted, will be at 55°-60°F.
• The wine cellar can be set to any temperature you desire to accommodate your wine storage require-
ments. To set the temperature, press both the "White Wine" and "Red Wine" buttons simultaneously and
hold for approximately 3 seconds. Now you are in temperature set mode. Decrease the temperature
by pushing the "White Wine" button and increase the temperature by pressing the "Red Wine" button.
Pressing the appropriate button 3 times will adjust the temperature 3 degrees, press 4 times equals 4
degrees, 5 times equals 5 degrees, and so on. Once you have selected the temperature you desire,
push the "On/Off" button. Now the wine cellar is programmed and the LED readout will return to cur-
rent internal temperature reading.
• There will be a 3 degree variance +/- between the temperature you select and the temperature
indicated on the LED readout. This occurs because the wine cellar activates and deactivates trying to
maintain your desired temperature. There is often a 10° variance between the top and bottom shelves
of the wine cellar. Therefore, if you have set the wine cellar for 50° and have a mix of red and white
wines, you may want to put the white wine on the bottom shelf where the temperature will be 45° F,
and place the red wine on the top shelf where the temperature will be 55° F.
Initial Setup
Down
White Red
Up on / off

7
English
Shelving
(will vary per model purchased)
•The shelves are chrome plated or black coated depending on your model purchased. They are
designed for flexibility and easy cleaning. The shelves are designed to allow free air movement.
Interior Light
•To complement the look of your wine collection, a soft light has been built into the wine cellar. The
light switch is on the front bottom, or on the electronic control panel depending on the model pur-
chased.
Normal Operating Sounds You May Hear
•Boiling water, gurgling sounds or slight vibrations that are the result of the refrigerant circulating
through the cooling coils.
•The thermostat control will click when it cycles on and off.

8
English
WINE CELLAR INSTALLATIONS
Install Limitations
•Do not install your wine cellar in any location not properly insulated or heated e.g. garage etc. Your
wine cellar was not designed to operate in temperature settings below 55˚ Fahrenheit.
•Select a suitable location for the wine cellar on a hard even surface away from direct sunlight or heat
source e.g. radiators, baseboard heaters, cooking appliances etc. Any floor unevenness should be cor-
rected with the leveling legs located on the front and rear bottom corners of the wine cellar.
Dimensions
•Built-in wine coolers need to be ventilated from the front. This feature allows the unit to be built in an
enclosed area. The bottom front grille should be clear of all obstructions. This is absolutely necessary
for the air to circulate and for the unit to operate efficiently. The dimensions for installation are as fol-
lows. (W x D x H)
Unit Dimensions: 14 7/8” x 23 1/8” x 34 1/4”
Built-In Dimensions: 15” x 24” x 34 1/2”
20-5/8” 14-7/8”
34-1/4”
23-1/8”

9
English
Door Reversal
1. Using a Phillips screw driver remove the upper hinge bracket by removing the screws and the hinge
cover on the bracket. (on the right side).
2. Lift and remove the door.
3. Remove the bottom hinge bracket by removing the 3 hexagonal nuts. Be careful not to loose the
door level rings which are placed in the hinge bracket axle. (right side).
4. Remove the lower door as shown in figure and install on opposite side.
5. To install the bottom hinge bracket on the opposite side (left side), you will also have to remove
screw hole plug from the left side.
6. Carefully align the bottom hinge axle hole on the door with the axle of the lower hinge bracket.
Remember to have the door level rings in place before you place the door on its axle.
7. Install the upper hinge bracket on the left side.
8. Make sure the door is aligned and then tighten the screws.
•For the HVCE15A remove and reinstall the door handle on the opposite side.
Replacing Light Bulb
1. Turn off and unplug the power cord of the wine cellar.
2. To remove the light bulb cover use a Phillips screw driver to remove the 3 screws.
3. Make sure the light bulb is cool before removing it. Replace using a light bulb 10 watts or less.
4. After the bulb is secure, install the light bulb cover and replace the three screws.
5. Turn unit on to its original setting after plugging in the power cord.
upper hinge
bracket
bottom hinge
bracket
lower door
bracket
HVC15A

10
English
Cleaning and Maintenance
Warning: •To avoid electric shock always unplug your wine cellar before cleaing. Ignoring
this warning may result in death or injury.
Caution: •Before using cleaning products, always read and follow manufacturer’s instruc-
tions and warnings to avoid personal injury or product damage.
General: • Prepare a cleaning solution of 3-4 tablespoons of baking soda mixed with
warm water. Use sponge or soft cloth, dampened with the cleaning solution, to
wipe down your wine cellar.
•Rinse with clean warm water and dry with a soft cloth.
• Do not use harsh chemicals, abrasives, ammonia, chlorine bleach,concentrat-
ed detergents, solvents or metal scouring pads. SOME of these chemicals may
dissolve, damage and/or discolor your wine cellar.
Door Gaskets: •Clean door gaskets every three months according to general instructions.
Gaskets must be kept clean and pliable to assure a proper seal.
• Petroleum jelly applied lightly on the hinge side of gaskets will keep the
gasket pliable and assure a good seal.
Power Interruptions
•Occasionally there may be power interruptions due to thunderstorms or other causes. Remove the
power cord from AC outlet when a power outage occurs. When power has been restored, replug
power cord to AC outlet.
Vacation and Moving Care
•For long vacations or absences, unplug the wine cellar and clean the wine cellar and door gaskets
according to "General cleaning" section. Prop doors open, so air can circulate inside. When moving
always move the wine cellar vertically. Do not move with the unit lying down. Possible damage to the
sealed system could occur.
PROPER WINE CELLAR CARE AND CLEANING

11
English
TROUBLESHOOTING
Wine Cellar does not operate
•Check if wine cellarr is plugged in.
• Check if there is power at the ac outlet, by checking the circuit breaker.
Wine appears too warm
•Frequent door openings.
• Allow time for recently added wine to reach desired temperature.
•Check gaskets for proper seal.
•Adjust temperature control to colder setting.
Wine temperature is too cold
•If temperature control setting is too cold, adjust to a warmer setting.
Wine Cellar runs too frequently
•This may be normal to maintain constant temperature during high temperature and humid days.
• Doors may have been opened frequently or for an extended period of time.
•Check gasket for proper seal.
•Check to see if doors are completely closed.
Moisture build up on interior or exterior of the Wine Cooler:
•This is normal during high humidity periods.
• Prolonged or frequent door openings.
•Check door gaskets for proper seal.
Wine Cooler door does not shut properly:
• Level the wine cellar.
• Check for blockages e.g. wine bottles, shelves.

12
English
LIMITED WARRANTY
What is covered and for how long?
This warranty covers all defects in workmanship or
materials for a period of:
12months labor
12 months parts
5years sealed system
The warranty commences on the date the item
was purchased and the original purchase receipt
must be presented to the authorized service center
before warranty repairs are rendered.
EXCEPTIONS: Commercial or Rental Use
warranty
90 days labor (carry-in only)
90 days parts
No other warranty applies
What is covered.
1. The mechanical and electrical parts, which
serve as a functional, purpose of this appliance
for a period of 12 months. This includes all
parts except finish, and trim.
2. The components of the sealed system e.g.her-
metic compressor,condenser and evaporator
from manufacturing defects for a period of 5
years from the date of purchase. Any damages
to such components caused by mechanical
abuse or improper handling or shipping will
not be covered.
What will be done?
1. We will repair or replace, at our discretion any
mechanical or electrical part which proves to be
defective in normal usage during the warranty
period so specified.
2. There will be no charge to the purchaser for
parts and labor on any covered items during
the initial 12 month period. Beyond this period
only parts are covered in the remaining
warranty. Labor is not provided and must be
paid by the customer.
3. Contact your nearest authorized service
center. For the name of the nearest service cen-
ter please call 1-877-337-3639
THIS WARRANTY COVERS APPLIANCES
WITHIN THE CONTINENTAL UNITED STATES,
PUERTO RICO AND CANADA.
ITDOES NOT COVER THE FOLLOWING:
Damages from improper installation.
Damages in shipping.
Defects other than manufacturing.
Damage from misuse, abuse, accident, alteration,
lack of proper care and maintenance or incorrect
current or voltage.
Damage from other than household use.
Damage from service by other than an authorized
dealer or service center.
Decorative trims or replaceable light bulbs.
Transportation and shipping.
Labor (after the initial 12 months).|
THIS LIMITED WARRANTY IS GIVEN IN LIEU OF
ALL OTHER WARRANTIES, EXPRESSED OR,
INCLUDING THE WARRANTIES OF
MERCHANTABILITY AND FITNESS FOR A
PARTICULAR PURPOSE
The remedy provided in this warranty is exclusive
and is granted in lieu of all other remedies.
This warranty does not cover incidental or
consequential damages, so the above limitations
may not apply to you. Some States do not allow
limitations on how long an implied warranty lasts,
so the above limitations may not apply to you.
This warranty gives you specific legal rights, and
you may have other rights, which vary, from state
to state.
Haier America
New York, NY 10018

Français
MESURES DE SECURITE
Lire l’ensemble des instructions avant d’utiliser l’appareil. Lors de
l’utilisation de cet appareil, prendre toutes les mesures de sécurité de
base, y compris les suivantes:
1) N’utiliser cet appareil que pour l’usage pour lequel il est prévu, tel qu’il est
indiqué dans le guide d’utilisation et d’entretien.
2) Ce réfrigérateur à vin doit être installé correctement, selon les instructions
d'installation, avant d'être utilisé. Voir les instructions de mise à la terre
dans la section d'installation.
3) Ne jamais débrancher le réfrigérateur à vin en tirant sur le cordon
d'alimentation. Saisissez toujours la fiche fermement et la tirez-la
directement de la prise de courant.
4) Réparez ou remplacez immédiatement tous les cordons d'alimentation qui sont
frangés ou endommagés. N'utilisez pas de cordon qui présente des
fissures ou de l'abrasion sur le fil ou aux extrémités.
5) Débranchez votre réfrigérateur avant de le nettoyer ou d'en faire l'entretien
général. Note: N'essayez pas de faire les réparations vous-mêmes. Contactez
un agent de service qualifié pour toute réparation.
6) Si vous remplacez un vieux réfrigérateur à vin, enlevez les portes avant de
l'entreposer ou de le jeter et laissez les étagères en place. Cela réduira les
dangers potentiels pour les enfants.
7) Ne faites pas fonctionner le réfrigérateur à vin en présence d'émanations
explosives.
8) N'enregistrez pas les nourritures dans le refroidisseur de vin car la
température intérieure peut ne pas être assez fraîche pour empêcher la détéri-
oration.
1

Français
2
VEUILLEZ CONSERVER CES INSTRUCTION
pour la référence d'avenir
DANGER
Les enfants pourraient se retrouver coincés dans votre réfrigérateur à
vin usagé avant que vous ne puissiez vous en débarrasser. Retirer les
portes. Laisser les étagères en place de manière à ce que les enfants
ne puissent pas grimper facilement à l’intérieur.
Nous vous remercions d’avoir choisi ce produit
Haier. Ce guide d’utilisation facile d’emploi per-
met une utilisation optimum du réfrigérateur á
vin. Ne pas oublier de prendre note du numéro
de modèle et de série. Ils sont inscrits sur une pla-
quette apposée sur l’arrière du réfrigérateur à vin.
Numéro de modèle
Numéro de série
Date d’achat
Agrafer le ticket de caisse au guide. Il devra être présenté pour tout service après-vente sous
garantie.

3
SOMMAIRE
PAGE
Mesures de Sécuriteé......................................................................................................1
Pièces et Caractéristiques ..............................................................................................4
Installation du Réfrigératuer á Vin ................................................................................5
Désemballage du Réfrigérateur á Vin..........................................................................................5
Réglage du Réfrigérateur á Vin ..................................................................................................5
Caractéristiques Electriques ........................................................................................................5
Utilisation de Rallonges..............................................................................................................5
Caractéristques du Réfrigérateur á Vin..........................................................................6
Montage Initial ..........................................................................................................................6
Tablettes....................................................................................................................................7
Lumière Intèrieure......................................................................................................................7
Bruits de Fonctionnement lors d'une Exploitation Normale............................................................7
Installation du Compartiment à Vin ..............................................................................8
Limitations ................................................................................................................................8
Dimensions ..............................................................................................................................8
Changer l'emplacement de la Porte............................................................................................9
Remplacer les Ampoules..........................................................................................................10
Entretien et Nettoyage du Réfrigérateur á Vin............................................................11
Nettoyage et Maintenance........................................................................................................11
Coupures de Courant ..............................................................................................................11
Entretien lors des Vacances ou d'un Déménagement..................................................................11
Guide de Dépannage ..................................................................................................12
Garantie........................................................................................................................13
Français

4
PIÉCE ET CARACTÉISTIQUES
Français
HVC15 HVCE15
2
3
5
6
7
79
9
*Quantité et modèle changer par modèle acheter.
1.
capacité
de
bouteille
2.
commande
de
température
réglable
3.
* rayon-
age
4.
lumière
intérieure
5.
poignée
de porte
6.
équilibre
de porte
7.
mise à
niveau
des
jambes
8.
porte
réversible
9.
verre
teinté
HVCE15 26 électronique
(non
montrer)
glissement
dehors
avec le
woodtrim
oui
manuel
(non
montrer)
type
poignée
de tube
métal
balayé 4
(non
montrer)
si bleu UV-
gris
HVC15 31 mechanical fil incurvé oui
automa-
tique
(non
montrer)
poignée
en
plastique
plastique
noir 4
(non
montrer)
si bleu UV-
gris

5
INSTALLATION DU RÉFRIGÉRATEUR Á VIN
Désemballage du Réfrigérateur á Vin
1.Retirer l’ensemble du material d’emballage. Ceci comprend la base en mousse ainsi que
l’ensemble du materiel adhesif qui maintient les accessoires du réfrigérateur à vin l’intérieur tout
comme à l’extérieur.
2. Inspecter et enlever tout restant d’emballage, de scotch ou de matériaux imprimés avant de brancher
le réfrigérateur à vin.
Réglage du Réfrigérateur á Vin
•Votre refroidisseur de vin a quatre jambes de mise à niveau qui sont plac dans les coins avant et
arrière de votre refroidisseur de vin.
• Pour régler les pieds de mise à niveau, les tourner dans le sens des aiguilles d’une montre afin de
surélever le réfrigérateur á vin et dans le sens inverse des aiguilles d’une montre pour l’abaisser. La
porte du réfrigérateur á vin se ferme plus facilement lorsque les pieds de mise à niveau sont surélevés.
Caractéristiques Electriques
• Pour l’alimentation du réfrigérateur á vin, veiller à utiliser une prise de courant convenable (prise de
115 volts,15 amp) raccordée à la terre.
• Eviter d’utiliser des adaptateurs à trois fiches ou de sectionner la troisième fiche reliée à la terre dans
le but d’utiliser un branchement à deux fiches. Cette pratique pourrait s’avérer dangereuse
dans la mesure où le réfrigérateur á vin n’est pas relié convenablement à la terre, et risquerait de
causer des risques d’électrocution.
Utilisation de Rallonges
•Éviter d’utiliser une rallonge électrique car, dans certains cas, cela peut entraîner des risques pour la
santé. S’il est nécessaire d’utiliser une rallonge, utiliser uniquement une rallonge possédant une fiche
male à deux broches plus terre à une extrémité et une prise femelle de même type à l’autre extrémité.
La capacité électrique de la rallonge doit être égale ou supérieure à la capacité de l’appareil.
Français

6
Français
CARACTÉRISTIQUES DU RÉFRIGÉRATUER Á VIN
Montage Initial
HVC15A
•La commande pour ceci est sur le dos de l'unité là sont 6 configurations plus 0 (EXCEPTÉ la
FONCTION) Commencez par placer la température plaçant à 3. Laissez l'unité effectuer pendant au
moins 30 minutes pour travailler avant de faire tous les changements.
HVC15EA
•Le réfrigérateur à vin est préréglé
àla fabrique pour s'adapter automatiquement aux conditions de température pour les vins rouge ou
blanc. Si vous y placer principalement des vins blancs, appuyez sur le bouton "Vin Blanc" et le
réfrigérateur à vin maintiendra une température moyenne variant entre 7°C et 10°C. En appuyant sur
le bouton "Vin Rouge", la température se situera entre 13°C et 15°C.
• Le réfrigérateur à vin peut être réglé à la température que vous désirez pour satisfaire vos exigences
de refroidissement. Pour régler la température, pressez simultanément sur les boutons "Vin Rouge" et
"Vin Blanc" pendant environ 3 secondes. Vous serez au mode de réglage de la température. Baissez la
température en appuyant sur le bouton "Vin Blanc" et augmentez la température en appuyant sur le
bouton "Vin Rouge" En appuyant sur le bouton 3 fois la température s'ajustera de 3 degrés, 4 fois
équivaut à 4 degrés, 5 fois équivaut à 5 degrés et ainsi de suite. Une fois que vous avez sélectionné
la température désirée, appuyez sur le bouton "On/Off". Leréfrigérateur à vin est maintenant pro-
grammé et le dispositif d'affichage à diodes luminescentes retournera à la lecture de température
courante.
•Il peut y avoir une variance de 3 degrés (+/-) entre la température choisie et celle indiquée sur le dis-
positif d'affichage à diodes luminescentes. Cela se produit parce que le réfrigérateur à vin s'active
et se désactive pour essayer de maintenir la température désirée. Il y a souvent une variance de 10o
entre la tablette du haut et celle du bas du réfrigérateur à vin. Donc, si vous avez réglé le réfrigérateur
àvin à 50o et que vous avez placé des vins rouges et blancs, vous pourriez placer le vin blanc sur la
tablette du bas où la température sera de 45o F et placer le vin rouge sur la tablette du haut où la
température sera de 55º F.
1
3
6
5
2
7
plus froid
Off
4
v
e
r
s
l
eba
s
B
l
a
n
c
R
o
u
g
e
v
e
r
s
l
e
h
a
u
t de
s
u
r
/
o
u
t
r
e de

7
Français
Tablettes
(changez dans différents modèles)
• Les étagères sont enduites plaqué ou noir de chrome selon votre modèle acheté. Elles sont conçues
pour la flexibilité et le nettoyage facile. Les étagères sont conçues pour permettre le mouvement d'air
libre et fournissent plus d'espace.
Lumière intérieure
•Pour compléter le regard de votre collection de vin, une lumière molle a été établie dans le refroidis-
seur de vin. Le commutateur léger est sur le fond plan, ou sur le panneau de commande électronique
selon le modèle acheté.
Bruits de Fonctionnement lors d'une Exploitation Normale
•Les éléments de refroidissement tubulaires (serpentins refroidisseurs) font des bruits d'ébullition, des
gargouillements et provoquent de légères vibrations.
• La commande du thermostat émettra un déclic lorsque qu'elle s'allume et s'éteint.
This manual suits for next models
3
Table of contents
Languages:
Other Haier Wine Cooler manuals

Haier
Haier HVTB40DPABS User manual

Haier
Haier JC-110GD User manual

Haier
Haier JC-110GD User manual

Haier
Haier HVTM12DABB User manual

Haier
Haier JC-110GD Wiring diagram

Haier
Haier HVFM20A User manual

Haier
Haier HWC-298SWA User manual

Haier
Haier JC-298G User manual

Haier
Haier HC-122 User manual

Haier
Haier HVTB18DABB User manual

Haier
Haier WC200GS User manual

Haier
Haier JC-298G User manual

Haier
Haier JQ-332A User manual

Haier
Haier HVF042ABL User manual

Haier
Haier HVFE040BBB User manual

Haier
Haier JC-164G User manual

Haier
Haier JC-112G User manual

Haier
Haier HVFM122ABL User manual

Haier
Haier HVC24B User manual

Haier
Haier JC-112GEA User manual