Hama Delta Ovum LED User manual

Power
Charge
Operating Instructions
Bedienungsanleitung
Mode d‘emploi
Instrucciones de uso
Руководство по эксплуатации
Istruzioni per l‘uso
Gebruiksaanwijzing
Instrukcja obsługi
Návod kpoužití
Manual de instruções
Bruksanvisning
Pistokelaturi
E
F
D
GB
I
NL
CZ
S
FIN
PL
P
RUS
“Delta Ovum LED”
Universal Charger
Universal-Ladegerät
00
081370

Power
Charge
Power
Charge
Front Back
Power
Charge Power
Charge
Power
Charge
Power
Charge
Power
Charge
Pic. 1
Pic. 3
Pic. 5
Pic. 2
Pic. 4

2
GOperating instruction
Thank you for choosing aHama product.
Take your time and read the following instructions
and information completely.Please keep these
instructions in asafe place for futurereference.
If you sell the device, please pass these operating
instructions on to the new owner.
If you sell the device, please pass these operating
instructions on to the new owner.
1. Explanation of Warning Symbols and Notes
Warning
This symbol is used to indicate safety instructions or
to draw your attention to specific hazards and risks.
Note
This symbol is used to indicate additional
information or important notes.
2. Package Contents
•1Delta Ovum LED universal charger
•1100 V-240 Vadapter
•These operating instructions
3. Safety Notes
•The product is intended for private, non-
commercial use only.
•Use the product for its intended purpose only.
•Donot operate the product outside the power
limits given in the specications.
•Protect the product from dirt, moistureand
overheating, and only use it in adry environment.
•Donot use the product in the immediate vicinity of
heaters or other heat sources or in direct sunlight.
•Only connect the product to asocket that has
been approved for the device. The socket must be
installed close to the product and easily accessible.
•Disconnect the product from the network using the
power button –ifthis is not available, unplug the
power cordfromthe socket.
•Lay all cables so that they do not pose atripping
hazard.
•Donot bend or crush the cable.
•Donot drop the product and do not expose it to
any major shocks.
•Keepthe packaging material out of the reach of
children due to the risk of suffocation.
•Keepthis product, as all electrical products, out of
the reach of children!
•Dispose of packaging material immediately
according to locally applicable regulations.
•Donot modify the product in any way.Doing so
voids the warranty.
•Donot use power supply units that arenot
recommended by the manufacturer.
Electrical shock hazard
•Donot use the product if the power supply
unit or power cable aredamaged.
•Donot attempt to service or repair the device
yourself.Leave any service work to qualied
professionals.
•Donot open the device or continue to
operate it if it becomes damaged.
Warning -Batteries
•Donot attempt to charge any Li-ion batteries
with voltages above or below the voltage
range specied for this charger.This can
damage the charger.
•Donot attempt to charge any non-
rechargeable batteries (e.g. alkaline) or any
batteries which aredamaged, leaking or
corroded.
4. Getting Started and Operation
•Connect the charger to the power supply unit
(Pic. 1).
•When the red power LED remains lit, the charger
is in standby mode.

3
Note
•The charger automatically recognises faulty
batteries and does not charge these for safety
reasons.
•When the green charge LED is ashing, this
indicates proper charging.
•The green charge LED remains lit when the
batteries arefully charged.
•Remove batteries from the charger once they are
fully charged.
•Disconnect all cable and mains connections
after use.
Note
•The charger is suitable for amains voltage
of 100-240 Vand can be used around the
world. Please note that acountry-specic
adapter may be necessary.
•You can nd an appropriate selection of
Hama products at www.hama.com.
4.1 Charging Li-ion batteries
•Open the slide cover of the charger completely
until it locks into place.
•Adjust the contacts on the bottom of the charger
to tthe particular Li-ion battery to be charged
(Pic. 2). Adjust the contacts so that one lies
against the –pole and the other lies against
the +pole of the rechargeable battery.
•Insert the battery into the charger (Pic. 3). The
charger automatically recognises the polarity of
the Li-ion battery.
•Unlock the sliding cover by pressing the red
unlock button. Close the cover so that the battery
is held rmly between the contacts.
•Ensurethat the green charge LED indicates
proper charging. If this is not the case, check
the contacts.
4.2 Charging NiMH batteries (AA/AAA cells)
•Open the slide cover of the charger completely
until it locks into place.
•When charging NiMH batteries, observe the correct
polarity indicated on the battery symbols. Insert the
NiMH battery with the correct polarity (Pic. 4).
•Unlock the slide cover by pressing the rote
release button and then close the slide cover so
that the particular battery is held securely and is
touching the contacts.
•Ensurethat the green charge LED indicates
proper charging. If this is not the case, check
the contacts.
•Only one type of battery (AA or AAA) may be
charge at the same time. Varying battery charge
capacities (as measured in mAh) areofno
concern.
4.3 USB charging option
•Connect the terminal device to be charged to
the USB port of the charger directly or using a
suitable USB cable. (Pic. 5)
•Incontrast to charging options 4.1 and 4.2, the
green charge LED does not indicate charging.
•Read the current charge level from your terminal
device.
•Charging of the terminal devices begins and ends
automatically.
Warning –Connecting terminal
devices
•Beforeconnecting aterminal device, check
whether the power output of the charger can
supply sucient power for the device.
•The USB charging option supplies a
maximum of 5V 1000 mA.
•Please refer to the operating instructions for
your terminal device.
•Itisessential that you observe these
specications and the safety instructions
regarding the power supply of your devices.

4
4.4. Simultaneous charging
Youcan charge aLi-ion battery or NiMH batteries
and aUSB terminal device at the same time.
Warning -Batteries
Do not charge both aLi-ion and aNiMH battery
simultaneously.
5. Care and Maintenance
Only clean this product with adry,lint-free cloth
and do not use aggressive cleaning agents. Make
surethat water does not get into the product.
6. Warranty Disclaimer
Hama GmbH &Co. KG assumes no liability and
provides no warranty for damage resulting from
improper installation/mounting, improper use of
the product or from failuretoobserve the operating
instructions and/or safety notes.
7. Service and Support
Please contact Hama Product Consulting if you
have any questions about this product.
Hotline: +49 9091 502-0 (German/English)
Further support information can be found here:
www.hama.com
8. Technical Data
Universal charger Delta
Ovum LED
Power supply
unit
In:100–240 V~50 /60Hz
500 mA
Out:12,0 V 1,0 A
12,0 W
Charger input
voltage 12 V 1000 mA
Charger output
voltage
Li-Ion 4,2 V 650 mA
Li-Ion 8,4 V 650 mA
NiMH (AA/AAA)
1x/2x 1,4 V 650 mA
USB 5V 1000 mA
Operating
temperature 0-40°C

5
Specications in accordance with
Regulation (EU) 2019/1782
Manufacturer’sname or
trade mark, commercial
registration number and
address
Hama, HRA12159,
Dresdner Str. 9,
86653 Monheim
Model identier JT-H120100E
Input voltage 100 V-240 V
Input AC frequency 50 Hz/60Hz
Output voltage/
Output current/
Output power
12.0 VDC/1.0 A/
12.0 W
Average active eciency 83.9 %
Eciency at low load
(10 %) 76.28 %
No-load power con-
sumption 0.0582 W
9. Recycling Information
Note on environmental protection:
After the implementation of the European
Directive 2012/19/EU and 2006/66/EU in
the national legal system, the following
applies:Electric and electronic devices as
well as batteries must not be disposed of
with household waste. Consumers are obliged by law
to return electrical and electronic devices as well as
batteries at the end of their service lives to the public
collecting points set up for this purpose or point of
sale. Details to this are defined by the national law of
the respective country. This symbol on the product,
the instruction manual or the package indicates that
aproduct is subject to these regulations.
By recycling, reusing the materials or other forms
of utilising old devices/Batteries, you aremaking
an important contribution to protecting our
environment.

6
DBedienungsanleitung
Vielen Dank, dass Sie sich für ein Hama Produkt
entschieden haben!
Nehmen Sie sich Zeit und lesen Sie die folgenden
Anweisungen und Hinweise zunächst ganz
durch. Bewahren Sie diese Bedienungsanleitung
anschließend an einem sicheren Ort auf,umbei
Bedarf darin nachschlagen zu können.
Sollten Sie das Gerät veräußern, geben Sie diese
Bedienungsanleitung an den neuen Eigentümer
weiter.
1. Erklärung von Warnsymbolen und
Hinweisen
Warnung
Wirdverwendet, um Sicherheitshinweise zu
kennzeichnen oder um die Aufmerksamkeit auf
besondereGefahren und Risiken zu lenken.
Hinweis
Wirdverwendet, um zusätzlich Informationen
oder wichtige Hinweise zu kennzeichnen.
2. Packungsinhalt
•1Universal-Ladegerät Delta Ovum LED
•1Steckernetzteil 100–240V
•Diese Bedienungsanleitung
3. Sicherheitshinweise
•Das Produkt ist für den privaten, nicht-
gewerblichen Haushaltsgebrauch vorgesehen.
•Verwenden Sie das Produkt ausschließlich für den
dazu vorgesehenen Zweck.
•Betreiben Sie das Produkt nicht außerhalb
seiner in den technischen Daten angegebenen
Leistungsgrenzen.
•Schützen Sie das Produkt vor Schmutz, Feuchtigkeit
und Überhitzung und verwenden Sie es nur in
trockenen Umgebungen.
•Betreiben Sie das Produkt nicht in unmittelbarer
Nähe der Heizung, anderer Hitzequellen oder in
direkter Sonneneinstrahlung.
•Betreiben Sie das Produkt nur an einer dafür
zugelassenen Steckdose. Die Steckdose muss in
der Nähe des Produktes angebracht und leicht
zugänglich sein.
•Trennen Sie das Produkt mittels des Ein-/
Ausschalters vom Netz –wenn dieser nicht
vorhanden ist, ziehen Sie die Netzleitung aus der
Steckdose.
•Verlegen Sie alle Kabel so, dass sie keine
Stolpergefahr darstellen.
•Knicken und quetschen Sie das Kabel nicht.
•Lassen Sie das Produkt nicht fallen und setzen Sie
es keinen heftigen Erschütterungen aus.
•Halten Sie Kinder unbedingt von dem
Verpackungsmaterial fern, es besteht
Erstickungsgefahr.
•Dieses Produkt gehört, wie alle elektrischen
Produkte, nicht in Kinderhände!
•Entsorgen Sie das Verpackungsmaterial
sofort gemäß den örtlich gültigen
Entsorgungsvorschriften.
•Nehmen Sie keine Veränderungen am
Produkt vor.Dadurch verlieren Sie jegliche
Gewährleistungsansprüche.
•Kein Netzteil verwenden, welches nicht vom
Hersteller empfohlen wird.
Gefahr eines elektrischen Schlages
•Verwenden Sie das Produkt nicht, wenn das
Netzteil oder die Netzleitung beschädigt sind.
•Versuchen Sie nicht, das Gerät selbst zu
warten oder zu reparieren. Überlassen Sie
jegliche Wartungsarbeit dem zuständigen
Fachpersonal.
•Öffnen Sie das Produkt nicht und betreiben
Sie es bei Beschädigungen nicht weiter.

7
Warnung -Akkus
•Laden Sie keine Li-Ion Akkus, deren Span-
nung über oder unter der für diesen Lader
angegeben liegt. Der Lader kann dadurch
beschädigt werden.
•Laden Sie keine Batterien (z.B. Alkaline)
und keine beschädigten, auslaufenden oder
korrodierten Akkus.
4. Inbetriebnahme und Betrieb
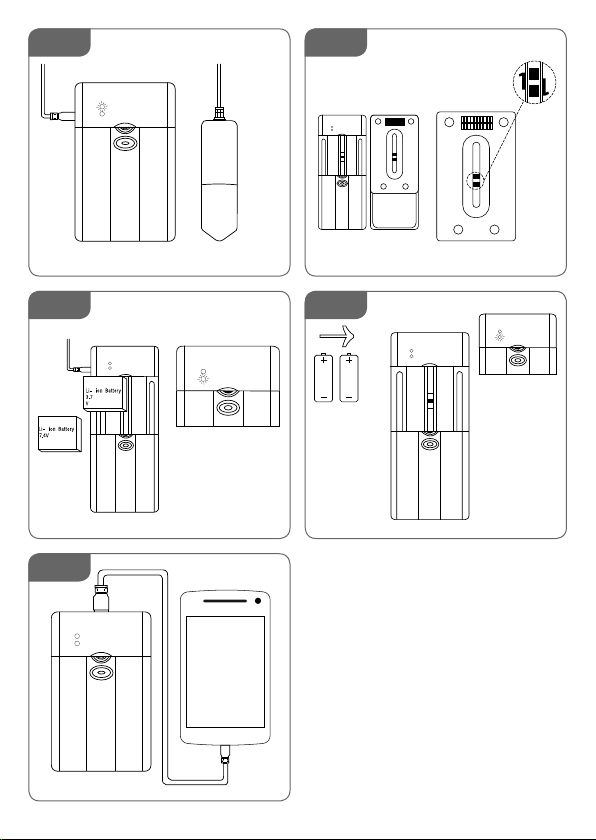
•Verbinden Sie den Lader mit dem Netzteil (Pic.1).
•Dauerlicht der roten Power-LED signalisiert den
Standby-Status des Laders.
Hinweis
•Der Lader erkennt fehlerhafte Akkus automa-
tisch und lädt diese aus Sicherheitsgründen
nicht.
•Ein korrekter Ladevorgang wirddurch die
blinkende grüne Charge-LED angezeigt.
•Voll geladene Akkus werden durch eine dauer-
haft leuchtende grüne Charge-LED angezeigt.
•Nehmen Sie Akkus nach beendetem Ladevorgang
aus dem Lader.
•Trennen Sie nach der Benutzung alle Kabel- und
Netzverbindungen.
Hinweis
•Das Ladegerät ist für eine Netzspannung
von 100–240 Vgeeignet und daher weltweit
einsetzbar.Beachten Sie, dass hierzu ein
länderspezischer Adapter notwendig ist.
•Eine entsprechende Auswahl an Hama
Produkten nden Sie unter www.hama.com.
4.1 Li-Ion Akkus laden
•Öffnen Sie die Schiebeabdeckung des Laders
vollständig bis zum Einrasten.
•Justieren Sie die Kontakte an der Laderunterseite
passend für den jeweiligen zu ladenden Li-Ion
Akku (Pic.2). Justieren Sie Kontakte so, dass ein
Kontakt am –-Polund der andeream+-Pol des
Akkus anliegt.
•Legen Sie den Akku in den Lader ein (Pic. 3).
Der Lader erkennt bei Li-Ion Akkus die Polarität
automatisch.
•Entriegeln Sie die Schiebeabdeckung durch
Druck auf die rote Entriegelungstaste und
schließen Sie die Schiebeabdeckung, so dass der
jeweilig eingelegte Akkutyp sauber gehalten und
kontaktiert wird.
•Achten Sie darauf,obdie grüne Charge-LED
einen korrekten Ladevorgang anzeigt. Ist dies
nicht der Fall, überprüfen Sie die Kontaktierung
4.2 NiMH Akkus laden (AA/AAA-Zellen)
•Öffnen Sie die Schiebeabdeckung des Laders
vollständig bis zum Einrasten.
•Bei NiMH-Akkus beachten Sie die Batteriesym-
bole und die darauf angegebene Polarität. Legen
Sie die NiMH-Akkus polrichtig ein (Pic.4)!
•Entriegeln Sie die Schiebeabdeckung durch
Druck auf die rote Entriegelungstaste und
schließen Sie die Schiebeabdeckung, so dass der
jeweilig eingelegte Akkutyp sauber gehalten und
kontaktiert wird.
•Achten Sie darauf,obdie grüne Charge-LED
einen korrekten Ladevorgang anzeigt. Wenn
nicht, überprüfen Sie die Kontaktierung.
•Eskönnen immer nur Akkus des Typs AA
oder AAA gleichzeitig geladen werden. Auf
unterschiedliche Kapazitäten (mAh) muss keine
Rücksicht genommen werden.
4.3 USB Ladeoption
•Stecken Sie das zu ladende Endgerät direkt oder
mit einem geeigneten USB-Kabel an dem USB-
Anschluss des Laders an. (Pic.5)
•ImGegensatz zu den beiden Ladeoptionen
4.1. und 4.2. erfolgt hier keine Anzeige durch die
grüne Charge-LED!
•Den aktuellen Ladezustand entnehmen Sie der
Akku-Anzeige Ihres Endgerätes.

8
•Der Ladevorgang der Endgeräte startet und endet
automatisch.
Warnung -Anschluss von Endgeräten
•Prüfen Sie vor Anschluss eines Endgerätes, ob
dieses mit der Stromabgabe des Ladegerätes
ausreichend versorgt werden kann.
•Die USB-Ladeoption liefert
max. 5V 1000 mA.
•Beachten Sie die Hinweise in der Bedienungs-
anleitung Ihres Endgerätes.
•Beachten Sie unbedingt die dort aufgeführten
Angaben und Sicherheitshinweise zur Strom-
versorgung Ihrer Geräte.
4.4. Gleichzeitiges Laden
Sie können gleichzeitig einen Li-Ion-Akku bzw.
NiMH-Akku/s und ein USB-Endgerät laden.
Warnung -Akkus
Laden Sie NiMH und Li-Ion Akkus nicht
gleichzeitig!
5. Wartung und Pege
Reinigen Sie dieses Produkt nur mit einem
fusselfreien, trockenen Tuch und verwenden Sie
keine aggressiven Reiniger.Achten Sie darauf,dass
kein Wasser in das Produkt eindringt.
6. Haftungsausschluss
Die Hama GmbH &Co. KG übernimmt keinerlei
Haftung oder Gewährleistung für Schäden, die aus
unsachgemäßer Installation, Montage und un-
sachgemäßem Gebrauch des Produktes oder einer
Nichtbeachtung der Bedienungsanleitung und/oder
der Sicherheitshinweise resultieren.
7. Service und Support
Bitte wenden Sie sich bei Fragen zum Produkt
gerne an die Hama-Produktberatung.
Hotline: +49 9091 502-0 (Deu/Eng)
WeitereSupportinformationen nden sie hier:
www.hama.com
8. Technische Daten
Universal-Ladegerät
Delta Ovum LED
Netzteil
In:100–240 V~50 /60Hz
500 mA
Out:12,0 V 1,0 A
12,0 W
Lader Eingangs-
spannung 12 V 1000 mA
Lader Ausgangs-
spannung
Li-Ion 4,2 V 650 mA
Li-Ion 8,4 V 650 mA
NiMH (AA/AAA)
1x/2x 1,4 V 650 mA
USB 5V 1000 mA
Betriebs-
temperatur 0-40°C
Angaben nach Verordnung (EU)
2019/1782
Handelsmarke,
Handelsregisternummer,
Anschrift
Hama, HRA12159,
Dresdner Str. 9,
86653 Monheim
Modellkennung JT-H120100E
Eingangsspannung 100 V-240 V
Eingangswechselstrom-
frequenz 50 Hz/60Hz

9
Ausgangsspannung/
Ausgangsstrom/Aus-
gangsleistung
12.0 VDC/1.0 A/
12.0 W
Durchschnittliche
Ezienz im Betrieb 83.9 %
Ezienz bei geringer
Last (10 %) 76.28 %
Leistungsaufnahme bei
Nulllast 0.0582 W
9. Entsorgungshinweise
Hinweis zum Umweltschutz:
Ab dem Zeitpunkt der Umsetzung der
europäischen Richtlinien 2012/19/EU und
2006/66/EG in nationales Recht gilt
folgendes: Elektrische und elektronische
Geräte sowie Batterien dürfen nicht mit
dem Hausmüll entsorgt werden. Der Verbraucher ist
gesetzlich verpflichtet, elektrische und elektronische
Geräte sowie Batterien am Ende ihrer Lebensdauer
an den dafür eingerichteten, öffentlichen
Sammelstellen oder an die Verkaufsstelle
zurückzugeben. Einzelheiten dazu regelt das
jeweilige Landesrecht. Das Symbol auf dem Produkt,
der Gebrauchsanleitung oder der Verpackung weist
auf diese Bestimmungen hin. Mit der
Wiederverwertung, der stofflichen Verwertung oder
anderen Formen der Verwertung von Altgeräten/
Batterien leisten Sie einen wichtigen Beitrag zum
Schutz unserer Umwelt.

10
FMode d‘emploi
Nous vous remercions d’avoir choisi un produit Hama.
Veuillez prendreletemps de lirel‘ensemble des
remarques et consignes suivantes. Veuillez conserver
ce mode d‘emploi àportée de main andepouvoir
le consulter en cas de besoin. Transmettez-le au
nouveau propriétaireavec l’appareil le cas échéant.
Transmettez-le au nouveau propriétaireavec
l’appareil le cas échéant.
1. Explication des symboles d‘avertissement et
des remarques
Avertissement
Ce symbole est utilisé pour indiquer des consignes
de sécurité ou pour attirer votreattention sur des
dangers et risques particuliers.
Remarque
Ce symbole est utilisé pour indiquer des
informations supplémentaires ou des remarques
importantes.
2. Contenu de l‘emballage
•1Chargeur universel «Delta Ovum LED »
•1Bloc d‘alimentation 100–240V
•Mode d‘emploi
3. Consignes de sécurité
•Ceproduit est destiné àune installation
domestique non commerciale.
•Utilisez le produit exclusivement conformément à
sa destination.
•N‘utilisez pas le produit en dehors des limites
de puissance indiquées dans les caractéristiques
techniques.
•Protégez le produit de toute saleté, humidité,
surchauffe et utilisez-le uniquement dans des
locaux secs.
•N’utilisez pas le produit àproximité immédiate
d‘un chauffage, d’autressources de chaleur ou
exposé aux rayons directs du soleil.
•Utilisez l‘appareil exclusivement branché àune
prise de courant appropriée. La prise de courant
doit êtresituée àproximité du produit et doit être
facilement accessible.
•Coupez le produit du secteur àl‘aide de
l‘interrupteur -débranchez la prise de courant en
cas d‘absence d‘interrupteur.
•Posez tous les câbles de telle sorte qu’ils ne
présentent aucun risque de chute.
•Faites attention ànepas plier ni coincer le câble.
•Protégez le produit des secousses violentes et
évitez tout choc ou toute chute.
•Tenez les emballages d‘appareils hors de portée
des enfants, risque d‘étouffement.
•Cet appareil, comme tout appareil électrique, doit
êtregardé hors de portée des enfants !
•Recyclez les matériaux d’emballage conformément
aux prescriptions locales en vigueur.
•N’apportez aucune modication àl’appareil. Des
modications vous feraient perdrevos droits de
garantie.
•N‘utilisez aucun bloc secteur non recommandé
par le fabricant.
Risque d’électrocution
•Cessez d‘utiliser le produit en cas de
détérioration du bloc secteur ou du câble
d‘alimentation.
•Netentez pas de réparer l’appareil vous-
même ni d’effectuer des travaux d’entretien.
Déléguez tous travaux d‘entretien àdes
techniciens qualiés.
•Netentez pas d‘ouvrir le produit en cas de
détérioration et cessez de l’utiliser.

11
Avertissement -batteries
•Nerechargez pas de batteries lithium-ion
dont la tension ne correspond pas àla
tension indiquée pour ce chargeur.Risque de
détérioration du chargeur.
•Nechargez pas de piles non rechargeables
(alcalines, par exemple), ni de batteries
endommagées, ayant coulé ou corrodées.
4. Mise en service et fonctionnement
•Branchez le chargeur sur le bloc secteur (Pic. 1).
•L'allumage constant du voyant LED rouge
d'alimentation indique l'état de veille du
chargeur.
Remarque
•Lechargeur détecte automatiquement les
batteries défectueuses et, pour des raisons de
sécurité, ne les charge pas.
•Une procédurecorrecte de charge est
indiquée par le clignotement du voyant LED
vert Charge.
•Lacharge complète des batteries est indiquée
par l‘allumage en permanence du voyant LED
vert Charge.
•Retirez les batteries du chargeur une fois la
recharge terminée.
•Après utilisation, débranchez tous les câbles et
les branchements secteur.
Remarque
•Lechargeur est adapté àune tension secteur
de 100-240 Vetpeut donc êtreutilisé dans le
monde entier.Veuillez toutefois noter qu‘un
adaptateur est éventuellement nécessaire
dans certains pays.
•L‘entreprise Hama propose une gamme de
produits sur www.hama.com.
4.1 Charge de batteries lithium-ion
•Ouvrez entièrement le couvercle coulissant
jusqu‘à la butée.
•Ajustez les contacts sur la face inférieuredu
chargeur en fonction de la batterie lithium-ion
que vous désirez charger (Pic.2). Ajustez les
contacts de sorte qu’un contact touche le pôle -
et l’autrelepôle +delabatterie.
•Insérez la batterie dans le chargeur (Pic. 3). Le
chargeur détecte automatiquement la polarité
des batteries lithium-ion.
•Déverrouillez le couvercle coulissant en appuyant sur la
touche de déverrouillage rouge et refermez le couvercle
coulissant de manièreàceque le type de batterie
inséré soit bien stable et touche bien les contacts.
•Contrôlez que la procéduredecharge soit
indiquée par l‘allumage en permanence du
voyant LED vert Charge.Vériez les contacts si
ce n‘est pas le cas.
4.2
Charge de batteries NiMH (cellules AA/AAA)
•Ouvrez entièrement le couvercle coulissant
jusqu‘à la butée.
•Enprésence de batteries NiMH, respectez le
symbole de batteries et la polarité indiquée.
Insérez les batteries NiMH conformément aux
indications de polarité (Pic. 4).
•Déverrouillez le couvercle coulissant en appuyant
sur la touche de déverrouillage rouge et refermez
le couvercle coulissant de manièreàceque le
type de batterie inséré soit bien stable et touche
bien les contacts.
•Contrôlez que la procéduredecharge soit
indiquée par l‘allumage en permanence du
voyant LED vert Charge.Vériez les contacts si
ce n’est pas le cas.
•Seules des batteries de type AA ou AAA peuvent
êtrerechargées simultanément. Il n’est pas
nécessairedeprendreencompte des capacités
différentes (mAh).
4.3 Option de charge USB
•Branchez directement, ou àl'aide ou d'un câble
USB approprié, l'appareil que vous désirez
charger au port USB du chargeur.(Pic. 5)

12
•Contrairement aux options de charge 4.1 et 4.2,
le voyant LED vert Charge ne s‘allume pas.
•L’état de charge actuel est rendu par le témoin de
charge de votreappareil.
•Lecycle de charge de l’appareil commence et se
termine automatiquement.
Avertissement -concernant la
connexion ‚d‘appareils
•Avant de raccorder un appareil, veuillez
contrôler que le débit de courant du chargeur
est susant pour ce type d‘appareil.
•L‘option de charge USB fournit un courant
maximal de 5V 1000 mA.
•Veuillez respecter les consignes du mode
d’emploi de votreappareil.
•Veuillez impérativement respecter les
indications et les consignes de sécurité
mentionnées concernant l'alimentation en
électricité de vos appareils.
4.4. Recharge simultanée
Vous pouvez charger une batterie Li-ion ou une/des
batterie(s) NiMH et un appareil USB simultanément.
Avertissement -batteries
Ne rechargez pas des batteries NiMH et Li-Ion
en même temps !
5. Soins et entretien
Nettoyez ce produit uniquement avec un chiffon
non pelucheux sec et n‘utilisez aucun détergent
agressif. Veillez àcequ’aucun liquide ne pénètre
dans le produit.
6. Exclusion de garantie
La société Hama GmbH &Co. KG décline toute
responsabilité en cas de dommages provoqués par
une installation, un montage ou une utilisation non
conformes du produit ou encoreprovoqués par un
non respect des consignes du mode d‘emploi et/ou
des consignes de sécurité.
7. Service et assistance
En cas de question concernant le produit, veuillez
vous adresser au service de conseil produits de
Hama.
Ligne téléphonique directe :+49 9091 502-0
(allemand/anglais)
Vous trouverez ici de plus amples informations
concernant l‘assistance :www.hama.com
8. Caractéristiques techniques
Chargeur universel
Delta Ovum LED
Bloc secteur
In:100–240 V~50 /60Hz
500 mA
Out:12,0 V 1,0 A
12,0 W
Tension d'entrée
du chargeur 12 V 1000 mA
Tension de sortie
du chargeur
Li-Ion 4,2 V 650 mA
Li-Ion 8,4 V 650 mA
NiMH (AA/AAA)
1x/2x 1,4 V 650 mA
USB 5V 1000 mA
Températurede
service 0-40°C
Indications prévues par le règlement
(CE) 2019/1782
Raison sociale ou
marque dé posée,numé-
ro d’enregistrement au
registreducommerce et
adresse du fabricant
Hama, HRA12159,
Dresdner Str. 9,
86653 Monheim
Référence du modèle JT-H120100E
Tension d’entrée 100 V-240 V
Fréquence du CA
d’entrée 50 Hz/60Hz

13
Tension de sortie/
Courant de sortie/
Puissance de sortie
12.0 VDC/1.0 A/
12.0 W
Rendement moyen en
mode actif 83.9 %
Rendement àfaible
charge (10 %) 76.28 %
Consommation élec-
trique hors charge 0.0582 W
9. Consignes de recyclage
Remarques concernant la protection de
l’environnement:
Conformément àladirective européenne
2012/19/EU et 2006/66/CE, et afin
d‘atteindre un certain nombre d‘objectifs
en matière de protection de
l‘environnement, les règles suivantes
doivent être appliquées: Les appareils électriques et
électroniques ainsi que les batteries ne doivent pas
être éliminés avec les déchets ménagers. Le
pictogramme “picto” présent sur le produit, son
manuel d‘utilisation ou son emballage indique que le
produit est soumis àcette réglementation. Le
consommateur doit retourner le produit/la batterie
usagé(e) aux points de collecte prévus àcet effet. Il
peut aussi les remettre àunrevendeur. En
permettant le recyclage des produits et des batteries,
le consommateur contribuera ainsi àlaprotection de
notre environnement. C‘est un geste écologique.

14
EInstrucciones de uso
Le agradecemos que se haya decidido por un
producto de Hama.
Tómese tiempo yléase primerolas siguientes
instrucciones eindicaciones. Después, guarde estas
instrucciones de manejo en un lugar seguropara
poder consultarlas cuando sea necesario. Si vende
el aparato, entregue estas instrucciones de manejo
al nuevo propietario.
Si vende el aparato, entregue estas instrucciones de
manejo al nuevo propietario.
1. Explicación de los símbolos de aviso ydelas
indicaciones
Aviso
Se utiliza paracaracterizar las indicaciones
de seguridad oparallamar la atención sobre
peligros yriesgos especiales.
Nota
Se utiliza paracaracterizar informaciones
adicionales oindicaciones importantes.
2. Contenido del paquete
•1Cargador universal Delta Ovum LED
•1Fuente de alimentación 100–240V
•Estas instrucciones de manejo
3. Instrucciones de seguridad
•Elproducto es paraeluso doméstico privado, no
comercial.
•Emplee el producto exclusivamente paralafunción
paralaque fue diseñado.
•Noopereelproducto fueradelos límites de
potencia indicados en los datos técnicos.
•Proteja el producto de la suciedad, la humedad y
el sobrecalentamiento yutilícelo sólo en recintos
secos.
•Noopereelproducto en las inmediaciones de la
calefacción, de otras fuentes de calor obajo la
radiación directa del sol.
•Utilice el producto sólo conectado auna toma de
corriente autorizada. La toma de corriente debe
estar colocada cerca del producto ydeforma
accesible.
•Desconecte el producto de la redeléctrica
mediante el interruptor on/off –denoexistir
éste, desenchufe el cable eléctrico de la toma de
corriente.
•Tienda todos los cables de modo que no
constituyan un peligrodetropezar.
•Nodoble ni aplaste el cable.
•Nodeje caer el producto ni lo someta asacudidas
fuertes.
•Mantenga el material de embalaje fueradel
alcance de los niños, existe peligrodeasxia.
•Este aparato, como todos los aparatos eléctricos,
no debe estar en manos de los niños.
•Deseche el material de embalaje en conformidad
con las disposiciones locales sobreeldesecho
vigentes.
•Norealice cambios en el aparato. Esto conllevaría
la pérdida de todos los derechos de la garantía.
•Noutilice ninguna fuente de alimentación no
recomendada por el fabricante.
Peligrodesufrir una descarga eléctrica
•Noutilice el producto si la fuente de
alimentación oelcable eléctrico están
dañados.
•Nointente mantener oreparar el aparato por
cuenta propia. Encomiende cualquier trabajo
de mantenimiento al personal especializado
competente.
•Noabraelproducto ynolosiga operando de
presentar deterioros.

15
Aviso -
pilas recargables
•Nocargue pilas recargables de iones de
litio, cuya tensión es superior oinferior a
la indicada paraeste cargador.Eso puede
provocar el deteriorodel cargador.
•Nocargue baterías (p. ej. alcalinas) ni pilas
recargables deterioradas, derramadas o
corroídas.
4. Puesta en servicio yfuncionamiento
•Conecte el cargador con la fuente de
alimentación (Pic.1).
•Luz permanente del LED Power rojo señaliza el
estado standby del cargador.
Nota
•Elcargador detecta automáticamente las
pilas recargables defectuosas ynolas carga
por razones de seguridad.
•Unproceso de carga correcto es indicado por
el LED Charge verde parpadeante.
•Elestado totalmente cargado de las pilas
recargables es indicado por la luz verde
permanente del LED Charge.
•Una vez nalizado el proceso de carga, retirelas
pilas recargables del cargador.
•Traseluso, interrumpa todas las conexiones por
cable ydered.
Nota
•Elcargador es adecuado parauna tensión de
redde100-240 V, por lo que se puede utilizar
en todo el mundo. Recuerde que paraello se
necesita un adaptador especíco del país.
•Encontrará la selección correspondiente de
productos Hama en www.hama.com.
4.1 Carga de pilas recargables de iones de litio
•Abratotalmente hasta que encaje la cubierta
deslizante del cargador.
•Ajuste los contactos en el lado inferior del
cargador de tal modo que estén adaptados ala
respectiva pila recargable de iones de litio que
desea cargar (Pic.2). Ajuste los contactos de
modo que un contacto vaya al polo –yelotroal
polo +delapila recargable.
•Coloque la pila recargable en el cargador
(Pic. 3). El cargador detecta automáticamente
la polaridad de las pilas recargables de iones
de litio.
•Desbloquee la cubierta deslizante presionando
sobrelatecla de desbloqueo roja ycierrela
cubierta deslizante de modo que el respectivo
tipo de pila recargable colocado se sujete yse
contacte correctamente.
•Asegúrese de que el LED Charge verde indica
un proceso de carga correcto. Si no es el caso,
compruebe los contactos.
4.2
Carga de pilas recargables NiMH (pilas AA/AAA)
•Abratotalmente hasta que encaje la cubierta
deslizante del cargador.
•Enelcaso de las pilas recargables NiMH tenga
en cuenta los símbolos de batería ylapolaridad
indicada en los mismos. Coloque las pilas
recargables NiMH con polaridad correcta (Pic.4).
•Desbloquee la cubierta deslizante presionando
sobrelatecla de desbloqueo roja ycierrela
cubierta deslizante de modo que el respectivo
tipo de pila recargable colocado se sujete yse
contacte correctamente.
•Asegúrese de que el LED Charge verde indica
un proceso de carga correcto. Si no es el caso,
compruebe los contactos.
•Sepueden cargar simultáneamente sólo pilas
recargables del tipo AA oAAA. No hace falta
tener en cuenta capacidades (mAh) diferentes.

16
4.3 Opción de carga USB
•Conecte el terminal que desee cargar al puerto
USB del cargador directamente outilizando un
cable USB adecuado. (Pic.5)
•Contrario alas dos opciones de carga 4.1 y4.2,
en este caso no hay ninguna indicación por el
LED Charge verde.
•Elestado de carga actual lo puede ver en el
indicador de pila recargable de su terminal.
•Lacarga de los terminales se inicia y naliza de
forma automática.
Aviso -Conexión de terminales
•Antes de conectar un terminal, compruebe si
éste se puede alimentar de forma suciente
con la salida de corriente del cargador.
•Laopción de carga USB suministra
máx. 5V 1000 mA.
•Observe las indicaciones contenidas en las
instrucciones de manejo de su terminal.
•Observe siemprelos datos ylas indicaciones
de seguridad relativos alaalimentación de
corriente de sus dispositivos contenidos en
los mismos.
4.4. Carga simultánea
Puede cargar simultáneamente una batería de
iones de litio obatería(s) NiMH yunterminal USB.
Aviso -
pilas recargables
No cargue simultáneamente pilas recargables
NiMH ydeiones de litio.
5. Mantenimiento ycuidado
Limpie este producto sólo con un paño ligeramente
humedecido que no deje pelusas ynoutilice
detergentes agresivos. Asegúrese de que no entre
agua en el producto.
6. Exclusión de responsabilidad
Hama GmbH &CoKGnoseresponsabiliza ni
concede garantía por los daños que surjan por
una instalación, montaje omanejo incorrectos del
producto opor la no observación de las instrucciones
de manejo y/o de las instrucciones de seguridad.
7. Servicio ysoporte
Si tiene que hacer alguna consulta sobreelproducto,
diríjase al asesoramiento de productos Hama.
Línea directa: +49 9091 502-0 (Alemán/Inglés)
Encontrar más información de soporte aquí:
www.hama.com
8. Datos técnicos
Cargador universal
Delta Ovum LED
Fuente de
alimentación
In:100–240 V~50 /60Hz
500 mA
Out:12,0 V 1,0 A
12,0 W
Tensión de
entrada del
cargador
12 V 1000 mA
Tensión de salida
del cargador
Li-Ion 4,2 V 650 mA
Li-Ion 8,4 V 650 mA
NiMH (AA/AAA)
1x/2x 1,4 V 650 mA
USB 5V 1000 mA
Temperaturade
funcionamiento 0-40°C

17
Datos según el Reglamento (UE)
2019/1782
Nombreomarca,
númerodel registro
mercantil ydirección del
fabricante
Hama, HRA12159,
Dresdner Str. 9,
86653 Monheim
Identicador del modelo JT-H120100E
Tensión de entrada 100 V-240 V
Frecuencia de la CA de
entrada 50 Hz/60Hz
Tensión de salida/
Intensidad de salida/
Potencia de salida
12.0 VDC/1.0 A/
12.0 W
Eciencia media en
activo 83.9 %
Eciencia abaja carga
(10 %) 76.28 %
Consumo eléctrico en
vacío 0.0582 W
9. Instrucciones para desecho yreciclaje
Nota sobrelaprotección medioambiental:
Después de la puesta en marcha de la
directiva Europea 2012/19/EU y2006/66/
EU en el sistema legislativo nacional, se
aplicara lo siguiente: Los aparatos
eléctricos yelectrónicos, así como las
baterías, no se deben evacuar en la basura
doméstica. El usuario está legalmente obligado a
llevar los aparatos eléctricos yelectrónicos, así como
pilas ypilas recargables, al final de su vida útil alos
puntos de recogida comunales oadevolverlos al
lugar donde los adquirió. Los detalles quedaran
definidos por la ley de cada país. El símbolo en el
producto, en las instrucciones de uso oenel
embalaje hace referencia aello. Gracias al reciclaje,
al reciclaje del material oaotras formas de reciclaje
de aparatos/pilas usados, contribuye Usted de forma
importante alaprotección de nuestro medio
ambiente.

18
RРуководство по эксплуатации
Благодарим за покупку изделия фирмы Hama.
внимательно ознакомьтесь снастоящей
инструкцией.Храните инструкцию внадежном
месте для справок вбудущем.Вслучае
передачи изделия другому лицу приложите иэту
инструкцию.
Вслучае передачи изделия другому лицу
приложите иэту инструкцию.
1. Предупредительные пиктограммы и
инструкции
Внимание
Данным значком отмечены инструкции,
несоблюдение которых можетпривести к
опасной ситуации.
Примечание
Дополнительная или важная информация.
2. Комплект поставки
•1Универсальное зарядное устройство Delta
Ovum LED
•1Блок питания 100-240 В
•Diese Bedienungsanleitung
3. Техника безопасности
•Изделие предназначено толькодля домашнего
применения.
•Запрещается использовать не по назначению.
•Соблюдатьтехнические характеристики.
•Беречь от грязи,влаги иисточников тепла.
Эксплуатировать тольковсухих условиях.
•Не эксплуатировать внепосредственной
близости снагревательными приборами,
беречь от прямых солнечных лучей.
•Прибор разрешается подключать толькок
соответствующей розеткеэлектросети.Розетка
электросети должна находиться рядом с
устройством влегкодоступном месте.
•Отключать спомощью выключателя
электросети,апри егоотсутствии вытащить
проводизрозетки.
•Кабели не должны создавать помехи
перемещению людей.
•Кабель не сгибать инезажимать.
•Не ронять.Беречь от сильных ударов.
•Упаковку не давать детям:опасность асфиксии.
•Не давать детям!
•Утилизировать упаковку всоответствии с
местными нормами.
•Запрещается вносить изменения вконструкцию.
Впротивном случае гарантийные обязательства
аннулируются.
•Запрещается применять блоки питания,
которые не были санкционированы
производителем.
Берегись высокогонапряжения!
•Запрещается эксплуатация при
неисправном блокепитания или
поврежденном кабеле питания.
•Запрещается самостоятельно
ремонтировать устройство.Ремонт
разрешается производить только
квалифицированному персоналу.
•Изделие не открывать.Запрещается
эксплуатировать неисправное изделие.
Внимание -
Аккумуляторы
•Незаряжайте литий-ионные
аккумуляторы,напряжение которых не
соответствуетхарактеристикам зарядного
устройства.Этоможетстатьпричиной
выходазарядногоустройства из строя.
•Запрещается заряжатьобычные батареи,
атакжеаккумуляторы сповреждениями,
утечкой электролитаикоррозией.

19
4. Ввод вэксплуатацию иэксплуатация
•Подключите зарядное устройство кблоку
питания (Pic. 1).
•Непрерывно горящая красная лампа
показывает,чтоустройствонаходится в
ждущем режиме.
Примечание
•Если устройство обнаружит недопустимый
аккумулятор,процессзаряда на
начинается.
•Во время заряда мигает зеленая лампа.
•По окончании заряда зеленая лампа горит
непрерывно.
•После завершения зарядки извлеките
аккумуляторы из зарядногоустройства.
•По окончании работы отключите все
кабельные исетевые соединения.
Примечание
•Устройство рассчитано на работу от сети
100-240 В,поэтому егоможно применять
во всех странах мира.Однакодля этого
могут потребоваться соответствующие
переходники.
•Необходимые комплектующие смотрите
на вебсайте .
4.1 Порядок заряда литий-ионных
аккумуляторов
•Откройте крышку до упора.
•Отрегулируйте контакты по размеру
аккумуляторов (Pic. 2.). Расположите
контакты так,чтобы один контакт прилегал к
отрицательному,адругойкположительному
полюсу аккумулятора.
•Вставьте аккумуляторы вустройство
(Pic. 3). Полярность аккумуляторов
определяется устройством автоматически.
•Для разблокировки крышки нажмите на
красный фиксаторкрышки изакройте ее так,
чтобы всеаккумуляторы сохраняли надежное
присоединение кконтактам.
•Зеленая лампа показывает начало процесса
заряда.Если зеленая лампа не горит,
проверьте контакты.
4.2 Порядок заряда никель-
металлогидридных аккумуляторов (АА/ААА)
•Откройте крышку до упора.
•Загружая никель-металлогидридные
аккумуляторы,соблюдайте полярность (
Pic
.4).
•Для разблокировки крышки нажмите на
красный фиксаторкрышки изакройте ее так,
чтобы всеаккумуляторы сохраняли надежное
присоединение кконтактам.
•Если на дисплее отсутствуетиндикация уровня
заряда,проверьте ипри необходимости
скорректируйте положение контактов.
•Одновременно заряжатьможно аккумуляторы
толькотипоразмера АА или ААА.Различие
емкостей (мА-ч)можно не учитывать.
4.3 Заряд через USB
•Непосредственно или спомощью
соответствующегокабеля USB подключите
заряжаемое устройство к USB-разъему
зарядногоустройства.(Pic. 5)
•Зеленая лампа показывает начало процесса
заряда.Если зеленая лампа не горит,
проверьте контакты.
•Фактический уровень заряда можно
определить по индикации заряда на
устройстве.
•Процессзарядки запускается изавершается
автоматически.
Other manuals for Delta Ovum LED
1
Table of contents
Languages:
Other Hama Batteries Charger manuals

Hama
Hama 00109860 User manual

Hama
Hama Delta Solid 2/4 User manual

Hama
Hama Delta 4 S User manual

Hama
Hama Vehicle Charger User manual

Hama
Hama 46664 User manual

Hama
Hama 136686 User manual

Hama
Hama Delta Solid 2/4 User manual

Hama
Hama 39659 User manual

Hama
Hama 00188318 User manual

Hama
Hama 119434 User manual