Hama Fluxity User manual

00053569/12.10
All listed brands are trademarks of the corresponding companies. Errors and omissions excepted,
and subject to technical changes. Our general terms of delivery and payment are applied.
Hama GmbH & Co KG
D-86651 Monheim/Germany
www.hama.com

*
Induction Charger
»Fluxity«
THE SMART SOLUTION
00053569

2
*
*
*
dBedienungsanleitung
I Vorstellung:
Wir freuen uns, dass Sie sich für den Induction Charger
»Fluxity« entschieden haben und gratulieren Ihnen zu
dieser Entscheidung.
Wir sind überzeugt, dass Ihnen unser Produkt in den
nächsten Jahren eine Menge Spaß beim Spielen berei-
ten wird. Diese Kurzanleitung enthält wertvolle Hinweise
zur Bedienung des Laders.
Bitte bewahren Sie diese Anleitung zum Nachschlagen
an einem sicheren Ort auf.
II Lieferumfang
1 x Induction Charger Fluxity
1 x NDSI XL Case für Induction Charger Fluxity
III. Kurzbeschreibung
Der Hama NDSI XL Induction Charger Fluxity lädt durch
ein Magnetfeld. Dazu ist es möglich den Nintendo DSI
XL in dem mitgeliefertem Case zu belassen. Alle Tasten
des Nintendo DSI XL bleiben bei Benutzung im Case
uneingeschränkt bedienbar. Zum Laden des DSI XL muss
ein original Netzteil verwendet werden.
(nicht im Lieferumfang enthalten)
IV. Installation
1. Der Induction Charger Fluxity wird mit Ihrem original
Nintendo DSI XL Netzteil betrieben. Stecken Sie das
Original Netzteil in die Netzteilbuchse der Ladeplatte.
Verbinden Sie das Original Netzteil mit der Steckdose.
Schalten Sie den On/Off Knopf der Ladeplatte auf on.
2. Öffnen Sie das mitgelieferte Case, legen Sie den
Nintendo DSI XL so in das Case, dass sich der im Case
befindliche Stecker direkt mit der Ladebuchse des DSI
XL verbindet.
3. Öffnen Sie nun den Oberen Bildschirm des Nintendo
DSI XL und befestigen Sie diesen im oberen Deckel
der Schützhülle.
4. Legen Sie das Case mit eingelegtem Nintendo DSI XL
mittig auf die Ladeplatte. Die Ladeanzeige des
Nintendo DSI XL beginnt orange zu leuchten.
Der Ladevorgang beginnt.
5. Wenn der Akku vollständig geladen ist, erlischt die
Ladeanzeige des Nintendo DSI XL. Der Ladevorgang
ist beendet.
6. Der Nintendo DSI XL kann während des Ladevorgangs
benutzt werden
*Nintendo DSI XL Nicht im Lieferumfang enthalten

3
VII. Sicherheitshinweise
• Versuchen Sie nicht, das Gerät selbst zu warten
oder zu reparieren. Überlassen Sie jegliche
Wartungsarbeit dem zuständigen Fachpersonal.
• Nehmen Sie keine Veränderungen am Gerät vor.
Da durch verlieren sie jegliche Gewährleistungsan-
sprüche.
VIII. Support- und Kontaktinformationen
Bei Defekt oder Problemen mit der Induction Charger
»Fluxity«, wenden Sie sich bitte an Ihren Händler oder
an die Hama Produktberatung.
Internet/World Wide Web
Produktunterstützung, neue Treiber oder
Produktinformationen bekommen Sie unter
www.hama.com
Support Hotline – Hama Produktberatung:
Tel. +49 (0) 9091 / 502-115
Fax +49 (0) 9091 / 502-272
e-mail: [email protected]

4
*
*
*
gOperating instructions
I. Presentation
Thank you for choosing the “Fluxity” induction charger
from Hama. Congratulations on your decision.
We are sure that our product will provide you with a
great deal of gaming pleasure for years to come. These
instructions contain valuable information on operating
the charger.
Please keep the instructions in a safe place for future
reference.
II. Extent of delivery
1 x „Fluxity” induction charger
1 x NDSI XL case for „Fluxity” induction charger
III. Brief description
The „Fluxity” NSDI XL induction charger from Hama
charges using a magnetic field. This way, it is possible
to leave the Nintendo DSI XL in the case (included in the
extent of delivery). All of the buttons of the Nintendo DSI
XL can be operated while the device is in the case. The
original power supply unit must be used to charge the
DSI XL. (Not included in the extent of delivery)
IV. Installation
1. The „Fluxity” induction charger must be operated
using the original Nintendo DSI XL power supply unit.
Plug the original power supply unit into the power
supply unit socket of the charging station. Connect the
original power supply unit to the power socket. Switch
the ON/OFF button on the charging station to „ON”.
2. Open the case (included in the extent of delivery) and
place the Nintendo DSI XL inside so that the plug
inside the case comes into direct contact with the
charging socket of the DSI XL.
3. Open the upper screen of the Nintendo DSI XL and
attach it to the top lid of the protective sleeve.
4. Place the case with the Nintendo DSI XL inside onto
the charging station, near the centre. The charging
indicator of the Nintendo DSI XL begins to light up
orange. Charging begins.
5. The charging indicator of the Nintendo DSI XL goes
out when the rechargeable battery is fully charged.
Charging is complete.
6. The Nintendo DSI XL may be used while it is charging.
*Nintendo DSI XL not included in extent of delivery.

5
VII. Safety instructions
• Do not attempt to service or repair the device your
self. Leave any service work to qualified experts.
• Do not modify the device in any way. Doing so voids
the warranty.
VIII. Support and contact information
Please contact your dealer or Hama Product Consulting
if you have any problems with the „Fluxity” induction
charger.
Internet/World Wide Web
Product support, new drivers and
product information is available at
www.hama.com
Support Hotline – Hama Product Consulting:
Phone: +49 (0)9091/502-115
Fax +49 (0)9091/502-272
E-mail: [email protected]

6
*
*
*
fMode d‘emploi
I Présentation :
Nous vous remercions d’avoir choisi le chargeur à
induction « Fluxity » et vous félicitons de votre choix.
Nous sommes convaincus que notre produit vous pro-
curera bien du plaisir pendant les années à venir. Cette
notice d’utilisation contient des remarques importantes
concernant l’utilisation du chargeur.
Veuillez la conserver en un endroit sûr pour toute con-
sultation ultérieure.
II Matériel livré
1 chargeur à induction « Fluxity »
1 coque NDSI XL pour le chargeur à induction « Fluxity »
III. Brève description
Le chargeur à induction NDSI XL « Fluxity » de Hama
fonctionne à l‘aide d‘un champ magnétique. Il est ainsi
possible de conserver votre Nintendo DSI XL dans sa
coque d‘origine. Toutes les touches de votre Nintendo
DSI XL sont accessibles sans aucune restriction, même
lorsque vous l‘utilisez dans sa coque. Utilisez un bloc
secteur d‘origine pour la recharge de votre DSI XL
(non fourni).
IV. Installation
1. Le chargeur à induction « Fluxity » fonctionne à l‘aide
du bloc secteur d‘origine de votre DSI XL. Branchez
le bloc secteur d‘origine à la prise d‘alimentation du
plateau de charge. Branchez le bloc secteur d‘origine
à une prise de courant. Mettez le plateau de charge
sous tension à l‘aide du bouton On/Off.
2. Ouvrez la coque fournie, placez votre Nintendo DSI
XL dans la coque de telle sorte que le connecteur
situé dans la coque entre directement en contact
avec la prise de charge du DSI XL.
3. Ouvrez l‘écran supérieur de votre Nintendo DSI XL et
fixez-le dans le couvercle supérieur de l‘étui de
protection.
4. Placez la coque contenant le Nintendo DSI XL au
milieu du plateau de charge. Le voyant de charge du
Nintendo DSI XL brille en orange. La procédure de
charge démarre.
5. Le voyant de charge du Nintendo DSI XL s‘éteint dès
que la batterie est complètement chargée.
La procédure de charge est terminée.
6. Vous pouvez utiliser votre Nintendo DSI XL pendant la
procédure de charge.
*Nintendo DSI XL non compris dans le matériel livré

7
VII. Consignes de sécurité
• Ne tentez pas de réparer l’appareil vous-même ni
d’effectuer des travaux d’entretien. Déléguez tous
travaux d‘entretien à des techniciens qualifiés.
• N’apportez aucune modification à l’appareil. Des mo
difications vous feraient perdre vos droits de garantie.
VIII. Support technique et contact
En cas de réclamation concernant le chargeur à
induction « Fluxity » (produit défectueux ou problèmes
généraux), veuillez vous adresser à votre revendeur ou
au service conseil produits de Hama.
Internet/World Wide Web
Notre support technique, les nouveaux pilotes et les
informations produits sont disponibles sur :
www.hama.com
Assistance – Conseil produits Hama :
Tél. +49 (0) 9091 / 502-115
Fax +49 (0) 9091 / 502-272

8
*
*
*
eInstrucciones de uso
I.Presentación:
Celebramos que se haya decidido por el cargador de
inducción „Fluxity” y le felicitamos por ello.
Estamos convencidos de que este producto nuestro le
procurará en los próximos años una inmensa diversión
con los juegos. Estas instrucciones breves contienen
valiosas indicaciones relativas al manejo del cargador.
Por favor, guarde estas instrucciones en un lugar seguro
para poder consultarlas cuando sea necesario.
II Volumen de suministro
Cargador de inducción “Fluxity”
Caja NDSI XL para el cargador de inducción Fluxity
III. Breve descripción
El cargador de inducción NDSI XL Fluxity de Hama fun-
ciona mediante un campo magnético. De esta forma es
posible dejar la Nintendo DSI XL dentro de la caja que
se suministra. Las teclas de la Nintendo DSI XL siguen
operativas sin limitaciones en la caja. Para cargar el
DSI XL se debe utilizar una fuente de alimentación
original. (no incluido en el volumen de suministro).
IV. Instalación
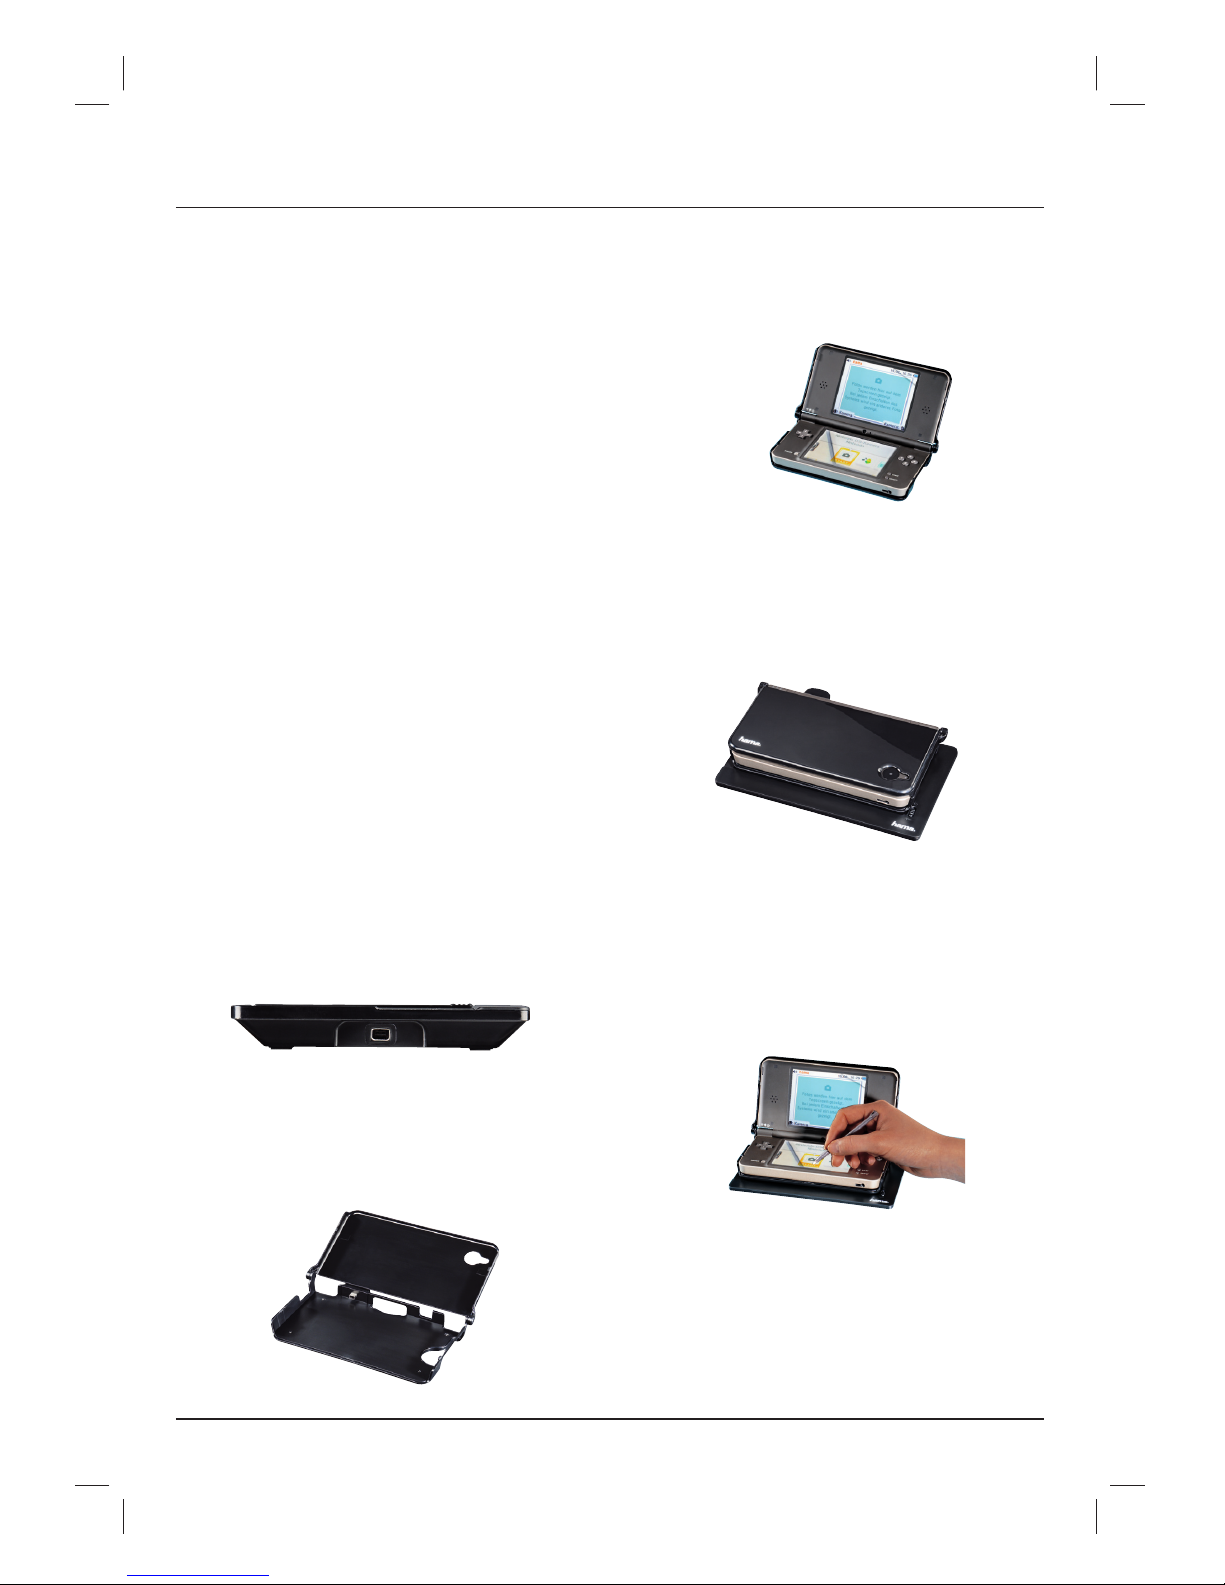
1. El cargador de inducción Fluxity funciona con su fu
ente de alimentación original de Nintendo DSI XL.
Enchufe la fuente de alimentación original a la
entrada para la fuente de alimentación de la placa de
carga.
Conecte la fuente de alimentación original al enchufe.
Ponga el interruptor On/Off de la placa de carga en
On.
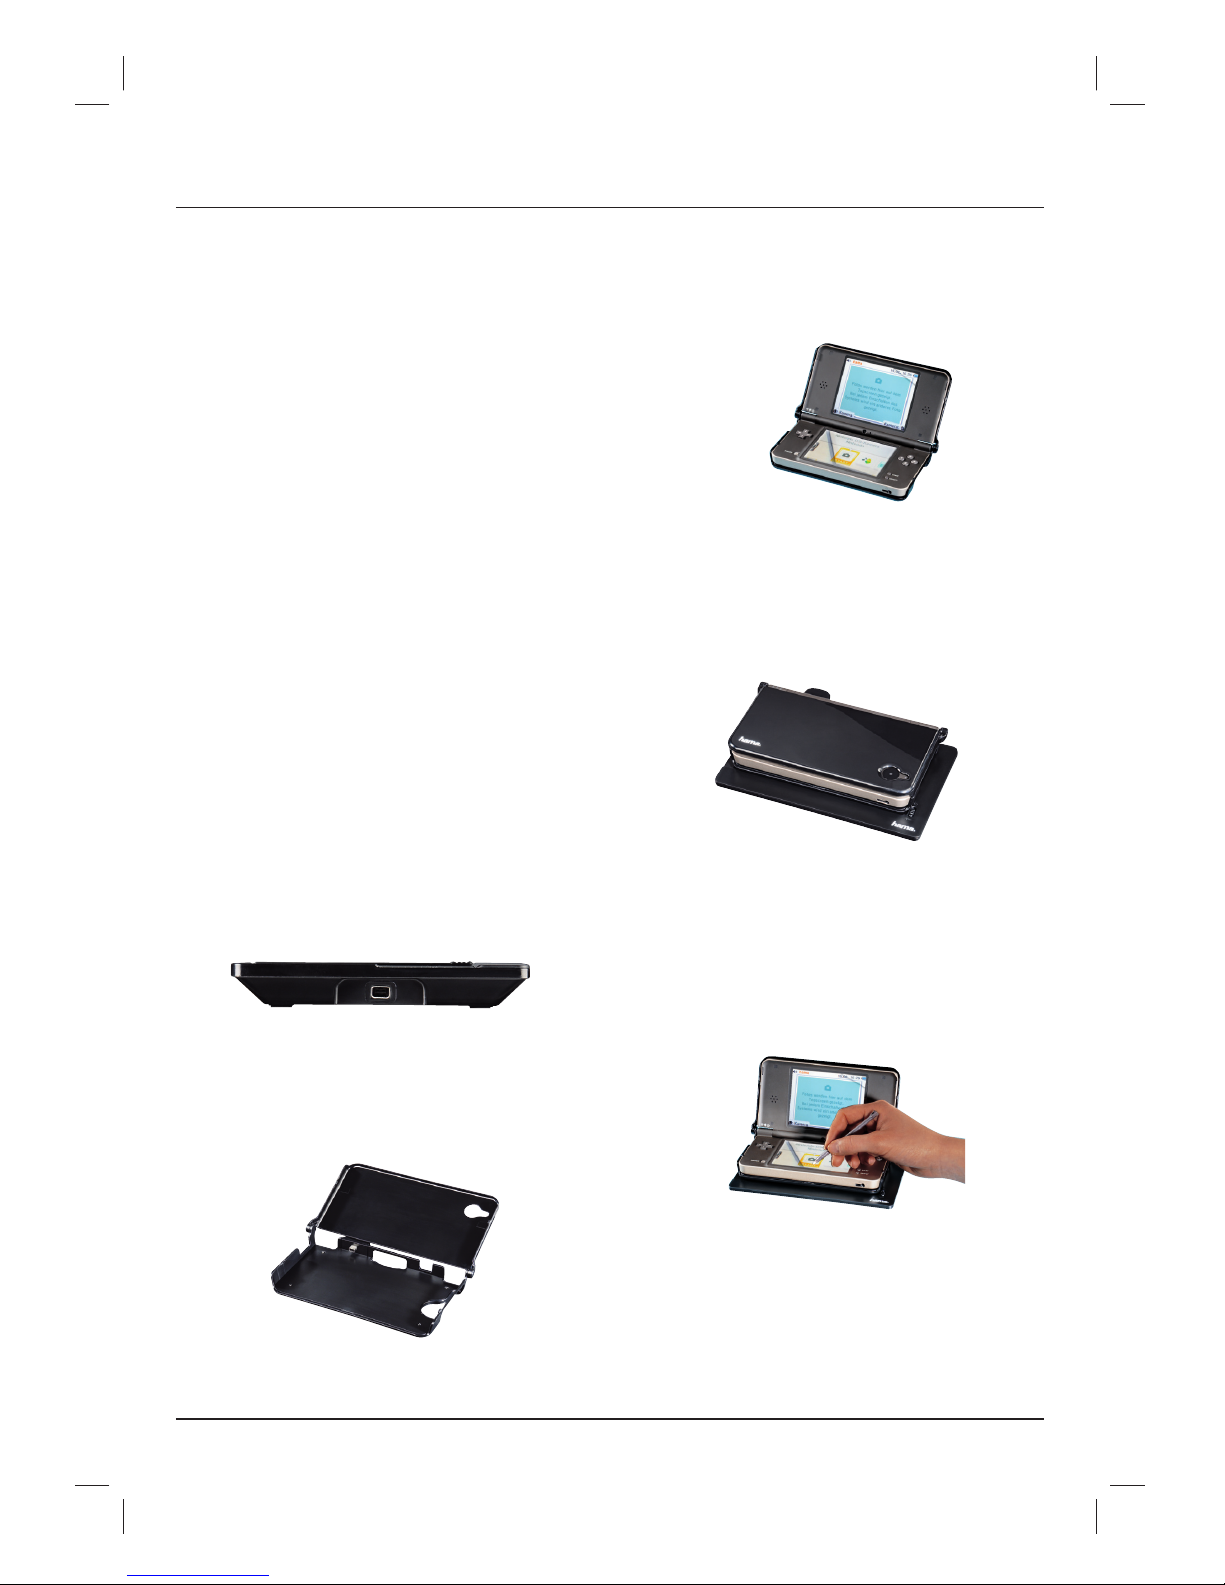
2. Abra la caja suministrada, introduzca la Nintendo
DSI XL en la carcasa de forma que el enchufe que se
encuentra dentro se conecte directamente a la toma
de carga del DSI XL.
3. A continuación abra la pantalla superior de la
Nintendo DSI XL y fíjela en la tapa superior de la
cubierta protectora.
4. Coloque la caja con la Nintendo DSI XL dentro en el
centro de la placa de carga. El indicador de carga
de la Nintendo DSI XL comenzará a lucir con luz
naranja. Comenzará el proceso de carga.
5. Cuando la pila recargable esté completamente llena,
la luz del indicador de carga de la Nintendo DSI XL se
apagará. El proceso de carga ha terminado.
6. La Nintendo DSI XL puede utilizarse durante el
proceso de carga
*Nintendo DSI XL no incluida en el volumen de suministro

9
VII. Instrucciones de seguridad
• No intente mantener o reparar el aparato por cuenta
propia. Encomiende cualquier trabajo de
mantenimiento al personal especializado competente.
• No realice cambios en el aparato. Esto conllevaría la
pérdida de todos los derechos de la garantía.
VIII. Información de contacto y de soporte
En caso de presentarse problemas o defectos en el
cargador de inducción “Fluxity”, diríjase a su proveedor
o al servicio de asesoramiento de Hama.
Internet/World Wide Web
Encontrará soporte para sus productos, nuevos
controladores o información sobre los productos en
www.hama.com
Línea directa de soporte – Asesoramiento sobre
productos Hama:
Tel. +49 (0) 9091 / 502-115
Fax +49 (0) 9091 / 502-272
e-mail: [email protected]

10
*
*
*
oGebruiksaanwijzing
I Inleiding:
Hartelijk dank dat u voor de Induction Charger »Fluxity«
gekozen heeft. Wij feliciteren u met deze aankoop.
Wij zijn ervan overtuigd dat u de komende jaren veel
plezier met ons product zult hebben. In deze korte
gebruiksaanwijzing staan belangrijke instructies over de
bediening van de oplader.
Wij adviseren u deze gebruiksaanwijzing als naslagwerk
goed te bewaren.
II Bij verpakking inbegrepen
1 x Induction Charger Fluxity
1 x NDSI XL case voor Induction Charger Fluxity
III. Korte beschrijving
De Hama NDSI XL Induction Charger Fluxity laadt op
door middel van een magneetveld. Daardoor kan de
Nintendo DSI XL gewoon in de inbegrepen case blijven.
Alle toetsen van de Nintendo DSI XL kunnen onbeperkt
bediend worden. Voor het opladen van de DSI XL moet
de originele voedingsadapter gebruikt worden.
(Niet bij de verpakking inbegrepen).
IV. Installatie
1. De Induction Charger Fluxity wordt gebruikt met de
originele Nintendo DSI XL voedingsadapter. Sluit de
originele voedingsadapter op de poort van de
oplaadplaat aan. Sluit de originele voedingsadapter
aan op een stopcontact. Zet de On/Off-knop van de
oplaadplaat op On.
2. Open de inbegrepen case, leg de Nintendo DSI XL zo
in de case dat de stekker in de case direct op de
laadpoort van de DSI XL is aangesloten.
3. Open vervolgens het bovenste beeldscherm van de
Nintendo DSI XL en bevestig het in het bovenste
deksel van de beschermhoes.
4. Leg de case met erin gelegde Nintendo DSI XL in het
midden op de oplaadplaat. De laadindicatie van de
Nintendo DSI XL begint oranje te branden.
Het opladen begint.
5. Zodra de accu volledig opgeladen is, gaat de
laadindicatie van de Nintendo DSI XL uit.
De accu is opgeladen.
6. De Nintendo DSI XL kan tijdens het opladen gebruikt
worden.
*Nintendo DSI XL niet bij de verpakking inbegrepen

11
VII. Veiligheidsinstructies
• Probeer niet het toestel zelf te onderhouden of te re
pareren. Laat onderhouds- en reparatiewerk-
zaamheden door vakpersoneel uitvoeren.
• Verander niets aan het toestel. Daardoor vervalt elke
aanspraak op garantie.
VIII. Support- en contactinformatie
Neem bij een defect of problemen met Induction Char-
ger »Fluxity« contact op met uw erkende handelaar of
met de afdeling Productadvies van Hama.
Internet/World Wide Web
Productondersteuning, nieuwe drivers of
productinformatie is verkrijgbaar onder
www.hama.com
Support hotline – Hama productadvies:
Tel. +49 (0) 9091 / 502-115
Fax +49 (0) 9091 / 502-272
E-mail: [email protected]

12
*
*
*
iIstruzioni per l’uso
I Presentazione:
Grazie per avere acquistato l’Induction Charger »Fluxity«
e complimenti per la scelta.
Siamo certi che il nostro prodotto vi regalerà un grande
divertimento per i prossimi anni. Queste brevi istruzioni
per l’uso contengono preziose indicazioni per l’impiego
del caricatore.
Conservare le istruzioni in un luogo sicuro per una
eventuale consultazione.
II Volume di fornitura
1 Induction Charger Fluxity
1 x NDSI XL Case per l’Induction Charger Fluxity
III. Breve descrizione
L’NDSI XL Induction Charger Fluxity Hama esegue la
carica mediante un campo magnetico. Inoltre, è
possibile lasciare il Nintendo DSI XL nella case in
dotazione. Tutti i tasti del Nintendo DSI XL, durante l’uso,
sono comandabili in maniera illimitata nella case.
Per la ricarica del DSI XL deve essere utilizzato un
alimentatore originale. (non compreso nella fornitura)
IV. Installazione
1. L’Induction Charger Fluxity viene alimentato con
l’alimentatore originale del Nintendo DSI XL. Inserire
l’alimentatore originale nella presa dell’alimentatore
della piastra di carica. Collegare l’alimentatore
re On/Off della piastra di carica su On.
2. Aprire la case fornita in dotazione, inserire il
Nintendo DSI XL nella case in maniera tale che il
connettore che si trova nella case si colleghi
direttamente con la presa di carica del DSI XL.
3. Aprire la parte superiore dello schermo del Nintendo
DSI XL e fissarla nel coperchio superiore
dell’involucro di protezione.
4. Mettere il case con il Nintendo DSI XL inserito al
centro della piastra di carica. L’indicazione di carica
del Nintendo DSI XL comincia a illuminarsi arancione.
Inizia il processo di carica.
5. Quando la batteria è completamente carica,
l‘indicazione di carica si spegne.
Il processo di carica è concluso.
6. Il Nintendo DSI XL può essere usato anche durante il
processo di carica.
*Nintendo DSI XL non è compreso nel volume di fornitura

13
VII. Indicazioni di sicurezza
• Non tentare di aggiustare o riparare l’apparecchio
da soli. Fare eseguire qualsiasi lavoro di riparazione al
personale specializzato competente.
• Non apportare modifiche all’apparecchio In caso
contrario si perde qualsiasi diritto di garanzia.
VIII. Informazioni per l’assistenza e i contatti
In caso di difetti o di problemi con l’Induction Charger
»Fluxity«, rivolgersi al proprio commerciante oppure alla
Consulenza prodotto Hama.
Internet/World Wide Web
Supporto prodotto, nuovi driver oppure
Le informazioni sul prodotto potete trovarle nel sito
www.hama.com
Support Hotline – Consulenza prodotto Hama:
Tel. +49 (0) 9091 / 502-115
Fax +49 (0)9091 / 502-272
e-mail: [email protected]

14
pManual de instruções
I Apresentação:
Parabéns pela compra do carregador por indução
»Fluxity«; fez uma boa escolha.
Temos a certeza de que, nos próximos anos, o nosso
produto lhe vai proporcionar muita diversão nos seus jo-
gos. Este breve manual contém indicações importantes
para a utilização do carregador.
Guarde-o num local seguro para futuras consultas.
II Material fornecido
1 x Carregador por indução Fluxity
1 x Caixa NDSI XL para carregador por indução Fluxity
III. Descrição breve
O carregador por indução Fluxity NDSI XL da Hama car-
rega através de um campo magnético. Para tal é pos-
sível deixar a Nintendo DSI XL na caixa fornecida. Todas
as teclas da Nintendo DSI XL permanecem operacionais
durante a utilização na caixa, sem quaisquer restrições.
Para o carregamento da DSI XL tem de ser utilizada uma
fonte de alimentação original. (não incluída no material
fornecido)
IV. Instalação
1. O carregador por indução Fluxity é operado com a
fonte de alimentação original da sua Nintendo DSI XL.
Ligue a fonte de alimentação original à respectiva
ficha fêmea da placa de carga. Ligue a fonte de
alimentação original à tomada. Coloque o botão On/
Off da placa de carga em On.
2. Abra a caixa fornecida e coloque nesta a Nintendo
DSI XL de forma a que o conector da caixa fique
ligado à tomada de carga da DSI XL.
3. Agora abra o ecrã superior da Nintendo DSI XL e
fixe-o na tampa superior da capa de protecção.
4. Coloque a caixa com a Nintendo DSI XL en
caixada no centro da placa de carga.
O indicador de carga da Nintendo DSI XL acende
a laranja. Começa o processo de carregamento.
5. Quando a bateria estiver completamente carregada,
o indicador de carga da Nintendo DSI XL apaga-se a
laranja.
O processo de carregamento terminou.
6. Pode-se utilizar a Nintendo DSI XL durante o proce
so de carregamento.
*Nintendo DSI XL não incluída no material fornecido
*
*
*

15
VII. Indicações de segurança
• Não tente fazer a manutenção ou reparar o aparelho.
Qualquer trabalho de manutenção deve ser executa
do por técnicos especializados.
• Não efectue alterações no aparelho. Caso contrário
perderá o direito à garantia.
VIII. Informações de assistência e contacto
Em caso de defeito ou problemas com o carregador
por indução »Fluxity«, dirija-se a um distribuidor ou à
assistência ao produto da Hama.
Internet/World Wide Web
Pode obter assistência ao produto, novos controladores
u informações sobre o produto em
www.hama.com
Linha de apoio – Assistência ao produto da Hama:
Tel. +49 (0) 9091 / 502-115
Fax +49 (0) 9091 / 502-272
E-mail: [email protected]
Other manuals for Fluxity
2
This manual suits for next models
1
Table of contents
Languages:
Other Hama Batteries Charger manuals

Hama
Hama Vehicle Charger User manual

Hama
Hama 87013 User manual

Hama
Hama Xbox360 User manual

Hama
Hama Prima 2/4 User manual

Hama
Hama Black Thunder User manual

Hama
Hama 00178312 User manual

Hama
Hama 00223201 User manual

Hama
Hama Delta V 2/4 User manual

Hama
Hama 4+4 energy User manual

Hama
Hama EasyLine Delta V 2/4 User manual