Hama DIR3020 User manual

Operating Instructions /Bedienungsanleitung /Mode d‘emploi /Instrucciones de uso /
Руководство по эксплуатации /Istruzioni per l‘uso /Gebruiksaanwijzing / Οδηγίες χρήσης /Instrukcja obsługi /
Használati útmutató /Návod kpoužití /Návod na použitie /Manual de instruções /Kullanma kılavuzu /
Manual de utilizare/Bruksanvisning /Käyttöohje / Работна инструкция /Betjeningsvejledning /Manuelt stasjonssøk
Digital Radio
00054873
(DIR3020)
Digital-Radio

Technical Data
Digital Radio DAB
ü
DAB+
ü
FM
ü
Internet
ü
Spotify
-
Connectivity WiFi 2.4GHz (b/g/n) /5GHz (a/n)
Display 2.5" Liquid Crystal Display (LCD)
Encryption WEP,WPA,WPA2, WPS
Power input 12 V 1.0 A
Power consumption Operation max. 12 WStandby <1W
Frequency range DAB/DAB+
174 –240 MHz
FM
87.5 –108 MHz
Input &Output DC Socket, Headphone 3.5 mm, Update Port
Presets
DAB/DAB+:
30
FM:
30
IR:
30
UI Languages Czech, English, Danish, Dutch, German, Finnish, French, Italian, Norwegian, Polish,
Portuguese, Slovak, Spanish, Swedish, Turkish
Package Content "DIR3020" digital radio, mains power supply,operating instructions
Dimensions (WxHxD) 30 x11.5 x12cm
Weight 1.6 kg

25
1 93 5 7
2 4 6 8
10
1 2 3
4
A
B

1
GOperating Instructions
Controls and Displays
A: Front
1Presets 1-4
2[POWER] button
3[MEMORY] button
4[MENU/SETTINGS] button
5[MUTE] button
6[INFO] button
7[BACK] button
8[MODE] button
9[NAVIGATE/ENTER/
VOLUME] button
10 Display
B: Reverse
1DC IN Mains power supply
2Headphone socket
3Update port
4Telescopic aerial

2
1. Explanation of Warning Symbols and Notes ..5
2. Package Contents .......................5
3. Safety Notes ...........................5
4. Informations and notes beforegetting started 6
5. Getting started .........................6
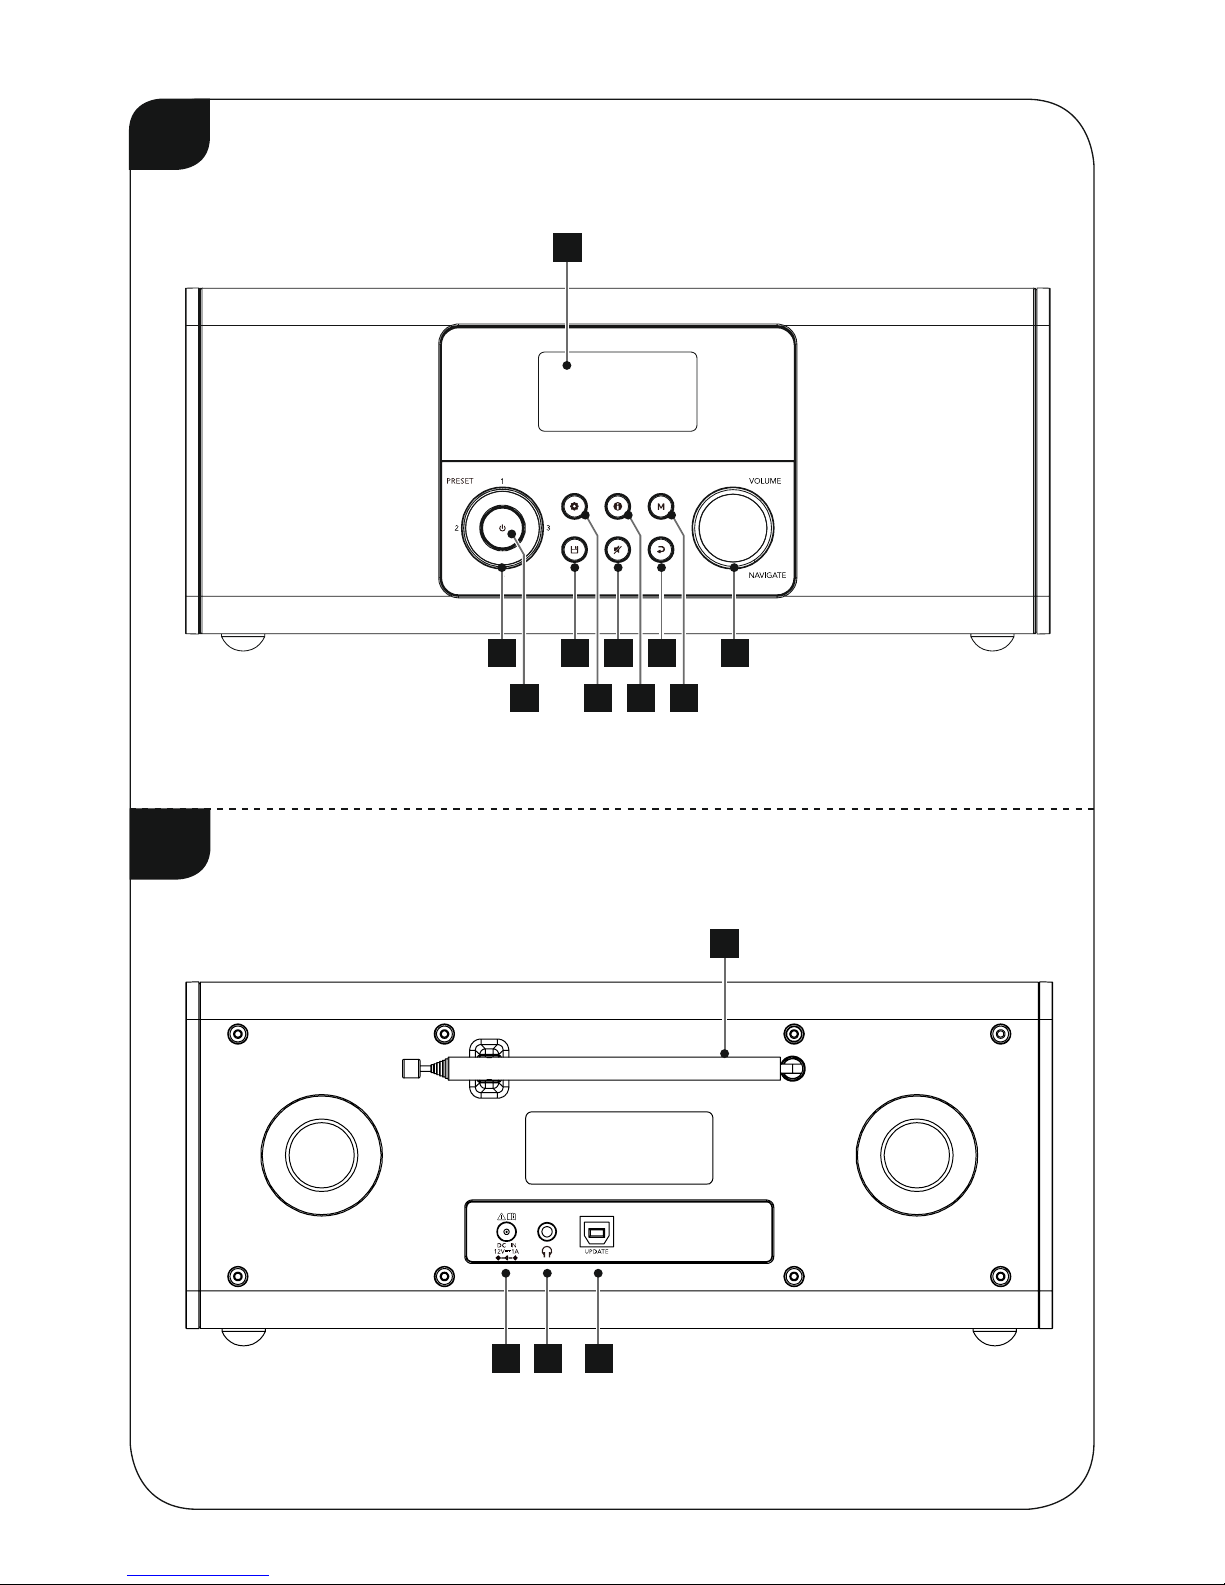
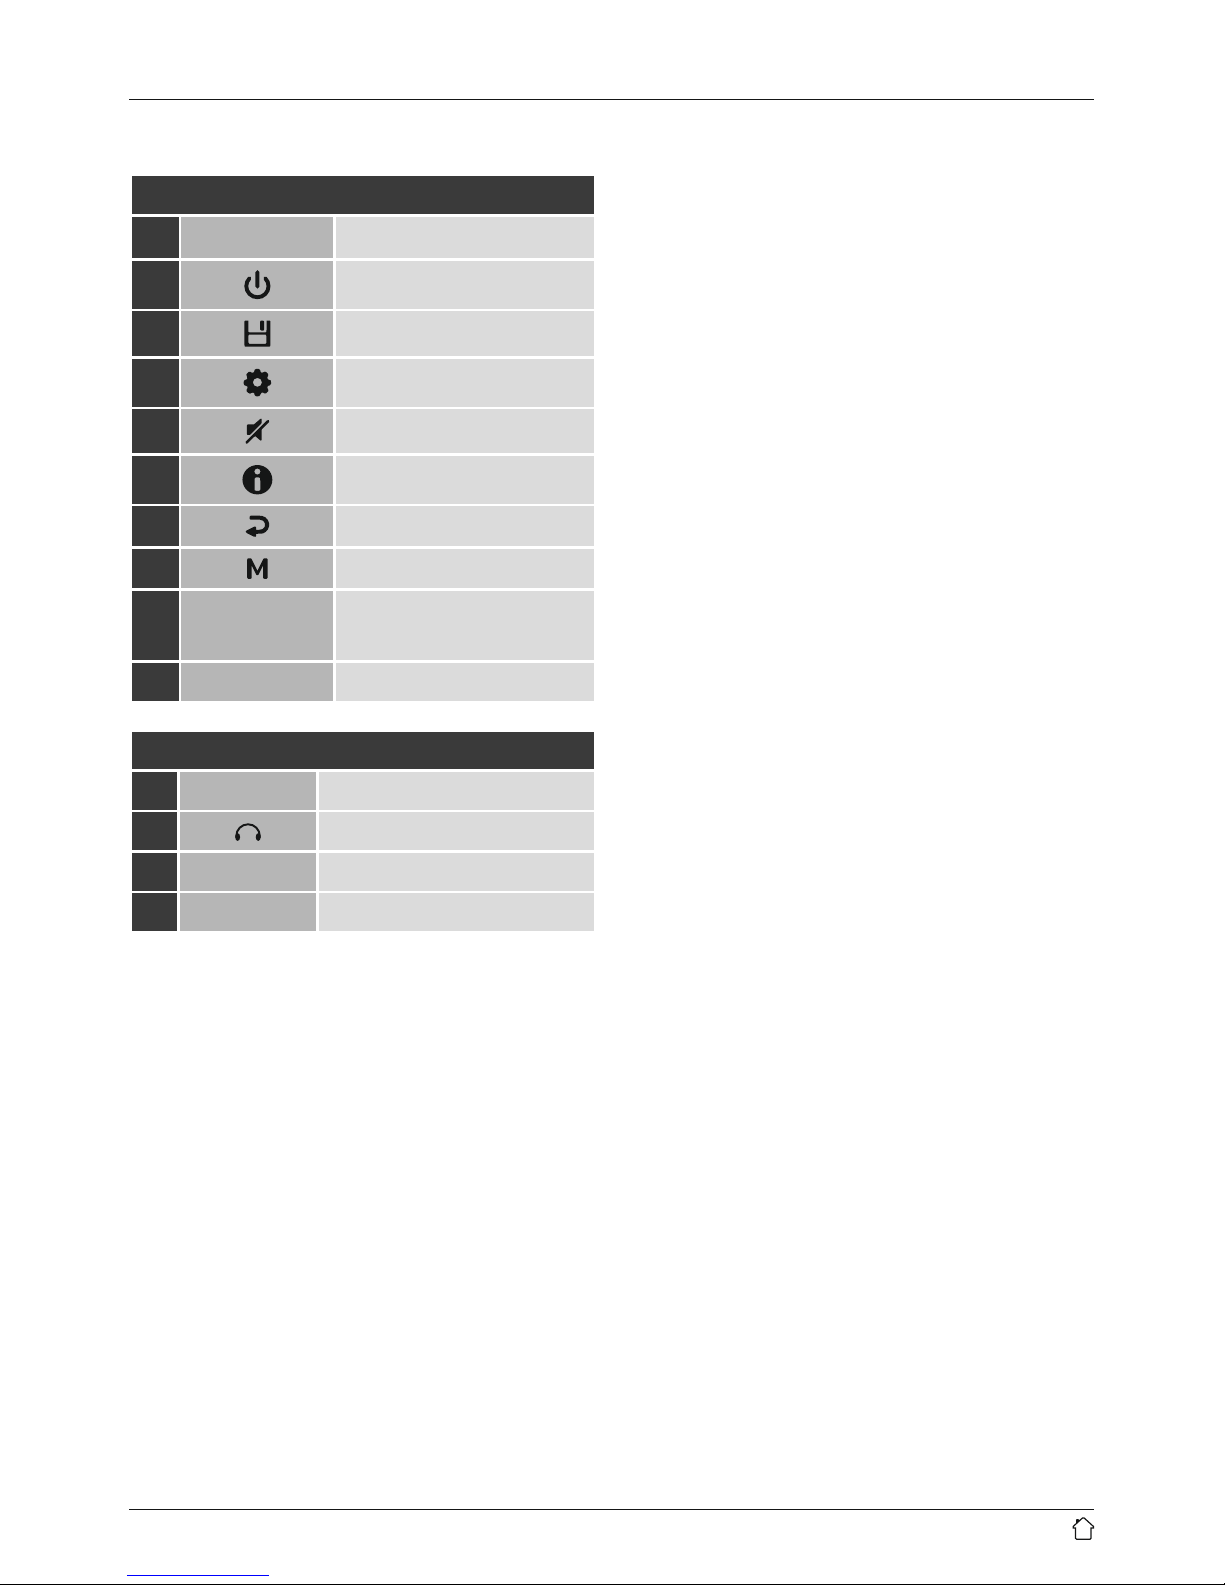
5.1 Radio –Connecting and starting up ...........6
5.2 General notes on use ......................6
6. Main menu /modes......................7
7. Internet radio ..........................7
7.1 Station search ...........................7
7.1.1 Search by country or region ..............8
7.1.2 Search by genre .......................8
7.1.3 Search by name .......................8
7.1.4 Popular stations ......................8
7.1.5 New stations .........................8
7.1.6 Local stations ........................8
7.2 Podcasts ...............................9
7.2.1 Search by country or region ..............9
7.2.2 Search by format (subjects or categories) ....9
7.2.3 Search by name .......................9
7.3 Last listened.............................9
7.4 Favourites (local) .........................9
7.4.1 Assigning the Presets shortcut buttons .....10
7.4.2 Calling up shortcut button presets ........10
7.4.3 Assigning the list of presets (1-30) ........10
7.4.4 Calling up astation from the Presets list (1-30)10
7.5 Presets ............................... 10
7.5.1 First use –Registering your radio .........10
7.5.2 Managing presets online ...............11
7.5.3 Opening the favourites list .............. 11
7.5.4 My Added Stations ................... 11
8. Music player ..........................11
8.1 Playback from acomputer (streaming) ........ 11
8.2 Playback from the network –Accessing les
using the radio..........................12
8.3 Playback of playlist.......................12
8.4 General playback options .................. 12
9. Digital radio (DAB/DAB+) ................13
9.1 Search /Automatic search .................13
9.2 Station list .............................13
9.3 Edit station list ..........................13
9.4 Presets................................13
9.4.1 Assigning the Presets shortcut buttons .....13
9.4.2 Calling up shortcut button presets ........14
9.4.3 Assigning the list of presets (1-30) ........14
9.4.4 Callingupastation from the Presetslist(1-30) .
14
9.5 DRC (Dynamic Range Control) .............. 14
9.6 Station sequence ........................14
10. FM .................................14
10.1 Scan setting ........................... 14
10.2 Search /Automatic search ................15
10.3 Manual station search ...................15
10.4 Presets...............................15
10.4.1 Assigning the Presets shortcut buttons ....15
10.4.2 Calling up shortcut button presets .......15
10.4.3 Assigning the list of presets (1-30) .......15
10.4.4
Calling up astation from the Presetslist(1-30)
.15
10.5 Audio setting ..........................15
11. Sleep ...............................15
12. Alarms ..............................16
12.1 Alarm settings .........................16
12.2 Activating /deactivating the alarm .......... 16
12.3 Stopping the alarm/ Snooze function ........16
13. System settings .......................16
13.1 Network..............................16
13.1.1 Network wizard–Conguration of Internet
connection /Search ..................16
13.1.2 Wireless network connection (WLAN) ..... 17
13.1.3 Manual conguration of network
connection –wireless (WLAN) ..........17
13.1.4 View settings .......................18
13.1.5 Network prole .....................18
13.2 Time/ Date settings......................19
13.3 Language.............................19
13.4 Factory Reset ..........................19
13.5 Softwareupdate........................20
13.6 Info .................................20
13.7 Lighting ..............................20
14. Careand Maintenance..................21
15. Warranty Disclaimer ...................21
16. Recycling Information ..................21
17. Declaration of Conformity...............21
Content

3
Menu structure
Main menu*
Internet radio
Last listened
Station list
My Favourites
Local Germany
Stations
Location
Genre
Search stations
Popular stations
New stations
Podcasts
Location
Genre
Search podcasts
My Added Stations
Help
System settings** Get access code
Main menu* FAQ
Music player
Shared media
My playlist
Repeat play
Shueplay
Clear My playlist
Prune servers
System settings**
Main menu*
DAB
Station list
Scan
Prune invalid
DRC
DRC high
DRC low
DRC off
Station order
Alphanumeric
Ensemble
Valid
System settings**
Main menu*
FM
Scan setting
Audio setting
System settings**
Main menu*
Sleep
Alarms
Alarm 1
Alarm 2

4
System settings**
Network
Network wizard
PBC Wlan setup
View settings
Manual settings
Network prole
Time/Date
Set Time/Date
Auto update
Update from DAB
Update from FM
Update from Network
No Update
Set format
Set timezone
Daylight savings
Language
Factory reset
Softwareupdate
Auto-check setting
Checknow
Setup wizard
Info
Backlight
Power-on Level
High
Medium
Low
Standby Level
Timeout
Standby Level

5
Thank you for choosing aHama product. Take your time
and read the following instructions and information
completely.Please keep these instructions in asafe place
for futurereference. If you sell the device, please pass
these operating instructions on to the new owner.
1. Explanation of Warning Symbols and Notes
Warning
This symbol is used to indicate safety instructions or
to draw your attention to specichazards and risks.
Note
This symbol is used to indicate additional
information or important notes.
Risk of electric shock
This symbol indicates product parts energized with
adangerous voltage of sucient magnitude
to constitute arisk of electric shock.
2. Package Contents
•DIR3020 digital radio
•AC/DC adapter
•Quick guide
3. Safety Notes
•Theproduct is intended forprivate,non-commercial use only.
•Do not use the product in the immediate vicinity of
heating, other sources of heat or in direct sunlight.
•Protect the product from dirt, moistureand overheating
and us it in dry rooms only.
•As with all electrical devices, this device should be kept
out of the reach of children.
•Children must not play with the device. Cleaning and
user maintenance must not be carried out by children
without supervision.
•Do not use the product in areas in which electronic
products arenot permitted.
•Be considerate. High volumes can disturb or interfere
with your surroundings.
•Do not drop the product and do not expose it to any
major shocks.
•Do not operate the product outside the power limits
given in the technical data.
•Keep the packaging material out of the reach of children
due to the risk of suffocation.
•Dispose of packaging material immediately according to
locally applicable regulations.
•Do not modify the device in any way.Doing so voids the
warranty.
Risk of electric shock
•Do not open the device or continue to operate
it if it becomes damaged.
•Do not use the product if the AC adapter,
adapter cable or power cable is damaged.
•Do not attempt to service or repair the product
yourself.Leave any and all service work to
qualied experts.

6
4. Informations and notes before getting started
Note
•Forbest reception, ensurethat the antenna
is fully extended and vertical.
•Tryvarious different positions if necessary
to get the best reception.
Network connection/ Preparing the internet
connection
Youcan integrate this radio into alocal network and
even access home servers or other authorised resources.
To receive Internet radio, an Internet connection is also
required on the network.
WLAN connection (wireless network)
•Ensurethat the router is switched on, is functioning
correctly and that thereisaconnection to the
Internet /network.
•Activate the WLAN function of your router if it is not
already activated.
•Followyour router´s operating instructions as regards
the correct functioning of the WLAN connection.
Note
Use only original accessories (or: accessories
approved by Hama) to avoid damage to the product.
5. Getting started
5.1 Radio –Connecting and starting up
Connect thepower supply to themains connection(1) on the
backofthe radio.
Connect the network cable to aproperly installed and
easily accessible network socket. The power supply unit is
suitable for mains voltages between 100 and 240 V, and
is thus operable on almost any AC power grid. Please note
that acountry-specicadapter may be necessary.You
can nd an appropriate selection of Hama products at
www.hama.com.
Note
•Only connect the product to asocket that has been
approved for the device.
•When using amulti-socket power strip, make surethat
the sum power draw of all the connected devices does
not exceed its maximum throughput rating.
•The electrical socket must always be easily accessible.
•If you will not be using the product for along period
of time, disconnect it from mains power.
Once the product has been connected to mains power,
initialisation takes place. The radio starts up.
5.2 General notes on use
Note
•When aselection among menu items is to be made
(such as YES or NO), the one currently selected has
alight-coloured background ll.
•In menus offering avariety of different options
(such as Language, Update, and so on), the currently
selected option is marked with an asterisk (*).
Navigation and controls
•Select among menu items by turning [NAVIGATE/
ENTER/VOLUME].
•Conrm the selection by pressing [NAVIGATE/ENTER/
VOLUME].
•After pressing ashortcut button, navigate amongst the
menu items using [NAVIGATE/ENTER/VOLUME].
Volume adjustment /mute
•Youcan turn the volume up (right) or down (left) by
turning [NAVIGATE/ENTER/VOLUME](9) accordingly.
•Press [](5) to mute the radio.
•Press [](5) again to reset the volume to the value
it was prior to the radio being muted.
Entering passwords, search terms, and so on.
•Select each successive letter and digit by turning
[NAVIGATE/ENTER/VOLUME]and conrm each
selection by pressing [NAVIGATE/ENTER/VOLUME].
•To make corrections, select [BKSP /<-]and conrm.
The last input made is deleted.
•To cancel input, select [CANCEL]and conrm.
•Once your input is complete, select [OK]and
conrm to nish.

7
Additional information
Depending on the operating mode and stations available,
pressing [ ](6) displays additional information:
•Description
Indicates the radio station, the current program,
contents, subjects, etc.
•Genre
The genre(music style) of the station is shown.
•Reliability /signal strength
•Bit rate
The currently received digital bit rate of the received
station is displayed.
•Channel information
•Current time
•Today’sdate
Switch On/Off /Standby
•Press [ ](2), to switch the device on or off (Standby).
•To completely switch off the device, disconnect it from
the power supply.
6. Main menu /modes
This devices supports radio reception via the Internet, DAB/
DAB+ and FM.
The main menu contains the various operating modes as
well as other options that areexplained separately in the
following chapters:
7. Internet radio
8. Music player
9. DAB
10. FM
11. Sleep
12. Alarms
13. System settings
Select amongst the available operating modes by
repeatedly pressing [ ](8).
During playback, the current operating mode appears at
the top left-hand edge of the screen.
7. Internet radio
The radio uses the station list on the vTuner* portal.
Youcan use stations without direct registration on the
following portal: http://www.wiradio-froniter.com. Youwill
nd detailed operating instructions under 7.5 Presets.
Note
If necessary,itispossible to switch providers in order to
make all features and functions of the product available.
From the main menu or after pressing [ ]repeatedly,
activate Internet (Internet Radio) mode on the radio.
7.1 Station search
This radio offers various ways to search for stations.
•Use [NAVIGATE/ENTER/VOLUME]tonavigate through
each search function and its options.
•Once you have found astation you like, conrm by
pressing [NAVIGATE/ENTER/VOLUME]. The radio starts
playing the selected station.

8
7.1.1 Search by country or region
To search for astation by continent, country and region,
proceed as follows:
•Press [ ](4) to access the Settings menu.
•Use [NAVIGATE/ENTER/VOLUME](9) to navigate
to the "Station list" menu item.
•Conrm the selection by pressing [NAVIGATE/
ENTER/VOLUME].
•Use [NAVIGATE/ENTER/VOLUME]tonavigate to the
"Stations" menu item. Conrm the selection by pressing
[NAVIGATE/ENTER/VOLUME].
Once you have restricted the results to acertain country or
region, select astation from the complete list or from alist
sorted by genre.
7.1.2 Search by genre
To search for astation of acertain genreorsubject focus,
proceed as follows:
•Press [ ](4) to access the Settings menu.
•Use [NAVIGATE/ENTER/VOLUME](9) to navigate to
the "Station list" menu item.
•Conrm the selection by pressing [NAVIGATE/
ENTER/VOLUME].
•Use [NAVIGATE/ENTER/VOLUME]tonavigate to the
"Stations" menu item. Conrm the selection by pressing
[NAVIGATE/ENTER/VOLUME].
Once you have restricted the results to acertain genre,
select astation from alist of all stations available, or from
apre-selected list, or from alist sorted by country.
7.1.3 Search by name
If you know the name of the desired station, you can
search for it directly:
•Press [ ](4) to access the Settings menu.
•Use [NAVIGATE/ENTER/VOLUME](9) to navigate to
the "Station list" menu item.
•Conrm the selection by pressing [NAVIGATE/ENTER/
VOLUME].
•Use [NAVIGATE/ENTER/VOLUME]tonavigate to the
"Stations" menu item. Conrm the selection by pressing
[NAVIGATE/ENTER/VOLUME].
•Use [NAVIGATE/ENTER/VOLUME]tonavigate to the
"Search stations" menu item. Conrm the selection by
pressing [NAVIGATE/ENTER/VOLUME].
Enter the complete name, or apart thereof,inthe input
screen andselect[OK]tostart the search. Youreceive alist
of all availablestations whose namescontainthe search key.
7.1.4 Popular stations
Youcan nd aselection of the most popular stations as follows:
•Press [ ](4) to access the Settings menu.
•Use [NAVIGATE/ENTER/VOLUME](9) to navigate to
the "Station list" menu item.
•Conrm the selection by pressing [NAVIGATE/ENTER/
VOLUME].
•Use [NAVIGATE/ENTER/VOLUME]tonavigate to the
"Stations" menu item. Conrm the selection by pressing
[NAVIGATE/ENTER/VOLUME].
•Use [NAVIGATE/ENTER/VOLUME]tonavigate to the
"Popular stations" menu item and select your preferred
station.
7.1.5 New stations
Stations that have recently been added to the database
can be found as follows:
•Press [ ](4) to access the Settings menu.
•Use [NAVIGATE/ENTER/VOLUME](9) to navigate to
the "Station list" menu item.
•Conrm the selection by pressing [NAVIGATE/ENTER/
VOLUME].
•Use [NAVIGATE/ENTER/VOLUME]tonavigate to the
"Stations" menu item. Conrm the selection by pressing
[NAVIGATE/ENTER/VOLUME].
•Use [NAVIGATE/ENTER/VOLUME]tonavigate to the
"New stations" menu item and select your preferred
station.
7.1.6 Local stations
To search for stations from your own country (the country
in which the radio is currently located), proceed as follows:
•Press [ ](4) to access the Settings menu.
•Use [NAVIGATE/ENTER/VOLUME](9) to navigate to
the "Station list" menu item.
•Conrm the selection by pressing [NAVIGATE/ENTER/
VOLUME].
•Use [NAVIGATE/ENTER/VOLUME]tonavigate to the
"Local <Country>" menu item. Conrm the selection by
pressing [NAVIGATE/ENTER/VOLUME].
•Use [NAVIGATE/ENTER/VOLUME]tonavigate to your
preferred station.

9
Note
Replace the <Country> placeholder with the country you
arecurrently located in.
Youcan lter this local list by genre, or select astation
from the complete list, or select from apre-selected list.
7.2 Podcasts
Podcasts areprograms on various topics and include, for
example, talk shows, news and much more. Podcasts can
be downloaded from the Internet.
Thereare normally approximately 10,000 programs
available. Similarly to radio stations, the radio makes it
possible to lter alarge number of Podcasts, or to search
the entiredatabase for amatching result.
7.2.1 Search by country or region
To search for apodcast by continent, country and region,
proceed as follows:
•Press [ ](4) to access the Settings menu.
•Use [NAVIGATE/ENTER/VOLUME](9) to navigate to
the "Station list" menu item.
•Conrm the selection by pressing [NAVIGATE/
ENTER/VOLUME].
•Use [NAVIGATE/ENTER/VOLUME]tonavigate to the
"Podcasts" menu item. Conrm the selection by pressing
[NAVIGATE/ENTER/VOLUME].
•Use [NAVIGATE/ENTER/VOLUME]tonavigate to the
"Location" menu item and select your preferred station.
Once you have restricted the results to acertain country or
region, select astation from the complete list or from alist
sorted by genre.
7.2.2 Search by format (subjects or categories)
To search for apodcast by continent, country and region,
proceed as follows:
•Press [ ](4) to access the Settings menu.
•Use [NAVIGATE/ENTER/VOLUME](9) to navigate
to the "Station list" menu item.
•Conrm the selection by pressing [NAVIGATE/
ENTER/VOLUME].
•Use [NAVIGATE/ENTER/VOLUME]tonavigate to the
"Podcasts" menu item. Conrm the selection by pressing
[NAVIGATE/ENTER/VOLUME].
•Use [NAVIGATE/ENTER/VOLUME]tonavigate to the
"Genre" menu item and select your preferred station.
7.2.3 Search by name
If you know the name of the desired Podcasts, you can
search for it directly:
•Press [ ](4) to access the Settings menu.
•Use [NAVIGATE/ENTER/VOLUME](9) to navigate to
the "Station list" menu item.
•Conrm the selection by pressing [NAVIGATE/
ENTER/VOLUME].
•Use [NAVIGATE/ENTER/VOLUME]tonavigate to the
"Podcasts" menu item. Conrm the selection by pressing
[NAVIGATE/ENTER/VOLUME].
•Use [NAVIGATE/ENTER/VOLUME]tonavigate to the
"Search podcasts" menu item.
Enter the complete podcast name, or apart thereof,
in the input screen and select [OK]tostart the search.
Youreceivealist of all available Podcasts whose names
contain the search key.
7.3 Last listened
The radio saves the last stations and podcasts listened to in
their own list. To access the list, proceed as follows:
•Press [ ](4) to access the Settings menu.
•Use [NAVIGATE/ENTER/VOLUME](9) to navigate to
the "Last listened" menu item.
•Conrm the selection by pressing [NAVIGATE/
ENTER/VOLUME].
7.4 Favourites (local)
Youcan save up to 30 of your favourite stations for quick
and direct access.

10
7.4.1 Assigning the Presets shortcut buttons
•Set the station that you would like to save as afavourite
station preset.
•Once the station is playing, press and hold the relevant
shortcut button for around 3seconds.
•The selection will be conrmed by the display showing
"Preset (1-4, depending on shortcut key) stored".
•During playback, the Preset memory slot is displayed at
the right-hand edge of the screen.
Note
Favourites cannot be deleted. If all 30 station memory
slots are lled and you wish to save anew station,
choose one of the occupied slots. The station in this slot
will be overwritten with the new station.
7.4.2 Calling up shortcut button presets
To call up apreset station, press the corresponding
shortcut button (2-5).
7.4.3 Assigning the list of presets (1-30)
•Set the station that you would like to save as afavourite
station preset.
•If the stations is playing, press and hold [ ](3) for
approx. 3seconds until the Presets list opens up.
•Navigate to the preferred memory slot and conrm your
selection by pressing [NAVIGATE/ENTER/VOLUME](9).
•The selection will be conrmed by the display showing
"
Preset (1-30, depending on storage space) stored
".
7.4.4 Calling up astation from the Presets list (1-30)
•Press []to call up the Presets list.
•Use [NAVIGATE/ENTER/VOLUME](9) to navigate
to the preferred station and conrm your selection by
pressing [NAVIGATE/ENTER/VOLUME].
7.5 Presets
(vTuner –http://www.wiradio-frontier.com)
In addition to the local station memory slots, you
can create additional lists of favourites using the
vTuner database.
Lists of favourites created using the vTuner database
can be synchronised across multiple radios.
7.5.1 First use –Registering your radio
In order to be able to use this function you have to register
at www.wiradio-frontier.com.You need avalid email
address and an access code which will be generated by
your radio.
Note
•No personal information is collected during the
registration process.
•Registering does not cost you anything extra. The offer
is completely free.
•Following registration you can choose from around
20,000 radio stations and 10,000 podcasts and
manage these in Presets lists.
Get access code:
•Press [ ](4) to access the Settings menu.
•Use [NAVIGATE/ENTER/VOLUME](9) to navigate to
the "Station list" menu item.
•Conrm the selection by pressing [NAVIGATE/
ENTER/VOLUME].
•Use [NAVIGATE/ENTER/VOLUME]tonavigate to the
"Help" menu item. Conrm the selection by pressing
[NAVIGATE/ENTER/VOLUME].
•Use [NAVIGATE/ENTER/VOLUME]tonavigate to the
"Get access code" menu item.
Note
Please note that each access code can only be used
once. Please contact customer service if you should
experience problems while registering the radio.
•During registration, the radio’s ID is associated with your
e-mail address and saved in the web interface.
•If multiple radios areregisteredtoyou and you wish to
delete one of those registrations or just comparethem,
you can nd the radio’s ID as follows:
•Press [ ](4) to go to the system settings.
•Use [NAVIGATE/ENTER/VOLUME](9) to navigate to
the "Info" menu item.
•Conrm the selection by pressing [NAVIGATE/
ENTER/VOLUME].
The radio ID can now be viewed on the display.

11
7.5.2 Managing presets online
(vTuner –http://www.wiradio-frontier.com)
After registering on the portal, you can search through
the station archive using various lters, try out stations,
and create your own favourites list from the stations listed
there. The favourites list is then synchronised with your
radio in seconds.
7.5.3 Opening the favourites list
To open the favourites list you created on the portal using
the radio, proceed as follows:
•Press [ ](4) to access the Settings menu.
•Use [NAVIGATE/ENTER/VOLUME](9) to navigate to
the "Station list" menu item.
•Conrm the selection by pressing [NAVIGATE/
ENTER/VOLUME].
•Use [NAVIGATE/ENTER/VOLUME]tonavigate to the
"My Favourites" menu item. Conrm the selection by
pressing [NAVIGATE/ENTER/VOLUME].
7.5.4 My Added Stations
If astation you desireisnot yet available, you can
add it manually to the portal (Only available on your
device), or suggest astation be added to the database
(Recommend station).
•Youneed the web address of the stream, which can
often be found on the station’swebsite.
•Youcan access the manually added radio stations
as follows:
•Press [ ](4) to access the Settings menu.
•Use [NAVIGATE/ENTER/VOLUME](9) to navigate
to the "Station list" menu item.
•Conrm the selection by pressing [NAVIGATE/
ENTER/VOLUME].
•Use [NAVIGATE/ENTER/VOLUME]tonavigate to the
"My Added Stations" menu item. Conrm the selection
by pressing [NAVIGATE/ENTER/VOLUME].
The database is constantly expanded and maintained.
Nevertheless, we hope you’ll understand that sometimes
therecan be delays in integrating new stations and some
stations areeven rejected.
8. Music player
This operating mode enables the playback of MP3, WMA
or FLAC les stored on aPCorlocal network.
From the main menu or after pressing [ ]repeatedly,
activate Music player mode on the radio.
8.1 Playback from acomputer (streaming)
Youcan manage the radio and stream music to it from
your computer.
The following explanation assumes your computer’s
operating system is Windows 8. If you use adifferent
operating system, or if you have any other questions,
please contact our customer support team.
Requirements:
•The radio and the computer must be on the
same network.
•The radio must be authorised as aplayback device on
the computer.
Proceed as follows:
-> Control Panel -> Network and Internet ->
Show network computers and devices
The radio should be shown here.
•Right-click on the icon or designation of the radio and
choose Allow streaming to this device.
•Right-click again on the icon or designation of the radio
and choose Show device website to change the
friendly name of the device.
•Anew browser window opens. Youcan make the desired
changes here.
Use:
•The radio can now access shared directories on the
computer,and you can stream audio les to the device
for playback (streaming).
•The music directory of your music library is enabled
as standard.
•Create and manage shared folders using Explorer or
Windows Media Player.
•Right-click on the desired music le,choose Play To,
and then select the designation of the radio.
•The radio begins playback of the music le.

12
8.2 Playback from the network –Accessing files
using the radio
To access one of the existing network shared les directly
from the radio, proceed as follows:
From the main menu or after pressing [ ]repeatedly,
activate Music player mode on the radio:
•Press [ ](4) to access the Settings menu.
•Use [NAVIGATE/ENTER/VOLUME](9) to navigate to
the "Music player" menu item.
•Conrm the selection by pressing [NAVIGATE/
ENTER/VOLUME].
•Use [NAVIGATE/ENTER/VOLUME]tonavigate to the
"Shared media" menu item. Conrm the selection by
pressing [NAVIGATE/ENTER/VOLUME].
•Choose the correct device (home server,PC, etc.) and
press [NAVIGATE/ENTER/VOLUME]toopen the list of
shared folders on that device.
Youcan now search for les,open aplaylist, or search
through the entireshared music folders. If you want to
search through the entireselection of music, thereare other
sorting functions available (Album, Artist, Genre, Folder,
etc.) that can help you nd the desired le morequickly.
Note
These functions areonly available if the ID3 tag and
other le information have been maintained on the
source device.
Prune servers:
To reset the list of servers connected to so far,press
[NAVIGATE/ENTER/VOLUME].
If you conrm by choosing YES,then all shared media will
be deleted.
8.3 Playback of playlist
Youcan create alocal playlist on the radio, in which you
save les shared on the network or from connected data
storage devices.
•Choose the le to be added to the playlist (under
Shared media).
•Press and hold [NAVIGATE/ENTER/VOLUME]for
approx. 3seconds until the display shows the message
Added to playlist.
Note
Youcan also use playlists that werecreated on your
Windows PC. (WPL =Windows Playlist). Forexample,
Windows Media Player is suited for this purpose.
To go directly to the playlist, do as follows:
•Press [ ](4) to access the Settings menu.
•Use [NAVIGATE/ENTER/VOLUME](9) to navigate to
the "Music player" menu item.
•Conrm the selection by pressing [NAVIGATE/
ENTER/VOLUME].
•Use [NAVIGATE/ENTER/VOLUME]tonavigate to
the "My Playlist" menu item. Conrm the selection by
pressing [NAVIGATE/ENTER/VOLUME]. The playlist is
now played.
•To remove individual les from the playlist, choose
the le and then press and hold [NAVIGATE/ENTER/
VOLUME]for approx. 3seconds.
•Conrm Delete from my playlist by choosing YES
to delete the le from the playlist.
•To delete the entireplaylist, proceed as follows:
•Press [ ](4) to access the Settings menu.
•Use [NAVIGATE/ENTER/VOLUME](9) to navigate to
the "Music player" menu item.
•Conrm the selection by pressing [NAVIGATE/ENTER/
VOLUME].
•Use [NAVIGATE/ENTER/VOLUME]tonavigate to the
"Clear My playlist" menu item. Conrm the selection by
pressing [NAVIGATE/ENTER/VOLUME].
•Conrm the prompt querying if you want to delete the
playlist with YES.
8.4 General playback options
These playback options, which arevalid for all playback
under Music player,can be found here:
•Press [ ](4) to access the Settings menu.
•Use [NAVIGATE/ENTER/VOLUME](9) to navigate to
the "Repeat play/Shueplay" menu item. Conrm the
selection by pressing [NAVIGATE/ENTER/VOLUME].

13
Repeat: On /Repeat: Off
To switch the function (On /Off), repeatedly press
[NAVIGATE/ENTER/VOLUME]. With Repeat: On,
only the current track is repeated.
Shue: On /Shue: Off
To switch the function (On /Off), repeatedly press
[NAVIGATE/ENTER/VOLUME]. With Shue: On,
all tracks areplayed in arandom order.
9. Digital radio (DAB/DAB+)
The radio receives all established digital radio frequencies
in the range of 174 MHz to 240 MHz (band III, channel
5A to 13F).
From the main menu or after pressing [ ]repeatedly,
activate operating mode DAB(DABRadio) on the radio.
9.1 Search /Automatic search
The automatic DABchannel search scans the DABband
III for available stations. After the station search, all
interference-free stations aresaved in alphabetical order.
In Stations list a?is displayed in front of the station names
of stations found during aprevious scan but which cannot
currently be received.
The automatic DABstation search starts automatically
when DABmode is started for the rst time; it is indicated
by Scanning… and astatus bar on the display.
If you would like to start the search again, proceed
as follows:
•Press [ ](4) to access the Settings menu.
•Use [NAVIGATE/ENTER/VOLUME](9) to navigate to
the "Scan" menu item.
•Conrm the selection by pressing [NAVIGATE/
ENTER/VOLUME].
•Wait until the search process has completed.
•The available stations arenow displayed in the
list of stations.
9.2 Station list
Youcan call up the station list in DABmode at any time.
To do so, proceed as follows:
•Press [ ](7) during playback to navigate through the
available stations in ascending alphabetical order using
[NAVIGATE/ENTER/VOLUME].
•Conrm the selection by pressing [NAVIGATE/
ENTER/VOLUME].
•The device starts playback automatically.
Note
The list of stations contains all stations that werefound
on the last station search. Afurther station search -as
described in 9.1 Search /Automatic search -can
be started. Astation's reception quality depends on
factors such as the weather,location and orientation
of the aerial. If astation shown in the list of stations is
not available, changing the orientation of the aerial or
the location of the radio may help. Stations that arenot
available can be removed from the list of stations as
described in 9.3 Edit station list.
9.3 Edit station list
To remove stations that arenot currently in the reception
area, from your station list, proceed as follows:
•Press [ ](4) to access the Settings menu.
•Use [NAVIGATE/ENTER/VOLUME](9) to navigate to
the "Prune invalid" menu item.
•Conrm the selection by pressing [NAVIGATE/
ENTER/VOLUME].
If you answer YES,then all currently unavailable stations
will be removed from the station list.
Note
To keep the list of stations up to date, we recommend
updating the list regularly with afullstation search
(see 9.1 Search /Automatic search).
9.4 Presets
Youcan save up to 30 of your favourite stations for quick
and direct access.
9.4.1 Assigning the Presets shortcut buttons
•Set the station that you would like to save as afavourite
station preset.
•Once the station is playing, press and hold the relevant
shortcut button for around 3seconds.
•The selection will be conrmed by the display showing
"Preset (1-4, depending on shortcut key) stored".
•During playback, the Preset memory slot is displayed
at the right-hand edge of the screen.

14
Note
Favourites cannot be deleted. If all 30 station memory
slots are lled and you wish to save anew station,
choose one of the occupied slots. The station in this slot
will be overwritten with the new station.
9.4.2 Calling up shortcut button presets
To callupapreset station, press the corresponding
shortcut button (2-5).
9.4.3 Assigning the list of presets (1-30)
•Set the station that you would like to save as afavourite
station preset.
•If the station is playing, press and hold [](3) for
approx. 3seconds until the Presets list opens up.
•Navigate to the preferred memory slot and conrm your
selection by pressing [NAVIGATE/ENTER/VOLUME].
•The selection will be conrmed by the display showing
"Preset (1-30, depending on storage space) stored".
9.4.4 Calling up astation from the Presets list (1-30)
•Press []to call up the Presets list.
•Use [NAVIGATE/ENTER/VOLUME]tonavigate to the
preferred station and conrm your selection by pressing
[NAVIGATE/ENTER/VOLUME].
9.5 DRC (Dynamic Range Control)
Some DABnetwork radio stations support avolume control
featurethat actively takes effect during playback. If the
volume suddenly increases, DRC automatically lowers it.
If the volume suddenly becomes quieter,DRC automatically
raises it. The same happens when playback is suddenly
quiet. The radio then increases the volume again.
DRC high:total equalisation of different volumes.
Strong compression can audibly reduce the dynamics
of amusic title.
DRC low:partial equalisation of different volumes. More
subtle compression, without too much loss of dynamics.
DRC off:noequalisation
Proceed as follows to do the settings:
•Press [ ](4) to access the Settings menu.
•Use [NAVIGATE/ENTER/VOLUME](9) to navigate to
the "DRC" menu item.
•Conrm the selection by pressing [NAVIGATE/ENTER/
VOLUME]and choose your preferred setting.
9.6 Station sequence
By default the radio sorts stations into alphabetical
order.You can also sort by signal strength or ensemble.
To change the sorting order,proceed as follows:
•Press [ ](4) to access the Settings menu.
•Use [NAVIGATE/ENTER/VOLUME](9) to navigate to
the "Station order" menu item.
•Choose between "Alphanumeric", "Ensemble"
and "Valid"and conrm your selection by pressing
[NAVIGATE/ENTER/VOLUME].
10. FM
From the main menu or after pressing [ ]repeatedly,
activate operating mode FM (FM Radio) on the radio.
Stations that broadcast additional information regarding
the station and the programme, arehighlighted on the
display with an RDS icon (Radio Data System).
This additional information is displayed by pressing [].
10.1 Scan setting
The search run setting allows you to determine whether
stations with low signal strength areignored during the
automatic search run. Proceed as follows:
•Press [ ](4) to access the Settings menu.
•Use [NAVIGATE/ENTER/VOLUME](9) to navigate to
the "Scan setting" menu item.
•Conrm the selection by pressing [NAVIGATE/
ENTER/VOLUME].
•To have the search run stop only at stations with high
signal strength, select Strong stations only.Otherwise,
the search run will stop at every station for which
asignal is received.

15
Note
By default, the "Strong stations only" method is selected.
10.2 Search /Automatic search
•Press [NAVIGATE/ENTER/VOLUME]tostart
astation search.
•The radio stops the search and starts playback when
it nds astation.
•Press [NAVIGATE/ENTER/VOLUME]again to continue
the search until the next station is found.
10.3 Manual station search
When you make station settings manually,you can dene
the desired frequency yourself and tune into stations that
wereignored during the automatic station search because
their signals weretoo weak.
•Press [back] to switch to the manual station setting.
•Turn [enter/navigate] (left: -0.05 MHz/ right: +0.05)
until you see the desired frequency.Wait amoment until
playback of the received station signal begins.
•Now press [back] again to leave the manual station
setting.
10.4 Presets
Youcan save up to 30 of your favourite stations for quick
and direct access.
10.4.1 Assigning the Presets shortcut buttons
•Set the station that you would like to save as afavourite
station preset.
•Once the station is playing, press and hold the relevant
shortcut button for around 3seconds.
•The selection will be conrmed by the display
showing "Preset (1-4, depending on shortcut key)
stored".
•During playback, the Preset memory slot is displayed at
the right-hand edge of the screen.
Note
Favourites cannot be deleted. If all 30 station memory
slots are lled and you wish to save anew station,
choose one of the occupied slots. The station in this slot
will be overwritten with the new station.
10.4.2 Calling up shortcut button presets
To callupapreset station, press the corresponding
shortcut button (2-5).
10.4.3 Assigning the list of presets (1-30)
•Set the station that you would like to save as afavourite
station preset.
•If the station is playing, press and hold [](3) for
approx. 3seconds until the Presets list opens up.
•Navigate to the preferred memory slot and conrm your
selection by pressing [NAVIGATE/ENTER/VOLUME](9).
•The selection will be conrmed by the display showing
"Preset (1-30, depending on storage space) stored".
10.4.4 Calling up astation from the Presets list (1-30)
•Press []to call up the Presets list.
•Use [NAVIGATE/ENTER/VOLUME](9) to navigate
to the preferred station and conrm your selection by
pressing [NAVIGATE/ENTER/VOLUME].
10.5 Audio setting
Forsome stations with aweak signal, quality can
be slightly improved by playing them in mono quality.
Youcan enable this function in the menu, and the
radio will automatically switch to mono reception when
signal quality is poor.Tochange the audio setting,
proceed as follows:
•Press [ ](4) to access the Settings menu.
•Use [NAVIGATE/ENTER/VOLUME](9) to navigate to
the "Audio setting" menu item.
•Conrm the selection by pressing [NAVIGATE/ENTER/
VOLUME]and choose your preferred setting.
11. Sleep
The radio has atimer function, which switches the radio
to standby mode after apre-dened length of time,
regardless of its operating mode.
•Press [ ](4) to access the Settings menu.
•Use [NAVIGATE/ENTER/VOLUME](9) to navigate to
the "Main menu" menu item.
•Conrm the selection by pressing [NAVIGATE/
ENTER/VOLUME].
•Use [NAVIGATE/ENTER/VOLUME]tonavigate to the
"Sleep" menu item.
•Youcan set the timer value with [NAVIGATE/
ENTER/VOLUME].
•Conrm the setting by pressing [NAVIGATE/
ENTER/VOLUME].
•If the sleep timer is activated, this is indicated in the
playback screen by [ ].

16
12. Alarms
The Radio has two individually adjustable alarm times.
12.1 Alarm settings
Youcan access the alarm settings as follows:
•Press [ ](4) to access the Settings menu.
•Use [NAVIGATE/ENTER/VOLUME](9) to navigate to
the "Main menu" menu item.
•Conrm the selection by pressing [NAVIGATE/ENTER/
VOLUME].
•Use [NAVIGATE/ENTER/VOLUME]tonavigate to the
"Alarms" menu item.
Alarm 1and alarm 2are congured identically and allow
two separate alarm times to be saved. Choose Alarm
1or2and conrm your selection by pressing [NAVIGATE/
ENTER/VOLUME].
Set the following details using [NAVIGATE/
ENTER/VOLUME].
Mode:
Choose when the alarm is to activate:
Off –Daily –Once –Weekdays –Weekends
Time:
First choose the hour,then the minute at which the alarm
is to activate.
Mode:
Set whether you wish to be woken by an alarm tone
(buzzer), by DAB,FM or by the Internet radio.
Program:
If you selected Internet radio/ DAB/ FM,choose which
station you wish to be woken with. Youcan choose any
of the 30 preset slots or the Last listened.
Volume:
Youcan set the volume at which the alarm sound should
be played. This setting makes it irrelevant how loud you
last listened to the radio.
Saving:
Select Off /Onto complete your alarm settings.
Note
It is recommended to allow the radio to update the
time automatically.This ensures that the time is always
correct even if thereisaseparation of power supply –
for example apower cut.
12.2 Activating /deactivating the alarm
•Conrm the menu item Save in alarm settings to activate
the alarm.
•Disable the alarm by setting the Mode to Off.
12.3 Stopping the alarm/ Snooze function
•When the alarm activates, press [ ]tostop the alarm.
•When the alarm activates, press [NAVIGATE/ENTER/
VOLUME]toenable snooze.
•The alarm turns off for the selected time interval
(5/10 minutes) beforeactivating once again.
13. System settings
Youcan modify all settings and access important
information about the radio in the System settings.
13.1 Network
13.1.1 Network wizard –Configuration of Internet
connection /Search
The network wizard helps you set up aconnection
between the radio and the Internet. Moremethods
of conguration and detailed information are
amplied subsequently.
•Youcan start the Network wizard as follows:
•Press [ ](4) to go to the system settings.
•Use [NAVIGATE/ENTER/VOLUME](9) to navigate to
the "Network" menu item.
•Conrm the selection by pressing [NAVIGATE/
ENTER/VOLUME].
•Use [NAVIGATE/ENTER/VOLUME]tonavigate to the
"Network wizard" menu item.
•When the wizardisstarted, the radio searches for
WLAN (WiFi) connections and then shows alist of the
available networks.
•Turn [NAVIGATE/ENTER/VOLUME]toswitch amongst
the networks discovered. At the bottom of the list are
options to restart the search ("[Rescan]") or congurethe
connection yourself ("[Manual cong]").
•If your network is not found or the SSID (Service Set
Identication, that is, the name of your network) is not
shown, the network may be hidden or out of range.
In this case, try manual conguration.

17
13.1.2 Wireless network connection (WLAN)
Depending on the network, thereare anumber of ways to
connect to it.
Networks that support connection via WPS (Wi-Fi Protected
Setup) areidentied in the list with the prex"[WPS]".
Other connections areeither open networks or connections
protected with aPSK, or Pre-Shared-Key.
WPS /PSK /open network connection
WPS allows simple and nevertheless protected connection
of the radio to the network. Twooptions areavailable for
this purpose:
The connection can be set up by means of PBC, or Push-
Button Conguration, or by the PIN procedure, in which
the web interface of your router prompts you to enter
arandomly generated sequence of numbers.
PBC setup
•Select your desired network. (Indicated by the
prex"[WPS...]")
•In the WPS menu, choose the "Push Button" option and
conrm your selection by pressing [NAVIGATE/ENTER/
VOLUME].
•Press the WPS button on your router or current
access point. This can often be done using the web
interface, as well.
•Consult the operating instructions of your router or
access point for details.
•Once the process has been started on the router or
access point, the radio should be able to nd and
connect to the network.
•Alternatively,PBC setup can be initiated from the radio's
Internet settings:
•Press [ ](4) to go to the system settings.
•Use [NAVIGATE/ENTER/VOLUME](9) to navigate to
the "Network" menu item.
•Conrm the selection by pressing [NAVIGATE/
ENTER/VOLUME].
•Use [NAVIGATE/ENTER/VOLUME]tonavigate to the
"PBC Wlan setup" menu item.
PIN setup
•Select your desired network. (Indicated by the
prex"[WPS...]")
•In the WPS menu, choose the PIN option and conrm
your selection by pressing [NAVIGATE/
ENTER/VOLUME].
•The radio generates an 8-digit code, which must be
entered into the web or user interface of your router
or access point.
•Consult the corresponding handbook for details on
conguring the router or access point.
Skip WPS /Pre-Shared Key(PSK) conguration
•Choose the item "Skip WPS" to proceed to key entry.
•On networks that do not support WPS, you will go
directly to key entry.
•In the input screen, enter the whole key and then conrm
with the OK button.
•If the key was entered correctly,the radio connects
to the access point and establishes the Internet/
network connection.
Note
•Often the Pre-Shared Keyisprinted on the back of the
router or access point.
•When entering the key,take notice of capitalisation.
Open network /unsecured network
Note
•We recommend against establishing unsecured
connections and advise you to always protect your
network against unauthorised access.
•If you plan to use an open network, you just have to
select the network from the list of available networks
and conrm. The radio then connects immediately with
the access point.
Other manuals for DIR3020
1
This manual suits for next models
1
Table of contents
Other Hama Radio manuals