Hammer LR 22i User manual

Loopband

1
Inhoudsopgave Index Pagina/Page
1.
Veiligheidsinstructies
1.
Safety instructions
02
2.
Algemene informatie
2.
General
03
2.1 Verpakking
2.1 Packaging
03
2.2 Afval
2.2 Disposal
03
3.
Montage
3.
Assembly
04
3.1
Checklist
3.1
Check list
04
3.2
Montage stappen
3.2
Assembly
steps
05
3.3
Instellen van de loopband
3.3
Setting up the item
07
3.3.1
Uitlijnen van de loopband
3.3.1
Setting up in detail
07
3.3.2
Stroomvoorziening
3.3.2
Power supply
07
3.3.3
Inklappen van de loopband
3.3.3
Folding
up
07
3.3.4
Uitklappen van de loopband
3.3.4
Unfolding
of the treadmill
07
3.3.5
Verplaatsen van de loopband
3.3.5
Moving
of the treadmill
08
3.3.6
Opbergen van de loopband
3.3.6
Storing
08
4. Start procedure 4. Starting procedure 08
4.1
Stroomvoorziening
4.1
Power supply
08
4.2
Veiligheidssleutel
4.2
Safety-key
08
4.3
Loopband op- en afstappen
4.3
Tread on and off
08
4.4
Loopband uit zetten in geval van nood
4.4
Tread offin emergency
case
08
5. Computer 5. Computer 09
5.1
Computertoetsen
5.1
Computer keys
09
5.2
Computerfuncties
5.2
Computer
operation
10
5.2.1
Quick-Start
5.2.1
Quick-Start
10
5.2.2
Program Modus
5.2.2
Program control
mode
10
5.2.3
HRC-Program
5.2.3
HRC-program
13
5.2.4
Customize-Program
5.2.4
Customize-program
14
5.2.4.1 Instellen van een
Customize-Program
5.2.4.1
Activating
a customize
program
14
5.2.5
Vetpercentage meting
5.2.5 Bodyfat
measurment
14
6.
Verzorging en onderhoud
6.
Care and Maintenance
15
6.1
Verzorging
6.1
Care
15
6.2
Centreren van de loopband
6.2
Centering the running belt
15
6.3
Opspannen van de loopband
6.3
Tighten the belt
16
6.4
Smeren van de loopband
6.4
Lubricate the running belt
16
7. Trainingshandleiding 7. Training
manual
17
7.1 Trainingsfrequentie
7.1 Trainingfrequency
17
7.2 Trainingsintensiteit
7.2 Trainingintensity
17
7.3
Hartslag
Training
7.3
Heartrate
orientated training
17
7.4 Trainen met hartslagmeting
7.4 Trainingcontrol
18
7.5 Trainingsduur
7.5 Trainingduration
19
8.
Onderdelentekening
8.
Explosion
drawing
21
9.
Onderdelenlijst
9.
Parts list
23
10.
Garantie
10.
Warranty
(Dutch only)
25
Loopband

2
1. Veiligheidsinstructies 1. Safetyinstructions
BELANGRIJK
!
Deze loopband is geproduceerd volgens DIN EN 957-1/6,
klasse HB.
Max. gewicht van de gebruiker 150 kg.
De loopband mag alleen gebruikt worden voor het
daarvoor bestemde doel.
Elk ander gebruik is niet toegestaan en kan mogelijk
gevaarlijk zijn. De importeur kan niet verantwoordelijk
worden gehouden voor enige schade of verwondingen ten
gevolge van onjuist gebruik van de apparatuur.
De loopband is volgens de nieuwste veiligheidsstandaarden
geproduceerd.
Om letsel en/of ongelukken te voorkomen bevelen wij u aan om
onderstaande regels aandachtig te lezen en na te volgen:
1. Het is niet toegestaan om kinderen op of in de omgeving
van de apparatuur te laten spelen.
2. Controleer regelmatig of alle schroeven, moeren,
handgrepen en pedalen goed vastzitten.
3. In geval van defecte onderdelen, deze onderdelen zo snel
mogelijk vervangen. Gebruik de apparatuur niet zolang de
onderdelen niet vervangen zijn. Controleer regelmatig op de
kwaliteit van het materiaal (in verband met materiaal
vermoeidheid).
4. Vermijd contact van de loopband met hoge temperaturen,
vochtigheid en vloeistoffen.
5. Lees deze handleiding goed en nauwkeurig door voor
ingebruikname van de apparatuur.
6. Houd rondom de apparatuur voldoende ruimte vrij in alle
bewegingsrichtingen (ten minste 1,5m).
7. Plaats de apparatuur op een vlakke en solide ondergrond.
8. Train niet direct voor of direct na een maaltijd.
9. Raadpleeg eerst een arts voordat u begint met een
trainingsprogramma.
10. Het veiligheidsniveau van de apparatuur kan alleen
gegarandeerd worden als u regelmatig de onderdelen
inspecteert op slijtage. De onderdelen waar u op moet letten
worden in de onderdelenlijst aangegeven met een *.
Hendels en andere verstelmechanismen mogen de
bewegingsvrijheid van de apparatuur niet blokkeren.
11. Traingsapparatuur mag in geen enkel geval gebruikt worden
als speelgoed.
12. Stap alleen op de pedalen die hiervoor bedoeld zijn en niet op
andere onderdelen van de apparatuur.
13. Draag niet te wijd zittende kleding, maar geschikte
trainingskleding zoals bijvoorbeeld een trainingspak.
14. Draag altijd schoenen en train nooit op blote voeten.
15. Zorg dat er geen andere personen in de omgeving van de
loopband aanwezig zijn om ongelukken door bewegende
onderdelen te voorkomen
16. Het is niet toegestaan om deze apparatuur te plaatsen in
ruimtes met hoge luchtvochtigheid (zoals de badkamer) of om
deze te plaatsen op het balkon.
17. Zorg ervoor dat de loopband geaard is. Als dit niet het geval
is, zou een computerstoring mogelijk een elektrische shock
kunnen veroorzaken.
18. Reparaties mogen alleen door een electricien gedaan worden.
19. Zorg ervoor dat de loopband en de stroomkabel niet in de
buurt komen van hete bronnen/voorwerpen.
20. Stel de loopband zo op dat u personen die dezelfde ruimte
betreden kunt zien aankomen.
21.
IMPORTANT
!
The treadmill is produced according to
DIN
EN
957-1/6
classHB.
Max. user weight is
150kg.
The treadmill should be used onlyfor its intended
purpose.
Any
other use of the item is prohibited and maybe danger-
ous. The importer cannot be held liable for damage or inju-
ry caused by improper use of the equipment.
The treadmill has been produced according to the
latest
safety
standards.
To
prevent
injury
and
/
or accident, please read and
follow
these simplerules:
1. Do not allow children to play on or near the equipment.
2
.
Regularly check that all screws, nuts, and
handles
are
tightly
secured.
3. Promptly replace all defective parts and do not use
the
equipment until it is repaired. Watch for any
material
fatigue.
4.
Avoid
high
temperatures,
moisture and splashing
water.
5. Carefullyread through the operating instructions
before
starting the equipment.
6
.
The equipment requires sufficient free space in all
directions, at the rear side, min. 2m and the width like
the treadmill is
having!
7. Set up the equipment on a solid and flat
surface.
8. Do not exercise immediately before or after
meals.
9
.
Before starting any fitness training, let yourself
examined by a physician.
10. The safety level of the machine can be ensured
only if
you
re
gul
ar
ly
i
ns
pec
t
parts subject to wear. These
ar
e
indicated by an * in the parts list. Levers and
other
adjusting
mechanisms
of the equipment must not
obstruct
the range of movement during training.
11
.
Training equipment must never be used as toys.
12. Do not step on the housing but only on the
steps
provided for this
purpose.
13. Do not wear loose clothing;wear suitable training
gear
such as a training suit, for example.
14. Wear shoes and never exercise barefoot.
15. Make certain that other
persons
are not in the area of
the treadmill,
because
other
persons
may be injured by
the moving
parts.
16. It is not allowed to place the item in rooms with high
humidity
(bathroom) or on the balcony.
17. Please check that the item is grounded during exercise.
If
the ground is not perfect, a mailfunction of the
computer
can cause an electrical shock!
18. Repairs are
only
allowed to be done by an electrician.
19. Pay attention to enough distance between the power
cable and the treadmill to hot
sources.
20. Set up the treadmill in such a way,that you are able
to
see other persons, who are appraoching..
3
2. Algemene informatie 2. General
Deze training apparatuur is voor thuisgebruik. De apparatuur
voldoet aan DIN EN 957-1/6 Klasse HB. De CE-markering verwijst
naar de EG Richtlijn 2004/108/EG,
98/37/EG, 2006/42/EG
en
2006/95/EG. Schade aan de gezondheid kan niet worden
voorkomen als de apparatuur niet gebruikt wordt zoals bedoeld
(bijvoorbeeld door overmatig trainen, incorrecte instellingen etc.).
Voor u begint met trainen, consulteert u uw arts over eventuele
gezondheidsrisico's bij gebruik van deze apparatuur op basis van
uw persoonlijke gezondheid om gezondheidsrisico's te voorkomen.
2.1 Verpakking
De verpakking bestaat uit milieuvriendelijke en recyclebare
materialen:
De buitenverpakking is gemaakt van karton
De gegoten onderdelen zijn van CFS-vrij polystyrol (PS)
Foli Folie en zakken zijn gemaakt van polyethylene (PE)
Verpakkingsbandjes zijn van Polypropylene (PP)
2.2 Afval
Bewaar de verpakking voor het geval van
reparaties / garantie aangelegenheden.
De apparatuur mag niet bij het gewone
huisvuil geplaatst worden maar dient
aangeboden te worden als grofvuil of bij
groot-afval instanties.
This training equipment is for use at home. The equipment
complies with the
requirements
of
DIN
EN
957-1/6
Class HB.
The CE marking refers to the EU Directive
2004/108/EEC;
98/37/EEC, 2006/42/EEC
und die
2006/95/EEC. Damage
to health cannot be ruled out
if
this equipment is not used
as
intended (for example, excessive training, incorrect
settings,
etc.).
Before starting your training, you should have a complete
phy
-
sical examination by your physician, in order to rule out any
existing health risks.
2.1 Packaging
Environmentally
compatible and recycable
materials:
External packaging made of
cardboard
Molded parts made of foam CFS-free
polystyrol
(PS)
Sheeting and bags made of polyethylene(PE)
Wrapping
straps
made of
polypropylene
(PP)
2.2 Disposal
Please be sure to keep the packing for
the
event of repairs
/
warranty
matters.
The
equipment should not be disposed of in
the
household rubbish!

4
3. Montage 3. Assembly
Om het monteren van de loopband zo gemakkelijk mogelijk voor
u te maken, hebben we de belangrijkste onderdelen reeds voor u
gemonteerd. Lees voor het monteren a.u.b. goed deze instructies
door en volg ze stapsgewijs zoals omschreven.
Inhoud van de verpakking
Haal alle individuele onderdelen uit de verpakking
en plaats ze op de grond.
Houd voldoende ruimte over rondom de loopband (ten
minste 2m ) om bewegingen mogelijk te maken.
Zorg ervoor dat de loopband op kamertemperatuur is
wanneer u begint te monteren
.
Om schade en ongelukken te voorkomen moet de
loopband door 2 personen gemonteerd worden.
Plaats uw vingers nooit tussen de loopband en de
behuizing van de motor!
3.1 Checklist
In order to make assembly of the treadmill as easy as
possib
-
le for you, we have
preassembled
the most important
parts.
Before you assemble the equipment, please read these
instruc
-
tions carefully and then continue step by step as
described.
Contents
of
packaging
Unpack all
individual
parts and place them on the floor.
Make certain that you have
adequate
room for
movement
(at least 2m) on all sides during assembly.
Before assembling, please make sure, that the treadmill is
having room
temperature.
To
have a secure assembly, the treadmillhas
to be
assembled
by two
persons. Put
your
fin
-
gers never between the mainframe and
the
motor cover!
3.1 Checklist

5
3.2 Montage stappen
/
Assembly
steps
Stap
/
Step
1
Stap
/
Step
2

6
Stap
/
Step
3
LET OP: zorg ervoor dat de kabels niet beschadigd raken
tijdens het monteren. Attention: do not damage the cables during assembly.
Stap
/
Step
4
7
3.3 Instellen van de loopband 3.3 Setting up the item
Gebruik de loopband nooit buiten.
Don´t use it outside.
Plaats de loopband niet dicht bij waterbronnen of in ruimten met
een hoge luchtvochtigheid.
Don´t set up the item very close to water
sources
or in
a
room with high humidity.
Zorg ervoor dat u niet kunt struikelen over de stroomkabel.
Make sure, that the power cord
doesn´t
lay,
where you
are
walking
Als de loopband op een tapijt staat, zorg er dan voor dat er
voldoende ruimte is tussen de onderzijde van de loopband en het
tapijt. Is dit niet het geval, plaats dan een beschermingsmat onder
de loopband.
If
the treadmill is placed on a carpet, please check,
that
there is enough space between the carpet and the running
belt.
If
not, please use a protection
mat.
Houd een veiligheidsafstand (vrije ruimte) aan van ten minste
2x1m aan de achterzijde van de loopband.
Pay attention to the safety area at the rear side of
the
treadmill of
2x1m.
Na verloop van tijd zou u zwarte slijtage onder de loopband op
kunnen opmerken. Dit is een normale slijtage en betekent niet dat
de loopband gebrekkig is. Deze slijtage kan worden verwijderd
met standaard reinigingsmiddelen. Om te voorkomen dat de
zwarte slijtage uw ondergrond besmet, is het aanbevolen om een
beschermingsmat onder de loopband te leggen.
You
can
find
rubber abrasion during longer exercise.
It
is
not
a defect, it is a normal scoring. To avoid any impurity, you
can put a protection mat under the running
area.
3.3.1 Uitlijnen van de loopband
Zorg voor een stabiele en vlakke ondergrond.
3.3.2 Stroomvoorziening
Steek de stekker van de loopband niet in een stekkerdoos
waar ook de TV en andere entertainment apparaten op
aangesloten zijn.
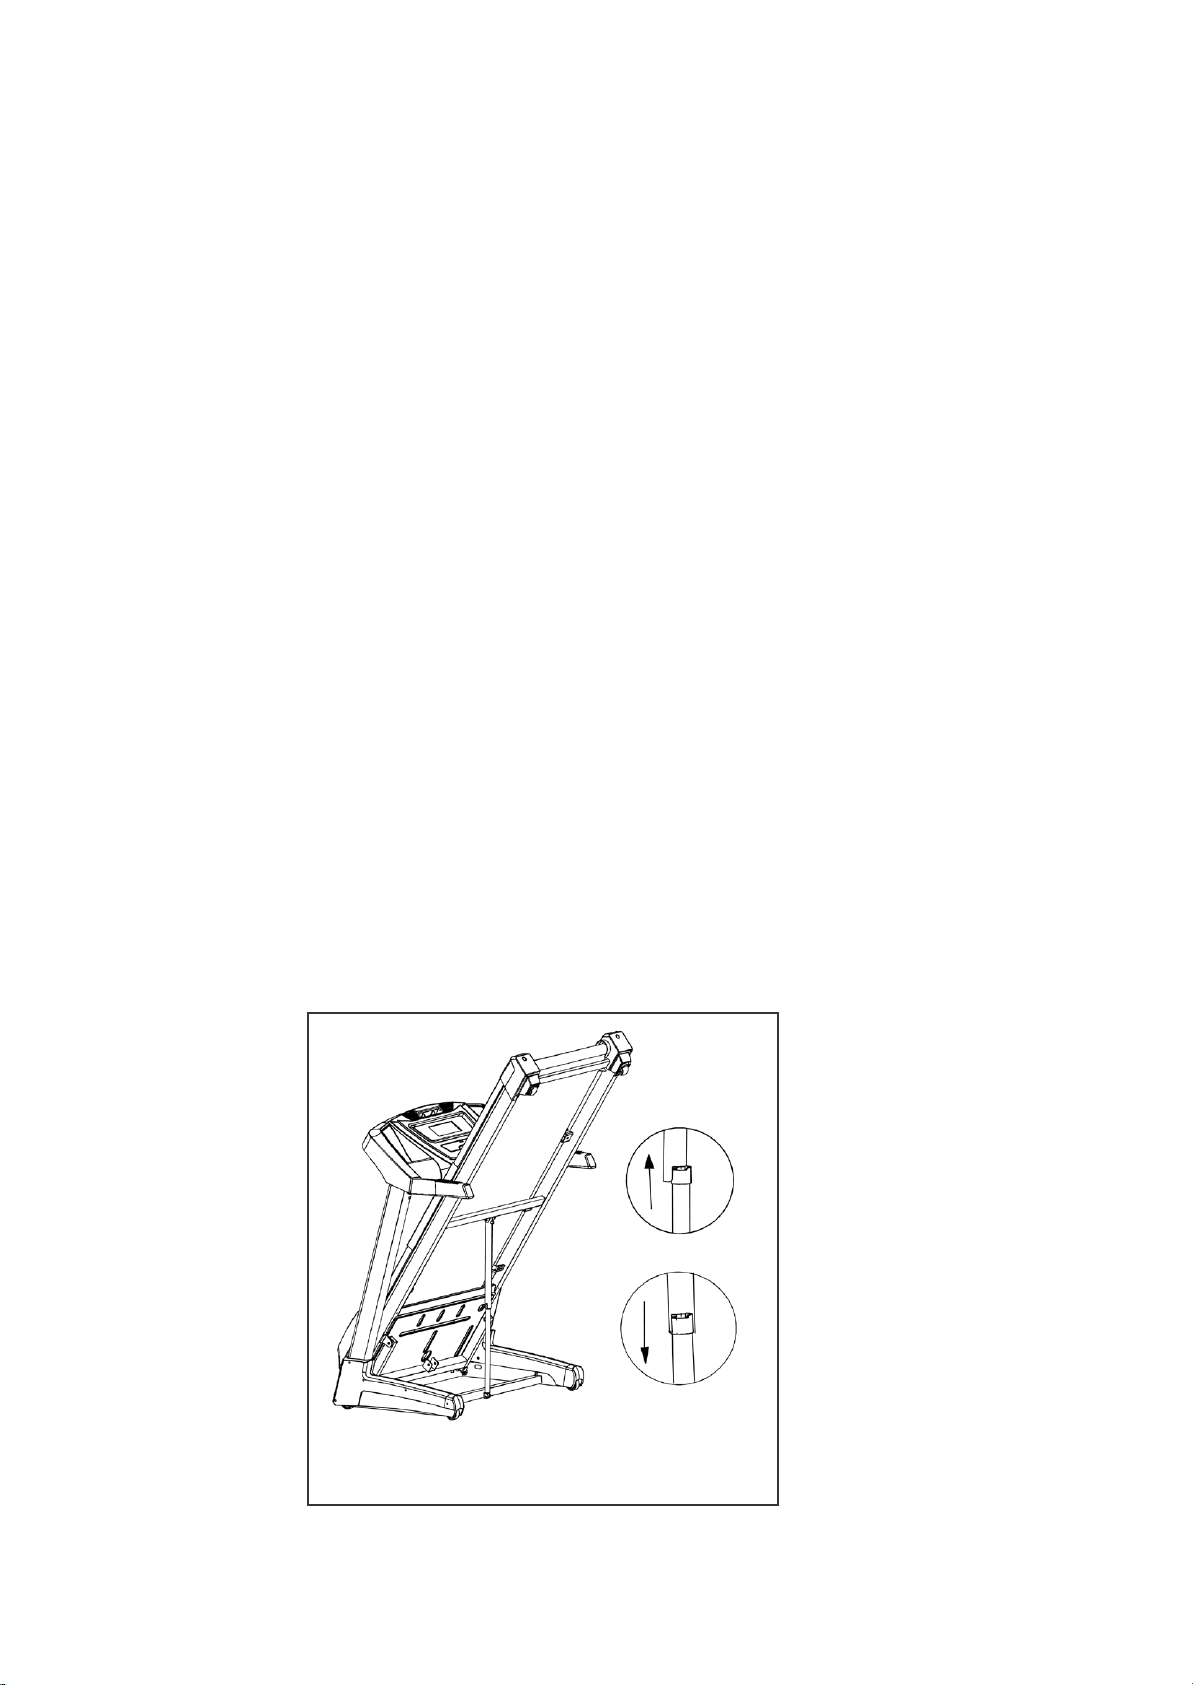
3.3.3 Inklappen van de loopband
Het inklappen van de loopband gaat zeer eenvoudig dankzij
gasveren. Zorg ervoor dat de loopband in horizontale positie
is (0% helling) voordat u de loopband inklapt. Klap het
loopvlak met de nodige voorzichtigheid omhoog totdat u
deze hoort vastklikken.
3.3.4 Uitklappen van de loopband
Om de loopband uit te klappen drukt u met uw voet op de
ontgrendelingshendel op het kantelmechanisme. Begeleid
het loopvlak met uw handen langzaam naar de grond.
Dankzij het demping systeem, valt het loopvlak pas vanaf
een bepaalde hoek naar beneden. Houd het loopvlak met
beide handen vast totdat u veilig los kunt laten.
3.3.1 Setting up in detail
The ground has to be even in the area, where you
will
set
up the item.
3.3.2 Power supply
Pay attention, that the treadmill
will
not be plugged in a multi
socket,
if
there are already
TV
and other
entertainment
items plugged in.
3.3.3
Folding
up
The
folding
up goes easily,
because
of the
assistance
of
the
compression
spring system. Make sure, that the running
surface is flat
(incline
0%) before
you fold
up the item. Move
the running area up, by holding the frame at the rear side,
till
you can hear a
„Clack“
and the position of the running
area is
secured.
3.3.4
Unfolding
of the treadmill
To
unfold
the treadmill, press the unlock system with your
foot at the
folding
mechanismus
and guide the running
area downwards. Pay attention, that the
compression
spring system
will
support
you,
but please don´t
unhand
the running deck!
A
-
1
A
-
2
A

8
3.3.5 Verplaatsen van de loopband
Om de loopband naar een andere plek te verplaatsen gaat u
als volgt te werk:
-
Stel de hellingshoek in op 0%
-
Zet het apparaat uit
.
-
Haal de stekker uit het stopcontact
.
-
Klap de loopband in totdat u een klik hoort.
-
Kantel de loopband voorzichtig naar u toe en rol de
loopband naar de nieuwe plek.
3.3.6 Opbergen van de loopband
Bij opbergen de volgende punten niet vergeten:
-
Zet het apparaat uit
-
Trek de stekker uit het stopcontact
.
-
Verwijder de nood-sleutel en bewaar deze op een veilige
plek buiten het bereik van kinderen
3.3.5
Moving
of the treadmill
To move the treadmill to another place,
follow
up
the
following
instruction,
please:
-
Incline
angle has to be 0%.
-
Switch
off
the item.
-
Unplugthe power cord of the
socket.
- Fold
up the item.
-
Cant the treadmill to your side,
till
your can rollit
easilyon the integrated rollers to the new place.
3.3.6 Storing
Pay attention for storing.
-
Switch
off
the item.
-
Unplugthe main cord.
-
Remove the emergency
key
and put it at
an
unapproachable
location for kids.
4. Start procedure 4. Starting procedure
4.1
Stroomvoorziening
Schakel de aan/uit schakelaar aan.
4.2 Veiligheidssleutel
Controleer of de veiligheidssleutel geplaatst is. Als de nood-
sleutel niet correct is geplaatst zal de loopband niet starten.
Het is niet toegestaan om te trainen zonder dat de
veiligheidssleutel geplaatst is omdat de loopband anders niet
automatisch stopt als u eraf valt. Om de loopband veilig te
stoppen, gebruikt u de START-STOP knop.
Het is verboden om te trainen zonder dat u het koord van de
veiligheidssleutel aan uw kleding bevestigd heeft. Reden
hiervoor is dat de loopband niet automatisch zal stoppen in
het geval dat u van de loopband af zou vallen.
Mocht u aan het trainen zijn geweest met de loopband
ingesteld op een helling hoger dan 0% dan moet u de helling
eerst opnieuw instellen naar 0% nadat de veiligheidssleutel in
werking is getreden. Als u dit niet doet, zal de loopband niet
opnieuw starten.
4.3 Loopband op- en afstappen
Gebruik a.u.b. de handleuningen als u de loopband op- en
afstapt. Tijdens het trainen kijkt u in de richting van de
computer. Als u wilt stoppen drukt u op
START-STOP
en wacht u totdat de loopband volledig tot stilstand is
gekomen, voor u afstapt.
4.4 Afstappen in een noodgeval
Volg in geval van een nood de volgende stappen:
-
Trek aan het koord van de veiligheidssleutel.
-
Houd de handleuningen met beide handen vast.
-
Spring op de zijkanten van de loopband en wacht tot de
loopband gestopt is met bewegen.
-
Druk op STOP.
4.1 Power supply
Switch on the power switch.
4.2 Safety-key
Check
if
the safety-key is placed.
If
the safety-key is
not
placed correctly, the treadmill cannot be
started.
An
exercise without
fixing
the cord is not allowed,
because the
treadmill
will
not stop,
if
you
fall
down. To stop the treadmill
safely, use the
START-STOP--button,
please.
If
you pull
the
safety
key
and the
incline
of the tradmill is not 0%, you have
to
reset
the incline to zero, after putting on the emergency
key,
by pressing
the
START-STOP-button.
If
you didn´t set
the incline to 0%,
the
treadmill cannot be
started.
4.3 Tread on and off the treadmill
Please use the handrails for treading on and off
the
treadmill. During your exercise, please look in the direction
of the computer.
If
you
would like
to stop the exercise,
press
the
START-STOP--button
and wait
till
the treadmill come
to
a complete
stop.
4.4 Tread
off
in emergency
case
Inan emergency case
follow
up the
following
procedure:
- Pull
out the emergency key
-
Grab both
handles
-
Jump onto the side rails and wait
till
the running belt
come to a complete
stop.
-
Press
the
STOP
button.
9
5. Computer 5. Computer
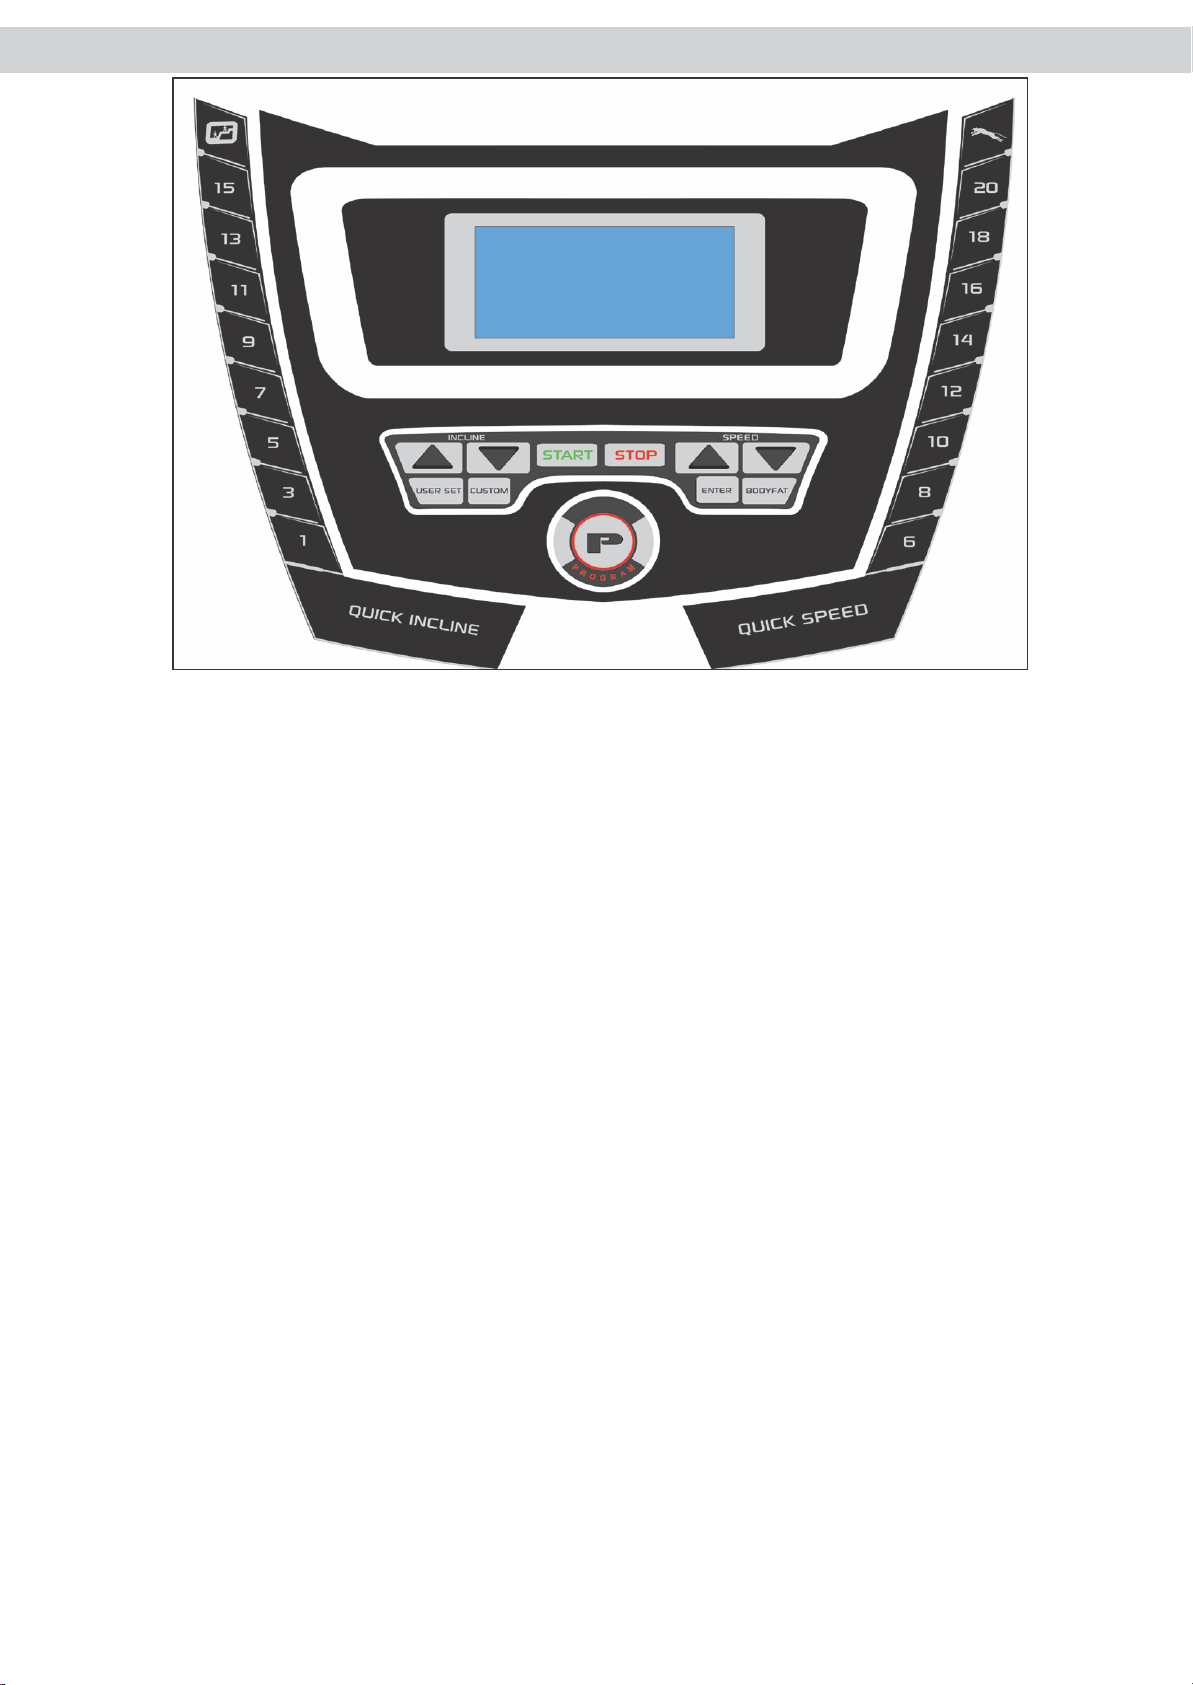
5.1 Computertoetsen
START-STOP:
Start en stopt uw t
raining.
CUSTOM:
Voor elke gebruiker kan een profiel met persoonlijke data
opgeslagen worden.
USER SET:
Activeert het vooraf ingestelde programma.
BODYFAT:
Start de vetpercentagemeting
.
P (Program):
Activeert de programma mogelijkheden.
ENTER:
Bevestigen van een waarde/input
.
INCLINE:
Toename
/
Afname van waarden of de helling (INCLINE).
Langer ingedrukt houden activeert de automatische waarde vinder.
SPEED:
Toename
/
Afname van waarden en van de snelheid
(SPEED
Langer ingedrukt houden activeert de automatische waarde
vinder.
QUICK
INCLINE
:
Directe verandering van waarden en van de hellingshoek.
QUICK
SPEED
:
Directe verandering van waarden en van de snelheid.
5.1 Computerkeys
START-STOP:
Start and stop your exercise.
CUSTOM:
Aprofileand the personal datas can be saved for each
user.
USER SET:
The
preset
program can be activated.
BODYFAT:
Starts the bodyfat
measurement.
P (Program):
Starts the selection of profiles.
ENTER:
Pressing of this button,
will
confirm the set values.
INCLINE:
Increase
/
decrease
of function levels and of the
incline.
A
longer pressing of these buttons
will
activate the
automatic
value finder.
SPEED:
Increase
/
decrease
of function levels and of the speed. A
longer pressing of these buttons
will
activate the
automatic
value finder.
QUICK
INCLINE
:
Direct change of function levels and of the incline.
QUICK
SPEED:
Direct change of function levels and of the
speed.

10
5.2 Computer functies
5.2.1
Quick
Start
Zet de loopband aan.
Plaats de veiligheidssleutel in de daarvoor bestemde ingang. Er
zal een pieptoon te horen zijn en het
PULSE/CAL-
venster toont
0, de
SPEED/DISTANCE
venster
toont 0, en in het grote scherm
op het display knippert het hartsymbool.
Druk op
START
om de loopband
te
starten.
De loopband begint met een snelheid
(SPEED)
van
1.0
km/h, en
een helling
(INCLINE)
van 0%.
Tijdens de training kunt u met de SPEED en INCLINE toetsen de
snelheid respectievelijk de hellingshoek veranderen. Dit kan ook
met de respectievelijke Quick toetsen.
Als u tijdens de training 1x op STOP drukt, zal de loopband 5
minuten stoppen met lopen. Na 5 minuten zal de loopband weer
naar de start modus overschakelen. Om uw training binnen deze 5
minuten te hervatten, druktu op START.
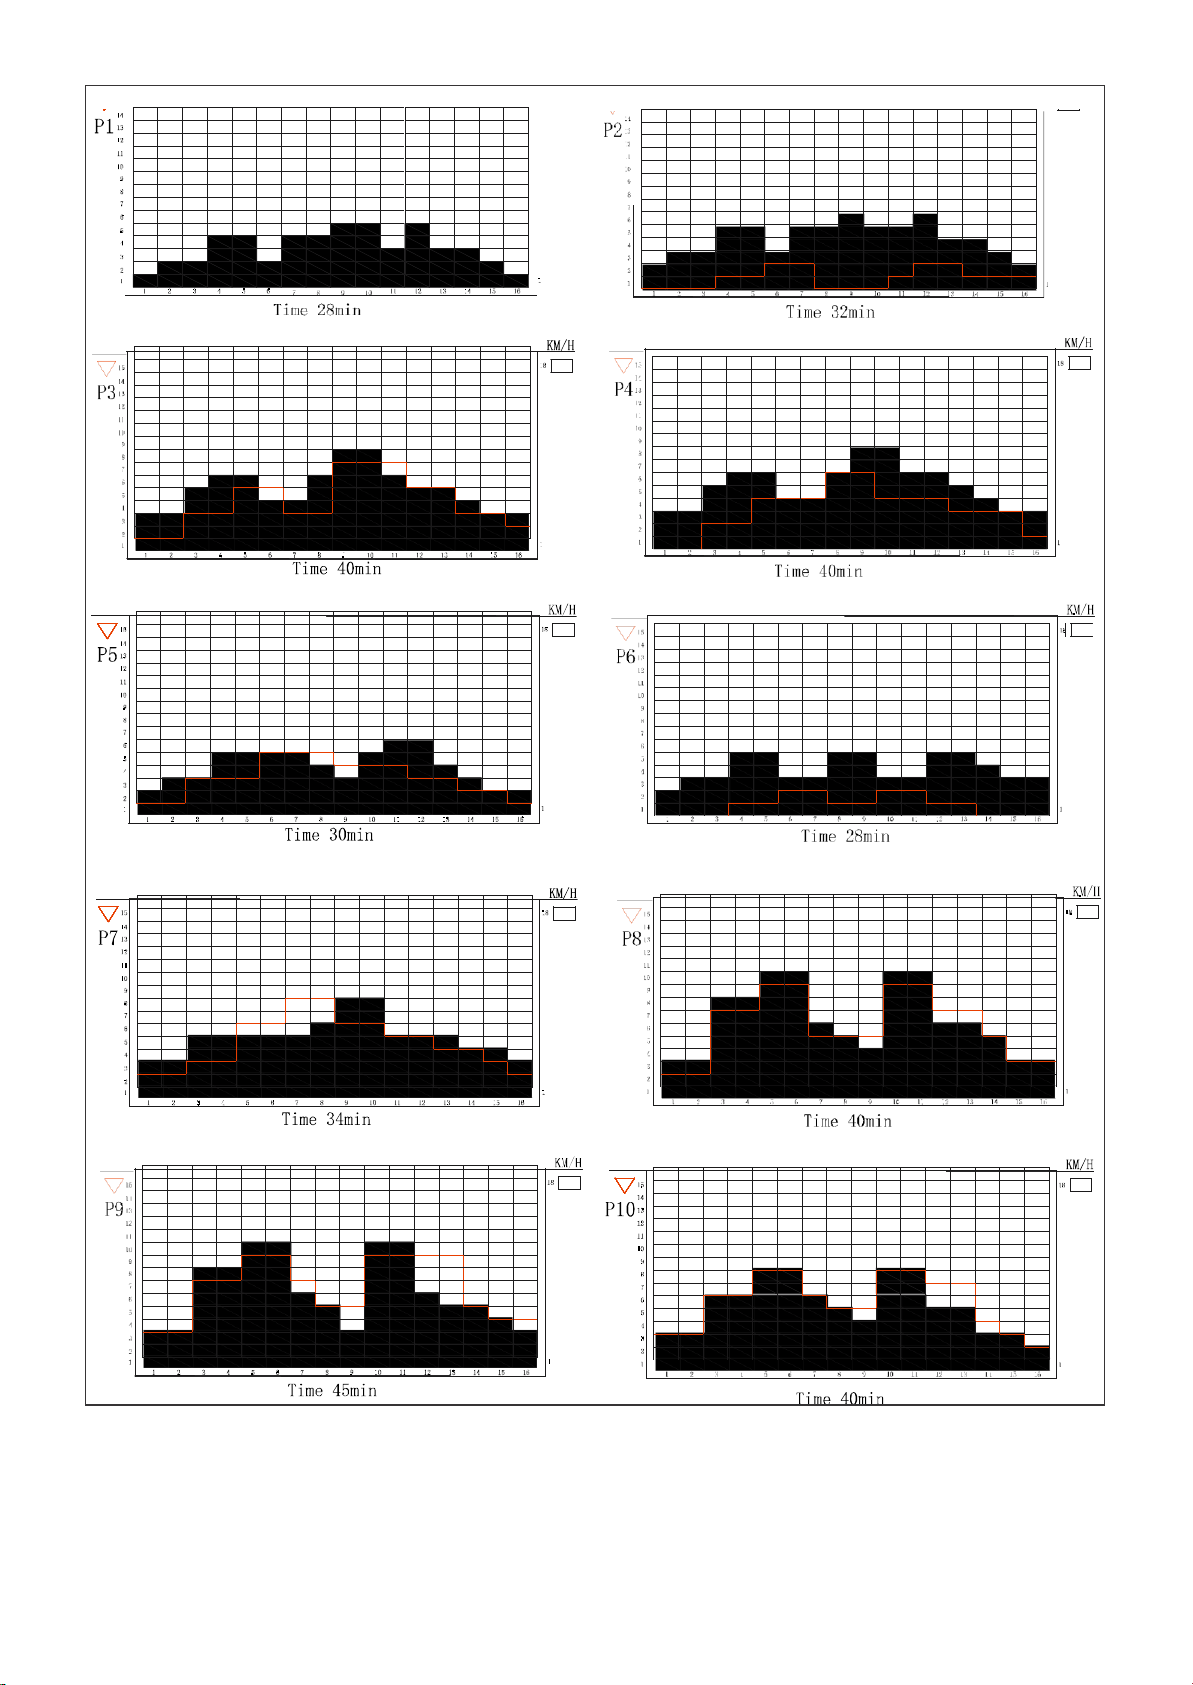
5.2.2 Program Modus
Druk op de Program (P) knop in startpositie en selecteer
met de pijltoetsen een van de pro
gramma's
P1-P19.
Bevestig uw keuze met
ENTER.
Er wordt een tijdsduur getoond welke u kunt aanpassen met de
INCLINE of de SPEED toetsen.
Bevestig uw gewenste trainingstijd met ENTER en druk op
START om uw training te beginnen.
U kunt de helling en de snelheid gedurende de training aanpassen.
P1: standaard 5000m programma. De loopband stopt automatisch
als u 5000m heeft gelopen. Dit programma is vooral geschikt voor
joggen.
WAARSCHUWING: Systemen met hartslagmeting kunnen
incorrect zijn. Overmatig trainen kan blessures veroorzaken
en kan zelfs leiden tot de dood. Als u zich licht in uw hoofd
of zwak voelt, stop dan onmiddellijk met trainen!
5.2 Computer
operation
5.2.1
Quick
Start
Turn on the treadmill.
Put the safety
key
in the
recess
of the console. The
beeper
will
sound and the
PULSE/CAL window
will
display0,
the
SPEED/DISTANCE window
will
display0 and in the big windon
heartsymbol is blinking.
Press
START
to start the treadmill and it
will
start
at
SPEED
= 1.0 km/h,
INCLINE
= 0%.
During work out, press
SPEED
to increase or
decrease the
speed,
or press
INCLINE
to increase or
decrease
the
incline.
You
can also do it with the Quick-buttons.
During work out, press
STOP
once, the treadmill
will
stop
running for 5 minutes. After 5 minutes, the treadmill
will
go
back to start mode. To continue
yiur
exercise during this
5
minutes, press START.
5.2.2 Program control
mode
Press
the
PROGRAM-button
in the starting position and
use
the
Program-arrow
buttons to select your program
P1-P19.
To confirm your choice, press the ENTER-button.
A
preset
time
will
be shown in the
dispaly,
which can
be
changed bypressing the
INCLINE
or the
SPEED
-buttons.
If
everythingnis
finalized,
press the
ENTER-button
and
finally
the
START-button
to start your exercise.
P1: Standard
5000m
Programm. The treadmill
will
stop,
after
your have finished the
5000m.
This program is
mainly
for
jogging.
WARNING: Systems
with
heartrate control can be
incorrect.
Too
much exercise could injure
your body
or
can cause dead.
If you feel light
theaded or weak,
stop
your
exercise immediately!
11
12

13
5.2.3
HRC Program
Er zijn 4
HRC p
rogramma's:
HRC1:
65% van de max.
hartslag
HRC2.75% van de max.
hartslag
HRC3:
90% van de max.
hartslag
HRC4:
u kunt uw eigen maximale hartslag instellen.
Kies P19, zoals in de vorige sectie uitgelegd en dan zal op het
display HRC verschijnen.
Druk ENTER om het HRC Programma te bevestigen. U kunt nu
uw leeftijd instellen met de SPEED of INCLINE
toetsen. Bevestig uw leeftijd met ENTER.
De trainingstijd kunt u instellen met de
SPEED of
INCLINE-
toetsen (10-99min). Deze stap kunt u ook overslaan. Druk in
dat geval ENTER en de trainingstijd zal vanaf 0 oplopen.
Nu kunt u 1 van de 4 HRC programma's kiezen met behulp van
de
SPEED
of
INCLINE toetsen.
Op het grote scherm ziet u de
percentages of IND. Toets
ENTER
om uw keuze te bevestigen.
Als u
HRC
1-3
gekozen heeft, dan kunt u de reeds ingevoerde
waarden bekijken en aanpassen met ENTER. U begint uw
training door op START te drukken.
Heeft u
HRC4
(IND)
gekozen, dan kunt u met de
SPEED
of
INCLINE toets
uw max. trainingshartslag
(50-220)
instellen.
Druk op
ENTER om
uw ingestelde waarde te veranderen of op
START
om uw training te beginnen.
In de eerste minuten kunt u zelf de snelheid veranderen,
waarbij de defautlt snelheid
3km/h
bedraagt. De snelheid die
aan het eind van de eerste minuten is ingesteld, is de
startsnelheid van uw HRC training.
Tijdens de training zal de computer de snelheid en hellingshoek
aanpassen aan uw hartslag
.
LET OP: Als de computer geen hartslagsignaal ontvangt,
zal de snelheid van de loopband automatisch afnemen.
5.2.3
HRC
programs
There are four HRC-programs
HRC1:
65% of the max.
heartrate
HRC2.75% of the max.
heartrate
HRC3:
90% of the max.
heartrate
HRC4: You
can set your personal max
heartrate.
Select P19
like
above mentioned. the displayshows HRC.
Press
ENTER
to confirm the
HRC
program. Now
you
are able
to
set your age by pressing the
SPEED
or
INCLINE
buttons.
Press
ENTER
to confirm your
setting.
By
pressing the
SPEED
or
INCLINE-buttons,
youcan set
the
exercise time (10-99min),
if
wanted.
If
not, press
ENTER,
and
the time
will
count up.
By
pressing the
SPEED
or
INCLINE-buttons,
youcan select
one
of the four
HRC
programs. Inthe big
window,
the
percentage
or
IND will
be shown.
Press
ENTER
to confirm your selection.
If
youchoose HRC1-3,youcan revise the already set values by
pressing
ENTER
or start your exercise bypressing START.
Have you choosen HRC4, for
individual
target setting, than you
need to set your max exercise
heartrate
limit
(50-220bpm)
by
pressing the
SPEED
or
INCLINE-buttons.
Press
ENTER
to revise
your already set datas or press
START
to start your
exercise.
In
the first minute, youcan adjust the speed byyourself,but
the
preset
speed is
3km/h.
The speed, which is set at the end of
this first minute, is the starting speed for the
HRC
program.
During your exercise, the computer is controlling the
speed
and
incline,
according to your
heartrate.
Attention: In the case, that the heartrate signal is lost, the
treadmill will reduce the speed step by step!

14
5.2.4 Customize-Program
Zet de loopband aan.
Druk op
USER-SET.
Druk op de Programma-pijltoetsen om een programma
te selecteren.
Druk op ENTER zodat u de trainingstijd kunt instellen. De
vooraf ingestelde tijd bedraat 16 minuten. Met de INCLINE of
SPEED toets kunt u deze waarde aanpassen.
Druk op ENTER als u de gewenste tijd heeft ingesteld. Op het
display knippert nu de eerste sectie.
U kunt nu met INCLINE de helling en met SPEED de snelheid
voor iedere sectie instellen. Bevestig met ENTER en hierna zal de
volgende sectie knipperen. Stel alle 16 secties in.
Als u de laatste sectie met
ENTER
bevestigt, zal de computer 2x
een pieptoon afgeven.
Om het programma op te slaan drukt u op
USER
SET. Alle
ingestelde waarden zijn nu zichtbaar op het display.
Om van de setting modus naar trainingmodus te gaan drukt u op
START.
5.2.4.1 Selecteren van een
Customize-Program
Druk op
CUSTOM
, op het display verschijnt nu PROGRAM 1.
Als u vaker op CUSTOM drukt ziet u ook Progamma's 2-5. Als u
nogmaals op CUSTOM drukt, zal de selectie gedeactiveerd
worden. Als u een programma heeft gekozen, druk dan op
ST
ART
om uw training
te
beginnen.
5.2.5
Vetpercentagemeting
Voor de eerste meting zijn een aantal basisgegevens vooraf
ingesteld. Als er al een meting verricht is, zullen de opgeslagen
waarden van die meting gebruikt worden
.
Schakel de loopband aan.
Druk op
BODYFAT.
Selecteer met de Programma toetsen uw geslacht. Bevestig met
ENTER
, de volgende waarde zal geactiveerd worden.
Selecteer met de Programma toetsen uw gewicht. Bevestig met
ENTER
, de volgende waarde zal geactiveerd worden.
Selecteer met de Programma toetsen uw lengte. Bevestig met
ENTER
, de volgende waarde zal geactiveerd worden.
5.2.4 Customize
Program
Turn on the treadmill.
Press
USER-SET
Press
the Program arrow-buttons to select a
program.
Press
ENTER
and select the time which you want to use for
your exercise. a
preset
time of 16 minutes is already
preset.
If
you have selected your exercise time press
ENTER
and
the
matrix of the first section in the
LCD
displayis blinking.
By
pressing the
INCLINE
-buttons, the
incline
can be
changed
or bypressing the
SPEED
-buttons the speed for
each
section can be adjusted..
If
youhave set the data, press
the
ENTER-button
and the next section
will
be activated, up
to
section
16.
If
you confirm the last section bypressing the
ENTER-button,
the computer
will
beep twice.
To save the
profile,
press the
USER-SET-
button again.
All
set
data
will
be shown in the display.
If
you are in the setting mode and want to go back into
the
exercise mode, press the START-button.
5.2.4.1
Activating
a customize
program
Press
“CUSTOM”
under ready status, the
LCD will
show
Program 1.
Press
“CUSTOM”
continuously, the
LCD will
show
2-5.
If
press
“CUSTOM”
again, it
will
go back to ready
status.
If
the custom program is set, the
LCD will
show the data of
the
program.
Press
“START”
to operate
program.
5.2.5 Bodyfat
measurment
For the first
measurment,
there are basic values set.
If
you
mae
a
remeasurment,
the last set datas
will
be
used.
Activate the treadmill.
Press
the BODYFAT-button.
Select bypressing the
Program-buttons
your gender.
If
you
select it, press
ENTER
and the next section
will
be activated.
Select bypressing the
Program-buttons
your
bodyweight.
If
you
select it, press
ENTER
and the next section
will
be activated.
Select bypressing the
Program-buttons
your bodyheight.
If
you
select it, press
ENTER
and the next section
will
be activated.

15
Selecteer met de Programma toetsen uw leeftijd. Bevestig met
ENTER
en de vetpercentagemeting zal starten.
Als de meting klaar is zal het vetpercentage of bij een mislukte
meting „-------“op het display getoond worden. Om de Bodyfat-
Moduste verlaten, drukt u op
BODY-Fat
.
Voor een correcte meting moeten beide handen op de
harstlagsensoren geplaatst worden
!
Select bypressing the
Program-buttons
your age.
If
you
select
it, press
ENTER
and the bodyfat
measurment
will
start.
If
the
measurment
is finished,the bodyfat value or
„--------“
for
a
failed
mesurement
will
be shown in the display.
For
the measurement both palms need to
be
placed
on
the handpulsesensors!
6. Verzorging en onderhoud 6. Care and Maintenance
6.1 Verzorging
Gebruik voor het schoonmaken van de loopband een
stofzuiger. Alleen als de band erg vies is, kunt u een natte
doek gebruiken. Gebruik geen reinigingsmiddel.
Voor het schoonmaken van het frame en het display kunt
u een vochtige doek gebruiken. Vermijd het gebruik van
agressieve reinigingsmiddelen en zorg dat er geen
vloeistof in de computer kan binnendringen.
Onderdelen die in contact komen met zweet kunt u met
een vochtige doek schoonmaken.
6.2 Centreren van de loopband
Tijdens het trainen kan het gebeuren dat uw ene voet
harder neerkomt dan uw andere voet. Dit kan ervoor
zorgen dat de loopband niet meer gecentreerd in het
midden ligt.Normaal gesproken zal de loopband
automatisch terug gecentreerd worden. Na langdurig
gebruik kan het echter voorkomen dat dit niet meer
automatisch gebeurt
.
In dat geval moet u de loopband met de 2 inbus
schroeven centreren. Trek niet al te wijd zittende
kleding aan tijdens deze werkzaamheden.
-
Draai de inbusschroef per keer niet meer dan 1x
volledig rond.
-
Strek de ene zijde en maak de andere zijde los
.
-
Laat tijdens het centreren de loopband met een
snelheid van ca. 6km/hr lopen zonder dat er iemand
op staat.
Als u klaar bent met centreren, loop dan zelf gedurende 5
minuten op de loopband met een snelheid van ca.6km/hr.
Als de loopband nog steeds niet goed ligt, herhaal dan
bovenstaande stappen. Let op dat u de loopband niet teveel
forceert, doet u dat wel dan kan dat een kortere levensduur
van de band tot gevolg hebben.
Als de band teveel afwijkt van de linker zijkant:
-
draai dan de linker schroef 1 slag met de klok mee
(vaster zetten)
-
draai dan de rechter schroef 1 slag tegen de klok in
(losser draaien)
Als de band teveel afwijkt van de rechter zijkant:
-
draai dan de linker schroef 1 slag tegen de klok in (losser
draaien)
-
draai dan de rechter schroef 1 slag met de klok mee
(vaster zetten)
6.1
Care
For cleaning the running belt use a vacuum cleaner.
If
the belt is really
dirty,
please use a wet cloth. Do not
use
any
cleanser.
When cleaning, use only a moist cloth and avoid
harsh
cleaning agents. Ensure that no moisture
comes
into the
computer.
Components that come into contact with
perspiration,
need cleaning
only
with a damp cloth.
6.2 Centering the running belt
During the exercise, one foot is pushing the running belt
stronger
than the other. According to that, the belt
will
be
moved out of the centre.
Normlly
the belt
will
be
centred
automatically, but during longer exercise, it can be,
that
the
belt is
off
the centre.In this case, please
follow
up
the
following
instruction. At the rear end of the running
deck, there are 2pcs of allen screws, which
will
be
used
for centering the belt. Don´t use any loose clothes during
centering.
-
Please turn the allen screw not more than
¼
turn for
each
step.
-
Stretch one side and release the other side.
-
the speed of the belt has to be
6km/h,
but
make
sure, that nobodyis running on the belt.
If
you
finish
the centering,
walk
on the treadmill for about
5
minutes, with the speed of
6km/h.
If
the running belt is still
not in centre, please centre the belt again. Pay
attention,
that you don´t force the belt too much, a
shorter
life will
be
caused.
If
the gap on the left side is too big,
please
-
turn the left screw a
¼
turn clockwise (tighten it)
-
turn the right screw a
¼
turn anticlockwise (loose it)
If
the gap on the right side is too big,
please
-
turn the left screw a
¼
turn anticlockwise (loose it)
-
turn the right screw a
¼
turn clockwise (tighten it)

16
6.3 Opspannen van de loopband
In de loop der tijd kan de spanning op de loopband afnemen. Dit is
een normaal verschijnsel. Dit kunt u opmerken doordat de
loopband bij het plaatsen van een voet kort stopt. Om dit
probleem op te lossen draait u beide schroeven per keer 1/4 slag
met de klok mee. Herhaal totdat het probleem verholpen is en de
band bij plaatsing van uw voet niet meer stopt. Als de band
onverhoopt niet meer gecentreerd ligt na deze aanpassingen, volg
dan de stappen onder 6.2
.
6.4 Smeren van de loopband
De loopband is in de fabriek al klaargemaakt voor directe
ingebruikname. Smering is dus niet nodig voorafgaand aan uw
eerste training. Als gevolg van wrijving, moet de loopband echter
van tijd tot tijd te worden gesmeerd. Als richtlijn geldt: elke 6
maanden smeren op basis van 3 trainingen per week van 30
minuten en een snelheid van 6 km/h.
Om te controleren of de loopband gesmeerd dient te woden zet u
eerst de loopband uit. U voelt met uw hand onder de loopriem of
deze nog voldoende gesmeerd is. Voelt de rug van de loopriem
droog, smeer deze dan met een siliconen spray.
Werkwijze smeren:
1)Stop de loopband zodanig dat de naat van de loopband zich aan
de bovenzijde bevindt.
2) Til de loopband op en spuit wat siliconenspray tussen het dek
en het midden van de loopband.Begin aan de voorzijde werk
toe naar de achterzijde.
Herhaal dit voor de andere kant.
3)Start de loopband met een snelheid van
1km/h
en loop van
links naar rechts op de loopband zodat de band de
siliconenspray goed kan opnemen.
6.3 Tighten the belt
after longer exercise, the tension of the belt
will
decrease.
It
can be checked
if
youput one foot on the belt and belt
will
stop.
To solve this problem, please turn both screws clockwise for
¼
turns. Please do not turn them more.
If
the belt is running out of
the centre, please adjust it
like
described under
6.2.
6.4 Lubricate the running belt
Agood lubricate running deck is
minimizing
the
wearout.
Alubrication before the first training is not necessary. The
lubrication should be done everey 6 month,
if
youdo your
exercise 3 times a week for 30 minutes.
For checking the lubrication, please make sure, that
the
treadmill is switched
off.
Put your hand between the belt
and
the deck.
If
you
still
feel some
silicon,
then it is no
need
for lubrication.
If
the backside of the belt feels dry, then it is
necessary
to lubricate the belt.
Howto do it:
1)Stop the belt, that the seam is stopped on top side.
2) Lift the belt a little bit and put some silicon between the deck
and the belt in the centre, starting from the front side, ending
at the rear side. Lubricate it again from the other side.
3) Start the treadmill with a speed of
1km/h
and
walk
on
the
treadmill from left to right side, so that the belt can
absorb
the silicon verywell.

17
7. Trainingshandleiding 7.
Training
manual
Trainen op de loopband is een ideale training om de belangrijke
spiergroepen te trainen en te werken aan uw conditie.
Algemene tips voor het trainen
Train nooit direct na een maaltijd.
Mits mogelijk, train dan zoveel mogelijk met
hartslagmeting.
Begin elke training met korte een warming-up en het
rekken van een de spieren.
Bouw een training altijd langzaam af. Stop nooit
abrupt met trainen.
7.1 Trainingsfrequentie
Om op lange termijn uw conditie te verbeteren en uw fysieke
fitheid te verbeteren raden wij u aan om ten minste 3 maal per
week te trainen. Dit is de gemiddelde trainingsfrequentie
waarmee een volwassene op lange termijn een goede conditie
opbouwt en vet verbrandt. Als uw conditie verbetert, kunt u ook
dagelijks trainen. Het is met name belangrijk dat u met
regelmatig traint met regelmatige intervallen tussen elkaar
opeenvolgende trainingen.
7.2 Trainingsintensiteit
Plan uw training zorgvuldig. De trainingsintensiteit zou
langzaam opgebouwd moeten worden zodat er geen
vermoeidheid van spieren of vermoeidheid van uw motorische
systeem optreedt.
7.3 Hartslag Training
Zorg ervoor dat uw hartslag binnen het aerobe bereik blijft als u
traint met hartslagmeting. Verbetering van uw resultaat op
duurtraining kan worden behaald door lange trainingen te doen
binnen het aerobe bereik.
U kunt het aerobe bereik vinden in het 'target harstslag diagram'
of door op andere hartslagdiagrammen uw bereik op te zoeken.
U zou 80% van uw trainingstijd binnen het aerobe bereik
moeten completeren (dat is tot 75% van uw maximale hartslag).
In de overgebleven 20% van de trainingstijd kunt u
piekbelastingen implementeren om de aerobe bovengrens te
verhogen. Met het behaalde trainingsresultaat kunt u later beter
presteren bij dezelfde hartslag. Wat betekent dat uw conditie
verbeterd is.
Als u reeds ervaring heeft met hartslag trainingen, kunt u uw
gewenste hartslagzone of trainings/fitnessprogramma aanpassen
naar uw eigen waarden.
Training with the treadmill is an ideal movement
training for
strengthening
important muscle groups
and the cardio-circu
-
latory
system.
Generalnotes
for
Training
Never train immediately after a meal.
If
possible, orientate training to pulse
rate.
Do muscle warm-up before starting training by
loosening
or stretching
exercises.
When
finishing
training,
please
reduce speed. Never abruptly end training.
7.1 Training frequency
To improve physical fitness and to enhance condition
over the
l
ong term, we
recommend
training at lea
st
three times a week. This is the average training
frequen
-
cy for an adult in order to obtain long-term condition
success
or high fat burning. As your fitness level
incre
-
ases, you can also train daily. It is particularly
important
to train at regular intervals.
7.2 Training
intensity
Carefully
structure
your training. Training intensity should
be
increased
gradually, so that no fatigue phenomena of
the musculature or the locomotion system
occurs.
7.3 Heart rate orientated training
For your personal pulse zone it is
recommended
that
an aerobic training range
will
be chosen.
Performance
increases
in the
endurance
range are
principal
-
ly
achieved by long training units in the aerobic
range.
Find
this zone
in
the target pulse diagram or orientate
yourself
on
the pulse programs. You should complete 80% of your training
time in this aerobic range (up to 75% of your maximum pulse).
In
the remaining 20%
of
the time,
you
can incorporate load
peaks,
in
order to
shift
your
aerobic threshold upwards. With the resulting
training
success
you
can later produce higher
performance
at
the
same pulse; this means an improvement in your physical
shape.
If
you already have some experience in pulse-controlled training,
you can match your desired pulse zone to your special training
plan or fitness
status.

18
Opmerking:
Sommige mensen hebben een hogere of lagere rusthartslag dan
anderen. Dit is ook de reden dat uw individuele optimale
hartslagzone (aerobe, anaerobe) kan afwijken van het
hartslagdiagram.
Als dit bij u het geval is raden wij u aan om op uw eigen ervaring af
te gaan. Voor beginners is het belangrijk om een arts te consulteren
alvorens met de training aan te vangen. Een arts kan uw gezondheid
en capaciteit om te trainen vaststellen.
7.4 Trainen met hartslagmeting
De beste manier om te trainen (zowel medisch als fysiologisch) is
trainen met hartslagmeting waarbij gelet moet worden op de
individuele maximale hartslag.
Dit geldt voor beginners, ambitieuze recreatieve atleten en
professionele atleten.
Afhankelijk van uw trainingsdoel en uw huidig conditie, traint u
op een specifieke intensiteit als percentage van uw maximale
hartslag.
Om een effectieve hartslagtraining te bereiken, raden wij u aan
om op een hartslagfrequentie van 70 % - 85 % van uw maximale
hartslag te trainen. Gebruik hierbij de onderstaande hartslagtabel.
Meet uw hartslag op de volgende momenten:
1. Voor de training = Rusthartslag
2. 10 minuten na start training = Trainingshartslag
3. 1 minuut na de training = Herstelhartslag
De eerste weken is het aanbevolen om te trainen op een
hartslag binnen de lagere zones van het hartslagbereik
(ongeveer 70 %) of lager.
2-4 maanden na de eerste weken kunt u stapsgewijs de
training intensiveren tot dat u de bovenste range van uw
hartslagbereik heeft bereikt (ongeveer 85%), zonder dat u
zichzelf hierbij overbelast.
.
Note:
Because there are
persons
who have
„high“
and
„low“
pulses,
the individual optimum pulse zones (aerobic zone,
anaerobic
zone) may differ from those of the general public (target pulse
diagram).
In these cases, training must be configured according to
indi
-
vidual experience.
If
beginners are confronted with this
pheno
-
menon, it is important that a physician
will
be consulted
before
starting training, in order to check health capacity for training.
7.4 Training
control
Both medically and in terms of training
physiology,
pulse-con
-
trolled training makes most
sense
and is orientated on
the
individual
maximum pulse.
This rule applies both to beginners, ambitious recreational
ath
-
letes and to pros. Depending on the goal of training and
perfor
-
mance status, training is done at a specific intensity of
individual
maximum pulse (expressed in
percentage
points).
In order to effectively configure cardio circulatory training
according to sport-medical
aspects,
we
recommend
a training
pulse rate of 70%
-
85% of maximum pulse. Please refer to
the
following
target pulse diagram.
Measure
your
pulse rate
at the following
points
in
time:
1. Before training = resting pulse
2. 10 minutes after starting training = training
/
workingpulse
3. One minute after training = recovery pulse
During
the first weeks,
it
is
recommended
that training
will
be done at a pulse rate at the lower
limit
of the training
pulse zone (approximately70 %) or lower.
During the next 2
-
4 months,
intensify
training
stepwise
until you reach the upper end of the training pulse zone
(approximately85
%),
but without overexerting yourself.
Ook als u in goede conditie bent, raden wij u aan om een
aantal trainingsunits in uw trainingsprogramma in te bouwen
waarbij u traint binnen het lagere aerobische bereik. Alleen op
deze manier kunt u goed herstellen. Een 'goede' training
betekent altijd een intelligente training waarbij herstel op
gezette tijden is ingebouwd. Anders raakt u overtraind en
verliest u conditie in plaats van dat u conditie opbouwt.
If
you are in good training condition, disperse
easier
units in the lower aerobic range here and there in
the
training program so that you
regenerate
sufficient-
ly.
„Good“ training always means training
intelligently,
which includes
regeneration
at the right time. Otherwise
overtraining results and your form
degenerates.
Iedere trainingsunit die u doet in de bovenste regionen van het
hartslagbereik moet gevolgd worden door een hersteltraining
in het lagere bereik (tot 75 % van de maximale hartslag).
Every loading training unit in the upper pulse range of
individual
performance
should always be followed in
subsequent
training by a regenerative training unit in
the
lower pulse range (up to 75 % of the maximum pulse).

19
Wanneer uw conditie verbeterd is, is een hogere trainingsintensiteit
vereist om de hartslag binnen het trainingsbereik te krijgen. U heeft
namelijk een betere conditie.
Berekening van de trainingshartslag:
220 hartslagen per minuut minus leeftijd = individuele maximale
hartslag (100%).
Trainingshartslag
Ondergrens: (220 - leeftijd) x 0,70
Bovengrens: (220 - leeftijd) x 0,85
7.5 Trainingsduur
Iedere trainingseenheid bestaat idealiter uit een warming-up, een
trainingsfase en een cooling down om blessures te voorkomen.
Warming-up:
5 to 10 minuten langzaam lopen.
Training:
15 to 40 minuten intensief lopen, maar niet meer dan de
bovengrens zoals hierboven te berekenen.
Cooling down:
5 tot 10 minuten langzaam lopen.
Stop direct met trainen als u zich onwel voelt of als zich andere
symptomen van oververmoeidheid voordoen.
Verandering van de stofwisseling tijdens de training:
In de eerste 10 minuten van een duurtraining verbruikt ons
lichaam glycogeen (suikers) dat opgeslagen is in de spieren.
When condition has improved, higher intensity of training is
required for the pulse rate to reach the „training zone“;
that
means, the organism is capable of higher
performance.
Calculation
of
the training
/
working
pulse:
220
pulse beats per minute minus age = personal, maximum
heart rate (100 %).
Training
pulse
Lower limit: (220
-
age)
x
0.70
Upper limit: (220
-
age)
x
0.85
7.5 Training
duration
Every training unit should ideally consist of a warm-up
phase,
a training phase, and a cool-down phase in order to
prevent
injuries.
Warm-up:
5 to 10 minutes of slow running.
Training:
15 to 40 minutes of intensive or not overtaxing training at
the
intensity mentioned above.
Cool-down:
5 to 10 minutes of slow running.
Stop training immediately
if
you feel unwell or
if
any signs of
overexertion
occur.
Alterations
of
metabolic
activity during
training:
In the first 10 minutes of
endurance performance our
bodies consume the
sugars
stored in our
muscles
Glycogen.
Na ca. 10 minuten wordt ook vet verbrand.
After about 10 minutes fat is burned in addition.
Na 30-40 minuten wordt het vetverbrandings- metabolisme
geactiveerd en wordt vet de belangrijkste bron van energie.
After 30
-
40 minutes fat metabolism is activated,
then
the body‘s fat is the main source of energy.
This manual suits for next models
1
Table of contents
Other Hammer Treadmill manuals

Hammer
Hammer Race Runner 2200I User manual

Hammer
Hammer Q.Vadis 10.0 User manual

Hammer
Hammer Walkrunner RPE User manual

Hammer
Hammer LR 18i User manual

Hammer
Hammer Laufband LR 18i User manual

Hammer
Hammer RACE RUNNER 200M User manual

Hammer
Hammer Cleverfold TM7 User manual

Hammer
Hammer Q.VADIS 3.0 User manual

Hammer
Hammer Q.VADIS 5.0 User manual

Hammer
Hammer LR 18i User manual


